Using Flash- P3
Bạn đang xem bản rút gọn của tài liệu. Xem và tải ngay bản đầy đủ của tài liệu tại đây (1.01 MB, 100 trang )
201
CHAPTER 11
Working with Sound
Macromedia Flash MX 2004 and Macromedia Flash MX Professional 2004 offer several ways to
use sounds. You can make sounds that play continuously, independent of the Timeline, or you
can synchronize animation to a sound track. You can add sounds to buttons to make them more
interactive and make sounds fade in and out for a more polished sound track.
There are two types of sounds in Flash: event sounds and stream sounds. An event sound must
download completely before it begins playing, and it continues playing until explicitly stopped.
Stream sounds begin playing as soon as enough data for the first few frames has been
downloaded; stream sounds are synchronized to the Timeline for playing on a website.
You select compression options to control the quality and size of sounds in exported SWF files.
You can select compression options for individual sounds using the Sound Properties dialog box
or define settings for all sounds in the document in the Publish Settings dialog box.
You can use sounds in shared libraries to link a sound from one library to multiple documents.
For more information, see “Using shared library assets” on page 69. You can also use the
ActionScript
onSoundComplete
event to trigger an event based on the completion of a sound. For
more information, see “About the onSoundComplete event” on page 208.
You can use behaviors that are prewritten ActionScript scripts to load and control the playback of
sounds. As with behaviors, the media components contain prewritten ActionScript scripts to load
and control sounds (MP3 sounds only) but also provide a controller for stop, pause, rewind, and
so on. For more information on using the media components, see “Playing FLV video clips with
media components (Flash Professional only)” on page 196.
Note: You can also use actions to load sounds dynamically. For more information, see
Sound.attachSound() and Sound.loadSound() in Flash ActionScript Language Reference.
This chapter contains the following sections:
Importing sounds. . . . . . . . . . . . . . . . . . . . . . . . . . . . . . . . . . . . . . . . . . . . . . . . . . . . . . . . . . 202
Adding sounds to a document . . . . . . . . . . . . . . . . . . . . . . . . . . . . . . . . . . . . . . . . . . . . . . . . 203
Adding sounds to buttons . . . . . . . . . . . . . . . . . . . . . . . . . . . . . . . . . . . . . . . . . . . . . . . . . . . 204
Using sounds with Sound objects. . . . . . . . . . . . . . . . . . . . . . . . . . . . . . . . . . . . . . . . . . . . . . 205
About accessing ID3 properties in MP3 files with Flash Player . . . . . . . . . . . . . . . . . . . . . . . 205
202 Chapter 11: Working with Sound
Using the sound-editing controls . . . . . . . . . . . . . . . . . . . . . . . . . . . . . . . . . . . . . . . . . . . . . . 206
Controlling sound playback using behaviors . . . . . . . . . . . . . . . . . . . . . . . . . . . . . . . . . . . . . 206
Starting and stopping sounds at keyframes. . . . . . . . . . . . . . . . . . . . . . . . . . . . . . . . . . . . . . . 208
About the onSoundComplete event . . . . . . . . . . . . . . . . . . . . . . . . . . . . . . . . . . . . . . . . . . . . 208
Compressing sounds for export . . . . . . . . . . . . . . . . . . . . . . . . . . . . . . . . . . . . . . . . . . . . . . . 209
Using sounds in Flash documents for mobile devices (Flash Professional only). . . . . . . . . . . . 213
Creating a Flash Lite sound file . . . . . . . . . . . . . . . . . . . . . . . . . . . . . . . . . . . . . . . . . . . . . . . 214
Importing sounds
You place sound files into Flash by importing them into the library for the current document.
Note: When placing a sound on the Timeline, you place it on a separate layer. For more information,
see “Adding sounds to a document” on page 203.
You can import the following sound file formats into Flash:
•
WAV (Windows only)
•
AIFF (Macintosh only)
•
MP3 (Windows or Macintosh)
If you have QuickTime 4 or later installed on your system, you can import these additional sound
file formats:
•
AIFF (Windows or Macintosh)
•
Sound Designer II (Macintosh only)
•
Sound Only QuickTime Movies (Windows or Macintosh)
•
Sun AU (Windows or Macintosh)
•
System 7 Sounds (Macintosh only)
•
WAV (Windows or Macintosh)
Flash stores sounds in the library along with bitmaps and symbols. As with graphic symbols, you
need only one copy of a sound file to use that sound multiple ways in your document.
If you want to share sounds among Flash documents, you can include the sounds in shared
libraries. For more information, see “Working with common libraries” on page 21. To use a
sound in a shared library, you assign the sound file an identifier string in the Linkage Properties
dialog box. The identifier can also be used to access the sound as an object in ActionScript. For
information on objects in ActionScript, see “Using sounds with Sound objects” on page 205.
Sounds can use considerable amounts of disk space and RAM. However, MP3 sound data is
compressed and smaller than WAV or AIFF sound data. Generally, when using WAV or AIFF
files, it’s best to use 16-bit 22 kHz mono sounds (stereo uses twice as much data as mono), but
Flash can import either 8- or 16-bit sounds at sample rates of 11, 22, or 44 kHz. Flash can
convert sounds to lower sample rates on export. For more information, see “Compressing sounds
for export” on page 209.
Adding sounds to a document 203
Note: Sounds recorded in formats that are not multiples of 11 kHz (such as 8, 32, or 96 kHz) are
resampled when imported into Flash.
If you want to add effects to sounds in Flash, it’s best to import 16-bit sounds. If you have limited
RAM, keep your sound clips short or work with 8-bit sounds instead of 16-bit sounds.
To import a sound:
1.
Select File > Import > Import to Library.
2.
In the Import dialog box, locate and open the desired sound file.
Note: You can also drag a sound from a common library into the library for the current document.
For more information, see “Working with common libraries” on page 21.
Adding sounds to a document
To add a sound to a document from the library, you assign the sound to a layer and set options in
the Sound controls in the Property inspector. It is recommended that you place each sound on a
separate layer.
You can load a sound into a SWF file during runtime, using the
loadSound
method of the Sound
object. For more information, see
Sound.loadSound()
in Flash ActionScript Language Reference.
To test sounds that you add to a document, you can use the same methods you use to preview
frames or test SWF files: Drag the playhead over the frames containing the sound or use
commands in the Controller or the Control menu.
To add a sound to a document:
1.
Import the sound into the library if it has not already been imported. For more information, see
“Importing sounds” on page 202.
2.
Select Insert > Timeline > Layer to create a layer for the sound.
3.
With the new sound layer selected, drag the sound from the Library panel onto the Stage. The
sound is added to the current layer.
You can place multiple sounds on one layer or on layers containing other objects. However, it
is recommended that each sound be placed on a separate layer. Each layer acts as a separate
sound channel. The sounds on all layers are combined when you play the SWF file.
4.
In the Timeline, select the first frame that contains the sound file.
5.
Select Window > Properties and click the arrow in the lower right corner to expand the
Property inspector.
6.
In the Property inspector, select the sound file from the Sound pop-up menu.
7.
Select an effect option from the Effects pop-up menu:
None
applies no effects to the sound file. Select this option to remove previously
applied effects.
Left Channel/Right Channel
plays sound in the left or right channel only.
Fade Left to Right/Fade Right to Left
shifts the sound from one channel to the other.
Fade In
gradually increases the volume of a sound over its duration.
204 Chapter 11: Working with Sound
Fade Out
gradually decreases the volume of a sound over its duration.
Custom
lets you create custom in and out points of sound using the Edit Envelope. For more
information, see “Using the sound-editing controls” on page 206.
8.
Select a synchronization option from the Sync pop-up menu:
Note: If you are placing the sound on a frame other than Frame 1 in the main TImeline, select
the Stop option.
Event
synchronizes the sound to the occurrence of an event. An event sound plays when its
starting keyframe first appears and plays in its entirety, independently of the Timeline, even if
the SWF file stops playing. Event sounds are mixed when you play your published SWF file.
An example of an event sound is a sound that plays when a user clicks a button. If an event
sound is playing and the sound is instantiated again (for example, by the user clicking the
button again) the first instance of the sound continues to play and another instance begins to
play simultaneously.
Start
is the same as Event, except that if the sound is already playing, no new instance of the
sound plays.
Stop
silences the specified sound.
Stream
synchronizes the sound for playing on a website. Flash forces animation to keep pace
with stream sounds. If Flash can’t draw animation frames quickly enough, it skips frames.
Unlike event sounds, stream sounds stop if the SWF file stops playing. Also, a stream sound
can never play longer than the length of the frames it occupies. Stream sounds are mixed when
you publish your SWF file.
An example of a stream sound is the voice of a character in an animation that plays in
multiple frames.
Note: If you use an MP3 sound as a stream sound, you must recompress the sound for export. You
can export the sound as an MP3 file, with the same compression settings that it had on import. For
more information, see “Compressing sounds for export” on page 209.
9.
Enter a value for Repeat to specify the number of times the sound should loop, or select Loop
to repeat the sound continuously.
For continuous play, enter a number large enough to play the sound for an extended duration.
For example, to loop a 15-second sound for 15 minutes, enter 60. Looping stream sounds is
not recommended. If a stream sound is set to loop, frames are added to the file and the file size
is increased by the number of times the sound is looped.
Adding sounds to buttons
You can associate sounds with the different states of a button symbol. Because the sounds are
stored with the symbol, they work for all instances of the symbol.
To add sound to a button:
1.
Select the button in the Library panel.
2.
Select Edit from the options menu in the upper right corner of the panel.
3.
In the button’s Timeline, add a layer for sound.
About accessing ID3 properties in MP3 files with Flash Player 205
4.
In the sound layer, create a regular or blank keyframe to correspond with the button state to
which you want to add a sound.
For example, to add a sound that plays when you click the button, create a keyframe in the
frame labeled Down.
5.
Click the keyframe you created.
6.
Select Window > Properties.
7.
In the Property inspector, select a sound file from the Sound pop-up menu.
8.
Select Event from the Synchronization pop-up menu.
To associate a different sound with each of the button’s keyframes, create a blank keyframe
and add another sound file for each keyframe. You can also use the same sound file and apply a
different sound effect for each button keyframe. For more information, see “Using the sound-
editing controls” on page 206.
Using sounds with Sound objects
You can use the Sound object in ActionScript to add sounds to a document and to control
sound objects in a document. Controlling sounds includes adjusting the volume or the right
and left balance while a sound plays. For more information, see “Creating sound controls” in
Using ActionScript in Flash.
To use a sound in a Sound action, you assign an identifier string to the sound in the Linkage
Properties dialog box.
To assign an identifier string to a sound:
1.
Select the sound in the Library panel.
2.
Do one of the following:
■
Select Linkage from the options menu in the upper right corner of the panel.
■
Right-click (Windows) or Control-click (Macintosh) the sound name in the Library panel,
and select Linkage from the context menu.
3.
Under Linkage in the Linkage Properties dialog box, select Export for ActionScript.
4.
Enter an identifier string in the text box, and click OK.
About accessing ID3 properties in MP3 files with Flash Player
Macromedia Flash Player 7 and later supports ID3 v2.4 and v2.4 tags. With this version, when
you load an MP3 sound using the
attachSound()
or
loadSound()
method, the ID3 tag
properties are available at the beginning of the sound data stream. The onID3 event executes
when the ID3 data is initialized.
Flash Player 6 (6.0.40.0) and later supports MP3 files with ID3 v1.0 and v1.1 tags. With ID3
v1.0 and v1.1 tags, the properties are available at the end of the data stream. If a sound does not
contain an ID3v1 tag, the ID3 properties are undefined. Users must have Flash Player 6
(6.0.40.0) or later for the ID3 properties to function.
206 Chapter 11: Working with Sound
For more information on using the ID3 properties, see
Sound.id3
in Flash ActionScript Language
Reference.
Using the sound-editing controls
To define the starting point of a sound or to control the volume of the sound as it plays, you use
the sound-editing controls in the Property inspector.
Flash can change the point at which a sound starts and stops playing. This is useful for making
sound files smaller by removing unused sections.
To edit a sound file:
1.
Add a sound to a frame (for more information, see “Adding sounds to a document”
on page 203), or select a frame that already contains a sound.
2.
Select Window > Properties.
3.
Click the Edit button on the right side of the Property inspector.
4.
Do any of the following:
■
To change the start and end points of a sound, drag the Time In and Time Out controls in
the Edit Envelope.
■
To change the sound envelope, drag the envelope handles to change levels at different
points in the sound. Envelope lines show the volume of the sound as it plays. To create
additional envelope handles (up to eight total), click the envelope lines. To remove an
envelope handle, drag it out of the window.
■
To display more or less of the sound in the window, click the Zoom In or Out buttons.
■
To switch the time units between seconds and frames, click the Seconds and
Frames buttons.
5.
To hear the edited sound, click the Play button.
Controlling sound playback using behaviors
You can control sound playback using sound behaviors. Behaviors are prewritten ActionScript
scripts that you apply to an object, such as a button, to control a target object, such as a sound.
Behaviors enable you to add the power, control, and flexibility of ActionScript coding to your
document without having to create the ActionScript code yourself.
You can use the Load Sound from Library or Load Streaming MP3 File behaviors to add a sound
to your document. Adding a sound using these behaviors creates an instance of the sound. The
instance name is then used to control the sound.
The Play Sound, Stop Sound, and Stop All Sounds behaviors let you control sound playback. To
use these behaviors, you must first load a sound with one of the Load behaviors. To play or stop a
sound with a behavior, you use the Behaviors panel to apply the behavior to a triggering object,
such as a button. You specify the event that triggers the behavior (such as clicking the button),
select a target object (the sound to be affected by the behavior), and select settings for the
behavior parameters to specify how the behavior executes.
Controlling sound playback using behaviors 207
To load a sound to a file using a behavior:
1.
Select the object, such as a button, that you want to use to trigger the behavior.
2.
In the Behaviors panel (Window > Development Panels > Behaviors), click the Add (+) button
and select Sound > Load Sound from Library or Sound > Load Streaming MP3 File.
3.
In the Load Sound dialog box, enter the linkage identifier for a sound from the Library, or the
sound location for a streaming MP3 file. Next, enter a name for this instance of the sound, and
click OK.
For information on linkage identifiers, see “Using sounds with Sound objects” on page 205.
4.
In the Behaviors panel, under Event click On Release (the default event), and select a mouse
event from the menu. If you want to use the
OnRelease
event, do not change the option.
To play a sound using a behavior:
1.
Select the object, such as a button, that you want to use to trigger the Play Sound behavior.
2.
In the Behaviors panel (Window > Development Panels > Behaviors), click the Add (+) button.
3.
Select Sound > Play Sound.
4.
In the Play Sound dialog box, enter the instance name of the sound you want to play, and click
OK.
5.
In the Behaviors panel, under Event click On Release (the default event) and select a mouse
event from the menu. If you want to use the
OnRelease
event, leave the option unchanged.
To stop a sound using a behavior:
1.
Select the object, such as a button, that you want to use to trigger the Play Sound behavior.
2.
In the Behaviors panel (Window > Development Panels > Behaviors), click the Add (+) button.
3.
Select Sound > Stop Sound.
4.
In the Stop Sound dialog box, enter the linkage identifier and the instance name of the sound
you want to stop, and click OK.
5.
In the Behaviors panel, under Event click On Release (the default event) and select a mouse
event from the menu. If you want to use the
OnRelease
event, leave the option unchanged.
To stop all sounds using a behavior:
1.
Select the object, such as a button, that you want to use to trigger the Stop All Sounds behavior.
2.
In the Behaviors panel (Window > Development Panels > Behaviors), click the Add (+) button.
3.
Select Sound > Stop All Sounds.
4.
In the Stop All Sounds dialog box, click OK to verify that you want to stop all sounds.
5.
In the Behaviors panel, under Event click On Release (the default event) and select a mouse
event from the menu. If you want to use the
OnRelease
event, leave the option unchanged.
208 Chapter 11: Working with Sound
Starting and stopping sounds at keyframes
The most common sound-related task in Flash is starting and stopping sounds at keyframes to
synchronize with animation.
To stop and start a sound at a keyframe:
1.
Add a sound to a document. For more information, see “Adding sounds to a document”
on page 203.
To synchronize this sound with an event in the scene, select a beginning keyframe that
corresponds to the keyframe of the event in the scene. You can select any of the
synchronization options.
2.
Create a keyframe in the sound layer’s Timeline at the frame where you want the sound to end.
A representation of the sound file appears in the Timeline.
3.
Select Window > Properties and click the arrow in the lower right corner to expand the
Property inspector.
4.
In the Property inspector, select the same sound from the Sound pop-up menu.
5.
Select Stop from the Synchronization pop-up menu.
When you play the SWF file, the sound stops playing when it reaches the ending keyframe.
6.
To play back the sound, simply move the playhead.
About the onSoundComplete event
The
onSoundComplete
event of the ActionScript Sound object lets you trigger an event in a Flash
application based on completing an attached sound file. The Sound object is a built-in object that
lets you control sounds in a Flash application. For more information, see “Sound class” in Flash
ActionScript Language Reference. The
onSoundComplete
event of a Sound object is invoked
automatically when the attached sound file finishes playing. If the sound is looped a specified
number of times, the event is triggered when the sound finishes looping.
The Sound object has two properties that you can use with the
onSoundComplete
event. The
duration
property is a read-only property representing the duration, in milliseconds, of the
sound sample attached to the sound object. The
position
property is a read-only property
representing the number of milliseconds the sound has been playing in each loop.
The
onSoundComplete
event lets you manipulate sounds in a variety of powerful ways, such as
the following:
•
Creating a dynamic playlist or sequencer
•
Creating a multimedia presentation that checks for narration completion before advancing to
the next frame or scene
•
Building a game that synchronizes sounds to particular events or scenes and transitions
smoothly between different sounds
•
Timing an image change to a sound—for example, changing an image when a sound is
half over
Compressing sounds for export 209
Compressing sounds for export
You can select compression options for individual event sounds and export the sounds with those
settings. You can also select compression options for individual stream sounds. However, all
stream sounds in a document are exported as a single stream file, using the highest setting of all
those applied to individual stream sounds. This includes stream sounds in video objects.
You select compression options for individual sounds in the Sound Properties dialog box. You
can also select global compression settings for event sounds or stream sounds in the Publish
Settings dialog box. These global settings are applied to individual event sounds or all stream
sounds if you do not select compression settings for the sounds in the Sound Properties dialog
box. For more information, see “Publishing Flash documents” on page 311.
You can also override export settings specified in the Sound Properties dialog box by selecting
Override Sound Settings in the Publish Settings dialog box. This option is useful if you want to
create a larger high-fidelity audio file for local use and a smaller low-fidelity version for the web.
For more information, see “Setting publish options for the Flash SWF file format” on page 312.
The sampling rate and degree of compression make a significant difference in the quality and size
of sounds in exported SWF files. The more you compress a sound and the lower the sampling
rate, the smaller the size and the lower the quality. You should experiment to find the optimal
balance between sound quality and file size.
When working with imported MP3 files, you can export the files in MP3 format using the same
settings that the files had when imported.
Note: In Windows, you can also export all the sounds from a document as a WAV file using File >
Export > Export Movie. For more information, see “Exporting Flash content and images”
on page 345.
To set export properties for an individual sound:
1.
Do one of the following:
■
Double-click the sound’s icon in the Library panel.
■
Right-click (Windows) or Control-click (Macintosh) a sound file in the Library panel and
select Properties from the context menu.
■
Select a sound in the Library panel and select Properties from the options menu in the
upper right corner of the panel.
■
Select a sound in the Library panel and click the properties icon at the bottom of the Library
panel.
2.
If the sound file has been edited externally, click Update.
3.
For Compression, select Default, ADPCM, MP3, Raw, or Speech. To select options for a
compression format, see the following section that corresponds to the selected format:
■
“Using the ADPCM compression option” on page 210
■
“Using the MP3 compression option” on page 210
■
“Using the Raw compression option” on page 211
■
“Using the Speech compression option” on page 212
210 Chapter 11: Working with Sound
4.
Set export settings.
5.
Click Test to play the sound once. Click Stop if you want to stop testing the sound before it
finishes playing.
6.
Adjust export settings if necessary until the desired sound quality is achieved.
7.
Click OK.
The Default compression option uses the global compression settings in the Publish Settings
dialog box when you export your SWF file. If you select Default, no additional export settings
are available.
Using the ADPCM compression option
The ADPCM compression option
sets compression for 8- or 16-bit sound data. Use the ADPCM
setting when you export short event sounds such as button clicks.
To use ADPCM compression:
1.
In the Sound Properties dialog box, select ADPCM from the Compression menu.
2.
For Preprocessing, select Convert Stereo to Mono to convert mixed stereo sounds to monaural
(mono). (Mono sounds are unaffected by this option.)
3.
For Sample Rate, select an option to control sound fidelity and file size. Lower rates decrease
file size but can also degrade sound quality. Rate options are described in the following list:
5 kHz
is barely acceptable for speech.
11 kHz
is the lowest recommended quality for a short segment of music and is one-quarter of
the standard CD rate.
22 kHz
is a popular choice for web playback and is half the standard CD rate.
44 kHz
is the standard CD audio rate.
Note: Flash cannot increase the kHz rate of an imported sound above the rate at which it
was imported.
Using the MP3 compression option
The MP3 compression option lets you export sounds with MP3 compression. Use MP3 when
you are exporting longer stream sounds such as music sound tracks.
If you are exporting a file that was imported in MP3 format, you can export the file using the
same settings the file had when it was imported.
To export an imported MP3 file with the same settings the file had when it was imported:
1.
In the Sound Properties dialog box, select MP3 from the Compression menu.
2.
Select Use Imported MP3 Quality (the default setting). Deselect this option to select other MP3
compression settings, as defined in the following procedure.
Compressing sounds for export 211
To use MP3 compression:
1.
In the Sound Properties dialog box, select MP3 from the Compression menu.
2.
Deselect Use Imported MP3 Quality (the default setting).
3.
For Bit Rate, select an option to
determine the bits per second in the exported sound file. Flash
supports 8 through 160 Kbps CBR (constant bit rate). When you are exporting music, set the
bit rate to 16 Kbps or higher for the best results.
4.
For Preprocessing, select Convert Stereo to Mono to convert mixed stereo sounds to monaural.
(Mono sounds are unaffected by this option.)
Note: The Preprocessing option is available only if you select a bit rate of 20 Kbps or higher.
5.
For Quality, select one of the following options to determine the compression speed and
sound quality:
Fast
yields faster compression but lower sound quality.
Medium
yields somewhat slower compression but higher sound quality.
Best
yields the slowest compression and the highest sound quality.
Using the Raw compression option
The Raw compression option exports sounds with no sound compression.
To use raw compression:
1.
In the Sound Properties dialog box, select Raw from the Compression menu.
2.
For Preprocessing, select Convert Stereo to Mono to convert mixed stereo sounds to monaural.
(Mono sounds are unaffected by this option.)
3.
For Sample Rate, select an option to control sound fidelity and file size. Lower rates decrease
file size but can also degrade sound quality. Rate options are described in the following list:
5 kHz
is barely acceptable for speech.
11 kHz
is the lowest recommended quality for a short segment of music and is one-quarter of
the standard CD rate.
22 kHz
is a popular choice for web playback and is half the standard CD rate.
44 kHz
is the standard CD audio rate.
Note: Flash cannot increase the kHz rate of an imported sound above the rate at which it
was imported.
212 Chapter 11: Working with Sound
Using the Speech compression option
The Speech compression option exports sounds using a compression specially adapted to speech.
To use speech compression:
1.
In the Sound Properties dialog box, select Speech from the Compression menu.
2.
For Sample Rate, select an option to control sound fidelity and file size. A lower rate decreases
file size but can also degrade sound quality. Select from the following options:
5 kHz
is acceptable for speech.
11 kHz
is recommended for speech.
22 kHz
is acceptable for most types of music on the web.
44 kHz
is the standard CD audio rate. However, because compression is applied, the sound is
not CD quality in the SWF file.
Guidelines for exporting sound in Flash documents
Besides sampling rate and compression, there are several ways to use sound efficiently in a
document and keep file size small:
•
Set the in and out points to prevent silent areas from being stored in the Flash file and to
reduce the size of the sound.
•
Get more out of the same sounds by applying different effects for sounds (such as volume
envelopes, looping, and in/out points) at different keyframes. You can get a number of sound
effects using only one sound file.
•
Loop short sounds for background music.
•
Do not set streaming sound to loop.
•
When exporting audio in embedded video clips, remember that the audio is exported using the
global streaming settings selected in the Publish Settings dialog box.
•
Use stream synchronization to keep the animation synchronized to your sound track when you
preview your animation in the editor. If your computer is not fast enough to draw the
animation frames so that they keep up with your sound track, Flash skips frames.
•
When exporting QuickTime movies, use as many sounds and channels as you want without
worrying about file size. The sounds are combined into a single sound track when you export
as a QuickTime file. The number of sounds you use has no effect on the final file size.
Using sounds in Flash documents for mobile devices (Flash Professional only) 213
Using sounds in Flash documents for mobile devices
(Flash Professional only)
With Flash MX Professional 2004, you can include event sounds when authoring documents for
playback on mobile devices. The general process and tools required to embed sound are described
in this section. For detailed information on authoring for mobile devices, see the Content
Development Kits on the Mobile and Devices Development Center at www.macromedia.com/
devnet/devices.
Flash does not support sound file formats used for mobile devices (such as MIDI and others);
when authoring for mobile devices, you must temporarily place a proxy sound in a supported
format such as MP3, WAV, or AIFF in the Flash document. The proxy sound in the document is
then linked to an external mobile device sound, such as a MIDI file. During the document
publishing process, the proxy sound is replaced with the linked external sound. The SWF file
generated contains the external sound and uses it for playback on a mobile device.
When adding sounds to Flash documents for playback on mobile devices, remember the
following information:
•
This feature works with event sounds only.
•
The Effect, Sync, Edit, and Loop options are not supported on mobile devices.
•
You must specify an external device sound file for each sound in a document.
•
As with all external files, the device sound file must be available during the publishing process
but is not needed by the SWF file for playback.
To add an event sound to a Flash document for playback on a mobile device:
1.
Import a sound file to the library in the Flash document (File > Import > Import to Library).
For information on supported file formats and importing procedures, see “Importing sounds”
on page 202.
2.
In the Library panel, right-click (Windows) or Control-click (Macintosh) the sound, and
select Properties.
3.
In the Device sound text box, enter a path or click the folder icon and browse to the location
where the mobile device sound file is located. Click OK to close the Property inspector.
4.
Add a button instance to the Stage from the Buttons common library (Window > Other
Panels > Common Libraries > Buttons). For more information on the common libraries, see
“Working with common libraries” on page 21.
5.
Add the linked sound to the Hit frame of the button. For more information, see “Adding sounds
to buttons” on page 204.
6.
Open the Publish Settings dialog box (File > Publish Settings), and click the Flash tab.
214 Chapter 11: Working with Sound
7.
Select Export Device Sounds. Flash Lite is automatically selected from the Version pop-up
menu. Click OK.
The SWF file now contains the linked mobile device sound.
8.
Select Control > Test Movie to test your Flash application.
9.
Select Control > Disable Keyboard Shortcuts.
10.
Press Tab to select the button, and then press Enter or Return to play the sound.
Note: Depending on which device you are developing for, certain restrictions might apply to
how an event sound is triggered. For more information, see Mobile Articles on the Mobile and
Devices Development Center at www.macromedia.com/devnet/devices.
Creating a Flash Lite sound file
Flash Lite 1.1 provides the ability to encapsulate device-specific sounds of multiple formats into a
single tagged data block. This provides content developers with the ability to create a single piece
of content that is compatible with multiple devices. As an example, a single Flash SFW file can
contain the same sound represented in both MIDI and MFi formats. This SWF file can be played
back both on a device that supports only MIDI and on a device that supports only MFi, with
each device playing back the specific sound format that it natively supports.
During content creation, content developers identify the sound files in the formats that they want
to bundle together. An external tool (Flash Lite Bundler.exe) is available to bundle the identified
sound files into one sound data block, to be played when triggered by an event. When the
appropriate event is triggered, Flash Lite 1.1 processes this bundled sound data block and plays
the sound data in the specific format supported by the device.
For a complete overview of the process, see the FlashLite1.1_Authoring_Guidelines.pdf file on
your Macromedia Flash application CD or on the Mobile and Devices Development Center.
215
CHAPTER 12
Working with Screens (Flash Professional Only)
In Macromedia Flash MX Professional 2004, screens provide an authoring user interface with
structural building blocks that make it easy for you to create complex, hierarchical Flash
documents, such as slide presentations or form-based applications.
Screens provide high-level containers for creating applications. With screens, you can structure
complex applications in Flash without using multiple frames and layers on the Timeline. In fact,
you can create a complex application without viewing the Timeline.
When you author a screen-based document, the screens are arranged in a structured hierarchy
that you create. You structure the document by nesting screens in a branching tree. You can easily
preview and modify the structure of a screen-based document.
You can create screen-based documents of two types: a Flash Slide Presentation, suitable for
sequential content such as a slide show or multimedia presentation, or a Flash Form Application,
ideal for nonlinear, form-based applications, including Rich Internet Applications. Screen-based
documents can be saved in Flash Player 6 format or later only. For an introduction to building a
Flash Form Application, see the On Demand seminar, “Flash MX Professional 2004: Developing
with screens,” at www.macromedia.com/macromedia/events/online/ondemand/index.html.
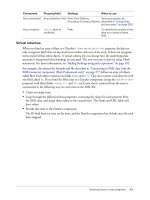
Detail of default workspace for a new Flash Slide Presentation. Screen thumbnails appear in the Screen
Outline pane on the left side of the workspace, and the Timeline is collapsed.
216 Chapter 12: Working with Screens (Flash Professional Only)
This chapter contains the following sections:
Understanding screen-based documents and the screen authoring environment (Flash
Professional only). . . . . . . . . . . . . . . . . . . . . . . . . . . . . . . . . . . . . . . . . . . . . . . . . . . . . . . . . . 216
Using the Screen Outline pane (Flash Professional only) . . . . . . . . . . . . . . . . . . . . . . . . . . . . 219
About undoing and redoing commands with screens (Flash Professional only). . . . . . . . . . . . 220
Using the screens context menu (Flash Professional only). . . . . . . . . . . . . . . . . . . . . . . . . . . . 220
Creating a new screen-based document (Flash Professional only) . . . . . . . . . . . . . . . . . . . . . . 220
Adding screens to a document (Flash Professional only). . . . . . . . . . . . . . . . . . . . . . . . . . . . . 221
Naming screens (Flash Professional only) . . . . . . . . . . . . . . . . . . . . . . . . . . . . . . . . . . . . . . . . 222
Setting properties and parameters for a screen (Flash Professional only) . . . . . . . . . . . . . . . . . 223
About adding media content to screens (Flash Professional only) . . . . . . . . . . . . . . . . . . . . . . 226
Selecting and moving screens (Flash Professional only). . . . . . . . . . . . . . . . . . . . . . . . . . . . . . 226
Creating controls and transitions for screens with behaviors (Flash Professional only) . . . . . . 228
Using Find and Replace with screens (Flash Professional only). . . . . . . . . . . . . . . . . . . . . . . . 230
About using the Movie Explorer with screens (Flash Professional only) . . . . . . . . . . . . . . . . . 230
About using Timelines with screens (Flash Professional only). . . . . . . . . . . . . . . . . . . . . . . . . 231
About using ActionScript with screens (Flash Professional only) . . . . . . . . . . . . . . . . . . . . . . 231
About using components with screens (Flash Professional only). . . . . . . . . . . . . . . . . . . . . . . 233
Accessibility in the Flash screens authoring environment (Flash Professional only). . . . . . . . . 233
Understanding screen-based documents and the screen
authoring environment (Flash Professional only)
The authoring environment for screen-based documents provides several ways for you to work
with these documents. The next sections present information on the types of documents you can
create with screens, ways to organize and navigating screens, and ways to use ActionScript,
components, or Flash accessibility features with screens.
Workflow for authoring screen-based documents (Flash Professional only)
To author a screen-based document, you first create a new Slide Presentation or Form Application
document. Then you add screens, configure the screens and add content, and add behaviors to
create controls and transitions for the screens.
For detailed information, see the procedures described in the following sections:
•
“Creating a new screen-based document (Flash Professional only)” on page 220
•
“Adding screens to a document (Flash Professional only)” on page 221
•
“Naming screens (Flash Professional only)” on page 222
•
“Setting properties and parameters for a screen (Flash Professional only)” on page 223
Understanding screen-based documents and the screen authoring environment (Flash Professional only) 217
•
“About adding media content to screens (Flash Professional only)” on page 226
•
“Selecting and moving screens (Flash Professional only)” on page 226
•
“Creating controls and transitions for screens with behaviors (Flash Professional only)”
on page 228
Slide presentations and form applications (Flash Professional only)
You can create screen-based documents of two types. The type of document you select determines
the type of default screen in the document.
•
A Flash Slide Presentation uses the slide screen as the default screen type. A slide screen has
functionality designed for a sequential presentation.
•
A Flash Form Application uses the form screen as the default screen type. A form screen has
functionality designed for a nonlinear, form-based application.
Although each document has a default screen type, you can include both slide screens and form
screens in any screen-based document. For information on slide and form screens, see “Slide
screens and form screens (Flash Professional only)” on page 218.
Document structure and hierarchy (Flash Professional only)
Each document has a master screen at the top level. In a Flash Slide Presentation, the top-level
screen is called Presentation by default. In a Flash Form Application, the top-level screen is called
Application by default.
The top-level screen is the container for everything that you add to the document, including
other screens. You can place content on the top-level screen. You cannot delete or move the
top-level screen.
Screens are similar to nested movie clips in some ways: Child screens inherit the behavior of their
parents, and you use target paths in ActionScript to send messages from one screen to another.
However, screens do not appear in the library, and you cannot create multiple instances of a
screen. For information on using ActionScript with screens, see “About using ActionScript with
screens (Flash Professional only)” on page 231.
218 Chapter 12: Working with Screens (Flash Professional Only)
You can add multiple screens to a document, and you can nest screens within other screens, in as
many levels as you want. A screen that is inside another screen is the child of that screen. A screen
that contains another screen is the parent of that screen. If a screen is nested several layers deep, all
the screens above that screen are its ancestors. Screens that are at the same level are sibling screens.
All screens nested in another screen are its descendants. A child screen contains all the content of
its ancestor screens.
The Screen Outline pane for a Flash Slide Presentation containing screens nested three levels deep.
About using preloaders with screen-based documents
If you want to include a preloader with your screen-based document, one way to do this is to
create the preloader as a separate SWF file (non-screen-based), and load the SWF file for the
screen-based document from within the preloader SWF.
You cannot create a preloader within a screen-based document, because all screens in a document
are located on the first frame of the root Timeline, so you cannot call or load other frames.
Slide screens and form screens (Flash Professional only)
You can create two types of screens in a document: slide screens and form screens. A Flash Slide
Presentation uses the slide screen as the default screen type. A Flash Form Application uses the
form screen as the default screen type. However, you can mix slide screens and form screens in any
screen-based document to take advantage of the functionality of each type of screen and create
more complex structure in a presentation or application.
Slide 1 has one child
and one grandchild.
Top-level slide has three children,
Slide 1, Slide 2, and Slide 3.
Slide 4 is a child of Slide 1.
Slide 5 is a child of Slide 4.
Using the Screen Outline pane (Flash Professional only) 219
You can set parameters for slide or form screens in the Property inspector. For more information,
see “Setting parameters for a screen (Flash Professional only)” on page 225. You can also use
ActionScript to control screens. For more information, see “Screen class (Flash Professional
only)”, “Form class (Flash Professional only)”, and “Slide class (Flash Professional only)”, in Using
Components.
Slide screens let you create Flash documents with sequential content, such as a slide show. The
default runtime behavior lets users navigate sequentially through slide screens, using the left and
right arrow keys. Sequential screens can overlay one another so that the previous screen remains
visible when the next slide is viewed. Screens can continue playing after they are hidden. Use slide
screens when you want the visibility of each screen to be managed automatically.
Form screens let you create structured form-based applications, such as online registration or
e-commerce forms. Form screens are simple containers that you use to structure a form-based
application. By default, to create the navigation structure with form screens, you must
write ActionScript. Use form screens when you want to manage the visibility of individual
screens yourself.
Using the Screen Outline pane (Flash Professional only)
When you work with a screen-based document, the Screen Outline pane at the left of the
Document window displays thumbnails of each screen in the current document, in a collapsible
tree view. The tree represents the structural hierarchy of the document. Nested screens are
indented below the screen that contains them.
When you add a screen to a document, the screen appears in the Screen Outline pane. For more
information, see “Adding screens to a document (Flash Professional only)” on page 221.
You can collapse and expand the tree to hide and show nested screens. You can hide, show, and
resize the Screen Outline pane.
By clicking on a screen thumbnail in the Screen Outline pane, you can display the screen on the
Stage. For information on viewing screens in a document, see “Selecting and moving screens
(Flash Professional only)” on page 226.
To hide or show the Screen Outline pane:
•
Select Window > Screens.
To expand or collapse the tree:
•
In Windows, click the Plus (+) or Minus (-) button next to a screen to show or hide the screens
nested within it.
•
On the Macintosh, click the triangle next to a screen to show or hide the screens nested
within it.
To resize the Screen Outline pane:
•
Drag the dividing line between the Screen Outline pane and the Document window.
220 Chapter 12: Working with Screens (Flash Professional Only)
About undoing and redoing commands with screens
(Flash Professional only)
You can use the Edit > Undo and Edit > Redo menu commands to undo and redo the following
actions performed on screens: adding, cutting, copying, pasting, deleting, and hiding a screen.
The following actions performed on screens are recorded in the History panel: adding a screen,
adding a nested screen, selecting a screen, renaming a screen, and deleting a screen. For
information on the Undo and Redo commands and the History panel, see “Using the Undo,
Redo, and Repeat menu commands” on page 34.
Using the screens context menu (Flash Professional only)
The screens context menu contains many commands for working with screens. You can
insert screens, cut, copy and paste screens, and perform other operations with the context
menu commands.
Note: Specific context menu commands are documented in sections describing those tasks. For
example, to find information on the Insert Screen command, see“Adding screens to a document
(Flash Professional only)” on page 221.
To view the context menu for a screen:
•
Right-click (Windows) or Control-click (Macintosh) a screen thumbnail in the Screen
Outline pane.
Creating a new screen-based document
(Flash Professional only)
You can create a new screen-based document using one of two screen types:
•
A Flash Slide Presentation uses the slide screen as the default screen type.
•
A Flash Form Application uses the form screen as the default screen type.
For more information, see “Slide screens and form screens (Flash Professional only)” on page 218.
When you create a new screen-based document, it contains a top-level container screen and a
single screen of the default type. Keep in mind that a screen-based document can be published
only Flash Player 6 format or later, with ActionScript 2.0. You cannot save a screen-based
document in any earlier Flash Player format.
You can create a new screen-based document from the Start page or from the New Document
dialog box.
For information on the Start page, see “Using the Start page” in Getting Started with Flash. For
information on the New Document dialog box, see “Creating or opening a document and setting
properties” on page 12.
Adding screens to a document (Flash Professional only) 221
To create a new screen-based document from the Start page:
•
Select a screen type for your document. Under Get Started, select one of the following from
the Open a File options menu:
Flash Slide Presentation
creates a document with the slide screen as the default screen type.
Flash Form Application
creates a document with the form screen as the default screen type.
To create a new screen-based document from the New Document dialog box:
1.
Select File > New.
2.
Click the General tab and select one of the following under Type:
Flash Slide Presentation
creates a document with the slide screen as the default screen type.
Flash Form Application
creates a document with the form screen as the default screen type.
Adding screens to a document (Flash Professional only)
You can add a new screen at the same level as the currently selected screen. The new screen is a
sibling screen of the selected screen. You can also add a nested screen one level below the currently
selected screen. You can add a screen of the default screen type or select a screen type when you
add a screen. You can view all screens in a document in the Screen Outline pane. For more
information, see “Using the Screen Outline pane (Flash Professional only)” on page 219.
When you add screens to a document, Flash exhibits certain default behaviors:
•
By default, Flash uses the screen type of the document (slide type for a Slide Presentation or
form type for a Form Application) for the new screen. You can select to insert a screen of
another type, using the Insert Screen Type command in the screens context menu.
•
Flash inserts the first screen you add directly after the top-level screen, one level below it.
•
Flash inserts a new screen after the currently selected screen, at the same level. If the document
contains nested screens below the currently selected screen, the new screen is added after the
nested screens, at the same level as the selected screen.
•
Flash inserts a new nested screen directly after the currently selected screen, and nested one
level down. If the document already contains a nested screen or screens below the currently
selected screen, the new screen is inserted after all nested screens already in place, one level
below the selected screen.
You can also use a template to add a new screen or a series of screens. Flash MX Professional 2004
includes screen templates in various categories.
To add a screen of the default type at the current screen level:
1.
Select a screen in the Screen Outline pane.
2.
Do one of the following:
■
Press Enter or Return.
■
Click the Insert Screen (+) button at the top of the Screen Outline pane.
■
Select Insert > Screen.
■
Select Insert Screen from the screens context menu.
222 Chapter 12: Working with Screens (Flash Professional Only)
To add a screen of a specified type at the current screen level:
1.
Select a screen in the Screen Outline pane.
2.
Select Insert Screen Type from the context menu and select a screen type.
To add a nested screen of the default type:
1.
Select a screen in the Screen Outline pane.
2.
Do one of the following:
■
Press Enter or Return.
■
Select Insert > Nested Screen.
■
Select Insert Nested Screen from the screens context menu.
To add a screen or series of screens based on a template:
1.
Select a screen in the Screen Outline pane.
2.
Select Insert Screen Type from the context menu and select Saved Templates.
3.
Select a template category under Category, and then select a template under Templates.
4.
Click OK to close the dialog box and add the template-based screen(s) to your document.
Naming screens (Flash Professional only)
By default, screens are named with their default type, in the order in which they are created:
slide1, slide2, form1, form2, and so on. The creation order does not necessarily reflect the order
of the screens in the Screen Outline pane. For example, you could create three sibling screens,
slide1, slide2, and slide3. If you then create a nested screen directly below slide1, the nested
screen is slide4.
You can rename screens, including the top-level screen. Screen names must be unique in a
document. For example, you can have only one screen named Quiz_Page in a document.
The default screen name is used as the instance name, which is used in ActionScript to control a
screen. (For more information, see “About using ActionScript with screens (Flash Professional
only)” on page 231.) If you change the default screen name, the instance name is updated with
the new name; likewise, if you change the instance name, the screen name is updated. The linkage
identifier for the screen is also identical to the screen name, and it is updated when the screen
name or instance is updated.
Instance names must conform to the following requirements:
•
The name must not contain any spaces.
•
The first character must be a letter, underscore (
_
), or dollar sign (
$
).
•
Each subsequent character must be a letter, number, underscore, or dollar sign.
•
The instance name must be unique.
You can also change the instance name in the Property inspector. For more information, see
“Setting properties and parameters for a screen (Flash Professional only)” on page 223.
Setting properties and parameters for a screen (Flash Professional only) 223
To rename a screen:
•
Double-click the screen name in the Screen Outline pane and enter a new name.
Setting properties and parameters for a screen
(Flash Professional only)
You use the Property inspector to set properties and parameters for individual screens. On the left
side of the Property inspector, you can view the instance name, width, height, and x and y
coordinates of a screen:
•
The instance name is a unique name assigned to a screen, used when you target the screen in
ActionScript. Each screen is assigned a default instance name, based on its default name in the
Screen Outline pane. The instance name and default screen name are also identical to the
linkage identifier for the screen. If you update the instance name, the default screen name and
the linkage identifier are also updated.
•
Width and height are specified in pixels. The values in the W and H fields are read-only.
Width and height are determined by the screen contents. You can use the Auto Snap option to
make sure the registration point stays in the same relative position when the screen width and
height change. For more information, see “Specifying the ActionScript class and registration
point of a screen (Flash Professional only)” on page 224.
•
The x and y coordinates of a screen are specified in pixels. You can move a child screen on the
Stage by changing its x and y coordinates. You can change the registration point of a screen
using the registration point grid. For more information, see “Specifying the ActionScript class
and registration point of a screen (Flash Professional only)” on page 224.
You can set parameters for slide and form screens, to control screen behavior during playback. For
more information, see “Setting parameters for a screen (Flash Professional only)” on page 225.
To change the instance name of a screen:
1.
Select a screen in the Screen Outline pane.
2.
Select Window > Properties.
3.
On the left side of the Property inspector, enter a name in the Instance Name text box.
Note: If you update the instance name, the screen name in the Screen Outline pane and the
linkage identifier for the screen also update.
To move a child screen on the Stage:
1.
If the Hide Screen context menu option for the child screen is selected (the default setting for
slide screens), deselect the option.
2.
Select the screen’s parent in the Screen Outline pane, and select the child screen on the Stage.
3.
Select Window > Properties.
4.
In the Property inspector, enter new values for the x and y coordinates, drag the child screen to
another location on the Stage, or use the Align panel.
224 Chapter 12: Working with Screens (Flash Professional Only)
Specifying the ActionScript class and registration point of a screen
(Flash Professional only)
You can specify the ActionScript class of the screen and its registration point on the Properties tab
of the Property inspector:
•
The ActionScript class specifies what class to which the screen belongs. The class determines
what methods and properties are available for the screen. By default, slide screens are assigned
to the
mx.screens.Slide
class, and form screens are assigned to the
mx.screens.Form
class.
You can assign the screen to a different class.
•
The registration point grid indicates the position of the screen registration point in relation to
its content. By default, the registration point of a slide screen is in the center and Auto Snap is
on. The registration point of a form screen is in the upper left corner and Auto Snap is off by
default. You can change the registration point using the grid. You can use the Auto Snap option
to keep the registration point in the same position in relation to screen contents, even when
you add, remove, or reposition the screen contents.
Remember that the height and width of a screen are determined by its content. Therefore, the
center of a screen cannot be the center of the Stage.
Note: If you have changed the coordinate grid setting in the Info panel in another Flash document, the
coordinate grid for the screen registration point can reflect that change. To check the Info panel
coordinate grid setting, open a Flash document (a non-screen-based document) or select something
on the Stage that is not a screen, and select Window > Design Panels > Info. To change settings in the
Info panel while working in a screen-based document, deselect all screens before you open the
panel.
For more information on the Info Panel, see “Getting information about instances on the Stage”
on page 67.
To change the ActionScript class of a screen:
1.
Select a screen in the Screen Outline pane.
2.
Select Window > Properties.
3.
In the Property inspector, click the Properties tab.
4.
Enter a class name in the Class Name text box. For more information on ActionScript classes,
see Chapter 10, “Creating Custom Classes with ActionScript 2.0” in Using ActionScript in
Flash.
To change the registration point of a screen:
1.
Select a screen in the Screen Outline pane.
2.
Select Window > Properties.
3.
Click the Properties tab and click a point in the registration grid.
Clicking a registration point automatically selects in on the Properties tab. When this option is
selected, the registration point moves in relation to the screen content, but the screen itself
does not move.
Setting properties and parameters for a screen (Flash Professional only) 225
Setting parameters for a screen (Flash Professional only)
On the Parameters tab of the Property inspector, you can set parameters to control how the
screen appears and behaves during playback. Different parameters are available for slide and
form screens.
The following parameters are available only for slide screens:
•
The parameter
autoKeyNav
determines whether the slide uses default keyboard handling to
control navigation to the next or previous slide. When
autoKeyNav
is set to
true
, pressing the
Right Arrow key or the Spacebar advances to the next slide, and pressing the Left Arrow key
moves to the previous slide. When
autoKeyNav
is set to
false
, no default keyboard handling
takes place. When
autoKeyNav
is set to
inherit
(the default setting), the slide inherits its
autoKeyNav
setting from its parent. If the slide’s parent is also set to
inherit
, the
parent’s ancestors are examined until one is found with its
autoKeyNav
parameter set to
true
or
false
. If a slide is a root slide, setting
autoKeyNav
to
inherit
yields the same result as
setting it to
true.
Note: This property can be set independently for each slide, and it affects keyboard handling when
that slide has focus.
•
The parameter
overlayChildren
specifies whether child screens overlay one another on the
parent screen during playback. When
overlayChildren
is set to
true
, child screens overlay
one another. For example, suppose you have two children, Child 1 and Child 2, which are
bullet points on the parent screen. If the user clicks a Next button and displays Child 1, then
clicks Next again and displays Child 2, Child 1 remains visible when Child 2 appears. When
overlayChildren
is set to
false
(the default setting), Child 1 is removed from the display
when Child 2 appears. This parameter affects only the immediate children of a slide, not
nested descendants.
•
The parameter
playHidden
specifies whether a slide continues to play if it is hidden after
being shown. When
playHidden
is set to
true
(the default setting), the slide continues to play
when the slide is hidden after being shown. When
playHidden
is set to
false
, the slide stops
playing if it is hidden, and resumes playing at Frame 1 if it is shown again.
There is one parameter that is available only to form screens: The parameter
visible
indicates
whether a screen is visible or hidden at runtime. When
visible
is set to
true
, the screen is visible
at runtime. When
visible
is set to
false
, the screen is hidden. This property does not affect the
visibility of the screen in the authoring environment.
The following parameters are available for slide and form screens:
•
The parameter
autoload
indicates whether the content should load automatically (
true
), or
wait to load until the
Loader.load()
method is called (
false
). The default value is
true
.
This parameter is inherited from the Loader component.