Building microservices asp net core cross platform 8662 pdf
Bạn đang xem bản rút gọn của tài liệu. Xem và tải ngay bản đầy đủ của tài liệu tại đây (3.93 MB, 232 trang )
Building Microservices with
ASP.NET Core
Develop, Test, and Deploy Cross-Platform Services in the
Cloud
Kevin Hoffman
Building Microservices with ASP.NET Core
by Kevin Hoffman
Copyright © 2017 Kevin Hoffman. All rights reserved.
Printed in the United States of America.
Published by O’Reilly Media, Inc., 1005 Gravenstein Highway North,
Sebastopol, CA 95472.
O’Reilly books may be purchased for educational, business, or sales
promotional use. Online editions are also available for most titles
( For more information, contact our
corporate/institutional sales department: 800-998-9938 or
Editors: Nan Barber and Brian Foster
Production Editor: Shiny Kalapurakkel
Copyeditor: Kim Cofer
Proofreader: Rachel Head
Indexer: Wendy Catalano
Interior Designer: David Futato
Cover Designer: Karen Montgomery
Illustrator: Rebecca Demarest
September 2017: First Edition
Revision History for the First Edition
2017-08-31: First Release
See for release
details.
The O’Reilly logo is a registered trademark of O’Reilly Media, Inc. Building
Microservices with ASP.NET Core, the cover image, and related trade dress
are trademarks of O’Reilly Media, Inc.
While the publisher and the author have used good faith efforts to ensure that
the information and instructions contained in this work are accurate, the
publisher and the author disclaim all responsibility for errors or omissions,
including without limitation responsibility for damages resulting from the use
of or reliance on this work. Use of the information and instructions contained
in this work is at your own risk. If any code samples or other technology this
work contains or describes is subject to open source licenses or the
intellectual property rights of others, it is your responsibility to ensure that
your use thereof complies with such licenses and/or rights.
978-1-491-96173-5
[LSI]
Preface
The handwriting is on the wall—most people building software and services
today are rushing to embrace microservices and their benefits in terms of
scale, fault tolerance, and time to market.
This isn’t just because it’s a shiny new fad. The momentum behind
microservices and the concepts driving them is far more important, and those
looking for the pendulum to swing back away from the notion of smaller,
independently deployed modules will be left behind.
Today, we need to be able to build resilient, elastically scalable applications,
and we need to do it rapidly to satisfy the needs of our customers and to keep
ahead of our competition.
What You’ll Build
Unlike other more reference-style books that are all about showing you each
and every API, library, and syntax pattern available to you in a given
language, this book is written and meant to be consumed as a guide to
building services, with ASP.NET Core simply being the framework in which
all the code samples are built.
This book will not teach you every single nuance of low-level C# code; there
are far thicker books written by other people if that’s what you’re looking
for. My goal is that by the end of the book, creating, testing, compiling, and
deploying microservices in ASP.NET Core will be muscle memory for you.
You’ll develop good, practical habits that will help you rapidly build stable,
secure, reliable services.
The mentality I’d like you to have is that after reading this book, you’ll have
learned a lot about how to build services that are going to be deployed in
elastically scalable, high-performance cloud environments. ASP.NET Core in
C# is just one of many languages and frameworks you can use to build
services, but the language does not make the service—you do. The care,
discipline, and diligence you put into building your services is far more a
predictor of their success in production than any one language or tool ever
could be.
The paintbrushes and canvas do not make the painting, the painter does. You
are a painter of services, and ASP.NET Core is just one brush among many.
In this book, you’ll start with the basic building blocks of any service, and
then learn how to turn them into more powerful and robust services. You’ll
connect to databases and other backing services, and use lightweight
distributed caches, secure services, and web apps, all while keeping an eye on
the ability to continuously deliver immutable release artifacts in the form of
Docker images.
Why You’re Building Services
Different teams work on different release cadences with different
requirements, motivations, and measures of success. Gone are the days of
building monoliths that require a custom, handcrafted, artisanal server in
order to run properly. Hopefully, gone as well are the days of gathering a
hundred people in conference rooms and on dial-in lines to hope and pray
for the successful release of a product at 12:01 on a Sunday morning.
Microservices, if done properly, can give us the agility and drastically
reduced time to market that our companies need in order to survive and thrive
in this new world where nearly every vertical, regardless of its domain, seems
to need software running in the cloud to make money.
As you progress through the book you’ll see the rationalizations for each
decision made. From the individual lines of code to the high-level
architectural “napkin drawings,” I’ll discuss the pros and cons of each choice.
What You’ll Need to Build Services
First and foremost, you’ll need the .NET Core command-line utilities and the
appropriate software development kit (SDK) installed. In the first chapter I’ll
walk you through what you’ll need to get that set up.
Next, you’re going to need Docker. Docker and the container technology that
supports it are ubiquitous these days. Regardless of whether you’re deploying
to Amazon Web Services (AWS), Microsoft Azure, Google Cloud Platform
(GCP), or your own infrastructure, Docker provides the portable and
immutable release artifacts that you crave (and I’ll get more into the details of
why this is the case throughout the book).
The development and build pipeline for the services in this book is the
creation of Docker images running on Linux infrastructure in the cloud. As
such, the path of least friction for readers of this book is likely a Mac or a
Linux machine. You’ll be able to work with Windows, but some things may
be higher-friction or require extra workarounds. The new Linux subsystem
for Windows 10 helps with this, but still isn’t ideal.
Docker on Windows and the Mac will use virtual machines to host a Linux
kernel (required for Docker’s container tech), and as such you may find your
machine struggling a bit if you don’t have enough RAM.
If you’re using Linux (I used Ubuntu to verify the code), then you don’t need
any virtual machines as Docker can run directly on top of a Linux kernel.
Online Resources
Microsoft’s website
This book’s GitHub repo
Conventions Used in This Book
The following typographical conventions are used in this book:
Italic
Indicates new terms, URLs, email addresses, filenames, and file
extensions.
Constant width
Used for program listings, as well as within paragraphs to refer to
program elements such as variable or function names, databases, data
types, environment variables, statements, and keywords.
Constant width bold
Shows commands or other text that should be typed literally by the user.
Constant width italic
Shows text that should be replaced with user-supplied values or by values
determined by context.
TIP
This element signifies a tip or suggestion.
NOTE
This element signifies a general note.
WARNING
This element indicates a warning or caution.
Using Code Examples
Supplemental material (code examples, exercises, etc.) is available for
download at />This book is here to help you get your job done. In general, if example code
is offered with this book, you may use it in your programs and
documentation. You do not need to contact us for permission unless you’re
reproducing a significant portion of the code. For example, writing a program
that uses several chunks of code from this book does not require permission.
Selling or distributing a CD-ROM of examples from O’Reilly books does
require permission. Answering a question by citing this book and quoting
example code does not require permission. Incorporating a significant
amount of example code from this book into your product’s documentation
does require permission.
We appreciate, but do not require, attribution. An attribution usually includes
the title, author, publisher, and ISBN. For example: Building Microservices
with ASP.NET Core by Kevin Hoffman (O’Reilly). Copyright 2017 Kevin
Hoffman, 978-1-491-96173-5.
If you feel your use of code examples falls outside fair use or the permission
given above, feel free to contact us at
O’Reilly Safari
Safari (formerly Safari Books Online) is a membership-based training and
reference platform for enterprise, government, educators, and individuals.
Members have access to thousands of books, training videos, Learning Paths,
interactive tutorials, and curated playlists from over 250 publishers, including
O’Reilly Media, Harvard Business Review, Prentice Hall Professional,
Addison-Wesley Professional, Microsoft Press, Sams, Que, Peachpit Press,
Adobe, Focal Press, Cisco Press, John Wiley & Sons, Syngress, Morgan
Kaufmann, IBM Redbooks, Packt, Adobe Press, FT Press, Apress, Manning,
New Riders, McGraw-Hill, Jones & Bartlett, and Course Technology, among
others.
For more information, please visit />
How to Contact Us
Please address comments and questions concerning this book to the
publisher:
O’Reilly Media, Inc.
1005 Gravenstein Highway North
Sebastopol, CA 95472
800-998-9938 (in the United States or Canada)
707-829-0515 (international or local)
707-829-0104 (fax)
We have a web page for this book, where we list errata, examples, and any
additional information. You can access this page at />To comment or ask technical questions about this book, send email to
For more information about our books, courses, conferences, and news, see
our website at .
Find us on Facebook: />Follow us on Twitter: />Watch us on YouTube: />
Acknowledgments
This book would not have been possible without the superhuman patience
and tolerance of my family. Their support is the only thing that helped take
this book from a concept to a published work. I honestly don’t know how
they put up with my stress and quirks and awful schedule of travel,
maintaining my day job, and devoting an absurd amount of hours to this
book.
For every chapter and sample in a book like this, there are countless hours of
coding, testing, research, consulting with experts, and the mandatory
smashing of the head on the desk. I need to thank the open source community
at large for their involvement and engagement with .NET Core, especially the
advocates and developers at Microsoft.
And as always, I must thank the other members of the A-Team (Dan, Chris,
and Tom) for continuing to be a source of inspiration that keeps
programming fun and interesting.
Chapter 1. ASP.NET Core Primer
.NET Core is not just yet another .NET version. It represents a complete
overhaul of everything we may have learned as .NET developers. This is a
brand new, “1.0” product that is finally going to bring .NET development
into the open source community as a fully cross-platform development stack.
This chapter will break down the essential components of ASP.NET Core
and .NET Core. In classic Microsoft fashion, there are a dozen new terms and
labels to learn, and those have changed multiple times between the betas and
release candidates, so the internet is awash with confusing, misleading, or
downright incorrect information.
By the end of the chapter, you’ll have a better idea of what ASP.NET Core is
and how it fits into the new cross-platform framework architecture. You will
also have set your workstation up with all of the prerequisites so that you’ll
be ready to dive into the rest of the book.
Distilling the Core
I’d love to be able to jump straight to the canonical and mandatory “hello
world” application using .NET Core. However, Core (I will use “.NET Core”
and “Core” interchangeably throughout the book) represents such an
enormous shift in architecture, design, and tooling that we need to take a
minute to at least cover some of the terminology that has changed from
previous versions of .NET.
Even if you’ve never used .NET before and Core is your first exposure,
you’ll find this terminology everywhere you search, so knowing what it all
means is essential.
CoreCLR
The CoreCLR is a lightweight, cross-platform runtime that provides many of
the same features that the Common Language Runtime (CLR) provides on
the Windows desktop or server, including:
Garbage collection
A garbage collector is responsible for the cleanup of unused object
references in a managed application. If you’ve used any of the previous
versions of .NET (or Java), then you should be familiar with the concept.
Despite the differences between the CLR and CoreCLR, they both follow
the same fundamental principles when it comes to garbage collection.
JIT compilation
As with previous versions of .NET, the Just-in-Time (JIT) compiler is
responsible for compiling the Intermediate Language (IL) code in the
.NET assemblies into native code on demand. This holds true now for
Windows, Linux, and macOS.
Exception handling
For a number of reasons beyond the scope of this book, exception
handling (e.g., try/catch statements) is a part of the runtime and not the
base class library.
In the first version of .NET, the CLR was a large, monolithic thing that
provided the basic services required by .NET applications. Over time it grew
larger and more tightly coupled to Windows. It eventually grew so large that
Microsoft had to split the CLR in two, allowing developers to choose full or
light versions because the whole thing was usually too bloated for most
practical uses. Here, developers generally chose based on whether they were
building server or client applications.
With .NET Core, the CoreCLR is now the smallest possible thing that can
provide runtime services to .NET Core applications. It is essentially a
bootstrapper. Everything not responsible for the most primitive parts of the
cross-platform runtime are part of CoreFX (discussed next) or available as
completely separate add-on libraries.
CoreFX
People who have been developing .NET applications for some time now
should be familiar with the concept of the base class library (BCL)—the sum
total of all .NET libraries that comprise the framework. If you installed
something like “.NET Framework v3.5” on a server, then you would
get every possible class that came with the framework. This led to developers
expecting everything to exist on their servers, and unfortunately to developers
treating their servers like pets (more on why this is bad later).
The legacy .NET Framework is an enormous beast, with thousands of
classes. When deploying applications to a server, the entire framework has to
be installed, regardless of how much of it your application actually uses.
CoreFX is a set of modular assemblies (available as NuGet packages and
completely open source, available on GitHub) from which you can pick and
choose. Your application no longer needs to have every single class library
assembly installed on the target server. With CoreFX, you can use only what
you need, and in true cloud-native fashion you should vendor (bundle) those
dependencies with your application and expect nothing of your target
deployment environment. The burden of dependency management is now
reversed—the server should have nothing to do with it.
This represents an enormous shift in the way people think about .NET
development. Building .NET applications is no longer about closed-source,
vendor-locked development on Windows. Today, it’s a lean, use-only-whatyou-need model that is absolutely in line with patterns and practices of
modern microservice development and how the open source community at
large views the art of building software.
.NET Platform Standard
Prior to .NET Core, .NET developers were familiar with the concept of
Portable Class Libraries (PCLs). These allowed developers to compile their
assemblies to target an intersection of architecture and platform (e.g., a
Windows Phone 8 DLL and a DLL that could be used by an ASP.NET app
on the server). This resulted in multiple different DLLs that were each tagged
with where they could be deployed.
The .NET Platform Standard (often just called .NET Standard) aims to
simplify this process and allow for a more manageable architecture to support
.NET Core’s cross-platform goals for binary portability. For more
information on .NET Standard, check out the documentation on GitHub.
It may also help to think of .NET Standard in terms of interfaces. You can
think of each version of .NET Standard as a collection of interfaces that can
either be implemented by the traditional .NET Framework (v.4x–vNext) or
by the .NET Core libraries. As you evaluate which NuGet packages you want
to use, you’ll be looking at which version of the standard they use. If
they don’t conform to some version of .NET Standard, they’re not compatible
with .NET Core.
Table 1-1 shows the compatibility and equivalencies between .NET Standard,
.NET Core, and the existing .NET Framework versions at the time of writing
this book (table contains data taken from the official Microsoft
documentation).
Table 1-1. .NET Standard compatibility
Platform
netstandard
1.0
1.1
1.2
1.3
1.4
1.5
netcoreapp
(.NET Core)
net
4.5
4.5.1
4.6
4.6.1
4.6.2
1.6
2.0
1.1
2.0
vNext
4.6.2
(.NET Framework)
ASP.NET Core
ASP.NET Core is a collection of small, modular components that can be
plugged into your application to let you build web applications and
microservices. Within ASP.NET Core you will find APIs for routing, JSON
serialization, and rigging up MVC controllers and views.
Historically, ASP.NET came with the .NET Framework—you could not
separate the two. After the split between lightweight and heavyweight
frameworks, you could install versions of the .NET Framework that did not
include ASP.NET.
Now, much in line with the way the rest of the open source software (OSS)
community has been doing things for years, all of the components you need
to convert a console app into a web app or service are simply modules you
add as dependencies. As with everything that is part of Core, it is 100% open
source. You can find all of the source code to ASP.NET Core at
/>
Installing .NET Core
As mentioned before, you no longer need to install ASP.NET as it is nothing
more than a collection of modules from which you can choose to add
functionality to your Core app. What you’ll need to install is the .NET Core
command-line tools as well as an SDK. The distinction between the tooling
and the SDK is important, because you can have more than one SDK (e.g.,
v1.0 and v1.1) installed and managed by a single version of the commandline tools.
This new modular design is a more modern approach to open source
frameworks and is exactly how you’ll see frameworks for other languages
managed and distributed. For folks coming to .NET Core from the OSS
world, this should feel natural and second-nature. For developers who have
spent a good portion of their careers installing ASP.NET on server after
server, this is a new (and hopefully refreshing) experience.
To install .NET Core, simply follow the instructions at the main website.
Make sure you install the newest version of the SDK (the tooling) and the
newest version of the runtime.
There are different instructions for each operating system, but when you’re
done, you should be able to execute the following command without error:
$ dotnet --version
1.0.3
Your version may vary slightly from the preceding output, but the executable
should be in your path and it should produce a version number. This book
was written against version 1.0.3 of the SDK and version 1.1.1 of the
runtime.
.NET Core has a very active community and a pretty rapid release cycle, so
it’s quite possible that newer versions of the tooling and runtime will be
available by the time you read this.
If this works, then you can be reasonably confident that you’ve got the basic
requirements for .NET Core installed on your workstation. Double-check this
with Microsoft’s installation instructions to make sure you have the latest
version of the tools.
All of the samples in this book assume that your projects will be managed
with project files in the form of
some basic internet searching for .NET Core samples, you may run into
samples that use the project.json file format. These are old and deprecated
and not compatible with the 1.x versions of the SDK.
If you ended up with a version of dotnet that is earlier than the one shown
in the preceding snippet, you may need to download a specific version
manually from GitHub.
The requirements for this book are that you have a runtime version of 1.1 or
greater and an SDK/tools version of 1.0.2 or better.
TOOL VERSIONS
Depending on what directory you’re in when you run the dotnet
command, the version output may vary. If a global.json file is a peer or in a
parent directory and specifies a fixed SDK version, you will see this
version, even if the dotnet command-line tool is a higher version. To see
the highest version of the tooling/SDK you have available, run the dotnet
--version command from a root or temporary directory that has no nearby
global.json file.
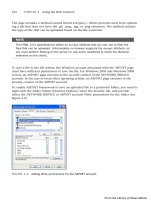
One side effect of the modularity of .NET Core that many developers may
take some time getting used to is the difference between the SDK (tools/CLI)
version and the runtime version. The latest runtime version at the time this
book was written was 1.1.1. On a Mac, you can use the following command
to see which versions of the runtime are available to you:
$ ls -F /usr/local/share/dotnet/shared/Microsoft.NETCore.App/
1.0.1/
1.0.3/
1.0.4/
1.1.0/
1.1.0-preview1-001100-00/ 1.1.1/
If you see 1.1.1 in this directory, and you’re using 1.0.2 or newer of the SDK,
then you should be fine for the rest of this book.
If you do not see 1.1.1 in the directory, you’re going to want to download it.
The list of runtimes is available directly on Microsoft’s .NET Core page.
If you’re using a Windows machine, you should be able to find your installed
runtimes in the following directory: Program
Files\dotnet\shared\Microsoft.NETCore.App.
.NET Core is extremely lightweight and, as I mentioned earlier, only includes
the bare minimum necessary to get you going. All of the dependencies your
applications need are going to be downloaded via the dotnet restore
command by examining your project file. This is essential for cloudnative application development because having vendored (locally bundled)
dependencies is mandatory for deploying immutable artifacts to the cloud,
where you should assume virtually nothing about the virtual machine hosting
your application.
Building a Console App
Before we can get to any of the really interesting stuff, we need to make sure
that we can create and build the world’s simplest sample—the oft-derided yet
canonical “hello world.”
The dotnet command-line tool has an option that will create a bare-bones
scaffold for a simple console application. If you type dotnet new without
any parameters, it will give you a list of the templates you can use. For this
sample, we’re going to use console.
Note that this will create project files in the current directory. So, make sure
you’re where you want to be before you run the command:
$ dotnet new console
Welcome to .NET Core!
--------------------Learn more about .NET Core @ />Use dotnet --help to see available commands or go to
/>Telemetry
-------------The .NET Core tools collect usage data in order to improve your
experience.
The data is anonymous and does not include commandline arguments.
The data is collected by Microsoft and shared with the community.
You can opt out of telemetry by setting a DOTNET_CLI_TELEMETRY_OPTOUT
environment variable to 1 using your favorite shell.
You can read more about .NET Core tools telemetry @
/>Configuring...
------------------A command is running to initially populate your local package cache, to
improve restore speed and enable offline access. This command will take
up
to a minute to complete and will only happen once.
Decompressing 100% 2828 ms
Expanding 100% 4047 ms
Created new C# project in /Users/kevin/Code/DotNET/sample.
If this isn’t your first time using the latest version of the command-line tools
you will see far less spam. Worth noting is the telemetry opt-out message. If
you’re uncomfortable with Microsoft collecting information about your
compilation habits anonymously, then go ahead and modify the profile for
your favorite shell or terminal to include setting
DOTNET_CLI_TELEMETRY_OPTOUT to 1.
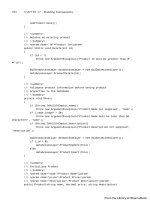
Once the project is created, you can type dotnet restore, which analyzes
the project dependencies and downloads whatever packages are necessary.
This step is required every time you modify the project file:
$ dotnet restore
Restoring packages for
/Users/kevin/Code/DotNET/sample/sample.csproj...
Writing lock file to disk. Path: /Users/kevin/Code/DotNET/sample/obj/
project.assets.json
Restore completed in 743.6987ms for /Users/kevin/Code/DotNET/sample/
sample.csproj.
NuGet Config files used:
/Users/kevin/.nuget/NuGet/NuGet.Config
Feeds used:
/>
Assuming nothing went wrong, you can now run the application and you’ll
see the text “Hello World!” emitted to your terminal window (you may
experience a delay of a few seconds if this is the first time you’ve compiled
this app to a binary):
$ dotnet run
Hello World!
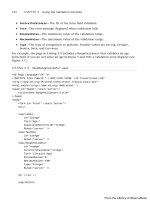
Our project consists of two files: the project file (which defaults to
<directory name>.csproj) and Program.cs, listed in Example 1-1.
Example 1-1. Program.cs
using System;
namespace ConsoleApplication
{
class Program
{
static void Main(string[] args)
{
Console.WriteLine("Hello World!");
}
}
}
Make sure that you can run all of the dotnet commands and execute the
application and see the expected output before continuing. On the surface this
looks just like any other console application written for previous versions of
.NET. In the next section, we’ll start to see immediate differences as we
incorporate ASP.NET Core.
If you looked at the .csproj file, you might’ve noticed that it declares which
version of netcoreapp it’s targeting (1.0).
To make sure that your tools are working properly and your environment is
suitable for all of the rest of the code samples in the book (which use v1.1 of
the runtime), let’s edit this .csproj file so that it looks like this:
<Project Sdk="Microsoft.NET.Sdk">
<PropertyGroup>
<OutputType>Exe</OutputType>
<TargetFramework>netcoreapp1.1</TargetFramework>
</PropertyGroup>
</Project>
We’ve upped the NET Core version to 1.1 and changed the dependency on
Microsoft.NETCore.App to version 1.1.0. One muscle memory you’ll want
to start building right away is the need to run dotnet restore after every
.csproj file change:
$ dotnet restore
Restoring packages for
/Users/kevin/Code/DotNET/sample/sample.csproj...
Generating MSBuild file /Users/kevin/Code/DotNET/sample/obj/ \
sample.csproj.nuget.g.props.
Writing lock file to disk. Path: /Users/kevin/Code/DotNET/sample/obj/
\
project.assets.json
Restore completed in 904.0985ms for /Users/kevin/Code/DotNET/sample/
\
sample.csproj.
NuGet Config files used:
/Users/kevin/.nuget/NuGet/NuGet.Config
Feeds used:
/>
Now you should be able to run the application again. There should be no
visible change and there should be no problem compiling it.
If you’ve been following along, take a look at your bin/Debug directory. You
should see one subdirectory called netcoreapp1.0 and another one called
netcoreapp1.1. This is because you built your application for two different
target frameworks. If you were to remove the bin directory and rerun
restore and then run, you’d only see the netcoreapp1.1 directory.
Building Your First ASP.NET Core App
Adding ASP.NET Core functionality to a console application is actually quite
easy. You could start off with a template from inside Visual Studio, or you
could use Yeoman on the Mac to create a new ASP.NET project.
However, I want to show just how small the gap is from a console “hello
world” to a web-based “hello world” without using any templates or
scaffolding. My opinion is that templates, scaffolding, and wizards should be
useful, but if your framework requires these things then it has too high a
complexity burden. One of my favorite rules of thumb is:
However inconvenient, if you cannot build your entire app with a simple text
editor and command-line tools, then you’re using the wrong framework.
Adding ASP.NET Packages to the Project
First, we’re going to want to add a few package references to our project:
Microsoft.AspNetCore.Mvc
Microsoft.AspNetCore.Server.Kestrel
Microsoft.Extensions.Logging (three different packages)
Microsoft.Extensions.Configuration.CommandLine
Whether you choose to edit the project file on your own or use Visual Studio
or VSCode to add the references is up to you.
Throughout the early history of .NET Core, the format of the project file
changed. Everything from the initial alphas all the way up through the release
candidates and 1.0 general availability made use of a file called project.json.
During the “preview3” release of v1.0 of the tools, Microsoft created a crossplatform version of the MSBuild tool and embedded that in the commandline tools. As a result, at the time this book went to print, we now have
a
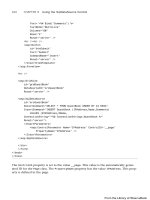
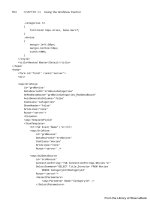
Here’s what our hellobook.csproj file looks like with the new dependencies:
<Project Sdk="Microsoft.NET.Sdk">
<PropertyGroup>
<OutputType>Exe</OutputType>
<TargetFramework>netcoreapp1.1</TargetFramework>
</PropertyGroup>
<ItemGroup>
Version="1.1.1" />
Version="1.1.1"/>
</ItemGroup>
</Project>
Adding the Kestrel Server
We’re going to extend the existing sample so that whenever you issue an
HTTP request, you get “Hello, world” in response. We will return that phrase
regardless of what URL is requested or what HTTP method is used.
Let’s take a look at our new Program.cs main entry point, in Example 1-2.
Example 1-2. Program.cs
using
using
using
using
System;
Microsoft.AspNetCore.Hosting;
Microsoft.AspNetCore.Builder;
Microsoft.Extensions.Configuration;
namespace HelloWorld
{
class Program
{
static void Main(string[] args)
{
var config = new ConfigurationBuilder()
.AddCommandLine(args)
.Build();
var host = new WebHostBuilder()
.UseKestrel()
.UseStartup<Startup>()
.UseConfiguration(config)
.Build();
host.Run();
}
}
}
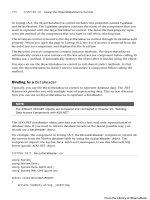
In this new Main method, the first thing we do is initialize the configuration
sub-system. We can use the ConfigurationBuilder to accept configuration
settings from JSON files, from environment variables, and, as our sample
shows, from the command line. Samples in forthcoming chapters will show
more varied use of the configuration system.
Once we’ve got our configuration built, we then use
the WebHostBuilder class to set up our web host. We’re not using Internet
Information Services (IIS) or the Hostable Web Core (HWC) on Windows.
Instead, we’re using a cross-platform, bootstrapped web server called Kestrel.
For ASP.NET Core, even if you deploy to Windows and IIS, you’ll still be
using the Kestrel server underneath it all.
Adding a Startup Class and Middleware
In classic ASP.NET, we had a global.asax.cs file that we could use to
accomplish work during the various startup phases of the application. With
ASP.NET Core, we can use the UseStartup<> generic method to define a
startup class that handles the new startup hooks.
The startup class is expected to be able to support the following methods:
A constructor that takes an IHostingEnvironment variable
The Configure method, used to configure the HTTP request pipeline and
the application
The ConfigureServices method, used to add scoped services to the
system to be made available via dependency injection
As hinted at by the .UseStartup<Startup>() line in Example 1-2, we need
to add a Startup class to our project. This class is shown in Example 1-3.
Example 1-3. Startup.cs
using
using
using
using
Microsoft.AspNetCore.Builder;
Microsoft.AspNetCore.Hosting;
Microsoft.Extensions.Logging;
Microsoft.AspNetCore.Http;
namespace HelloWorld {
public class Startup
{
public Startup(IHostingEnvironment env)
{
}
public void Configure(IApplicationBuilder app,
IHostingEnvironment env, ILoggerFactory loggerFactory)
{
app.Run(async (context) =>
{
await context.Response.WriteAsync("Hello, world!");
});
}
}
}
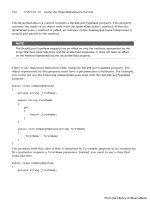
The Use method adds middleware to the HTTP request processing pipeline.
Everything about ASP.NET Core is configurable, modular, and extremely
extensible. This is due in large part to the adoption of the middleware pattern,
which is embraced by web frameworks for many other languages. Developers
who have built web services and applications using other open source
frameworks will likely be familiar with the concept of middleware.
ASP.NET Core middleware components (request processors) are set up as a
chain or pipeline and are given a chance to perform their processing in
sequence during each request. It is the responsibility of the middleware
component to invoke the next component in the sequence or terminate the
pipeline if appropriate.
As we’ve shown in Example 1-3, the simplest possible ASP.NET application
has a single middleware component that handles all requests.
Middleware components can be added to request processing using the
following three methods:
Map
Map adds the capability to branch a request pipeline by mapping a specific
request path to a handler. You can also get even more powerful
functionality with the MapWhen method that supports predicate-based
branching.
Use
Use adds a middleware component to the pipeline. The component’s code
must decide whether to terminate or continue the pipeline.
Run
The first middleware component added to the pipeline via Run will
terminate the pipeline. A component added via Use that doesn’t invoke
the next component is identical to Run, and will terminate the pipeline.
We’ll be playing with middleware components extensively throughout the
rest of this book. As I’ve mentioned, this modular ability to manipulate the
HTTP request handling pipeline is key to our ability to make powerful
microservices.
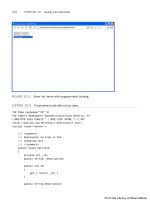
Running the App
To run this sample, you can simply type dotnet run from the command line.
You should see something very similar to the following when you’ve run the
app. Make sure you’ve done a dotnet restore prior to this:
$ dotnet run
Hosting environment: Production
Content root path:
/Users/kevin/Code/DotNET/sample/bin/Debug/netcoreapp1.1
Now listening on: http://localhost:5000
Application started. Press Ctrl+C to shut down.
You can exercise this service easily using the following terminal commands.
Note that any URL you try, as long as it’s a valid URL that curl understands,
will invoke the middleware and give you a response:
$ curl
Hello,
$ curl
Hello,
localhost:5000
world!
localhost:5000/will/any/url/work?
world!
Out of the box, Windows doesn’t come with the curl command. If you have
Windows 10 and have enabled the Linux subsystem, then you can use curl
from a bash prompt running within Windows. Otherwise, you can just open
this URL in a browser or use your favorite REST client testing tool, like the
Chrome plug-in Postman.
If you weren’t playing the home game and typing the sample as you read the
chapter, you can get the full code from the GitHub repo.
Summary
This chapter got you started with .NET Core. You were able to download and
install the latest tools (despite the confusing difference between tooling
versions and runtime versions), and you created a console app.
We then converted this console application into a simple web application
using middleware that responds with “Hello, world!” to all requests. This was
easy to do with just a few changes to a project file and adding a few lines of
code. Don’t worry if not all of the code made sense yet; it’ll get much clearer
as subsequent chapters go into more detail.
At this point, you should have most of the tools you need for the rest of the
book and be ready to dive in!
Chapter 2. Delivering
Continuously
One of the driving reasons why developers choose to build microservice
ecosystems over traditional monoliths is the ability to rapidly deploy
enhancements and fixes to small, independently scalable pieces of the
system.
This only works if you have confidence that those services are going to work
in production before you deploy them.
Introducing Docker
Lately Docker has been gathering momentum and becoming increasingly
popular both as a tool to aid development and as one to aid deployment and
operations. It is a container tool that utilizes Linux kernel features
like cgroups and namespaces to isolate network, file, and memory resources
without incurring the burden of a full, heavyweight virtual machine.1
There are countless platforms and frameworks available today that either
support or integrate tightly with Docker. You can deploy Docker images to
AWS (Amazon Web Services), GCP (Google Cloud Platform), Azure, virtual
machines, and combinations of those running orchestration platforms like
Kubernetes, Docker Swarm, CoreOS Fleet, Mesosphere Marathon, Cloud
Foundry, and many others. The beauty of Docker is that it works in all of
those environments without changing the container format.2
As you’ll see throughout this book, Docker gives us the ability to create
an immutable release artifact that will run anywhere, regardless of the target
environment. An immutable release means that we can test a Docker image in
a lower environment like development or QA and have reasonable
confidence that it will perform exactly the same way in production. This
confidence is essential to being able to embrace continuous delivery.
For more information on Docker, including details on how to create your own
Docker files and images and advanced administration, check out the book
Docker: Up & Running by Karl Matthias and Sean P. Kane (O’Reilly).
Later in this chapter we will demonstrate publishing Docker images to
dockerhub directly from our CI3 tool of choice. All of this will be done
online, in the cloud, with virtually no infrastructure installed on your own
workstation.
Installing Docker
When installing Docker on a Mac, the preferred method is to install the
native Mac application. If you see older documentation referring to
something called Boot2Docker or Docker Toolbox, these are deprecated and
you should not be installing Docker this way. For details on how to install
Docker on your Mac, check out the installation instructions from the Docker
website. Instructions are also available for other operating systems, but I
won’t cover them in depth in this chapter as the online documentation will
always be more current than this book.
When I started writing this book, I had Docker version 17.03.0-ce, build
60ccb22 installed. Make sure you check the documentation to ensure you’re
looking at the newest installation instructions before performing the install.
You can also manually install Docker and all prerequisites via Homebrew.
It’s slightly more involved and, honestly, I can see little use in installing it
this way on a Mac. The Docker app comes with a nice icon that sits in your
menu bar and automatically manages your environment to allow
terminal/shell access.
If you’ve managed to install Docker properly, it should start up automatically
on the Mac. Since Docker relies on features specific to the Linux kernel,
you’re really starting up a VirtualBox virtual machine that emulates those
Linux kernel features in order to start a Docker server daemon.
It may take a few minutes to start Docker, depending on the power of your
computer.
Now you should be able to run all Docker commands in the terminal to
examine your installation. One that you’ll find you may run quite often is
docker images. This command lists the Docker images you have stored in
your local repository.
Running Docker Images
Now that you can examine the Docker version and the IP address of a
running Docker machine, and you can see the list of installed Docker images,
it’s time to put it to use and run a Docker image.
Docker lets you manually pull images into your local cache from a remote
repository like docker hub. However, if you issue a docker run command
and you haven’t already cached that image, you’ll see it download in the
terminal.
If you run the following command, it will launch our “hello world” web
application developed in the previous chapter.4 It will fetch the Docker image
from docker hub if you don’t have it, and it will then invoke the Docker
image’s start command. Note that you need to map the port from the inside
of the container to the outside port so you can open up a browser from your
desktop:
$ docker run -p 8080:8080 dotnetcoreservices/hello-world
Unable to find image 'dotnetcoreservices/hello-world:latest' locally
latest: Pulling from dotnetcoreservices/hello-world
693502eb7dfb: Pull complete
081cd4bfd521: Pull complete
5d2dc01312f3: Pull complete
36c0e9895097: Pull complete
3a6b0262adbb: Pull complete
79e416d3fe9d: Pull complete
6b330a5f68f9: Pull complete
Digest:
sha256:0d627fea0c79c8ee977f7f4b66c37370085671596743c42f7c47f33e9aa99665
Status: Downloaded newer image for dotnetcoreservices/helloworld:latest
Hosting environment: Production
Content root path: /pipeline/source/app/publish
Now listening on: http://0.0.0.0:8080
Application started. Press Ctrl+C to shut down.
The output shows what it looks like after that image has been cached locally.
If you’re doing this for the first time, you will see a bunch of progress reports
indicating that you’re downloading the layers of the Docker image. This
command maps port 8080 inside the Docker image to port 8080 outside the
Docker image.
Docker provides network isolation, so unless you explicitly allow traffic from
outside a container to be routed inside the container, the isolation will
function just like a firewall. Since we’ve mapped the inside and outside
ports, we can now hit port 8080 on localhost.
We can see that this application is running with the following Docker
command:
$ docker ps
CONTAINER ID
IMAGE
COMMAND
CREATED
STATUS
PORTS
NAMES
61a68ffc3851
dotnetcoreservices/hello-world
"/pipeline/source/..." 3 minutes ago
Up 2 minutes
0.0.0.0:8080->8080/tcp priceless_archimedes
So let’s hit our application with an HTTP client to make sure it’s working:
$ curl http://localhost:8080/will/it/blend?
Hello, world!
This shows that we can download a fully functioning piece of software from
docker hub, cache the image locally, and execute the Docker image’s run
command. Even if we didn’t install a single tool for ASP.NET Core or
configure our workspace, we could still use this Docker image to launch our