Automobile training 43 engine hood door
Bạn đang xem bản rút gọn của tài liệu. Xem và tải ngay bản đầy đủ của tài liệu tại đây (15.26 MB, 153 trang )
ED–1
ENGINE HOOD / DOOR – HOOD (for Sedan)
HOOD (for Sedan)
ADJUSTMENT
Centering Bolt
Standard Bolt
B104980E01
HINT:
• Centering bolts are used to mount the hood hinge and
hood lock. The hood and hood lock cannot be adjusted
with the centering bolts on. Substitute standard bolts (with
washers) for the centering bolts when making
adjustments.
• For bolts without torque specifications, check the standard
bolt chart (see page SS-2).
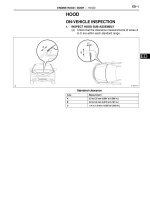
1.
INSPECT HOOD
(a) Check that the clearance measurements are within
the standard ranges.
A
B
C
ED
B140679E01
Standard
Area
Measurement
Area
Measurement
A
2.35 to 6.35 mm
(0.092 to 0.250 in.)
C
2.0 to 5.0 mm
(0.079 to 0.197 in.)
B
-2 to 2 mm
(-0.079 to 0.079 in.)
-
-
ED–2
ENGINE HOOD / DOOR – HOOD (for Sedan)
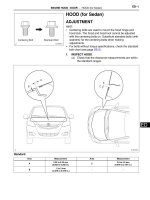
2.
ADJUST HOOD
(a) Loosen the hood side hinge bolts.
(b) Move the hood to adjust the clearance to within the
standard range.
(c) Tighten the hood side hinge bolts after the
adjustment.
Torque: 13 N*m (133 kgf*cm, 10 ft.*lbf)
B136202
(d) Adjust the height of the hood front end by turning
the cushion rubber.
HINT:
The cushion rubber can be raised and lowered by
turning it.
B136203
(e) Adjust the hood lock.
(1) Loosen the 3 bolts.
(2) Adjust the hood lock position so that the striker
can enter it smoothly.
(3) Tighten the 3 bolts after the adjustment.
Torque: 7.5 N*m (76 kgf*cm, 66 in.*lbf)
B136204
ED
ED–3
ENGINE HOOD / DOOR – HOOD (for Hatchback)
HOOD (for Hatchback)
ADJUSTMENT
Centering Bolt
Standard Bolt
B104980E01
HINT:
• Centering bolts are used to mount the hood hinge and
hood lock. The hood and hood lock cannot be adjusted
with the centering bolts on. Substitute standard bolts (with
washers) for the centering bolts when making
adjustments.
• For bolts without torque specifications, check the standard
bolt chart.
1.
INSPECT HOOD
(a) Check that the clearance measurements are within
the standard ranges.
K
C
H
D
J
I
E
F
ED
G
A
B
B118065E01
Standard
Area
Measurement
Area
Measurement
A
1.7 to 5.7 mm
(0.067 to 0.224 in.)
G
-1.55 to 2.45 mm
(-0.061 to 0.096 in.)
B
-2 to 2 mm
(-0.079 to 0.079 in.)
H
1.75 to 5.75 mm
(0.067 to 0.226 in.)
C
4.45 to 10.45 mm
(0.175 to 0.411 in.)
I
-1.25 to 2.75 mm
(-0.049 to 0.108 in.)
D
-0.95 to 5.05 mm
(-0.037 to 0.199 in.)
J
-1.5 to 1.5 mm
(-0.059 to 0.059 in.)
E
7.55 to 13.55 mm
(0.297 to 0.533 in.)
K
2.0 to 5.0 mm
(0.079 to 0.197 in.)
ED–4
ENGINE HOOD / DOOR – HOOD (for Hatchback)
Area
Measurement
Area
Measurement
F
1.65 to 5.65 mm
(0.065 to 0.222 in.)
-
-
2.
ADJUST HOOD
(a) Loosen the hood side hinge bolts.
(b) Move the hood to adjust the clearance to within the
standard range.
(c) Tighten the hood side hinge bolts after the
adjustment.
Torque: 13 N*m (133 kgf*cm, 10 ft.*lbf)
B106963
(d) Adjust the height of the hood front end by turning
the cushion rubber.
HINT:
The cushion rubber can be raised and lowered by
turning it.
B106965
(e) Adjust the hood lock.
(1) Loosen the 3 bolts.
(2) Adjust the hood lock position so that the striker
can enter it smoothly.
(3) Tighten the 3 bolts after the adjustment.
Torque: 7.5 N*m (76 kgf*cm, 66 in.*lbf)
ED
B106964
ED–5
ENGINE HOOD / DOOR – FRONT DOOR (for Sedan)
FRONT DOOR (for Sedan)
ENGINE HOOD / DOOR
BODY
COMPONENTS
w/ Power Window:
for Front Passenger Side:
FRONT ARMREST
BASE UPPER PANEL
DOOR CONTROL
SWITCH
POWER WINDOW
REGULATOR SWITCH
ASSEMBLY
FRONT NO.1
SPEAKER
ASSEMBLY
RIVET
FRONT DOOR GLASS
WEATHERSTRIP INNER
FRONT DOOR
INSIDE HANDLE
SUB-ASSEMBLY
FRONT DOOR LOWER
FRAME BRACKET GARNISH
ED
CLIP
FRONT DOOR TRIM
BOARD SUB-ASSEMBLY
for Driver Side:
w/o Power Mirror:
FRONT
ARMREST
BASE UPPER
PANEL
POWER WINDOW
REGULATOR MASTER
SWITCH ASSEMBLY
FRONT DOOR
LOWER FRAME
BRACKET
GARNISH
x3
Non-reusable part
B141922E01
ED–6
ENGINE HOOD / DOOR – FRONT DOOR (for Sedan)
w/o Power Window:
FRONT ARMREST BASE
UPPER PANEL
w/ Power Door Lock:
DOOR CONTROL
SWITCH
FRONT NO.1
SPEAKER
ASSEMBLY
RIVET
FRONT DOOR GLASS
WEATHERSTRIP INNER
FRONT DOOR LOWER
FRAME BRACKET GARNISH
ED
CLIP
FRONT DOOR
INSIDE HANDLE
SUB-ASSEMBLY
FRONT DOOR TRIM
BOARD SUB-ASSEMBLY
w/o Power Window:
FRONT DOOR
WINDOW REGULATOR
HANDLE ASSEMBLY
FRONT DOOR LOWER
FRAME BRACKET GARNISH
Non-reusable part
B141923E01
ED–7
ENGINE HOOD / DOOR – FRONT DOOR (for Sedan)
FRONT DOOR
BELT MOULDING
FRONT DOOR
TRIM BRACKET
FRONT DOOR
GLASS RUN
w/ Power Mirror:
OUTER REAR
VIEW MIRROR
CLIP
w/o Power Mirror:
CLIP
OUTER REAR
VIEW MIRROR
FRONT DOOR
WEATHERSTRIP
8.0 (82, 71 in.*lbf)
x3
5.5 (56, 49 in.*lbf)
FRONT DOOR
CHECK ASSEMBLY
w/ Power Window:
30 (306, 22)
FRONT DOOR GLASS SUB-ASSEMBLY
FRONT DOOR
WINDOW REGULATOR
SUB-ASSEMBLY
w/o Power Window:
8.0 (82, 71 in.*lbf)
x2
x3
5.4 (55, 48 in.*lbf)
ED
x2
8.0 (82, 71 in.*lbf)
x2
x4
8.0 (82, 71 in.*lbf)
POWER WINDOW
REGULATOR MOTOR
ASSEMBLY FRONT
8.0 (82, 71 in.*lbf)
N*m (kgf*cm, ft*lbf) : Specified torque
Non-reusable part
x2
x3
8.0 (82, 71 in.*lbf)
FRONT DOOR
WINDOW
REGULATOR
SUBASSEMBLY
FRONT DOOR SERVICE
HOLE COVER
B141924E01
ED–8
ENGINE HOOD / DOOR – FRONT DOOR (for Sedan)
FRONT DOOR
OUTSIDE HANDLE
ASSEMBLY
FRONT DOOR OUTSIDE
HANDLE COVER
FRONT DOOR LOCK
REMOTE CONTROL
CABLE ASSEMBLY
FRONT DOOR OUTSIDE
HANDLE PAD REAR
FRONT DOOR
OUTSIDE HANDLE
PAD FRONT
5.0 (51, 44 in.*lbf)
FRONT DOOR
OUTSIDE
HANDLE FRAME
SUB-ASSEMBLY
x3
FRONT DOOR
LOCK
DOOR LOCK WIRE
HARNESS SEAL
FRONT DOOR INSIDE LOCKING
CABLE ASSEMBLY
FRONT DOOR
FRAME SUBASSEMBLY REAR
LOWER
DOOR OUTSIDE
HANDLE PROTECTOR
FRONT DOOR FRAME
SUB-ASSEMBLY
FRONT LOWER
6.2 (63, 54 in.*lbf)
6.2 (63, 54 in.*lbf)
HOLE PLUG
ED
x2
CUSHION
8.0 (82, 71 in.*lbf)
FRONT DOOR STIFFENER
CUSHION
N*m (kgf*cm, ft.*lbf) : Specified torque
Non-reusable part
B136201E01
ENGINE HOOD / DOOR – FRONT DOOR (for Sedan)
ED–9
DISASSEMBLY
HINT:
• Use the same procedure for both the RH and LH sides.
• The procedure described below is for the LH side.
1.
DISCONNECT CABLE FROM NEGATIVE BATTERY
TERMINAL
2.
REMOVE FRONT DOOR WINDOW REGULATOR
HANDLE ASSEMBLY (w/o Power Window)
(a) Insert a clip remover between the plate and door
trim.
(b) Turn the handle with the clip remover inserted, as
shown in the illustration.
(c) Remove the front door window regulator handle and
clip.
(d) Remove the window regulator handle plate.
3.
REMOVE FRONT DOOR LOWER FRAME BRACKET
GARNISH
(a) Disengage the claw and clip and remove the front
door lower frame bracket garnish.
B136189
w/ Power Mirror:
w/o Power Mirror:
ED
B136157E01
4.
B136158
REMOVE FRONT ARMREST BASE UPPER PANEL
(a) for Driver side with power window:
(1) Remove the screw.
(2) Disengage the 7 claws and 2 clips and remove
the front armrest base upper panel.
(3) Disconnect the connector.
ED–10
ENGINE HOOD / DOOR – FRONT DOOR (for Sedan)
(b) for Front passenger side with power window:
(1) Remove the screw.
(2) Disengage the 7 claws and 2 clips and remove
the front armrest base upper panel.
(3) Disconnect the connector.
B141925
(c) w/o Power window:
(1) Remove the screw.
(2) Disengage the 5 claws and 2 clips and remove
the front armrest base upper panel.
B141926
5.
REMOVE POWER WINDOW REGULATOR MASTER
SWITCH ASSEMBLY (w/ Power Window)
(a) Remove the 3 screws and the power window
regulator master switch.
6.
REMOVE POWER WINDOW REGULATOR SWITCH
ASSEMBLY (w/ Power Window)
(a) Using a screwdriver with its tip wrapped in
protective tape, disengage the 2 claws and remove
the power window regulator switch.
7.
REMOVE DOOR CONTROL SWITCH (w/ Power Door
Lock)
(a) Using a screwdriver with its tip wrapped in
protective tape, disengage the 2 claws and remove
the door control switch.
B136183
ED
B141906
B141927
ENGINE HOOD / DOOR – FRONT DOOR (for Sedan)
8.
ED–11
REMOVE FRONT DOOR TRIM BOARD SUBASSEMBLY
(a) w/ Power window:
(1) Remove the screw.
B136159
(2) Disengage the 9 clips.
B136160
(3) Disconnect the front door lock remote control
cable and front door inside locking cable and
remove the front door trim board.
B136161
(b) w/o Power window:
(1) Remove the screw.
B136193
(2) Disengage the 9 clips.
B136192
ED
ED–12
ENGINE HOOD / DOOR – FRONT DOOR (for Sedan)
(3) Disconnect the front door lock remote control
cable and front door inside locking cable and
remove the front door trim board.
B136194
9.
REMOVE FRONT DOOR INSIDE HANDLE SUBASSEMBLY
(a) Using a screwdriver with its tip wrapped in
protective tape, disengage the 4 claws and remove
the front door inside handle.
10. REMOVE FRONT DOOR GLASS WEATHERSTRIP
INNER
(a) Remove the front door glass weatherstrip inner from
the front door trim board.
B136188
11. REMOVE FRONT NO.1 SPEAKER ASSEMBLY (See
page AV-164)
12. REMOVE OUTER REAR VIEW MIRROR (See page MI8)
13. REMOVE FRONT DOOR BELT MOULDING (See page
ET-85)
14. REMOVE FRONT DOOR TRIM BRACKET
(a) Remove the 2 screws and front door trim bracket.
ED
B136164
15. REMOVE FRONT DOOR SERVICE HOLE COVER
(a) Disconnect the connectors and clamps, then
remove the front door service hole cover.
NOTICE:
Remove any tape remaining on the door side.
B136163
16. REMOVE FRONT DOOR GLASS SUB-ASSEMBLY
(a) w/ Power window:
(1) Driver side:
Provisionally install the power window regulator
master switch.
(2) Passenger side:
Provisionally install the power window regulator
switch.
ENGINE HOOD / DOOR – FRONT DOOR (for Sedan)
ED–13
(b) w/o Power window:
(1) Provisionally install the front door window
regulator handle.
(c) Move the front door glass until the 2 bolts can be
seen through the service holes.
(d) Remove the 2 bolts.
NOTICE:
Do not drop or damage the front door glass
when removing the bolts.
B136165
B136166
A
B136167E01
A
B136195E01
(e) Remove the front door glass in the direction
indicated by the arrows in the illustration.
NOTICE:
Do not damage the glass.
(f) w/ Power window:
(1) Driver side:
Remove the power window regulator master
switch.
(2) Passenger side:
Remove the power window regulator switch.
(g) w/o Power window:
(1) Remove the front door window regulator
handle.
17. REMOVE FRONT DOOR WINDOW REGULATOR
SUB-ASSEMBLY
(a) w/ Power window:
(1) Disconnect the connector.
(2) Loosen bolt A.
(3) Remove the 5 bolts, then remove the front door
window regulator.
NOTICE:
Do not drop or damage the window
regulator when removing the bolts.
HINT:
Remove the window regulator through the
service hole.
(b) w/o Power window:
(1) Loosen bolt A.
(2) Remove the 5 bolts, then remove the front door
window regulator.
NOTICE:
Do not drop or damage the window
regulator when removing the bolts.
HINT:
Remove the window regulator through the
service hole.
ED
ED–14
ENGINE HOOD / DOOR – FRONT DOOR (for Sedan)
18. REMOVE POWER WINDOW REGULATOR MOTOR
ASSEMBLY FRONT (w/ Power Window)
(a) Using "Torx" socket wrench T25, remove the 3
screws and power window regulator motor.
B127213
19. REMOVE FRONT DOOR GLASS RUN
(a) Disengage the clip, then remove the front door glass
run.
B136168
B136170
ED
B136171
20. REMOVE FRONT DOOR FRAME SUB-ASSEMBLY
REAR LOWER
(a) Remove the bolt, then remove the front door frame
sub-assembly rear lower.
NOTICE:
Do not drop or damage the front door frame
sub-assembly rear lower when removing the
bolt.
HINT:
Remove the front door frame sub-assembly rear
lower through the service hole.
21. REMOVE FRONT DOOR FRAME SUB-ASSEMBLY
FRONT LOWER
(a) Remove the bolt, then remove the front door frame
sub-assembly front lower.
NOTICE:
Do not drop or damage the front door frame
sub-assembly front lower when removing the
bolts.
HINT:
Remove the front door frame sub-assembly front
lower through the service hole.
ENGINE HOOD / DOOR – FRONT DOOR (for Sedan)
ED–15
22. REMOVE FRONT DOOR OUTSIDE HANDLE COVER
(a) Remove the hole plug.
(b) Using "Torx" socket wrench T30, loosen the screw
and remove the cover with the door lock key
cylinder installed.
B136172
B136169
23. REMOVE FRONT DOOR LOCK
(a) Using "Torx" socket wrench T30, remove the 3
screws.
(b) Move the front door lock downward, remove the
outside handle frame link and remove the front door
lock.
NOTICE:
Do not drop or damage the front door lock when
removing the screws.
HINT:
Remove the front door lock through the service
hole.
(c) Open the cover.
B121552
(d) Disconnect the front door lock remote control cable
and front door inside locking cable.
(e) Remove the door lock wire harness seal.
B121553
ED
ED–16
ENGINE HOOD / DOOR – FRONT DOOR (for Sedan)
24. REMOVE FRONT DOOR OUTSIDE HANDLE
ASSEMBLY
(a) Remove the handle by sliding and pulling it in the
direction indicated by the arrow mark in the
illustration.
B136173
25. REMOVE FRONT DOOR OUTSIDE HANDLE PAD
REAR
(a) Disengage the 2 claws and remove the front door
outside handle pad rear.
B136175
26. REMOVE FRONT DOOR OUTSIDE HANDLE PAD
FRONT
(a) Disengage the 2 claws and remove the front door
outside handle pad front.
B136176
27. REMOVE FRONT DOOR OUTSIDE HANDLE FRAME
SUB-ASSEMBLY
(a) Using "Torx" socket wrench T30, loosen the screw.
(b) Slide the front outside handle frame to remove it.
ED
B136177
28. REMOVE DOOR OUTSIDE HANDLE PROTECTOR
(a) Slide the door outside handle protector to remove it.
B136184
ENGINE HOOD / DOOR – FRONT DOOR (for Sedan)
ED–17
29. REMOVE FRONT DOOR CHECK ASSEMBLY
(a) Remove the 3 bolts, then remove the front door
check.
NOTICE:
Do not drop or damage the door check when
removing the bolts.
HINT:
Remove the door check through the service hole.
B136180
30. REMOVE FRONT DOOR WEATHERSTRIP
(a) Disengage the 35 clips and remove the front door
weatherstrip.
NOTICE:
Remove any tape remaining on the door side.
B136181
31. REMOVE FRONT DOOR STIFFENER CUSHION
(a) Remove the bolt and front door stiffener cushion.
B136190
32. REMOVE CUSHION
(a) Remove the 2 cushions from the door panel.
B136182
ED
ED–18
ENGINE HOOD / DOOR – FRONT DOOR (for Sedan)
ADJUSTMENT
Centering Bolt
Standard Bolt
B104980E01
HINT:
• Before adjusting the door position on vehicles equipped
with side airbags and curtain shield airbags, be sure to
disconnect the battery. After the adjustment, inspect the
SRS warning light, the side airbag system and the curtain
shield airbag system for normal operation. Then initialize
both airbag systems.
• Use the same procedure for the RH and LH sides.
• The procedures described below are for the LH side.
• Centering bolts are used to mount the door hinge onto the
vehicle body and door. The door cannot be adjusted with
the centering bolts on. Substitute standard bolts (with
washers) for the centering bolts when making
adjustments.
• For bolts without torque specifications, check the standard
bolt chart (see page SS-2).
1.
INSPECT FRONT DOOR
(a) Check that the clearance measurements are within
the standard ranges.
C
D
E
F
ED
A
B
G
B140680E01
Standard
Area
Measurement
Area
Measurement
A
2.5 to 5.5 mm
(0.098 to 0.217 in.)
E
3.3 to 6.3 mm
(0.130 to 0.248 in.)
B
-1.5 to 1.5 mm
(-0.059 to 0.059 in.)
F
-1.5 to 1.5 mm
(-0.059 to 0.059 in.)
ED–19
ENGINE HOOD / DOOR – FRONT DOOR (for Sedan)
Area
Measurement
Area
Measurement
C
3.2 to 6.2 mm
(0.126 to 0.244 in.)
G
4.2 to 7.2 mm
(0.165 to 0.283 in.)
D
1.3 to 4.3 mm
(0.051 to 0.169 in.)
-
-
2.
ADJUST FRONT DOOR
(a) Disconnect the cable from the negative battery
terminal.
Wait for at least 90 seconds after disconnecting the
cable to prevent the airbag from working.
(b) Using SST, adjust the door horizontally and
vertically by loosening the body side hinge bolts.
SST 09812-00010
(c) Tighten the body side hinge bolts after the
adjustment.
Torque: 26 N*m (265 kgf*cm, 19 ft.*lbf)
B140683
(d) Adjust the door horizontally and vertically by
loosening the door side hinge bolts.
(e) Tighten the door side hinge bolts after the
adjustment.
Torque: 26 N*m (265 kgf*cm, 19 ft.*lbf)
B140684
(f)
Using "Torx" socket wrench T40, adjust the striker
position by slightly loosening the striker mounting
screws and hitting the striker with a plastic-faced
hammer.
(g) Using "Torx" socket wrench T40, tighten the striker
mounting screws after the adjustment.
Torque: 23 N*m (235 kgf*cm, 17 ft.*lbf)
(h) Connect the cable to the negative battery terminal.
Torque: 5.4 N*m (55 kgf*cm, 48 in.*lbf)
B106966
REASSEMBLY
1.
B136182
INSTALL CUSHION
(a) Install the 2 cushions onto the door panel.
ED
ED–20
ENGINE HOOD / DOOR – FRONT DOOR (for Sedan)
2.
INSTALL FRONT DOOR STIFFENER CUSHION
(a) Install the front door stiffener cushion with the bolt.
Torque: 8.0 N*m (82 kgf*cm, 71 in.*lbf)
3.
INSTALL FRONT DOOR WEATHERSTRIP
(a) Engage the 35 clips and install the front door
weatherstrip.
4.
INSTALL FRONT DOOR CHECK ASSEMBLY
(a) Apply MP grease to the sliding areas of the door
check.
(b) Install the front door check onto the door panel with
the 2 bolts.
Torque: 5.5 N*m (56 kgf*cm, 49 in.*lbf)
(c) Apply adhesive to the threads of the bolt.
Adhesive:
Toyota Genuine Adhesive 1324, Three Bond
1324 or the equivalent.
(d) Install the front door check onto the body panel with
the bolt.
Torque: 30 N*m (306 kgf*cm, 22 ft.*lbf)
B136190
B136181
ED
B136180
ENGINE HOOD / DOOR – FRONT DOOR (for Sedan)
ED–21
5.
INSTALL DOOR OUTSIDE HANDLE PROTECTOR
(a) Slide the door outside handle protector to install it.
6.
INSTALL FRONT DOOR OUTSIDE HANDLE FRAME
SUB-ASSEMBLY
(a) Using "Torx" socket wrench T30, install the front
outside handle frame with the screw.
Torque: 4.0 N*m (41 kgf*cm, 35 in.*lbf)
7.
INSTALL FRONT DOOR OUTSIDE HANDLE PAD
FRONT
(a) Engage the 2 claws and install the front door outside
handle pad front.
8.
INSTALL FRONT DOOR OUTSIDE HANDLE PAD
REAR
(a) Engage the 2 claws and install the front door outside
handle pad rear.
B136185
B136178
B136176
B136175
9.
B136174
INSTALL FRONT DOOR OUTSIDE HANDLE
ASSEMBLY
(a) Pushing the front door outside handle in the
direction of the arrow mark shown in the illustration,
install the front door outside handle.
10. INSTALL FRONT DOOR LOCK
NOTICE:
• If reusing a door lock that has been removed,
replace the packing in the connecting part with
new.
ED
ED–22
ENGINE HOOD / DOOR – FRONT DOOR (for Sedan)
• Make sure that no grease or dirt adheres to the
packing surface in the connecting part.
(a) Apply MP grease to the sliding and rotating areas of
the front door lock.
(b) Connect the front door lock remote control cable
and front door inside locking cable.
B121553
(c) Close the cover.
B121552
(d) Insert the door lock open rod into the front door lock,
then set it to the door panel.
NOTICE:
Make sure that the outside handle link is
securely engaged with the door lock.
ED
B116845
(e) Apply adhesive to the threads of the screws.
Adhesive:
Toyota Genuine Adhesive 1324, Three Bond
1324 or the equivalent.
(f) Using "Torx" socket wrench T30, install the front
door lock with the 3 screws.
Torque: 5.0 N*m (51 kgf*cm, 44 in.*lbf)
B136169
ENGINE HOOD / DOOR – FRONT DOOR (for Sedan)
ED–23
11. INSTALL FRONT DOOR OUTSIDE HANDLE COVER
(a) Using "Torx" socket wrench T30, install the cover
with the door lock key cylinder.
Torque: 4.0 N*m (41 kgf*cm, 35 in.*lbf)
HINT:
Make sure that the door lock key cylinder rod is
inserted.
(b) Install the hole plug.
B136172
12. INSTALL FRONT DOOR FRAME SUB-ASSEMBLY
FRONT LOWER
(a) Install the front door frame sub-assembly front lower
with the bolt.
Torque: 6.2 N*m (63 kgf*cm, 54 in.*lbf)
B136171
13. INSTALL FRONT DOOR FRAME SUB-ASSEMBLY
REAR LOWER
(a) Install the front door frame sub-assembly rear lower
with the bolt.
Torque: 6.2 N*m (63 kgf*cm, 54 in.*lbf)
B136170
14. INSTALL FRONT DOOR GLASS RUN
(a) Install the front door glass run, then engage the clip.
B136168
15. INSTALL POWER WINDOW REGULATOR MOTOR
ASSEMBLY FRONT (w/ Power Window)
(a) Apply MP grease to the sliding and rotating areas of
the regulator motor.
(b) Using "Torx" socket wrench T25, install the power
window regulator motor assembly front with the 3
screws.
Torque: 5.4 N*m (55 kgf*cm, 48 in.*lbf)
B127213
ED
ED–24
ENGINE HOOD / DOOR – FRONT DOOR (for Sedan)
16. INSTALL FRONT DOOR WINDOW REGULATOR SUBASSEMBLY
(a) Apply MP grease to the sliding and rotating areas of
the front door window regulator.
NOTICE:
Do not apply grease to the window regulator
spring.
A
B136167E01
A
B136195E01
ED
(b) w/ Power window:
(1) Loosely screw bolt A onto the front door
window regulator.
(2) Insert the front door window regulator into the
door panel. Use bolt A to hang the front door
window regulator on the door panel.
NOTICE:
Do not drop the window regulator as it may
be damaged.
(3) Install the front door window regulator with the
5 bolts, and tighten bolt A.
Torque: 8.0 N*m (82 kgf*cm, 71 in.*lbf)
(4) Connect the connector.
(c) w/o Power window:
(1) Loosely screw bolt A onto the front door
window regulator.
(2) Insert the front door window regulator into the
door panel. Use bolt A to hang the front door
window regulator on the door panel.
NOTICE:
Do not drop the window regulator as it may
be damaged.
(3) Install the front door window regulator with the
5 bolts, and tighten bolt A.
Torque: 8.0 N*m (82 kgf*cm, 71 in.*lbf)
(4) Connect the connector.
17. INSTALL FRONT DOOR GLASS SUB-ASSEMBLY
(a) Insert the door glass into the door panel along the
glass run as indicated by the arrows in the
illustration.
NOTICE:
Do not damage the glass.
B136186
ED–25
ENGINE HOOD / DOOR – FRONT DOOR (for Sedan)
(b) Install the front door glass onto the front door
window regulator with the 2 bolts.
Torque: 8.0 N*m (82 kgf*cm, 71 in.*lbf)
B136165
18. INSTALL FRONT DOOR SERVICE HOLE COVER
(a) Apply butyl tape to the door panel, then install a new
front door service hole cover as shown in the
illustration.
Adhesive:
Part No. 08850-00065, Butyl Tape Set or the
equivalent
Specification
B
A
B136187E01
Area
Dimension
A
2.0 mm (0.079 in.) or more
B
6.0 mm (0.236 in.) or more
HINT:
• When installing the service hole cover, pull the
links and connectors out through the service
hole.
• There should be no wrinkles or folds after
attaching the service hole cover.
• After attaching the service hole cover, check the
quality of the seal.
19. INSTALL FRONT DOOR TRIM BRACKET
(a) Install the front door trim bracket with the 2 screws.
20. INSTALL FRONT DOOR BELT MOULDING (See page
ET-86)
21. INSTALL OUTER REAR VIEW MIRROR (See page MI11)
22. INSTALL FRONT NO.1 SPEAKER ASSEMBLY (See
page AV-160)
B136164
23. INSTALL FRONT DOOR GLASS WEATHERSTRIP
INNER
(a) Install the front door glass weatherstrip inner onto
the front door trim board.
ED