Practical Arduino Cool Projects for Open Source Hardware- P38 pot
Bạn đang xem bản rút gọn của tài liệu. Xem và tải ngay bản đầy đủ của tài liệu tại đây (125.44 KB, 10 trang )
CHAPTER 15 VEHICLE TELEMETRY PLATFORM
if(millis() - lastLogWrite > LOG_INTERVAL)
{
The blue LED indicating that a sample is being written is illuminated, and the position counter for
the log buffer is reset.
digitalWrite(VDIP_WRITE_LED, HIGH);
byte position = 0;
The log entry length and the entry itself are sent to the host for debugging purposes.
HOST.print(logEntry.length());
HOST.print(": ");
HOST.println(logEntry);
Now for the interesting bit. A WRF (WRite File) command is sent to the VDIP1 with a single
argument that tells it the number of bytes of data to follow in the actual message. Because each log entry
will have a newline character appended, we have to take the current logEntry length and add 1 to it to get
the actual message length.
Note that before doing this, the VDIP1 needs to be initialized, and that process is taken care of by a
function that we’ll see in just a moment.
VDIP.print("WRF ");
VDIP.print(logEntry.length() + 1);
VDIP.print(13, BYTE);
The position counter is used to walk through the log buffer array one character at a time to send it to
the VDIP1. However, the RTS (ready to send) pin on the VDIP1 is checked prior to transmission of each
character to make sure the VDIP1 input buffer still has free space. If RTS is low (inactive) it’s clear to
send the character and increment the position counter. Otherwise it shouts loudly to the host to notify
you that the VDIP1 buffer was full. In production, you probably wouldn’t want the error message being
sent to the host, but it can be handy when doing development.
while(position < logEntry.length())
{
if(digitalRead(VDIP_RTS_PIN) == LOW)
{
VDIP.print(vdipBuffer[position]);
position++;
} else {
HOST.println("BUFFER FULL");
}
}
After sending a WRF command to the VDIP1, it will keep accepting data until it has received exactly
the number of bytes specified in the WRF argument. The number passed in was one greater than the
number of bytes in the buffer, so if nothing else was sent, the Vinculum chip on the VDIP1 would sit
patiently waiting for the next character. If a mistake is made calculating the number of bytes to be sent,
it’s easy to end up in a situation where you send one byte too few and the Vinculum doesn’t finish
reading. Then, your program continues on around the loop and comes back to send more data to the
VDIP1 on the next pass through. It then starts sending the WRF command, but because the Vinculum
never exited write mode last time around, it sees the “W” character as the final character of the last write,
then interprets “RF” is the start of another command. RF is meaningless to it so it will then output an
error and you’ll end up with the original entry written to the file with a trailing W and nothing written for
the second pass at all.
So the moral of the story is to always, always, always check your message length very carefully when
preparing data to send to the Vinculum chip. If you send fewer characters than it is expecting, it will
remain in write mode waiting for more data; if you send too many characters, it will treat the excess as
separate commands. If you’re really unlucky, those excess characters could constitute a command to
perform a dangerous action such as deleting a file!
349
CHAPTER 15 VEHICLE TELEMETRY PLATFORM
Something that could be done to minimize the risk is to send the characters one at a time and
implement a check to look for the prompt response that the Vinculum will send when it finishes writing
to the file. If the prompt comes back unexpectedly, it’s better to skip sending the rest of the buffer rather
than to keep sending data. If the prompt doesn’t come back after all the characters have been sent, the
message could be padded by sending spaces until the prompt returns.
In this case, though, we’re just carefully counting characters including the trailing newline, so the
program then sends the newline character and turns off the LED that indicates a write is in progress. It
then sets the lastLogWrite variable to the number of milliseconds since startup so next time through the
loop it can check whether it’s due to record another log entry.
VDIP.print(13, BYTE);
digitalWrite(VDIP_WRITE_LED, LOW);
lastLogWrite = millis();
}
}
Way back in setup(), we looked at pin change interrupts and the way changes to the menu button
states cause an ISR to be invoked. This is the definition of that ISR, and you can see that it uses an #ifdef
check to substitute a different version of the function, depending on whether this is a Mega or non-Mega
build.
The Mega version is attached to PCINT2, and the first thing it does is check whether it has been
more than 20 milliseconds since it was last invoked. If not, it’s probably a problem with the physical
switch bouncing open and closed rapidly as it settles, so it’s ignored. If it is greater than 20 milliseconds,
the buttonState global variable is updated with the value of the PINK register, which reads the value of all
the pins in port K. Analog inputs 7 through 13 on a Mega are all part of port K.
#ifdef MEGA
ISR(PCINT2_vect)
{
static unsigned long last_millis = 0;
unsigned long m = millis();
if (m - last_millis > 20)
{
buttonState |= ~PINK;
}
last_millis = m;
}
The non-Mega version does the same thing but with PCINT1, and reads from the port C register
using PINC.
#else
ISR(PCINT1_vect)
{
static unsigned long last_millis = 0;
unsigned long m = millis();
if (m - last_millis > 20)
{
buttonState |= ~PINC;
}
last_millis = m;
}
350
CHAPTER 15 VEHICLE TELEMETRY PLATFORM
#endif
Reading from the ELM327 is pretty much the core function of the OBDuinoMega sketch. Everything
else in the sketch is really just life support for a dozen or so lines of code in a function called elm_read()
that simply listens to the serial connection until it sees an “\r” character followed by a prompt,
indicating that the ELM327 has finished sending its message.
The function requires two arguments: a pointer to a character array for the response to be stored in,
and a byte indicating how many elements it’s allowed to put in that array.
It then defines variables to hold response values and the number of characters read so far.
byte elm_read(char *str, byte size)
{
int b;
byte i=0;
It loops reading from the serial port until it either sees a prompt character (in which case it knows it
got a complete response) or runs out of space in the array. It inserts each character into the array and
increments the position counter only if the character is a space character or greater, which is hex value
0x20 in the ASCII table. This excludes any control characters that could be sent through.
while((b=OBD2.read())!=PROMPT && i<size)
{
if(b>=' ')
str[i++]=b;
}
The two possible outcomes at this point are that the number of characters received is less than the
array length and therefore the program got a prompt, or that the number of characters reached the array
length and therefore the response was probably meaningless.
If the counter “i” is not equal to the array size, everything is probably okay, so the last character
entered into the array pointer (most likely a carriage return) needs to be replaced with a null character to
indicate the end of the string. The function then returns the prompt character to indicate success.
Otherwise, the program assumes the response was meaningless and returns the value 1, signified by
the DATA placeholder defined at the start of the sketch, to indicate that there is raw data in the buffer.
if(i!=size)
{
str[i]=NUL;
return PROMPT;
}
else
return DATA;
}
The response that comes back from the ELM327 is an ASCII string that represents a hexadecimal
number. It may look like hex but don’t be deceived—it’s not!
For example, if the ELM327 sends a response of 1AF8 to mean a decimal value of 6904, what we
actually receive from the serial port is the ASCII values that represent those individual characters: 0x31
to represent 1, 0x41 to represent A, 0x46 to represent F, and 0x38 to represent 8. This is not at all what we
wanted, and if you process the bytes literally, you’ll get an incorrect answer.
To make sense of the response value, the sketch really needs it as an actual numeric type rather than
a string, so the elm_compact_response() function accepts a raw ELM327 response and turns it into a real
hex value stored in a byte array.
Because the response from the ELM327 starts with an echo of the mode plus 0x40 and then the PID,
the sketch has to skip the first few bytes. For example, if the request 010C was sent, the response would
be something like “41 0C 1A F8,“ so the first byte we would actually care about would be the seventh
character. The end result that we want is the numeric value 0x1AF8 ready to send back to the calling
function.
351
CHAPTER 15 VEHICLE TELEMETRY PLATFORM
Note that the call to strtoul (string to unsigned long) passes in a third argument of 16, the base
required for the response. Base 16 is hexadecimal.
The return value from the function is simply the number of bytes in the converted value.
byte elm_compact_response(byte *buf, char *str)
{
byte i=0;
str+=6;
while(*str!=NUL)
buf[i++]=strtoul(str, &str, 16);
return i;
}
Initializing the serial connection to the ELM327 is quite straightforward. First, the serial port itself is
opened at the rate configured at the start of the sketch, then the serial buffer is flushed to ensure there’s
no stray data sitting in it.
void elm_init()
{
char str[STRLEN];
OBD2.begin(OBD2_BAUD_RATE);
OBD2.flush();
Just in case the ELM327 had already been powered up and had settings changed, it’s then sent a
soft-reset command.
elm_command(str, PSTR("ATWS\r"));
A message is then displayed on the LCD to show progress. If the first character back is an “A,” the
program assumes that it’s echoing the command and skips ahead to read the response from the fifth
character (position 4) onward. Otherwise, it simply displays the message as is.
lcd_gotoXY(0,1);
if(str[0]=='A')
lcd_print(str+4);
else
lcd_print(str);
lcd_print_P(PSTR(" Init"));
To get responses back from the ELM327 a little faster it’s a good idea to turn off command echo,
otherwise every response will be bloated with several bytes taken up just repeating the command we
sent to it. The ATE0 command suppresses command echo.
elm_command(str, PSTR("ATE0\r"));
The sketch then goes into a do-while loop trying to verify that the ELM327 is alive and
communicating by sending a request for PID 0X0100 (PIDs supported) repeatedly until it gets a
response. If you start up the system without putting it into debug mode or connecting it to an ELM327,
and it ends up sitting on a screen that reads “Init” forever; this is the loop it’s trapped in.
do
{
elm_command(str, PSTR("0100\r"));
delay(1000);
}
while(elm_check_response("0100", str)!=0);
When using the OBD-II interface to communicate with a vehicle’s internal communications bus,
there are typically multiple ECUs (electronic control units) sharing that bus. The primary ECU that
responds with OBD-II values is identified as ECU #1, and the ELM327 can either direct its requests
generally to all devices on the bus or it can direct them to a specific ECU.
352
CHAPTER 15 VEHICLE TELEMETRY PLATFORM
By default, the ELM327 shouts its requests to the world, but by modifying the communications
header that it sends to the car, it’s possible to make it specifically ask for the primary ECU.
This is done by setting a custom header that the ELM327 uses for messages sent to the car, but the
format of the header depends on what communications protocol it’s using. Because the ELM327 takes
care of all the protocol conversion behind the scenes, the sketch doesn’t generally need to know the
details of what’s going on, but to determine the car’s protocol it can send an ATDPN (ATtention:
Describe Protocol by Number) command to have the ELM327 report which protocol it has
autonegotiated with the car.
elm_command(str, PSTR("ATDPN\r"));
The OBDuinoMega sketch can then set a custom header specifying that all requests should go to
ECU #1 using the appropriate format for that particular protocol.
if(str[1]=='1') // PWM
elm_command(str, PSTR("ATSHE410F1\r"));
else if(str[1]=='2') // VPW
elm_command(str, PSTR("ATSHA810F1\r"));
else if(str[1]=='3') // ISO 9141
elm_command(str, PSTR("ATSH6810F1\r"));
else if(str[1]=='6') // CAN 11 bits
elm_command(str, PSTR("ATSH7E0\r"));
else if(str[1]=='7') // CAN 29 bits
elm_command(str, PSTR("ATSHDA10F1\r"));
}
All done. The ELM327 should now be running in a reasonably well optimized state, with no
command echo and all requests specifically directed to ECU #1.
The get_pid() function is called by the display() function to fetch values to display on the LCD, and
also in the main loop by the logging code to fetch values to write to the CSV file on the memory stick. The
majority of the code in this very long function is a massive switch statement that checks which PID is
being requested and then sources the result and processes it appropriately, putting the numeric value in
a long pointer and a version formatted for string output into a buffer. The return value of the function
indicates whether retrieval of the PID was successful or not, so a simple call to this function and then a
check of the response will give access to just about any information accessible by the Vehicle Telemetry
Platform.
The start of the function takes the requested PID and sets up some variables.
boolean get_pid(byte pid, char *retbuf, long *ret)
{
#ifdef ELM
char cmd_str[6]; // to send to ELM
char str[STRLEN]; // to receive from ELM
#else
byte cmd[2]; // to send the command
#endif
byte i;
byte buf[10]; // to receive the result
byte reslen;
char decs[16];
unsigned long time_now, delta_time;
static byte nbpid=0;
It then checks if the PID is supported by calling out to another function. If it is not supported, it puts
an error message in the return buffer and returns a FALSE value.
if(!is_pid_supported(pid, 0))
{
353
CHAPTER 15 VEHICLE TELEMETRY PLATFORM
sprintf_P(retbuf, PSTR("%02X N/A"), pid);
return false;
}
Way back at the start of the sketch, each PID was defined along with the number of bytes to expect
in response to each one. The sketch then reads the receive length value out of EEPROM by referencing
the memory position for that PID.
reslen=pgm_read_byte_near(pid_reslen+pid);
The request is then sent to the vehicle using one of two methods, depending on whether the system
was built using an ELM327 as in our prototype, or uses interface hardware specific to the particular car.
The ELM version formats the request by appending the PID to the mode then adding a carriage
return at the end, then sends it to the ELM327, and then waits for the response. The response value is
checked to make sure there’s no error value. If there is, “ERROR” is put in the return buffer and the
function bails out with a FALSE return value.
Assuming the response was good and the function didn’t bail out, it then proceeds by sending the
value off to be converted from an ASCII string to an actual numeric value using the
elm_compact_response() function previously defined.
#ifdef ELM
sprintf_P(cmd_str, PSTR("01%02X\r"), pid);
elm_write(cmd_str);
elm_read(str, STRLEN);
if(elm_check_response(cmd_str, str)!=0)
{
sprintf_P(retbuf, PSTR("ERROR"));
return false;
}
elm_compact_response(buf, str);
The non-ELM version follows almost exactly the same process, but rather than use calls to ELM
functions, it uses equivalent ISO functions.
#else
cmd[0]=0x01; // ISO cmd 1, get PID
cmd[1]=pid;
iso_write_data(cmd, 2);
if (!iso_read_data(buf, reslen))
{
sprintf_P(retbuf, PSTR("ERROR"));
return false;
}
#endif
By this point, the sketch has the raw result as a numeric value, but as explained previously most
PIDs require a formula to be applied to convert the raw bytes into meaningful values.
Because many PIDs use the formula (A * 256) + B, the sketch then calculates the result of that
formula no matter what the PID is. The result may be overwritten later if this particular PID is an
exception, but determining a default value first, even if it’s thrown away later, saves 40 bytes over
conditionally calculating it based on the PID. With the original MPGuino/OBDuino codebases designed
to squeeze into smaller ATMega CPUs, every byte counts.
*ret=buf[0]*256U+buf[1];
The rest of the function is a huge switch statement that applies the correct formula for the particular
PID being requested. We won’t show the whole statement here, but you’ll get the idea by looking at a few
examples.
The first check is whether the requested PID was the engine RPM. In debug mode it returns a hard-
coded value of 1726RPM, and otherwise it takes the return value and divides it by 4. The full formula for
354
CHAPTER 15 VEHICLE TELEMETRY PLATFORM
the engine RPM is ((A * 256) + B) / 4, but because the return value was already calculated, the first part of
the formula has already been applied and it just needs the division portion.
switch(pid)
{
case ENGINE_RPM:
#ifdef DEBUG
*ret=1726;
#else
*ret=*ret/4U;
#endif
sprintf_P(retbuf, PSTR("%ld RPM"), *ret);
break;
The Mass Air Flow parameter is similar: return a hard-coded value in debug mode, or take the
precalculated value and divide it by 100 as per the required formula.
case MAF_AIR_FLOW:
#ifdef DEBUG
*ret=2048;
#endif
long_to_dec_str(*ret, decs, 2);
sprintf_P(retbuf, PSTR("%s g/s"), decs);
break;
Vehicle speed is a trivial parameter, and then it gets to the fuel status parameter. Fuel status is a
bitmap value, so each bit in the response value is checked in turn by comparing it to a simple binary
progression (compared in the code using the hex equivalent value) and the matching label is then
returned. In the case of this particular parameter, it’s not really the numeric value that is useful, but the
label associated with it.
case FUEL_STATUS:
#ifdef DEBUG
*ret=0x0200;
#endif
if(buf[0]==0x01)
sprintf_P(retbuf, PSTR("OPENLOWT")); // Open due to insufficient engine temperature
else if(buf[0]==0x02)
sprintf_P(retbuf, PSTR("CLSEOXYS")); // Closed loop, using oxygen sensor feedback to
determine fuel mix. Should be almost always this
else if(buf[0]==0x04)
sprintf_P(retbuf, PSTR("OPENLOAD")); // Open loop due to engine load, can trigger
DFCO
else if(buf[0]==0x08)
sprintf_P(retbuf, PSTR("OPENFAIL")); // Open loop due to system failure
else if(buf[0]==0x10)
sprintf_P(retbuf, PSTR("CLSEBADF")); // Closed loop, using at least one oxygen sensor
but there is a fault in the feedback system
else
sprintf_P(retbuf, PSTR("%04lX"), *ret);
break;
A number of parameters require an identical formula of (A * 100) / 255, so they’re all applied in a
group.
case LOAD_VALUE:
case THROTTLE_POS:
case REL_THR_POS:
355
CHAPTER 15 VEHICLE TELEMETRY PLATFORM
case EGR:
case EGR_ERROR:
case FUEL_LEVEL:
case ABS_THR_POS_B:
case CMD_THR_ACTU:
#ifdef DEBUG
*ret=17;
#else
*ret=(buf[0]*100U)/255U;
#endif
sprintf_P(retbuf, PSTR("%ld %%"), *ret);
break;
The function continues in a similar way for the rest of the PIDs. If you want to see the details of how
a particular PID is processed, it’s best to look in the OBDuinoMega source code.
Other functions in the main file then provide features such as calculation of current (instant) fuel
consumption and the distance that could be traveled, using the fuel remaining in the tank.
Once on every pass through the main loop, a call is placed to the accu_trip() function to accumulate
data for the current trip by adding current values to trip values. Among other things, it increments the
duration of the trip in milliseconds; the distance traveled in centimeters (allowing a trip of up to
42,949km or 26,671mi because the distance is stored in an unsigned long); fuel consumed; and mass air
flow.
One particularly interesting value it accumulates is “fuel wasted,” which is the amount of fuel that
has been consumed while the engine was idling.
The display() function takes care of fetching the value associated with a specific PID and displaying
it at a nominated location on the LCD. Because the PIDs defined at the start of the sketch can be either
real (provided by the engine-management system) or fake (generated by the sketch internally or from
some other data source), this function explicitly checks for a number of PIDs that require data to be
returned by a specific function.
void display(byte location, byte pid)
char str[STRLEN];
if(pid==NO_DISPLAY)
return;
else if(pid==OUTING_COST)
get_cost(str, OUTING);
else if(pid==TRIP_COST)
get_cost(str, TRIP);
else if(pid==TANK_COST)
get_cost(str, TANK);
It goes on in a similar way for dozens of PIDs that it knows about specifically until it falls through to
the default behavior, which is to pass the request on to the get_pid() function we just saw.
else
get_pid(pid, str, &tempLong);
The function then sets a null string terminator into the result string at the LCD_split position, which
was calculated back at the start of the sketch as half the width of the LCD. This effectively truncates the
result at half the display width so that it can’t overwrite an adjacent value.
str[LCD_split] = '\0';
It then does some manipulation of the “location” argument that was passed in to determine which
row it goes on given that there are two locations per line, then checks if it’s an even number and should
therefore go on the left, and finally calculates the start and end character positions for that location.
byte row = location / 2; // Two PIDs per line
boolean isLeft = location % 2 == 0; // First PID per line is always left
356
CHAPTER 15 VEHICLE TELEMETRY PLATFORM
byte textPos = isLeft ? 0 : LCD_width - strlen(str);
byte clearStart = isLeft ? strlen(str) : LCD_split;
byte clearEnd = isLeft ? LCD_split : textPos;
It’s then just a matter of going to that location and printing the string to the LCD.
lcd_gotoXY(textPos,row);
lcd_print(str);
The last thing the function needs to do is get rid of any leading or trailing characters that might still
be visible on the LCD after the value was written. This can happen if the previously displayed value used
more characters than the current value, and because characters are only replaced if they are explicitly
written to, it’s necessary to write spaces into characters we don’t care about.
lcd_gotoXY(clearStart,row);
for (byte cleanup = clearStart; cleanup < clearEnd; cleanup++)
{
lcd_dataWrite(' ');
}
}
For maintenance purposes, one of the most important pieces of information available via OBD-II is
the response to mode 0x03, “Show diagnostic trouble codes.” It’s also one of the most complex because
of the variations in the type of data that it needs to return.
Mode 0x03 doesn’t contain any PIDs, so there’s no need to request anything but the mode itself, and
it always returns four bytes of data. A typical response could be as follows:
43 17 71 00 00 00 00
The “43” header is because it’s a response to a mode 0x03 request, and response headers always
start with the mode plus 0x40.
The rest of the message is three pairs of bytes, so this example would be read as 1771, 0000, and
0000. The zero value pairs are empty but are always returned anyway so that the response length is
consistent.
In this example, the only stored trouble code is 0x1771, so let’s look at how to convert it into
something meaningful and figure out what might have gone wrong with the car.
The first byte is 0x17 (or binary 00010111), which consists of two digits, 1 and 7. If we split that
binary value into two halves (nibbles) we end up with 0001 representing the first digit, 1, and 0111
representing the second digit, 7.
The first digit represents the DTC prefix that tells us what type of trouble code it is and whether its
meaning is standards-defined or manufacturer-defined. To complicate things a little more, the first digit
is in turn divided into two sets of bits, so we can’t just take it at face value.
In our example, the first digit is 1, or binary 0001. That needs to be split into a pair of two-bit
numbers, so in our case it will be 00 and 01. Each pair can have four possible values, with the first pair
representing the section of the car in which the problem occurred, and the second pair specifying
whether that DTC is defined by the SAE standards body or the manufacturer.
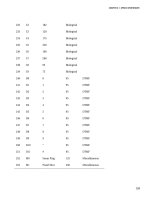
The four possible values for the first pair of bits are shown in Table 15-9.
357
CHAPTER 15 VEHICLE TELEMETRY PLATFORM
Table 15-9. DTC location codes
Binary Hex Code Meaning
00 0 P Powertrain code
01 1 C Chassis code
10 2 B Body code
11 3 U Network code
There are also four possible values for the second pair of bits, but unfortunately their meaning can
vary depending on the value of the first pair. These are given in Table 15-10.
Table 15-10. DTC definition source
Binary Hex Defined By
00 0 SAE
01 1 Manufacturer
10 2 SAE in P, manufacturer in C, B, and U
11 3 Jointly defined in P, reserved in C, B, and U
Because the meaning of the second value can vary based on the first value, the easiest way to
approach it is so create a big look-up table that maps all 16 possible values of the first four bits (the first
character in the response) to its specific meaning. These are given in Table 15-11.
Table 15-11. DTC location and definitions combined
Binary Hex Prefix Meaning
0000 0 P0 Powertrain, SAE-defined
0001 1 P1 Powertrain, manufacturer-defined
0010 2 P2 Powertrain, SAE-defined
0011 3 P3 Powertrain, jointly defined
0100 4 C0 Chassis, SAE-defined
358