LightWave 3D 8 Character Animation phần 4 docx
Bạn đang xem bản rút gọn của tài liệu. Xem và tải ngay bản đầy đủ của tài liệu tại đây (2.94 MB, 50 trang )
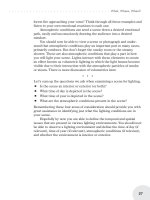
14. Enter 50 for Value 1. (We only need to worry about Value 1 for
point weighting; LightWave automatically assumes the value
to be a percent.)
15. Select RightCalf as the active weight map. (The red coloring
will disappear from the Weight Shade window because only
RightThigh has values assigned to its points right now;
RightCalf does not.)
140
Chapter 7: Point Weighting
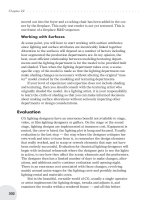
Figure 7.6. After pressing Enter in step 14, the surface surrounding the isoparm
defined by the points we have selected turns the shade of red corresponding to the
value of +50%.
16. Activate Set Map Value again, and enter 50 for Value 1.
17. Select the points that influence the isoparm directly above the
knee joint.
141
Chapter 7: Point Weighting
Figure 7.7. These points will now move with 50% of
their influence coming from RightThigh and 50%
coming from RightCalf.
Figure 7.8. These will be influenced 25% by
RightCalf and 75% by RightThigh.
18. With the RightCalf map still as the active weight map, activate
Set Map Value and enter 25 for Value 1.
19. Select RightThigh as the active weight map, and set Value 1
for these points to be 75.
142
Chapter 7: Point Weighting
Figure 7.9. RightCalf now has 25% influence over these points.
Figure 7.10. RightThigh now has 75% influence over these points.
20. Select the points that influence the next higher isoparm.
143
Chapter 7: Point Weighting
Figure 7.11. These points will be set to follow
RightThigh 100%.
21. Bring up Set Map Value again and enter 100 for these points.
22. Set the points of the next highest isoparm to a value of 75 for
RightThigh.
144
Chapter 7: Point Weighting
Figure 7.12. These points will now follow 100% of RightThigh’s motion.
Figure 7.13. These points will move 75% with RightThigh and 25% with Pelvis.
23. Select the Pelvis weight map (in the lower-right corner), and
set Value 1 for these points to 25.
145
Chapter 7: Point Weighting
Figure 7.14. These points will now move 25% with Pelvis.
Figure 7.15. Set the points of the isoparm just below the knee to move 25% with
RightThigh and 75% with RightCalf. (Two images are shown together for illustrative
purposes.)
24. Hide the foot so we can be sure to only select the points of the
pant leg.
146
Chapter 7: Point Weighting
Figure 7.16. Set the points of the next two lower isoparms and the points that make
up the top of the foot to move 100% with RightCalf.
Figure 7.17. Using this illustration as a guide, assign RightCalf weight maps for
these points.
Figure 7.18. Using this illustration as a guide, assign RightFoot weight maps for
these points.
25. Press \ to unhide everything in the model.
26. Rehide everything except the right foot.
This method is the basis for all point weighting. As you gain famil
-
iarity with this process, you will develop your own ways of working,
your own tricks and shortcuts. Where multiple bones exert multiple
influences, such as in the shoulder where a point may be affected by
Spine3, RightShoulder, and RightBicep, you simply visualize how
much influence each bone should have on the point and assign the
values accordingly.
147
Chapter 7: Point Weighting
Figure 7.19. Using this illustration as a guide, assign RightFoot weight maps for
these points.
Figure 7.20. Using this illustration as a guide, assign RightToes weight maps for
these points.
The values on each point must add up to 100%. If the combined
values on a point add up to less than 100%, it will get “left behind”
as you move the model. (The closer to 100% this cumulative value
is, the less noticeable the lag, until the character is moved signifi
-
cantly from its starting position. Be very watchful of these values.)
If you have the combined values on a given point add up to more
than 100%, that point may “leap ahead” of the motion described by
its controlling bone. (LightWave has a bit of a fix for values over
100%: activating Weight Normalization under the Bone Properties
panel of Layout. It is far better to be precise with your point weight
-
ing than to depend on software to fix it though.)
7.3 Swapping Models and Testing Weight
Mappings
The only way to really know if your point weighting is working is to
take it for a test spin in Layout. In this section, we’ll check out the
weighting we just did for the right leg. To do that, we’ve got to swap
out an old model for a new one. Using this technique, and having
common bone and weight map names, you’ll be able to use almost
every animation you do with almost every character you make!
148
Chapter 7: Point Weighting
Note:
Figure 7.21. LW[8] has a new Setup|Skelegons|Rotate Skelegons tool that lets
you test your weight mapping right in Modeler. This is exceptionally handy for
tweaking problem areas. However, putting your character onto his fully
functional rigging is the only way to truly know how his “skin” will behave
under animation conditions.
1. In Layout, load up the scene you created in the last chapter.
2. In a working directory set aside for Chapter 7, save a version
of this scene with a name that will make sense to you if you
come back to it years later. Something like “Scenes\Work\
ch07\ch_07_MappingTest_01_v001.lws” will do nicely.
3. In the Classic Scene Editor, make sure that your character
model’s visibility is set to at least Shaded Solid.
4. Press <f>, and type 10 to jump to Frame 10. (We’re going to
be playing with the controls on Frame 10, so we can check that
our character comes in properly on its “rest pose,” Frame 0.)
149
Chapter 7: Point Weighting
Note:
If, while you’re working, bending your model around, you
accidentally hit <r> (an easy thing to do), LW will record the
selected bone’s current position and rotation as its rest posi-
tion. If this happens, your model’s skin will be fouled for that
bone. To fix it, you need to go to the frame where the skeleton
is at rest and press <r> for the offending bone. So, once
again, just to drive a point well into the ground: You always
need to have a frame in your scene where your skeleton is at
rest. This can be at 0, –20, –100, or whatever. Just don’t get
caught putting the final touches on your masterwork scene
(which, because of being “in the groove,” wasn’t saved for
several hours) and accidentally tap the <r> key; otherwise
you’ll likely wind up exploring new and more creative combi
-
nations of expletives than you ever thought possible.
Note:
If you need to use mine, it can be found in Scenes\chapters\
ch_06.lws.
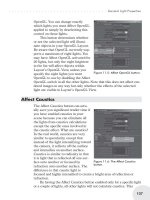
5. Select the RightFoot bone, and move it up and forward.
6. With the mesh (object) selected,
choose Items|Replace|
Replace With Object….
7. Select the latest revision of the
model you’ve been working on
in this chapter.
150
Chapter 7: Point Weighting
Figure 7.22. Moving the RightFoot up and forward. This scene is from the last
chapter, and in it we were using the model from Chapter 4. No points are
weighted, so nothing moves, yet.
Figure 7.23. Replacing the old
mesh with something newer.
151
Chapter 7: Point Weighting
Note:
If your new mesh isn’t doing quite what you think it
should be doing, double-check your mappings in
Modeler to make sure that no points are mapped that
shouldn’t be, and that all points that should have
mapping have correct values.
Figure 7.24. If everything is as it should be, your replacement mesh loads in with
the newly assigned weight maps for the right thigh, calf, foot, and toes. The
points of the right leg are now controlled by the bones of the right leg. (If not,
look to the following notes for troubleshooting information.)
152
Chapter 7: Point Weighting
Note:
If your mapping values are correct, and you’re still not getting the results you
expect, or if the model isn’t moving at all, you might need to check that bone
weight maps are properly assigned for each bone. When you convert
skelegons into bones, and you have already created weight maps (which we
did in Chapter 4, Section 4.6, Step 24), bone weight maps are automatically
assigned to the bone (skelegon) of the same name. If no weight maps exist on
the skelegons at the time you convert them into bones, no weight maps are
assigned. If this is the case, you have to assign each weight map to each bone
manually.
1. Select the root bone.
2. Press <p> to bring up the Bone
Properties window for Root.
3. Under Bone Weight Map, make
sure that the map Root is selected.
4. Press the Down Arrow to scroll
through all the bones and make sure
that Bone Weight Map matches Cur-
rent Bone for each bone.
Figure 7.25. The bone weight map
should match the current bone for
every bone in your model.
153
Chapter 7: Point Weighting
Advanced Note:
Another way to apply motion from one model to another is to use the Use Bones From
Object setting in the Bone Properties window. (This is a fantastic way of comparing two
ideas you might have for weighting a problem area, like the hips.)
All motion from the bones of ch_07_w03:Layer1 is applied to Thinguy_F. (This is an
excellent technique for rudimentary crowd scenes.)
Figure 7.26. A version of the character named Thinguy_F was loaded into the scene.
Under the Bone Properties window for Thinguy_F, I chose Ch_07_v006, the model I am
currently using to test point weighting. All SRT from all bones of Ch_07_v006 is applied
to Thinguy_F.
8. Using the RightFoot control (bone), stretch the character’s leg
out and rotate the foot in ways a foot would rotate.
And that’s all there is to point weighting! All the points in the model
are handled in the same way. Use your best judgment when assign
-
ing weights in Modeler, toggling between subpatches and polys,
then test your decisions in Layout, making changes where
necessary.
154
Chapter 7: Point Weighting
Figure 7.27. Rotating the RightToes as well,
watching the areas of the knee, ankle, and toes to
see if the point weighting looks believable for this
character. (Remember, we haven’t really blended
the weighting up into the hips, so we’re not
looking at that area yet.)
Note:
Here is where your own sense of artistry comes into
play. You have to judge. A balance of your own (or
your director’s) stylistic sensibilities and what you think
you’ll eventually need this character to do determines
how much the weighting needs finessing.
Note:
It isn’t necessary to cover all
possible ranges of movement,
just things that may be com
-
mon positions for this
character. If you need specific
poses that are distant from the
character’s normal range of
movement, you’ll need to
build special-case mod
-
els/point weightings to handle
unique instances where the
general-purpose setup breaks.
Point weighting is a logician’s dream. It is a process that follows
the pathways of reason and empiricism. There are no magic wands
or silver bullet solutions to point weighting. Thus far, I’ve yet to
find an “automatic” plug-in that can even give you a good base from
which to start. I find it much easier and quicker to just start from
scratch and proceed as we have done with the right leg. (Yoichiro’s
Mirror Weights plug-in—afreeplug-in available online at
— is something I do, however, recommend. It
can copy weights from one side of your model to the other and is a
real time-saver.)
The following is a list of the weight maps that need to be
assigned to the points of your model. All other weight maps (for
control bones that shouldn’t have any direct influence on the
model’s points) need to be left with their default influence of 0% on
the model’s points:
Pelvis, Spine1, Spine2, Spine3, Head, RightHand_Rot, Right-
Shoulder, LeftHand_Rot, LeftShoulder, RightFoot, RightToes,
LeftFoot, LeftToes, RightIndex_Base, RightIndex_Mid, Right-
Index_Tip, RightMiddle_Base, RightMiddle_Mid, RightMiddle_Tip,
RightPinky_Base, RightPinky_Mid, RightPinky_Tip, RightThumb_
Base, RightThumb_Mid, RightThumb_Tip, LeftIndex_Base, Left-
Index_Mid, LeftIndex_Tip, LeftMiddle_Base, LeftMiddle_Mid,
LeftMiddle_Tip, LeftPinky_Base, LeftPinky_Mid, LeftPinky_Tip,
LeftThumb_Base, LeftThumb_Mid, LeftThumb_Tip, RightBicep,
RightForearm, LeftBicep, LeftForearm, RightThigh, RightCalf,
LeftThigh, LeftCalf, Neck
155
Chapter 7: Point Weighting
Note:
Don’t use Map|General|Clear Map or Map|General|Delete Map to
remove a map’s influence from the vertices in the mesh. If you do, that
map will be removed entirely from the character. It will no longer be
there for Layout to associate with the bone of the same name. (Even
bones that have no direct influence on the character (like *Elbow) need
to still be associated with a map.) Having a bone associated with a “0%
influence” map (for this manner of setup) is the most efficient way to
keep it from exerting unwanted influence on the model’s points.
7.4 The Use Weight Map Only Option
There are many and differing views on whether or not to let
LightWave’s mathematical falloff for bones play a part in skinning.
Letting LightWave use its falloff to influence the points affected by
bones can indeed help quickly smooth problem areas, and can some
-
times give a point that doesn’t have its values add up to 100% that
extra oomph it needs to stay on track. My issue with using falloff is
that it is very difficult to control details where bones are close
together, as in the fingers. It can also make it very difficult to trou
-
bleshoot problem points with values less than 100%. Most
importantly, depending on falloff to clean up after you can make for
sloppy weighting habits. If you can make something work without
computer assistance, you really understand what you’re doing.
My general MO is that when given a choice to do something
right by hand or to depend on a computer system that might fall
short when you need it most, I always opt for the more controllable
of the two. (If the system needs adjusting under a deadline, you can
spend more time trying to find and fix a problem in which the com-
puter intervenes heavily than it would have taken to do it correctly
by hand to begin with.) You will have to decide for yourself which
works best for you. (If you are building animations for a video game,
chances are the game engine
won’t have the spare clock cycles
to calculate falloff, so you must
use the Use Weight Map Only
option.)
If this is your first time point
weighting, I’d strongly suggest
using the Use Weight Map Only
setting. With this option, there’s
nowhere to hide errors. When
you have a weighting that works,
you know you did it right.
156
Chapter 7: Point Weighting
Figure 7.28. Use Weight Map Only
and Weight Normalization.
Under Item Properties for all bones in your character, activate Use
Weight Map Only (if this is how you will be working).
7.5 Finding Stray Points
So now you’ve got all your points weighted, or at least you’re pretty
sure you do. You swap the model into Layout and, using the Sche-
matic window to select Root, RightFoot, and LeftFoot, you drag
your model a couple of meters –Z. You notice, as in Figure 7.29, that
some parts of the skin aren’t looking quite right.
157
Chapter 7: Point Weighting
Note:
When you activate Use Weight Map Only, Weight Normalization is
automatically checked as well. As much as I am against using a subrou
-
tine to cover for untidy weighting, I’d suggest leaving this active (unless,
of course, you are working on a video game, in which case you’ll have
to ask your core programmer how he has the game engine deal with
cumulative values greater than 100%).
Figure 7.29. The points that are “left behind” have
cumulative weighting values that don’t add up to
100%.
This is a technique for letting the model itself tell you where
the problem points are:
1. Switch to Modeler. (If you’re not running LightWave with the
Hub active so that Modeler and Layout can pass information
between each other, you’ll have to manually save and reload
the model where appropriate.)
2. From the Current Object pop-up button (to the left of the layer
buttons), make sure you have the mesh you are currently
working on in Layout selected. (For me, this would be
ch_07_w07.lwo.) See Figure 7.30.
3. With the mesh layer active, press Tab to convert subpatches
into polygons.
4. Switch back to Layout. With the Hub active, you should now
be looking at your scene with your character as a polygonal
mesh instead of subpatches. If this doesn’t happen, you may
have to save the object in Modeler, then reload in Layout to
update the changes.
158
Chapter 7: Point Weighting
Figure 7.30. The character’s mesh, in polygons.
5. Choose File|Save|Save Trans Object…. A dialog box will
come up, warning you to “Select a different filename for the
transformed object if you want to keep your original object
geometry.”
159
Chapter 7: Point Weighting
Note:
If Layout and Modeler seem
to not be passing information
back and forth properly
through the Hub, I’d suggest
saving a revision of your
scene, closing both Layout
and Modeler, and forcing the
Hub to quit as well. When
the Hub becomes unreliable,
Layout and/or Modeler are
often not far behind. Closing
everything, the Hub includ
-
ing, and reopening Layout
and Modeler is often the best
preventative against a nasty
crash.
Figure 7.31. The polygon version of our character
now in Layout.
Figure 7.32. Saving transformed geometry.
6. Name the transformed object BadPointFinder.lwo.
7. Switch back to Modeler and load BadPointFinder.lwo.
8. Copy the mesh and paste it into Layer 3 of your current work
-
ing model. (See Figure 7.33.)
160
Chapter 7: Point Weighting
Figure 7.33. With Layer 1 visible in the background, the mesh of BadPointFinder.lwo
points directly to the points that need weighting adjustments!
7.6 Straightening the Feet for Animation
I saved this part for last because while point weighting, I like to see
bones stretching from where their real-life socket would be to
where their real-life tip would be. The feet have a notable “L” shape
to them where the ankle is and where the toes connect. Because of
this, when we built the foot control bones, we built them at a bit of a
downward angle. This works great for getting a visual bearing on
point weighting, but in order to animate well, the foot control bones
have to be realigned to 0H, 0P, 0B.
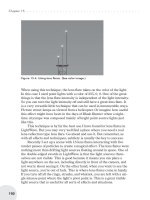
1. In Layout, make sure you are on Frame 0, that all parts of
Auto Key Create are active, and that Parent in Place is active.
2. Change one of your viewports to Right, and set its Rendering
Level to Bounding Box (so we can easily see through our
model to our bones).
3. Select RightToes.
161
Chapter 7: Point Weighting
Note:
Were we to leave the feet at this angle, it would be hard to
keep them flat on the floor when we rotated them in
worldspace H. Even using world coordinates, the feet dip a bit
as they rotate in H because LightWave uses parent coordi-
nates to store animation data, regardless of what coordinate
system we use to manipulate the controls.
4. In a Schematic view, Ctrl-click on the node representing the
object to (temporarily) reparent this bone to the model itself.
5. Select RightFoot, and activate Modify|Rotate|Rotate
Pivot.
162
Chapter 7: Point Weighting
Figure 7.34. The RightToes are now a child of the model itself. Because we have
Parent in Place active, they stay in place. (In addition to setting one view to Bounding
Box, I’ve also set one to Bone X-Ray to see the bones that would normally be hidden
by opaque geometry.)
6. Set the pivot rotation for RightFoot to 0H, 0P, 0B.
163
Chapter 7: Point Weighting
Figure 7.35. When you change the RightFoot’s
pivot rotation to 0, 0, 0, LightWave automatically
compensates by adjusting its rotation settings —
its orientation appears unchanged.
7. Press <y> to switch to Rotation mode, and set the rotation
for RightFoot to 0H, 0P, 0B.
164
Chapter 7: Point Weighting
Figure 7.36. Now, when the rotation of RightFoot
is set to 0, 0, 0, we see it “line-out” along the
Z-axis of the world.