LightWave 3D 8 1001 Tips & Tricks phần 9 potx
Bạn đang xem bản rút gọn của tài liệu. Xem và tải ngay bản đầy đủ của tài liệu tại đây (928.09 KB, 65 trang )
492 |
Chapter 10
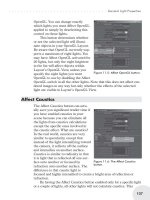
FPrime
FPrime can do up to 20 radiosity bounces where LightWave is limited to 8
bounces.
Versions: 7-8
1173 Nicholas Boughen | FPrime | Intermediate
Fun with Radiosity Bounces
If you want to have a lot of fun with radiosity bounces — and believe me it
is fun when it works this fast — make a zigzag hallway, set a light at one end,
and then observe how the light goes one more zig every time you increment the
bounces by one.
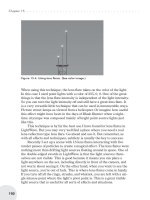
Monte Carlo
radiosity, 0 bounces
Monte Carlo
radiosity, 2 bounces
Rendering
| 493
FPrime
Monte Carlo
radiosity, 10
bounces
If you’re going to use any displacements on your objects with FPrime, don’t
forget to add the FPrime displacement plug-in.
Head with morph targets but no FPrime displacement plug-in
494 |
Chapter 10
Network Rendering
With the FPrime displacement plug-in added, displacements are visible in the FPrime window.
Thanks to Proton for the great model.
Versions: 7-8
Network Rendering
1174 Kevin Phillips | Network Rendering | Intermediate
Only One Machine Needs LightWave Installed
One misconception that many people make when they first consider attempting to set up ScreamerNet is that they need to copy LightWave across all their
computers for it to work.
In reality, you only need to copy LightWave files to the one computer on the
network that is going to act as a file server for the rest of the computers (i.e., the
computer where the render nodes will write their image files to). I create a
screamernet folder on this computer, in which I copy all the plug-ins, LScripts,
and program files from my LightWave installation. I also copy the
LWEXT3.CFG configuration file here, and then simply edit it so that all
plug-ins and LScripts can be found from the right place in the screamernet
folder.
Once I’m done, I simply map the screamernet folder on the server to the
same drive letter on all my computers, make sure that the LWEXT3.CFG file
contains this drive letter (so all computers find the plug-ins), and run the
LWSN.EXE file directly from the screamernet folder on the file server itself.
Versions: 5-7.5c
Rendering
| 495
Network Rendering
1175 Kevin Phillips | Network Rendering | Beginner
Content Folders
Content folders are the preferred way of setting up your 3D projects when
working in LightWave. They are simply folders on disk that contain all the components of your 3D project inside subfolders. Commonly, you will find objects
(for the objects in your project), images (for all the texture maps and images
used in your project), and scenes (for all your scene files) in your subfolders.
The names of these subfolders must be spelled correctly for LightWave to find
them within the Content folder.
Content folders are of extreme importance when setting up scenes and projects to render on a render farm. You would be amazed at just how many users
do not use content folders correctly at all, mainly due to the fact that they probably don’t work in a studio environment. However, it’s always good practice to
use them, even if you are working on a single computer at home or in your
office.
If you ever get that killer job doing 3D animation in a studio, it’s easier to
have good habits already set in place than try and unlearn a pile of bad ones!
Versions: All
1176 Kevin Phillips | Network Rendering | Intermediate
Preparing Projects with Content Manager
If you’ve just finished a large project and now decide that you need to place
it onto a render farm to get it finished on time, but you didn’t set up a proper
content folder at the start, don’t fret. Layout has a tool that can help.
Go to File>Content Manager. This tool will let you consolidate all the files
in your scene into one place. Alternatively, I prefer to export the scene into a
whole new content folder. Exporting is not only good for creating content folders, it’s especially good for making a clean content folder, especially if you’ve
been saving iterations of files and have a ton of backups, etc., in your current
content folder.
Once you have selected the option to export or consolidate, Content Manager shows you a list of your scene-related files. These can be selected and you
can set a subfolder to move them into. Once done, clicking the OK button will
do its magic and start to recompile all the files into place, making them render
farm-approved and ready to go!
There are a few issues with this tool that are useful to note, however:
n If you have multilayered object files and are using only a few layers from
them, you may run across an “Object Conversion Failure.” This is nothing to
worry about; the content folder will have been created and the files moved,
but the scene file will not have been saved with the new content paths set.
You can manually do this yourself, but you’ll have to reload the objects.
n Content Manager doesn’t always fix image paths inside object files. That is,
while it will move everything and resave everything for you, some objects
with externally linked image files won’t be properly updated and will still
request these files from their original location. A render farm will show
496 |
Chapter 10
Network Rendering
these when the surfaces do not render correctly. Personally, I just rename the
old content directory where the image files are known to reside so that the
path name is changed. This will bring up “Cannot find image” warnings
when I load my scene from my new content directory, giving me the chance
to select the correct images from the content folder itself.
Versions: 5-7.5c
1177 Kevin Phillips | Network Rendering | Beginner
Set Up Those Scene Saving Options
Before sending any scene to a render farm, you need to first make sure that
you have loaded it, selected the rendering options, set up the save options to render to RGB (and alpha if applicable), and saved the scene file again. You need to
also ensure that the save path for the rendered images (and alpha) is pointing to
a network drive that all the render nodes can see.
This is essential if you plan on using Layout’s own ScreamerNet controller
tools to run your render farm. Most third-party control software allows you to
dynamically set up the saving options without opening the file first.
Versions: 5-7.5c
1178 Kevin Phillips | Network Rendering | Beginner
Rendering a QuickTime or AVI
Render farms can only render to still image sequences — plain and simple.
Movie files, such as AVI and QuickTime, require that each frame of the animation be rendered in sequence so that the video file can be written correctly to
disk, and compressed as well if required. Because a render farm cannot control
the order of frames that are rendering, nor can each computer be expected to
track where or when it needs to write a frame into a video file, it’s impossible to
create a movie file this way.
You can, however, recompile the image sequences rendered by the render
farm back into a movie file, either with a third-party video editing tool or with
LightWave itself.
Rendering to image sequences is also a good habit to get into. If anything
happens in the middle of a render to a video file, or you need to abort your render because the boss wants his laptop back so he can go home, you cannot
continue the render later. You have to restart the video file again, which could
mean extra hours of re-rendering what you’d already done.
With an image sequence, you simply set the start frame number in the Render Options panel to the next frame after the last file rendered and keep
rendering from where you stopped.
Versions: All
Rendering
| 497
Network Rendering
1179 Kevin Phillips | Network Rendering | Intermediate
Fixing Jittering Particle Effects
When rendering scenes containing HyperVoxels or particles on a network,
you should first save the motion of the particle emitter out to a .pfx file. Failing
to do so means that render nodes will attempt to determine the particle emitter
motion themselves, sometimes leading to a semi-jittered and random-looking
effect in the render itself.
Make sure that the .pfx file is saved into the project’s content folder and that
you save the scene directly after adding the .pfx file to ensure it gets mapped to
the emitter. A .pfx file will ensure that the motion is pre-saved and identical on
all nodes.
Versions: All
1180 Kevin Phillips | Network Rendering | Intermediate
Missing Texture Maps
Render farms really do work better with scenes that have been set up with a
good content folder structure in the first place. In most cases, many weird problems stem from users with bad habits of grabbing files from outside their content
folders and using them in a scene or on a model.
Content folders require all components of the scene to be in the folder structure. Any other file is known as external and is bad news, especially for a render
farm! In the case of a render that contains missing texture maps, this can mean a
few things:
n The import plug-ins for loading certain image types could not be loaded or
used. This is related to the nodes not being able to read the ScreamerNet
configuration files or the configuration files not pointing to the right files on
disk (or even the right drive for that matter!).
n The images were not in the content folder and the render nodes could not
locate them. Therefore, they don’t exist, but ScreamerNet will still render
what it can.
n An object uses the image map from an external location. These are harder to
identify, as the image may exist in the content folder but the location in the
object does not point to it.
Versions: All
1181 Kevin Phillips | Network Rendering | Intermediate
Popping Texture Maps
In cases of renders that contain the weird effect of popping texture maps
(images that appear to pop on and off throughout a render), this issue seems to
be more prevalent on Windows-based networks, and in most cases relates to
badly maintained objects or content folders.
This occurs when an object or scene contains external images that are
mapped by a network name in LightWave (i.e., \\kevs_computer\images\
dumb.png). If these can be located by a render node if it is connected to the
same network, it will be loaded. The problem happens when a network
498 |
Chapter 10
Network Rendering
connection cannot be made and the file cannot be loaded on a render node. The
node will still render the frame, but the final image will be missing a few
textures.
Versions: 5-7.5c
1182 Kevin Phillips | Network Rendering | Intermediate
Windows Workstation Network Connection Limit
Workstation installations of Windows allow a maximum of 10 network connections. If there are more than 10 machines on the network, any machine after
the tenth will not be able to connect and therefore will be missing from the render farm.
In this case you should consider:
n Purchasing a Windows Server license and enough CAL (Client Access
Licenses) for your entire network (this will be a very costly exercise, especially for a small studio).
n Building a server using the widely available and (mostly) free Linux operating system (which has no limitations on the number of connections) and use
the program Samba that allows Windows computers to treat the Linux file
system as though it were a Windows one. A version of Samba is usually
included in most installations of Linux.
Versions: All
1183 Kevin Phillips | Network Rendering | Intermediate
Only Rendering to FLX Files
One common issue most new ScreamerNet setups have is all output having
the file extension .flx instead of the correct file extension that was specified.
This is almost always related to the render nodes not being able to load their
plug-ins. To save in all the different image formats, LightWave uses a series of
image save-load plug-ins.
Double-check that all the file paths to the plug-ins in your ScreamerNet version of the LWEXT.CFG file are correctly set up.
Versions: 5-7.5c
1184 Kevin Phillips | Network Rendering | Intermediate
No Files Were Rendered to Disk
If your ScreamerNet render farm appears to be operating reliably but is producing no image files, there are two possible things that may be wrong:
n ScreamerNet couldn’t load any of the image saver plug-ins. In later editions
of LightWave (6.x upward), this problem is usually more noticeable by FLX
files being created instead.
Rendering
| 499
Network Rendering
n The scene file was not set up properly prior to placing it onto the render
farm. You need to ensure that the scene file has had its rendering options set
for saving to RGB files, and that the pathname for those RGB files points to
the network drive! Setting it to Save Animation or saving RGB to the local
hard drive and not the network drive usually results in no files being created.
Versions: 5-7.5c
1185 Kevin Phillips | Network Rendering | Intermediate
Cannot Find an LScript
If you are using any LScript or LScript/RT plug-ins in your scene to load
LScripts, you should ensure that you move the LScript files into your content
folder before loading them. Like all other files in a project, any LScripts added
to your scene from outside the content directory will be linked as external files,
and the render nodes may not be able to find them.
Versions: 5-7.5
Ü Note:
Since LightWave 7.5c, LScript allows programmers to add the ability for scripts to embed themselves inside scene files directly.
1186 Kevin Phillips | Network Rendering | Intermediate
Batch Those Nodes with DOS
Typing that long ScreamerNet command line into each workstation on a network can be hard work! That’s where good old DOS batch file programming can
be a time-saver. I tend to set up my ScreamerNet command line into a batch file,
and set it to use a parameter that I can pass to the batch file using the %1 symbol. In this example, I have my ScreamerNet folder mapped to the L drive:
L:\shared\programs\LWSN.EXE -2 -cL:\config -dL:\content L:\command\
job%1 L:\command\ack%1
I place this batch file into the ScreamerNet folder on the server computer,
and each render node simply has a shortcut on the desktop that calls the batch
file with a node number as a parameter. For example, if I saved the batch file in
my L drive and called it startnode.bat, the shortcut for node 1 would call the
command L:\startnode.bat 1.
When ScreamerNet aborts a node, usually this just terminates the batch file
and exits back to Windows. This can be a nuisance if you then need to restart all
the nodes, so instead add a label and goto command to make the batch file
restart itself when it’s aborted:
:restart
L:\shared\programs\LWSN.EXE -2 -cL:\config -dL:\content L:\command\job%1
L:\command\ack%1
goto restart
Versions: 5-7.5c
500 |
Chapter 10
Network Rendering
1187 Kevin Phillips | Network Rendering | Beginner
The Importance of Sequence
When setting up your render farm, it’s important to use a sequential numbering order for each node. This number is used by ScreamerNet for generating
message files (job and ack) that make ScreamerNet work.
If you are using Layout to control your render farm, you must specify the
number of CPUs. This number should be the highest node CPU ID you have
allocated. If you have decided to call one of your nodes 132, just to be unique,
then you must tell Layout that there are 132 possible nodes in your render farm.
When you initialize the render farm, searching and waiting for 132 nodes can
take some time!
Versions: 5-7.5c
1188 Kevin Phillips | Network Rendering | Beginner
Better Ways to Work with ScreamerNet
Are there alternatives to ScreamerNet? Sure, there are some around, but in
most cases it’s not ScreamerNet that is the alternate solution, but an alternate
piece of software for talking to the ScreamerNet nodes. Here are a handful of
free and commercial controller products that you can look into if Layout’s own
ScreamerNet control is too limited:
n LightNet (Joe Justice build) />index.html
n StationX Spider (Station X)
n Tequila Scream (DigitalToons) />n ButterflyNetRender (Liquid Dream Solutions)
n Screamernet Controller for OSX (Catalyst Productions)
Versions: 5-7.5c
1189 Timothy “Amadhi” Albee | Network Rendering | Beginner
Master Plug-ins
If you’re finding your ScreamerNet nodes refusing to load a scene, check
your scene and remove the Master Plug-ins, Spreadsheet, and Standard Banks
before sending your scene to be network rendered. (Open the Master Plug-ins
interface under the Scene tab in 7.x and Utilities tab in 8.x.)
Versions: 7-8
Rendering
| 501
Network Rendering
1190 Timothy “Amadhi” Albee | Network Rendering | Beginner
Cache Shadow Map
Don’t use Cache Shadow Map with shadow-mapped spotlights when you
know you’ll be rendering via ScreamerNet. If you start a node rendering midway through the completion of the scene, its cached shadow map data will look
different than the nodes started earlier. The difference may be slight, but often it
results in “pops” that make the render unusable for professional production.
Versions: 7-8
1191 Timothy “Amadhi” Albee | Network Rendering | Beginner
Bake Before Sending to ScreamerNet
If you use Motion Mixer in a scene, you must bake the motion before sending the scene to be rendered via ScreamerNet.
Motion Mixer is a powerful and complex tool for blending bits of animation
to create a performance — the 3D version of the limited animation seen in Saturday morning cartoons. Because of all it can do, and the deceptive simplicity of
its interface, if you plan on playing around with it, read its documentation!
Versions: 7-8
1192 Lee Stranahan | Network Rendering | Beginner
ScreamerNet Isn’t Enough
One of LightWave’s big appeals to many people in Hollywood is that it
includes free, unlimited network render nodes with the included ScreamerNet
software. The problem is that ScreamerNet is virtually unusable on its own.
What you need is a front end for it. There are free ones out there such as
LightNet and Spider — a Google search should find them — and there are also
commercial ones that give you support and more bells and whistles. Either way
— get one!
Versions: ???
This page intentionally left blank.
Chapter 11
Compositing
It is very rare to see final output on the big screen, or television for that matter,
that hasn’t gone through some compositing or postprocessing. Typically, 3D
footage is by its nature very crisp and clean. To make 3D elements blend better
with film or video, the footage is usually at least color corrected, blurred, and
some noise (or actual film grain) is applied. Often, a slight halo is added to the
highlights. These steps try to reproduce the artifacts of real-life cameras.
So, why not do this all in LightWave? While it is possible to some extent,
there are many more possibilities on dedicated applications. Also, the settings
can be adjusted more or less interactively — with no need to re-render after each
tweak.
It’s often more productive to do some, or even all, of the elements of a given
shot in 2D. The best methods always depend on the job at hand. If you create
images with LightWave, you will miss a lot in speed and control if you ignore
the possibilities of compositing tools.
— Erkki Halkka
General Tips
1193 Patrik Beck | General Tips | Intermediate
Render to Composite
When rendering an object with the intent of compositing it in an image, it
helps to mix in part of the palette of the background plate. This can be done by
grabbing a frame of the background image and mixing it in. Load a single frame
of the background image, blur the snot out of it, apply as a projection to a spotlight, and aim in the general direction of the object. The intensity of the image
projecting spotlight must be adjusted to what looks best on each particular
scene, but it should be very low and not a major source of illumination. With
judicious mixing of one or several of these projection lights you can get a mock
radiosity/global illumination type effect.
Versions: All
503
504 |
Chapter 11
General Tips
1194 Patrik Beck | General Tips | Intermediate
Invisible Reflection Box
A reflective metallic object can be rendered to look like it is in the background image by using an invisible reflection box. Create a box in Modeler and
flip the polygons so that they are all facing inward. Take a single frame of the
background plate and use a cylindrical map so that the image is mapped once
around the inside of the box like a label on a soda can. In Layout, position the
box so that it is completely surrounding the object. Under Object Properties, in
the Render tab, select Unseen by Camera. With Ray Trace Reflections turned on,
the reflection box will give the original object something to reflect that is related
to the environment of the background plate. If there is a lot of action in the background plate, the image can be replaced by a sequence. The reason for using a
reflection box instead of using spherical reflection mapping is that it gives you
more control over how the environment is seen in the reflection. You can position and scale the box so that it roughly aligns with what would be seen in the
background. You may decide to use a sphere with a spherical map instead of a
box to cage your reflection surfaces, which is fine if it gives you the look you
want, but boxes seem to give a realistic reflection surface.
Versions: All
1195 Patrik Beck | General Tips | Intermediate
Jitter, Grain, and Defocus
To help “marry” the LightWave rendered element to the background image,
combine the elements as well as you can, then add a little jitter, grain, defocus,
or film float to the full image. This helps sell the image as a complete picture to
the eye.
Versions: All
1196 Lee Stranahan | General Tips | All Levels
Consider Rendering at a Smaller Size
If you’re going to take LightWave-created images and composite them with
real-world images that you’ve shot on video or film, you might want to do some
tests and see if you’d benefit from rendering your LightWave images at a
smaller size than normal — about 80% of the final intended size. Then scale
them up during the compositing phase.
Wait — did you read that right? Render them smaller and then scale them
up? Huh? I mean, everyone knows that when you scale images up, you lose resolution. That’s true, so that’s exactly what’s going to happen. Your perfect,
pristine LightWave image will lose resolution. That’s just the point, too.
Part of why computer-generated images sometimes stick out like a digital
sore thumb is that they are too perfect, especially around the edges. If you look
at a frame of film or video, edges in the real world — as least the real world as
captured by a camera — aren’t all that clear. The edges, in fact, tend to mush
into one another a little bit. That is just what this technique is attempting to do to
Compositing
| 505
General Tips
your computer-generated images — mush them up a bit so they fit in better.
This won’t always be a good idea, but try it out.
Versions: All
1197 Gerald Abraham | General Tips | Beginner
Reflecting Surroundings
When compositing a 3D object together with a live plate, it’s a good idea to
have the object seem like it’s reflecting its surroundings. To do this, simply use
the backdrop image as a spherical reflection.
Versions: All
1198 Eki Halkka | General Tips | All Levels
Using LightWave as a Video Effects Application
You can use LightWave as a video effects application simply by mapping
image sequences on polygons. Then just animate the polygons for cool page
turns, wipes, and so forth. Use surface transparency to mask parts of the images.
You can have an infinite amount of these video layers. You can also create 2D
warps and morphs by applying an image to a subdivided flat box and creating
morph targets for it.
Versions: 6-8
1199 Larry Shultz | General Tips | Intermediate
Speeding Up Animation and Setup
Sometimes I’ve had to use large background images as reference to animate
over. If the background plates are sufficiently large this can really bog down the
updates when you try to scrub through the animation. What I do is to render a
low-res movie file (AVI or MOV) with the same aspect ratio as the original. I
load this as a background to animate over because I can scrub through it much
faster. Once I’m satisfied with the animation I simply swap out the low-res background sequence with the full-res version.
Versions: 5-8
1200 Larry Shultz | General Tips | Advanced
Matching Geometry and Images
Here’s a little trick I use to easily match up background image and geometry.
I create a polygon in Modeler that has the same aspect ratio as the image I
need to match my geometry to. For example, if the image is 640 x 480 I create a
polygon that is 6.4m x 4.8m and so on. I then load the image into Modeler,
apply it to the surface of my background polygon, and change my viewport render mode to Texture.
Next I use the Pen tool to trace a new polygon around the feature on the
image I need to match to. I may create several of these mask polys. I also make
sure that I apply the texture in Layout as a front projection and turn on Fixed.
506 |
Chapter 11
General Tips
This will allow me to move the camera slightly and get a little parallax out of the
background image.
I make sure I pull the mask polys far enough forward to allow other objects
to move behind them. It’s also helpful to give each of the mask polys their own
layer. Once all of this is loaded into Layout it’s simple to match the camera view
to the polygons.
Versions: 6-8
1201 Leigh van der Byl | General Tips | Beginner
Creating Shadows for Compositing
When working with animated elements that are to be composited with
live-action (shot) plates, you usually create a 3D environment that is based on
the environment filmed in the shot, so that you can properly position the 3D
characters or objects into the scene. Another use for creating the environment in
3D is so that the characters or objects can cast shadows onto the environment
that can then be composited into the footage. Of course, when doing this, you
won’t want to have the actual geometry of the environment visible in the render;
you’ll only want the shadows.
To do this, you need to set up the surface of the environment geometry so
that the only areas of it that are included in the render’s alpha channel are the
areas where shadows fall.
Compositing
| 507
General Tips
In LightWave, we do this by
using the Shadow Density Alpha
Channel option, found under the
Advanced tab in the Surface Editor.
This causes the alpha channel of
the render to ignore all areas of the
object to which this surface is applied
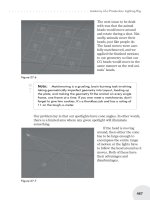
except for areas where shadows fall,
making it the ideal solution for rendering shadows needed for
compositing.
Versions: 6-8
1202 Gerald Abraham | General Tips | Intermediate
Volumetric Clouds or Explosions
Volumetric clouds or explosions rendered on a black background can easily
be merged with other layers using screen mode in compositing software such as
After Effects or Digital Fusion. This mode cuts all the black from a layer, leaving everything beneath visible.
Versions: All
1203 Gerald Abraham | General Tips | Intermediate
A Touch of Realism
Adding noise or film grain can give a nice touch of realism to the final composite. Even the slightest bit often helps fuse CG and non-CG elements.
Versions: All
1204 William “Proton” Vaughan | General Tips | All Levels
Compositing Saves Render Times
Final animations or images don’t have to be generated in LightWave. Take
advantage of compositing programs like Aura, Digital Fusion, or even
Photoshop. Here’s an example:
If you have a character talking on a phone in a house, render the character
and phone in one pass and then render the background elements in another pass.
Composite (merge) the two renders in a compositing package. If you have to go
back and make changes to the animation, you won’t always have to re-render all
elements. This is the way most shots are created for movies.
Versions: All
Ü Note:
This is also very helpful when lighting a scene. Sometimes it’s easier to isolate elements and
light them without having the lights affect other elements in the shot.
508 |
Chapter 11
Splitting Renders into Layered Elements
1205 Timothy “Amadhi” Albee | General Tips | All Levels
Depth Channels Are Not Antialiased
If you are going to be working with any Z-buffer-based effect in post
(depth-based compositing, fogging, blurring, etc.), the best results come from
rendering your RGBA images without antialiasing as well. I find that if I render
at twice the size of my target resolution, but without antialiasing, and then
reduce the result of the depth work in the compositer, I get output that is good
enough for “prime time” with most scenes. (Some scenes, with minute surface
details, need to be rendered at 4x target resolution.)
Versions: All
Splitting Renders into Layered Elements
1206 Policarpo | Splitting Renders into Layered Elements | Intermediate
Lighting in Layers
Having access to multiple files that are comprised of key, fill, and back
lights and compositing them separately in post allows you to change color, density, and mood in real time without the need to re-render images. Place your key
light as layer 1 in Photoshop, and apply Linear Dodge mode to your fill and
back lights in the comp. Now you can tweak the color of the lights in real time
without any rendering penalties.
After a few minutes of tweaking the Hue/Saturation levels of the three light
layers, you can achieve dramatic results without having to render your scene
again.
Versions: 6-8
Exporting Channels (Depth/Spec/etc.)
1207 Geoffrey Kater | Exporting Channels (Depth/Spec/etc.) | Beginner
DOF Shot
Create a quick depth of field shot by using a blurred background image.
Load your blurred background image into the Compositing tab of the Effects
dialog (press Ctrl+F7, or go to Window>Compositing Options, for 7.x go to
Scene>Effects>Compositing). When you render your scene it will look like the
foreground object is in focus and the background is not — hence, quick depth of
field.
Versions: 5-8
Compositing
| 509
Exporting Channels (Depth/Spec/etc.)
1208 Policarpo | Exporting Channels (Depth/Spec/etc.) | Intermediate
PSD Exporter/Render Buffer
Set up scenes with the PSD exporter or use the Render Buffer view plug-in
to gain access to the various buffers that make up a final render. The PSD
exporter is located in Windows>Image Processing>Add Image Filter. Having
access to these channels allows you to make minor or major adjustments to your
final image in real time in a compositing package.
Select the buffers you want to tweak in post. By adjusting the Specular and
Shadow layers, a lot of color tweaking can be accomplished relatively quickly in
post. Try copying and pasting different buffers as an alpha channel, and load
them to create unique visual effects in your composite.
Versions: 7.5-8
1209 Policarpo | Exporting Channels (Depth/Spec/etc.) | Intermediate
DOF in Real Time
Use the Depth Pass as an alpha channel in Photoshop to simulate a depth of
field effect in real time.
Place the Depth Pass in the Channel tab as an alpha channel.
Load the Depth Pass channel and apply a Gaussian blur to simulate a DOF
effect to your final image.
510 |
Chapter 11
Digital Fusion
Versions: 6-8
Digital Fusion
1210 Timothy “Amadhi” Albee | Digital Fusion | Intermediate
Save It as a Base
When working on a production with many scenes with similar lighting environments, when you get a scene done that represents how you’ll want the rest of
that sequence to look, save it as a “base,” replacing the loaders with the new
footage for each new scene you work on.
Versions: All
1211 Timothy “Amadhi” Albee | Digital Fusion | Intermediate
Highlight Tool
“Screen”-merging the glow only output of the Highlight tool gives you more
control over the “star-bloom” effect. If you add a Blur tool between the Highlight and Merge tools, you can soften the sharpness of the highlights.
Versions: All
1212 Timothy “Amadhi” Albee | Digital Fusion | Intermediate
Pixel Crawl
If you have problems with pixel crawl in the fine details of a render (and
don’t have time to re-render at a higher level of Antialiasing), you can often
greatly reduce it with a Time Speed tool, with only Interpolate Between Frames
active and a Sample Spread of .2, leaving Speed and Delay at their defaults.
Compositing
| 511
After Effects
(You may find you need to limit the effect with a soft-edged mask because this
adds a pseudo-motion blur to the image somewhat.)
Versions: All
Ü Note:
Pixel crawl is the “sizzle” you get when mismatched antialiasing makes the edges of objects and
shadows wiggle around from frame to frame.
After Effects
1213 Geoffrey Kater | After Effects | Advanced
Render Animation to Layers
Render your animation in layers to have more control over your final composite with this easy two-step process. First turn off all objects in the
background (Scene Editor) and uncheck those objects. Then render your main
object (character, vehicle, etc.) as an image sequence or QuickTime with a
built-in alpha channel. Then go to the Scene Editor and recheck your background objects and uncheck your main object. Render your background as a
sequence or QuickTime. Load both animations into After Effects with the background layer on the bottom layer. You’ll be able to affect each layer separately
with a multitude of filters like motion blur, rack focus, noise, color shifts, etc.
Versions: 5-8
1214 Gerald Abraham | After Effects | Intermediate
Recompositing
Test renders take time and it is sometimes more efficient to split a render
into various passes or elements and recomposite them in Photoshop or After
Effects. From there, you can adjust color, opacity, and many other values without having to wait for a test render. You can also make notes of the changes you
made and use them to adjust your layers in LightWave. For example, you might
render out a specular pass as an orange color but after some manipulation in
After Effects decide it looks better in red. Discard the changes in After Effects
and simply go back and make the change to the object’s surface in LightWave.
Versions: All
1215 Gerald Abraham | After Effects | Beginner
Adding Bloom
Although LightWave is completely capable of adding a realistic bloom to an
object’s surface, the same effect can easily be recreated in After Effects by
applying a slight Gaussian blur to a specular pass. This method not only saves a
rendering hit in LightWave, but it can also be adjusted much more quickly.
Versions: All
512 |
Chapter 11
After Effects
1216 Gerald Abraham | After Effects | Intermediate
Matching Enviroment
Using a simple choker and a small amount of Gaussian blur on the edges of
an object’s alpha channel often helps match an object to its environment.
Versions: All
1217 Gerald Abraham | After Effects | Intermediate
Adjusting Glow
You might need to give the bright areas of your image a little bit more glow.
Rendering out a separate specular pass is not always necessary, however. Simply
duplicate the original layer, desaturate, and adjust levels. Now apply screen
mode to this layer and turn down the opacity. Also, potentially add a slight
Gaussian blur to this layer to emulate a bloom effect.
Versions: All
1218 Gerald Abraham |After Effects | Intermediate
Interpret Footage
When importing rendered footage in After Effects, it’s extremely important
to make sure the frame rate specified for LightWave output corresponds to the
footage. Adjust these settings in the Interpret Footage dialog box.
Versions: All
1219 Gerald Abraham | After Effects | Intermediate
Disabling Alpha
Footage imported into After Effects from LightWave normally shows up
with the alpha channel enabled. However, options within the Interpret Footage
dialog box will allow you to disable the alpha as well as invert the values.
Versions: All
Chapter 12
Scripting
Ever find yourself doing the same task over and over again? Ever find yourself
repeating the same keyframing over and over? Ever wish some motion would
just get on by itself and leave you to concentrate on the acting? Well, help is at
hand! Scripting — using LScripts and expressions — can help in many of these
situations. “Scripting, expressions — pah! That’s for coders and mathematicians.” Not so — the designers of both systems have done their best to make
scripting as easy as possible to use. There is also good LScript documentation to
help non-programmers get started and the math for expressions isn’t anything
more than what you learned at school.
“So, what exactly can LScripts and expressions do for me?” Well, LScripts
can help with repetitive tasks. If you repeatedly perform the same commands in
Layout or Modeler, you can write a script to do it all in one step. LScripting provides access to the core of LightWave — use it to issue commands or add
features that don’t yet exist. You can use LScripts for automating animations for
motions that are very mechanical, such as rotating wheels, gears, projectile
motion, pistons, etc.
“What about expressions?” Well, think of them as one-line LScripts — simple formulae that determine how channels should change with time or two
different channels should stay related to each other, e.g., force a character’s hips
to remain centered or the pitch of two gears to synchronize. Expressions are very
useful for character and mechanical rigs and for simple procedural animations.
There are many more uses for LScripts and expressions — just have a look
through all the great tips in this book!
— Richard Brak
LScripts
1220 Eki Halkka | LScripts | Beginner
Don’t Be Afraid
The most important LScript tip I can think of is “don’t be afraid.” Even if
you have no programming experience whatsoever, you can be writing working
LScripts after just a few hours of practice. How to start then? First of all, the
current LScript documentation, which can be downloaded from NewTek’s site
( should
give you a good start.
513
514 |
Chapter 12
LScripts
If you’re not into reading manuals, you can start by examining existing
LScripts that ship with LightWave. The scripts that have an .ls extension can be
opened and modified in any text editor, while .lsc scripts can’t be modified.
So, don’t be afraid to open one of the .ls LScripts in the LScripts directory
and take a look. You can also modify the scripts if you wish, but I suggest trying
that on a copy, not the original.
Versions: 6-8
1221 Eki Halkka | LScripts | Beginner
LScripts in Modeler and Layout
There’s only one LScript type for Modeler, but many for Layout, depending
on their purpose. The most straightforward of the LScript types are Modeler and
Layout generic LScripts. Both will go through their tasks, and then be done with
it. I suggest starting with them.
Here’s a classic:
main
{
info(“Hello World!”);
}
If you type these four lines in a text editor, and save the result as plain text
with the .ls file extension, you have just written your first Modeler LScript.
What makes the script Modeler-specific? It’s the first line — main. This line
tells LightWave that this is a Modeler script, and everything between the curly
brackets ({ and }) belong to the main function of the script. The only command
in the script is info(), which will pop up a requester with the text “Hello
World!”. The script can be modified into a Layout generic script by altering the
first line:
generic
{
info(“Hello World!”);
}
Versions: 6-8
1222 Eki Halkka | LScripts | Beginner
Using LScript Commander
One great shortcut to creating scripts for Layout is LScript Commander. It’s
kind of like a macro recorder but with more power. If you don’t already have a
button for it, I suggest adding one now. Press Alt+F10 to open the Configure
Menus panel, locate LS Commander on the left side under plug-ins, and drag it
to Main menu — LScript — Utilities. Done.
Open LScript Commander. From this point on, everything you do in Layout
will be added to a list of commands in the bottom half of the interface — as long
as it’s something that can be coded into an LScript. You can then drag these
commands to the upper half of the interface to create a sequence of commands.
Scripting
| 515
LScripts
After you have a few commands lined up, select Convert to LScript from the
session pop-up. Ta-da! You now have a working Layout LScript. If you wish,
you can edit the script in the upper half of LS Commander interface. Click the
Install button to save and add an interface button for it. The button will appear in
the LScript tab under Macros.
Ü Note:
There are occasions where some manual editing will be needed for the script to work.
LScript Commander is also great for finding LScript commands, if you are
lazy like me and don’t always want to search through the manuals. Just open LS
Commander and perform the desired action in Layout — you now have the
commands ready to copy to your script.
Versions: 7.5-8
1223 Eki Halkka, Kevin Phillips | LScripts | Beginner
LScript Helper Applications
LightWave comes with helper applications for LScript that can be found in
the Programs directory.
The more important of these is the LScript Editor (LSED). Even though you
can use any text editor to create your scripts, LScript Editor has some small but
useful features I couldn’t live without. It color codes the script so that it’s easier
to follow what’s going on, includes a simple syntax checking tool, and shows
the number of the line of code your cursor is on. As LightWave usually gives a
line number in the error message, locating the troublesome part is much easier
than in a regular text editor. Plus a lot more — check it out, I say!
There’s also LScript Interface Designer (LSID), which lets you design an
interface for your script in drag-and-drop style in a manner similar to tools such
as Delphi or Visual Basic. After you have arranged all the needed buttons, sliders, etc., interface elements to your liking, you can export your interfaces to
work in either Layout or Modeler LScripts, as well as in the C programming language (Panels).
Both of these tools are very good and extremely useful. They can be found
in your LightWave \Programs folder.
Versions: 6-8
1224 Eki Halkka | LScripts | Beginner
Integrating LScripts
LScripts can be integrated into LightWave’s interface with a simple two-step
procedure. First, add the LScript just like you would add any other plug-in. Press
Alt+F11 to open the edit plug-ins panel, click Add Plug-ins, and locate the script
you wish to add. Then create a button for it. Open the Configure Menus panel
(Alt+F10). Click the Search button and type (a part of) the script’s name in the
dialog box. Drag the highlighted script to the right side, in the desired location.
516 |
Chapter 12
LScripts
You will find AddPlug-in+.ls on the companion CD. It automates this procedure; unfortunately, it’s for Layout only.
Versions: 6-8
1225 Emanuele Salvucci | LScripts | Advanced
Writing BMPs
Unfortunately, LightWave 3D doesn’t have a function to write image data to
a file through LScript. But since LScript has been created to let users improve
the system, we can actually create our own function!
Let’s divide the code in two functions, the “pixel data writer” and the
“header writer.” We do this so we can easily create new format writers by simply
changing the header writer — in some cases. Generally it keeps the code clear
and lets you track bugs easily. The writebmp() function is the pixel data writer
and expects a string parameter containing a full directory path, while
writeheader() is clearly our header writer:
writebmp: dir
{
filename = getfile("choose name",,dir,0);
bmpimg = File(filename, "wb");
if(!bmpimg)
error("Cannot create file!");
writeheader();
for (x=1; x<=100; x++)
{
for (y=1; y<=100; y++)
{
tmp = pixdata[x,y];
//
}
bmpimg.writeByte(tmp.x);
bmpimg.writeByte(tmp.y);
bmpimg.writeByte(tmp.z);
bmpimg.writeByte(0);
}
bmpimg.close();
}
writeheader