LightWave 3D 8 1001 Tips & Tricks phần 8 pps
Bạn đang xem bản rút gọn của tài liệu. Xem và tải ngay bản đầy đủ của tài liệu tại đây (1.3 MB, 65 trang )
geometry in or around a gash or opening in the Balrog, for example, and make
that a particle emitter.
Versions: 6-8
1021
Larry Shultz | Simulation Examples | All Levels
Voyager Effect
Most of the time we see particles used in something like a fountain or fire
with its particles spraying out from a source. So how can we do something
where we want a ship to fly through a cloud of particles and knock them aside as
it passes?
It’s simple: Create an emitter. Change the nozzle size to something large to
cover the region we want to animate our ship through. Determine how many
particles are needed to fill the region we need and input that number into the
Birth Rate field. Now set Generate by to Frame. This will make sure that the full
number of particles that are needed will be created instantly. Also set the particle
limit to the same number entered in the Birth Rate field. Now all we have to do
is load in our ship and make it a collision object or parent a collision object to it.
This will act as the shields around the ship and push the particles away as the
ship travels through the “nebula.” In addition we can add wind generators and so
forth behind and parented to the ship to swirl the particles.
Versions: 6-8
1022
William “Proton” Vaughan | Simulation Examples | All Levels
Crowd Creation in a Snap
Using a particle emitter and FX_Linker you can create a crowd in no time.
FX_Linker lets you turn each particle into an object. If you change the collision
size on the particle, the object will collide with itself. This is great for creating a
flock of birds, crowd of people, or school of fish.
Versions: All
1023
Larry Shultz | Simulation Examples | Advanced
Bamf!
An easy way to make an object disappear in a puff of smoke is to make the
object a particle emitter by applying FX_Emitter to it. Set Object Dissolve to
make the object suddenly disappear at a particular frame. In the Particle Prop
-
erties panel, make sure Fixed is checked and that Start Frame is the frame where
the object dissolves out. Make sure that a lot of particles are generated quickly
from the starting frame. Apply HVs to the particles and when animated the
object will suddenly disappear in a puff of smoke that is roughly shaped like the
object.
Versions: 6-8
Animating | 427
Simulation Examples
1024 Larry Shultz | Simulation Examples | Intermediate to Advanced
Cigarette Smoke
To create decent-looking cigarette smoke, you have to break down what is
going on.
You have your basic particle motions. You have the size or, shall we say, a
volume filled with smoke (HV Size). You also have turbulence of the basic
stream of particles that makes the stream wind and twist somewhat. You then
have turbulence within the larger volume, which the smoke begins to fill as it
starts to dissipate.
You can get the basic particle stream to bend and twist with a couple of wind
generators. Then as the smoke stream passes through this, it hits another wind
generator that scatters the particles somewhat.
Let’s say that your animation is 300 frames and your smoke begins to scatter
at frame 150. You can use a gradient to affect the size of the HVs based on the
age of the particles. You then use the gradient to keep the size of the HVs small
when the particles are tightly packed in the stream but then grow as the particles
begin to scatter. This fills a larger volume. You can copy and paste the gradient
to also affect the density. As the particles scatter into a larger volume and the
HVs also expand you want to drop their density. The problem that you have now
is that you have smoke filling a larger area. In reality, the smoke would be some-
what turbulent in that volume with fingers of smoke that are more dense and
areas with less smoke where it’s less dense. You can break up the larger smoke
volume using procedurals.
You can also use the same gradient you used to affect the size and density to
affect the amplitude of your procedural so that it only begins to appear at the
precise moment the particles begin to scatter and the HVs begin to grow in size.
Versions: 6-8
Editor Windows>Scene Editor
1025 Jonny Gorden | Editor Windows>Scene Editor | Beginner
Scene Editor
Use Scene Editor for faster item selection in large scenes.
Versions: 6-8
1026
William “Proton” Vaughan, Jonny Gorden | Editor Windows>Scene Editor | Beginner
Parenting Inside Scene Editor
You can easily parent an object to another item in the Scene Editor by left-
clicking on the object’s name in the list and dragging it to the right side of the
item you would like to parent it to.
You can actually make any number of things children of the same parent this
way by selecting them all, using either Shift+click or Ctrl+click, and then drag
-
ging them.
Versions: All
428 | Chapter 8
Editor Windows>Scene Editor
1027 Jonny Gorden | Editor Windows>Scene Editor | Beginner
Easy Navigation
When working with multiple characters in a scene, only have the character
you’re working on expanded in the Scene Editor to allow for easiest navigation.
Versions: 6-8
1028
Jennifer Hachigian | Editor Windows>Scene Editor | Intermediate
Tangled Schematic
You can sort out a tangled Schematic view relatively quickly with the Scene
Editor. The Scene Editor is organized by hierarchy, making it easy to find the
topmost items in each parented chain. Start at the top of the chain and work your
way down. Select items in the Scene Editor and move their representative nodes
in the Schematic view. If Drag Descendants is activated in the Schematic View
tab of the Display Options, moving a node in the Schematic view will drag both
it and all of its children around the Schematic view. It’s easier to use the Scene
Editor to sort out a hierarchy than it is to click on a node in the Schematic view
and guess.
Versions: 6-7.5
1029
Rob Powers | Editor Windows>Scene Editor | Intermediate
Built-In Filtering
Use the built-in filtering function of the new Scene Editor/Dope Sheet to
streamline your item and channel selection process. You can sort the items and
channels in various ways including by item type, name, locked status, and chan-
nel type. You can also save and load custom filters that you use frequently.
Version: 8
1030
Rob Powers | Editor Windows>Scene Editor | Intermediate
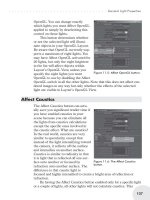
Scene Editor/Dope Sheet
Use the Selection Sets feature in the new Scene Editor/Dope Sheet to create
custom selection sets containing objects, bones, nulls, lights, or cameras found
in your complex rigs. Selecting your custom sets will allow you to manipulate
keys across multiple item types in the Dope Sheet all at once.
Version: 8
Animating | 429
Editor Windows>Scene Editor
Editor Windows>Graph Editor
1031 William “Proton” Vaughan | Editor Windows>Graph Editor | Intermediate
Speeding Up Refreshing
If you are working with a lot of curves and keys in the Graph Editor, you can
turn off the Antialias Curves and Show Tangents options, which should speed up
display refreshing.
Versions: All
1032
Todd Grimes | Editor Windows>Graph Editor | Intermediate
Hotkeys
Use the same navigation hotkeys in the Graph Editor that are used in Mod
-
eler and Layout:
Alt+click/drag — Move
Ctrl+Alt+click/drag — Zoom
Versions: 6-8
1033
Jonny Gorden | Editor Windows>Graph Editor | Beginner
Track Item Selections
In Graph Editor Options, set Track Item Selections to On so you don’t have
to find the item you want to work on in the Channels Bin.
Versions: 6-8
430 | Chapter 8
Editor Windows>Graph Editor
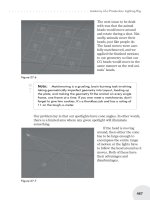
The new Scene Editor/Dope Sheet allows you to create custom selection sets.
Ü
Note: Graph Editor Options may be in the More pull-down if the Graph Editor window is small.
1034
Todd Grimes | Editor Windows>Graph Editor | Intermediate
Fit Values
In the Graph Editor, click on the Options button. In the General tab, click on
Fit Values When Selected. This will automatically place each curve you select in
the middle of the graph so you don’t have to move around to find it.
Versions: 6-8
1035
Jonny Gorden | Editor Windows>Graph Editor | Beginner
Always Show Modified
In Graph Editor Options, set Always Show Modified to On so you can see
the results of motion modifiers and expressions.
Versions: 6-8
Ü
Note: Graph Editor Options may be in the More pull-down if the Graph Editor window is small.
1036
Todd Grimes | Editor Windows>Graph Editor | Intermediate
Performance
In the Graph Editor, click on the Options button. In the General tab, click on
Lazy Layout Update. This will stop the Layout from dynamically trying to keep
up with the alterations you’ll make to the curve and speed up the performance
within the Graph Editor.
Versions: 6-8
1037
Larry Shultz | Editor Windows>Graph Editor | Intermediate Advanced
Channel Sets
Channel sets provide an easy way to manage channels used in animation.
What I do is to throw all the channels of every bone that has motion on it
into the Graph Editor in the Channel Bin. I then create a favorite set of those
channels I wish to recall easily to tweak timing, copy keys, etc.
You can bake motion data in the Graph Editor by selecting or multiselecting
the channels you wish to bake and then hitting the “b” (bake) key. This works
fine on bones driven with expressions. Again baking motion data is easier when
channel sets are used.
You can also use Motion Baker, which is built into LW to bake IK onto
bones or the free one from DStorm. If you search on the Internet, you might find
others.
Versions: 6-8
Animating | 431
Editor Windows>Graph Editor
1038 William “Proton” Vaughan | Editor Windows>Graph Editor | Intermediate
Footprints
Footprints are overlooked by many, but once you use them they won’t be so
easily overlooked. If you want to clean up your keyframes, here are the easy
steps to do so.
1. In the Graph Editor choose a channel (or channels) with a lot of keyframes.
2. Select Leave Foot Print from the Foot Prints drop-down menu.
3. With the right mouse button, box-select all the keyframes for the selected
channel and delete them.
Note that although the keyframes are now gone, there is a faded line (that’s
the footprint) with the keyframes of the channel you just deleted.
4. Select the Keyframe tool in the Graph Editor. Hold down the Shift key and
left-click in the Graph Editor everywhere you want a keyframe.
Versions: All
Ü
Note: If you press Ctrl+B or choose Match Footprint Time Slice from the Keys menu, the keyframe will
snap to the footprint. This is an easy way to clean up motion capture data or animations that have
keyframes of every frame and appear jerky or rough.
1039
Timothy “Amadhi” Albee | Editor Windows>Graph Editor | Intermediate
TCB Splines
TCB (Tension, Continuity, and Bias) splines may seem a bit arcane to folks
not used to them, but they are actually easier to work with (and get good anima-
tion from) than the more common bezier splines. If you need to have motion
“ease out” of one pose and then “ease into” another, set the Tension for the end
keyframe to 1 (the highest level LW’s Graph Editor will allow). Then, create a
keyframe roughly halfway between the two and assign –1 as the Tension for that
new, intermediate keyframe. (The motion will blend more smoothly with the
positions at the end keyframes than before!)
Versions: All
1040
Larry Shultz | Editor Windows>Graph Editor | Advanced
Precision Control of Morphs with Cycler
You can tie the exact shape of the morph curve to the channel of a bone.
Open up the Graph Editor and put the morph channel and the control chan
-
nel right above each other in the Channel Bin. Rotate the bone to the desired
rotational value on frame 30. Sculpt the shape of the morph channel the way you
want it to appear over the same 30 frames.
Now select the morph channel, open up the Modifier tab, and select Cycler.
Select the rotational channel of the bone, and input the starting and ending angle
for the channel and the range of frames it’s to cover (0 to 30 in this case). What
will happen now is that the morph will occur in the shape that you laid out at the
speed that you rotate the bone. The rotational channels are visible in the Cycler
control panel.
432 | Chapter 8
Editor Windows>Graph Editor
You can also do multiple morphs the same way by copying and pasting the
Cycler settings onto those other morphs or by tying the morphs to a master chan
-
nel and then tying the master channel to the one bone channel. Essentially this
gives more control. You can set a morph to do its thing based on the rotational
angle of a controller. You should be able to have more than one morph tied to a
particular channel of a controller. This would allow you to blend morphs in par
-
ticular ways using a single controller.
You could have one morph activate at a certain angle of the controller and
deactivate the rest of the time. This could be done with several morphs to shape
the joint at particular stages. It’s easy to simply activate a morph based on
another channel’s behavior. This allows you to have the morph do several things
over the range of the controlling channel.
Versions: 6-8
Motion Mixer
1041 Jonny Gorden | Motion Mixer | Beginner
Turn Off Actor
Having your Motion Mixer actor active can cause delays in the updates
when you’re creating keyframes. As a general rule, turn off the actor while
you’re animating, only activating it when working with Motion Mixer or pre-
viewing the animation.
Versions: 6-8
1042
Jonny Gorden | Motion Mixer | Beginner
Motion Mixer Actor
If you have items using expressions or other motion modifiers linked to
other items, include both in your Motion Mixer Actor and Motions, as motion
modifiers don’t see Motion Mixer motion.
Versions: 6-8
1043
Jonny Gorden | Motion Mixer | Beginner
Motion Mixer Motion/Keyframed Animation
If you’re using a combination of Motion Mixer motions and keyframed ani
-
mation, create a keyframe for all actor items at the first and last frame of each
Motion Mixer animation so your keyframed animation transitions nicely.
Versions: 6-8
Animating | 433
Motion Mixer
This page intentionally left blank.
Chapter 9
Special Effects
Great special effects are equivalent to the supporting cast in a drama. They’re
not the “stars of the show,” but they enhance the entire scene and add production
value to your shots. When special effects are done right they add to the overall
believability of your virtual animated worlds. It is often a subtle dust trail left
from stomping hooves or a beautiful diffuse glow added to magical objects that
really push a shot from being good to being great! The real “art” is in that final
ten percent of polish. This is where the special effects features in LightWave
really shine.
LightWave includes a very diverse toolset for special effects. From surface
glows to volumetrics, you will find pretty much any effect you can imagine at
your fingertips. Unlike some other areas of 3D animation, special effects have a
unique appeal because experimentation is a requirement. Adding special effects
to your shots requires creative problem solving and forces you to think about
your shots in different ways. The following tips not only reveal special effects
techniques from several professional LightWave artists but also demonstrate
how LightWave’s tools are used in fresh and new ways to achieve the desired
artistic result. With a little experimentation, you will soon be adding magic to
your own shots.
— Rob Powers
General Tips
1044 William “Proton” Vaughan | General Tips | All Levels
Two-Point Polygons Make for Powerful FX Tools
Need a light saber? Try these settings on a two-point poly chain:
n
Luminosity — 100%
n
Glow Intensity — 120% (Glow Intensity is under the Advanced tab of the
Surface Editor.)
n
Enable Glow in the Processing tab of the Effects dialog. (The Effects dialog
is under Window>Image Processing (Scene>Effects>Image Processing in
7.x) or press Ctrl+F7.)
n
Intensity — 100%
Help me, Obi-Wan Kenobi; you’re our only hope.
435
Need some quick electricity? Use the same surface settings on a two-point
poly chain with many segments but also apply a displacement map. Using the
default setting for displacement map will give you a nice render, but you can
also animate the displacement map for further detail.
Versions: All
1045
Patrik Beck | General Tips | All Levels
Glow Function
The Glow function is sometimes confusing. It needs to be activated in two
different places: turned on for the surface in the Surface Editor and activated in
the Processing tab of the Effects panel. The closer to white the surface color is,
the more prominent the glow will appear.
Versions: All
Volumetrics
1046 Kevin Phillips | Volumetrics | Beginner
Quicker Volumetric Rendering
This tip is also mentioned in the rendering section of this book. If you do not
need to apply motion blur or depth-of-field effects to your volumetrics, deacti-
vating the Volumetric Antialiasing option can greatly improve your rendering
time.
Versions: 6-7.5c
1047
Kevin Phillips | Volumetrics | Beginner
Particle Size Envelope vs. Particle Size Texture
The Particle Size parameter, found under the Geometry tab of the
HyperVoxels panel, sets the base size for every HyperVoxel in the currently
active item. You can control this parameter using either an envelope or a texture.
The differences are that an envelope alters the parameter value directly, while a
texture scales the parameter value without actually altering it.
Versions: 6-7.5c
1048
Kevin Phillips | Volumetrics | Beginner
Randomizing HyperVoxel Sizes
One way to get some randomization into HyperVoxels is through the Size
Variation option in the Geometry tab of the HyperVoxels panel. This sets the
maximum size a HyperVoxel may become. For instance, 100% means that a
HyperVoxel may increase up to 100% again (i.e., become twice as large).
Another way to get a much more random effect, ideal for things such as
boulders on a beach and more, is to instead apply a procedural texture to the Par
-
ticle Size. HyperVoxels will then be randomly scaled based on the procedural
texture value at that point in the 3D space (or world space if selected in the Tex
-
ture Editor).
436 | Chapter 9
Volumetrics
Of course, there’s nothing stopping you from using both of these settings
together as well!
Versions: 6-7.5c
1049
Kevin Phillips | Volumetrics | Beginner
Perfect Spheres
Ever need a perfect sphere? Simply add a null and apply HyperVoxels to it!
That might sound like a stupidly simple tip, but it’s not one many consider when
they need a fast, but perfectly smooth sphere in a hurry!
Versions: 6-7.5c
1050
Kevin Phillips | Volumetrics | Beginner
Quick Asteroids
Need an asteroid field in a hurry and there’s no time to model? Build your
asteroid field with either points in Modeler or a particle emitter and then apply
HyperVoxels. Applying a procedural in the Texture channel of the Particle Size
parameter in the Geometry tab will randomize the sizes of the asteroids for you,
and applying the Dented hypertexture works nicely for a rocky look.
Stretching the HyperVoxels about 125 to 150% in the Y direction can help
get rid of the “round” look of all your asteroids. Once done, texture them (proce-
dural bump maps can also assist in that rocky look) and render.
Versions: 6-7.5c
1051
Kevin Phillips | Volumetrics | Beginner
Shaders
Don’t forget that you can apply most of LightWave’s surface shaders to your
HyperVoxel textures. This includes the celshaders such as SuperCelShader and
BESM. (Hint!)
Versions: 6-7.5c
1052
Kevin Phillips | Volumetrics | Beginner
Sprite Images
If you plan on making custom HV sprite images, remember that images
should be fairly square in shape and that you should leave a black border around
them since when they are used, HyperVoxels will use a circular area from the
center outward to display them. Rectangular-sized images will stretch, and
images that go right out to the edge will display as circular images when ren
-
dered as sprites, losing the edges.
Versions: 6-7.5c
Special Effects | 437
Volumetrics
1053 Kevin Phillips | Volumetrics | Beginner
Random Forestation
Need a forest in a hurry from a series of tree image maps? If you are using
HyperVoxels to generate a series of random trees for fast forests from a collec
-
tion of image sprites, make sure you create them all as square images (adding
black borders if necessary) to maintain correct tree proportions and shape (pre
-
venting weird squashed-looking trees).
Load all your tree sprite images first in the Image Editor, then apply them as
sprite mode HyperVoxels by adding them to the clips list under the Shading tab.
Remove any hypertextures from the Hypertexture tab to prevent your images
from becoming tarnished with procedural noise and utilize the Clips options of
Use Color and Solid options to ensure that the trees do not “blend” together
when they are drawn.
Planting the forest can be done in Modeler by generating a point cloud on
your landscape model so that trees appear to be physically attached to the earth
(you may need to move the point cloud down in Layout if the trees appear to
float). You should use some Size Variation setting to vary the trees a little but
not too randomly as to look odd. Activate ray-traced shadows to have the sprites
cast shadows on your landscape as well.
Versions: 6-7.5c
1054
Kevin Phillips | Volumetrics | Beginner
Think Simple — Think Controlled Effects
You can create and animate effects such as bubbling mud, oozing slime, and
more by using Modeler to build your base shapes and then applying Hyper-
Voxels to them. Controlled animation can be done easily and quickly through
standard animation tools, displacement maps, and morph targets.
Often once rendered with HyperVoxels, the effect will be quite impressive
and a lot less headache than attempting to generate the same effects through
FX_Emitters or Motion Designer.
Versions: 6-7.5c
1055
Kevin Phillips | Volumetrics | Beginner
Surprise!
Do the following. It’s not so much a tip, but something discovered out of
curiosity!
1. Create a new scene, switch the viewport to Camera View mode, and add a
simple HV emitter.
2. Load an image into the Image Editor.
3. Go to the Volumetrics panel. Activate the HV emitter and make it sprite
mode.
4. Go to the Shading tab and add the image as a clip.
5. Go back to the Geometry tab and activate Show Particles.
The image should appear in the OpenGL viewport. What’s so curious? Noth
-
ing yet…
438 | Chapter 9
Volumetrics
6. Go back to the Shading tab. Next to the image clip, uncheck the image
(don’t delete it, just deactivate it).
All the particles in OpenGL suddenly change to a new image! This only
works in Camera view, however.
I thought that might make a change from all the useful tips to have at least
one odd and useless one. Trying to render this emitter will just give the usual
misty HV look you’d expect.
Versions: 7.5-8
1056
Kevin Phillips | Volumetrics | Beginner
Surface Refraction and Reflections
HyperVoxels are great for simulating liquids, and look even better if you use
some refraction to bend the background showing through them. Molten metals
look cool with reflection. Both of these effects are easy to set up with a few sur
-
face parameters in the HyperVoxels Shading tab.
Because HyperVoxels are generated using ray tracing technology, you do not
need to activate the Render Options for either Raytrace Reflection or Raytrace
Refraction for these effects to work for your HyperVoxels. You only need to
activate those options for polygon rendering.
Note that refraction will occur if the HyperVoxel refraction value is set in the
Shading tab and there is some transparency. The refraction effect will be calcu-
lated on the surfaces that are directly visible to the camera, which in most cases
will look just fine and render quite quickly. If you require a more accurate
refraction through several layers of particles, say in the case of a heap of HV
glass marbles, then activate the Full Refraction option, which will calculate the
refraction through any internal surfaces as well.
Note that Full Refraction will make render time increase. So do some test
renders first to see if you can get away without this option if render time is of
the essence.
Versions: 6-7.5c
Fog
1057 Geoffrey Kater | Fog | Beginner
Using Fog
Using fog to make items fade into the distance will add a more
dynamic/realistic effect to your scenes. Open the Volumetrics panel by clicking
Volumetrics or pressing F6. For Fog Type, choose Non-linear and choose a fog
color best for your shot. Depending on your object distance from camera, dial in
a fog amount and fog distance until it gives you the desired effect.
Versions: 5-8
Special Effects | 439
Fog
1058 Geoffrey Kater, Kevin Phillips | Fog | Beginner
OpenGL to Preview Fog
Use OpenGL fog to help preview your fog for proper distance and amount
before rendering. Open the Display Options panel (Layout>Options>Display
Options or shortcut “d”). Click the OpenGL fog button near the bottom of the
display panel.
Versions: 5-8
1059
Timothy “Amadhi” Albee | Fog | All Levels
Atmospheric Perspective
Even a small amount of fogging in a scene (even if you’re the only one who
can tell it’s there) helps to make things look “real.” This atmospheric perspective
is present in all environments where there is even the slightest amount of humid
-
ity in the air.
Versions: All
1060
Larry Shultz | Fog | Beginner
Ground Fog Using HV Sprites
A quick ground fog can be created by generating HyperVoxel sprites directly
off the ground geometry itself. Textures, gradients, and weight maps can be used
to determine where the HV sprites are generated.
Versions: 5-8
1061
Larry Shultz | Fog | Advanced
Ground Fog Using Stacked Polys
Another way to create ground fog is to create a stack of polygons closely
grouped together. Give them all the same surface name and make them 100%
transparent. Apply a fractal noise to the surface in the transparency channel
using world coordinates. Now animate the stack of polys up and down very,
very quickly and turn on motion blur.
This will blur the rapidly vibrating stack of polys, but the world coordinates
of the fractal noise will cause the texture not to streak or blur out. The position
of the fractal noise can be animated to make the fog appear to “roll” slightly.
Versions: 5-8
1062
Kevin Phillips | Fog | Beginner
Enlarge Your Environments or Fake DOF with Fog
If you want to blend a ground plane into your background image (either an
environment or composited image), use the fog option Use Background Color
on the Volumetrics tab of the Effects panel, set the fog distance to near the edges
of the ground plane, and adjust until it looks right. This will create the appear
-
ance of your backdrop and ground plane being seamless.
440 | Chapter 9
Fog
You can use this same effect to fake depth of field by fading your environ
-
ment into a blurred background image. The effect is not accurate, but it’s fast
and cheap!
Versions: All
1063
Kevin Phillips | Fog | Beginner
Fade to Black
You can use fog to simulate dark rooms, deep oceans, and anywhere where
items must fade into the darkness. Tweak the effect by adjusting the minimum
and maximum distances for your fog and using a dark color such as black.
Versions: All
HyperVoxels
1064 Larry Shultz | HyperVoxels | Beginner
Creating Water Drops on a Surface Using HVs without Particles
When using HyperVoxels to simulate water on a surface, it isn’t necessary to
use particles.
HyperVoxels only need to see vertices, not polygons. HyperVoxels can there-
fore be generated on any object at every vertex. If the object is SubPatched, the
number of HyperVoxels generated will be based on the SubPatch level. The
HyperVoxels can be turned on and off by applying a texture map in the
HyperVoxels panel under the Geometry tab in the Size channel by clicking on
the “T” button to open the Texture Editor.
The grayscale value of the texture map will determine the size of the
HyperVoxels. Drops, fluids, and other effects can be easily generated this way.
Versions: 5-8
1065
Larry Shultz | HyperVoxels | Beginner
A 3D “Drawing” Effect
For a 3D “drawing” effect, create a particle emitter and animate it along a
path. Set the emitter so that each particle is created quickly and in place and
doesn’t die out.
This is done by increasing the Birth Rate, setting the Lifetime to the length
of the full animation, and setting Parent Motion to 0.
Apply HyperVoxel sprites to the emitter. You can use the default sprite or
apply an image to the sprite as a clip. Keep the size of the sprites small enough
so that the emitter appears to be drawing a line. The emitter can be parented to
the tip of a pencil or pen.
Versions: 5-8
Special Effects | 441
HyperVoxels
1066 Arne Kaupang | HyperVoxels | Beginner
Bubbly Text
To make bubbly text, in Modeler type in and make a text object of what you
want to animate or import an Illustrator EPS file of your text/logo/object. Kill
the polygons so you are only left with the points of the object(s).
Make a morph target of your object in Modeler, and use Drag, Scale, and the
Magnet tools to pull the points down to the bottom and out of frame. Add a little
jitter to the points in your morph to make them a little more random.
Import the object into Layout, assign the MorphMixer plug-in to it, and
blend the two morphs. You’ll see the points rise up from the bottom to shape
your original object. Animate your morph to the timing of your liking, and use
HyperVoxels on the points for a bubbly shape.
Add a little procedural Ripple to the displacement channel of the object to
make it wavy and resemble an underwater feeling. Voilá! Render!
Versions: All
1067
Larry Shultz | HyperVoxels | Intermediate to Advanced
Water Drops without Particles
It’s often desirable to achieve a particular effect as quickly as possible. Many
times people will resort to using particles to create water drops. Here’s a couple
of quick ways to get the effect without using particles:
1. Use textures to displace your geometry to form a bump. The same texture
can also act as an alpha so the displaced geometry can have different surface
attributes (like looking like mercury).
2. Apply HVs to your surface and give them mercury-like surface attributes.
Use textures to turn the HVs on or off in the size channel.
Versions: 6-8
SasLite
1068 Larry Shultz | SasLite | Beginner
Faking Dynamics in SasLite
You can fake dynamics in SasLite pretty easily. Let’s say you want to put fur
on something and have the fur move around a bit in the wind. Maybe you want
to have wind blow through some grass. All you have to do is apply an animated
displacement map to the object that has SasLite applied to it. As the object is
deformed, the fur will displace with it. If you don’t want to see the surface dis
-
placing, simply copy and paste your object into a new layer in Modeler. Give the
copy a surface name of fur. In Layout make the fur object 100% dissolved in the
Object Properties panel. SasLite doesn’t care if the base object it’s attached to is
visible or not. If you’re animating the original object using bones, make sure the
fur object is set to use its bones as well. Now you can apply displacement maps
to the fur object and see the fur move.
Versions: 5-8
442 | Chapter 9
SasLite
1069 Jennifer Hachigian, Larry Shultz | SasLite | Advanced
Motion Designer and SasLite Hair Guides
SasLite hair guides are chains of two-point polygons, and neither one-point
nor two-point polygons can act as collision or self-collision objects. If you use
Motion Designer on SasLite hair guides directly, the hair guides will ignore and
intersect each other. It’s better to animate a curtain stand-in that matches the
general shape of the hair to calculate an .mdd file for the hair. Then, play back
the .mdd file on the real hair guides with MD_MetaPlug, using the curtain
stand-in as the cage object. The curtain stand-in will be able to detect self-
collision situations, and if you turn on Fiber Structure for the stand-in, it will
behave even more like real hair.
For a similar setup in LightWave 8, calculate ClothFX on the curtain stand-
in and make the SasLite wig object the child of the curtain stand-in object. For
the stand-in object, set the Fiber Effect to Y axis in the Advanced tab of
ClothFX. Apply FX_MetaLink to the SasLite hair guides so that each point of
the hair guide object tracks its closest point equivalent on its parent.
Additional topic from Larry Shultz
Dynamics can be applied to SasLite hair guides. Let’s say we want to ani-
mate hair guides that are part of a head. Create a low-resolution proxy object
that is about the same volume as the hair guides. Attach the proxy object to the
head and tell it to use the bones in the character or head. Apply Motion Designer
to the proxy object and let the simulation run.
You can save out the MDScanned data for the proxy object and reapply it to
the hair guides object using MDMetaPlug.p. What this does is allow the
low-resolution hair proxy to act as a deformer for the hair guides. Motion
Designer needs edges to work properly and hair guides don’t have enough edges
to work properly.
Versions: 6.5-8
1070
Lee Stranahan | SasLite | Beginner
SasLite Hint Roundup
Here’s a general hint free-for-all on using LightWave’s built-in hair, fur, and
grass rendering system, in no particular order.
n
A lot of the settings in SasLite will go above 100% and below 0% if you
manually enter the number instead of using the sliders. Test this by entering
extreme numbers into the numeric panels and see what the permissible val
-
ues are.
n
With controls like Density and Length, a little change goes a long way.
n
Use multiple instances of SasLite — you’re limited to eight per scene, but
eight is a lot so use ’em!
n
The quickest way to get multiple instances going is to use the plug-in panel’s
copy/paste functions.
n
If you are using multiple instances in the same area — for example, to create
a “salt and pepper” beard look with one instance of white hair and one
instance of dark — you need to vary the settings for Frizz, Drooping,
Special Effects | 443
SasLite
Clumping, or the Comb setting. Those settings all move the hairs around;
otherwise, your instances will be on top of each other.
n
Turn up antialiasing to its highest level.
n
If you are doing an animation, you might want to set Render Backside Fibers
to 100 in the Pixel Filter version of the SasLite plug-in. This will slow ren
-
der times but avoid embarrassing “pop-up” hairs from suddenly appearing.
n
If you are doing a heavy-duty hair project — yes, the full version of
Sasquatch is worth it.
Versions: All
1071
Lee Stranahan | SasLite | Beginner
Don’t Hold Your Breath
No, plug-in genius Steve Worley never does holiday specials or sudden pro
-
motions. He does offer substantial discounts when products first come out and
volume discounts, though. When you buy something from Steve, you won’t see
it priced lower later and get mad. So, don’t hold your breath; buy with confi-
dence — and if it’s Worley, buy it early!
Versions: All
Environments
1072 Kevin Phillips | Environments | Beginner
The Difference between Backdrop and Background
There’s two ways to place images or effects into the background of a Layout
render — Backdrop/Environment or Background Image. Each of these options
can be found under the Scene tab in the Effects section of the menu bar, but each
works in a completely different way!
A backdrop/environment is a color, gradient, or plug-in that paints itself onto
a giant infinite sphere that surrounds your 3D scene. Because of this, Layout can
see it in the 3D world and therefore use it in various ways such as in reflections,
refraction, radiosity, and more.
A background image is placed into the background as part of the
compositing options in Layout. That is, it’s “painted” into your rendered image
(and not part of the 3D scene), filling pixels where no 3D models were rendered.
Technically, it doesn’t exist in the 3D world at all — it’s just painted in to fill in
holes or, to be more exact, it’s a postprocess effect that happens after all the 3D
calculations are finished. That means that Layout cannot see it or use it for
reflections, etc.
Note that in LW 8, these settings can be found under the Windows menu or
by pressing Ctrl+F5.
Versions: 6-8
444 | Chapter 9
Environments
SkyTracer
1073 Lee Stranahan | SkyTracer | All Levels
Use Sky Baker When Using SkyTracer
SkyTracer makes neat clouds and skies, but your scene will take a real ren
-
der hit if you have it turned on. In 99% of the cases where you use SkyTracer,
it’s much better to use Sky Baker, which is built right into SkyTracer. The baker
really just renders out an image map at the resolution you choose; about 1500
pixels or so will give you a nice enough image, although you get surprisingly
good results even at a resolution of 600 or so. I personally like the Spherical
Wrap setting, but these are just suggestions.
Then, assuming you used Spherical, you just make a sphere big enough to
cover your scene, flip the polys, and texture the big sphere — or skydome —
with the image that Baker created.
Versions: All
1074
Kevin Phillips | SkyTracer | Beginner
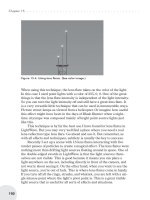
Sun Positioning in SkyTracer2
By default, SkyTracer2 adds its own “sun” light called SKT_Sun and atta-
ches a motion modifier called Sun_Spot, which controls the position of the sun
based on country, city, and date/time. You can adjust this modifier directly from
the Suns tab in the SkyTracer options panel (the Sun Position button will acti-
vate the SunSpot settings panel for SKT_Sun).
This is not the easiest way to set up the location of a sun in my humble opin-
ion, so I often remove the motion modifier from SKT_Sun in the Motion options
panel, or use a different light as a sun source altogether (for example, the key
light).
In SkyTracer2, rotation controls the position of the sun (unlike Skytracer1,
which would generate the sun at the location relative to the camera — which in
some ways made the positioning a lot simpler for people like me!).
Heading controls the direction of where the sun is positioned around the
camera, and the pitch controls the elevation of the sun in the sky. Moving the
light source has no effect on the direction and position. The easiest way to think
of the sun is as a distant light, which doesn’t have a particular point of light
emission, just a direction.
Versions: 7-7.5c
1075
Kevin Phillips | SkyTracer | Beginner
Instantaneous Cumulus Clouds
Anyone who’s used SkyTracer2 and activated the clouds will know that the
default clouds really don’t look much like clouds at all, more like blobby shapes.
While you can tweak the texture, not everybody wants to spend a lot of time
editing procedurals to get a decent set of clouds.
Special Effects | 445
SkyTracer
To get nice big clouds quickly in SkyTracer2:
1. Select the Clouds tab and activate Low Altitude clouds.
2. Click the Texture button to open the Texture Editor.
3. Change the procedural to STClouds.
4. Make sure that Cloud type is Cumulus for nice big puffy clouds.
5. Change Texture Axis to Y.
6. Change Big Scale to 1.0. (You can leave the other settings at their defaults.)
Ta-da! Instant improvement on the default clouds, I’m sure you’ll agree!
And with very little tweaking required whatsoever.
Versions: 7-7.5c
1076
Lee Stranahan | SkyTracer | All Levels
Bored? Rainy Day? Make Some Skies
If you have a couple of free hours, prebake a whole bunch of sky images.
You’ll be glad you did later on.
Versions: All
Textured Environment
1077 Dave Jerrard | Textured Environment | Intermediate
Textured Environment
For better-looking backdrops, use the Textured Environment plug-in found
under the Backdrop tab on the Effects panel. By selecting a gradient and setting
its Input Parameter to Pitch, you can make a gradient backdrop that gives you
far more control than the normal gradient backdrop does. You can even layer
textures to simulate clouds in it. Try adding a Turbulence texture on top of it,
setting its Falloff to –5000 and the Falloff Type to Linear Y. This will make the
texture disappear at the horizon, so you can selectively texture either the top or
bottom half of the environment. This value assumes the scale, shown on the
Effects panel, is left at the default of 1 meter.
Versions: 6-8
1078
Emanuele Salvucci | Textured Environment | Advanced
HDR Images Out of Normal Ones
HDR (High Dynamic Range) image backgrounds are mainly used for global
illumination purposes.
There are some excellent HDR image collections around, but you may want
to create your own at some point.
Use the following steps to add extra luminosity to any image:
1. Load an image into an empty scene.
2. In the Backdrop tab of the Effects panel, add the Textured Environment
plug-in.
3. Set the Axis option of the Textured Environment plug-in to Z.
4. Enter the Texture option, and set the loaded image to be the first layer.
446 | Chapter 9
Textured Environment
5. Set Blending Mode for this layer to Additive, set Projection to Planar and set
Texture Axis to Z.
6. Create a new layer of type Gradient; we’ll be setting keys for the layer later
on.
7. Set Input Parameter to Previous Layer and Blending Mode to Alpha.
8. Copy the image map layer and paste it using Add to Layers.
From top to bottom, the first layer adds the image to the black background
color, the third layer adds the extra luminosity needed, and the second layer
decides where the image is going to be “overbrightened.”
You can boost the amount of added luminosity by setting Layer Opacity to
more than 100% for the third layer.
Before setting the gradient’s keys, we should analyze the image by turning
off the last two layers in the Textured Environment plug-in, turning on the
Image Viewer FP in the Rendering Options panel, and making a test render.
Sample some values from the rendered image for the areas you want to
overbrighten (the sun or the sky would be perfect areas for this purpose), hold
-
ing the right mouse button on the image in the Image Viewer FP.
Now back in the Textured Environment plug-in, set keys for the gradient
layer. If the sampled values, for the sun for instance, were around 99%, set a
white (255,255,255) gradient key at parameter 0.99 and set a black one right
before that value (i.e., at parameter 0.9).
To test where on the original image you’re actually adding brightness, do the
following in the Texture options of the Textured Environment plug-in:
1. Deactivate the first image map layer.
2. Activate the second and third layer.
3. Make a test render.
Once you’re happy with the result, activate all three layers, set the camera’s
width and height to the size of the original image, make a render, and save the
result using the Radiance (.hdr) format.
If gradients aren’t enough to locate the areas to overbrighten, you can substi
-
tute the gradient layer with a proper alpha map. Since we have already
approximately defined an alpha map using the gradient, we can render and mod
-
ify it in a paint program:
1. In the Textured Environment plug-in, turn off the first layer.
2. Set the Blending Mode to Additive for the gradient layer.
3. Set the Blending Mode to Alpha for the third (last) layer.
4. Render and save the image.
You can now retouch the generated alpha map and replace the gradient layer
with it.
Versions: 7-8
Special Effects | 447
Textured Environment
1079 Dave Jerrard | Textured Environment | Beginner
Save Presets
If you make a textured environment that you like and want to use it in
another scene, open the scene that uses this environment. Open VIPER so you
can see the plug-in’s effects previewed there, then double-click the image in
VIPER. This will save a preset for that environment. Now you can load this tex
-
ture into any other scene easily by adding the Textured Environment plug-in,
opening the Preset Shelf, and double-clicking the preset. The texture will auto
-
matically load into the plug-in for you.
Versions: 6-8
1080
Steve Warner | Textured Environment | Beginner
Custom Environments
Use the Textured Environment plug-in (found on the Effects panel’s Back
-
drop tab) to quickly set up a library of custom environments. To do this, turn on
VIPER and bring up the VIPER preview window so you can see what you’re
doing. Begin by adding a gradient for the sky color. Then add several layers of
procedural textures for clouds. To give your clouds depth, copy one of the layers
and paste it back on top of itself. Then offset the lower layer’s X and Y position
and give it a darker color than the original. This will create the “silver lining”
effect seen in clouds. Also, try experimenting with the blending modes for each
layer to achieve different effects. When you’re happy with your results, click on
the Add Preset button in the VIPER window. Test out your new environment by
spinning your camera around and rendering out an animation. You’re now in
control of a seamless 3D environment.
Versions: All
1081
Kevin Phillips | Textured Environment | Beginner
Quick Space
You can create colorful space environments very quickly by adding Texture
Environments. Add the Textured Environments modifier to the list in the Back
-
drop panel (under the Scenes tab), double-click on it to bring up its properties,
and then click on the Texture button to open the Texture Editor panel. Start by
adding an FBM procedural texture. Invert it, make its color a light blue, and give
it a 50% contrast. Set the texture size to 150m, 150m, 150m. This layer will
form a nebula for our space environment, so it needs to be huge. Also, set its
layer opacity level to 50% to fade it from being too intense.
Next, add another procedural texture layer. Make this layer a Crust proce
-
dural. The color should be white. Set Coverage to 0.05 and both the Ledge Level
and Width to 0.2. You can leave the texture size at its default 1m. This proce
-
dural creates a series of random spots, hence using a small scale will allow Crust
to generate thousands of stars for us.
Click the Use Texture button to close the Texture Editor window, and then
set the Texture Environment scale to 10mm to scale the space to fit nicely. This
scale option can be tweaked — The larger this value, the larger the environment
448 | Chapter 9
Textured Environment
will appear (as though through a magnifying glass) which can look quite strange
should the stars suddenly become huge circles!
Make sure that the backdrop color is black, and render!
Versions: 6-8
Image World
1082 Leigh van der Byl | Image World | Beginner
The Importance of Creating Environments
When you are creating any kind of scene in CG, it is extremely important
that you give that scene some kind of surrounding environment, whether mod
-
eled or simulated. This is because when you create a scene that has no environ
-
ment, you are basically creating something existing in a total void, which is very
unrealistic. A void also does absolutely nothing to enhance your scene whatso
-
ever. Environments add to your scene by providing something for your objects
to reflect, as well as by providing lighting, when using images with a high
dynamic range.
LightWave’s Image World allows you to take an image and wrap it around
the scene, thus forming a total environment surrounding the entire scene.
Image World works with High Dynamic Range (HDR) images, which are
images that have luminance capabilities, since they contain pixel values that
extend the usual range of images. Essentially these images can actually light
your scene realistically, especially when used with radiosity. You simply load an
HDR image (you can download free ones off the web, and there are also a num
-
ber of commercial packs of HDR images available for purchase) into Image
Special Effects | 449
Image World
World, adjust its Heading and Pitch values (to rotate it into a desirable position),
and adjust the Brightness, which basically controls how brightly the image will
light the scene.
Versions: 6.5-8
1083
Larry Shultz, Kevin Phillips | Image World | Beginner
Background Images
Sometimes we may want to load an image to use as a source of light when
using global illumination or simply for the reflections on particular surfaces. At
the same time we may not want this image visible. We may prefer a solid black
background or simply a different background image to be visible. The simple
way to do this is to load the background image that we want to use as a light or
reflection source into the Textured Environment plug-in or Image World. We can
also load a blank image and apply that as a background in the Compositing tab.
Versions: 6-8
1084
Leigh van der Byl | Image World | Beginner
Dealing with Artifacts from HDR Images
When you are using HDR images in Image World for lighting your scene in
conjunction with radiosity, you often encounter an abundance of unsightly white
speckles in your render. This is because of the image that you are using, and is a
common problem.
One way to minimize or even totally annihilate these artifacts is to use the
Full Precision Blur filter on the HDR image in the Image Editor. This filter is
found under the Processing tab.
450 | Chapter 9
Image World
This generally does the trick. Sometimes you’ll still occasionally encounter a
few speckles in your renders, but increasing the blur on the image further can
help to eradicate them completely.
Versions: 6.5-8
1085
Gerald Abraham | Image World | Intermediate
LDR Images
Although Low Dynamic Range images do not contain light value informa
-
tion, they can be used in combination with Image World to give a bit more
diffuse color to a scene.
Versions: All
1086
Policarpo | Image World | Beginner
Low-Res Image Illumination
Experiment with low-res image files to illuminate your scene. As an experi
-
ment, load up a tried-and-true .hdr image file, save out another 32-bit version of
it from the Image Editor, and compare the times and results. Also mess with the
size of the image that is driving your renders. A lot can be done with a little
experimentation.
Versions: 7-8
Filters
1087 Geoffrey Kater | Filters | Beginner
Film Grain
Run a noise filter over your animation to make it feel more like true film
grain.
Versions: 5-8
1088
Kevin Phillips | Filters | Beginner
Getting the Corona Input Threshold
Have you ever wanted to use the Corona tool on the specular highlights in
your render, but have no idea how to determine the correct Input Threshold to
trigger the Corona effect? The answer to this question and other buffer values is
simple!
1. Temporarily deactivate the Corona filter (if it’s active)
2. Add the Render Buffer View image filter, double-click, and choose the
buffer(s).
3. Make sure that the Image Viewer is active (Rendering Options panel>Render
Display).
4. Press F9 to render the image.
5. Select the buffer from the Image Viewer’s Layer menu.
If you move the mouse pointer over the “darkest” pixel in this buffer where
you want Corona to be applied and then click the left mouse button, the value
Special Effects | 451
Filters