LightWave 3D 8 1001 Tips & Tricks phần 6 docx
Bạn đang xem bản rút gọn của tài liệu. Xem và tải ngay bản đầy đủ của tài liệu tại đây (1.23 MB, 65 trang )
659 Policarpo | General Tips | Beginner
Train Your Eye
It helps to train one’s eye by studying paintings by the great masters like
Caravaggio, Vermeer, Rembrandt, and others. Any book on art history will pro
-
vide you with ample examples of how painters have learned to depict reality via
the play of light and shadow. This is another good reason to use the Google
Image Search function to build up your library of reference material. When you
find an image that inspires you, go about recreating it in 3D so that you come to
a better understanding of what it takes to achieve a particular look.
Versions: All
660
Policarpo | General Tips | Beginner
Test Lights
Set up a basic scene and test out the different light types and properties for
these lights in LightWave. See what the different falloff modes do to the power
and quality of light in your scene. Create a default scene filled with interesting
objects that you can reuse during your testing and experimentation process.
Versions: 6-8
661
Lee Stranahan | General Tips | All Levels
Turn Ambient to Zero; Except When Radiosity Is On
It’s a pretty common hint to turn ambient intensity down. I say turn it to
zero, period. Why? Because it’s evil, that’s why. It’s nondirectional, additive
light — that means it makes all your objects slightly brighter. This is useless. It’s
like a brightness control, and it adjusts your black point higher. As I said — evil.
If you want ambient light, toss in a distant light at a low level.
Except…when radiosity is turned on, ambient intensity becomes a different
thing. Now, it adjusts the level of radiosity bounce and it’s a good thing, indeed.
In fact, it’s often useful to crank it up to 20, 40, 60% — levels nobody in their
right mind would use with regular ambient light.
Versions: All
662
Geoffrey Kater | General Tips | Beginner
Ambient Intensity
Set Ambient Intensity to 0% in the Global Illumination panel. Use a distant
light or spotlight to create more realistic reflected light. You can open it by
clicking the Global Illumination button at the top of the Light Properties dialog
(tap “L” then “p”).
Versions: 5-8
Lighting | 297
General Tips
663 Eki Halkka | General Tips | Intermediate
Recreating the Sun
Even though the sun is a huge luminous gas ball, it’s also very far away and
it only covers a small portion of the sky. So it can be considered a small light
source in relation to your scene. As the sun is extremely far away, it also has a
unique property not often seen in other, worldly light sources: Light rays coming
from the sun are, in practice, parallel. Shadows cast by the sun grow very little
over distance.
LightWave’s distant light mimics these properties. It can be thought of as an
infinitely small light source, infinitely far away. For many scenes, this is a good
enough approximation for a sun.
But if you wish to take your render a step further, you should take into
account the fact that the sun is not a pinpoint light source. A distant light’s shad
-
ows are always hard. Even though the sun’s shadows don’t grow much bigger
over distance, they do get a bit softer. The soft edges, called penumbra, appear
where the shadow-casting object blocks the light source, the sun, only partially.
You can try using a shadow-mapped spotlight, shining from very far away. This
will give you softer shadows, but their softness is constant regardless of the dis-
tance from the shadow-casting object.
There are a few ways to do more realistic shadows. Maybe the most accurate
way is to use an area light, moved very far away and scaled so that its size is
approximately the same as the real sun’s perceived size, relative to the scene.
Another way is to use multiple distant lights, each with their rotation slightly
offset from each other and casting their shadows in slightly different directions.
When you have enough of these lights, their shadows will blend together into
one soft-looking shadow. You can use the spinning light trick to multiply the
apparent number of these lights by the number of antialiasing passes, or even
create the same result with a single distant light.
Versions: 6-8
664
Policarpo, Eki Halkka | General Tips | Intermediate
Spinning Light Trick
Use the spinning light trick to simulate GI. To get smoother shadows, just
use a higher AA setting.
LightWave calculates motion blur by rendering a different time step at each
antialiasing pass and combining these to a single image. If the Antialiasing set
-
ting is low and there’s fast motion in the frame, a series of ghost images can be
seen. The spinning light trick uses this phenomena to multiply the apparent
number of lights in the scene. When a high enough Antialiasing setting is used,
the shadows from the lights blend together, giving the appearance of a single
soft shadow.
With a basic spinning light setup, the goal is to make the light rotate a full
revolution, 360º, during the antialiasing passes. LightWave’s default motion blur
length is 50%, so to get 360º of rotation, the light has to turn 720º each frame.
One way to create spinning light rigs is by using Overcaster from Eki’s PlugPak.
298 | Chapter 7
General Tips
When the user runs an Overcaster script, the script first reads some parameters
from the scene. The most important is the motion blur length of the current cam
-
era. If the user has set the motion blur to, for example, 5%, the amount of
spinning must be increased to 7200º to get a full revolution during the
antialiasing passes, as the desired 360º is 5% of 7200.
With high antialiasing and normal motion blur, a single spinning light will
shine from 17 different positions. There’s no difference in render time compared
to a regular light.
Follow these steps to create a global illumination rig with spinning lights:
1. Create a hemisphere object and hit “f” to flip the polygons.
2. Create a Luxigon object via Setup>Layout Tools.
3. Select the Light Type and set the Color and Intensity options.
(You can use any type of light you wish, but I prefer
ray-traced shadowed distant lights.)
Lighting | 299
General Tips
4. Send the scene to Layout and select your Hemisphere object.
5. Select the Convert Luxigons item from the Items>Lights drop-down (use
Utilities>Additional in LW 7.5), and name your light rig set accordingly.
Your light rig is created.
300 | Chapter 7
General Tips
6. Select the Hemisphere polygon object. In the Object Properties panel, select
the Render tab and check the following: Unseen by Rays, Unseen by Cam
-
era, and Unaffected by Fog. This will ensure that it does not appear in the
final render.
7. In LightWave 8, use the Scene Editor to multiselect your lights. (This is only
available in LW 8.)
Lighting | 301
General Tips
8. Right-click and choose Select in view ports from the drop-down.
9. Adjust any settings you want to alter in the Light Properties panel, changing
light and shadow types and doing a series of render tests until you achieve
the look you want.
10. Select the parent object for your light rig. Go to frame 1 and set the Heading
field to 60º (720/12, the number of sides in the hemisphere).
11. Open the Graph Editor and select the Heading channel. Select Repeat from
the Post Behavior drop-down.
302 | Chapter 7
General Tips
12. Set Antialiasing to Enhanced Low or higher and activate Dithered in the
Motion Blur drop-down.
13. Activate Ray Trace Shadows in the Render Options panel.
Lighting | 303
General Tips
The look and feel of GI without the render time hit.
Notes on optimizing a scene:
n Reduce the number of luxigons you use by using less geometry during setup.
n To smooth your ground plane shadows, increase your AA settings.
n Use multiple colored lights in your scene to enrich the color space of the
final render.
n Use one key light to drive your primary shadow in your scene.
Versions: 7.5-8
665
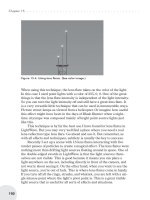
Eki Halkka | General Tips | Intermediate
Creating a Sun
Here’s how to create a basic spinning distant light sun.
1. Start with a new, empty scene. Take the default distant light and rename it
“Sun.” Reset its motion and rotation.
2. Add two nulls to the scene and name them “Sun_handle” and “Sun_spinner.”
Parent (“m,” parent item drop-down) the spinner null to the handle and the
distant light to the spinner.
3. Go to frame one and rotate the spinner null’s bank 720º. Create a keyframe
(Enter). Open Graph Editor (Ctrl+F2) and select the bank rotation channel.
Set Pre and Post Behavior to Repeat.
4. The more you rotate the sun light, the bigger the light source’s simulated
diameter and softer the shadows. Rotate the sun light by 0.5º at frame zero
on heading or pitch to roughly match the sun’s diameter, as perceived here
on earth.
5. You can now rotate the handle null to aim your sun, treat the null as if it
were the distant light itself. The spinning light trick is done, but there’s one
more thing to do. As the spinning light trick relies on LightWave’s internal
motion blur calculations, you will need to turn it on in the Camera Options
panel (Shift+C, p). Usually a sun will look good enough with low
304 | Chapter 7
General Tips
Spinning spotlights with shadow-mapped shadows and four distinct
light colors.
antialiasing and normal motion blur, but if you make the spinning light
softer, you will need to use higher settings.
For more information on spinning lights, see:
/> /> />I have created a collection of LScripts that automate the creation of a variety
of spinning light rigs ranging from a basic sun similar to the above to a full
global illumination setup. Have a look; you can use the scripts for free, as long
as you don’t mind a few nagging requesters!
( />Versions: 6-8
666
Dave Jerrard | General Tips | All Levels
Project a Procedural through a Spotlight
You can project a procedural texture through a spotlight using the Projected
Image feature. The trick is to open an image in the Image Editor and then apply
the Textured Filter plug-in. This will allow you to texture the image as though it
were a surface. By applying a procedural like Ripples or Underwater, you can
have an animated procedural texture applied to the image, which would also ani-
mate when it’s projected through a spotlight. It’s a good idea to use a large
image since the procedural texture will be bitmapped when it’s projected, and
the resolution will be the same as the image you’re using. Use a large image that
only has one bit plane (two colors) to get the largest resolution without eating up
a lot of RAM.
Lighting | 305
General Tips
The following is a large 2000 x 2000 pixel image that has an Underwater
procedural applied.
When this image is projected through a spotlight, it creates an animated
underwater effect.
Versions: 6.5-8
667
Dave Jerrard | General Tips | All Levels
Shading Noise Reduction
If you’re using linear or area lights (or even shadow maps), radiosity, or
caustics, you might want to turn on the Shading Noise Reduction option in the
Global Illumination panel. This was added to help reduce the grain that fre
-
quently appears in images using these features. On a typical frame it will add 5
to 10 seconds of render time to the end of each render pass. What it really does
is perform a small blur to the shading buffer (which you can view separately
using the Render Buffer View image plug-in and the Image Viewer).
However, this can blur out small texture details, such as those caused by fine
bump maps, so you’ll have to determine whether to use it on a scene-by-scene
basis.
Versions: 6.5-8
668
Dave Jerrard | General Tips | All Levels
More on Shading Noise Reduction
Shading Noise Reduction can also be used to subtly soften ray-traced shad
-
ows cast by distant, spot, or point light sources. Again, this may have
detrimental effects to fine textures, so you’ll have to test this for each scene.
Versions: 6.5-8
306 | Chapter 7
General Tips
669 Dave Jerrard | General Tips | All Levels
Area Lights
When using area lights, a quality level of 3 will give you good results and is
all you really need, especially if you’re using antialiasing. This will save a fair
amount of render time with little, if any, reduction in image quality.
Versions: 6.5-8
670
Dave Jerrard | General Tips | All Levels
Distance from Light vs. Light Size
A good rule of thumb when using area lights is to make sure that the dis
-
tance from the light to the smallest object is not less than the size of the light. If
a large area light is placed too close to a small object, it will render with a large
amount of grain and the lighting will look terrible, even at the highest quality
setting. When any surface is too close to an area light, it risks falling into a small
shadow area that surrounds the light for a short distance. This is caused by the
acute angles between the surface and the surface of the light. At these angles, the
area light is mostly seen nearly edge on, and thus very little of its surface affects
objects that are so close. If you need to create a large soft light effect, consider
using an array of smaller area lights, or possibly even radiosity.
Versions: All
671
Dave Jerrard | General Tips | All Levels
Lens Reflections and Glow Behind Object
Reflections take place whenever a bright light enters a camera lens and, as
the name implies, reflects back and forth between the different lens elements. In
fact, they are artifacts that happen in the camera, and since they’re closer to the
film plane than anything else that’s outside the camera, they will always appear
superimposed on top of everything else in the scene. An object could never
block out part of a reflection like this*. It would have to be inside the camera to
do so. If you want to have a light glow behind an object and have it cause lens
reflections, use two lights — one with Glow Behind Objects turned on and the
other to cast the reflections. This second light should also have Fade Behind
Objects turned on.
Ü
Note: This is also true for the Random Streaks option, which are caused by smudges and scratches on
the camera lens.
*Technically, an object can partially block lens reflections in a real camera, but
not the way it happens in LightWave. In a real camera, each reflection would
have a silhouette of the object cutting into it. For example, if a man stood on a
hill in the distance, with the sun behind him, he would be a black shape against
the sun. The shape of the remaining visible part of the sun would be the shape
that’s reflected in each lens.
Lighting | 307
General Tips
The following image is wrong. The only way this could happen is if the
space station were floating in front of an image that had this lens flare.
The unobstructed lens reflections correctly obscure the station.
Versions: All
672
Dave Jerrard | General Tips | All Levels
Shadow-mapped Shadows
Shadow-mapped shadows can be improved by spinning the light 180º on its
bank every frame and using motion blur. Their accuracy will be increased with
-
out needing to increase their resolution, and if you’re already using motion blur,
there will be a negligible hit on render times. Each render pass will generate a
new shadow map at a new angle, and at the end of the passes, these shadows
will be averaged. This will reduce the leaky shadow effect that is common with
shadow maps, while at the same time speeding up the render by saving time on
calculating much larger shadow maps (which also eat a lot more RAM).
308 | Chapter 7
General Tips
Here, a shadow map with the size set to 200 looks very chunky and
pixelated.
Here is the same shadow map, but this time the light is spinning on its bank.
Motion blur smoothes out the errors and creates a better-looking shadow.
Versions: All
673
Rob Powers | General Tips | Intermediate
Parenting Tricks
When setting up a standard lighting rig such as a three-point light kit, I’ve
developed a few simple parenting tricks that make the setup easily adjustable.
For a three-point light kit, I usually create a key, fill, and back light. I then add
four nulls to the scene. I name them as follows: Master Light Kit null, Key Light
null, Fill Light null, and Backlight null. I then parent the Key Light null, Fill
Light null, and the Backlight null to the Master Light Kit null. Next, I parent the
key light to the Key Light null, the fill light to the Fill Light null, and the back
light to the Backlight null. I then move and rotate all three lights into the proper
position and point them toward the center area. I can then use the Master Light
Kit null to rotate and scale the entire rig as one group. I can also use each indi
-
vidual light’s null to rotate that light around the central focus of the light kit. The
nulls become the pivot point to rotate the lights easily around your subjects. This
Lighting | 309
General Tips
way the direction of the key light, fill light, or back light can quickly be
changed. Also, use Load From Scene to load this rig into any new scenes and
then use the Master Light Kit null to scale the rig to fit that scene.
Versions: 7-8
674
Rob Powers, Steve Warner | General Tips | Intermediate
Changing Color Display on Lights
I prefer to change the color display settings on my lights to clearly identify
the type of light in Layout. That way I can easily find my key light, fill light, and
back light in any viewport at a glance. I typically use red for the key light, light
blue for my fill light, and orange for the back lights. The specific color choices
are not important but you should try to maintain consistency in your light kits.
Developing a “color coding” system like this for your lights will save time when
reusing light kits and working with larger projects where you must work with
numerous scenes.
Versions: 7-8
Ü
Note: You can change the color display settings for objects, lights, cameras, etc., from the Scene Editor.
675
Rob Powers | General Tips | Intermediate
View Lighting Effects One at a Time
When doing the initial lighting on your scenes it is often helpful to view the
effect of the lights one at a time. This will allow you to easily see the influence
that each light has on the overall “mood” of the scene and will help you under-
stand what adjustments are needed. Worley’s G2 lighting plug-in will do this
easily with the click of a button in the G2 preview window. However, you can
easily do this in LightWave by just turning down the intensity of all other lights
or by unchecking Affect Diffuse and Affect Specular in the Light Properties
panel.
Versions: 7-8
676
Rob Powers | General Tips | Intermediate
The Size of an Area Light Will Influence How Fast the Scene Will Render
You can simply select the area light and then use the transform and scale
tools in Layout to resize it. Often smaller area lights positioned closer to the
objects will work well and will render much faster. Also, larger area lights can
increase the amount of “shading noise” or speckles in the renders. In that case,
checking Shading Noise Reduction in the Light Properties Global Illumination
panel will help reduce this.
Versions: 7-8
310 | Chapter 7
General Tips
677 Rob Powers | General Tips | Intermediate
Adjust Shadow Colors
When trying to set up realistic lighting, don’t forget to adjust the light’s
shadow color in the Light Properties panel to a more appropriate color for your
environment. If you are doing a shot on the moon, the default solid black color
might work well. For most other environments, the shadows should usually be
adjusted to match the ambient and bounce lights in the scene. For example, the
shadows in many exterior day shots would have a slight blue tone because of the
large blue sky ambient light present.
Versions: 7-8
678
Larry Shultz | General Tips | Beginner
Negative Lights
Many times when lighting a scene I will end up using many different lights.
Most of the time I don’t want multiple shadows. This means I’ll turn shadows
off for all the lights except one that may be pointed at a character. Sometimes
what happens is the interior of the character’s mouth may appear to “glow”
because the surfaces are being affected by lights that are not casting shadows.
Rather than go adjust the diffuse values on the surfaces in the mouth, I may put a
point light in the character’s mouth and parent it to a head bone. I will give the
light a negative value, which means the light will remove light rather than cast
it. It’s important to give the light falloff so it doesn’t affect any other surfaces or
exclude it. This will help darken the inside of the mouth. This is also a great way
to darken parts of a room in corners, for example. If a spotlight is used as a neg-
ative light, the dark area it creates can be “sculpted” or shaped by projecting an
image through the spotlight.
Versions: 5-8
679
Larry Shultz | General Tips | Intermediate to Advanced
Eye Lights
Eyes are the windows to the soul. Eyes are what make characters look alive.
Sometimes when a character goes into shadow, the eyes lose their highlights and
appear dull and lifeless. One trick I use to keep the eyes looking lifelike is to
create spotlights that shine directly into the character’s eyes. These are narrow
spotlights with only specularity turned on. You can also have the lights only
affect the eyes. These eye lights can also project images onto the eyes. Be sure
to parent the lights to the character’s head bone so they follow the character
around.
Versions: 5-8
Lighting | 311
General Tips
680 Patrik Beck | General Tips | All Levels
Never Use Several Pure White Lights to Light a Scene
Changing the color value of the lights in the scene by just a few notches
makes it much more natural and pleasing to the eye.
Versions: All
681
Patrik Beck | General Tips | All Levels
Using Negative Lights
Lights can have negative values; this means they will actually suck light out
of an area. It is a common problem that many computer-generated images are
overlit. Using a negative light with falloff is really handy for darkening corners
of a room or the underside of things. If the negative light is tinted, say for
instance a blue light with an intensity value of –50%, it will suck the blue com
-
ponent out of the surrounding lights.
Versions: All
682
Patrik Beck | General Tips | All Levels
Understanding How Linear and Area Lights Can Cast Soft Shadows
You know that linear and area lights can be used to generate soft-edged
shadows, but in practice the shadows can be tricky to control. It helps if you
imagine a linear light as having a point light at each end, and an area light hav-
ing points at the four corners. The shadows those points cast show the angles of
the shadows. The bigger the lights, the wider apart the shadows will spread.
Versions: All
683
Patrik Beck | General Tips | All Levels
Working with Caustics
Caustics are the specks of light that bounce off of a reflective surface. Often
the lights illuminating the scene do not throw the caustic specs where you want
them. To give you more control, clone the light that is generating the caustics
and have it affect only caustics. Reposition the light to give it a more desirable
caustic angle.
Versions: All
312 | Chapter 7
General Tips
684 Patrik Beck | General Tips | All Levels
Faking Radiosity Effects
You can fake radiosity effects by using settings in the Light Properties panel.
Using either point or spot lights, go to areas where there is a strong color on
which you would expect to see some bounced illumination, say a red wall. Add
a light with enough falloff so that the light does not reach very far. Set the light
color to match the wall. Use Affect Diffuse, and turn off Affect Specular, Affect
Caustics, and shadows for that light. If possible, exclude the red wall from that
light’s influence. These settings are necessarily subtle but can achieve pleasing
visual effects.
Versions: All
685
Patrik Beck | General Tips | All Levels
Caustics
Caustics are caused by refraction in transparent surfaces and reflection, but it
is not necessary to activate Trace Reflection or Trace Refraction for there to be
caustics.
Versions: 6.5-8
686
Patrik Beck | General Tips | All Levels
Falloff
If the layout of the scene covers a wide area, be sure to use falloff for the
lights. Lights with no falloff will go on forever and ever, which means a porch
light a mile away will still cast a shadow or add to the illumination of the current
area.
Versions: All
687
Patrik Beck | General Tips | All Levels
Watch Out When Using Distant Lights That Cast Shadows
Beginners will often grab the default scene light (which by default is a dis
-
tant light) and place it inside an object like a house. This leads to the odd
situation where it will cause the house to cast a shadow from the outside when
ray-traced shadows are turned on. Distant lights start at an infinite point behind
them and go to an infinite point in front of them, following a path parallel with
the angle of the light item, which means the location of the light itself is incon
-
sequential as far as lumination and shadows are concerned, only the rotational
angle of the light. For lighting enclosed spaces, it is better to use any type of
light setting other than distant.
Versions: All
Lighting | 313
General Tips
688 Lee Stranahan | General Tips | All Levels
Use Light Exclusion, Often Often Often
Many people don’t take advantage of this hugely useful feature. Excluding
lights let you handpick which objects are affected by a light and which aren’t.
This gives you pinpoint control over your lighting setups and allows you to have
lights serve very specific purposes in a scene.
Versions: All
689
Lee Stranahan | General Tips | All Levels
Point Lights and Distance Falloff
It’s almost always a good idea to turn on distance falloff of some kind when
you’re using a point light. Otherwise, the light beams often end up hitting poly
-
gons that you may not have wanted them to.
Versions: All
690
Lee Stranahan | General Tips | All Levels
Don’t Think About What a Light IS — Think About What It Does
It’s easy to think about a light in LightWave for the type of light it is — as a
distant, point, spot, and so on. In fact, that’s sort of the only way most people
describe or think about lights. Clear your mind, though, and expand your light-
ing consciousness.
Look at every light in your scene and ask yourself What does this light do?
What is its purpose? Use that as your starting point, and you’re approaching
lighting in an artistic (as opposed to technical) way. It also keeps you from try-
ing to have a light do too much in a scene. If the purpose of the light is to, for
example, bring out the detail in the shadows of a spaceship — well, maybe that’s
enough. Maybe it’s a mistake to make the light try to illuminate the planet in the
shot, too.
Find the purpose of the light — what it does — and what kind of light it
should be, how bright, what color, shadows or not, and so on…all those ques
-
tions answer themselves.
Versions: All
691
Lee Stranahan | General Tips | All Levels
Study Good Lighting for the Result, Not the Technique
Lighting in LightWave and lighting in the real world have almost nothing in
common. Lights in LightWave aren’t realistic at all. Things that gaffers and cin
-
ematographers and photographers use — like diffusions, spot metering,
exposure controls, flags, C stands — have no counterparts in LightWave. So,
lighting in LightWave isn’t like lighting in the real world — but reality is really
overrated.
314 | Chapter 7
General Tips
That doesn’t mean you shouldn’t study good lighting by watching movies or
looking at photos. These reference sources are crucial to give you ideas — about
the results. Achieving those results in 3D, however, is a totally different process.
Versions: All
Global Illumination/Radiosity
692 Leigh van der Byl | Global Illumination/Radiosity | Beginner
“Clay” Rendering
When you want to really show off the details of your models, especially for
the purposes of a modeling show reel or similar presentation, rendering your
model with a very even level of lighting can help to display all the details in
your model really well.
A popular method of rendering models to exploit all the details is to use a
method commonly known as “clay rendering,” whereby you create a very even
lighting situation that creates soft shadows on your model. It is referred to as
clay rendering because the final look is very soft and devoid of specular high-
lights and looks very much like a clay sculpture.
To create this kind of lighting environment you need to go to the Global Illu
-
mination panel in Layout. First you should change the Global Light Intensity
value to 0%. This means that the lights in the scene will no longer affect the
scene in any way, as the renderer will completely ignore them. Then you need to
switch on Radiosity, using preferably Monte Carlo or Interpolated as the
radiosity type. Choose an appropriate Intensity setting, depending on how
brightly lit you want your scene to be.
Using radiosity will instead light the scene using bounced light within it, and
to help this along you need to add an environment to your scene. You can do this
either by setting your Backdrop Color to white in the Effects panel or by using
an HDR (high dynamic range) image in Image World.
Using a white image in the backdrop will light the scene evenly with a white
light, while using an HDR image (commonly known as “light probes”) lights the
Lighting | 315
Global Illumination/Radiosity
scene subtly with the colors that are within the image. You can load HDR
images into Image World under the Backdrop tab in the Effects panel.
Creating an environment like this for the scene ensures that the radiosity will
have a great effect on the model, creating a nice, even lighting in the scene that
shows off all the details of your models.
Versions: 6-8
8
Newbie Note (Robin Wood): Image World will only work with pre-loaded images, so if you don’t
see the image you want in the list, load it using the Image Editor in the top-left corner of the screen. It will
then appear in the list so you can choose it.
693
Patrik Beck | Global Illumination/Radiosity | All Levels
Radiosity, Diffusion, and Luminosity
Radiosity only works with the surface attributes of diffusion and luminosity.
Specularity has nothing to do with it. The higher the level of diffusion, the more
light will bounce off of it and illuminate the surrounding area. Making a surface
luminous will make it a very soft light source when radiosity is turned on. The
luminous object can be set to Unseen by Camera and still illuminate the screen.
It is sometimes necessary to crank the luminosity level up to several hundred
percent in order to get visible results from the luminous radiosity illumination.
Versions: All
316 | Chapter 7
Global Illumination/Radiosity
694 Eki Halkka | Global Illumination/Radiosity | Beginner
Recreating the Sky
Practically all the natural light you see outdoors is either direct, reflected, or
diffuse sunlight. (I’m discounting stars and fireflies, as their contribution is quite
small.) Even moonlight comes from the sun. Even though direct sunlight is very
dominant when present, it’s just as important to take the diffuse light into
account. In most cases, the reflected light is much less important.
The sky is a very big, hemispherical diffuse light source. So, what would be
the best ways to reproduce this?
Let’s examine a few options from quick and ugly to slow and beautiful…
LightWave’s internal ambient light (Shift+L, p, Global Illumination) is a
very quick but not too nice-looking option. We are so used to watching things
under outdoor lighting that we expect diffuse lighting to come from above.
LightWave’s ambient light has no direction whatsoever; it just adds even lumi
-
nosity to all surfaces in the scene.
A simple and fast way to improve things is to add two distant lights to com
-
plement LightWave’s default 25% ambient lighting. Turn shadows off for both
lights. Rotate the first light so that it points directly down (H0, P90, B0), and set
its intensity to 25%. This light mimicks the light from the sky, so you may wish
to give it a slight blue tint. Rotate the next light to point up (H0, P–90, B0), and
set its intensity to –25%. This negative light will suck away ambient light from
the bottom of the items in the scene. That’s it — the result is a lot more convinc-
ing than the default LightWave ambient lighting. The polygons pointing up will
receive 50% ambient light and the polygons pointing down will receive 0%. You
can tweak the settings to get a different ambient solution. If you need soft ambi-
ent shadows, you can try replacing the sky distant light with a shadow map
spotlight placed very far above the scene. The shadows won’t be accurate, but
they are often good enough to sell the scene. And this setup is very fast to
render.
The next way to create overall ambient solution is to use a hemispherical
array of lights surrounding your scene. When you have enough of these lights,
their shadows will blend together and give a rather believeable radiosity-like
illumination to your scene. A similar lighting rig can be created using distant
lights with varying rotations. And yes, the spinning light trick can be used to
multiply the apparent number of these lights. A variation of this technique is
often the best bet when comparing quality vs. speed.
Area lights can also be used as skylights. Make the area light big, rotate it
90º on pitch, and place it low, just over the items in your scene. The results look
very nice but it is slower than the previous methods. The bigger the light is, the
better, slower, and grainier the results. You can reduce the grain by turning on
Shading Noise Reduction in the Global Illumination panel and using motion
blur; this helps reduce grain with radiosity and soft shadow maps too.
Finally, you can use radiosity for the ambient light in your scene. The results
are beautiful, but there’s often a hefty punishment at the rendering stage; the
accurate calculations take a lot of time. Most of the time using Backdrop Only
Lighting | 317
Global Illumination/Radiosity
radiosity is the best option if speed is an issue but you still need to use “real”
radiosity.
Versions: 6-8
695
Eki Halkka | Global Illumination/Radiosity | Beginner
Lighting Interiors
Interiors are much harder than exteriors, as far as global illumination is con
-
cerned — it’s often hard to get perfect results even with radiosity. There are no
exact rules or steps to follow, as there are so many different variations. Usually
you will simply need to carefully examine the scene at hand, and create the
ambient lighting using a variety of techniques.
Versions: 6-8
696
Eki Halkka | Global Illumination/Radiosity | Beginner
To HDRI or Not to HDRI
Even though you can use radiosity to fully light your scene, it is at its best
when it’s used to simulate diffuse and relected “ambient” light. Many HDR
images have small high-intensity areas, which will cause the radiosity solution
to look rather grainy unless extremely high-quality radiosity settings are used. I
usually use a blurred normal dynamic range version of the environment for
radiosity, giving the overall ambient light, and use regular lights for the more
“tight” light sources. This combined with HDRI environment for the reflections
gives excellent results.
Versions: 6-8
697
Emanuele Salvucci | Global Illumination/Radiosity | Advanced
Accessibility Map
An accessibility shader is very similar to making a rendering using back
-
drop-only radiosity with a white background color. Since the backdrop-only
radiosity together with a flat background simulates lighting coming from a
sphere around the object, we obtain a homogeneous shading representing how
and where a light can hit any point on our object; thus, we have a representation
of how every point on the object is easy to “access” for a light ray.
You may consider this “accessibility” map as an “object diffuse map,” which
is independent from the environment since it’s a property of the geometry
topology.
Using Surface Baker you can bake this map either on a texture or on points
if you have enough.
You can then reapply the baked accessibility map on the diffuse channel of
your object, or, if you already have diffuse textures applied, you can multiply
them together in the Texture Editor using layers.
To create this map you need simply to set a flat white background color
(255, 255, 255), apply Surface Baker with only Bake Illumination on, and turn
Radiosity on, using the Backdrop Only radiosity type.
318 | Chapter 7
Global Illumination/Radiosity
Also, remember to deactivate any other light in the scene and set Ambient
Intensity to 0% to avoid overbrightening and falsing the results.
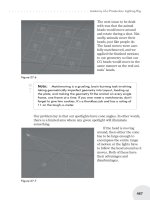
Here’s an example of an accessibility map applied to an object:
Ü
Note: Silhouette edges have been added just so the object’s shape is recognizable.
You can modulate the brightness of the map before baking it by setting
Radiosity Intensity higher or lower than 100%.
With standard lighting and the accessibility map applied, your objects will
always keep that “solid” look without using radiosity every time.
Versions: 6-8
698
Dave Jerrard | Global Illumination/Radiosity | All Levels
HDRI Rendering with Radiosity
Instead of mapping an image on a skyball object for HDRI rendering with
radiosity, map the image on the Textured Environment instead. This will allow
you to use the Backdrop Only radiosity method, which will render much faster.
Even if you use Monte Carlo or Interpolated radiosity, this will speed rendering
because there’s no longer a skyball object to figure into the radiosity
calculations.
Versions: 6.5-8
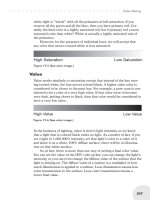
699
Dave Jerrard | Global Illumination/Radiosity | All Levels
Backdrop Only Radiosity
For most scenes using Backdrop Only radiosity, you can lower the Rays Per
Evaluation to3x9andgetvery good results as well as good render times.
Higher values will increase the render times significantly, while lower values
will create very grainy images.
Versions: 6.5-8
700
Dave Jerrard | Global Illumination/Radiosity | All Levels
Keep Detailed Textures to a Minimum
When working with Monte Carlo or Interpolated radiosity, try to keep
detailed textures to a minimum. Every time light bounces from a surface, the
texture for that surface needs to be calculated to find out what color that ray will
be. Remember that every ray that comes from the camera to a surface must first
find out the color of the surface at that point. It will also be split into several
evaluation rays, and each of these will be traced out in random directions. When
Lighting | 319
Global Illumination/Radiosity
these hit a surface, the texture at that point must also be calculated. If the point
where one of these rays hits is significantly brighter or darker than the others, it
can cause a bright pixel on the originating surface (the one that fired the evalua
-
tion rays). Textures with lots of detail will return a lot of these brighter or darker
rays, and this is what causes the grain in radiosity renders. In addition to the
grainy appearance, the extra surface calculation will add a lot of time to the ren
-
der. Try comparing the quality and render times of the same object with textures
and without. The simpler surfaces will render faster and tend to look better.
Versions: All
701
Gerald Abraham | Global Illumination/Radiosity | Intermediate
Realistic Shadows with HDRI
Using HDRI or radiosity does not automatically exclude the use of other
lights in a scene. Often when recreating a scene with a bright key light such as
the sun, you’ll need to use an area or spot light along with radiosity/HDRI to
simulate a realistically cast shadow. Although HDRI can provide nice, diffuse
lighting and reflections, the shadows are not always accurate.
Versions: All
702
Policarpo | Global Illumination/Radiosity | Beginner
Preview Global Illumination Renders
Preview Global Illumination renders at low sampling settings to get a feel of
what the final piece will look like. Turn on Shading Noise Reduction in the
Global Illumination panel to smooth out the preview renders.
Versions: 7-8
703
Gerald Abraham | Global Illumination/Radiosity | Beginner
Exclude Transparent or Reflective Objects from Radiosity Hit
On occasion, it’s a good idea to exclude transparent or reflective objects
from a radiosity hit. For example, when creating headlights for a car, neither the
covers nor reflectors rely on diffuse shading to sell the surface. Excluding these
objects might save you quite a bit of render time.
Versions: All
704
Policarpo | Global Illumination/Radiosity | Beginner to Intermediate
Shading Noise Reduction
Use Shading Noise Reduction in the Global Illumination panel to reduce the
graininess of GI renders. This in combination with various AA settings helps to
de-grain your final render. Use higher AA settings to reduce the need for higher
sampling rates. Render scenes in passes to ensure the ability to tweak your final
renders in post.
Versions: 7-8
320 | Chapter 7
Global Illumination/Radiosity
Ü
Note (Robin Wood): You may want to test this in your scene first to see which is more efficient and
then use that one (higher AA or higher sampling).
Flares
705 Emanuele Salvucci | Flares | Intermediate
Fake Glows
In addition to properly calculated light glows, it is possible to use a simple
technique to make custom fake glows. The only things needed are a square plane
and a grayscale transparency map of our flare. The idea is to make the glow
plane always target the camera so that it will always look approximately “front
face.”
To create a field of fake flares:
1. Create a quadrangle on the XZ plane and make its normal facing +Z.
2. Send the object to Layout and map the flare image on it.
3. Set the desired color, set Luminosity to 100% or more on the surface, and set
Diffuse to 0%.
4. In the Advanced Options tab, set Additive Transparency to 50% (you can
tune this with some quick test renders).
5. In Motion Options, set Target Item to Camera.
6. Clone the plane as many times as you want (50 would be a good number to
show off).
7. Keeping all clones selected, add the first plane to the current selection (or
simply reselect all the fake flares again using the Scene Editor).
8. Start the Keyframer generic plug-in (Scene>Generics>Keyframer).
9. In the Standard tab, select Randomize/Jitter Keys.
10. Just click “OK” on this panel (select range and objects).
11. In the next requester, check Object Position on and set a Max Value (10 if
your plane is 1 square meter).
Now you can navigate through all those light glows always facing the cam
-
era. If you want them to fade in distance, just turn on the Distance Dissolve
check box in the Object Properties>Render tab and set a maximum distance
before cloning the rest of the planes.
Version: 7
706
Kevin Phillips | Flares | Beginner
Quick Blinking Fairy Lights
Say you have a simple logo project with an array of lens flares that you need
to blink on and off continuously, all at the same time. Easy, right? You could just
create one light, edit the flare intensity with the Graph Editor, and then clone it a
few hundred times.
However, then your client asks you to change the timing of the lights, maybe
add in a couple of extra blinks, etc.! Sure, they may all be doing it at the same
time, but you’re going to have to update hundreds of lights.
Lighting | 321
Flares