Windows Server 2003 Clustering & Load Balancing PHẦN 6 pot
Bạn đang xem bản rút gọn của tài liệu. Xem và tải ngay bản đầy đủ của tài liệu tại đây (717.76 KB, 41 trang )
Chapter 3: Designing a Clustered Solution with Windows Server 2003 187
OsbNetw / Windows Server 2003 Clustering & Load Balancing / Shimonski/ 222622-6 / Chapter 3
•
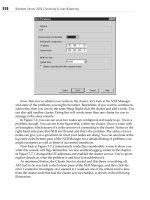
Although the Network address box isn’t a configurable option, it displays the
MAC address of the adapter being configured for NLB clustering. The NLB
service automatically generates the MAC address based on the given cluster
VIP address. This address also serves as a multicast address when multicast
support is enabled. Because the overriding of the network adapter’s built-in
MAC is automatic and controlled by network load balancing, as long as it’s
bound (enabled) to that adapter, you needn’t configure the adapter to
recognize this MAC address. If your network adapter doesn’t support
overriding the MAC address, you’ll need to get one that does.
Cluster Operation Mode
From the Cluster Operation Mode area, you’ll configure the operation of the cluster,
either unicast or multicast. A unicast transmission is a point-to-point transmission
between two nodes. Uni or one is a transmission meant for a single node. When you
implement multicasting, you allow a transmission of data to an addressable group,
based on a specific class of addressing. This way, you can get your message to a group
of listening nodes, instead of inundating the entire segment with a broadcast.
• Selecting the Unicast Mode radio button specifies your NLB cluster is
operating in Unicast mode. When the cluster is operating in Unicast mode,
the NLB service assigns and controls the MAC address for the network
adapter, assigning it the MAC address of the cluster. This network adapter
doesn’t retain the built-in MAC address while NLB is bound to it, but regains
it if NLB is removed from the adapter. While in Unicast mode, no communication
is possible between hosts unless each host has two more network adapters. In
Unicast mode, network load balancing assigns the cluster’s MAC address to
the network adapter. The network adapter to which the network load balancing
driver is bound doesn’t retain its original MAC address. For this example,
we’re going to configure Unicast mode for our NLB cluster.
•
Selecting the Multicast Mode radio button specifies your NLB cluster will
operate in Multicast mode. When an NLB cluster is operating in Multicast
mode, NLB converts the cluster MAC address into a multicast address. NLB
also ensures that cluster IP (the virtual IP) address resolves to this multicast
MAC address via Address Resolution Protocol (ARP). In Multicast mode, the
network adapter retains its built-in MAC address. The problem with using
Multicast mode is some routers don’t support ARP resolution. If you run into
a case like this, you need to make manual entries in the ARP table of the router
to correct the problem.
P:\010Comp\OsbNetw\622-6\ch03.vp
Monday, March 24, 2003 1:51:35 PM
Color profile: Generic CMYK printer profile
Composite Default screen
188 Windows Server 2003 Clustering & Load Balancing
OsbNetw / Windows Server 2003 Clustering & Load Balancing / Shimonski/ 222622-6 / Chapter 3
•
If you select to have your NLB cluster operate in Multicast mode, you have
a new option in Windows Server 2003 available to you: IGMP Multicast. If
you enable IGMP Multicast, NLB attempts to prevent switch flooding by
limiting multicast traffic to only those ports on a switch that have a NLB-bound
network adapter connected to them. So, when you use IGMP Multicast, traffic
is designed to flow only to those switch ports connected to NLB cluster hosts,
thus preventing all other switch ports from being flooded by the multicast
traffic. This is a major improvement for multicasting in an NLB cluster and it
goes a long way toward making switches function smoothly in this environment.
Allowing Remote Control
The last area of the Cluster Properties tab is fairly straightforward. If you plan on
using remote control to control the nlb.exe executable, then you want to enable support
for remote control, as well as provide the password required to initiate the remote
control session.
• Placing a check in the Allow Remote Control box will allow other network
(remote) computers running Windows to control cluster operations using the
nlb.exe cluster control program. As a security measure (and a recommended
way of doing business), remote control is disabled by default. I recommend
you leave it this way.
• If you enable remote control, then you need to specify a password to be used to
allow remote control access in the two password field boxes. Ensure that the
password selected is a strong one. This password won’t be subject to any of the
password policies that might be in effect via Group Policy for your organization.
If you decide to enable remote control of your NLB cluster, you need to make certain
you blocked UDP on ports 1717 and 2504 on your external firewall, thus preventing
someone from taking control of your NLB cluster from outside the organization. Again,
the password you choose should be complex and it should consist of a combination of
letters, numbers, and characters. If you’re concerned about security by enabling remote
control of your NLB cluster, then you’re better off administering it via Terminal Services,
which has the capability to authenticate user requests against Active Directory.
P:\010Comp\OsbNetw\622-6\ch03.vp
Monday, March 24, 2003 1:51:35 PM
Color profile: Generic CMYK printer profile
Composite Default screen
Chapter 3: Designing a Clustered Solution with Windows Server 2003 189
OsbNetw / Windows Server 2003 Clustering & Load Balancing / Shimonski/ 222622-6 / Chapter 3
Host Parameters
Up to this point, you’ve only been configuring options that apply to the entire cluster.
From the Host Parameters tab, shown in the next illustration, you can configure those
options that apply to only the specific NLB host you are working with.
Priority
You configure the Priority (unique host identification) to specify a specific host’s unique
priority for handling the network traffic for those TCP and UDP ports that are not
otherwise accounted for on the Port Rules tab. Each NLB cluster member is assigned
a unique number, ranging from 1 (highest priority) to the maximum of hosts in the
NLB cluster (lowest priority). In the event a cluster goes offline or is otherwise lost
(that is, becomes unresponsive), the priority setting is used to determine which host
within the NLB cluster will now become responsible for handling this traffic. Each
host within the NLB cluster must have a unique priority number configured.
P:\010Comp\OsbNetw\622-6\ch03.vp
Monday, March 24, 2003 1:51:35 PM
Color profile: Generic CMYK printer profile
Composite Default screen
When attempting to join a new host to the NLB cluster, ensure that the priority
setting for it is unique and does not conflict with any existing settings. The new host
will not be allowed to join the cluster if its priority setting conflicts with any other
already existing host and will cause an entry to be written to the event log describing
the error.
Dedicated IP Configuration
The information in the Dedicated IP address space specifies information applicable to
this particular host only.
•
In the IP address box, enter the cluster IP address in standard dotted notation.
This IP address is the IP address that belongs to the specific network adapter
you are dealing with. So, in our example, we will be using the value of
10.0.0.1/24 as previously determined when we mapped out the new design.
This IP address is typically already assigned to the network adapter before
getting to this step from the TCP/IP Properties page for the adapter, as shown
in the next illustration. The value you configure must be the same in both places.
• In the Subnet mask box, enter the required subnet mask that corresponds to your
VIP entered in the IP address box. Since we are using the 10.0.0.1/24 range for
our NLB cluster, we will enter 255.255.255.0 here.
190 Windows Server 2003 Clustering & Load Balancing
OsbNetw / Windows Server 2003 Clustering & Load Balancing / Shimonski/ 222622-6 / Chapter 3
P:\010Comp\OsbNetw\622-6\ch03.vp
Monday, March 24, 2003 1:51:35 PM
Color profile: Generic CMYK printer profile
Composite Default screen
Chapter 3: Designing a Clustered Solution with Windows Server 2003 191
OsbNetw / Windows Server 2003 Clustering & Load Balancing / Shimonski/ 222622-6 / Chapter 3
Initial Host State
Using the Default state configuration, you can determine what happens when the NLB
host starts up.
•
If you want the host to immediately join the cluster when Windows starts up,
then you should select the Started option.
•
If you want the host to start and not join the cluster until you manually join the
cluster, then you should select the Stopped option.
•
If you want the host to start without joining the cluster and enter a suspended
state, then you can select the Suspended option. Note that when the host is
suspended, it will not take part in any clustering operations until you issue the
resume command; all other cluster commands will be ignored by the host with
the exception of the query command. You can instruct the host to resume NLB
cluster operation from either the command line or by using the Network Load
Balancing Manager, one of the new features in Windows Server 2003.
If you enable the Retain setting, the host will start up in a suspended state if it was
in a suspended state at the time of shutdown. For the purposes of our example here, I
am going to configure the host with the Startup option selected so the host can immediately
become part of the NLB cluster upon startup. In most cases, your configuration should
be the same. One reason why you might not want to have the host immediately join the
NLB cluster is after the hardware installation where you want to monitor performance
before putting the host back into the cluster.
Port Rules
One of the greatest features with NLB clustering is the use of port rules. A port is what
TCP/IP uses for services-based communication. If you have to connect to a Web Server
hosting a web site, you’ll probably (by default) attach via port 80. This can be changed
but, by default, it’s via 80. The Internet Assigned Numbers Authority (IANA), found
at , is the keeper of such port numbers for your review. The port
numbers are divided into three ranges:
•
Well-Known Ports—port 0 to 1023. These ports are usually marked
for specific services, such as HTTP on port 80 or SMTP on port 25
•
Registered Ports—port 1024 to 49151
•
Dynamic and/or Private Ports—port 49152 to 65535
The combined use of a TCP/IP address and a port creates a socket connection
between nodes. For example, if you were going to connect to a web server using HTTP
P:\010Comp\OsbNetw\622-6\ch03.vp
Monday, March 24, 2003 1:51:35 PM
Color profile: Generic CMYK printer profile
Composite Default screen
192 Windows Server 2003 Clustering & Load Balancing
OsbNetw / Windows Server 2003 Clustering & Load Balancing / Shimonski/ 222622-6 / Chapter 3
and the web server’s IP address is 10.1.1.10, then you would enter the DNS name that
resolves to that IP address or enter http://10.1.1.10. Because port 80 is a well-known
port, you should immediately connect to the web server via port 80. The ports can be
altered, so if it’s changed to port 8080, then you’ll need to create a socket connection
manually by specifying the port. You could then enter the following to make a connection
with the web server: http://10.1.1.10:8080. Although you don’t need to know all this for
setting up this feature, I hope this helps you understand what a port is because now
you’ll learn to configure rules for these ports and their use with the NLB Port Rules
Parameters tab, shown in the next illustration.
Defined Port Rules
The Port Rules tab has undergone some changes from Windows 2000 Server to
Windows Server 2003. In the previous version of Windows, you could use the Port
Rules tab to perform the configuration and editing of port rules. In Windows Server 2003,
you only see a listing of the currently configured port rules. I think this is a much
cleaner approach that makes working with port rules easier and more efficient. As you
saw in the previous illustration, a default port rule is configured. From the Port Rules
P:\010Comp\OsbNetw\622-6\ch03.vp
Monday, March 24, 2003 1:51:35 PM
Color profile: Generic CMYK printer profile
Composite Default screen
Chapter 3: Designing a Clustered Solution with Windows Server 2003 193
OsbNetw / Windows Server 2003 Clustering & Load Balancing / Shimonski/ 222622-6 / Chapter 3
tab, you can click the Add button to define a new port rule, click the Edit button to edit
a selected port rule, or delete the selected port rule by clicking Remove. Active port
rules are sorted by the port range they cover by default, but you can change the sort by
clicking the column you want to sort by.
Adding/Editing Port Rules
If you decide to add new port rules or to edit an existing port rule, you’ll be working
with the new (and improved) Add/Edit Port Rule page, as shown in the next illustration.
When you work with port rules, always remember the number and type of rules must
match across all the hosts in the NLB cluster.
Cluster IP Address
If you’re configuring a port rule for a specific machine, enter the IP address for that
host. If the port rule is for all members of the NLB cluster, leave the IP address blank
and place a check in the All box. By selecting the All box, the port rule is configured
as a global port rule and covers all VIP addresses associated with the NLB cluster.
P:\010Comp\OsbNetw\622-6\ch03.vp
Monday, March 24, 2003 1:51:35 PM
Color profile: Generic CMYK printer profile
Composite Default screen
Port Range
Port range lets you specify the starting and ending port numbers for the port rule. The
default range is all ports (0 to 65535). If you’re configuring a port rule for a single port,
then you simply need to enter the same port number in both the starting and the
ending box.
Protocols
This enables you to specify the IP protocol the port rule is for—TCP or UDP, or both.
By configuring a protocol, only network traffic for that protocol(s) is affected by the
rule. All other traffic not affected by this port rule (or any other existing port rules) is
handled per the Default Filtering mode.
Filtering Mode
By configuring the Filtering mode, you can choose how to distribute the network
traffic for the port rule among your NLB cluster hosts. You have two major choices:
Multiple host or single host, as well as a third choice that won’t be used often: Disable
this port range.
Multiple Host
Selecting Multiple Host option specifies that multiple hosts in the NLB
cluster can handle the network traffic associated with the specific port rule. Many
advantages exist to using the Multiple Host option, such as fault tolerance and scalable
performance as the load is distributed over two or more cluster hosts, instead of being
applied solely to one host as when the Single Host option is selected. Loading can
be applied equally to all hosts or it can be manually configured for each host as
desired (and as hardware limitations dictate sometimes).
Incoming network traffic to be handled by this rule is distributed to each of the
NLB hosts in different ways, depending on what type of traffic it is. If the traffic is TCP,
then it’s distributed on a per-connection basis, which means a specific NLB host maintains
a connection with a specific client computer. You see the importance of this shortly. If
the traffic is UDP, though, then it’s distributed on a per-datagram basis, either way, the
source IP address and the destination port number creates a unique client request. You
can further configure the behavior of the load distribution algorithm by configuring
affinity options, as discussed next.
Webster’s Dictionary defines affinity as “An attractive force between substances or
particles that causes them to enter into and remain in chemical combination.” While we
aren’t dealing with chemical combinations and reactions here, the term affinity is still
quite relevant. In simple terms, affinity is the attraction one item feels for another item.
In network load balancing, affinity can be configured to control how NLB hosts distribute
incoming client requests.
•
Selecting None specifies that NLB doesn’t need to direct multiple requests from
the same client to the same NLB host. This usually isn’t the preferred option, as
explained in the following discussion of the Single and Class C affinity options.
194 Windows Server 2003 Clustering & Load Balancing
OsbNetw / Windows Server 2003 Clustering & Load Balancing / Shimonski/ 222622-6 / Chapter 3
P:\010Comp\OsbNetw\622-6\ch03.vp
Monday, March 24, 2003 1:51:36 PM
Color profile: Generic CMYK printer profile
Composite Default screen
•
Selecting Single specifies that NLB should direct multiple requests from the
same client (by IP address) to the same NLB host until the session is closed or
timed out. These requests can be either TCP connections or UDP datagrams.
Using Single affinity ensures that one, and only one, cluster host handles the
entire session from a specific client, which is vital if an application running
on the server requires the maintenance of a client session state—such as an
ecommerce application that maintains cookies between connections. In this
way, the Single affinity setting can be quite useful. However, a benefit exists
to disabling Single affinity and resorting to None for affinity: disabling affinity
will improve performance of the entire NLB cluster by allowing multiple
connections from a single client to be distributed to multiple hosts. Single affinity
is best used for intranet-accessible web sites that require the maintenance of
session state between connections.
•
Selecting Class C affinity specifies that NLB should direct multiple requests
from the same TCP/IP Class C address range to the same cluster host. These
requests can be either TCP connections or UDP datagrams. When you implement
Class C affinity, you safely ensure that the use of multiple proxy servers within
the requesting client’s domain don’t cause a session state to be lost—a single
NLB host would end up being responsible for all the domain’s proxy servers,
assuming they all share the same Class C address range. In this way, Class C
affinity works similarly to Single affinity. The only difference is in the scope
of the IP address—each will still maintain the client’s session state between
connections. As with Single affinity, disabling affinity altogether and using
the None setting improves the overall cluster performance, but at the expense
of session state data. Class C affinity is best used for Internet-accessible web sites
that require the maintenance of session state between connections.
If you’re using the Multiple Host option, then you have the option to configure
the load weight setting. The load weight setting specifies the percentage of the load-
balanced network traffic the host should handle for that port rule. You can change
the load weight setting to any value from 0 (prevents the host from handling any
of the network traffic associated with the port rule) to 100 (sets the host to handle all
the network traffic associated with the port rule). A point often misunderstood about
configuring the load weight is this: the total load weight setting of all the NLB cluster
hosts doesn’t have to add up to 100. The actual percentage of traffic a specific host
will handle is computed by dividing its load weight setting by the sum of all the load
weight settings across the entire NLB cluster. So, if you had five NLB hosts with a total
load weight of 150, and one specific host had a load weight setting of 60, then it would
receive about 40 percent of the total distributed load.
If you don’t need to manually configure the load weight for each cluster host,
then you can simply place a check in the Equal box to specify that all network traffic
associated with this port rule should be equally divided among all active cluster hosts
per the distribution algorithm in use.
Chapter 3: Designing a Clustered Solution with Windows Server 2003 195
OsbNetw / Windows Server 2003 Clustering & Load Balancing / Shimonski/ 222622-6 / Chapter 3
P:\010Comp\OsbNetw\622-6\ch03.vp
Monday, March 24, 2003 1:51:36 PM
Color profile: Generic CMYK printer profile
Composite Default screen
Single Host
Selecting the Single Host option specifies the network traffic associated
with the port rule should all be handled by one specific host, as determined by the
Handling priority. In this way, the Handling priority serves a similar (but not the same
by any means) purpose as the Priority setting by determining which server will handle
the network traffic.
The Handling priority is used to specify the local NLB host’s priority for handling
the network traffic associated with the port rule being configured. The host with the
highest priority (which would be the lowest settings) handles all traffic associated with
this rule first by default. If that host becomes unavailable; the next highest priority host
takes over the role of handling network traffic associated with the port rule. The allowable
values range from 1 to the number of hosts in the NLB cluster and each cluster host
must have a unique value configured.
Disable This Port Range
The last option available when configuring a port rule is to
block all traffic in the port range you have configured from passing. When this option
is selected, the NLB driver filters all traffic that corresponds to the port range configured
and prevents it from passing. The Filtering mode helps you build a firewall to prevent
unwanted network access to a configured range of ports on your NLB cluster hosts.
MANAGING NETWORK LOAD BALANCING
Now that you’ve configured your first NLB cluster host, you want to ensure that you’ve
documented everything at each step of the process. You could have been doing this
along the way or you can go back and do it now. I prefer to take screen shots of each
area requiring configuration, print them, and then place them in a notebook. In this
way, you can easily see what gets configured if you need to add another host or change
a specific setting. On the topic of adding another NLB host, you’ll probably want to do
that now because an NLB cluster isn’t an NLB cluster until you get two or more hosts
up and running the NLB service. You can add additional hosts by following the same
process you went through for configuring the first one or by using the Network Load
Balancing Manager. One caveat for using the NLB Manager to add new cluster hosts:
you must have already configured the IP address for the host from the Internet
(TCP/IP) Properties page.
In the next few sections, you look at managing NLB clusters and performing more
advanced operations with NLB clusters.
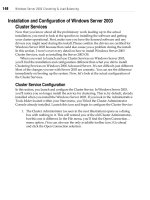
Using the Network Load Balancing Manager
As mentioned previously, the Network Load Balancing (NLB) Manager is a new feature
to Windows in Windows Server 2003. Using the NLB Manager (nlbmgr.exe), you can
easily perform the most common NLB cluster control and configuration options from
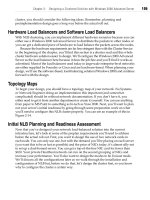
within an easy-to-use GUI. Figure 3-13 shows what the NLB Manager looks like after
completing the configuration of your first NLB cluster host.
196 Windows Server 2003 Clustering & Load Balancing
OsbNetw / Windows Server 2003 Clustering & Load Balancing / Shimonski/ 222622-6 / Chapter 3
P:\010Comp\OsbNetw\622-6\ch03.vp
Monday, March 24, 2003 1:51:36 PM
Color profile: Generic CMYK printer profile
Composite Default screen
Chapter 3: Designing a Clustered Solution with Windows Server 2003 197
OsbNetw / Windows Server 2003 Clustering & Load Balancing / Shimonski/ 222622-6 / Chapter 3
Some of the tasks you can perform with the NLB Manager include the following:
•
Connect to existing clusters
•
Create new clusters
•
Delete clusters
•
Add hosts to a cluster
•
View the properties for a cluster
•
Issue the Query, Start, Stop, Drainstop, Suspend, and Resume commands
to a cluster
•
Delete a host from a cluster
•
View the properties for a host
•
Issue the Query, Start, Stop, Drainstop, Suspend, and Resume commands
to a host
•
Specify the credentials to use when connecting to a host
•
Specify logging to occur
Figure 3-13. The NLB Manager
P:\010Comp\OsbNetw\622-6\ch03.vp
Monday, March 24, 2003 1:51:36 PM
Color profile: Generic CMYK printer profile
Composite Default screen
198 Windows Server 2003 Clustering & Load Balancing
OsbNetw / Windows Server 2003 Clustering & Load Balancing / Shimonski/ 222622-6 / Chapter 3
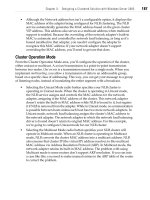
Let’s look at how you can add a second host to your NLB cluster using the NLB
Manager. After Windows Server 2003 is installed and properly configured, you must
ensure the Internet (TCP/IP) Properties are configured for the new host. In this
example, you use all the same settings for the first host, with one exception: the IP
address will be set as 10.0.0.2. Once this is done, you can add the host to the NLB
cluster by right-clicking the cluster name (in this case, cluster.domain.com), and then
selecting Add host to cluster, as seen in the following illustration.
After you enter the name or IP address of the host to add to the cluster, click Connect
to connect it to the cluster. The list of available adapters appears at the bottom of the page:
select the adapter you want and click Next. All you must do now is configure the Host
Properties page with the correct information. Ensure that you use the correct IP address—
the one that matches what you configured previously on the Internet (TCP/IP) Properties
page. If all went well, you should have another node in your NLB Manager. You can
continue to add any remaining NLB cluster hosts in the same fashion.
Using the NLB Command
After you enable Network Load Balancing on an adapter, you’ll find a new executable
file, nlb.exe, has appeared in your %systemroot%/system32/ folder. The nlb.exe command
replaces the wlbs.exe command previously used in Windows NT 4.0 and Windows 2000
Server. The context for the NLB.exe command is
nlb <command> <remote options>
P:\010Comp\OsbNetw\622-6\ch03.vp
Monday, March 24, 2003 1:51:36 PM
Color profile: Generic CMYK printer profile
Composite Default screen
Table 3-6 lists the commands available for use with the nlb.exe command.
OsbNetw / Windows Server 2003 Clustering & Load Balancing / Shimonski/ 222622-6 / Chapter 3
Chapter 3: Designing a Clustered Solution with Windows Server 2003 199
Command Description
help
Displays the help listing all commands.
suspend [<
cluster
>[:<
host
>] | all <
local
>|<
global
>]
Suspends all cluster operations until the Resume command
is issued. Using suspend prevents remote control commands
from being carried out by the cluster. The Suspend command can
be targeted at a specific cluster, a specific cluster on a specific
host, all clusters on the local machine, or all global machines that
are part of the cluster.
resume [<
cluster
>[:<
host
>] | all <
local
>|<
global
>]
Instructs a suspended cluster to resume cluster operations. Using
the Resume command doesn’t restart clustering operations but,
instead, allows the use of Cluster Control commands, including
those sent remotely. The Resume command can be targeted at a
specific cluster, a specific cluster on a specific host, all clusters
on the local machine, or all global machines that are part of
the cluster.
start [<
cluster
>[:<
host
>] | all <
local
>|<
global
>]
Directs that cluster operations on the specified hosts should start.
This enables all ports that might have been previously disabled.
The Start command can be targeted at a specific cluster, a
specific cluster on a specific host, all clusters on the local
machine, or all global machines that are part of the cluster.
stop [<
cluster
>[:<
host
>] | all <
local
>|<
global
>]
Directs that cluster operations on the specified hosts should stop.
The Stop command can be targeted at a specific cluster, a
specific cluster on a specific host, all clusters on the local
machine, or all global machines that are part of the cluster.
drainstop [<
cluster
>[:<
host
>] | all <
local
>|<
global
>]
Instructs the specified hosts not to add any new network traffic.
The specified hosts drain (servicing existing connections, while not
allowing new connections) and stop all cluster operations when
all active connections have terminated.
You can cease draining by issuing the Stop command or the
Start command. The Drainstop command can be targeted at
a specific cluster, a specific cluster on a specific host, all clusters
on the local machine, or all global machines that are part of
the cluster.
enable [
vip
[:
port
|:all] | all[:
port
|:all]] [<
cluster
>[:<
host
>] |
all <
local
>|<
global
>]
Enables traffic handling for the port rule, which contains the
specified port in its port range.
Using the first set of optional parameters, the Enable command
can be targeted at every VIP, a specific VIP on a specific port
rule, or all port rules.
Using the second set of optional parameters, the Enable
command can be targeted at a specific cluster, a specific cluster
on a specific host, all clusters on the local machine, or all global
machines that are part of the cluster. All ports specified by the
port rule are affected.
If all is specified for the port, then the Enable command is applied
to the ports covered by all port rules. If the hosts specified in the
command haven’t yet started cluster operations, the Enable
command is ignored.
Table 3-6. NLB Commands and Remote Control Options
P:\010Comp\OsbNetw\622-6\ch03.vp
Monday, March 24, 2003 1:51:36 PM
Color profile: Generic CMYK printer profile
Composite Default screen
200 Windows Server 2003 Clustering & Load Balancing
OsbNetw / Windows Server 2003 Clustering & Load Balancing / Shimonski/ 222622-6 / Chapter 3
Command Description
disable [
vip
[:
port
|:all] | all[:
port
|:all]] [<
cluster
>[:<
host
>] |
all <
local
>|<
global
>]
Issuing the Disable command immediately disables and blocks all
traffic handling for the port rule whose port range contains the
specified port.
Using the first set of optional parameters, the Disable command
can be targeted at every VIP, a specific VIP on a specific port
rule, or all port rules.
Using the second set of optional parameters, the Disable
command can be targeted at a specific cluster, a specific cluster
on a specific host, all clusters on the local machine, or all global
machines that are part of the cluster. All ports specified by the
port rule are affected.
If all is specified for the port, then the Disable command is
applied to the ports covered by all port rules. If you want to
maintain existing active connections, use the Drain command
instead. If the hosts specified in the command haven’t yet started
cluster operations, the Disable command is ignored.
drain [
vip
[:
port
|:all] | all[:
port
|:all]] [<
cluster
>[:<
host
>] |
all <
local
>|<
global
>]
Disables new traffic handling for the rule whose port range
contains the specified port.
Using the first set of optional parameters, the Drain command
can be targeted at every VIP, a specific VIP on a specific port
rule, or all port rules.
Using the second set of optional parameters, the Drain command
can be targeted at a specific cluster, a specific cluster on a
specific host, all clusters on the local machine, or all global
machines that are part of the cluster. All ports specified by the
port rule are affected.
If all is specified for the port, then the Disable command is
applied to the ports covered by all port rules. All new connection
requests will be refused, but all active connections are
maintained until the session is terminated. If you want to disable
existing active connections, use the Disable command instead. If
the hosts specified in the command haven’t yet started cluster
operations, the Disable command is ignored.
query [<
cluster
>[:<
host
>] | all <
local
>|<
global
>]
Provides a display showing the current cluster state and the list of
host priorities for the current members of the cluster. There are
four possible states:
Unknown—The host hasn’t started cluster operations, so it can’t
determine the state of the cluster.
Converging—The cluster is attempting to converge to a
consistent state. If the cluster remains in Converging status for a
long time, a problem with cluster parameters is usually to blame.
Investigating the event logs for messages related to NLB could
offer an indication of the problem.
Draining—The cluster is converged, but the host had initiated
draining to drain all active existing connections. This state is
caused by issuing the Drainstop command.
Converged as default—The cluster is fully converged and the
responding host is the current default (highest active priority
host). The default host handles network traffic for all the TCP and
UDP ports not covered by the configured port rules.
Converged—The cluster is fully converged and the responding
host isn’t the default host.
The Query command can be targeted at a specific cluster, a
specific cluster on a specific host, all clusters on the local
machine, or all global machines that are part of the cluster.
Table 3-6. NLB Commands and Remote Control Options
(continued)
P:\010Comp\OsbNetw\622-6\ch03.vp
Monday, March 24, 2003 1:51:37 PM
Color profile: Generic CMYK printer profile
Composite Default screen
The following table lists the Remote Control options:
/PASSW
password
Supplies the remote control password to initiate
a remote control session.
/PORT
port
Specifies the cluster’s remote control UDP port.
/local
Performs the operations only on the local machine.
CONCLUSION
In this chapter, you learned the start-to-finish process of designing, installing, and
configuring all aspects of a Windows Server 2003 clustering as well as NLB services
you’ll need to know to have a Highly Available solution. In this chapter, you began
by looking at a rolling upgrade from a Windows 2000 Advanced Server two-node
cluster to a Windows Server 2003 Enterprise two-node cluster. Next, you saw all
the design work that goes into planning for a Windows Server 2003 cluster from
scratch and how to implement it. Once you had the cluster operational, you looked
at advanced configurations and troubleshooting. Finally, you examined the design
and implementation of rolling out a Windows Server 2003 Highly Available NLB
or network load-balanced solution. In this chapter, you also learned how to take
Microsoft’s newest platform and create Highly Available solutions using Microsoft’s
new flagship OS: Windows Server 2003.
OsbNetw / Windows Server 2003 Clustering & Load Balancing / Shimonski/ 222622-6 / Chapter 3
Chapter 3: Designing a Clustered Solution with Windows Server 2003 201
Command Description
reload [
cluster
| all] (local only)
Instructs NLB to reload the current parameter set from the
Registry. If required to complete the process, cluster operations
are stopped and subsequently restarted. Any errors that exist
within the parameters prevent the host from joining the cluster
and also cause a warning dialog box to be displayed.
display [
cluster
| all] (local only)
Displays information about the current NLB parameters, cluster
state, and past cluster activity. The Display command also
displays the last several event log entries produced by the NLB
service, including any binary data attached to the log entry. The
Display command is typically used for troubleshooting cluster
operations.
ip2mac <cluster>
Displays the MAC address corresponding to the specified cluster
name or IP address. The ip2mac command is useful when
creating a static ARP entry in routers.
Table 3-6. NLB Commands and Remote Control Options
(continued)
P:\010Comp\OsbNetw\622-6\ch03.vp
Monday, March 24, 2003 1:51:37 PM
Color profile: Generic CMYK printer profile
Composite Default screen
OsbNetw / Windows Server 2003 Clustering & Load Balancing / Shimonski/ 222622-6 / Chapter 3
Blind Folio 3:202
P:\010Comp\OsbNetw\622-6\ch03.vp
Monday, March 24, 2003 1:51:37 PM
Color profile: Generic CMYK printer profile
Composite Default screen
CHAPTER 4
Designing a Clustered
and Load-Balanced
Solution with
Application Center 2000
203
OsbNetw / Windows Server 2003 Clustering & Load Balancing / Shimonski/ 222622-6 / Chapter 4
P:\010Comp\OsbNetw\622-6\ch04.vp
Monday, March 24, 2003 2:36:03 PM
Color profile: Generic CMYK printer profile
Composite Default screen
Copyright 2003 by The McGraw-Hill Companies, Inc. Click Here for Terms of Use.
204 Windows Server 2003 Clustering & Load Balancing
OsbNetw / Windows Server 2003 Clustering & Load Balancing / Shimonski/ 222622-6 / Chapter 4
I
n this chapter, you learn about Microsoft’s Server 2003 solution called Application
Center 2000. In previous chapters, you learned the fundamentals of clustering, network
load balancing, and high availability in Windows 2000 Server and Windows 2003
Server. Now you’re going to examine a product designed solely for creating large, robust,
and easy to manage server farms using clustering or load balancing (both network load
balancing and component load balancing). In this chapter, you learn about how to plan,
design, configure, and install Application Center 2000. This chapter also sets the stage
for future chapters that will cover the more advanced configurations with Application
Center 2000.
PREDESIGN PLANNING
Application Center 2000 is the Server 2003 solution used for building and managing
Web applications, and managing high availability and load balancing, as well as
enabling you to “scale out” your load-balanced solution over many more nodes for
a much more robust NLB solution. Application Center 2000 also offers you more
manageability (which you learn about in great detail throughout this chapter.). Another
benefit to appreciate is rolling out and deploying content to a load-balanced cluster
using Application Center 2000.
The Purpose of Application Center 2000
Microsoft Application Center 2000 is the management and deployment tool that enables
you the ultimate in management and deployment of content of your web and COM+
applications.
So what’s at the core of this product? Quite simply, Application Center 2000
leverages your preexisting load-balanced cluster solution. You don’t just install
Application Center 2000 on a machine and load balance it. You install NLB clusters
with Windows 2000, and then install Application Center 2000 on top of the nodes to
create a more manageable cluster. Remember in Chapter 2 when you installed network
load balancing from Windows 2000 Advanced Server? We covered many settings you
can configure, but you never had total control over all your nodes. You never had the
capability to send content to the entire cluster from one location. Now you can, as you’ll
see when we take a critical look at Application Center 2000.
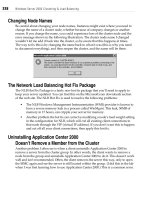
I want to explain the terminology for this chapter quickly. We already covered the
differences in terminology when discussing building a cluster with Microsoft Clustering
Services, instead of building a load-balanced cluster with NLB Services. In Application
Center 2000, you build Application Center 2000 clusters. Figure 4-1 shows a basic topology
map with Application Center 2000 in use.
Application Center clusters are designed for stateless, middle-tier applications, such
as web sites and COM+ applications. They don’t require a shared disk (or any special
P:\010Comp\OsbNetw\622-6\ch04.vp
Monday, March 24, 2003 2:36:03 PM
Color profile: Generic CMYK printer profile
Composite Default screen
hardware). You wouldn’t want to use Application Center 2000 for Exchange 2000 or for
SQL clustering because these are considered stateful applications. If an application is
stateful, this means it’s one in which some information about a connection between two
systems is retained for future use: state is maintained. A stateless connection is one in
which no information is retained by either sender or receiver.
You can use Application Center to manage availability and application deployment
on stand-alone servers or servers that aren’t running web sites. Also, be aware for
design purposes that you can build Windows 2000 Server Application Center 2000
clusters because you aren’t locked into using Windows 2000 Advanced Server to use
NLB. Installing Application Center 2000 on a Windows 2000 Server installs the drivers
that enable you to use NLB.
Application Center 2000 comes with a great management tool-based console (you’ll
see this later), which is a Microsoft Management Console (MMC) snap-in. This console
does something unique: it enables you to monitor the state of the cluster with a view of
how every node is doing, as well as their combined health. From this console, you can
even manage Internet Information Server (IIS) and deploy content to it.
Chapter 4: Designing a Clustered and Load-Balanced Solution with Application Center 2000 205
OsbNetw / Windows Server 2003 Clustering & Load Balancing / Shimonski/ 222622-6 / Chapter 4
Figure 4-1. Basic Application Center 2000 topology map
P:\010Comp\OsbNetw\622-6\ch04.vp
Monday, March 24, 2003 2:36:04 PM
Color profile: Generic CMYK printer profile
Composite Default screen
206 Windows Server 2003 Clustering & Load Balancing
OsbNetw / Windows Server 2003 Clustering & Load Balancing / Shimonski/ 222622-6 / Chapter 4
Availability with Application Center 2000 is top of the line. Because all nodes balance
together, no single point of failure exists for the cluster. This also works for maintenance
because you can easily take a node offline and repair it while all other nodes take the
brunt of the load. This also makes Application Center 2000 a powerful tool for repair
and troubleshooting purposes.
The true reason for installing Application Center 2000 is to enhance the product
you currently use: Windows 2000 Server. Windows 2000 Server with IIS installed
on it is a powerful tool by itself, but add the power of high availability and extended
management to it, and you have an even more powerful formula. Let’s look at how
this fits into your current environment.
Application Center 2000 Feature Set and Requirements
Application Center 2000 is hard to deploy if you don’t understand how it benefits you,
the purpose of the rollout, what preparations you need to make, and so on. Just like
every other technology we’ve discussed, it’s all about the plan and design. Anyone can
install software and get something to work eventually but, without a solid plan and
meeting good prerequisites, most high-availability designs won’t perform well during
implementation. Let’s step back and review the specifics before we get to the installation.
The feature set behind Application Center 2000 is light on the surface, but gets dense
when you use the product. The heart and soul of Application Center 2000 revolves around
the cluster. You’re taking Windows 2000 Servers and providing yourself (or your staff)
with a better way to implement and manage the cluster. Application Center 2000 isn’t
cryptic like NLB on Windows 2000 Advanced Server. With Windows 2000 Advanced
Server there is no central console and no Deployment Wizard. Application Center 2000
is scaled down. If you were asked by management to give an accurate assessment of
the load on a four-node Windows 2000 Advanced Server NLB cluster, this would be
difficult to do. Once Application Center 2000 is installed, you have the benefits of Health
Monitor (explained later) to use for this purpose alone, as well as its many other uses.
Application Center 2000 also supports both NLB for network load balancing (NLB)
and component load balancing (CLB). Be aware that the Application Center 2000
product is key to successful web site deployment, content deployment (which uses
the load-balancing feature for all components within the web sites), and management
of its high availability within many tiered environments.
Application Center 2000 also plays a major role in the synchronization, replication,
and deployment of nodes—up to 32 in total. When you make a system’s settings change,
this change is quickly replicated to all other nodes within your cluster. This makes
deployment of changes easy (and quick) to do.
Application Center 2000 allows you to apply more control over affinity as well. We
discussed affinity and how to configure it with Windows 2000 Advanced Server NLB
P:\010Comp\OsbNetw\622-6\ch04.vp
Monday, March 24, 2003 2:36:04 PM
Color profile: Generic CMYK printer profile
Composite Default screen
OsbNetw / Windows Server 2003 Clustering & Load Balancing / Shimonski/ 222622-6 / Chapter 4
in Chapter 2, but as we move forward with Application Center 2000, you’ll see it’s more
easily managed and configured.
Application Center 2000 is feature-rich and builds your infrastructure to allow your
servers to be managed and monitored better. You now have a tool to deploy content.
Let’s look at the requirements.
System Requirements
With Application Center 2000, you need to have Windows 2000 Server or Windows 2000
Advanced Server installed. You could also use Windows 2000 Datacenter Server, but
we won’t discuss it specifically here. In Chapters 1 and 2, you learned you must
have Windows 2000 Advanced Server installed to take advantage of any clustering
services. With Application Center 2000, you can now set up a cluster of Windows 2000
Servers (which saves you money on licenses), and install Application Center 2000 on
top of Windows 2000 Server to get the network load balancing feature and drivers
installed. Note, you can also mix and match, so if you already have a cluster of two
servers running Windows 2000 Advanced Server in an NLB cluster, you can install
Application Center 2000, and then start adding nodes using Windows 2000 Server into
the preexisting cluster as new nodes. We’ll drill down deeper into specific hotfixes and
Service Packs you need later, but first look at the fundamentals of what you need to
get started.
First, you need to know the requirements listed in the following tables, Table 4-1
and Table 4-2, for the server and the client. When you first read this, you might become
confused because the “client” almost seems as if you need to install a software package
on your network clients. This isn’t the case. The client portion of the install is the PC
you’ll install the console on to manage the cluster through Application Center 2000.
Chapter 4: Designing a Clustered and Load-Balanced Solution with Application Center 2000 207
Processor Pentium-Based 400 MHz or Higher CPU
Operating System Microsoft Windows 2000 Server
Windows 2000 Advanced Server
Microsoft Windows 2000 Service Pack 1 or later
Microsoft Internet Information Services 5.0 must be installed
Memory 256MB of RAM minimum and 512 or above recommended, especially if running IIS
Hard Disk 100MB of available space
Other Devices One network interface card (NIC) (two recommended)
If using Windows 2000 Network Load Balancing (NLB), two NICs are required
CD-ROM, mouse, and compatible display
Table 4-1. Server-Based Requirements
P:\010Comp\OsbNetw\622-6\ch04.vp
Monday, March 24, 2003 2:36:04 PM
Color profile: Generic CMYK printer profile
Composite Default screen
The server portion of the install is the actual package you place directly on the server,
so it becomes Application Center 2000. You can also, if needed, manage Application
Center from a console directly on the server. Microsoft Application Center 2000 Server
requires the following minimum system configuration, as seen in Table 4-1.
Microsoft Application Center 2000 Client requires the following minimum system
configuration, as seen in Table 4-2.
Make sure you never settle for only the minimum requirements and always figure
you could be running other services (such as IIS), which cache much of their services
in RAM for improved performance and speed. If you try to skimp on resources, your
system may be impacted. If you plan on installing Application Center 2000 Service
Pack 1, you need an additional 110MB of disk space available. In addition, you need to
ensure that servers to be updated with Application Center 2000 SP1 have been updated
already with Windows 2000 SP2.
Application Center 2000 Installation Summary
This is a breakdown of the most essential items you need to pay attention to while
preparing an installation and deployment of Application Center 2000.
•
To install Application Center on the Windows 2000 Server and Windows 2000
Advanced Server OSs, you must install the Windows 2000 Service Pack 1 (SP1)
and Pre service Pack 2 (SP2) components. If you fail to adhere to these strict
requirements, Application Center 2000 installation will fail every time.
•
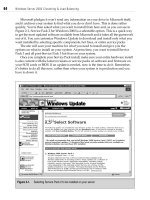
IIS 5.0 must be installed as part of your Windows 2000 solution, see the
following illustration. If you need to reapply the service, follow this path:
Start | Settings | Control Panel | Add/Remove Programs. Click the Add/
Remove Windows Components Icon, then add the IIS Service.
208 Windows Server 2003 Clustering & Load Balancing
OsbNetw / Windows Server 2003 Clustering & Load Balancing / Shimonski/ 222622-6 / Chapter 4
Processor Pentium-Based 266 MHz or Higher CPU
Operating System Microsoft Windows 2000 Professional
Windows 2000 Server
Windows 2000 Advanced Server operating system (OS)
Microsoft Windows 2000 Service Pack 1 or later
Memory 128MB of RAM minimum
Hard Disk 20MB of available space
Other Devices Network adapter card, CD-ROM, mouse, and compatible display
Table 4-2. Client-Based Requirements
P:\010Comp\OsbNetw\622-6\ch04.vp
Monday, March 24, 2003 2:36:04 PM
Color profile: Generic CMYK printer profile
Composite Default screen
Chapter 4: Designing a Clustered and Load-Balanced Solution with Application Center 2000 209
OsbNetw / Windows Server 2003 Clustering & Load Balancing / Shimonski/ 222622-6 / Chapter 4
• Application Center 2000, when installed on Windows 2000 Server (not
Windows 2000 Advanced Server), automatically installs network load
balancing. As previously mentioned, Windows 2000 Server doesn’t support
NLB. When you install Application Center 2000, though, it adds the NLB
drivers to the server. Make sure when you install Application Center 2000,
it appears in the Network Properties dialog box. If you don’t have the driver
installed, it won’t work. If you need to check the driver, follow this path: Click
Start | Settings | Control Panel | Network and Dial-up Connections. Select
an adapter and right-click it. Select Properties | Install Button, and then
highlight Service. Click Add, and select NLB or network load balancing. This
is seen in the next illustration.
P:\010Comp\OsbNetw\622-6\ch04.vp
Monday, March 24, 2003 2:36:04 PM
Color profile: Generic CMYK printer profile
Composite Default screen
210 Windows Server 2003 Clustering & Load Balancing
OsbNetw / Windows Server 2003 Clustering & Load Balancing / Shimonski/ 222622-6 / Chapter 4
•
Make sure your server is not running as a domain controller. If you’re running
a domain controller, then the installation program won’t let you continue as
per the installation requirements.
•
One of the most important things to plan before you install Application
Center 2000 (and one of the biggest failures of installation) is keeping the same
directory and drive structure between all cluster nodes. Because replication is
a large part of the Application Center 2000 cluster, the drive structures where
the program and system files reside must be identical. If not, then you’ll have
a failed installation because the first node in the cluster will run a check to
make sure this requirement was met. They can be integrated later with some
work but, for ease of installation and configuration, make sure you pay close
attention to this bullet or it could consistently hang you up when at installation.
•
Another main point to mention is the NICs you use must be compliant with
the Hardware Compatibility List (HCL) or the installation could hang you up.
Of course, you want to make sure all your hardware is compliant with the
HCL. Don’t take shortcuts in this area; it isn’t worth the headaches.
• Plan your IP addresses accordingly (as you’ve done with every other installation
thus far). Make sure you have the appropriate interfaces configured with valid
and static IP addresses. Don’t use DHCP.
• When using Application Center 2000 Network Load Balancing, you must use
two NICs.
• You need to have two IP addresses per node and the cluster controller will be
responsible for the VIP (Virtual IP Address) for the entire cluster so you will
need one more IP address for the VIP. In other words, if you have a two-node
Application Center 2000 cluster, you need two IP addresses per node, which
equals four, and a single IP Address to denote the VIP, so a total of five is needed.
Other Load-Balancing Options
Other load-balancing options, as mentioned previously, are also available in
Application Center 2000. Application Center 2000 enables you to use CLB). With
CLB, requests for COM+ components are load balanced across all the CLB members.
Third-party hardware/software load balancing is also supported, as you saw in
Chapter 1. Third-party load balancing can be accomplished with a separate device
that forwards traffic to each node member. Cluster types with Application Center
have support for three basic types:
P:\010Comp\OsbNetw\622-6\ch04.vp
Monday, March 24, 2003 2:36:04 PM
Color profile: Generic CMYK printer profile
Composite Default screen
Chapter 4: Designing a Clustered and Load-Balanced Solution with Application Center 2000 211
OsbNetw / Windows Server 2003 Clustering & Load Balancing / Shimonski/ 222622-6 / Chapter 4
•
General/web cluster
•
COM+ application cluster
•
COM+ routing cluster
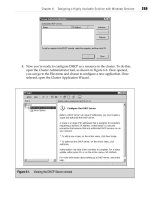
General/Web Cluster
A General/Web cluster is a name given to describe any standard
cluster that uses a grouping of servers to process client requests or web-based requests
(see Figure 4-2). These clusters can include, but are not limited to:
•
Internet web servers
•
Staging servers (used to deploy content to the rest of the cluster)
Figure 4-2. A General/Web cluster
P:\010Comp\OsbNetw\622-6\ch04.vp
Monday, March 24, 2003 2:36:05 PM
Color profile: Generic CMYK printer profile
Composite Default screen