Windows Server 2003 Clustering & Load Balancing PHẦN 5 ppt
Bạn đang xem bản rút gọn của tài liệu. Xem và tải ngay bản đầy đủ của tài liệu tại đây (607.56 KB, 41 trang )
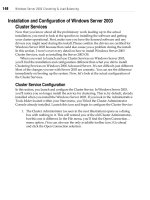
Installation and Configuration of Windows Server 2003
Cluster Services
Now that you know about all the preliminary work leading up to the actual
installation, you need to look at the specifics to installing the software and getting
your cluster operational. First, make sure you have the licensed software and any
drivers you might need during the install. Please confirm the drivers are certified for
Windows Server 2003 because that could also cause you a problem during the install.
In this section, I won’t cover every detail on how to install Windows Server 2003
Cluster Services, such as installing the Server 2003 OS.
When you want to launch and use Cluster Services on Windows Server 2003,
you’ll find the installation and configuration different than what you did to install
Clustering Services on Windows 2000 Advanced Server. It’s not difficult, just different.
Most of the changes you see with Server 2003 are cosmetic. You can see the difference
immediately on booting up the system. Now, let’s look at the actual configuration of
the Cluster Services.
Cluster Service Configuration
In this section, you launch and configure the Cluster Service. In Windows Server 2003,
you’ll notice you no longer install the service for clustering. This is, by default, already
installed when you install the Windows Server 2003. If you look in the Administrative
Tools folder located within your Start menu, you’ll find the Cluster Administrator
Console already installed. Launch this icon and begin to configure the Cluster Service:
1. The Cluster Administrator (as seen in the next illustration) opens as a dialog
box with nothing in it. This will remind you of the old Cluster Administrator,
but this one is different. In the File menu, you’ll find the Open Connection…
menu option. (You can also use the only available toolbar icon.) Go ahead
and click the Open Connection selection.
146 Windows Server 2003 Clustering & Load Balancing
OsbNetw / Windows Server 2003 Clustering & Load Balancing / Shimonski/ 222622-6 / Chapter 3
P:\010Comp\OsbNetw\622-6\ch03.vp
Monday, March 24, 2003 1:51:27 PM
Color profile: Generic CMYK printer profile
Composite Default screen
Chapter 3: Designing a Clustered Solution with Windows Server 2003 147
OsbNetw / Windows Server 2003 Clustering & Load Balancing / Shimonski/ 222622-6 / Chapter 3
2. In the next illustration, you see the Open Connection to Cluster dialog box.
This dialog box enables you to do multiple things, such as create a new cluster,
add a node to a cluster, or open a current cluster. Because you’re creating a new
cluster, select the default and select to create a new cluster.
P:\010Comp\OsbNetw\622-6\ch03.vp
Monday, March 24, 2003 1:51:27 PM
Color profile: Generic CMYK printer profile
Composite Default screen
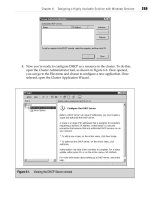
3. Once you select to create a new cluster, you’ll launch the New Server Cluster
Wizard, as seen in the following illustration. In the New Server Cluster Wizard,
you have much more flexibility than you had with Windows 2000 Advanced
Server, as you soon see. You need to provide the domain the cluster is joined
to, the cluster name that’s unique to the domain, the name of the first node
you’ll add to this cluster, and one static IP address that’s unique and will be
used for the entire cluster as the virtual IP address (VIP). You also need the
account you were asked to make on the domain controller, which will be used
as the Cluster Service Account.
4. Now add all the information you were just asked to obtain to the Cluster
Wizard. In the next screen, provide the domain name, which is RSNETWORKS.
The cluster name I chose for the entire cluster is DOTNET-CLUSTER. You can
make this anything you want, but make sure it’s 15 characters or less (NetBIOS
restriction) and, if you can, stick with what I provided because I change the
name later to force errors on the cluster, as shown in the next illustration.
148 Windows Server 2003 Clustering & Load Balancing
OsbNetw / Windows Server 2003 Clustering & Load Balancing / Shimonski/ 222622-6 / Chapter 3
P:\010Comp\OsbNetw\622-6\ch03.vp
Monday, March 24, 2003 1:51:27 PM
Color profile: Generic CMYK printer profile
Composite Default screen
5. Once you click the next button, you begin the domain confirmation search seen
in the following illustration. If you don’t have the proper credentials and prior
configurations set up correctly, your Cluster Service configuration will fail
every time. Misconfiguration is the number one reason cluster server solutions
don’t work, can’t be installed, or break down.
Chapter 3: Designing a Clustered Solution with Windows Server 2003 149
OsbNetw / Windows Server 2003 Clustering & Load Balancing / Shimonski/ 222622-6 / Chapter 3
P:\010Comp\OsbNetw\622-6\ch03.vp
Monday, March 24, 2003 1:51:27 PM
Color profile: Generic CMYK printer profile
Composite Default screen
6. After domain access is confirmed, you can add the first node to the cluster.
You must have your nodes joined to the domain and you might need to verify
on the domain controller that your nodes have computer accounts on them. At
times, this isn’t added automatically and you have to add them manually. To
add a machine account manually to a domain controller, you need to log in to
the domain controller and open the Active Directory Users and Computers MMC.
Once opened, open the Computers folder located in the left-hand navigation
pane of the MMC and in the right-hand contents pane, you should find your
nodes as computer accounts on the domain controller. If you don’t find them,
right-click the Computers folder and add them. If you had trouble adding the
node to the domain, this will solve your problems.
7. In the next illustration, you can see I added a totally new cluster node to the
entire new cluster I’m building called DOTNET-CLUSTER. Click Next to
continue.
8. Once you select your node, you can click Next to continue. The following
screen is a tremendous help to any administrator trying to determine what’s
wrong with a service configuration. It gives you a nice way to view the errors,
have a log you can save to your desktop to analyze, and a Details tab to
troubleshoot problems immediately without having to open any other consoles
to view the Event Viewer or any other logs. If the screen in the following
illustration is successful, you can continue with your cluster configuration. If
not, you have many ways available to you to troubleshoot why it didn’t work.
150 Windows Server 2003 Clustering & Load Balancing
OsbNetw / Windows Server 2003 Clustering & Load Balancing / Shimonski/ 222622-6 / Chapter 3
P:\010Comp\OsbNetw\622-6\ch03.vp
Monday, March 24, 2003 1:51:28 PM
Color profile: Generic CMYK printer profile
Composite Default screen
Chapter 3: Designing a Clustered Solution with Windows Server 2003 151
OsbNetw / Windows Server 2003 Clustering & Load Balancing / Shimonski/ 222622-6 / Chapter 3
9. You look at the log when the installation is completed but, for now, click
the Details button. This produces the dialog box. This is a new add-on for
Server 2003 and it’s extremely handy. If you look at the previous illustration,
you can see check marks next to plus signs. These plus signs can be expanded
(you see this in the next section) to reveal information about the configuration
the wizard performed. When you click Details and open the dialog box, you
can see the information in a more detailed manner with time stamps and
other useful information.
P:\010Comp\OsbNetw\622-6\ch03.vp
Monday, March 24, 2003 1:51:28 PM
Color profile: Generic CMYK printer profile
Composite Default screen
10. Close out of Details and go to the plus signs. Expand them and look at the
contents of the configuration dialog box. The check marks let you know
everything was configured correctly and you could move on, but if you want
to look into the actual steps and find more details about the configuration, you
can inspect them here. Once you finish analyzing the configuration in the next
illustration, click the Next button to continue the cluster configuration.
11. Once you click the Next button, you can see in the following illustration that
you have to add the cluster IP address. This was thought out in the redesign
plans. This IP address must be publicly accessible or you won’t have proper
cluster communications. We analyze all the problems you might have if you
misconfigure these settings later but, for now, please add the proper IP address
and continue by clicking Next.
152 Windows Server 2003 Clustering & Load Balancing
OsbNetw / Windows Server 2003 Clustering & Load Balancing / Shimonski/ 222622-6 / Chapter 3
P:\010Comp\OsbNetw\622-6\ch03.vp
Monday, March 24, 2003 1:51:28 PM
Color profile: Generic CMYK printer profile
Composite Default screen
12. After you add the IP address, you can click Next to continue. The next dialog
box, as shown in the following illustration, lets you use the Cluster Service
account. The Cluster_Service account is what you created on the domain
controller specifically for the Cluster Service. You can now log the node into
the domain with this account, the password, and the domain name. Click
Next to continue.
Chapter 3: Designing a Clustered Solution with Windows Server 2003 153
OsbNetw / Windows Server 2003 Clustering & Load Balancing / Shimonski/ 222622-6 / Chapter 3
P:\010Comp\OsbNetw\622-6\ch03.vp
Monday, March 24, 2003 1:51:28 PM
Color profile: Generic CMYK printer profile
Composite Default screen
154 Windows Server 2003 Clustering & Load Balancing
OsbNetw / Windows Server 2003 Clustering & Load Balancing / Shimonski/ 222622-6 / Chapter 3
13. Once you click Next, you’ll finish the Cluster Wizard with a “proposed”
Cluster Configuration dialog box as seen in the following illustration. This is
where you must pay strict attention to what kind of quorum device you want
configured. In this dialog box, you have the option to click the Quorum button.
14. Click the Quorum button to open a smaller dialog box. Previously, I mentioned
one of the advancements you would see is the addition of a locally placed
quorum or a majority node set if you didn’t want to configure a shared SCSI
bus. The Cluster Service can now be configured without a shared device, but
with a separate drive on a single server where resources can be pooled together.
Because you already did a rolling upgrade on the other nodes from Chapter 2,
let’s configure a brand new two-node cluster with Windows Server 2003 with
the use of its new features, including selecting the local quorum and the
Majority Node Set. In the following illustration, you can see the local quorum
configuration and, if you drop the arrow down, you can see the Majority Node
Set. Select either Local Quorum or Majority set, and click the OK button. For
this exercise, please use Majority set.
P:\010Comp\OsbNetw\622-6\ch03.vp
Monday, March 24, 2003 1:51:29 PM
Color profile: Generic CMYK printer profile
Composite Default screen
Chapter 3: Designing a Clustered Solution with Windows Server 2003 155
OsbNetw / Windows Server 2003 Clustering & Load Balancing / Shimonski/ 222622-6 / Chapter 3
NOTE When you switch back and forth between the quorum configurations, your proposed
configuration re-creates itself to apply the change to the quorum you select.
Another note from the beginning of the chapter is a Majority Node Set (as seen
in the following illustration), which is a new quorum resource that enables you
to use something other than a shared disk as a quorum device. This new
service enables you to create topologies that don’t have shared disks and/or
need to span multisite configurations.
15. Now, the final steps of configuring the cluster are underway. The next screen
you see is the New Server Cluster Wizard, in the next illustration, attempting
to finalize your proposed configuration. Everything should run smoothly and
no errors should be seen because you’ve read nearly three chapters on how to
preplan your design! You should see the status bar run straight through and
you can click Next to continue.
P:\010Comp\OsbNetw\622-6\ch03.vp
Monday, March 24, 2003 1:51:29 PM
Color profile: Generic CMYK printer profile
Composite Default screen
16. Let’s look at a common problem. In the next illustration, I forced the cluster
configuration to create an error, seen in the expanded errors within the dialog
box. You can see the final error was a logon failure, which was caused by my
going over to the domain controller and disabling the Cluster Service account.
If you set the Administrator account for this task, and someone changes a
password, this error (and many more of its kind) can become a harsh reality.
Let’s put things back the way they were and continue with the cluster
configuration.
17. As you move forward (and past this error), you can see in the next illustration
a nice, clean, fully installed cluster configuration. I expanded all the positive
acknowledgements to see what was done. The quorum device and the resources
were configured correctly. Remember, you can click the Details button to get
more information about any wizard event you highlighted (I have Configure
Resource Types highlighted here). After you examine the configuration
completion, click Next.
156 Windows Server 2003 Clustering & Load Balancing
OsbNetw / Windows Server 2003 Clustering & Load Balancing / Shimonski/ 222622-6 / Chapter 3
P:\010Comp\OsbNetw\622-6\ch03.vp
Monday, March 24, 2003 1:51:29 PM
Color profile: Generic CMYK printer profile
Composite Default screen
18. Congratulations! You successfully created your new Windows Server 2003
Cluster. You still have much more work to do, such as add a node, create
resources and groups, and so on but, for the most part, your work here is
completed as far as the basic cluster configuration goes. In the following
illustration, the wizard is finalizing the cluster completion. Click the View Log.
Chapter 3: Designing a Clustered Solution with Windows Server 2003 157
OsbNetw / Windows Server 2003 Clustering & Load Balancing / Shimonski/ 222622-6 / Chapter 3
P:\010Comp\OsbNetw\622-6\ch03.vp
Monday, March 24, 2003 1:51:29 PM
Color profile: Generic CMYK printer profile
Composite Default screen
158 Windows Server 2003 Clustering & Load Balancing
OsbNetw / Windows Server 2003 Clustering & Load Balancing / Shimonski/ 222622-6 / Chapter 3
19. Once you select the View Log option, you can see the log referred to earlier in
the exercise, which is called the ClCfgSrv log. The log (as seen in Figure 3-8)
takes a step-by-step snapshot of your entire cluster configuration from the
beginning. This was an option you could have looked at all along, depending
on where you were in the configuration, but all it was doing was recording
each step. You can check this log to get information on any problems you
might have had. You can also save these files for archiving and/or submittal
to Microsoft if you have issues and need technical support.
You’re officially done with the configuration. You can now continue with the rest
of the configuration steps so you can view and work with your new cluster node.
In Figure 3-9, you see I opened the Cluster Administrator where we’ll now manage
our new cluster. You can open this cluster by going to Start | Programs | Administrative
Tools and selecting the Cluster Administrator. You’ll open a dialog box, which you saw
in the beginning of the last exercise. But, now, you know how to select to open a connection
to a preexisting cluster if you didn’t automatically open to the Cluster Administrator.
Go to File | Open Connection to open the connection.
Figure 3-8. Viewing the ClCfgSrv log
P:\010Comp\OsbNetw\622-6\ch03.vp
Monday, March 24, 2003 1:51:29 PM
Color profile: Generic CMYK printer profile
Composite Default screen
OsbNetw / Windows Server 2003 Clustering & Load Balancing / Shimonski/ 222622-6 / Chapter 3
Windows Server 2003 has many different configuration settings within the Cluster
Administrator to work with. We’ll get to them but, first, we have to add a cluster node
to the cluster, so we can have an Active/Passive two-node cluster. Let’s add another
cluster node.
Configuring and Troubleshooting the Cluster Service
In this section of the chapter, we’ll look at the advanced configuration you can perform
on the cluster you created. We look at adding another node and all the problems you
can encounter along the way.
Adding Nodes
Now that your cluster is up and running, you only have one node connected to it. This
is where we add another node to the cluster to make it a two-node cluster. In the next
Chapter 3: Designing a Clustered Solution with Windows Server 2003 159
Figure 3-9. The Windows Server 2003 Cluster Administrator
P:\010Comp\OsbNetw\622-6\ch03.vp
Monday, March 24, 2003 1:51:30 PM
Color profile: Generic CMYK printer profile
Composite Default screen
exercise, we build up the cluster you already have by adding another server. To add
another server, start by opening the Cluster Administrator.
1. To add nodes, you need to open the Cluster Administrator, as seen in Figure 3-9.
Once opened, you can right-click the Cluster Name icon at the top of the left-
hand side navigation pane and select New from the menu. Once New is selected,
choose Node.
2. When you choose Node, the Add Nodes Wizard is launched to help you in the
process of adding nodes to your cluster, as seen in the next illustration. The wizard
is helpful in pointing you to requirements to add a node, such as the computer
names of the nodes you want to add and the password for the Cluster Service
account.
3. Once you click Next, the wizard quickly confirms access to a domain. If the
domain is available, you’re shown a dialog box to select the names of the node
you want to add to the cluster. Click Browse and you’ll open the dialog box
you see in the following illustration.
160 Windows Server 2003 Clustering & Load Balancing
OsbNetw / Windows Server 2003 Clustering & Load Balancing / Shimonski/ 222622-6 / Chapter 3
P:\010Comp\OsbNetw\622-6\ch03.vp
Monday, March 24, 2003 1:51:30 PM
Color profile: Generic CMYK printer profile
Composite Default screen
Chapter 3: Designing a Clustered Solution with Windows Server 2003 161
OsbNetw / Windows Server 2003 Clustering & Load Balancing / Shimonski/ 222622-6 / Chapter 3
4. In the Enter the object names to select section of the dialog box, add the name
of the cluster node you want to join the cluster. You can click the Check Names
dialog box to verify it does exist, and then click OK.
5. In the next illustration, you can add the cluster node you selected by clicking
the Add button. You can also remove it if you want to select a different node.
Click Next.
P:\010Comp\OsbNetw\622-6\ch03.vp
Monday, March 24, 2003 1:51:30 PM
Color profile: Generic CMYK printer profile
Composite Default screen
In the next three scenarios, I show you problems you can have while adding a
node. To add a node, all you need to do is click Next, the wizard will finish, and
you’ll have added the node. In the following illustration, I created a situation
where the resolution for the cluster name DOTNET-CLUSTER wasn’t available
(from being taken offline) and the name couldn’t be resolved, so the node
couldn’t be added.
6. In the next illustration, I disabled a NIC connection to the cluster node we’re
trying to add. Because the connection was disabled, the cluster couldn’t be
contacted. If you are unable to contact the cluster, it won’t let you add a node.
162 Windows Server 2003 Clustering & Load Balancing
OsbNetw / Windows Server 2003 Clustering & Load Balancing / Shimonski/ 222622-6 / Chapter 3
P:\010Comp\OsbNetw\622-6\ch03.vp
Monday, March 24, 2003 1:51:30 PM
Color profile: Generic CMYK printer profile
Composite Default screen
Chapter 3: Designing a Clustered Solution with Windows Server 2003 163
OsbNetw / Windows Server 2003 Clustering & Load Balancing / Shimonski/ 222622-6 / Chapter 3
7. In the next illustration, you see many errors relating to cluster networks
(192.168.0.0) not being found. While the wizard was checking feasibility,
I changed the IP address subnet. This caused errors based on TCP/IP.
P:\010Comp\OsbNetw\622-6\ch03.vp
Monday, March 24, 2003 1:51:30 PM
Color profile: Generic CMYK printer profile
Composite Default screen
As you can see, the error information is a bit cryptic and didn’t exactly explain the
problem that caused the error. Because these are going to be the most common errors
you’ll see, I re-created them here for you to use as a troubleshooting guide to adding
nodes to the cluster. In the next section, you look at all the problems you can experience
while changing a cluster name.
Changing the Cluster Name
If you’re ever in the position where you want to change the cluster name, remember
these points. You should know why you’re changing a cluster name. Many times,
organizations in the rollout phase of any project might have made up a name that
wasn’t in your organization’s naming conventions and you could have to change it.
(This happens often when companies acquire other companies.)
The actual mechanics of changing the cluster name are simple. Simply open the
Cluster Administrator and go to the top-level icon in the console. This is the cluster root
and it’s currently named DOTNET-CLUSTER. To rename the cluster, simply right-click
the icon and select Rename. Now change the name. In this scenario, we want to remove the
dash in the cluster name. The new name will become DOTNETCLUSTER. Once you
finish the change, you’re prompted to take the cluster offline for it to be known as the
new name, as seen in the next illustration, or simply close the Cluster Administrator
and reopen it.
In this scenario, let’s close out of Cluster Administrator and relaunch it, so you can
be prompted with the new cluster name through browsing. Once you try to open a
connection to the cluster, you can click the Browse button to open the Browse Clusters
dialog box. As you can see in the following illustration, both cluster names are
maintained.
164 Windows Server 2003 Clustering & Load Balancing
OsbNetw / Windows Server 2003 Clustering & Load Balancing / Shimonski/ 222622-6 / Chapter 3
P:\010Comp\OsbNetw\622-6\ch03.vp
Monday, March 24, 2003 1:51:31 PM
Color profile: Generic CMYK printer profile
Composite Default screen
Chapter 3: Designing a Clustered Solution with Windows Server 2003 165
OsbNetw / Windows Server 2003 Clustering & Load Balancing / Shimonski/ 222622-6 / Chapter 3
A problem exists, however. You don’t have the old cluster anymore because you
renamed it. Windows Server 2003 has a glitch that it will retain a renamed cluster name
as if it’s another cluster on your network, instead of a renamed one. It does this because
it holds the name in the Registry. The key is
HKEY_CURRENT_USER\Software\Microsoft\Cluster Administrator\
Recent Cluster List
As you can see in the Registry (go to start | Run | type REGEDIT), your Recent
Cluster List has the old DOTNET-CLUSTER as a second cluster when it isn’t the second
cluster. I don’t recommend you try to remove it because there’s no recommended
Registry hack for it at this time.
Let’s see how the new cluster name appears in the actual browse list. Open
My Network Places and browse to the domain to which you’re currently attached.
Once you open the domain, you’ll see, as shown in the following illustration, the
DOTNETCLUSTER cluster name appears in the browse list. If you recently changed
the cluster name, remember that the name change can take up to 45 minutes or so to
disappear from the browse list and change the new name because of browser-based
updates.
In the next illustration, you’re shown a Cluster Administrator error that you might
experience if you have poor NetBIOS resolution on your network. For example, NetBIOS
is disabled, WINS isn’t configured properly, or NetBIOS is being blocked on the network
somewhere. If you see this informational error, you might want to start looking at
possible networking-related issues with NetBIOS resolution.
P:\010Comp\OsbNetw\622-6\ch03.vp
Monday, March 24, 2003 1:51:31 PM
Color profile: Generic CMYK printer profile
Composite Default screen
In this section, you saw possible issues you might experience while trying to
rename a cluster node. In the next section, you learn how to take a node offline and
correct offline errors you could experience.
Taking a Cluster Offline
To take a cluster offline, you can either go at the group level or at the node level. This is
important to note because you might only need to take a node offline and not the entire
cluster. Let’s review the differences.
If you take the cluster offline, you need to right-click your cluster group in the
left-hand pane of the Cluster Administrator. You can choose to put the group in offline
status, which makes the whole group inaccessible, but this creates a red mark up on
the cluster group to make you aware the group is offline. You can also select a single
node to go offline in much the same way, except by right-clicking the node you want
to make unavailable temporarily. This won’t affect the whole group. When you take
Cluster Services offline and online, you can see a state column when you’re looking
at the cluster group in the right-hand Contents pane in Cluster Administrator. You should
see it online. (In Figure 3-10, you can see “Unknown” which means that you are having
166 Windows Server 2003 Clustering & Load Balancing
OsbNetw / Windows Server 2003 Clustering & Load Balancing / Shimonski/ 222622-6 / Chapter 3
Figure 3-10. A similar offline error relating to network connectivity
P:\010Comp\OsbNetw\622-6\ch03.vp
Monday, March 24, 2003 1:51:31 PM
Color profile: Generic CMYK printer profile
Composite Default screen
Chapter 3: Designing a Clustered Solution with Windows Server 2003 167
OsbNetw / Windows Server 2003 Clustering & Load Balancing / Shimonski/ 222622-6 / Chapter 3
a problem with it, is as previously mentioned.) You might see online pending if you’re
waiting for the service to start, but you want to see it in the online state for it to be
functional to network clients.
Don’t be mistaken by what you see in Figure 3-10, where all I simulated was lost
network connectivity (I shut the switch ports to which the cluster is connected) and it
showed blue exclamation marks. This isn’t the same as the red marks the offline cluster
shows you. Be aware of this because you might think your cluster is offline but, instead,
you’ve lost network connectivity.
Now that you know how to take a node or the whole group offline, let’s start to
look into the more advanced configurations you can perform with your new cluster.
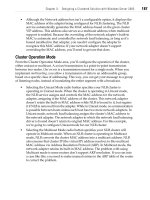
Advanced Cluster Configuration Settings
In this section, you see how to make configuration settings to your new two-node
cluster. You look at the configuration settings you can make after everything is
operational from configuring with wizards.
In the following illustration, the actual quorum configuration is available from the
cluster. To get to this Properties dialog box, right-click the cluster object itself within the
Cluster Administrator and select Properties. You can now configure the settings for
the entire cluster itself. Here, in the next illustration, you can change the settings once
again for the quorum. Note, for most of the settings changes you make, you’re forced
either to restart the Cluster Administrator or to take objects offline and online, so the
settings changes can take place. Here, you can change the quorum log size to be larger
or smaller. I recommend either keeping the log the size it is or increasing it (in the
preplanning stages, you should have made sure you acquired a server with plenty
of disk space available).
P:\010Comp\OsbNetw\622-6\ch03.vp
Monday, March 24, 2003 1:51:31 PM
Color profile: Generic CMYK printer profile
Composite Default screen
168 Windows Server 2003 Clustering & Load Balancing
OsbNetw / Windows Server 2003 Clustering & Load Balancing / Shimonski/ 222622-6 / Chapter 3
While you’re still looking at the Cluster properties, you can click the next tab
to look at the Network Priority. The Network Priority tab enables you to set which
interface should be given priority. In this case, you can see I set the external, publicly
accessible interface (LAN) to be given priority. In the following illustration, you can
move the priorities up and down (up being the highest priority), and you can also
set the properties on each interface. Change the properties by clicking the Properties
button on the interface which you want to configure. You might or might not see
both interfaces in the Network Priority tab. If you don’t, then you have an interface
configured as external only. Later in the section, you see how to set internal/external
and mixed interface values. Be aware, this is only looking at the internal interface or
interfaces that are mixed, as in both internal and external.
P:\010Comp\OsbNetw\622-6\ch03.vp
Monday, March 24, 2003 1:51:31 PM
Color profile: Generic CMYK printer profile
Composite Default screen
Chapter 3: Designing a Clustered Solution with Windows Server 2003 169
OsbNetw / Windows Server 2003 Clustering & Load Balancing / Shimonski/ 222622-6 / Chapter 3
In the next illustration, you can see the Cluster Group properties where you can set
thresholds and periods for failover and failback. To get to the failover and failback settings,
right-click the actual cluster group in the Cluster Administrator console. Right-click
cluster group | Properties | Failover tab. Failover is set by default. You can adjust the
threshold, which defaults (and is recommended) at ten and the period of six hours,
which you can also leave at default level. Most important here is to notice failover is
configured by default, as you see shortly, failback is not.
In the next illustration, you moved to the Failback tab and now you see that failback
is configured by default. As you learned in Chapter 1, a failover is what happens when
one node goes down or offline and the other node in the cluster takes over. Failback is
P:\010Comp\OsbNetw\622-6\ch03.vp
Monday, March 24, 2003 1:51:31 PM
Color profile: Generic CMYK printer profile
Composite Default screen
170 Windows Server 2003 Clustering & Load Balancing
OsbNetw / Windows Server 2003 Clustering & Load Balancing / Shimonski/ 222622-6 / Chapter 3
when the other node that failed attempts to take over automatically as the primary and
active node on the group when it comes back online. This can be prevented, as seen in
the following illustration, or it can be configured either to failback immediately or within
an hourly range.
Let’s move to some actual cluster group resources to configure. In the left-hand side
of the Cluster Administrator, you find your cluster group. If you left-click it once, you
can see in the Contents pane (right side) a cluster IP address. This is, by far, the most
important setting you can view because it’s the IP address by which the cluster will
be referenced by your client. Look at this setting. In the right-hand side Content pane,
right-click the Cluster IP address and select Properties. You’ll open a dialog box, as
seen in the following illustration. Here, on the General tab, you can find the possible
P:\010Comp\OsbNetw\622-6\ch03.vp
Monday, March 24, 2003 1:51:32 PM
Color profile: Generic CMYK printer profile
Composite Default screen