Pro MySQL experts voice in open source phần 8 ppt
Bạn đang xem bản rút gọn của tài liệu. Xem và tải ngay bản đầy đủ của tài liệu tại đây (2.01 MB, 77 trang )
Granting All Privileges
When you want to grant or revoke all available privileges for a user (except for the GRANT ➥
OPTION privilege) at a specific privilege scope level, you can substitute the keyword ALL for
the (much longer and cumbersome) list of privileges. For instance, if you wanted to provide
mkruck@localhost all privileges on the ToyStore.Customer table, you could issue the following:
GRANT ALL ON ToyStore.Customer TO 'mkruck'@'localhost';
This would affect all table-level privileges: SELECT, INSERT, UPDATE, DELETE, CREATE, DROP, INDEX,
and ALTER.
Issuing GRANT ALL requests at other scope levels yields similar results. Consider this example:
GRANT ALL ON ToyStore.* TO 'mkruck'@'admin.example.com';
This would grant the user account the database-level privileges of
ALTER, ALTER ROUTINE, CREATE, CREATE ROUTINE, CREATE TEMPORARY TABLES, CREATE VIEW, DELETE,
DROP, EXECUTE, INSERT, UPDATE, INDEX, SELECT, SHOW VIEW, and LOCK TABLES. By using the *.*
modifier, you grant the user every privilege except the GRANT OPTION privilege, so take care
when using the ALL keyword to use the correct scope modifier after the ON keyword!
To revoke all privileges issued to a user account, use the REVOKE ALL command:
REVOKE ALL ON *.* FROM 'mkruck'@'localhost';
This would remove all global privileges from mkruck@localhost except for the GRANT OPTION
privilege.
To include the GRANT OPTION privilege in the REVOKE command, issue the following version:
REVOKE ALL, GRANT OPTION ON *.* FROM 'mkruck'@'localhost';
This syntax is available from MySQL 4.1.2. Prior to this version, two statements are neces-
sary to remove all privileges for a user:
REVOKE ALL ON *.* FROM 'mkruck'@'localhost';
REVOKE GRANT OPTION ON *.* FROM 'mkruck'@'localhost';
Viewing User Privileges
You can use a number of methods to obtain information regarding a user’s granted or revoked
privileges. Which method you choose is a really just a matter of formatting preference. Here,
we’ll cover using the SHOW GRANTS command and querying the grant tables directly. Another
method of viewing user privileges is to use the new support for the INFORMATION_SCHEMA virtual
database, which we’ll cover in Chapter 21.
Using SHOW GRANTS
One way to check a user’s grants is to use the SHOW GRANTS statement:
SHOW GRANTS FOR username;
CHAPTER 15 ■ USER ADMINISTRATION 507
505x_Ch15_FINAL.qxd 6/27/05 3:35 PM Page 507
This will show, in reproducible GRANT statements, the privileges available to the user
(helpful in reminding you of the syntax for the GRANT statement). Listing 15-2 shows the output
of SHOW GRANTS.
Listing 15-2. SHOWS GRANTS Output
mysql> SHOW GRANTS FOR 'jpipes'@'localhost';
+ +
| Grants for jpipes@localhost |
+ +
| GRANT SELECT, INSERT, UPDATE, DELETE ON *.* TO 'jpipes'@'localhost' |
| GRANT SELECT ON `ToyStore`.* TO 'jpipes'@'localhost' |
| GRANT EXECUTE ON `test`.`ShowIndexSelectivity` TO 'jpipes'@'localhost' |
+ +
3 rows in set (0.00 sec)
You may notice a peculiarity in the results in Listing 15-2. The privileges for
jpipes@localhost on a global level completely negate the need for the SELECT privilege on
the ToyStore database. So, why do both lines appear? This is because MySQL does not remove
grant table entries just because a more encompassing privilege level has been granted to the
user. Keep this in mind when changing user privileges. If at some point, you loosen a user’s
restrictions by granting global privileges, and later revoke the global privileges, the database-
specific privileges will still exist.
Querying the Grant Tables
Another option for determining a user’s privileges involves querying the actual grant tables
(which are described in the next section). To see global permissions for jpipes@localhost,
query the user grant table, as Listing 15-3 demonstrates.
Listing 15-3. Querying the user Grant Table Directly
mysql> SELECT * FROM mysql.user
-> WHERE User = 'jpipes' AND Host = 'localhost' \G
*************************** 1. row ***************************
Host: localhost
User: jpipes
Password:
Select_priv: Y
Insert_priv: Y
Update_priv: Y
Delete_priv: Y
Create_priv: N
Drop_priv: N
Reload_priv: N
Shutdown_priv: N
Process_priv: N
File_priv: N
CHAPTER 15 ■ USER ADMINISTRATION508
505x_Ch15_FINAL.qxd 6/27/05 3:35 PM Page 508
Grant_priv: N
References_priv: N
Index_priv: N
Alter_priv: N
Show_db_priv: N
Super_priv: N
Create_tmp_table_priv: N
Lock_tables_priv: N
Execute_priv: N
Repl_slave_priv: N
Repl_client_priv: N
Create_view_priv: N
Show_view_priv: N
Create_routine_priv: N
Alter_routine_priv: N
Create_user_priv: N
ssl_type:
ssl_cipher:
x509_issuer:
x509_subject:
max_questions: 0
max_updates: 0
max_connections: 0
max_user_connections: 0
1 row in set (0.31 sec)
Here, you can see all privileges except the SELECT, INSERT, UPDATE, and DELETE privileges
are set to N, which makes sense; the first line from the previous output of Listing 15-2 shows
the global GRANT statement having these privileges enabled.
Querying each of the grant tables as in Listing 15-3 will produce similar output for each of
the privilege scope levels. The user and db tables store privilege information in separate fields
of type ENUM('Y','N'). The tables_priv, columns_priv, and procs_priv grant tables store privi-
lege information in a single SET() field containing a list of the available privileges. Listing 15-4
shows the output of a SELECT on the tables_priv table to illustrate this difference.
Listing 15-4. Querying the columns_priv Grant Table Directly
mysql> SELECT Db, Table_name, Table_priv FROM mysql.tables_priv
-> WHERE User = 'mkruck' AND Host = 'localhost';
+ + + +
| Db | Table_name | Table_priv |
+ + + +
| ToyStore | Customer | Select,Insert |
+ + + +
1 row in set (0.00 sec)
Now that you’ve seen how to grant and revoke privileges, it’s important to understand
how MySQL actually applies and verifies those privileges.
CHAPTER 15 ■ USER ADMINISTRATION 509
505x_Ch15_FINAL.qxd 6/27/05 3:35 PM Page 509
How MySQL Controls Access and Verifies Privileges
MySQL controls access to the database server through a two-step process. In the first step of
the process, MySQL identifies and authenticates the user connecting through a MySQL client.
The second part of the process entails determining what the authenticated user can do once
inside the system, based on that user’s privileges.
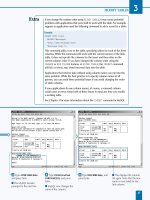
Figure 15-1 illustrates the flow of events in the MySQL access control and privilege verifi-
cation system. You can see how the different steps of the process are designed to ensure that
the requests issued by the client, including the actual connection request, are allowed. When
requests or connections do not meet all access criteria, MySQL returns an error code corre-
sponding to the reason for request refusal.
w of events
Supplies:
[host]
[username]
[password]
Client requests
connection
MySQL refuses
connection
Credentials
not valid
MySQL verifies
supplied
credentials
MySQL validates the host,
user, and password by
querying the user grant
table
Client issues
statement
Credentials
valid
e.g., SELECT, INSERT,
ALTER TABLE, etc.
Step 1:
Access
Authentication
Step 2:
Permission
Verfiication
MySQL determines
permissions needed
for requested
statement
Some requests need multiple
permissions; for example, an ALTER TABLE
request requires permission for ALTER,
INSERT, and CREATE privileges for
the table
MySQL looks for
needed permission to
objects in grant tables
matching the user/
host
MySQL queries the db, tables_priv,
and columns_priv grant tables for
appropriate permissions
MySQL refuses
request
Privileges
not matched
All privileges
found
MySQL sends request
along to parser
CHAPTER 15 ■ USER ADMINISTRATION510
505x_Ch15_FINAL.qxd 6/27/05 3:35 PM Page 510
■Note See for an explanation of com-
mon reasons for access denied messages.
How MySQL Authenticates Users
MySQL uses a two-part label to identify the user issuing a connection request. This label is
composed of the username and the host values. The host value represents the machine from
which the connection originates. The username part of the label is the specific user connect-
ing from the host.
The user grant table stores information needed to authenticate incoming connections,
along with a set of global privileges tied to each entry in the table (discussed earlier in the chap-
ter). The three columns of the user grant table that are used in the connection authentication
decision are Host, User, and Password. The User column value can be either an actual username
(for example, joe_smith) or a blank string (' '). Wildcard matches can be used in the Host col-
umn. An underscore (_) character represents a single character, and a percent (%) represents any
number of characters. The Host column value can be in any of the following formats:
•Host (or domain) name: www.mycompany.com, %.mycompany.com
•Host IP address: 123.124.125.255, 123.124.125.%
• Local machine client: localhost, and on some Linux systems, localhost.localdomain
MySQL compares the username and host values of the connection with entries in the
user grant table in a special way. When the mysql.user table data is loaded into memory, it is
first sorted based on how specific the User and Host column values are. Because the Host col-
umn values can contain wildcard characters, and the User column can be blank (meaning any
user at the specified Host), some table entries will be more specific than others.
For example, Listing 15-5 shows some sample rows from the user grant table on a test
database server we’ve set up for the examples in this chapter.
Listing 15-5. The user Grant Table
mysql> SELECT User, Host FROM mysql.user;
+ + +
| User | Host |
+ + +
| | % |
| mkruck | % |
| jpipes | %.example.com |
| mkruck | admin.example.com |
| | localhost |
| jpipes | localhost |
| mkruck | localhost |
| root | localhost |
| responder | mail.example.com |
+ + +
CHAPTER 15 ■ USER ADMINISTRATION 511
505x_Ch15_FINAL.qxd 6/27/05 3:35 PM Page 511
When MySQL sorts this list according to specificity, it will be ordered by the most specific
Host value to the least specific. Since IP addresses or domain names are more specific than a
host specification that contains a wildcard, the actual order in which MySQL would see the
entries in Listing 15-5 would be as listed in Table 15-6.
Table 15-6. The user Table Results Ordered by Specificity of Username and Host Label
User Host
jpipes localhost
jpipes %.example.com
mkruck localhost
mkruck admin.example.com
mkruck %
responder mail.example.com
root localhost
localhost
%
If the label were passed to the identification system, MySQL
would first search for all entries matching the supplied username or having a blank entry in
the User column. Then it would go down the returned list of entries, looking first for a Host
column value that matches the incoming tag. Four entries in the sample user grant table
match this username part of the identification label, as shown in Table 15-7.
Table 15-7. Possible Entries That Could Match Label
User Host
jpipes localhost
jpipes %.example.com
localhost
%
Of these four, the top row contains the most specific username and host combination.
However, the groups.example.com domain clearly does not match the Host column value
localhost. The next row, with the Host value of %.example.com matches our supplied domain,
and so this row is used in order to determine access and privileges to the system. If the Host
value did not match, the next row would be checked, and so on down the line.
We cover this sorting logic here because of the confusion some MySQL users experience
regarding why certain privileges have not been granted to them when executing queries. This
confusion can be tracked to a misunderstanding of which entry in the user grant table has
been loaded for their current connection. Often, if a number of entries have been made to the
user grant table with similar Host and User column values, it may not be clear which entry has
been loaded. If you are unsure about which entry has been loaded for a connection, use the
CURRENT_USER() function, as shown in Listing 15-6.
CHAPTER 15 ■ USER ADMINISTRATION512
505x_Ch15_FINAL.qxd 6/27/05 3:35 PM Page 512
Listing 15-6. Using the CURRENT_USER() Function to Determine Active Entry
mysql> SELECT CURRENT_USER();
+ +
| CURRENT_USER() |
+ +
| root@localhost |
+ +
1 row in set (0.00 sec)
DEFAULT CONNECTION PARAMETERS
Clients can connect to a MySQL server in numerous ways. Regardless of the client or API used to connect,
MySQL executes the same authentication procedures to authorize the incoming requests. Even so, it is possi-
ble through the use of option files, to configure clients to send a default host, username, and password along
with each connection. This is done by altering the MySQL configuration file (described in Chapter 14) and
inserting one or more of the following entries under the [client] configuration section:
• host=hostname
• user=username
• password=your_pass
Setting a default password for the MySQL client is not a secure practice, and should not be done on
anything but test or development servers that do not have any sensitive data.
Also be aware that, by default, MySQL accepts connections from anonymous users; that is, MySQL
allows connections that do not supply a username. Though the default access of this anonymous user is lim-
ited, and only the test database can be accessed, it is still a security threat, as discussed in Chapter 16.
How MySQL Verifies User Privileges
After MySQL has verified that the user connecting has access to the database server, the next
step in the access control process is to determine what, if anything, that user may do while
connected to the server. In order to determine if a user can issue a command, the privileges
at the different scope levels are checked from the broadest scope (global) to the finest scope
(column level). An additional grant table, mysql.host, is consulted in special circumstances.
Logically, MySQL follows this equation to determine if a user has appropriate privileges
to a database-specific object:
•Global privileges
• Or (database privileges and host privileges)
• Or table privileges
• Or column privileges
CHAPTER 15 ■ USER ADMINISTRATION 513
505x_Ch15_FINAL.qxd 6/27/05 3:35 PM Page 513
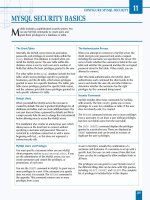
Take a look at Figure 15-2 to get a feel for how this logic is processed by the privilege veri-
fication system for a simple request. In Figure 15-2, let’s assume that the connection was
authenticated as jpipes@localhost, and sent the following request:
SELECT login, password FROM ToyStore.Customer WHERE ID=1;
MySQL would first look to see if an entry existed in the user grant table matching the supplied
user and host and having the SELECT privilege enabled (found in the select_priv column). If
the value of the SELECT privilege were 'Y', MySQL would stop the privilege verification process
and continue with the request’s execution. If the value of the SELECT privilege were 'N', MySQL
would continue down the grant table chain to the db table.
Figure 15-2. Privilege verification detailed flow of events
MySQL determines
which privilege(s) and
scope are required
MySQL accepts
request
Yes
Row exists for:
db.User='jpipes' AND
(db.Host='localhost' OR
db.Host=") AND
db.Db='ToyStore'?
Required privilege: SELECT
Database: ToyStore
Table: Customer
Columns: login, password
MySQL accepts
request
Row exists in host table for:
host.Db='ToyStore' AND
host.Host='localhost' ?
MySQL denies
request
db.Select_priv = 'Y'
AND
host.Select_priv = 'Y' ?
MySQL accepts
request
Yes
Row exists in tables_priv table for:
tables_priv.User='jpipes' AND
tables_priv.Host='localhost' AND
tables_priv.Db='ToyStore' AND
FIND_IN_SET('SELECT',
tables_priv.table_priv)>0 ?
MySQL accepts
request
Client request received and
connection authorized
(see Figure 15-1)
Rows exists in user table for:
user.User='jpipes' AND
user.Host='localhost' AND
user.Select_priv='Y' ?
MySQL denies
request
Row exists in db table for:
db.User='jpipes' AND
db.Host='localhost' AND
db.Db='ToyStore' ?
db.Select_priv =
'Y' ?
Two rows exists in columns_priv table for:
columns_priv.User='jpipes' AND
columns_priv.Host='localhost' AND
columns_priv.Db='ToyStore' AND
columns_priv.Table_name='Customer' AND
columns_priv.Column_name IN ('login','password')
FIND_IN_SET('SELECT',
columns_priv.column_priv)>0
MySQL accepts
request
MySQL denies
request
NoYes
Assume query:
SELECT login, password
FROM ToyStore.Customer
WHERE customer_id=1
No
No
No
Yes
Yes
Yes
No
No
No
Yes
No
AND
CHAPTER 15 ■ USER ADMINISTRATION514
505x_Ch15_FINAL.qxd 6/27/05 3:35 PM Page 514
MySQL looks for an entry in the db table matching db.User='jpipes' AND ➥
db.Host='localhost' AND db.Database_name='ToyStore'. If a row exists in mysql.db for
this combination, the db.Select_priv column is checked. If it found a 'Y' value for the
db.Select_priv column, MySQL would accept the request. If a row did not exist in mysql.db
matching db.User='jpipes' AND db.Host='localhost' AND db.Database_name='ToyStore'
but a row that matched db.User='jpipes' AND db.Host='' AND db.Database_name='ToyStore'
did exist, then the mysql.host grant table is queried.
If no rows in mysql.host match host.Host='localhost' AND host.Db='ToyStore',
MySQL denies the request. If a row in mysql.host does match host.Host='localhost' AND
➥
host.Db='ToyStore', then the Select_priv column in both rows in mysql.db and mysql.host
are checked for a 'Y' value. If this is the case, MySQL accepts the request. (We’ll discuss the
relationship between the db and host grant tables in just a moment.) If not, MySQL continues
to the tables_priv grant table.
If MySQL has reached the tables_priv grant table, it determines if there is a row in
the table that matches the condition WHERE User='jpipes' AND Host='localhost' AND
Db='ToyStore' AND Table_name='Customer' AND FIND_IN_SET('SELECT', Table_priv)>0.
2
If such a row exists, MySQL accepts the request. If not, it repeats a similar process in the
columns_priv grant table. If MySQL does not find rows in the columns_priv table for the
requested columns of the SELECT statement, MySQL denies the request.
The Purpose of the host Grant Table
The host grant table stores entries that are used when the db grant table does not have ade-
quate information to process the privilege verification request (see Figure 15-2). Neither the
GRANT nor REVOKE statements affect entries in mysql.host. Entries must be added and removed
manually.
The host grant table has an almost identical schema to the db grant table, except it does
not have a User column. When a statement request is evaluated by the access control system,
and it comes to the database grant level (meaning the user’s global privileges were insufficient
to grant the request and the object requiring privileges is of a database scope level or below),
the access control system checks to see if there is an entry in mysql.db for the supplied user. If
one is found, and the Host column value is blank (not '%', which means any database) then
mysql.host is consulted for further information. If an entry is found in mysql.host for the sup-
plied Host value in the identification label, then the privileges contained in both mysql.db and
mysql.host are combined (with a logical AND expression) to determine if the request should be
granted.
So, why would you even bother using the host table? That’s a good question. Most data-
base administrators never even touch it. Many don’t even know it exists, and if they do, they
don’t know why it’s there. The primary reason that mysql.host was added to the grant table
mix was to provide database administrators the ability to grant or deny access requests com-
ing from certain hosts or domains, regardless of the username. Remember that the MySQL
access control system is not denial-based. It uses an OR-based system to search for any granted
level of needed privilege, instead of searching first for the explicit denial of that privilege.
CHAPTER 15 ■ USER ADMINISTRATION 515
2. MySQL doesn’t actually use the FIND_IN_SET() function, but rather does a bitwise & operation on the
privileges loaded into memory for the queried user. We use the FIND_IN_SET() function here to
demonstrate the concept.
505x_Ch15_FINAL.qxd 6/27/05 3:35 PM Page 515
However, there are times when it is necessary to create what are known as stop lists, or lists
of items to which access specifically is denied. mysql.host can be used to create just such lists
for domains, regardless of the user part of the identification label. Let’s say we have three server
hosts in our network: sales.example.com, intranet.example.com, and public.example.com. Of
these, the only server that we don’t want to have access to any databases is public.example.com,
as it poses a security risk. So, we run the following code:
mysql> INSERT INTO mysql.host SET Host='public.example.com', Db='%';
mysql> INSERT INTO mysql.host SET Host='%.example.com', Db='%'
-> , Select_priv='Y', Insert_priv='Y', Update_priv='Y', Delete_priv='Y'
-> , Create_priv='Y', Drop_priv='Y', Index_priv='Y',Alter_priv='Y'
-> , Create_tmp_table_priv='Y';
This allows us to put a stop list together (currently containing only one entry for the
public.example.com host) and deny access to connections originating from that server. Using
the % wildcard this way in the Db column and in the Host column means that the access control
system will always find a match in the host table for any internal example.com server, regard-
less of the request. Since any privilege columns we leave out in the INSERT statement will
default to 'N', we can rest assured that no unintended privileges have been granted.
Remember, however, that the MySQL access control system will use privileges in the
global mysql.user entry first in the privilege verification process. Therefore, if the account
had privileges set to 'Y' at the global level, that entry would
override the host table entries.
Managing User Accounts from the Command Line
You can use SQL commands to add and remove user accounts, including several GRANT clauses
to place restrictions on accounts. Here, we’ll look at those commands. In the next section, we’ll
cover using the MySQL Administrator GUI tool to manage user accounts.
Adding User Accounts
As mentioned earlier, you can use the GRANT command to create new user accounts. Any time
you issue a GRANT statement for a username and host combination that does not currently
exist in the mysql.user table, a new user account is created. A row is inserted in the mysql.user
table for the username and host specified in your GRANT statement. If the scope of the privi-
leges granted in the statement is global, the user account’s global permissions will be set in
this new row and no other tables will receive an entry. If the scope of privileges was below the
global scope, a new entry will be inserted in the grant table corresponding to the privilege
level.
The IDENTIFIED BY clause of the GRANT statement allows you to specify a password for the
user account, like so:
GRANT SELECT ON ToyStore.*
TO 'some_user'@'localhost' IDENTIFIED BY 'my_password';
CHAPTER 15 ■ USER ADMINISTRATION516
505x_Ch15_FINAL.qxd 6/27/05 3:35 PM Page 516
Another way to add new user accounts is to insert rows directly into the mysql.user table.
This is a convenient way to add multiple users at once, however we don’t recommend this
method for just the odd user or two. To add only a few users, stick to the GRANT command. If
you do insert directly into mysql.user, note the password supplied in the IDENTIFIED BY clause
is actually encrypted in the mysql.user grant table. If you add the row to the user table directly,
you must use the PASSWORD() function to encrypt the password:
INSERT INTO mysql.user SET Host='localhost', User='some_user',
Password=PASSWORD('my_password'), Select_priv='Y';
Otherwise, the connecting user would not be able to access the server, as the supplied pass-
word would be encrypted and compared to the (plain-text) Password column value in the user
table.
Starting in MySQL 5.0.2, you can also add users with no privileges by using the CREATE
➥
USER command. The following two statements are identical in function:
CREATE USER 'some_user'@'localhost' IDENTIFIED BY 'my_password';
GRANT USAGE ON *.* TO 'some_user'@'localhost' IDENTIFIED BY 'my_password';
Restricting User Accounts
In addition to the user account’s global privileges, the mysql.user grant table also houses
a number of additional fields that can aid you as a database administrator in restricting
the account’s use of the database server. Starting with version 4.0.2, MySQL provides three
fields—max_questions, max_updates, and max_connections—which allow you to limit the
interaction a particular account has with the server. Before 4.0.2, all you could do was set
the max_connections configuration variable to limit the number of connections made by a
single user account, meaning you couldn’t vary the setting per user. Now, you have much
more flexibility in how you handle resource usage.
You can use the following to restrict user accounts:
• WITH MAX_QUERIES_PER_HOUR n, where n is the number of queries the user may issue,
limits the number of queries a user may issue against the server in one hour.
• WITH MAX_UPDATES_PER_HOUR n changes the number of update requests the user may
issue.
• WITH MAX_CONNECTIONS_PER_HOUR n changes the number of times a user may log in to
the database server in a single hour.
• MAX_USER_CONNECTIONS, available in MySQL 5.0.3 and later, differs from the
MAX_CONNECTIONS_PER_HOUR setting in that it is not time limited and refers to the
total amount of connections simultaneously made by the user account. Use this option
if you have a user that consistently opens too many user connections to the server,
leaving many of them idle or sleeping.
One good use of the USAGE privilege is in changing these variables without affecting any
other privileges. Listing 15-7 demonstrates changing all three of these variables, as well as a
direct query on mysql.user to show the change.
CHAPTER 15 ■ USER ADMINISTRATION 517
505x_Ch15_FINAL.qxd 6/27/05 3:35 PM Page 517
Listing 15-7. Using the USAGE Privilege to Change Global User Restriction Variables
mysql> GRANT USAGE ON *.* TO 'jpipes'@'localhost'
-> WITH MAX_QUERIES_PER_HOUR 1000
-> MAX_UPDATES_PER_HOUR 1000
-> MAX_CONNECTIONS_PER_HOUR 50;
Query OK, 0 rows affected (0.00 sec)
mysql> SELECT max_questions, max_updates, max_connections
-> FROM mysql.user
-> WHERE User='jpipes' AND Host='localhost';
+ + + +
| max_questions | max_updates | max_connections |
+ + + +
| 1000 | 1000 | 50 |
+ + + +
1 row in set (0.01 sec)
Using a combination of these resource limiters, you can achieve a fine level of control
over the resource usage of user accounts. They are useful when you have a high-traffic, multi-
user database server, as is typical in shared hosting environments, and you want to ensure
that the database server shares its available resources fairly.
Removing Accounts
If you are using a MySQL version 4.1.1 or later, you can remove a user account with the
DROP USER command:
DROP USER 'some_user'@'%';
In versions prior to MySQL 4.1.1, you need to issue the following two statements to
remove an account:
DELETE FROM mysql.user WHERE user='some_user' AND Host='%';
FLUSH PRIVILEGES;
Here, we’re manually deleting the entry, and issuing FLUSH PRIVILEGES to ensure that changes
are reflected in the in-memory copy of the grant tables, as discussed in the next section.
Effecting Account Changes
As stated earlier, MySQL keeps privilege information in-memory from when the server is started.
When making changes to privileges, you should be aware of when the in-memory copy of the
grant tables contains the most up-to-date privilege information and when it does not.
CHAPTER 15 ■ USER ADMINISTRATION518
505x_Ch15_FINAL.qxd 6/27/05 3:35 PM Page 518
When In-Memory Tables Are Updated
In all of the following situations, the in-memory grant tables contain the most up-to-date
privilege and access information:
•After issuing a GRANT, REVOKE, CREATE USER, or DROP USER statement
• After issuing the FLUSH PRIVILEGES statement
•Immediately after the server starts and before any requests are made to the mysql
database
If, however, you alter the mysql grant tables directly, as is necessary when altering
mysql.host or deleting a user account before version 4.1.1 of MySQL, the in-memory copies
of the privilege tables will not contain the most current information, and you should immedi-
ately issue a FLUSH PRIVILEGES statement to make the changes current.
When Current Connection Requests Use the New Privileges
If you make high-priority changes to the privilege system—for instance, because a security
violation was detected and you want to take immediate action—you will want to know exactly
when MySQL will use the privileges you have changed.
When you change a user’s database-level access and privileges (those stored in mysql.db),
the new privileges will take effect after the next issue of a USE db_name statement. While this is
okay for most web-based systems, where a new USE statement is issued on each HTTP request,
this can be more problematic if the offending user is logged in to a persistent session (a con-
sole or client/server application session). If the security risk is high, you may be forced to KILL
the offending user’s process (identified using the SHOW FULL PROCESSLIST command) in order
to ensure a new USE db_name request is generated.
When you make changes to the user’s global privileges, as well as passwords, the next
time the correct privileges will be read is when a new connection request is received with the
same identification tag. Again, it may be necessary in some situations to identify the offending
process IDs and KILL the processes to effectively “log out” the offending user.
When you change a user’s table or column-level privileges, the new privileges will take
effect on the very next request to the server, so, in general, you do not need to worry about
enforcing privilege changes at that level.
Using the MySQL Administrator GUI Tool
MySQL AB released the GUI tools MySQL Administrator and MySQL Query Browser in different
stages over 2004. New database administrators will find the GUI tools more intuitive than their
command-line counterparts. In some cases, particularly for user management tasks, the GUI
can reduce a number of fairly repetitive SQL statements down to a few clicks of the mouse.
Here, we’ll discuss how to use the MySQL Administrator tool to manage user accounts.
Your first step is to set up your connection to the server. Then you can navigate to the User
Administration section and use those tools to add and remove accounts, as well as specify
user privileges.
CHAPTER 15 ■ USER ADMINISTRATION 519
505x_Ch15_FINAL.qxd 6/27/05 3:35 PM Page 519
■Note To administer the user accounts, you must first connect to the server as a user with GRANT OPTION
privileges (database administrator). Otherwise, all the options detailed here are unavailable (grayed-out) to you.
Connecting to the Server
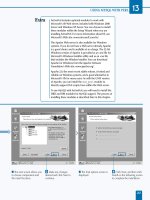
When you start up the MySQL Administrator program, you are greeted with the dialog box
shown in Figure 15-3.
■Note The figures in this section come from a computer running Fedora Core 3 Linux using the KDE
desktop environment. Although you may notice slight variations in the MySQL Administrator functionality,
depending on the operating system you use, the interface runs in a very similar fashion on Windows and
Macintosh operating systems. See for the version for your system.
Figure 15-3. The MySQL Administrator common connection dialog box
You can enter your information in to the text boxes provided for server hostname, user-
name, and password. However, since you’ll presumably be using this tool more than once, you
can set up a stored connection so you don’t need to repeatedly enter this information. To do so,
select Open Connection Editor in the Stored Connection drop-down box. This will bring up the
Preferences dialog box, shown in Figure 15-4.
CHAPTER 15 ■ USER ADMINISTRATION520
505x_Ch15_FINAL.qxd 6/27/05 3:35 PM Page 520
Figure 15-4. The MySQL Administrator Connection Preferences dialog box
Click the Add Connection button in the lower-left corner, and then fill in the appropriate
information to the space in the right of the dialog box. When you’re finished, click Apply
Changes, then Close. You will be taken back to the Connection dialog box, where you can
now select the new stored connection you just saved. Enter your password and click Connect.
Navigating User Administration
After you connect to the server, you will find yourself in the MySQL Administrator interface,
with a number of options in the left pane, as shown in Figure 15-5.
■Tip If you’re a Linux user, you can avoid needing to retype your passwords every time you enter MySQL
Administrator or MySQL Query Browser. In either application, select File
➤ Preferences, and then click Gen-
eral Options tab and select Store Connection Passwords. Optionally, you can obscure the password storage
by selecting Obscured in the Storage Method drop-down list.
CHAPTER 15 ■ USER ADMINISTRATION 521
505x_Ch15_FINAL.qxd 6/27/05 3:35 PM Page 521
Figure 15-5. The MySQL Administrator console
Click the User Administration option to go to the User Administration section of MySQL
Administrator, as shown in Figure 15-6.
As you can see, in the bottom-left pane of the window is a tree-view-like User Accounts
list. The server’s user accounts are listed by username. Clicking the username will display zero,
one, or more hostnames preceded by an @ sign, depending on how many entries in mysql.user
have a User column value matching the username. If no hosts are listed, it means that the only
entry in mysql.user with that username is one where the Host column value is '%'.
In Figure 15-6, notice that while we have selected jpipes@% (the top-level of the node for
jpipes), the Schema Privileges and Resource Limits tabs in the main window area are grayed-out.
This is because there actually is no record in mysql.user for jpipes@%. There is, however, a record
in mysql.user for jpipes@localhost, which is why, as demonstrated in Figure 15-7, the Schema
Privileges and Resource Limits tabs are active and available when we select that part of the tree.
CHAPTER 15 ■ USER ADMINISTRATION522
505x_Ch15_FINAL.qxd 6/27/05 3:35 PM Page 522
Figure 15-6. The User Administration section of MySQL Administrator
Figure 15-7. Selecting a user account with a matching entry in mysql.user
CHAPTER 15 ■ USER ADMINISTRATION 523
505x_Ch15_FINAL.qxd 6/27/05 3:35 PM Page 523
Adding a New User Account
To add a new user account, right-click in the User Accounts section and select New User
(Add New User in the Windows version) from the context menu, or optionally, click the New
User button at the bottom of the window. This adds a new_user entry in the User Accounts list.
In the right pane, fill in the fields in the Login Information section, as shown in Figure 15-8.
Filling in the Additional Information area is strictly optional.
3
Figure 15-8. Filling in new user information
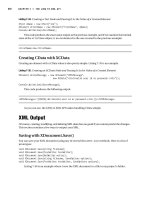
When you are finished filling in the basic information, select the Schema Privileges tab. In
this tab, any privileges that you move from the rightmost Available Privileges list to the middle
Assigned Privileges list will be granted for the schema (database) that you have selected in the
leftmost list, entitled Schema. In Figure 15-9, you can see that for this new user, we have
granted the SELECT, INSERT, UPDATE, and DELETE privileges for the ToyStore schema.
If you click the Resource Limits tab, you can set the maximum connections, queries, and
updates values for this user, as shown in Figure 15-10.
CHAPTER 15 ■ USER ADMINISTRATION524
3. Information you enter in the Additional Information is stored in the mysql.user_info system table.
505x_Ch15_FINAL.qxd 6/27/05 3:35 PM Page 524
Figure 15-9. Granting the new user privileges on the ToyStore schema
Figure 15-10. Setting the new user’s resource limitations
CHAPTER 15 ■ USER ADMINISTRATION 525
505x_Ch15_FINAL.qxd 6/27/05 3:35 PM Page 525
CHAPTER 15 ■ USER ADMINISTRATION526
When you have finished making your changes, click the Apply Changes button. Your user
will be added to the user grant table with the Host column value of '%'. Usually, this is not
what you really want, since it is better to have a more specific entry for the Host column. To
create an entry in mysql.user with a more specific Host value, right-click the username in the
User Accounts area and select Add Host. In the Add Host dialog box, shown in Figure 15-11,
select the Hostname or IP option and type in your desired domain or host address. Click OK,
and you will see an additional node under the new username in the User Accounts area.
Figure 15-11. The Add Host dialog box
Selecting the new node will change the right content area to display the entry for the
node.
Viewing and Editing User Privileges
Have you noticed that you haven’t seen a way to change global or table-level privileges? The
default behavior of MySQL Administrator is to not show these privilege levels. To turn them
on, select File
➤ Preferences, and then click the Administrator icon. Under User Administra-
tion, check the “Show global privilege editor” and “Show table/column privilege editor”
options, as shown in Figure 15-12. Click the Apply Changes button, and then click Close.
You’ll now notice two additional tabs when you click a user account. Selecting the Global
Privileges tab, shown in Figure 15-13, gives you the ability to assign permissions on a global
level.
■Caution Remember that global privileges override all others. Be careful what you assign through MySQL
Administrator.
505x_Ch15_FINAL.qxd 6/27/05 3:35 PM Page 526
Figure 15-12. Turning on the global privilege editor
Figure 15-13. The Global Privileges editor in MySQL Administrator
CHAPTER 15 ■ USER ADMINISTRATION 527
505x_Ch15_FINAL.qxd 6/27/05 3:35 PM Page 527
Similarly, you can change table and column privileges by selecting the Table/Column
Privileges tab, as shown in Figure 15-14. You can select a table or column by clicking the
appropriate schema in the left pane and drilling down to the object of interest. The Available
Privileges list displays the privileges available for each object you click.
Figure 15-14. The Table/Column Privileges editor in MySQL Administrator
Removing an Account
MySQL Administrator makes it (a bit too) easy to remove users (and all related user/host
mysql.user records). Simply right-click the user account you wish to remove and select one of
the following options:
• Remove Host: Removing the host removes that user/host entry and all associated privi-
leges. If there is only one user/host entry, MySQL Administrator will warn you that you
will essentially be removing the user account entirely, since no remaining mysql.user
entries will be available.
• Remove User: Removing the user will delete all record of the user and any host combi-
nations it might have. Obviously, you should use this option with caution.
MySQL Administrator asks you to confirm your impending action, as shown in Figure 15-15.
CHAPTER 15 ■ USER ADMINISTRATION528
505x_Ch15_FINAL.qxd 6/27/05 3:35 PM Page 528
Figure 15-15. The Remove Account confirmation dialog box
For more information about using MySQL Administrator, see />administrator/en/mysql-administrator-introduction.html.
Thinking in Terms of User Roles
Up until now, we’ve been speaking about the access control and privilege verification systems
strictly in terms of user accounts. However, many other database vendors have implemented
an alternate, more complex, account management subsystem. The primary difference
between MySQL and other popular vendors is that MySQL does not have a role-based
implementation.
4
Sticking to their original goals for ease of use and simplicity, the MySQL developers have
chosen not to overcomplicate the access control process by adding new layers of complexity
to the grant system. It is unlikely that you will see a role-based implementation in the near
future. However, that does not mean you should disregard the notion of account management
by roles. The concept is just as important, whether MySQL implements the roles systemati-
cally or leaves the implementation to your own devices.
Many of you who are systems administrators are already intimate with group-based
account management. All major server operating systems provide a mechanism to place user
accounts into one or more usually function-oriented groups. By function-oriented, we mean
that the group’s members generally share similar work goals: server administrators, power
users, regular users, server daemons, and so on. It is often helpful to think of the user accounts
you manage for a MySQL database server in similar terms. Users of the database server almost
always can be categorized into groups based on the roles they play in the overall scheme of the
database server’s daily activity.
More than likely, if you already manage a MySQL database server, you, perhaps unknow-
ingly, think in terms of role-based management. When you add a new user account, you find
out what the user will need to accomplish on a daily basis and which databases the account
will need to access. In doing so, you are effectively determining the role that the user will play
in the system.
The primary advantage to role-based account management is that user accounts and
privileges are controlled in a consistent manner. If you administer database servers with more
than just a few users, it is important to have a written policy detailing the roles having access
to the system. This written policy provides a reference for administrators to use when adding,
removing, or changing user accounts.
CHAPTER 15 ■ USER ADMINISTRATION 529
4. MySQL’s MaxDB product already has a role-based account management system. If you feel MySQL’s
normal user access and privilege verification system will not meet the needs of your organization,
head over to to check out how MaxDB implements
its role-based system through an extended SQL variant.
505x_Ch15_FINAL.qxd 6/27/05 3:35 PM Page 529
As you start down the road to role-based management, begin with a list of the roles that
can be played by database users in your system. For this section, we will return to our toy store
sample schema. After a few minutes of thinking about the different types of users that will
have access to the database server, we come up with the following list:
•Database Administrators
•Database Users
The Database Administrators group (role) is fairly self-explanatory. For our Database
Users role, we can further break down the list to the following:
• Super Users: Users who have access to all databases and can do all simple table-related
tasks, as well as have full rights on a database named tmp.
• Regular Users: Users who have access to specified databases and may do simple table-
related tasks.
• Designers: Users who have all database-related access and privileges on some data-
bases (schema).
We want to ensure that users belonging to each role (and sub-role) have only the privi-
leges that they need to do their activities, and no more. Also, we’re assuming here that Super
Users have some general database knowledge and know how to use MySQL, so we’ve given
them a database (tmp) to use for their own measures. Thus, we put together a matrix to show
which global and database level privileges member users should be granted as defaults, as
shown in Table 15-8. This kind of table serves as an important written policy to guide database
administrators for large projects. This document should be maintained as changes to the
account management system are implemented.
Table 15-8. Role-Privilege Matrix for the Toy Store Database Server
Role Global Privileges Database-Level Privileges
DB Admins ALL N/A
5
DB Users NONE NONE
DB Users: Super Users NONE SELECT, INSERT, UPDATE, DELETE on all schema;
ALL on schema called tmp
DB Users: Regular Users NONE SELECT, INSERT, UPDATE, DELETE on select schema
DB Users: Designers NONE ALL on select schema
Now, we have a working strategy for setting defaults for our system’s users based on their
roles. You would use a list like the one in Table 15-8 as a reference when making account man-
agement changes. Instead of remembering the exact privileges a specific user account should
be granted, you need to know only which role a new user will play.
Finally, you might streamline the process of account management further, by encapsulat-
ing the account management into stored procedures or shell scripts that add appropriate
permissions based on these well-defined roles.
CHAPTER 15 ■ USER ADMINISTRATION530
5. Remember that global privileges override database-level privileges.
505x_Ch15_FINAL.qxd 6/27/05 3:35 PM Page 530
Practical Guidelines for User Administration
In this chapter, we’ve covered a number of topics related to user account management. Here,
is a simple list of strategies we consider to be best practices:
•Grant as few privileges as is absolutely necessary for users to accomplish their daily
activities.
•Avoid using WITH GRANT OPTION.
•Avoid issuing any global privileges to anyone but the topmost database administrator.
6
•Keep privileges as simple as possible. If you don’t need table or column-level privileges,
don’t use them. This only slows down the access control system and overcomplicates
your setup.
• Think in terms of role-based management. This will allow you to more effectively
manage large groups of users by grouping them by like activities.
•Use scripts to consolidate role-based management into a secure, well-organized
environment.
Summary
In this chapter, we’ve covered some essentials of MySQL user administration, as well as some
advanced aspects. To review, we started by explaining MySQL privileges and their scopes.
Then we took an in-depth look at how the two-step access control and privilege verification
system works. You learned how the decision to allow or deny a certain request is made, and
stepped through some common misunderstandings regarding that decision-making process.
Next, we reviewed how to add users into the system, modify permissions for those users,
and eventually remove them. Along the way, we pointed out some occasional “gotchas,” and
walked you through the more unique, but nonetheless important, scenarios of limiting a
user’s resources and setting up a host stop list using the mysql.host grant table.
We then looked at how to manage users using the MySQL Administrator GUI, walking
through setting up a connection, and working in the User Administrator section.
Finally, we switched gears a bit and talked about the major difference between MySQL’s
user administration implementation and other database vendors: MySQL’s lack of role-based
account management. We demonstrated some techniques for thinking in terms of role-based
management and finished up with some guidelines to follow as you administer users in your
databases.
CHAPTER 15 ■ USER ADMINISTRATION 531
6. An exception to this would be specific roles such as a backup job user account that requires global
RELOAD, LOCK TABLES, and SELECT privileges.
505x_Ch15_FINAL.qxd 6/27/05 3:35 PM Page 531