Mysql your visual blueprint for creating open source databases- P11 ppt
Bạn đang xem bản rút gọn của tài liệu. Xem và tải ngay bản đầy đủ của tài liệu tại đây (671.22 KB, 20 trang )
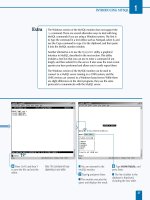
■ The variable list is
displayed.
‹ Click the Exit button to
return to the administration
panel.
› Click the Display status
button to display detailed
server status.
■ The status information is
displayed in a new window.
ˇ Click Exit to return to the
administration panel.
MANAGE THE MYSQL SERVER
9
You may have noticed that there is often more than one way to achieve the
same result. For example, if you want to display a list of MySQL variables and
their current values, you can use several commands: show variables from
the MySQL monitor, mysqladmin variables from the command prompt,
the Variables tab in WinMySQLadmin, or the Show variables button in
MySQLGUI.
Each of these methods of MySQL administration has its advantages and
disadvantages. The MySQL monitor and the mysqladmin utility are available
on all operating systems and provide a consistent interface, while the
MySQLGUI and WinMySQLadmin utilities provide a graphical interface with
easy access to common options. You can use whichever commands are
available to you, and whichever you find the most comfortable to work with.
In addition to the administrative features discussed here, you can use
MySQLGUI to send queries to the MySQL server and display the results. Unlike
the command-line MySQL monitor, MySQLGUI includes options to save query
results to a file after you view them, and saves a list of the most recent queries
for easy access.
While MySQLGUI looks simple, keep in mind that it is every bit as powerful as
the command-line utilities. You can use it to delete an entire database or shut
down the MySQL server. Be sure to select commands carefully.
187
516922 Ch09.F 9/26/02 12:01 PM Page 187
W
hile MySQL will work remarkably well using the
default settings, you can change a variety of
factors to improve performance. Some of the
most important factors that affect MySQL server
performance include the speed of the server hardware, the
design of tables, and the performance of particular queries.
OPTIMIZE MYSQL
MySQL
Disk Access
Disk access is usually the largest bottleneck affecting a
MySQL server. Because tables are stored on disk,
virtually every MySQL operation involves disk access.
MySQL will benefit from a fast disk drive. Additionally,
you may want to consider using a separate drive for
MySQL data so that other server functions do not slow
down MySQL.
Processor Speed
While not as important as disk speed, the processor, or
CPU, of the MySQL server comes into play when
working with data that has been read from disk: A faster
processor will handle MySQL queries faster. It is also
beneficial to analyze the other applications on the
server. If a Web server or other software is using the
CPU intensively, MySQL would benefit from a faster
processor or a dedicated MySQL server machine.
Memory
A busy MySQL server requires a large amount of
memory. This is used to store data temporarily while it
is sent to clients, and for temporary tables. Adding
memory will often improve performance, especially if
the disk drives and CPU are already reasonably fast.
OPTIMIZE THE MYSQL SERVER
Using Fixed-Length Rows
When a table is frequently changed, MySQL performs
better using fixed-length rows. To use fixed-length rows
on a table, avoid using variable-length column types
such as VARCHAR, TEXT, and BLOB. The disadvantage of
fixed-length rows is that all rows take the same amount
of space. Variable-length rows will make more efficient
use of disk space if there is a large amount of variation
in the sizes of data items.
Reduce Data Size
The less data MySQL has to work with, the faster it will
be. Use the smallest column sizes possible for your data
and eliminate unnecessary columns to improve the
MySQL server's performance working with a table.
OPTIMIZE TABLE DESIGN
188
One aspect of MySQL that is relatively easy to optimize is
the speed of the machine running the MySQL server.
Upgrading disks, memory, or processor, or switching to a
faster machine can dramatically improve performance.
The design of a table can also affect performance. By
considering performance when you design and create a
table under MySQL, you can ensure that queries on the
table can be quickly handled by the server.
516922 Ch10.F 9/26/02 11:38 AM Page 188
OPTIMIZE AND TROUBLESHOOT MYSQL
10
189
Using EXPLAIN
You can use the EXPLAIN command with a SELECT
query to display information about how MySQL will
handle the query. When you use EXPLAIN, the MySQL
server does not actually process the SELECT query.
Instead, it displays a chart of information about the query.
The information displayed by EXPLAIN includes the
tables the query will use, the keys it can use to quickly
find records, the number of rows the query will return,
and any extra explanation the server can offer about the
query.
The Extra column will indicate whether a file sort is
necessary to process an ORDER BY clause. It will also
indicate whether a temporary table will be needed to
handle a GROUP BY clause. If either of these is present,
it indicates a major bottleneck for the query. You may
be able to eliminate the problem by adding an index or
changing the query.
Example:
EXPLAIN SELECT * FROM quotes;
Improve Queries
After you have isolated a slow query, you can try
changing its syntax. Eliminate any unnecessary ORDER
BY clauses, as they can slow down the query. Add
WHERE clauses to target specific records wherever
possible, and use the LIMIT clause to limit the number
of records returned. See Chapter 6 for details about the
syntax of these SELECT query clauses.
Add Indexes
If you frequently search for values in a particular
column, you may be able to improve performance by
adding an index on that column. You can use the ALTER
TABLE command to add an index at any time. This is
explained further in "Improve Performance with
Indexes," later in this chapter.
Lock Tables
MySQL normally handles table locking automatically. You
may be able to improve the performance of a complex
query or series of queries by locking the table first. You
can use the LOCK TABLES and UNLOCK TABLES
commands to control table locking. This is described in
"Manage Table Locking," later in this chapter.
OPTIMIZE SLOW QUERIES
Multiple Tables and Relationships
Performance problems multiply when you are working
with multiple tables. Because JOIN queries that retrieve
data from multiple tables tend to be slow, do not divide
data into more tables than necessary.
When you do use multiple tables that have a
relationship, be sure the columns that form the
relationship are the same type, length, and preferably
have the same name. This will ensure that the MySQL
server can perform a JOIN query efficiently.
Sort Table Data
You can use the ORDER BY keywords with an ALTER
TABLE command to sort the data in the table. This can
improve performance when the contents of the table
are often read in the same order, and are not changed
frequently.
Example:
ALTER TABLE address ORDER BY name;
OPTIMIZE TABLE DESIGN (CONTINUED)
Often, a particular query that is used frequently can slow
down the MySQL server. By optimizing a query's syntax,
you can often improve its performance.
The MySQL server keeps track of the number of slow
queries, or queries that took more than a certain length
of time, since the server started. You can display this
value using the SHOW STATUS command in the MySQL
monitor or the mysqladmin status command at the
command prompt.
The MySQL server can optionally maintain a slow query
log, which keeps a record of each slow query. This is
particularly useful for determining which queries are
slowing down the server. This log file is described in
detail in "View MySQL Log Files," later in this chapter.
516922 Ch10.F 9/26/02 11:38 AM Page 189
⁄ From the command
prompt, type
cd /usr/local/
mysql/data/testdb and press
Enter.
■ This switches to the
directory where the testdb
database is stored.
Note: On Windows systems,
the directory is usually
c:\mysql\data\testdb.
¤ Type myisamchk quotes
and press Enter.
■ This checks the table for
errors and displays a report.
Note: To check a different table,
replace quotes with the name of
the table.
M
ySQL includes a utility called myisamchk that
allows you to check tables for errors and repair any
errors that occur. You can use this utility as a
regular check to watch for errors, or when you suspect a
problem with a table. This utility is for the default MyISAM
table type. An older utility, isamchk, works for ISAM tables.
To check a table for errors, start in the directory where the
database files are stored, typically /usr/local/mysql/data/
database_name. Type myisamchk followed by one or more
table names. The check will be performed immediately, and
may take several minutes on a large table. No clients can
access the table while myisamchk is running, and
myisamchk only works if no clients have a lock on the
table. The following example checks the quotes table:
cd /usr/local/mysql/data/testdb
myisamchk quotes
The myisamchk utility displays a series of status messages
during the table check. If any of these indicate an error
in the table, you can attempt to repair the table. Use the
myisamchk -r option to attempt to repair a corrupt table.
The following example repairs the quotes table:
myisamchk -r quotes
If an error message is displayed, and myisamchk is unable
to repair the table using this option, you can try the -o
option. This performs a slower recovery process that may
work when the standard process fails.
Unlike other MySQL utilities, the myisamchk utility does
not require a MySQL username and password. It works
directly with database files. For this reason, in the default
installation, your UNIX username must have root access to
run myisamchk. On Windows systems, this utility is
available as c:\mysql\bin\myisamchk.exe.
CHECK A TABLE FOR ERRORS
MySQL
190
CHECK A TABLE FOR ERRORS
516922 Ch10.F 9/26/02 11:38 AM Page 190
‹ Type myisamchk -m quotes
and press Enter.
■ This performs a more
detailed (medium) check on
the table.
› Type myisamchk -r quotes
and press Enter.
■ This attempts to recover
the table data.
OPTIMIZE AND TROUBLESHOOT MYSQL
10
The myisamchk utility includes a number of additional options to control
the check and repair process. Type myisamchk help for a complete list
of options. The following table describes some of the most useful options:
OPTION DESCRIPTION
-c Check (default if no options are specified)
-e Extended check — slow but more thorough
-m Medium check — faster than extended
-F Fast check — only checks improperly closed tables
-C Checks only tables changed since the last check
-i Displays information about the table while checking
-f Automatically repairs the table if any errors are detected
-T Does not mark table as checked
-r Recover — attempts to repair table and recover data
-o Safe recover — uses slower recovery method
-q Quick recover — checks index files only
-v Verbose — displays detailed information
-V Displays the myisamchk version number
-w Wait — waits until no clients are locking table before checking
191
516922 Ch10.F 9/26/02 11:38 AM Page 191
Note: This example uses the quotes
table in the testdb database, but it
would work with any table.
⁄ From the MySQL monitor,
type
USE testdb; and press
Enter.
■ The database is now
selected.
¤ Type OPTIMIZE TABLE
quotes; and press Enter.
■ The table is scanned and
optimized, and a report is
displayed.
W
hen you delete rows from a MySQL table, they
are not actually deleted. Instead, MySQL marks
the rows as deleted and re-uses the space later
when rows are inserted. If you have deleted a large number
of rows from a table, you should optimize the table to reclaim
the space. Optimizing is also necessary when a table with
variable-length rows has been changed many times.
To optimize a table, use the OPTIMIZE TABLE command
within the MySQL monitor. To use this command, specify
the table name. The following example optimizes the
quotes table:
OPTIMIZE TABLE quotes;
Along with reclaiming space from deleted rows, the
OPTIMIZE TABLE command also repairs minor errors
in table rows, sorts the index files, and updates the table's
statistics. You can use this command as often as you desire
without damaging a table. However, the table is locked and
cannot be used by clients during the optimization process.
From time to time, you may run into a situation where a
MySQL table becomes corrupted. This usually happens
when a power outage or hardware failure causes the server
to go down unexpectedly while a table is being updated. In
most cases, you can easily repair the table. You can use the
myisamchk utility discussed earlier or the REPAIR TABLE
command to repair a damaged table.
To use REPAIR TABLE, specify the table name. You can
also specify the optional keyword QUICK for a quick repair
or EXTENDED for an extended repair. If the regular repair
does not work, the extended option may. The following
command repairs the quotes table:
REPAIR TABLE quotes;
OPTIMIZE AND REPAIR TABLES
MySQL
192
OPTIMIZE AND REPAIR TABLES
516922 Ch10.F 9/26/02 11:38 AM Page 192
‹ Type REPAIR TABLE
quotes; and press Enter.
■ This attempts to repair any
errors in the table.
› Type SELECT * FROM
quotes; and press Enter.
■ This displays the contents
of the table. Verify that the
table rows are undamaged.
OPTIMIZE AND TROUBLESHOOT MYSQL
10
Along with OPTIMIZE TABLE and REPAIR TABLE, MySQL includes a CHECK
TABLE command. This command is equivalent to the myisamchk utility, but runs
from the MySQL monitor or another client. To use CHECK TABLE, specify one or
more table names. The following example checks the quotes table for errors:
Example:
CHECK TABLE quotes;
You can also use several optional keywords with CHECK TABLE after the table
name. These are described in the table below.
KEYWORD DESCRIPTION
QUICK Quick check — does not scan all table rows
FAST Fast check — only checks improperly closed tables
CHANGED Checks only tables that have changed since the last check
MEDIUM Medium check — checks each table row (default)
EXTENDED Extended check — comprehensive but slow on large tables
193
516922 Ch10.F 9/26/02 11:38 AM Page 193
T
he MySQL server is a complex system, and includes a
number of parameters you can use to tune the
server's performance. You can modify these values by
editing configuration files or with command-line options.
Each configuration file is divided into sections for different
MySQL components. For example, the line [mysqld]
begins the section for the server, and [client] begins the
section for clients. Within each section, each line can include
an option from the program's command-line options or the
set-variable command to set a system variable.
MYSQL CONFIGURATION OPTIONS
MySQL
194
The Global Configuration File
The global configuration file is read first. On UNIX
systems, this file is /etc/my.cnf. On Windows systems,
the two global files are supported: my.ini in the
Windows system directory, and my.cnf in the root
directory, typically C:\.
The User Configuration File
On UNIX systems, each user can have their own
configuration file, .my.cnf, in their home directory. You
can use this file to set values for each user, typically for
MySQL client utilities.
The Server Configuration File
The server configuration file affects a particular copy of
the MySQL server software, and is only needed when
multiple servers are installed on the same machine. This
file also has the filename my.cnf. On UNIX systems, it is
stored in the data directory under the MySQL
installation, typically /usr/local/mysql/data. On
Windows systems, the file is usually under
C:\mysql\data\. The values you specify in the server
configuration file override the values in the global file.
CONFIGURATION FILES
The [client] section in the configuration file includes
options that affect all of the MySQL client programs,
including the MySQL monitor, mysql, the mysqladmin
utility, myisamchk, and other client tools. This section
is particularly useful in a .my.cnf file in a user's home
directory. For example, the following file excerpt sets
the password option for MySQL clients. If you include
this in the .my.cnf file in your home directory, you do
not need to specify a password when using MySQL
client programs.
[client]
password=mypassword
The table below lists several options that may also be
useful in the [client] section for a particular user.
VALUE DESCRIPTION
host=name
Specifies a MySQL server to
connect to
user=name Username for the MySQL server,
if different from UNIX username
password=value Password for the MySQL server
database=value Default database to select
CLIENT OPTIONS
MySQL supports a variety of configuration files. Each can
contain the same commands and settings, but the order
in which they are read determines which files can
override others.
516922 Ch10.F 9/26/02 11:38 AM Page 194
OPTIMIZE AND TROUBLESHOOT MYSQL
10
VARIABLE DESCRIPTION
back_log Maximum number of client requests waiting for threads
concurrent_inserts Specifies ON to allow INSERT operations while clients are reading data
connect_timeout Number of seconds the server waits for a connection before timing out
delayed_insert_limit Number of rows of an INSERT DELAYED query to process at a time
delayed_insert_timeout Time the server waits for additional INSERT DELAYED items
delayed_queue_size Number of INSERT DELAYED rows to store
flush_time Closes all tables after the specified number of seconds
interactive_timeout Number of seconds of idle time before disconnecting interactive clients
join_buffer_size Buffer size for full joins (queries from multiple tables)
key_buffer_size Buffer size for index values
long_query_time Amount of seconds before a query is considered slow
max_allowed_packet Maximum size of a single packet of data
max_connections Maximum number of simultaneous client connections allowed
max_connect_errors Number of allowed errors before blocking connections from a host
max_delayed_threads Maximum number of threads used for INSERT DELAYED queries
max_join_size Maximum number of rows for JOIN queries
max_sort_length The number of bytes of each BLOB or TEXT value to use when sorting
max_user_connections Maximum number of connections for each username
net_buffer_length Default size for the communication buffer
net_read_timeout Number of seconds to wait before aborting when reading data
net_write_timeout Number of seconds to wait before aborting when writing data
thread_cache_size Number of threads kept standing by for use by clients
wait_timeout Number of seconds of idle time before disconnecting a client
SYSTEM VARIABLES
Set Variables
You can set MySQL system variables by
including them in the [mysqld] section
of a configuration file, using the set-
variable command. The following
example sets the
max_allowed_packet variable:
[mysqld]
set-variable max_allowed_packet=1M
You can also set variables using the
set-variable option when
mysqld is started.
Display Current Values
You can display the current values of all of the system variables using the
SHOW VARIABLES command from the MySQL monitor or the
mysqladmin variables command at the UNIX or Windows
command prompt. This is useful if you are unsure whether the
configuration files are being read correctly, and is the first thing you
should do if a variable change has not produced the effect you expected.
You can also use the LIKE operator with SHOW VARIABLES to show a
section of the list. The following example shows the values of all
variables that include the characters "max" in their names:
SHOW VARIABLES LIKE '%max%';
195
MySQL includes a number of system variables that
control the behavior of the server. While these variables
have sensible default values, setting them to optimal
values for your system can dramatically improve the
server's performance. The table below describes key
system variables for optimizing performance.
516922 Ch10.F 9/26/02 11:38 AM Page 195
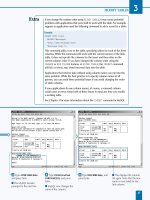
⁄ From the MySQL monitor,
type
SHOW STATUS; and
press Enter.
■ The current values of the
status variables are displayed.
¤ Type SHOW STATUS LIKE
'%Opened%'; and press Enter.
■ The variables that match
the string you specified are
displayed.
T
o optimize the performance of a MySQL server,
the first step is to determine how it is currently
performing. MySQL keeps a number of running
status variables that you can examine to get a snapshot of
the server's current performance. This will let you know
how much traffic the server is handling, as well as early
indications of performance problems.
To display the status variables, you can use the SHOW
STATUS command in the MySQL monitor or the
mysqladmin extended-status command at the
command prompt. The output of either command is a table
of variables and their values. You can use the LIKE operator
with SHOW STATUS to show only certain values.
Most of the variables count the number of times something
has happened since the server started. For example, the
Opened_tables value is the number of table that have
been opened, and the Questions value is the number of
queries the server has received. The Uptime value gives
you the number of seconds the server has been running, so
you can use this and the various variables to get an idea of
how the server performs over time.
The Threads_connected value indicates how many client
connections are currently open to the server, and the
Max_used_connections value is the largest number of
clients that are simultaneously connected. You can use
these values to determine whether the server is busy and
whether the max_concurrent_users system variable
needs to be increased.
Slow_queries is another value you should watch
carefully. This is the number of queries that have taken
more than the expected amount of time. The time for a
slow query is set using the long_query_time system
variable. If many slow queries are being counted, this
means the server is running slower than expected, or
some particular queries in use are slowing down the server.
DISPLAY SERVER PERFORMANCE
INFORMATION
MySQL
196
DISPLAY SERVER PERFORMANCE INFORMATION
516922 Ch10.F 9/26/02 11:38 AM Page 196
‹ Type USE testdb; and
press Enter.
■ This selects a database.
› Type CREATE TABLE
newtable ( and press Enter.
■ You are prompted for the
next line.
ˇ Type field1 INT); and
press Enter.
■ This creates a new table.
Á Type SHOW STATUS LIKE
'%Opened%'; and press Enter.
■ Notice that the number of
opened tables has increased.
OPTIMIZE AND TROUBLESHOOT MYSQL
10
197
The list of values returned by SHOW STATUS is quite long,
but certain values are important to watch. The table below
describes some of the most important status variables.
VARIABLE DESCRIPTION
Aborted_clients Number of client connections not closed properly
Aborted_connects Number of failed connections to the server
Bytes_received Total bytes of data received from clients
Bytes_sent Total bytes of data sent to clients
Connections Number of times clients have connected to the server
Open_tables Number of tables currently in use
Open_files Number of files currently in use
Opened_tables Number of tables opened since the server started
Questions Total number of queries received from clients
Slow_queries Number of queries that have taken longer than a maximum amount of time
Threads_cached Number of threads standing by for clients
Threads_created Number of threads created since the server started
Threads_running Current number of active threads
Uptime Number of seconds since the server started
516922 Ch10.F 9/26/02 11:38 AM Page 197
⁄ From the command
prompt, type
pico /etc/my.cnf
and press Enter.
■ This loads the configuration
file into the editor.
Note: You may need to use a different
editor name on your system.
¤ From the editor, make
the desired changes to the
configuration file.
‹ When you are finished,
press Ctrl-X and then Y.
■ This saves the file and exits
the editor.
Note: The command to save and exit
may be different depending on the
editor you are using.
I
f you decide to change some of the MySQL options to
improve the performance of the server, you can edit the
configuration file to make the changes. As discussed
earlier in this chapter, there may be several configuration
files on a UNIX system. The main configuration file is
usually /etc/my.cnf.
To edit the configuration file, load it into a text editor such
as pico, vi, or emacs. One or more of these editors is
included with most UNIX and Linux systems. Depending on
your MySQL installation, the file may not yet exist. You can
create it using the text editor. On most systems, only the
root user can edit files in the /etc directory. The following
example loads the /etc/my.cnf file into the pico editor:
pico /etc/my.cnf
When adding commands to the configuration file, the best
strategy is to make one change at a time and test the server
with the modified value before making other changes.
This is especially important on a busy production server;
changing variables incorrectly can reduce performance or
even cripple the server.
After you make changes to the configuration file, save it and
exit the editor. MySQL does not read the new configuration
automatically. You will need to shut down the server using
the mysqladmin shutdown command and restart it to
read the modified configuration information. Chapter 9
includes information on stopping and restarting the MySQL
server.
After you have changed system variable values in the
configuration file, you can use the SHOW VARIABLES
command from the MySQL monitor or the mysqladmin
variables command from the command prompt to verify
that the changes were read and implemented by the server.
EDIT THE CONFIGURATION
FILE IN UNIX
MySQL
198
EDIT THE CONFIGURATION FILE IN UNIX
516922 Ch10.F 9/26/02 11:38 AM Page 198
Note: Select Run from the Start
menu to display the Run dialog box.
⁄ From the Run dialog
box, type
C:\mysql\bin\
winmysqladmin and press
Enter.
■ This starts the
WinMySQLadmin utility.
¤ Within MySQLadmin,
click the my.ini Setup tab.
‹ Make the desired changes
to the file.
› Click the Save
Modification button to save
the changes you have made.
199
T
he Windows version of MySQL supports three different
configuration files. The first has the filename my.ini.
This file is stored in the Windows system directory,
typically C:\windows\system or C:\winnt\system32. You can
also use a global options file with the filename my.cnf in the
C:\ root directory, and a server options file called my.cnf in
the C:\mysql\data directory.
When the MySQL server starts in Windows, it reads the
my.ini file first, followed by the my.cnf file in the root
directory, and finally the my.cnf file in the data directory.
Values in a later file can override those set in an earlier file.
There are two ways to edit the configuration file in
Windows. The first is to load the file into any text editor. The
Notepad accessory included with Windows will work fine.
Use the following command from the command prompt or
the Run dialog box to edit the my.cnf file in Notepad:
notepad c:\mysql\my.cnf
The second method is to use the WinMySQLadmin utility,
introduced in Chapter 9. This utility provides a graphical
overview of the MySQL server's configuration, and the
my.ini Setup tab allows you to create a configuration file
using default values or edit the existing file.
By default, none of the MySQL configuration files exist after
you install the MySQL server. You can create them using a
text editor or the WinMySQLadmin utility. After you have
created or modified a configuration file, you need to restart
the server. See Chapter 9 for instructions to restart the
server.
After you have changed system variable values in a
configuration file, you can verify that the changes were read
by using the SHOW VARIABLES command from the MySQL
monitor, or the mysqladmin variables command from
the command prompt.
EDIT THE CONFIGURATION
FILE IN WINDOWS
OPTIMIZE AND TROUBLESHOOT MYSQL
10
EDIT THE CONFIGURATION FILE IN WINDOWS
516922 Ch10.F 9/26/02 11:38 AM Page 199
⁄ From the command
prompt, type
cd /usr/local/
mysql/data and press Enter.
■ This switches to the
location where logs are
stored.
Note: The location may vary
depending on your installation.
Under Windows, the location is
usually c:\mysql\data.
¤ To view the error log, type
cat hostname.err, replacing
hostname with the name of
your server, and press Enter.
■ The contents of the error
log are displayed.
Note: Under Windows, type
more
hostname.err
instead.
Note: If the log is large, you can use
the
tail
command to view only
the most recent entries on UNIX
systems.
M
ySQL supports a number of different log files. You
can use these to analyze the performance of the
server and to detect errors and potential problems
when they occur. The log files are standard text files stored
in the same directory as the database files, typically /usr/
local/mysql/data.
The only log file created by default is the error log. This logs
all errors encountered by the server and each time the
server is started or stopped. The error log is named with
the hostname of the server and the .err extension under
UNIX, and is stored at c:\mysql\data\mysql.err on Windows
systems.
MySQL can optionally create a general query log, which
logs each query sent to the server. This log file is created
if you specify the -l or log option when you start the
mysqld server. Unless you specify a different name in the
command line, the filename for this log is the hostname of
the server, and the extension .log is added.
If you specify the log-update option when you start
mysqld, an update log is created. This is similar to the
query log, but includes only queries that have resulted
in updates to a table. You can use the update log to
reconstruct a table from a backup, using the logged
queries to make any changes that were not backed up.
The final available log is the slow query log. This is
a log of all queries that have exceeded the defined
long_query_time value. This log is very useful in
determining which queries are taking a large amount of
time and potentially slowing down the server. To turn on
the slow query log, use the log-slow-queries option
on the command line.
VIEW MYSQL LOG FILES
MySQL
200
VIEW MYSQL LOG FILES
516922 Ch10.F 9/26/02 11:38 AM Page 200
‹ To view the query
log, type
cat hostname.log,
replacing hostname with the
server name, and press Enter.
■ The contents of the log are
displayed.
Note: Under Windows, use the
command
more hostname.log
instead.
Note: Depending on your
configuration, the query log
may not be created by default.
› To view the slow query
log, type
cat hostname-
slow.log, replacing hostname
with the server name, and
press Enter.
■ The contents of the log are
displayed.
Note: Under Windows, use the
command
more hostname-slow.log
instead.
Note: The slow query log is not
created by default; you must
explicitly enable it.
OPTIMIZE AND TROUBLESHOOT MYSQL
10
201
Newer versions of MySQL support a binary update log. This is
similar to the update log, but stored in a binary rather than text
format for greater efficiency. To use the binary log, specify the
log-bin option on the command line to mysqld. MySQL
includes a utility, mysqlbinlog, to convert the binary log to a
text format.
You can maintain the MySQL log files at any time by renaming
or deleting them. After you have done this, use the mysqladmin
flush-logs command to restart logging. When you do this,
the update log is automatically recreated with a new sequence
number; you can then move the old log to a backup location or
delete it. The binary log is also rotated automatically. If you want
to regularly rotate the query log or slow query log, you need to
do so manually.
The FLUSH LOGS command within the MySQL monitor also
refreshes the logs and rotates the update logs. The Redhat Linux
version of the MySQL server includes a mysql-log-rotate
script that rotates the logs. This is set up automatically if you
install the RPM version of the MySQL server.
516922 Ch10.F 9/26/02 11:38 AM Page 201
Note: This example uses the quotes
table in the testdb database. You can
import this table from the CD-ROM.
⁄ From the MySQL monitor,
type
USE testdb; and press
Enter.
■ This selects the database.
¤ Type ALTER TABLE quotes
and press Enter.
■ You are prompted for the
next line.
‹ Type ADD INDEX
authorind (author); and press
Enter.
■ This adds an index to the
table.
A
MySQL table can have one or more indexes
associated with it. While at least one unique index
is usually used as a primary key to uniquely identify
each row of the table, you can add additional indexes,
unique or not, to improve performance.
The MySQL status values shown by the SHOW STATUS
command or the mysqladmin extended-status
command can help you determine whether an index
would improve performance. In particular, a high value for
the Handler_read_key counter indicates that records are
often being read by key and that indexing is working well.
The Handler_read_rnd_next value, on the other hand,
indicates that sequential reads are being used often rather
than direct access by key. This may mean that you are
using inefficient queries, or that an additional index would
improve performance. If you add an index, be sure to test
the performance of your queries afterward and remove the
index if it has not improved performance.
To add an index, use the ALTER TABLE query with the
ADD_INDEX keyword. Specify the index name, if desired,
followed by a list of columns to index in parentheses. For
example, the following query adds an index on the author
field of the quotes table:
ALTER TABLE quotes
ADD INDEX authorind (author);
The process of adding a unique index is similar, but uses
the ADD UNIQUE keyword instead of ADD INDEX. To use
a unique index, the column must have unique values for
each row. However, if you specify multiple columns for the
unique index, only the combination of the column values
needs to be unique.
IMPROVE PERFORMANCE WITH INDEXES
MySQL
202
IMPROVE PERFORMANCE WITH INDEXES
516922 Ch10.F 9/26/02 11:38 AM Page 202
› Type SHOW STATUS LIKE
'%Handler%'; and press Enter.
■ The list displayed includes
values that may help you
determine whether an index
will improve performance.
ˇ Type ALTER TABLE quotes
and press Enter.
■ You are prompted for the
next line.
Á Type DROP INDEX
authorind; and press Enter.
■ This removes the added
index.
OPTIMIZE AND TROUBLESHOOT MYSQL
10
203
Sometimes an index does not improve performance.
In particular, if you are not frequently searching for
particular values of a column, indexing that column is
not likely to help. In a table with few rows, often very
little indexing is needed for optimal performance.
If an index is slowing down performance or is not an
improvement, you can remove it from the table. To
remove an index, use DROP INDEX with the ALTER
TABLE command. The following command removes
the index named authorind from the quotes table:
Example:
ALTER TABLE quotes DROP INDEX authorind;
When you use DROP INDEX, only the extra data stored
in index files is deleted; no rows of the table are modified
or deleted. However, if the index was a unique index or
primary key, it may be the only way to refer to a single
row of the table. In this case, removing the index can
reduce the usefulness of the table.
516922 Ch10.F 9/26/02 11:38 AM Page 203
Note: This example uses the testdb
database and the address and mail
tables. If you have not created these,
see the CD-ROM for instructions.
⁄ From the MySQL monitor,
type
USE testdb; and press
Enter.
■ This selects the database.
¤ Type LOCK TABLES address
READ, mail WRITE; and press
Enter.
■ This obtains a READ lock
for the address table and a
WRITE lock for the mail
table.
M
ySQL uses a system of table locking to ensure that
the various threads working with a table do not
conflict. When a thread has a lock on a table,
MySQL prevents other threads from performing conflicting
operations on the table. While this is normally handled
automatically, you can use the LOCK TABLES and UNLOCK
TABLES commands to manually lock and unlock tables.
MySQL supports two basic types of table lock: READ locks
and WRITE locks. When a thread obtains a READ lock for a
table, other threads can still read the table, but no threads
can write to the table. You can use this to ensure that the
table is not changed during a SELECT query or other
operation, and to improve the speed of a complex query.
When a thread obtains a WRITE lock for a table, no other
threads are allowed to read from or write to the table. This
ensures that other writes do not interfere with your updates
to the table, and that no clients read a partially-updated
version of the table during the update.
To lock one or more tables, use the LOCK TABLES
command. Specify one or more tables and the keywords
READ or WRITE to indicate the lock type. For example, the
following command requests a READ lock for the address
table:
LOCK TABLES address READ;
When you use LOCK TABLES, the client waits until the
table is not locked by another thread and then locks it
for your session. The lock ends automatically when you
close your connection to the server or use another LOCK
TABLES command. You can also use the UNLOCK TABLES
command to end all current locks:
UNLOCK TABLES;
The MySQL server gives priority to WRITE locks. If you
add the LOW_PRIORITY keyword before WRITE in a LOCK
TABLES command, the server allows READ locks for other
threads while it waits for exclusive access to the table.
MANAGE TABLE LOCKING
MySQL
204
MANAGE TABLE LOCKING
516922 Ch10.F 9/26/02 11:38 AM Page 204
‹ Type INSERT INTO mail
(name, address) and press
Enter.
› Type SELECT name,
address FROM address; and
press Enter.
■ This copies data between
the tables. On a busy system,
it would execute faster
because of the table locking.
ˇ Type UNLOCK TABLES; and
press Enter.
■ This releases the locks on
both tables.
OPTIMIZE AND TROUBLESHOOT MYSQL
10
205
There are two basic reasons to manually lock tables. The first is to ensure
that a complex operation is not interfered with by other threads. This is
not necessary with basic UPDATE queries, because MySQL uses locking
automatically. You may need to use it when you are performing a series of
UPDATE queries and do not want the table to be changed in between.
When you use a READ lock, you ensure that the table cannot be changed
during a SELECT query. This allows the SELECT query to obtain an accurate
snapshot of the current table data. If you keep the READ lock in place, you
can be sure that multiple SELECT queries will be working with exactly the
same data.
The second reason to lock tables is to improve performance. A complex
SELECT query can run faster when no other clients can access the table, so
a READ lock will improve performance. A complex UPDATE query will run
much faster with a WRITE lock, giving it exclusive access to the table.
In general, you should only use table locking when you are sure you need it
for data integrity, or when you have experienced performance problems
without locking. Using locking unnecessarily can create performance
problems for other clients.
516922 Ch10.F 9/26/02 11:38 AM Page 205
S
ecurity is a growing concern among system
administrators. Any system that stores data critical to a
company or organization is vulnerable to security risks. A
MySQL database may store thousands of tables of crucial data
and can be a major vulnerability if it is not properly secured.
THE IMPORTANCE OF SECURITY
MySQL
206
Database Security
Because databases are often used to store important
data, MySQL does not rely on the security abilities of
the underlying operating system. Instead, it includes its
own security system. This allows you to control access
to each database, each table, and even specific columns
within a table individually.
Users should be given access only to the data they need
to work with directly, and should be given the minimum
amount of access to be able to do their jobs. MySQL
includes a number of commands that allow you to create
users and assign them specific privileges, or abilities.
System Security
Because the MySQL data files for each database are
stored in the file system of the underlying operating
system, a secure operating system is also important for
a secure database server. Be sure that no users except
trusted administrators have the ability to directly access
the MySQL data files. Anyone who can access these files
directly can completely circumvent MySQL's security
system.
Physical Security
When you are planning the security of a database server,
be sure not to forget the server hardware itself. Despite
the most sophisticated security and encryption in
MySQL and the operating system, the data is still stored
on a hard disk and is vulnerable if there is physical
access to the server machine. Client machines should
also be kept physically secure if they have the ability to
connect without specifying a password each time.
Network Security
Because a MySQL server is often accessed across a local
or wide-area network, the security of the network is also
important. Malicious users can scan network traffic and
view data or passwords as they are transmitted between
database clients and servers.
To prevent potential network security issues, MySQL
encrypts passwords before sending them across
the network. You can also use data compression between
MySQL clients and servers, which prevents data from
being sent as readable text.
The best network security is provided by a good firewall
or proxy server. Because the MySQL server usually does
not need to be accessed from everywhere in the world,
you can keep it behind the firewall and allow
connections only from trusted systems.
Password Guidelines
MySQL relies on passwords for security. While this
provides a basic level of security in authenticating users,
this system is only as secure as the passwords chosen.
To keep the MySQL server secure, be sure to have a set
of guidelines in place for assigning passwords.
You should never create users without passwords.
Passwords should be as long as possible. MySQL allows
passwords up to at least eight characters, depending on
the operating system. Avoid passwords that contain
names, words that appear in the dictionary, or common
abbreviations, as they can be easily guessed.
Security Risks
While most people imagine data security as a battle
against crackers and malicious vandals, the reality is that
most security threats come from inside the company.
Well-meaning users who have more access than they
should have can accidentally delete or invalidate entire
MySQL tables with a single command, and disgruntled
employees are an even greater risk. For this reason,
avoid giving users more than the minimum privileges
they require.
516922 Ch11.F 9/26/02 11:39 AM Page 206