Mysql your visual blueprint for creating open source databases- P2 docx
Bạn đang xem bản rút gọn của tài liệu. Xem và tải ngay bản đầy đủ của tài liệu tại đây (721.16 KB, 20 trang )
INTRODUCING MYSQL
1
7
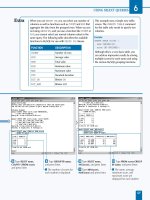
The SHOW TABLES command displays a list of
tables available in the currently selected database.
You can use this command when you are unsure of
the exact name of a table within the database.
Example:
SHOW TABLES;
SHOW TABLES
The INSERT command inserts a new row of data
into an existing table within the currently selected
database. You can specify a list of fields in the
INSERT command along with values for each field.
The INSERT command is described in detail in
Chapter 4.
Example:
INSERT INTO address(name, address, phone)
VALUES ('John Smith','321 Elm Street',
'804-555-1234');
INSERT
The UPDATE command alters one or more existing
rows of data within a table. The WHERE keyword
can be used with this command to specify one or
more rows to alter. The command specifies new
values for one or more of the fields within each
row. These values can be based on existing fields or
constant values specified within the command.
If you do not specify a WHERE clause, this command
will update all of the rows in the table. While you
will sometimes want to update all of the rows,
using UPDATE without a WHERE clause can cause
loss of data if you are not careful. Update queries
are described in detail in Chapter 5.
Example:
UPDATE address SET phone = '801-555-1234'
WHERE name = 'John Smith';
UPDATE
The DELETE command deletes one or more rows
of data within an existing table. The WHERE clause
should be used to specify the rows that will be
deleted. Use this command with care: If you omit
the WHERE clause, all rows of data within the table
are deleted. See Chapter 4 for further information
about the DELETE command.
Example:
DELETE FROM address WHERE name = 'John Smith';
DELETE
The SELECT command retrieves one or more rows
from a database. You can specify the columns to be
returned or use the wildcard * to return values for
all columns in the order they appear in the table
definition. You can use a WHERE clause to specify
one or more conditions that rows must match in
order to be returned. If you do not use a WHERE
clause, the specified columns from all of the rows in
the database are returned.
Example:
SELECT name, address, phone FROM address
WHERE name like '%Smith';
SELECT
516922 Ch01.F 9/26/02 11:31 AM Page 7
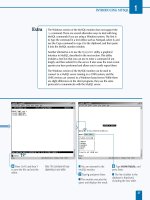
⁄ From your Web
browser, go to this URL:
www.mysql.com/.
■ The MySQL Web page is
displayed.
¤ Click the Downloads link.
■ The Downloads page is
displayed.
‹ Click the link for
MySQL 3.23.
Note: If a newer version has been
released, you can download the
latest version instead.
B
efore you can use MySQL, you need a working
MySQL server. If you do not already have access to
one, you can download the MySQL software from
the MySQL Web site, www.mysql.com/, and install it on a
computer running UNIX, Windows, or another supported
operating system. MySQL is freely available for non-
commercial use.
To access the downloadable files, click the Download link
from the MySQL Web site and then click the link for the
version of MySQL to install. At this writing, the current
stable release is MySQL 3.23. Under this site's Download
page, several different versions of MySQL are available. The
version you should download depends on your operating
system. For Windows, the choice is simple — a ZIP file is
available with everything you need for installation.
The download for Red Hat Linux and other versions that
support RPM packages is also simple. MySQL is divided
into several packages for its different components: server
software, client software, shared libraries, development
files, and benchmarking utilities. You can install these using
the rpm command.
If you have a different version of Linux or UNIX, the next
alternative is to download the binary distribution. These are
stored as tar.gz files, one for each of the five components.
The installation process for these is slightly more complex,
but easier than installing from source code.
Binary packages are available for Linux running under
Intel (PC) systems, DEC Alpha, IA64, Sun Sparc, and S/390.
Additional binary versions are available for other operating
systems. If one is not available for your operating system, you
can download the source code and compile and install it.
DOWNLOAD MYSQL
MySQL
8
DOWNLOAD MYSQL
516922 Ch01.F 9/26/02 11:31 AM Page 8
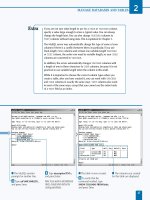
■ The download page for the
current version is displayed.
› Scroll down to the
Windows Downloads section
and click the Download link.
Note: For other operating systems,
download the appropriate files
instead.
■ A list of download
locations is displayed.
ˇ Choose a download
location near you and click
the HTTP or FTP link.
■ You will be prompted
for a location to save the
downloaded file.
INTRODUCING MYSQL
1
Along with Windows and Linux, binary versions of the MySQL server are
available for Solaris, FreeBSD, MacOS X, HP-UX, AIX, SCO, SGI Irix, DEC
OSF, and BSDi UNIX. The tip in the next section describes the process of
installing these binary distributions.
MySQL is actually available in multiple versions. The basic version, MySQL
3.23, should work for most purposes. The additional versions include
MySQL-Max, which is the same version but includes support for additional
types of tables and transactions.
Transactions are a feature used in mission-critical database systems, such as
those at financial institutions. These systems allow you to begin a
transaction, perform updates to the database, and then end the transaction.
The server keeps track of the changes made during the transaction, allowing
the server to roll back the entire transaction if it was not completed. This
ensures that the database is not corrupted by partial transactions.
MySQL 4.0 is also under development at this writing. This release increases
the speed of the MySQL server and clients and supports additional SQL
statements.
Currently, unless you need the new features of MySQL-Max or MySQL 4.0,
MySQL 3.23 is the safest choice.
9
516922 Ch01.F 9/26/02 11:31 AM Page 9
⁄ From the Linux command
prompt, type
rpm -i MySQL-
version.i386.rpm, replacing
version with the version
number of the downloaded
package, and press Enter.
Note: You should be logged on as
the root user to install MySQL.
■ The software is installed.
This may take several minutes
to complete.
Note: The package manager
automatically starts the MySQL
server after the installation of this
package.
¤ Type rpm -i MySQL-client-
version.i386.rpm, replacing
version with the version
number, and press Enter.
‹ Type rpm -i MySQL-shared-
version.i386.rpm, replacing
version with the version
number, and press Enter.
Note: You can stop here for a
minimal installation of MySQL,
or continue to install the other
packages.
I
f you are using Linux, there is a good chance you can
install MySQL from the package files in RPM format.
This format was developed by Red Hat Linux, but is now
supported by several other systems. Using packages is the
simplest way to install the MySQL server. MySQL is
distributed in several packages with different components.
The first package, MySQL-version-i386.rpm, contains
the MySQL server software, and the second, MySQL-
client-version-i386.rpm, contains the MySQL
monitor and other client software. The third package,
MySQL-shared-version.i386.rpm, contains shared
files needed by the MySQL client software.
Two additional packages are available but not required:
MySQL-bench-version.i386.rpm contains
benchmarking and testing utilities, and MySQL-devel-
version.i386.rpm contains development libraries and
header files.
In most cases, installing all five packages is a good idea.
If you have a limited amount of space, you can leave out
the benchmarking package. You can also leave out the
development files if you will not be using MySQL with
programming languages such as Perl.
As with other MySQL distributions, you can download the
package files from the Download section of the MySQL
Web page at www.mysql.com/. Download all five of the
RPM files, or only the files you will be installing, before
beginning the installation process.
You install RPM packages using the package manager utility,
rpm. This allows you to install complex software like MySQL
with a minimum of user interaction. The disadvantage of this
approach is that the software will be installed in the default
location and with the default compilation settings. If you
require different installation settings, you can install MySQL
from the source packages, as described in the next task.
INSTALL MYSQL UNDER
LINUX FROM A PACKAGE
MySQL
10
INSTALL MYSQL UNDER LINUX FROM A PACKAGE
516922 Ch01.F 9/26/02 11:31 AM Page 10
› Type rpm -i MySQL-bench-
version.i386.rpm, replacing
version with the version
number, and press Enter.
■ The benchmark files are
now installed.
ˇ Type rpm -i MySQL-devel-
version.i386.rpm, replacing
version with the version
number, and press Enter.
■ The development files are
now installed. This completes
the MySQL installation.
INTRODUCING MYSQL
1
If your particular operating system does not support RPM files, there is an alternative to
installing from source code. Pre-compiled binaries for a variety of operating systems are
available from the Download section at www.mysql.com. These are archived in the tar
(tape archive) format and compressed with gzip, and typically have an extension of .tar.gz.
Binary files have the advantage of being much easier to install. The potential
disadvantages are that you cannot customize the way MySQL is compiled, and that binary
packages are available only for some operating systems and may not be as up to date as
the source code version.
After you have downloaded the correct binary distribution for your operating system and
hardware, you can use the following sequence of commands to install MySQL. This
example assumes that you have the .tar.gz file stored in the /usr/local directory.
Example:
cd /usr/local
tar zxfv mysql-version-OS.tar.gz
ln -s mysql-version-OS mysql
cd mysql
scripts/mysql_install_db
This example stores the MySQL files in the /usr/local/mysql directory. The MySQL server
is not yet running; you can start it by running /usr/local/mysql/bin/safe_ mysqld
or following the instructions in the section "Start the MySQL Server," later in this chapter.
11
516922 Ch01.F 9/26/02 11:31 AM Page 11
⁄ From the UNIX command
prompt, type
cd /usr/local/src
to switch to the source
directory, and press Enter.
¤ Type tar zxfv mysql-
version.tar.gz, replacing
version with the correct
version number, and press
Enter.
■ The source files are
uncompressed into a new
directory.
‹ Type cd mysql-version,
replacing version with the
correct version number, and
press Enter.
› Type ./configure
prefix=/usr/local/mysql and
press Enter.
■ MySQL is configured for
your operating system and
hardware.
Note: You may need additional
configure options to compile
MySQL. See the Extra section.
I
f you need to change MySQL's installation location or
other options, or if there is no binary distribution of
MySQL for your operating system or hardware, you
can download the MySQL source code and install it from
source. This process is mostly automated and is not much
more difficult than installing a binary version.
The source code is distributed in a .tar.gz archive, and
you can download it from the Download section of the
MySQL Web page at www.mysql.com/. Before you begin
the process of installing from source, copy this archive to
your server at your choice of location. The instructions
in this section assume your source archive is in the
/usr/local/src directory.
Note that while Windows source code is also available,
these instructions are for Linux and other UNIX-like systems.
Compiling from source code in Windows is a more complex
process — in most cases, the easiest thing to do is to use
the regular Windows installation files. The only reason to
install from source is if there is no easier way to get MySQL
running in your particular environment.
To install MySQL from source, first unpack the archive of
source files. Next, use the configure program within the
distribution to set up the correct options for your operating
system. After this completes, use the make command to
compile the source code, and the make install
command to install the files.
This procedure compiles and installs all of the files
you need to run the MySQL server, the client software,
benchmarking and testing utilities, and to connect with
programming languages such as Perl. The installation
does not start the MySQL server; you will need to start it
following the instructions presented in the section "Start
the MySQL Server," later in this chapter.
INSTALL MYSQL UNDER UNIX FROM SOURCE
MySQL
12
INSTALL MYSQL UNDER UNIX FROM SOURCE
516922 Ch01.F 9/26/02 11:31 AM Page 12
ˇ Type make and press
Enter.
■ The MySQL files are now
compiled. This may take
several minutes. Watch for
any compilation errors.
Á Type make install and
press Enter.
■ The compiled MySQL
program files are now
installed.
Note: You need to be logged on as
the root user on most systems to
complete this last step.
INTRODUCING MYSQL
1
The configure script actually has a wide variety of options. If you have trouble compiling
MySQL or need to change installation locations or other settings, you will need to use one or
more of these options. You can type configure help from the source distribution
directory to view a list of these options. The table below shows some of the most useful options
for configure:
OPTION PURPOSE
help Display complete option list
without-server Install the MySQL client only, no server
prefix=path Use path as the installation directory
with-charset=CHAR Use CHAR instead of the standard (US English) character set
If you are installing MySQL from an operating system that supports RPM packages but still want
to compile from source, you can use the source RPM distribution. Use this command to build a
binary RPM from the source; you can then install the binary RPM in the normal way.
Example:
rpm rebuild MySQL-version.src.rpm
13
516922 Ch01.F 9/26/02 11:31 AM Page 13
⁄ A Welcome dialog box
is displayed. Click Next to
continue with the installation.
■ The release notes for this
version of MySQL are
displayed.
¤ Click Next to continue.
W
hile Linux is the most common platform for
MySQL, a Windows version is also available. You
can install the MySQL server under any 32-bit
version of Windows. Windows 2000, Windows XP, and the
older Windows NT are the best platforms for the MySQL
server because they are true multitasking systems and can
run MySQL as a service.
The Windows version of MySQL requires that you have
the TCP/IP protocol installed. This is installed by default on
Windows 98, 2000, and XP. If you currently do not have this
protocol installed, you can add it from the Network control
panel. You will also need to upgrade to the latest Winsock
drivers if you are running an early version of Windows 95.
One limitation of the MySQL server on some versions of
Windows is that the FAT file system does not allow files
larger than 4GB, and thus the tables in your databases will
be limited to this size. If you need to use larger tables, you
can use the NTFS file system under Windows NT, 2000, or
XP to overcome this limitation.
You can download the Windows version of MySQL
from the Download section of the MySQL Web site at
www.mysql.com/. Before installing MySQL, you need to
expand the contents of the ZIP file into a folder. Be sure
no other programs are running while you perform the
installation.
After the ZIP file is expanded, you can run the installation
program, setup.exe, to begin the installation. The
installation provides three options: Typical, which installs
the standard client and server files; Compact, which installs
only the minimum files needed to run the server; and
Custom, which allows you to choose which components to
install.
INSTALL MYSQL UNDER WINDOWS
MySQL
14
INSTALL MYSQL UNDER WINDOWS
516922 Ch01.F 9/26/02 11:31 AM Page 14
■ The Choose Destination
Location dialog box is
displayed.
‹ Click Next to continue
and install the components
into the c:\mysql directory.
■ Click Browse if you need
to choose a different
directory.
■ The Setup Type dialog box
is displayed.
› Choose Typical for a
standard installation and
click Next.
■ Choose Custom if
you want to select the
components to install.
■ The MySQL server and
client software is now
installed. This may take
a moment to complete.
INTRODUCING MYSQL
1
The installation process places all of the files for MySQL in the c:\mysql
directory by default. Within this directory, the following subdirectories are
available:
DIRECTORY PURPOSE
c:\mysql\bin The server and client EXE files
c:\mysql\data The database data storage area
c:\mysql\Docs The MySQL documentation in HTML format
c:\mysql\bench Benchmarking and testing utilities
Within the mysql\bin directory, two utilities unique to the Windows version are
included. The first, winmysqladmin.exe, is a graphical utility that allows you
to create users and passwords, edit MySQL server settings, and monitor the
MySQL server's status.
The second utility, MySqlManager.exe, allows you to monitor one or more
servers and to browse the data structure of the databases stored on the servers.
The configuration settings for the MySQL server are stored in the my.ini file,
which the server looks for in c:\mysql by default. You can create this file using
a text editor or the editor built into the winmysqladmin.exe utility.
15
516922 Ch01.F 9/26/02 11:31 AM Page 15
MySQL
STARTING MYSQL
UNDER WINDOWS
⁄ From a DOS prompt, type
c:\mysql\bin\mysqld-max and
press Enter.
■ The server starts in the
background and returns you
to the DOS prompt. It may
take a moment to initialize.
Note: If you used a directory other
than c:\mysql when installing,
substitute the correct directory.
STARTING MYSQL UNDER LINUX
⁄ From the command
prompt, type
cd /usr/local/
mysql to change to the
directory where MySQL
is installed.
Note: If you installed MySQL into a
different directory, substitute its
name here.
¤ Type bin/safe_mysqld &
and press Enter.
■ The MySQL server starts in
the background.
16
START THE MYSQL SERVER
A
fter you have installed the MySQL Server software,
you can start the server. The server software is a
daemon, a program that runs in the background and
usually does not have a window or output of its own. The
process of starting the MySQL server depends on your
operating system.
Under Windows, the simplest way to start the server is to
run the c:\mysql\bin\mysqld-max program from a
DOS prompt. You can also use the winmysqladmin utility
to set up the MySQL server to run as a service and start
automatically when the computer is booted.
Under Linux or UNIX, you can start the server by executing
the safe_mysqld program in the bin directory under the
MySQL installation directory. You should log on using a user
specifically created to run the MySQL server before starting
MySQL. Depending on the installation method you used, a
user account may have been created automatically.
The Linux installation of MySQL includes a script,
mysql.server, in the share/mysql directory. This script
can be used to start or stop the server. The following are
the start and stop commands:
mysql.server start
mysql.server stop
You can use this script to automatically start the MySQL
server. How to do this depends on the operating system
you are using. In most versions of Linux, you can add the
command to start the server to the /etc/rc.d/rc.local file
to start MySQL when Linux starts.
If you are using the MySQL server for experimentation
rather than for a production server, you can simply type
/bin/safe_mysqld & from the command prompt. The &
character indicates that the program will be run in the
background. See Chapter 9 for more details about starting
and stopping the MySQL server.
START THE MYSQL SERVER
516922 Ch01.F 9/26/02 11:31 AM Page 16
⁄ From the Linux command
prompt, type
cd /usr/local/
mysql to switch to the MySQL
installation directory.
Note: In Windows, switch to the
c:\mysql directory.
¤ Type bin/mysqladmin
status and press Enter.
Note: In Windows, type
c:\mysql\bin\mysqladmin status
.
■ The server's current status
is displayed.
Note: If an Uptime value is not
displayed, the server is either
not running or you are not
communicating with it.
‹ Type bin/mysqladmin
variables to display the
variable values.
Note: In Windows, type
c:\mysql\bin\mysqladmin variables
.
■ The values are displayed.
17
A
fter you have installed the MySQL server, you should
test it to be sure it is running correctly. Because the
MySQL server software runs in the background and
does not provide any obvious evidence that it is running,
you will need to use the utilities included with MySQL to
communicate with the server and check on it.
The mysqladmin program in the bin directory of the
installation can perform a wide variety of administration
tasks, most of which will be introduced in Chapter 9. To
check whether the server is running correctly, you can use
two simple options, mysqladmin status and
mysqladmin variables.
The status command in mysqladmin displays a summary
of the server's current status, including the amount of time
it has been running. Its output under Linux typically looks
something like this example:
Uptime: 2938036 Threads: 3
Questions: 35941287
Slow queries: 5 Opens: 60462
Flush tables: 1
Open tables: 53
Queries per second avg: 12.233
You can also display this information using the MySQL
monitor utility. You will learn how to do this in the next
section.
The variables command displays the values of a number
of MySQL settings. The variables themselves are not
important for this test — if you see a list of variables at all,
then mysqladmin has successfully communicated with the
MySQL server, and you are ready to begin using the server
to work with data.
The mysqladmin command works identically in Windows
and Linux. In both systems, it is located in the bin directory
under the directory where you installed MySQL. The steps
below are shown using Linux; notes are included where the
Windows version differs.
TEST THE MYSQL INSTALLATION
TEST THE MYSQL INSTALLATION
INTRODUCING MYSQL
1
516922 Ch01.F 9/26/02 11:31 AM Page 17
⁄ From the UNIX or DOS
command prompt, type
mysql
to start the monitor.
Note: You may need to add a
username, password, and host
name to this command, depending
on your server.
■ The MySQL Monitor
displays a welcome message.
¤ Type HELP at the monitor
prompt to display a list of
commands.
T
he MySQL Monitor is a command-line interface to
MySQL and was installed when you installed the
MySQL server. You can use the monitor to experiment
with SQL commands, and you will use it throughout this
book to work with MySQL databases.
MySQL uses a client-server architecture: the server interacts
with one or more client applications, either on the same
machine or different machines. The server deals with the
actual data for the database, and the client makes requests
and receives data from the server. The MySQL Monitor is a
simple client for the MySQL server.
To start the monitor, use the mysql command from your
operating system's command prompt. By default, the
monitor will try to connect to a server on the local
computer, using the current user's username and no
password. If you need to access a server on a different
computer or using a specific username or password, you
will need to specify one or more options to the mysql
command.
The options you will commonly use include -uUSERNAME
to specify a username, -pPASSWORD to specify a password,
and -hHOST to specify an address for the MySQL server.
When you are in the MySQL Monitor, the commands you
can use include monitor commands and SQL queries. The
results of your command or query are shown on the
monitor screen.
You can type monitor commands, such as EXIT and HELP,
directly. SQL queries can be long and can extend across
multiple lines, so the monitor requires that you end each
query with a semicolon (;). If you type a query and press
Enter without including the semicolon, you are prompted
for another line to add to the command.
USING THE MYSQL MONITOR
MySQL
18
USING THE MYSQL MONITOR
516922 Ch01.F 9/26/02 11:31 AM Page 18
■ A list of available
commands is displayed.
‹ You can use SQL
statements from the monitor.
For example, type
SHOW
DATABASES; and press Enter.
■ A list of available
databases is displayed.
› To exit the MySQL
Monitor, type
EXIT and
press Enter.
■ You are returned to the
UNIX or Windows
environment.
INTRODUCING MYSQL
1
If an error message is displayed when you try to start the monitor, be
sure you have correctly specified the username, password, and host
name for the MySQL server. The following table lists some of the most
useful options for the mysql command:
COMMAND DESCRIPTION
-? Display a complete list of options
-D Select a database to use
-h Specify the host (server name or IP address)
-p Specify the password to access the server
-P Specify the TCP/IP port number for the server
-u Specify a username for the server
-V Display the server version number
If your MySQL server is on the local machine, and you have created a
username and password to access it, you only need to specify the
username and password to start the MySQL Monitor.
Example:
mysql –uFRED -pPASSWORD
While monitor commands and SQL queries are typically shown in
uppercase, such as EXIT and SHOW DATABASES, the commands are
not case-sensitive, and you can type them in lowercase if you prefer.
19
516922 Ch01.F 9/26/02 11:31 AM Page 19
MySQL
⁄ Start the MySQL Monitor
by typing
mysql at the
command prompt.
¤ Type STATUS and press
Enter to display the server's
current status.
■ The status information is
displayed on the monitor
screen.
20
VIEW THE SERVER STATUS
Y
ou can use the STATUS command in the MySQL
Monitor to view the current status of the MySQL
server. This displays a table of basic status information
for the server. This command is useful to verify that the
server is running and to view details about your current
client session.
The first section of the status display contains version
information for the MySQL server. It displays the username
and hostname you are currently using, the currently selected
database, if any, and the length of time the server has been
running since the last time it was started.
The last two lines of the status display provide a snapshot
of the current performance of the server. Threads is the
number of processes currently communicating with
clients, Questions is the number of queries that have been
processed since the server was started, and Slow queries is
the number of queries that have taken more than a typical
amount of time to complete.
Opens is the number of times databases have been opened
by clients, which increases as the server continues to run.
Open tables is the number of tables currently in use by
queries, a rough measure of how busy the server is. The last
value, Queries per second, is a measure of the server's
average speed in responding to queries from clients.
While this information can let you know at a glance
whether the MySQL server is running and whether it is
keeping up with its workload, you can also use the data
displayed here to optimize the server's performance and
detect potential errors and slowdowns before they become
serious. You will learn more about this status information in
Chapter 10.
VIEW THE SERVER STATUS
516922 Ch01.F 9/26/02 11:31 AM Page 20
⁄ From the MySQL Monitor,
type
create database testdb;
and press Enter.
■ A message is displayed
indicating that the database
was created successfully.
Note: If the message Query OK was
not displayed, the server may not be
running, or you may not have the
correct permissions to create a
database. See Chapter 10 for
troubleshooting tips.
21
W
hile you can use the MySQL Monitor to view
status and other information about the server,
you will find it most useful for testing MySQL
queries and for using queries to work with data in
databases.
A MySQL query begins with an SQL command, such as
CREATE, INSERT, or SELECT. The remainder of the query
specifies the parameters of the command. You must end
each MySQL query with the ; (semicolon) character.
You can use a MySQL query at any time from the MySQL
Monitor prompt. Some query commands, such as SELECT
and INSERT, require that you first specify a database using
the USE command. This command is explained in Chapter 2.
When you enter a query into the MySQL monitor, it is
executed immediately by the MySQL server. The monitor
displays the results of your query. For queries such as
SELECT, it will display the data you requested. For queries
that affect the database, such as DELETE and INSERT, it will
display a message informing you how many rows were
affected by the query.
While the MySQL monitor is a great way to test MySQL
queries and perform simple tasks, it is not the most
efficient interface for complex database management. If
you need to use a large number of queries, you can do so
using a database client such as phpMyAdmin, introduced
in Chapter 12. You can also write your own programs in a
language such as PHP or Perl to work with the data in your
database.
In this example, you will enter a simple query at the MySQL
Monitor prompt to create a database. The database you
create here, testdb, will be used in subsequent examples, so
keep it available on the server.
TRY AN SQL QUERY
INTRODUCING MYSQL
1
TRY AN SQL QUERY
516922 Ch01.F 9/26/02 11:31 AM Page 21
⁄ From the MySQL monitor,
type
USE testdb; and press
Enter.
■ This selects the database.
Note: Be sure you have started the
MySQL monitor using the root user.
¤ Type GRANT ALL ON
testdb.* TO testuser and
press Enter.
‹ Type IDENTIFIED BY
'testpw'; and press Enter.
■ This creates the testuser
account.
Note: Choose your own password
rather than using the one shown
here.
M
ySQL has its own access control system
using usernames and passwords. To work
with data on a MySQL server, you will need a
valid MySQL username and password. MySQL usernames
are completely separate from UNIX or Windows usernames.
When you install MySQL, it creates the root user by
default. This user has access to all databases on the server,
and can create and manage additional users. You should
not use the root user to work with the MySQL server
unless absolutely necessary. Instead, use a username and
password that has been given access to the database you
are working with.
You will use the testdb database for examples throughout
this book. Rather than use the root user for these tests, you
can create a username specifically for this purpose. To
create the user, you will need to be connected to the
MySQL monitor as the root user. Use the following
command to create the new user:
GRANT ALL ON testdb.* TO testuser
IDENTIFIED BY 'testpw';
This GRANT command creates a new user, testuser, and
grants the user access to all tables in the testdb database.
The IDENTIFIED BY section specifies a password for the
user. You should choose your own password rather than
using the value given here.
After you have created the testuser username, you can use it
to access the MySQL monitor. The following command starts
the MySQL monitor with this username. You may need to
specify a hostname or other options, as described in the
section "Using the MySQL Monitor," earlier in this chapter.
mysql -utestuser -ptestpw
MySQL security is a complex topic. You can create any
number of users with different levels of access to databases,
tables, and even specific columns. See Chapter 11 for more
information about MySQL security.
CONFIGURE A MYSQL USER
MySQL
22
CONFIGURE A MYSQL USER
516922 Ch01.F 9/26/02 11:31 AM Page 22
Note: The following command is
only needed if you will be running
the MySQL monitor from the same
machine as the MySQL server.
› Type GRANT ALL ON
testdb.* TO testuser@localhost
and press Enter.
ˇ Type IDENTIFIED BY
'testpw'; and press Enter.
■ This creates an account
for use from the local host.
Á Type EXIT to exit the
MySQL monitor.
■ You are returned to the
command prompt.
‡ Type mysql -utestuser
-ptestpw to start the MySQL
monitor.
■ You are now connected to
MySQL as the new user.
Note: Use the same password you
specified when creating the user.
INTRODUCING MYSQL
1
When MySQL is installed, the root user has a
default password of mysql. Because this is
common knowledge, you should change the
password for the root user as soon as possible to
secure the server. To change the password, start
the MySQL monitor as the root user and use the
following command.
Example:
set password = password('newpass');
Replace newpass with the password of your
choice, and be sure to choose a password that is
not easy for others to guess. See Chapter 11 for
detailed information about changing passwords
for MySQL users.
Because you will be using the testdb database
throughout this book, you may find it useful to
make the MySQL monitor automatically use the
testuser user by default. This can easily be done on
UNIX systems. Create a file in your home directory
with the filename .my.cnf and add the following
lines to the file:
Example:
[client]
user=testuser
password=testpw
23
516922 Ch01.F 9/26/02 11:31 AM Page 23
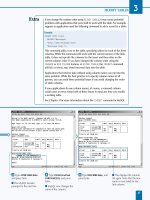
⁄ From the MySQL monitor,
type
USE testdb; and press
Enter.
■ The test database is now
selected.
¤ Type CREATE TABLE address (
and press Enter.
‹ Type name CHAR(100) NOT
NULL, and press Enter.
› Type address CHAR(120),
and press Enter.
W
hile simple SQL queries fit on a single line, some
query commands require several lines. You can
enter a multiple-line query in the MySQL
monitor by pressing Enter after each section of a command.
Because you must use the semicolon character at the end of
a query, the MySQL monitor does not act on the query until
you end a line with a semicolon. You can enter any number
of lines, in order, and use a semicolon at the end of the last
line to indicate the end of the query.
After you have entered a line, you can press the up-arrow
key to return to that line and edit it further. Press Enter again
to continue to the next line. The MySQL monitor also
supports a special command, \c (clear). If you type \c as the
first characters in a line, the monitor clears the command you
have entered so far, and you can start a new command on
the next line. This is useful if you have made a mistake.
As an example of using a multiple-line query, you can try
the CREATE TABLE command below:
CREATE TABLE address (
name CHAR(100) NOT NULL,
address CHAR(120),
city CHAR(50),
state CHAR(2) );
This example will use the testdb database you created
earlier in this chapter. If you have not already created the
testdb database, you can create it before beginning using
this command:
CREATE DATABASE testdb;
SPECIFY A MULTIPLE-LINE QUERY
MySQL
24
SPECIFY A MULTIPLE-LINE QUERY
516922 Ch01.F 9/26/02 11:31 AM Page 24
■ The command you have
entered so far is displayed.
ˇ Type city CHAR(50), and
press Enter.
Á Type state CHAR(2) ); and
press Enter.
■ The command is now
complete and the table is
created.
‡ Type SHOW TABLES; and
press Enter.
■ The monitor displays the
list of tables, including your
new table.
INTRODUCING MYSQL
1
Along with \c to clear the command, the MySQL monitor supports a number
of other commands. Most of the commands have a short version beginning
with the backslash character as well as a single-word version. The following
table summarizes some of the most useful commands.
SHORT LONG DESCRIPTION
\c CLEAR Clears the current command
\e EDIT Edits the command in a text editor
\g GO Executes the current command
\G EGO Executes the current command and displays a
vertical result
\h HELP Displays a list of commands and their descriptions
\p PRINT Displays the current command
\P PAGER Specifies a program to use to create paged output
\q EXIT Exits the MySQL monitor
\r CONNECT Attempts to reconnect to the server
\s STATUS Displays MySQL status information
\u USE Selects the database for subsequent commands
\ SOURCE Executes MySQL commands from a specified file
25
516922 Ch01.F 9/26/02 11:31 AM Page 25
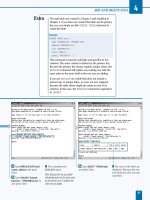
⁄ From the MySQL monitor,
type
USE testdb; and press
Enter.
■ This selects the database.
¤ From the MySQL monitor,
type
CREATE TABLE test ( and
press Enter.
‹ Type \e to edit the
command so far.
■ The editor opens and
displays the command you
have entered so far.
› In the editor, type field1
CHAR (100), and press Enter.
ˇ Type field2 CHAR(50) );
and press Enter.
W
hile it allows you to split a long query into
multiple lines, the MySQL monitor interface is
unforgiving — if you made an error on the first
line, you cannot correct it without entering the entire
command again. Fortunately, the MySQL monitor provides
an alternative.
You can use the \e command at the beginning of any line to
edit the current command. This opens a text editor and
allows you to use it to edit (or enter) the command. When
you are finished, you save the command and exit the editor,
and the full command is stored in the MySQL monitor buffer.
You can use \e as the first line in a command to enter the
entire command in the editor and avoid using the regular
MySQL monitor interface. You can also enter the \e
command at any time, and the command you have entered
so far will be transferred to the editor.
This feature is not included in the Windows version of the
MySQL monitor. In the Linux version, it uses the text editor
you have defined using the $EDITOR environmental
variable. To set this variable, use a command like this from
the command prompt:
export EDITOR=pico
This command may vary depending on your shell and
operating system. This example uses pico, a simple editor
included with most versions of Linux. You can use the
editor of your choice instead.
When you finish editing, be sure to use the editor's Save
command to save the file. If you do not save the file, the
command will be lost. After you have edited a command,
you will be returned to the MySQL monitor. You can then
use the \g (go) command to execute the command.
EDIT A LONG COMMAND
MySQL
26
EDIT A LONG COMMAND
516922 Ch01.F 9/26/02 11:31 AM Page 26