Mysql your visual blueprint for creating open source databases- P14 pptx
Bạn đang xem bản rút gọn của tài liệu. Xem và tải ngay bản đầy đủ của tài liệu tại đây (935.98 KB, 20 trang )
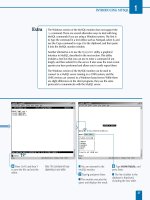
■ The next screen allows you
to choose components and
the install location.
‹ Make any changes
desired and click Next to
continue.
■ The final options screen is
displayed.
› Click Next, and then click
Install on the following screen
to complete the installation.
ActivePerl
ActivePerl includes optional modules to work with
Microsoft's IIS Web server, included with Windows 2000
Server and Windows XP Server. You can choose to install
these modules within the Setup Wizard when you are
installing ActivePerl. For more information about IIS, see
Microsoft's Web site: www.microsoft.com/iis/.
The Apache Web server is also available for Windows
systems. If you do not have a Web server already, Apache
is a good choice and is available at no charge. The 32-bit
Windows version of Apache is provided as an .msi file for
Microsoft's Windows Installer utility and as an .exe file
that includes the Window Installer. You can download
Apache for Windows from the Apache Software
Foundation's Web site: www.apache.org/.
Apache 2.0, the most recent stable release, is tested and
reliable on Windows systems, and a good alternative to
Microsoft's IIS for many users. As with the UNIX version
of Apache, you can install the mod_perl module to
directly support Perl scripts from within the Web server.
To use MySQL with ActivePerl, you will need to install the
DBD and DBI modules for MySQL support. The process of
installing these modules is described later in this chapter.
247
USING MYSQL WITH PERL
13
516922 Ch13.F 9/26/02 11:40 AM Page 247
MySQL
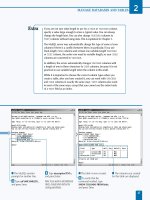
⁄ Type cd followed by the
directory name where the
.tar.gz file was downloaded
and press Enter.
¤ Type tar zxf followed by
the name of the downloaded
file and press Enter.
■ The files are expanded into
a new directory.
‹ Type cd followed by the
new directory name and
press Enter.
› Type perl Makefile.PL and
press Enter.
ˇ Type make and press Enter.
■ This compiles the files.
Á Type make test and press
Enter.
■ The compiled files are now
tested.
‡ Type make install and
press Enter.
■ The DBI files are now
installed.
248
INSTALL THE PERL DBI
T
he DBI package for Perl supports a number of
different database systems. Because it uses the same
syntax for all database servers, you can use it to write
portable Perl applications that work with any supported
database server. Along with the DBI, you will need to install
a separate database driver, or DBD, for each database server
your applications will be working with.
The DBI for Perl is available from the MySQL Web page,
www.mysql.com/, in the Downloads section. For UNIX
systems, this is distributed as a .tar.gz archive. You can
expand this archive and use the following commands to
compile and install the DBI:
perl Makefile.PL
make
make test
make install
The first command sets up the compilation options for your
system. The make command compiles the programs for the
DBI. The make test command runs some tests to make sure
the files work correctly, and make install installs the DBI
in your Perl libraries. If the final command does not display
any error messages, the DBI should work on your server.
If you run into trouble with installation, there is some
documentation on the Perl DBI within the MySQL
documentation, available from the MySQL Web site. After
the installation, you will need to install the DBD for MySQL.
Under Windows systems, you can use the Perl Package
Manager (PPM) included with ActiveState's Perl distribution
to automatically install the DBI. To use this, start the
c:\perl\bin\ppm.pl program from a command prompt
window, and then type the following command:
install DBI
MySQL also provides a downloadable Perl distribution for
Windows that includes the DBI and DBD modules required
for your scripts to connect to a MySQL server. See the
Downloads page at the MySQL Web site for a link to this
distribution.
INSTALL THE PERL DBI
516922 Ch13.F 9/26/02 11:40 AM Page 248
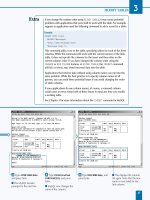
⁄
Type cd followed by the
directory name where the
.tar.gz file was downloaded
and press Enter.
¤
Type tar zxf followed by
the name of the downloaded
file and press Enter to expand
the files into a new directory.
‹
Type cd followed by the
new directory name and
press Enter.
›
Type perl Makefile.PL and
press Enter.
ˇ
Type 1 to choose MySQL
support and press Enter.
■
The Perl files are
configured for your system.
Á
Type make and press Enter.
■
This compiles the files.
‡
Type make test and press
Enter.
■
The compiled files are now
tested.
°
Type make install and
press Enter.
■
The DBD files are now
installed.
249
T
he DBI package cannot access a MySQL database, or
any database, by itself. It requires a DBD, or database
driver, module for each database server. The MySQL
DBD actually supports both MySQL servers and mSQL
servers in the same module. You can download the DBD
from the Downloads section of the MySQL Web page,
www.mysql.com/.
The DBD distribution file is in the .tar.gz format and usually
has a filename such as Msql-Mysql-modules-1.2216.tar.gz.
After you have downloaded this file, you use the same
sequence of commands used for the DBI module to install
the package:
perl Makefile.PL
make
make test
make install
The make test command runs some tests on the
compiled files, and the make install command installs
the files on your system. If these commands do not display
any error messages, the DBD is successfully installed. If you
run into trouble with the installation, consult the
documentation at the MySQL Web site.
After the DBI and DBD modules are installed, you can
begin to use Perl scripts to connect to a MySQL server and
make queries. If you are writing a Perl application that will
use MySQL, you need to include a use command at the
beginning of the script to load the DBI package. A separate
command for the DBD module is not required. The
following command loads the DBI package in Perl:
use DBI;
After this module is loaded, you can use the various
methods, or built-in functions, to work with MySQL.
For example, the DBI->connect method connects to a
MySQL server, as described in the next section. Complete
documentation for the various DBI functions is included
as part of the MySQL documentation, available from the
MySQL Web site at www.mysql.com/.
INSTALL THE MYSQL DBD
INSTALL THE MYSQL DBD
USING MYSQL WITH PERL
13
516922 Ch13.F 9/26/02 11:40 AM Page 249
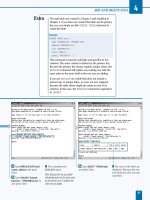
⁄ Open Notepad or another
text editor to create the Perl
script.
¤ Type #!/usr/bin/perl to
begin the Perl script.
Note: Specify the correct path for
Perl on your system.
‹ Type use DBI; to load the
DBI package.
› Type print to begin the
command to output the CGI
header, and add the Content-
type header.
ˇ Type print to begin the
commands that begin and
end the HTML document,
and add the appropriate
HTML tags.
Note: See the Extra section for
further information about CGI.
A
fter you have loaded the DBI package within a Perl
script, you can use the methods built into the DBI to
access MySQL. To connect to a MySQL server, you
use the DBI->connect method. To use this method, first
create a single string that includes the database type,
mysql, the database name, and the hostname. For example,
use DBI:mysql:testdb:localhost to connect to the
testdb database on the local host.
To connect to the database, specify the string you created,
the username for the MySQL server, and the password. If
you do not specify a username or password, the DBI uses
the default values defined by the DBI_USER and DBI_PASS
environmental variables. The following example connects to
the server at the local host and selects the testdb database:
use DBI;
$dbh = DBI->connect(
"DBI:mysql:testdb:localhost",
"testuser", "testpw");
The connect method returns a database handle object,
here stored in the $dbh variable. You can use the methods
of this object to send queries to the MySQL server and
retrieve the results. If the connection to the MySQL server
is unsuccessful, the connect method returns a false value
instead. You can test this variable to determine whether the
connection was successful. The following if statement
checks the database handler and prints a message if the
connection was successful:
if ($dbh) {print "Connected to MySQL
successfully.";}
else {print "Error: can't connect to
MySQL.";}
When you are finished using the connection to MySQL, you
can use the disconnect method to end the connection.
You use this method with the database handle. The
following example disconnects from the MySQL server:
$dbh->disconnect;
CONNECT TO A MYSQL SERVER
MySQL
250
CONNECT TO A MYSQL SERVER
516922 Ch13.F 9/26/02 11:40 AM Page 250
Á Type $dbh = DBI->connect
followed by the database
name, hostname, username,
and password to connect to
the MySQL server.
Note: Be sure to specify the correct
hostname, username, and password
for your server.
‡ Type if and else to begin
the statements that indicate
whether the connection was
successful, and add the print
commands.
° Load the Perl document
into a Web browser.
■ The displayed message
indicates whether the
connection was made.
Note: You will need to upload the
Perl file to a Web server before you
can use it.
251
USING MYSQL WITH PERL
13
When you use a Perl script as a CGI script on a Web server, you
need to send the output in HTML as it will be interpreted by
the Web browser. Before any output, your Perl script should
first send a Content-type header to indicate that the rest of
the page is interpreted as HTML. The following section of the
example code uses a print statement to send this header and
then prints the basic tags to begin the HTML document:
Example:
print "Content-type:text/html\n\n";
print "<html><head><title>Connecting to MySQL";
print "</title></head><body>";
When you send output within a CGI program, be sure to use
HTML tags to format it correctly. For example, you cannot end
a line using the standard \n code, as it will be ignored by the
browser. You can send a line break tag, <br>, or format the text
into paragraphs using <p> and </p> tags instead.
516922 Ch13.F 9/26/02 11:40 AM Page 251
Note: Open the Perl script in a text
editor.
⁄
Type the Perl header and
use DBI; to load the DBI
package.
¤
Type print to begin the
statements that send a CGI
header and start and end the
HTML document, and add
the header and HTML tags.
‹
Type $dbh = DBI->connect
and add the correct database
name, hostname, username,
and password to connect to
the MySQL server.
Note: Be sure to use the correct
hostname, username, and password
for your system.
›
Type $query = followed by
the MySQL query to store the
query in a variable.
A
fter you have made a connection to a MySQL server
from a Perl script, you can send a MySQL query to
the server. One way to do this is to use the prepare
method of the database handler. This accepts a query as a
parameter, and prepares a statement handler object to
execute the query. The query is not yet sent to the server.
The following example prepares a query:
$query = "SELECT quote, author FROM quotes";
$sth = $dbh->prepare($query);
This method returns a statement handler object, stored in
the $sth variable here. After you have prepared the query,
you can use the execute method on the statement handler
to send the query to the MySQL server. The following
example executes the query in the $sth object:
$result = $sth->execute;
This executes queries that do not return a result, such as
INSERT or DELETE, immediately. For a SELECT query,
the query is started. You can then use one of the fetch
methods to retrieve each row of the result. One such
method is fetchrow_array, which fetches a row from the
MySQL server and stores its fields in an array. The following
example uses a while loop to print each row of the query
result:
while(@row = $sth->fetchrow_array) {
print "<p>$row[0] —$row[1]</p>"; }
The columns of the result are returned in order, starting
with zero. Thus, in this example, $row[0] represents the
quote column, and $row[1] represents the author column.
The print statement prints each row, formatted as an
HTML paragraph.
DISPLAY QUERY RESULTS
MySQL
252
DISPLAY QUERY RESULTS
516922 Ch13.F 9/26/02 11:40 AM Page 252
ˇ Type $sth = $dbh-
>prepare($query); to
prepare the query.
Á Type $result = $sth-
>execute; to start the query.
‡ Type while to begin the
loop that retrieves and displays
each row of the result, and add
the
fetchrow_array method to
retrieve a row from the table.
° Type print followed by the
text that will be displayed with
each row, including the
variable values.
Note: Save the document and upload
it to a Web server.
· Load the Perl document
into a Web browser.
■ The results of the query are
displayed.
USING MYSQL WITH PERL
13
253
The DBI includes a number of different fetch methods, and you can use any of them
to retrieve the results of a SELECT query. For example, the fetchrow_hashref
returns each row as a reference to a hash table containing each column name and its
corresponding value. This is not as efficient as the fetchrow_array method, but
allows you to refer to result columns by their MySQL column name rather than by
number.
For example, the following Perl code sends a SELECT query to the MySQL server, and
then uses a while loop with the fetchrow_hashref method to display the results
of the SELECT query.
Example:
use DBI;
$dbh = DBI->connect("DBI:mysql:testdb:localhost",
"testuser", "testpw");
$query = "SELECT quote, author FROM quotes";
$sth = $dbh->prepare($query);
$result = $sth->execute;
while($hash = $sth->fetchrow_hashref) {
print "<p>$hash->{quote} $hash->{author}</p>"; }
516922 Ch13.F 9/26/02 11:40 AM Page 253
⁄ Type the Perl header and
use DBI; to load the DBI
package.
¤ Type print followed by the
CGI header.
‹ Type print followed by the
HTML tags to format the
output.
› Type $dbh = DBI->connect
followed by the database
name, hostname, username,
and password to connect to
the MySQL server.
ˇ Type $query = followed by
the MySQL query.
Á Type $rows = $dbh-
>do($query); to execute the
query.
‡ Type if and else and add
the statements to print the
result.
° Load the Perl document
into a Web browser.
■ The displayed message
indicates that the record was
successfully inserted.
Y
ou can use Perl to perform an INSERT query on the
MySQL server to add a record to a table. Because an
INSERT query is simple and does not return a result,
you do not need to use the prepare method. Instead, you
can use the do method of the database handler. This
function accepts a MySQL query and executes it
immediately.
As with other DBI methods, you must first use the connect
method to open a connection to a MySQL server and select
a database. To use the do method, specify the database
handler that was returned by the connect method and
specify a MySQL query. The following statements store an
INSERT query in the $query variable and use the do
method to execute the query:
$query = "INSERT INTO scores (name, score)
VALUES ('Fred', 92)";
$rows = $dbh->do($query);
The do method returns the number of rows affected by the
query. Because a single record should have been added by
the INSERT query, the $rows variable will be nonzero if
the insert succeeded. You can use an if statement to check
the number of rows and print a message indicating whether
the row was successfully inserted:
if ($rows > 0) {print "Inserted record
successfully.";}
else {print "Error: INSERT query failed.";}
Because the do method does not return a statement
handler, you cannot use it to process a SELECT query.
However, it works well for queries that return the number
of rows affected rather than returning rows of data, such as
INSERT, UPDATE, and DELETE.
INSERT A RECORD FROM PERL
MySQL
254
INSERT A RECORD FROM PERL
516922 Ch13.F 9/26/02 11:40 AM Page 254
⁄ Type the Perl header and
use DBI; to load the DBI
package.
¤ Type print followed by the
CGI header.
‹ Type print followed by the
HTML tags to format the
document.
› Type $dbh = DBI->connect
followed by the correct
database name, hostname,
username, and password to
connect to the MySQL server.
ˇ Type $query= followed by
the MySQL query.
Á Type $rows = $dbh-
>do($query); to execute the
query.
‡ Type if and else followed
by the statements to print the
result.
° Load the Perl document
into a Web browser.
■ The displayed message
indicates that the DELETE
query was successful.
255
Y
ou can also use Perl to send a DELETE query to the
MySQL server to delete one or more records. As with
the INSERT query, you can use the do method to
execute the query and return the number of rows that were
deleted.
To delete one or more rows of a table, create a DELETE
query that includes a WHERE clause. The WHERE clause will
determine the rows to be deleted. Without this clause, the
entire contents of the table would be deleted. The following
statements store a DELETE query in the $query variable
and execute the query using the do method:
$query = "DELETE FROM scores WHERE name =
'fred'";
$rows = $dbh->do($query);
As with the INSERT query, you can check the returned
result in the $rows variable to determine that the rows
were deleted successfully. The following statements check
the result and display a message:
if ($rows > 0) {print "Deleted record
successfully.";}
else {print "Error: DELETE query failed.";}
Note that a failed query is not the same as a query that did
not match any rows. If the query was invalid or caused a
MySQL error, the do method returns zero. If the query
simply matches no rows, it returns the special value "0E0".
Perl treats this value as true, but numerically it is evaluated
to zero. If you use an if statement like the following, it will
print a success message if the query succeeded, regardless
of whether it affected any rows:
if ($rows) {print "DELETE query was
successful.";}
DELETE RECORDS USING PERL
USING MYSQL WITH PERL
13
DELETE RECORDS USING PERL
516922 Ch13.F 9/26/02 11:40 AM Page 255
⁄ Type the Perl header and
use DBI; to load the DBI
package.
¤ Type print followed by the
CGI header.
‹ Type print followed by the
HTML tags to format the
output.
› Type print <<EOF;
followed by the HTML
tags for the search form.
ˇ Type if to begin the
statement that detects when
the form is submitted.
Á Type $dbh = DBI->connect
followed by the database
name, hostname, username,
and password to connect
to the MySQL server.
Y
ou can use Perl to send the results of an HTML form
to a MySQL query. For example, you can create a
search form to search the quotes table. To output the
form, you can use a special Perl syntax that allows you to
include several rows of content to output. The following
Perl code displays the form:
print <<EOF;
<form method="get" action="search.pl">
Search for: <input type="text"
name="search">
<input type="submit" name="submit"
value="Search">
</form>
EOF
The print << syntax means that everything starting on the
next line and ending with the text EOF should be output.
This allows you to include HTML directly within the Perl
script. When the user clicks the Search button, the form
data is sent to the Perl script in the QUERY_STRING
environmental variable. The following if statement
checks this variable:
if ($ENV{'QUERY_STRING'} =~ /search=(.*)&/)
{
This statement uses a regular expression to look for the
field name search in the query string. It uses the (.*)
expression to capture the value of the search field. Perl
stores this value in the $1 variable, and it can then be used
to create a MySQL query.
After you have created the MySQL query in the $query
variable, you can use the prepare method to prepare the
query and the execute method to send it to the server.
WORK WITH WEB FORMS
MySQL
256
WORK WITH WEB FORMS
516922 Ch13.F 9/26/02 11:40 AM Page 256
‡ Type $query= followed by
the MySQL query.
° Type $sth = $dbh-
>prepare($query); to prepare
the query.
· Type $result = $sth-
>execute;
to execute the
query.
‚ Type print to begin the
statement that prints a
heading for the search results.
— Type while to begin the
loop that displays each row
of the search results.
± Load the Perl document
into a Web browser.
¡ Type a search term and
click the Search button.
■ The results of the search
are displayed below the form.
USING MYSQL WITH PERL
13
257
You can simplify the use of HTML forms and their results using CGI.pm, a
popular Perl package. You can download this package and view its
documentation at this URL: />The following example shows the search form example rewritten to use
this package.
Example:
use DBI;
use CGI qw(:standard);
print header, start_html("Search Form"), start_form, "Search for: ",
textfield('search'), submit, end_form;
if (param()) {
$s=param('search');
print "<p>Searching for: <b>$search</b></p>";
$dbh = DBI->connect("DBI:mysql:testdb", "testuser", "testpw");
$query = "SELECT quote,author FROM quotes WHERE QUOTE LIKE '%$s%' ";
$sth = $dbh->prepare($query);
$result = $sth->execute;
while(@row = $sth->fetchrow_array) {
print "<p>$row[0] $row[1]</p>"; }
}
print end_html;
516922 Ch13.F 9/26/02 11:40 AM Page 257
ALTER
To modify the definition of a database table. MySQL supports the
ALTER TABLE command for this purpose.
BIT
The smallest unit of storage in computer memory. A bit can store
an on or off value and represents the numbers zero or one.
BYTE
The standard unit of storage in computer memory. A byte is
comprised of 8 bits, and can represent numbers from 0 to 255.
Multiple bytes can be combined to store larger numbers.
CLIENT
An application or interface that accesses an application on a server,
such as a MySQL database server. The MySQL monitor is a
command-line client for MySQL.
COLUMN
An item of data that can be stored in a database table. Each column
stores a specific type of data, and stores one value for each row of
data. Columns are sometimes known as fields.
CONDITION
An expression that can be evaluated to a true or false value.
Conditions can be used in a WHERE clause to select rows of data
from a table.
DATABASE
A combination of one or more tables stored in a single directory. A
MySQL server can store any number of databases.
DATABASE MANAGEMENT SYSTEM (DBMS)
A software application that stores data in files and organizes it into
columns, rows, and tables. MySQL is a database management system.
DEFAULT
The value that is stored in a column when no value is explicitly
assigned. If you do not specify a default value for a table column,
MySQL uses zero or the NULL value, depending on the column type.
DROP
To delete a column, table, or database. This action is accomplished
with MySQL commands such as DROP TABLE and DROP
DATABASE.
FIELD
See column.
FLOATING POINT
A type of numeric data that can be stored in a database. Floating
point numbers support fractional values and exponents, and can
have any number of decimal places. MySQL data types such as
FLOAT and DOUBLE support floating point numbers.
GRANT
To allow a user one or more privileges for a database or table.
MySQL privileges are assigned with the GRANT command.
HEAP
A type of MySQL table that stores data in RAM memory rather than
on disk, most often used for temporary tables.
INDEX
A file that stores pointers to rows in a table for a particular column
or columns. An index can be assigned to any column in a MySQL
table. Indexed columns are known as keys.
INDEXED SEQUENTIAL ACCESS
METHOD (ISAM)
A method for storing data in files that can be accessed sequentially
as well as through one or more indexes, or keys. MySQL supports
ISAM as a table type. The default table type, MyISAM, is an
improved version of this system.
INSERT
To add one or more rows to an existing table in a database. MySQL
supports the INSERT command for this purpose.
INTEGER
A number with no decimal portion. MySQL includes several
column types devoted to storing integers, such as INT and
TINYINT.
JOIN
To retrieve data from two or more tables using a relationship
defined by two or more columns that match between the tables.
This is accomplished with the SELECT command in MySQL, either
specifying multiple tables or using the JOIN keyword explicitly.
KEY
A column in a database table that has been indexed. Values for a
key column can be used to quickly access a row of data without
having to search sequentially through the table.
APPENDIX
258258
GLOSSARY
6516922 AppA.F 9/26/02 11:41 AM Page 258
GLOSSARY
A
MYSQL
A database management system (DBMS) that runs on UNIX,
Windows, and a variety of other systems. MySQL supports the SQL
query language.
MYSQL MONITOR
A command-line interface, or client, for MySQL. This utility allows
you to enter MySQL queries. It sends each query to a MySQL
server and displays the results. The mysql command starts the
monitor on most systems.
MYSQL SERVER
A computer running the MySQL server software. This software
takes requests, or queries, from clients, and acts on them to
manage one or more databases.
NULL
A special value meaning that no value has been explicitly assigned
to a column. In MySQL, a column with the NULL attribute is
allowed to store NULL values.
PERL
An open source language widely used for text processing and Web
programming. Perl modules are available for use with MySQL
databases.
PHP
An open source server-side language that runs on Web servers and
integrates with HTML files. PHP includes features for working with
MySQL databases.
PRIMARY KEY
A column that contains a unique value for each row of a table, and
can be used to refer to a single row.
PRIVILEGE
An action that a user or group is allowed to perform on a table or
database, such as creating a table or deleting records. MySQL’s
security system allows combinations of privileges to be assigned to
users to control access.
QUERY
A command in the SQL language to request data or perform
another action on a database server. Queries are sent from the
client to the server, and the server returns the results.
RECORD
See row.
REVOKE
To take away one or more access privileges from a user in MySQL’s
security system. The REVOKE command in MySQL is used for this
purpose.
ROW
An element of a database table. A table can store any number of
rows. Each row contains a value for each of the table’s defined
columns. Rows are sometimes known as records.
SECURE SOCKETS LAYER (SSL)
A standard for secure, encrypted communication between clients
and servers. SSL is used for secure Web services and is also
supported by MySQL clients and servers.
SELECT
A type of SQL query that uses the SELECT command to request
one or more rows of data from a table to be returned to the client.
SELECT supports a variety of clauses to control the amount and
type of data returned.
SERVER
A hardware or software service that accepts requests from clients
and acts on them. The MySQL software acts as a database server.
STRING
A text value that can be stored in a database column. MySQL
includes a number of column types and functions for working with
strings.
STRUCTURED QUERY LANGUAGE (SQL)
A standardized language for retrieving data from database tables,
inserting data, creating and modifying tables, and performing other
database management functions. MySQL’s query language is based
on the SQL standard.
TABLE
The basic element of data storage in a MySQL database. Each table
is defined to store one or more columns, each assigned a specific
type of data. The table can store a number of rows, each of which
includes a value for each defined column.
TIMESTAMP
A numeric value that represents a specific date and time, often
used for time logging of events. MySQL includes a TIMESTAMP
column type to store these values. Timestamp columns are
automatically updated with the current date and time when a row
is added or modified.
UNIQUE INDEX
A type of index that requires a unique value in each row of the
table for the column or columns being indexed. A primary key is a
special type of unique index.
UPDATE
To modify one or more existing rows of a table. MySQL supports
UPDATE queries for this purpose.
259259
6516922 AppA.F 9/26/02 11:41 AM Page 259
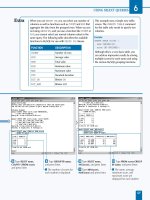
M
ySQL includes CREATE and DROP commands for
creating and deleting databases and tables. These
commands are described in the following sections.
CREATE AND DELETE TABLES
AND DATABASES
COLUMN DATA POSSIBLE
TYPE DESCRIPTION OPTIONS
INT
or Integer UNSIGNED, ZEROFILL
INTEGER
TINYINT Integer (0-255) UNSIGNED, ZEROFILL
SMALLINT Integer UNSIGNED, ZEROFILL
MEDIUMINT Integer UNSIGNED, ZEROFILL
BIGINT Integer UNSIGNED, ZEROFILL
REAL Floating-point UNSIGNED, ZEROFILL
DOUBLE Floating-point UNSIGNED, ZEROFILL
FLOAT Floating-point UNSIGNED, ZEROFILL
DECIMAL Decimal UNSIGNED, ZEROFILL
CHAR Text (fixed) BINARY
VARCHAR Text (variable) BINARY
TEXT Text (variable)
TINYTEXT Text (variable)
COLUMN DATA POSSIBLE
TYPE DESCRIPTION OPTIONS
MEDIUMTEXT Text (variable)
LONGTEXT Text (variable)
BLOB Binary (variable)
TINYBLOB Binary (variable)
MEDIUMBLOB Binary (variable)
LONGBLOB Binary (variable)
ENUM Enumerated
data (single)
SET Enumerated
data (multiple)
DATE Date
TIME Time
DATETIME Date and Time
TIMESTAMP Date and Time
(automatic)
Specify Columns
The CREATE TABLE command requires that you specify
one or more columns for the new table. To define a
column, specify a column name, column type, and any
options. Separate the column definitions with commas
and enclose the entire column list in parentheses.
Along with the specific column options listed in the
table, all columns can have the NULL or NOT NULL
attributes. This indicates whether the column can store
a NULL value. You can also specify DEFAULT followed
by a default value for the column, and AUTO_INCREMENT
to create an auto-increment column.
Indexes and Keys
You can include the PRIMARY KEY keyword within a
CREATE TABLE command to specify a primary key.
Specify one or more column names for the primary key
in parentheses. Specify the INDEX keyword to create an
index on one or more columns, or UNIQUE for a unique
index. Specify an index name followed by one or more
column names in parentheses.
CREATE TABLE
This command creates a new table within the current
database. To use this command, specify the table name,
one or more column definitions, and any table options.
You can also specify the IF NOT EXISTS keywords
before the table name to suppress an error message if
the specified table already exists.
Example:
CREATE TABLE inventory (
itemno INTEGER UNSIGNED NOT NULL PRIMARY KEY,
description VARCHAR(200),
price DECIMAL (9,2),
count TINYINT ) TYPE=ISAM;
260
APPENDIX
6516922 AppB.F 9/26/02 11:41 AM Page 260
MYSQL COMMAND REFERENCE
B
This command creates a new database. This is a
fast operation as the database does not yet contain
any data. You can optionally specify the IF NOT
EXISTS keywords before the database name to
suppress an error message if the database already
exists.
Example:
CREATE DATABASE newdb;
CREATE DATABASE
This command deletes an existing database,
including all tables and all of the data they contain.
This command does not prompt you for
confirmation, so use it with caution. You can
optionally specify the IF EXISTS keywords before
the database name to suppress an error message if
the specified database does not exist.
Example:
DROP DATABASE newdb;
DROP DATABASE
TYPE
Specify the column type. The default type, MyISAM, is
adequate for most purposes. Alternate types include
BDB, InnoDB, Heap, ISAM, and MERGE.
AUTO_INCREMENT
Use this option to specify the next index number for an
auto-increment column. The column values will start at
one if this option is not specified.
AVG_ROW_LENGTH
For tables with variable-length rows, specify an
approximate row length. This helps MySQL to optimize
data storage.
CHECKSUM
If this option is set to one, MySQL maintains a
checksum value for each row. This makes it easier to
detect errors, but decreases performance.
COMMENT
Specify an optional comment in quotation marks as a
description of the table. The comment can be up to 60
characters in length.
MAX_ROWS
Specify the maximum number of rows the table will
store.
MIN_ROWS
Specify the approximate minimum number of rows the
table will store.
ROW_FORMAT
Specify DYNAMIC or FIXED to determine whether the
table will use fixed or variable-length rows.
TABLE OPTIONS
At the end of the CREATE TABLE command, you can specify one or
more table options. To use options, specify the option name followed
by an equal sign and its value. Separate multiple options with commas.
You can optionally specify a
SELECT statement at the end of
the CREATE TABLE command.
This retrieves column names from
an existing table and creates
corresponding columns in the
new table.
COPY FROM ANOTHER TABLE
261
This command deletes an existing table. This command does not
prompt you for confirmation and should be used with caution. You
can optionally specify the IF EXISTS keywords before the table
name to suppress an error message if the table does not exist.
Example:
DROP TABLE IF EXISTS inventory;
DROP TABLE
6516922 AppB.F 9/26/02 11:41 AM Page 261
T
he ALTER TABLE command in MySQL modifies the
definition of an existing table. To use ALTER TABLE,
specify one or more of the following commands. You
can separate multiple commands with commas.
MODIFY TABLES WITH ALTER TABLE
ADD COLUMN
This command adds a column to an existing table. You
can specify a list of multiple columns, separated by
commas and enclosed in parentheses.
Example:
ALTER TABLE address ADD COLUMN newcol INT;
ADD INDEX and ADD UNIQUE
The ADD INDEX command adds an index to the table.
Specify a name for the index followed by one or more
column names to index in parentheses. Use ADD
UNIQUE to add a unique index.
Example:
ALTER TABLE address ADD INDEX newindex (name,
address);
ADD PRIMARY KEY
This command adds a primary key to an existing table.
It can only be used if the table does not already have a
defined primary key. Specify the column or columns for
the primary key in parentheses.
Example:
ALTER TABLE address ADD PRIMARY KEY (name);
CHANGE COLUMN
This command changes the definition of an existing
column and can also rename the column. To use this
command, specify the current column name, the new
name, and the new definition of the column. MySQL
will attempt to convert existing data to the new format.
Example:
ALTER TABLE address CHANGE COLUMN name name
VARCHAR(50);
ORDER BY
This command sorts the existing data in the table by the
column name you specify.
MODIFY COLUMN
This command changes the definition of an existing
column. Specify the column name followed by the new
column definition.
Example:
ALTER TABLE address MODIFY COLUMN name
VARCHAR(100);
DROP COLUMN
This command deletes a specified column from an
existing table. This deletes all data currently stored in
the column
Example:
ALTER TABLE address DROP COLUMN newcol;
DROP INDEX
This command deletes an index or unique index. Specify
the index name. This command does not delete any data.
DROP PRIMARY KEY
This command deletes the table's primary key, if one is
defined. You do not need to specify a column name.
This command does not delete any existing data.
RENAME TO
This command renames the table. Specify RENAME TO
followed by the new table name. The TO keyword is
optional.
Example:
ALTER TABLE address RENAME TO mailings;
Using Table Options
You can specify table options, such as TYPE for the
table type or COMMENT for a comment about the table,
within the ALTER TABLE command.
Example:
ALTER TABLE address TYPE=ISAM;
APPENDIX
262
6516922 AppB.F 9/26/02 11:41 AM Page 262
263
M
ySQL includes the INSERT command to add one
or more rows to a table and the DELETE
command to delete one or more rows. These are
described in the following sections.
ADD AND DELETE DATA
MYSQL COMMAND REFERENCE
B
This command adds a row, or multiple rows, to an
existing table. To use INSERT, specify the table
name, column names, and values.
Example:
INSERT INTO address (name, address)
VALUES ("John Smith", "181 West 7th");
Insert Options
If you specify the LOW_PRIORITY option before
the INTO keyword in an INSERT command, MySQL
does not add the data until no other clients are
using the table. The DELAYED keyword is similar,
but the data is held on the server for later insertion
and the client does not wait for the operation to
complete.
Specify the IGNORE keyword to ignore any conflicts
with existing data and continue without inserting
that row.
INTO
The INTO keyword is followed by the name of the
table to add data into. You can optionally specify a
list of column names in parentheses.
VALUES
The VALUES keyword is followed by the values for
each column of the new row. If you specified a list
of columns, specify the values in the same order. If
you did not specify a list of columns, a value must
be specified for each column in the table's
definition.
SELECT
You can optionally specify a SELECT statement at
the end of the INSERT command. This retrieves
data from one or more columns of an existing table
and copies it to the specified table.
INSERT
The DELETE command deletes one or more rows
of a table. This command does not prompt you for
confirmation; use it with caution. To use this
command to delete all of a table's data, specify the
FROM keyword and the table name.
Example:
DELETE FROM address;
Delete Options
You can specify one of two optional keywords after
the DELETE command and before the FROM
keyword. If the LOW_PRIORITY keyword is
specified, MySQL waits until no other clients are
using the table before deleting data. If the QUICK
option is specified, indexes are not updated during
the delete, which may speed up the process.
WHERE
Specify a WHERE clause and one or more conditions
to choose one or more rows to be deleted. If this
clause is not included, all rows of the table will be
deleted.
Example:
DELETE FROM address WHERE name="John Smith";
ORDER BY
In MySQL 4.0 and later, you can optionally specify
the ORDER BY keyword followed by a list of
column names to delete rows in a specified order.
LIMIT
Specify a number after the LIMIT keyword to limit
the number of rows that can be deleted
Example:
DELETE FROM address WHERE name > "A" LIMIT 10;
DELETE
6516922 AppB.F 9/26/02 11:41 AM Page 263
T
he UPDATE command in MySQL makes changes to
existing rows of a table. To use this command, specify
the table name followed by the SET keyword and one
or more pairs of column names and values.
Example:
UPDATE address
SET name="John Smith"
WHERE name="J. Smith";
MODIFY EXISTING DATA WITH UPDATE
264
UPDATE Options
You can specify two optional keywords with the
UPDATE query. If you specify the LOW_PRIORITY
keyword, the MySQL server waits until no other clients
are using the table before updating the data.
Example:
UPDATE LOW_PRIORITY address
SET name = UPPER(name);
The UPDATE command can make a change that results
in a conflict between two rows in a primary key or
unique index column. If this will occur, MySQL displays
an error message and stops the update. If you specify
the IGNORE keyword, MySQL skips any conflicting rows
and continues the update.
WHERE
Specify the WHERE clause with one or more conditions
to control which rows of the table will be updated. If
this clause is not specified, all rows of the table are
updated.
Example:
UPDATE address
SET address="830 West Terrace"
WHERE name = "John Smith";
LIMIT
If you specify the LIMIT keyword followed by a
number, only the specified maximum number of rows
can be updated.
Example:
UPDATE address
SET name = UPPER(name) LIMIT 10;
Multiple Updates
If you include more than one column name and value
after the SET keyword, all of the columns are updated
at once. This allows for complex updates in a single
command. This can also be combined with the WHERE
or LIMIT clauses as needed.
Example:
UPDATE address
SET address="392 East 10th",
city = "Salt Lake City", state="UT"
WHERE name = "Jane Smith";
APPENDIX
6516922 AppB.F 9/26/02 11:41 AM Page 264
RETRIEVE DATA WITH SELECT
265
T
he SELECT command returns the values of the
columns you specify for one or more rows of a
table in a MySQL database. This command
supports a variety of options.
MYSQL COMMAND REFERENCE
B
Basic SELECT Syntax
Specify one or more column names after the SELECT
command, separated by commas. You can also specify
the wildcard character * to return values for all columns
in the order defined when the table was created.
Example:
SELECT name, address, city, state
FROM address;
WHERE
Specify the WHERE keyword followed by one or more
conditions to choose one or more rows from the table.
If this clause is omitted, all rows are returned. This
clause should be specified immediately after the table
name.
Example:
SELECT * FROM address
WHERE name = "John Smith";
ORDER BY
The ORDER BY clause determines the order of the rows
returned from a SELECT query. Specify one or more
column names, separated by commas. For each column,
you can specify the ASC (ascending) or DESC
(descending) keywords. ASC is the default. You can also
order by a MySQL function or formula. The RAND()
function is useful for returning rows in random order.
Example:
SELECT * FROM address
ORDER BY state ASC, city ASC;
GROUP BY
If you specify the GROUP BY clause, MySQL groups the
returned rows into single rows for each value of the
specified columns. As with ORDER BY, separate the
column names with commas and optionally use the ASC
or DESC keywords.
Example:
SELECT * FROM address
GROUP BY city;
LIMIT
Specify the LIMIT keyword followed by a number to
return, at maximum, the specified number of rows. You
can optionally specify two numbers, separated by
commas, in the LIMIT clause. In this case, the first
number is the first row of the result to return and the
second is the maximum number of rows.
Example:
SELECT * FROM address LIMIT 10;
Multiple Tables
You can specify two or more table names separated
by commas. This joins data from multiple tables, and
requires a WHERE condition that matches rows between
the tables. Specify the table name for each column
name, with a period separating table and column names.
Example:
SELECT quotes.quote, quotes.author,
authors.born, authors.died
FROM quotes, authors
WHERE quotes.author = authors.author;
6516922 AppB.F 9/26/02 11:41 AM Page 265
M
ySQL includes a variety of SHOW commands that display
information about databases, tables, and the server
itself. These are described in the following sections.
DISPLAY STATUS INFORMATION
SHOW DATABASES
This command lists all of the databases on the current
server. Depending on security settings, it may only list
the databases you have access to.
Example:
SHOW DATABASES;
SHOW TABLES
This command lists all of the tables stored in the current
database. You can also specify the FROM keyword and a
database name to list the tables in another database.
SHOW OPEN TABLES
This command is similar to SHOW TABLES, but only lists
the tables that are currently in use or have a cached
connection. Information about the number of users is
displayed.
SHOW COLUMNS
This command displays a detailed list of columns for a
table. Specify the FROM keyword followed by a table
name. DESCRIBE is equivalent to SHOW COLUMNS FROM.
Example:
SHOW COLUMNS FROM address;
SHOW TABLE STATUS
This command displays a detailed list of information for
each table in the current database, including the table
type, row format, and table options.
SHOW CREATE TABLE
This command displays a CREATE TABLE command to
create the table specified. This is useful if you need to
recreate the table in another database or on another
server.
Example:
SHOW CREATE TABLE address;
SHOW INDEX
This command lists the indexes or keys defined for the
table you specify with the FROM keyword. The detailed
information listed for each index includes the columns
to which it applies.
Example:
SHOW INDEX FROM address;
SHOW STATUS
This command displays a detailed list of status
information for the MySQL server. This information is
useful for determining the server's current use and
optimizing performance.
SHOW VARIABLES
This command lists all of the MySQL system variables.
These are usually defined in the configuration file or on
the command line when the MySQL server is started.
This listing is useful for checking the server's
configuration.
SHOW PROCESSLIST
This command displays a list of processes, or threads,
currently running on the MySQL server. The results
include the username, hostname, current command,
and an ID number for each process.
Example:
SHOW PROCESSLIST;
SHOW GRANTS
The SHOW GRANTS command displays the privileges
granted to a MySQL user. Specify the FOR keyword
followed by the username.
Example:
SHOW GRANTS FOR testuser;
APPENDIX
266
6516922 AppB.F 9/26/02 11:41 AM Page 266