adobe InDesign CS5 Bible for dummies PHẦN 6 pdf
Bạn đang xem bản rút gọn của tài liệu. Xem và tải ngay bản đầy đủ của tài liệu tại đây (1.04 MB, 46 trang )
209
Chapter 11: Putting Words on the Page
Text that is cut or copied from InDesign normally retains its formatting,
whereas text pasted from other programs loses its formatting. But you can
specify whether pasted text from other programs always retains its for-
matting. Go to the Clipboard Handling pane in the Preferences dialog box
(choose InDesign➪Preferences➪Clipboard Handling [Ô+K] on the Mac,
or choose Edit➪Preferences➪Clipboard Handling [Ctrl+K] in Windows)
and select the All Information option in the When Pasting Text and Tables
from Other Applications section. If you select this option, you can still tell
InDesign to not preserve the formatting on a case-by-case basis by choosing
Edit➪Paste without Formatting (Shift+Ô+V or Ctrl+Shift+V).
Dragging and dropping text
You can drag highlighted text from other programs — or even text files from
the desktop or a folder — into an InDesign document. Text that you drag and
drop is inserted at the location of the cursor, replaces highlighted text, or is
placed in a new rectangular text frame.
When you drag and drop a text selection, its original formatting is usually
retained — unless you hold the Shift key when dragging. If you hold the Shift
key, the text takes on the attributes of the text you drag it into.
When you drag and drop a text file, the process is more like a text import:
The text retains its formatting and styles. Unlike the Place command
(File➪Place [Ô+D or Ctrl+D]) that imports text, drag-and drop-doesn’t give
you the option to specify how some of the formatting and styles in the
imported text file are handled.
Threading Text Frames
The text that flows through a series of frames is what InDesign considers a
story, and the connections among those frames are called threads. When you
edit text in a threaded story, the text reflows throughout the text frames. You
can also spell-check and do a find/change operation for an entire story, even
though you have just one of the story’s text frames active on-screen.
When you have threaded text frames, you’ll see visual indicators on your
text frame, assuming that you choose View➪Extras➪Show Text Threads
(Option+Ô+Y or Ctrl+Alt+Y) and have selected the frame with one of the
selection tools. At the lower right of the text frame is a small square, called
the out port, which indicates the outflow status:
18_614495-ch11.indd 20918_614495-ch11.indd 209 4/2/10 1:32 PM4/2/10 1:32 PM
210
Part IV: Text Essentials
✓ If the square is empty, that means you have no text flowing to another
frame, and not enough text to flow to another frame.
✓ If the square is red and has a plus sign in it, that means you have more
text than fits in the selected frame but that it’s not flowing to another
frame. This condition is called overset text.
✓ If the square has a triangle icon, the text is flowing to another frame.
That doesn’t mean that text is flowing, just that if you have more text
than the current frame can hold, it will flow.
Similarly, an in port at the upper left of a text frame indicates whether text is
flowing from another frame into the current frame:
✓ If the square is empty, no text is flowing from another frame, making this
frame the first (and perhaps only) frame in a story.
✓ If the square has a triangle icon, the text is flowing from another frame.
That doesn’t mean that text is flowing, just that if you have more text
than the other frame can hold, it will flow into this frame.
So how do you thread the frames in the first place? You have four options in
InDesign: manual, semi-autoflow, and two types of autoflow. Each of these
options has its own icon. The method you choose depends on the amount of
text you’re dealing with and the size and number of your text frames:
✓ To link two empty text frames across several pages (for example, for an
article that starts on page 2 and continues on page 24) — for frames
where you will later want the text to flow across — you might use the
manual method, in which you click the first text frame’s out port and
then click on the second text frame.
✓ To link a text frame with text to another text frame, you might also use
the manual method, in which you click the first text frame’s out port and
then click on the second text frame.
✓ To link a succession of text frames, you might want to use the semi-
autoflow method, which allows you to click a series of text frames to
flow text from one frame to the next. Hold the Option or Alt key when
clicking the mouse during text placement. Remember to, as you’re
threading frames, Option+click or Alt+click each text frame, or you’ll
revert to manual threading.
✓ To import text that is intended for long documents (such as a book
chapter, or brochure), you might want to use the autoflow method to
add text frames and pages that accommodate the text you’re importing.
Hold the Shift key when clicking the mouse during text placement to fill
all open master frames and create new ones as needed. Be sure to
Shift+click near the upper-left corner of the master text frame so that
18_614495-ch11.indd 21018_614495-ch11.indd 210 4/2/10 1:32 PM4/2/10 1:32 PM
211
Chapter 11: Putting Words on the Page
InDesign uses that frame rather than create a new one. Note that even if
you’ve already placed a text file into a single text frame or a threaded
chain of text frames, you can still autoflow text from the last text frame.
To do so, click the out port and then Shift+click any page to indicate
where to start the autoflow.
✓ To import text into a long page where you don’t want new pages
added, hold Option+Shift or Alt+Shift. The text autoflows into each open
page, but no new pages are added.
✓ To place multiple text frames in an array — such as for bios or other
snippet-size text — hold Shift+Ô or Ctrl+Shift when dragging the mouse
in your document. The files will be placed in an array, each in its own
frame within the area defined when dragging the mouse. This method
creates as many frames as it can in that array, placing the text files into
them. Any files not placed remain in the load-text icon for placement
elsewhere.
For a quick glance at your text threads while you’re threading text across
pages, simply change the document view briefly to 20 percent or so.
Text flows in the order in which you select frames. If you move a frame, its
order in the text flow remains unchanged. If you’re not careful, you can, for
example, accidentally have text flow from a frame at the top of the page to a
frame at the bottom of a page and then to one in the middle of a page.
Always switch to a selection tool when you’re threading frames. Oddly, you
can’t thread frames while the Type tool is selected. Oh, well.
Breaking and rerouting threads
After text frames are threaded, you have three options for changing the
threads: You can break threads to stop text from flowing, insert a text frame
into an existing chain of threaded text frames, and remove text frames from a
thread. Here are the techniques in a nutshell:
✓ Break the link between two text frames by double-clicking either
an out port or an in port. The thread between the two text frames is
removed, and all text that had flowed from that point is sucked out of
the subsequent text frames and stored as overset text.
✓ Insert a text frame after a specific text frame in a chain by clicking its
out port. Then, click and drag the loaded-text icon to create a new text
frame. That new frame is automatically threaded to both the previous
and the next text frames.
18_614495-ch11.indd 21118_614495-ch11.indd 211 4/2/10 1:32 PM4/2/10 1:32 PM
212
Part IV: Text Essentials
✓ Reroute text threads — for example, to drop the middle text frame
from a chain of three — by clicking the text frame with the Selection
tool and then pressing Delete or Backspace. This technique deletes the
text frame and reroutes the threads. You can also Shift+click to multiple-
select text frames to remove. Note that you can’t reroute text threads
without removing the text frames.
Working with Columns
Where you place columns on the page — and the amount of space you allow
between columns — has a big impact on readability. Used with a little know-
how, column width works with type size and leading to make text easier to
read. Columns help you keep from getting lost from one line to the next, and
from getting a headache as you’re trying to read the words on the page.
Generally, as columns get wider, the type size and leading increase. For
example, you might see 9-point text and 15-point leading in 21⁄2-inch columns,
whereas 15-point text and 13-point leading might work better in 31⁄2-inch
columns.
InDesign lets you place columns on the page automatically, create any
number of columns within a text frame, and change columns at any time.
Specifying columns in master frames
You can specify the number of columns at the same time you create a master
text frame — a text frame placed automatically within the margin guides.
In the Columns area in the New Document dialog box, use the Number field to
specify how many columns, and the Gutter field to specify how much space
to place between the columns. (The gutter is the space between columns.)
Whether or not you check Master Text Frame (which makes the frame appear
on all pages), guides for these columns are still placed on the page and can
be used for placing text frames and other objects.
Changing columns in text frames
You can change the number of columns in a text frame (whether an individ-
ual text frame or a master text frame), even after you’ve flown text into the
18_614495-ch11.indd 21218_614495-ch11.indd 212 4/2/10 1:32 PM4/2/10 1:32 PM
213
Chapter 11: Putting Words on the Page
frame — and doing so isn’t difficult. First, select the text frame with a selec-
tion tool or the Type tool (or Shift+click to select multiple text frames and
change all their columns at once). Then choose Object➪Text Frame Options
(Ô+B or Ctrl+B) and set the desired Number and Gutter values in the General
pane of the Text Frame Options dialog box.
The Text Frame Options dialog box has a new option, Balance Columns. If it’s
selected, InDesign CS5 makes the bottom of columns align as evenly as possi-
ble, rather than letting the text frame end with one column much shorter than
the others.
You can also use the Control panel to quickly change the number of columns,
set the gutter, and turn column balancing on or off. Note, however, that these
controls don’t display on a monitor set below 1152-×-870-pixel resolution
unless you customize the Control panel interface (to disable other controls
to make room for these ones) using the Customize command in its flyout
menu.
Some designers like to draw each column as a separate frame. I strongly rec-
ommend against this practice; it’s too easy to create columns of slightly dif-
ferent widths and slightly different positions, so text doesn’t align properly.
Instead, specify columns in your text frames so that you don’t have to worry
about sloppy layouts.
Note that the options in the Columns area of the Text Frame Options dialog
box work differently depending on whether Fixed Column Width is checked
or unchecked:
✓ If Fixed Column Width is unchecked, InDesign subtracts from the text
frame the space specified for the gutters and then divides the remaining
width by the number of columns to figure out how wide the columns can
be. For example, if you specify a 10-inch-wide text frame with three col-
umns and a gutter of
1
⁄2 inch, you end up with three 3-inch columns and
two
1
⁄2-inch gutters. The math is (10 – (2 × 0.5)) ÷ 3.
✓ If Fixed Column Width is checked, InDesign resizes the text frame to fit
the number of columns you selected at the indicated size, as well as the
gutters between them. For example, suppose that you’re using a 10-inch-
wide text frame with a column width of 5 inches and a gutter of
1
⁄2 inch,
and you choose three columns: You end up with a 15-inch-wide text
frame containing three 5-inch columns and two
1
⁄2-inch gutters. The math
is (5 × 3) + (2 × 2).
Check Preview to see the effects of your changes before finalizing them.
18_614495-ch11.indd 21318_614495-ch11.indd 213 4/2/10 1:32 PM4/2/10 1:32 PM
214
Part IV: Text Essentials
Wrapping Text around Objects
In the days before personal computers and page-layout software, wrapping
text around a graphic or other object was a time-consuming and expensive
task. Text wraps were rare, found only in the most expensively produced
publications. Not any more. Not only do all page-layout programs let you
create text runarounds, most programs — including InDesign — provide
several options for controlling how text relates to graphics and other objects
that obstruct its flow.
When a frame is positioned in front of a text frame, InDesign provides the fol-
lowing options. You can
✓ Ignore the frame and flow the text behind it.
✓ Wrap the text around the frame’s rectangular bounding box.
✓ Wrap the text around the frame itself.
✓ Jump the text around the frame (that is, jump the text from the top of
the frame to the bottom).
✓ Jump the text to the next column or page when the text reaches the top
of frame.
✓ Specify the amount of distance between the text and the edge of the
obstructing shape.
✓ Flow text within the obstructing shape rather than outside it.
InDesign lets you wrap text around frames on hidden layers — as well as
remove text wrap for objects on hidden layers. This technique is handy when
you want to hide images or other distracting items but preserve the layout.
See Chapter 4 for details on using layers.
If you want to wrap text around only a portion of a graphic — perhaps you
need to isolate a face in a crowd — the best solution is to open the graphics
file in its original program, create a clipping path around that portion, and
then resave the file and import it and its clipping path into an InDesign docu-
ment. (Chapter 17 explains clipping paths.)
The Text Wrap panel
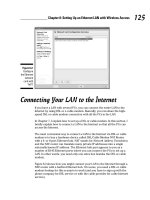
The controls in the Text Wrap panel (see Figure 11-2) let you specify how a
selected object will affect the flow of text behind it. Remember, the flow of
text around an obstructing object is determined by the text-wrap settings
applied to the obstructing object.
18_614495-ch11.indd 21418_614495-ch11.indd 214 4/2/10 1:32 PM4/2/10 1:32 PM
215
Chapter 11: Putting Words on the Page
You can override the text-wrap settings of objects that are in front of a text
frame by telling the text frame to ignore them. To do so, click a text frame and
then choose Object➪Text Frame Options (Ô+B or Ctrl+B). In the Text Frame
Options dialog box’s General pane, select Ignore Text Wrap and then click OK.
Text in the frame now flows behind any obstructing items regardless of the
text-wrap settings applied to them.
The Text Wrap panel has three options that may not display when you open
it: Wrap Options, Contour Options, and Include Inside Edges. You can more
easily hide/show these functions by double-clicking the double-arrow symbol
to the left of the Text Wrap label in the panel’s tab or by choosing Hide
Options/Show Options from the flyout menu.
Here’s how to apply text-wrap settings to a frame or other object:
1. If the Text Wrap panel isn’t displayed (as shown in Figure 11-2),
choose Window➪Text Wrap (Option+Ô+W or Ctrl+Alt+W).
2. Click either of the selection tools.
3. Click the object to which you want to apply text-wrap settings.
The object can be anywhere, but you’ll probably want to position it on
top of a text frame that contains text so that you can see the results of
the settings you apply.
4. Click one of the five text-wrap iconic buttons at the top of the Text
Wrap panel.
The iconic buttons show you what each wrap does conceptually.
5. If you want, adjust the space between the surrounding text and the
obstructing shape by typing values in the Top Offset, Bottom Offset,
Left Offset, and Right Offset fields.
These fields aren’t available if you click the No Text Wrap button. If the
object is a rectangle, all four fields are available if you click the Wrap
around Bounding Box button or Wrap around Object Shape. Only the
Top Offset field is available if you click the Wrap around Object Shape
button for a free-form shape or the Jump to Next Column button. The
Top Offset and Bottom Offset fields are available if you click the Jump
Object button.
If the Make All Settings the Same iconic button displays a chain, then
changing any of the offset values will cause the other offset values to
match. If the icon shows a broken chain, each offset value is indepen-
dent of the others. Click the button to switch between these two modes.
6. Select Invert if you want to flow the text inside the obstructing shape.
18_614495-ch11.indd 21518_614495-ch11.indd 215 4/2/10 1:32 PM4/2/10 1:32 PM
216
Part IV: Text Essentials
7. If you choose the Wrap around Object Shape button and a graphic
is in the frame, you can also select from the Contour Options’s Type
pop-up menu.
You have six options:
• Bounding Box is the same as clicking the Wrap around Bounding
Box button.
• Detect Edges tries to determine the graphic’s outside boundary
by ignoring white space — you’d use this option for bitmapped
images that have a transparent or white background.
• Alpha Channel uses the image’s alpha channel, if any, to create a
wrapping boundary (see Chapter 17).
• Photoshop Path uses the image’s clipping path, if any, to create a
wrapping boundary (see Chapter 17).
• Graphic Frame uses the frame’s boundary rather than the bound-
ing box.
• Same as Clipping uses the clipping path for the graphic created in
InDesign (see Chapter 17).
8. You can control how text wraps around an object that splits a column
by choosing an option from the Wrap To pop-up menu.
The options are Right Side, Left Side, Both Right & Left Sides, Side
Towards Spine, Side Away from Spine, and Largest Area. You’ll rarely
choose Both Left & Right Sides, because unless the object is small, read-
ers’ eyes will stop at the interposed object and not see the rest of the text
on the other side of it. Use either of the spine options to have the text stay
on the outside or inside of a page, relative to the object, based on whether
the page is right-facing or left-facing. You’ll often choose Largest Area
because that gives the text the most space next to the interposed object,
which tends to be what looks good in many situations.
9. By selecting the Include Inside Edges option, InDesign lets text appear
inside any interior “holes” in the graphic.
You’ll rarely use this technique, because in most cases, it’s hard for the
reader to follow text that wraps around an image, flows inside it, and
then continues to flow outside it. But if the interior is large enough and
not too distant from the text that flows on the outside, this effect may be
readable.
If you specify text-wrap settings when no objects are selected, the settings are
automatically applied to all new objects.
18_614495-ch11.indd 21618_614495-ch11.indd 216 4/2/10 1:32 PM4/2/10 1:32 PM
217
Chapter 11: Putting Words on the Page
Figure 11-2:
Left: The
Text Wrap
panel.
Upper right:
A graphics
frame with
text wrap
turned off.
Bottom
right: Two
graphics
frames with
text wrap
turned on.
To apply text-wrap settings to a master item on a document page, press and
hold Shift+Ô or Ctrl+Shift to select the item and then use the controls in the
Text Wrap panel as described in the preceding steps. If you don’t want the
text wrap applied to existing document items, only to new ones, choose Apply
to Master Page Only in the flyout menu.
Setting text-wrap preferences
Be aware of several global text-wrap options, all of which are accessed via
the Composition pane of the Preferences dialog box. (Choose InDesign➪
Preferences➪Composition [Ô+K] on the Mac or Edit➪Preferences➪
Composition [Ctrl+K] in Windows.) Here are the options:
✓ Justify Text Next to an Object: This option is useful when you have left-
aligned text that wraps around an object at the right. (It also works if
you have right-aligned text that wraps around an object at the left.) This
option can lead to an awkward wrap, however, because InDesign won’t
try to make the text align precisely to the wrap’s contour (because the
text isn’t justified). Use this option to justify the text just around the
wrap and then continue using the text’s specified nonjustified alignment.
✓ Skip by Leading: This option makes text wrap below or above an object
based on the text’s leading so that you have at least a full line space
between the text and the object, even if the object’s text-wrap settings
would allow less space.
18_614495-ch11.indd 21718_614495-ch11.indd 217 4/2/10 1:32 PM4/2/10 1:32 PM
218
Part IV: Text Essentials
✓ Text Wrap Only Affects Text Beneath: This option, if selected, pre-
vents text frames placed on top of an object from wrapping, while those
behind the graphic frame will still be allowed to wrap. This option allows
some text to overlap the graphic and other text to wrap around it. Note
that this setting is global, affecting all objects. To override wrap settings
of individual text frames, choose Object➪Text Frame Options (Ô+B or
Ctrl+B) and enable the Ignore Text Wrap option in the General pane.
18_614495-ch11.indd 21818_614495-ch11.indd 218 4/2/10 1:32 PM4/2/10 1:32 PM
Chapter 12
The Ins and Outs of Text Editing
In This Chapter
▶ Editing text in your layout
▶ Working with tracked changes
▶ Searching and replacing words and formats
▶ Checking spelling as you type or all at once
▶ Customizing the spelling and hyphenation dictionaries
W
hether you import text or type it into text frames directly in InDesign,
you’ll appreciate the tools that let you edit, search and replace, spell-
check, and hyphenate your text, as well as work with tracked changes. You
find out all about these capabilities in this chapter.
Editing Text
InDesign offers basic editing capabilities, not unlike those found in a word
processor: cutting and pasting, deleting and inserting text, searching and
replacing text and text attributes, and spell-checking. (Cutting, pasting,
inserting, and deleting text works just like it does for any standard Mac or
Windows program, so I don’t repeat those details for you here.)
To do anything with text, you need to use the Type tool. When the Type tool
is selected, you can click in any empty frame. (If it’s not already a text frame,
it becomes one automatically when you click it with the Type tool.) Or you
can click and drag to create a new text frame. You can even click in an exist-
ing block of text. From this point, start typing to enter text.
Chapter 7 gets into more of the nitty-gritty of creating frames. And you can
discover all about importing text in Chapter 11.
19_614495-ch12.indd 21919_614495-ch12.indd 219 4/2/10 1:32 PM4/2/10 1:32 PM
220
Part IV: Text Essentials
Controlling text view
In many layout views, the text is too small to work with. Generally, you zoom
in around the block of text using the Zoom tool. Select the tool and then click
to zoom in. To zoom out, hold the Option or Alt key when clicking.
Another way to zoom in is to use the keyboard shortcut Ô+= or Ctrl+=. Each
time you use it, the magnification increases. (Zoom out via Ô+– or Ctrl+–.)
In addition to seeing the text larger, zooming in also helps you see the
spaces, tabs, and paragraph returns that exist in the text. Choose
Type➪Show Hidden Characters (Option+Ô+I or Ctrl+Alt+I) to have the non-
printing indicators for those characters display. You can also use the Show
Options iconic pop-up menu in the application bar to access this command,
as Chapter 1 explains.
Navigating through text
To work at a different text location in your InDesign document, click in a dif-
ferent text frame or another location in the current text frame. You can also
use the four arrow (cursor) keys on the keyboard to move one character
to the right, one character to the left, one line up, or one line down. Hold Ô
or Ctrl when pressing the arrow keys to jump one word to the right or left,
or one paragraph up or down. The Home and End keys let you jump to the
beginning or end of a line; hold Ô or Ctrl when pressing those keys to jump
to the beginning or end of a story. (A story is text within a text frame or that is
linked across several text frames.)
Highlighting text
To highlight (or select) text, you can click and drag. Or you can use some
keyboard options. For example, Shift+Ô+→ or Ctrl+Shift+→ highlights the
next word to the right. Likewise, Shift+Ô+End or Ctrl+Shift+End highlights all
the text to the end of the story.
To highlight a word, double-click (this action doesn’t select its punctuation)
and triple-click to select the entire paragraph. If you’re highlighting a word and
also want to include the punctuation that follows the word, double-click, and
then press Shift+Ô+→ or Ctrl+Shift+→ to extend the selection.
To select an entire story, choose Edit➪Select All (Ô+A or Ctrl+A).
To deselect text, choose Edit➪Deselect All (Shift+Ô+A or Ctrl+Shift+A). An
even easier way to deselect text is simply to select another tool or click
another area of the page.
19_614495-ch12.indd 22019_614495-ch12.indd 220 4/2/10 1:32 PM4/2/10 1:32 PM
221
Chapter 12: The Ins and Outs of Text Editing
Undoing text edits
InDesign makes it easy for you to change your mind about text edits. Choose
Edit➪Undo (Ô+Z or Ctrl+Z) and Edit➪Redo (Shift+Ô+Z or Ctrl+Shift+Z) any
time you change your mind about edits.
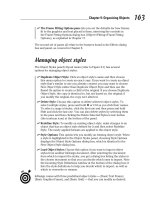
Using the Story Editor
The Story Editor is a window that lets you see your text without the distrac-
tions of your layout. In it, you see your text without line breaks or other non-
essential formatting — you just see attributes like boldface and italics, as well
as the names of the paragraph styles applied in a separate pane to the left
(see Figure 12-1). After clicking in a text frame, you open the Story Editor by
choosing Edit➪Edit in Story Editor (Ô+Y or Ctrl+Y).
Figure 12-1:
The Story
Editor.
In the Story Editor, you use the same tools for selection, deletion, copy-
ing, pasting, and search and replace as you would in your layout. The Story
Editor isn’t a separate word processor; it’s simply a way to look at your text
in a less distracting environment for those times when your mental focus is
on the meaning and words, not the text appearance.
The Story Editor also shows you the column depth for text, using a ruler
along the left side of the text, just to the right of the list of currently applied
paragraph styles. Overset text (text that goes beyond the text frame or
beyond the final text frame in a threaded story) is indicated by the word
Overset and is furthermore noted with a red line to the right of the text.
19_614495-ch12.indd 22119_614495-ch12.indd 221 4/2/10 1:32 PM4/2/10 1:32 PM
222
Part IV: Text Essentials
You can dock the Story Editor window into the document tabs so that you can
more easily switch in and out of it as needed. Just drag the Story Editor
window into the tabs, and InDesign converts it for you. Drag it back out to
make it a floating window.
Tracking text changes
To track the text changes that different people make in an InDesign layout, you
use several new capabilities in InDesign. You can also see the tracked changes
in an imported Microsoft Word file. (Note that you can’t track layout or graph-
ics changes, such as formatting.)
If you need to know who is making each text change, all users should set up
unique usernames in their individual copies of InDesign:
1. Choose File➪User to open the User dialog box.
2. Enter a name for yourself.
3. Choose your preferred color from the Color pop-up menu, then
click OK.
Once your username is set up, any document you edit now or in the future in
that copy of InDesign will have any tracked changes attributed to that user-
name. If more than one person uses a specific copy of InDesign, each person
should set their username in the User dialog box to ensure any tracked
changes are attributed to him or her, not to the previous user.
Enabling change tracking
You can enable tracking two ways:
✓ Select a single story.
✓ Simultaneously enable tracking for all currently open documents, and
all new documents you create (until you shut down this session in
InDesign).
Enabling tracked changes for your copy of InDesign isn’t enough: You
also need to enable tracked changes separately for each story in open
documents — if you open a document later, you will need to enable
tracked changes in its stories. If you close a document and reopen it
later, you also need to turn tracked changes back on for each story you
want to track.
To enable tracked changes for the current story, first select a text frame that
contains the story. (Use the Selection, Direct Selection, or Type tool to select
the frame.) Next, use one of these options to enable tracking:
19_614495-ch12.indd 22219_614495-ch12.indd 222 4/2/10 1:32 PM4/2/10 1:32 PM
223
Chapter 12: The Ins and Outs of Text Editing
✓ In the Track Changes panel (choose Window➪Editorial➪Track
Changes), either
• Click the Enable Track Changes in Current Story iconic button.
• Choose Enable Track Changes in Current Story in the flyout menu.
✓ Choose Type➪Track Changes➪Track Changes.
Figure 12-2 shows the Track Changes panel and its flyout menu.
To turn on tracked changes for all stories in the currently open documents
and in any documents you create while the current session of InDesign remains
active, use either of these actions:
✓ Choose Type➪Track Changes➪Enable Track Changes in All Stories.
✓ Choose Enable Track Changes in All Stories in the Track Changes panel’s
flyout menu.
For InDesign to show you revisions from your original Microsoft Word file
(if you used its changes-tracking feature), you must have selected the Track
Changes option in the Import Options dialog box when you first placed the
text file, as explained in Chapter 11.
The Enable Track Changes in All Stories option is in effect only for documents
already open and for documents you create in that same session of InDesign.
Any documents you open later won’t have tracked changes turned on unless
you turned tracked changes on for them previously. When you exit and
reopen InDesign later, Track Changes is turned off — you must turn it on each
time you use InDesign.
Now, any deletions and insertions to text are tracked, as are occurrences of
moved text. Formatting changes are not tracked.
Viewing changes
To see the changes, make sure a text frame you want to see the changes in is
selected with the Selection, Direction Selection, or Type tool, and then open
the Story Editor (choose Edit➪Edit in Story Editor or press Ô+Y or Ctrl+Y).
You’ll see the highlighting for added and deleted text in the Story Editor
window, as well as the change bars letting you know which lines have
changed text. (You can change how this highlighting displays in the Track
Changes pane of the Preferences dialog box. Choose InDesign➪Preferences
or press Ô+K on the Mac, or choose Edit➪Preferences or press Ctrl+K in
Windows, to open the Preferences dialog box.)
Wherever the text cursor is located or text is selected, the Track Changes
panel shows who made the change, when the change was made, and the type
of change (addition, deletion, or moved text).
19_614495-ch12.indd 22319_614495-ch12.indd 223 4/2/10 1:32 PM4/2/10 1:32 PM
224
Part IV: Text Essentials
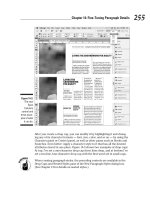
Figure 12-2:
Left: The
Story Editor
window
showing
tracked
changes.
Right: The
Track
Changes
panel and
its flyout
menu.
Next Change
Previous Change
Enable/Disable Track
Changes in Current Story
Show/Hide Changes
Change Time
Added text
Deleted text (strikethrough)
Change bar
User Name
Change Type
Reject All Changes in Story
Reject Change
Accept All Changes in Story
Accept Change
Working with changed text
You can do more than see changes and who made them in the Story Editor
and Track Changes panel. You can decide whether to accept or reject the
changes:
✓ Accepting a change means to remove the indicators that the text was
added, deleted, or moved, making it appear as if it was part of the origi-
nal story.
✓ Rejecting a change means to undo the change, as if it never happened.
The Track Changes panel is the best place to accept or reject changes. You
can also use the Type➪Track Changes menu’s options (they match the
options in the Track Changes panel’s flyout menu).
Most of the time, you’ll use the iconic buttons in the Track Changes panel, as
shown in Figure 12-2, to navigate through the changes and accept or reject
them.
19_614495-ch12.indd 22419_614495-ch12.indd 224 4/2/10 1:32 PM4/2/10 1:32 PM
225
Chapter 12: The Ins and Outs of Text Editing
While you’re deciding whether to accept or reject changes, you can save time
by automatically moving to the next change when you make your decision:
✓ If you Option+click or Alt+click the Accept iconic button, InDesign
moves to the next change for you after accepting the current change.
✓ Option+clicking or Alt+clicking the Reject iconic button moves to the
next change for you after rejecting the change.
If you want to inspect the changes without deciding whether to keep them, use
a couple of navigation shortcuts:
✓ Ô+Page Up or Ctrl+PgUp navigates to the preceding change.
✓ Ô+Page Down or Ctrl+PgDn navigates to the next change.
For faster acceptance or rejection of a bunch of changes, you can use the
Track Changes panel’s flyout menu options (or the Type➪Track Changes
menu’s options) to accept or reject all changes, or accept or reject all
changes by the user who made the current change. Submenu options let you
decide whether to accept or reject these changes in the current story only or
in all stories in the current document.
There’s one other option to note for tracked changes, which is found in the
Track Changes pane of the Preferences dialog box: Include Deleted Text
When Spellchecking. If selected, this option tells InDesign to check the spell-
ing of deleted text (the idea being that if you restore the deletion, you want
to make sure it is correctly spelled); if this option is deselected, InDesign
ignores deleted text while spell-checking. (I explain how to spell-check in
InDesign later in this chapter.)
Searching and Replacing Text
InDesign has a handy Find/Change feature (Edit➪Find/Change [Ô+F or
Ctrl+F]) that is similar to the search-and-replace features with which you may
already be familiar if you’ve used any word processor or page-layout applica-
tion. With the Find/Change dialog box, you can find and change text, or you
can extend the search to include attributes. Before starting a Find/Change
operation, first determine the scope of your search:
✓ To search within a text selection, highlight the selection.
✓ To search from one point in a story to its end, click the cursor at that
beginning location.
19_614495-ch12.indd 22519_614495-ch12.indd 225 4/2/10 1:32 PM4/2/10 1:32 PM
226
Part IV: Text Essentials
✓ To search an entire story, select any frame or click at any point in a
frame containing the story.
✓ To search an entire document, simply have that document open.
✓ To search multiple documents, open all of them (and close any that you
don’t want to search).
Then choose the appropriate search scope — InDesign’s term for range —
using the Search pop-up menu and the scope iconic buttons below it.
Figure 12-3 shows the Find/Change dialog box. It can search for much more
than just text, including special characters (glyphs) and object attributes
(see Chapter 8), plus it lets you save search/replace queries so you can use
them repeatedly. (It also lets you use the Unix grep syntax for conducting
criteria-based searches; this feature is for experts familiar with grep search-
ing and so is not covered in this book.)
Figure 12-3:
The Find/
Change
dialog box’s
Text pane
(left), with
its Special
Characters
for Search
iconic pop-
up menu
active
(right).
Replacing text
To search for text, follow these steps:
1. Determine the scope of your search, open the appropriate documents,
and insert the text cursor at the appropriate location.
2. Choose Edit➪Find/Change (Ô+F or Ctrl+F).
Go to the Text pane if it’s not already displayed.
19_614495-ch12.indd 22619_614495-ch12.indd 226 4/2/10 1:32 PM4/2/10 1:32 PM
227
Chapter 12: The Ins and Outs of Text Editing
3. Use the Search pop-up menu, as shown in Figure 12-3, to specify the
scope of your search by choosing All Documents, Document, Story, To
End of Story, or Selection.
Note that the Search options that display are based on what you’ve
selected before going to the Find/Change dialog box. For example, if you
didn’t select text, there’ll be no Selection option. Likewise, if no story is
selected, the Story and To End of Story options won’t appear.
4. Type or paste the text you want to find in the Find What field.
To use special characters, use the Special Characters for Search pop-up
list (the icon to the right of the Find What field) to select from a menu of
special characters (see Figure 12-3).
5. Type or paste the replacement text into the Change To field.
To use special characters, use the Special Characters for Replace pop-up
list (to the right of the Find What field).
6. Specify any additional parameters for your search by selecting
or deselecting the seven iconic buttons at the bottom of the pane:
Include Locked Layers, Include Locked Stories, Include Hidden
Layers, Include Master Pages, Include Footnotes, Case Sensitive, and
Whole Word.
If an icon’s background darkens, it’s selected.
7. To search for or replace with specific formatting, use the Find Format
and Replace Format areas.
If the Find Format and Replace Format areas don’t display in the dialog
box, click the More Options button. (Look for details in the “Replacing
formatting” section that comes next.)
8. Click the Find button to start the search.
After the search has begun, click the Find Next button (it changes from
the Find button after you start the search) to skip instances of the Find
What text, and click the Change, Change All, or Change/Find buttons as
appropriate. (Clicking the Change button simply changes the found text,
clicking the Change All button changes every instance of that found text
in your selection or story, and clicking the Change/Find button changes
the current found text and moves on to the next occurrence of it — it basi-
cally does in one click the actions of clicking Change and then Find Next.)
If you use the Change All feature, InDesign reports how many changes
were made. If the number looks extraordinarily high and you suspect the
Find/Change operation wasn’t quite what you wanted, remember that
you can use InDesign’s undo function (Edit➪Undo [Ô+Z or Ctrl+Z]) to
cancel the search and replace and then try a different replace strategy.
9. Click the Done button when you’re finished finding and replacing.
19_614495-ch12.indd 22719_614495-ch12.indd 227 4/2/10 1:32 PM4/2/10 1:32 PM
228
Part IV: Text Essentials
Replacing formatting
To find and change formatting or text with specific formatting, use the
expanded Find/Change dialog box. For example, you can find all the words
in 14-point Futura Extra Bold and change them to 12-point Bodoni.
The expanded dialog box contains two areas where you specify the format-
ting to search and change: Find Format and Replace Format. If these aren’t
visible in the Find/Change dialog box, click the More Options button.
To replace text formatting, follow these steps:
1. Use the Specify Attributes to Find iconic button (the magnifying-glass-
over-a-T icon) to open the Find Format Settings dialog box. (It’s to the
right of the Find Format area.)
In the Find Format Settings dialog box, your options are Style Options
(paragraph and character styles), Basic Character Formats, Advanced
Character Formats, Indents and Spacing, Keep Options, Bullets and
Numbering, Character Color, OpenType Features, Underline Options,
Strikethrough Options, Conditions, and Drop Caps and Other. You can
change multiple attributes at once by making selections from as many
panes as needed.
Go to each pane whose formatting you want to find and select the
desired formatting to search. Click OK when done; InDesign will bring
you back to the Find/Change dialog box’s Text pane.
2. Use the Specify Attributes to Change iconic button (the magnifying-
glass-over-a-T icon) to open the Change Format Settings dialog box.
(It’s to the right of the Replace Format area.)
The options in the Change Format Settings dialog box are the same as in
the Find Format settings dialog box. Go to each pane whose formatting
you want to change and select the desired formatting to replace. Click
OK when done; InDesign returns you to the Find/Change dialog box’s
Text pane.
3. Click Find Next and then Change to change the next occurrence or
click Change All to change all occurrences.
4. Click Done when you’re finished with the search and replace.
To search and replace formatting only — regardless of the text to which it is
applied — leave the Find What and Change To fields blank.
19_614495-ch12.indd 22819_614495-ch12.indd 228 4/2/10 1:32 PM4/2/10 1:32 PM
229
Chapter 12: The Ins and Outs of Text Editing
Changing special characters
InDesign also lets you replace special characters (glyphs) through a separate
Glyph pane in the Find/Change dialog box, shown in Figure 12-4. The Glyphs
pane makes it easier to actually enter the desired characters than using the
Text pane’s Special Characters for Search iconic pop-up menu (the @ icon).
The process is mostly straightforward (just ignore the parts of the pane not
described in the following steps):
1. In the Find Glyph section, choose the font of the desired character in the
Font Family pop-up menu and its style in the Font Style pop-up menu.
2. To choose the character itself, click the unnamed pop-up menu to the
right of the Glyph field.
You get a dialog box that mimics the Glyphs panel (see Chapter 15);
choose the character from the panel by double-clicking it.
3. Repeat Steps 1 and 2 using the controls in the Change Glyph section to
select the replacement glyph.
4. Set the scope of your search using the Search pop-up menu and the
Include Locked Layers, Include Locked Stories, Include Hidden
Layers, Include Master Pages, and Include Footnotes buttons, as
described in the “Replacing text” section, earlier in this chapter.
5. Execute the search and/or replace using the Find, Change, Change All,
and Change/Find buttons as described in the “Replacing text” section.
6. Click Done when done.
If you want to quickly wipe out the selected glyphs, click the Clear Glyphs
button.
Figure 12-4:
The Find/
Change
dialog box’s
Glyph pane
with its
Glyph
pop-up
menu
active.
19_614495-ch12.indd 22919_614495-ch12.indd 229 4/2/10 1:32 PM4/2/10 1:32 PM
230
Part IV: Text Essentials
Working with saved queries
If you plan to do the same search and/or replace operation repeatedly, you
can save queries in InDesign. After entering the find and search information,
click the Save Query iconic button, enter a name in the Save Query dialog
box that appears, and click OK. That query now appears in the Query pop-up
menu in the Find/Change dialog box.
To run a saved query, just choose it from the Query pop-up menu. (You’ll see
those that you saved plus some that came preinstalled with InDesign.) To
delete a saved query, choose it from the Query pop-up menu and then click
Delete Query iconic button.
That’s all there is to it!
Checking Spelling
The spell-check feature helps you eradicate spelling errors and catches
repeated words, as well as words with odd capitalization, such as internal
capitalization (called intercaps) in words such as InDesign. InDesign also flags
The solution to missing fonts
Sometimes, when you open a document,
InDesign tells you that it can’t find the fonts
used in the documents on your computer. You
get the option of finding the missing fonts, which
opens the Find Fonts dialog box. (You can also
open it after opening a document by choosing
Type➪Find Font.) This dialog box shows the
names of all missing fonts; if you select one, you
can change all occurrences of that font to one
that you do have by selecting a new font family
and font style from the menus at the bottom of
the dialog box and then clicking Change All. If
selected, the Redefine Style When Changing
All check box ensures that any font replaced is
also replaced in any paragraph and character
styles that used the original font.
Of course, another — often preferable —
solution is to get the fonts installed on your
computer. After all, the design shouldn’t change
just because you don’t happen to have the
needed fonts on your computer.
InDesign CS5 has a handy new feature: Rather
than require you to install fonts on your com-
puter, all you have to do is have the fonts for a
specific document in a folder named Document
Fonts. That Document Fonts folder needs to be
in the same folder as your InDesign document.
These fonts are available only for that docu-
ment, so using this feature makes sense for
temporary use of fonts — ones that you pass
around with the document for use with just that
project. (Remember: If you plan on using these
fonts for other purposes, you should get your
own copies and install them in your computer
for all your programs to use.)
19_614495-ch12.indd 23019_614495-ch12.indd 230 4/2/10 1:32 PM4/2/10 1:32 PM
231
Chapter 12: The Ins and Outs of Text Editing
words not found in the spelling dictionary. You can customize the spelling
dictionary, and you can purchase additional spelling dictionaries.
Checking spelling as you type
You can have InDesign check your spelling as you type by simply choosing
Edit➪Spelling➪Dynamic Spelling. If that menu option is checked, your spell-
ing will be checked as you type, as will the spelling of any text already in the
document. Suspected errors are highlighted with red squiggle underlining so
that you can correct them as needed. If you want InDesign to suggest proper
spelling, you need to use the Check Spelling dialog box, covered in the next
section.
Correcting mistakes on the fly
If you use a word processor, chances are it’s one that corrects mistakes as
you type. Microsoft Word, for example, has a feature called AutoCorrect
that lets you specify corrections to be made as you type, whether those
be common typos you make or the expansion of abbreviations to their full
words (such as having Word replace tq with thank you).
InDesign offers much of the same functionality, which it calls Autocorrect.
Unlike Word, you can’t use this feature to replace symbols, such as having
InDesign convert (R) to the ® symbol as you type. Note that — like Word —
Autocorrect works only for text entered in InDesign after Autocorrect is turned
on; it doesn’t correct imported or previously typed text.
You enable Autocorrect in the Autocorrect pane of the Preferences dialog
box. Choose InDesign➪Preferences➪Autocorrect (Ô+K) on the Mac or
choose Edit➪Preferences➪Autocorrect (Ctrl+K) in Windows. If you want
InDesign to automatically fix capitalization errors, check the Autocorrect
Capitalization Errors check box. Typically, this feature finds typos involving
capitalizing the second letter of a word in addition to the first. For example,
InDesign replaces FOrmat with Format.
To add your own custom corrections, click the Add button. You see the Add
to Autocorrect List dialog box, where you can enter the typo text or code
that you want InDesign to be alert for in the Misspelled Word field, as well
as the corrected or expanded text you want InDesign to substitute in the
Correction field.
19_614495-ch12.indd 23119_614495-ch12.indd 231 4/2/10 1:32 PM4/2/10 1:32 PM
232
Part IV: Text Essentials
You can’t use special characters in the Autocorrect pane, such as to automati-
cally replace two hyphens ( ) with an em dash (—).
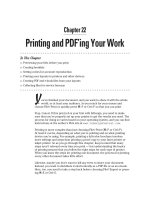
Using the Check Spelling dialog box
The Check Spelling dialog box lets you choose what part of the document
to spell-check and also provides suggestions on correct spelling. Plus, you
can use the dialog box to add correctly spelled words to InDesign’s spelling
dictionary. Even if you use the new dynamic spell-checking feature, you’ll still
want to do a final spell-checking pass with the Check Spelling dialog box.
Specifying the text to check is a two-step process: First set up the spell-check’s
scope in the document (in other words, exactly what text you want to be
checked). Second, specify the scope in the Search pop-up menu. Here’s how:
1. To set up the scope for the spell-check, highlight text, click in a story
to check from the cursor forward, select a frame containing a story, or
open multiple documents.
2. Open the Check Spelling dialog box (Edit➪Spelling➪Check Spelling
[Ô+I or Ctrl+I]) and choose an option from the Search pop-up menu:
Document, All Documents, Story, To End of Story, and Selection.
Figure 12-5 shows the dialog box.
You may not see all the options in the Search pop-up menu; the list
of options depends on how you set up the scope. For example, if you
didn’t highlight text, the Selection option isn’t available. However, you
can change the scope setup in the document while the Check Spelling
dialog box is open — for example, you can open additional documents
to check. You can also make the spell-check case-sensitive by checking
the Case Sensitive check box.
Figure 12-5:
The Check
Spelling
dialog box.
19_614495-ch12.indd 23219_614495-ch12.indd 232 4/2/10 1:32 PM4/2/10 1:32 PM
233
Chapter 12: The Ins and Outs of Text Editing
Note that when you first open the Check Spelling dialog box, if text is
selected or the text cursor is active, it immediately begins checking the
spelling, going to the first suspect word. Otherwise, the dialog box dis-
plays Ready to Check Spelling at the top.
3. To begin checking the text, click Start.
4. As InDesign finds suspect words and phrases, it displays that text to
you and provide several options to fix them.
When the spell-checker encounters a word without a match in the dic-
tionary or a possible capitalization problem, the dialog box displays Not
in Dictionary at the top and shows the word. When the spell-checker
encounters a duplicate word, such as of of, the dialog box displays
Duplicate Word and shows which word is duplicated. Use the buttons
along the right side of the dialog box to handle flagged words, like:
• Click the Skip button (it appears only after the spell-check has
started) to leave the current instance of a Not in Dictionary word
or Duplicate Word unchanged. To leave all instances of the same
problem unchanged, click the Ignore All button.
• To change the spelling of a Not in Dictionary word, click a word in
the Suggested Corrections list or edit the spelling or capitalization in
the Change To field. To make the change, click the Change button.
• To correct an instance of a Duplicate Word, edit the text in the
Change To field, and then click the Change button.
• To change all occurrences of a Not in Dictionary word or a
Duplicate Word to the information in the Change To field, click the
Change All button.
• To add a word flagged as incorrect — but that you know is
correct — to InDesign’s spelling dictionary, click the Add button.
(If you have multiple dictionaries, first choose the dictionary to
add it to using the Add To pop-up menu.)
• To add a word flagged as incorrect to a specific dictionary, click
the Dictionary button. A Dictionary dialog box appears, which lets
you choose the dictionary to which you want to add the word, as
well as what language to associate it with.
5. After you finish checking spelling, click the Done button to close the
Check Spelling dialog box.
Changing the spelling and
hyphenation dictionaries
The spelling dictionary that comes with InDesign is pretty extensive, but
you’ll likely need to add words to it. For example, your company may use
19_614495-ch12.indd 23319_614495-ch12.indd 233 4/2/10 1:32 PM4/2/10 1:32 PM