Flash CS3 For Dummies PHẦN 6 docx
Bạn đang xem bản rút gọn của tài liệu. Xem và tải ngay bản đầy đủ của tài liệu tại đây (1.27 MB, 41 trang )
Part IV
Total Flash-o-Rama
15_121009 pt04.qxp 4/10/07 6:21 PM Page 183
In this part . . .
M
oving imagery is the heart and soul of Flash, and in
this part you make your Flash creations come to
life through the power of animation and video. You find out
about moving objects, changing their shape (or morphing
them), letting Flash create animation for you, and easy
ways to integrate video into your Flash extravaganzas.
After you create your movie, you can make it interactive
so that the viewer’s Web experience is more meaningful
and engaging. Flash ActionScript offers infinite potential,
so let your imagination soar. We show you how to com-
bine your animation with your symbols and then add
ActionScript to script your entire movie.
The world is not silent, and your Flash movies don’t have
to be either. Find out how to add sounds and music to
your movies — from the simplest sound of a button click
to the majestic tones of a full-fledged symphony.
15_121009 pt04.qxp 4/10/07 6:21 PM Page 184
Chapter 9
Getting Animated
In This Chapter
ᮣ Understanding animation in Flash
ᮣ Getting ready to animate
ᮣ Using Timeline effects to create animations instantly
ᮣ Animating with keyframes
ᮣ Using motion tweening
ᮣ Editing your animation
ᮣ Managing scenes
I
n this chapter, we explain animation and making your graphics move. Are
you ready to plunge into a world where you can make almost anything
seem to happen? Hold on to your hat!
We start by explaining the basics of animation, including how to prepare for
animation and how to work with the Timeline. Then we go into the specific
techniques — Timeline effects, frame-by-frame animation, and tweening —
that you can use to create great, animated effects in Flash. We cover both
motion and shape tweening and then give you the details of editing your ani-
mation. So let’s get moving!
Who Framed the Animation?
The secret of animation in Flash, as in the movies, is that nothing ever really
moves. A Flash movie creates the illusion of movement by quickly displaying
a sequence of still images. Each still image is slightly different. Your brain fills
in the gaps to give you the impression of movement.
One of the great things about Flash is that you can easily create complicated,
spectacular extravaganzas of animation. And Flash stores lots of information
in the super-compact vector format. Because the files can be small, they can
be transmitted over the Web quickly. That’s good for your Web site viewers.
16_121009 ch09.qxp 4/10/07 6:21 PM Page 185
Just as in a movie on film, each still image is contained in a frame. Each frame
represents a unit of time. You create the animation by placing images in the
frames. A frame can contain one object or none or many, depending on how
crowded a scene you want to create.
Time is your ally in Flash because you have complete control over it. You can
look at each individual image in time and tweak it to your heart’s content.
Then you can step on the gas, play everything back at full speed, and watch
everything appear to move.
In Flash, you create animation in three ways:
ߜ Frame by frame: You move or modify objects one frame at a time. This
frame-by-frame animation is time consuming but is sometimes the only
way to create complex animated effects. This method can certainly sat-
isfy your appetite for total control.
ߜ Tweening: You create starting frames and ending frames and let Flash
figure out where everything goes in the in-between frames, which is why
it’s called tweening. Tweening is much more fun and easier than frame-
by-frame animation. If you can create the animation you want by tween-
ing, it’s definitely the way to go. Flash offers two types of tweening:
motion tweening and shape tweening, both of which we describe later in
this chapter, in the section “The Animation Tween.”
ߜ Timeline effects: You choose from a list of prebuilt animations, adjust a
few settings, and then instantly apply them to your text, graphics, but-
tons, or movie clips. Flash automatically creates the tweens for you.
This cool feature of Flash takes the automatic creation of animation to a
whole new level.
In tweening, the starting and ending frames are called keyframes because
they are the key moments in time that the software uses to calculate the in-
between frames. Tweening not only means less work for you but also creates
smaller files (which download faster) because you’re describing your anima-
tions more concisely. In frame-by-frame animation, every frame is a keyframe
because every frame defines a change in the action.
Preparing to Animate
You probably want to get started animating, but you need to set the stage
first so that your animation works properly. Here are the steps you need to
take before you can begin creating your animation:
1. Choose Insert➪Timeline➪Layer to create a new layer for your anima-
tion and put your starting graphic or graphics on that layer.
186
Part IV: Total Flash-o-Rama
16_121009 ch09.qxp 4/10/07 6:21 PM Page 186
You should always animate each object on a separate layer that has no
other objects on it. Otherwise, your animated objects might erase, connect
to, or segment other objects . . . with messy results. And your animation
probably won’t work. Refer to Chapter 6 for more information on layers.
2. If you plan to use motion tweening, turn your object into a symbol or
group; if you plan to use shape tweening, make sure that your object
is a shape and not a symbol; and if you plan to do frame-by-frame ani-
mation, your graphic can be anything you want.
See the section “The Animation Tween,” a little later in this chapter, to
find out more about motion tweening and shape tweening. Your graphic
absolutely must be a symbol instance, a group, or text for your motion
tweening to work. (Refer to Chapter 7 for more about symbols and
instances, and see Chapter 4 for the lowdown on grouping objects.) For
shape tweening, the rule is the opposite of motion tweening. If your
graphic is a symbol or a group or both, you can’t shape tween it; so for
shape tweening, just draw a shape by using the drawing tools.
Lines and shapes can have disastrous results when used together in shape
tweens. Try to stick to one or the other. Shapes seem to work the best.
3. Set a frame rate.
See the later section “Turtle or hare?” for more information.
When you animate, you often need to play back your animation during the
process. The simplest way is to press Enter (Windows) or Return (Mac), which
plays the movie. Sometimes, however, you might want more control — perhaps
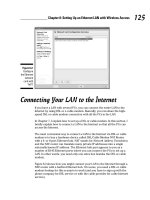
to play part of your movie. In this case, the Controller is invaluable. The
Controller, as shown in Figure 9-1, is a simple toolbar that looks like the controls
on a tape recorder. Use it to play, rewind, fast-forward, and stop your animation.
Pressing Enter or Return or using the Controller is a quick way to see your
animation. But if you have a movie clip on the Timeline, you won’t see the
animation within the movie clip until you choose Control➪Test Movie.
Master of the Timeline
The Timeline is the map of your animation sequence. If the Timeline isn’t visi-
ble, choose Window➪Timeline. Each layer has its own Timeline row. The
Figure 9-1:
The
Controller.
187
Chapter 9: Getting Animated
16_121009 ch09.qxp 4/10/07 6:21 PM Page 187
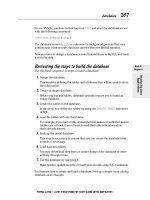
Timeline has its own coding to help you understand the structure of your ani-
mation, as shown in Figure 9-2.
You can undock the Timeline from the main Flash window and resize it. First
click the gripper (the two dotted vertical bars) at the upper-left corner of the
Timeline (to the left of the eye icon) and drag the Timeline where you want it.
Then you can resize it as an independent window by dragging the lower-right
corner (Windows) or the Size box in the lower-right corner (Mac). (If you get
lost with the new arrangement, you can always go back to
Window➪Workspace➪Default.)
Half the power of the Timeline is that it divides motion into frames — bits of
time that you can isolate and work with — one at a time. The other half of the
Timeline’s power is that you can organize different components of your ani-
mation into different layers.
Always animate one layer at a time.
Click any frame to make it active. Remember to click in the row of the layer
containing the graphics you want to animate. By clicking any frame, you can
view your animation frozen in a moment of time.
Keyframe
Empty keyframe
Frame
label
Folder
Layers
Playhead
(current
frame
marker)
Elapsed seconds
Frame rate
Unchanged content (light gray, ending with rectangle)
Incomplete tweened animation (no ending keyframe)
Motion tween (light blue)
Shape tween (light green)
Scene name
Figure 9-2:
Use the
Flash
Timeline to
control your
animations.
188
Part IV: Total Flash-o-Rama
16_121009 ch09.qxp 4/10/07 6:21 PM Page 188
As you read through the examples and steps in this chapter, you’ll quickly get
the hang of working with the Timeline.
Hide the layers that you’re not interested in (click below the eye icon) to help
you visualize the animation. But don’t forget to check the animation with all
the layers displayed to see how everything looks together. You should also
lock layers when you’re finished with them to avoid unwanted changes. Refer
to Chapter 6 for further instructions on hiding and locking layers.
Turtle or hare?
All you need to do to make animation work is to view your sequence of still
images over time at high speed. Unless you have a remarkable attention span,
one image per second is way too slow. Silent movies were typically 16 or 18
frames per second (fps). With the arrival of talkies, the speed got bumped
up to 24 fps for better quality sound. On your television, the speed is roughly
30 images per second.
The smoothness of the playback of your animation depends not only on the
frame rate that you specify but also on the complexity of the animation and
the speed of the computer that’s playing it. Generally, 12 fps is a good choice
for Web animation. Luckily, that’s the default rate in Flash.
To change the frame rate for your animation, follow these steps:
1. Double-click the Frame Rate box (which displays a number and the
letters fps), at the bottom of the Timeline, to open the Document
Properties dialog box.
Alternatively, you can choose Modify➪Document.
2. In the Frame Rate text box in the Document Properties dialog box,
type a new number (in frames per second).
You can set only one frame rate for all the animation in your current
Flash file. You should set the frame rate before you start animating.
3. Click OK to set the new speed and close the dialog box.
A Flash movie’s frame rate represents the maximum speed at which the movie
runs. Flash animation has no guaranteed minimum speed. If your animation is
lagging or bogging down, increasing the frame rate doesn’t help at all; in fact,
it might make things worse.
189
Chapter 9: Getting Animated
16_121009 ch09.qxp 4/10/07 6:21 PM Page 189
Creating Animations Instantly
with Timeline Effects
You can instantly create complex animations in Flash simply by choosing
from a list of Timeline effects and applying one to your art. With Timeline
effects, you can use prebuilt animations to make your art spin, shrink,
explode, expand, fade in or out, and do many other tricks, with just a few
clicks of your mouse.
To add animation by using Timeline effects, do the following:
1. Select an object that you want to animate.
You can apply Timeline Effects to a shape, text, a bitmap image, a
graphic symbol, a button symbol, a group, or a movie clip.
2. Choose Insert➪Timeline Effects and the submenus you want.
For example, in the Assistants submenu, you can choose Copy to Grid
or Distributed Duplicate. (These effects allow you to automatically posi-
tion multiple duplicates of an object.) In the Effects submenu, you can
choose Blur, Drop Shadow, Expand, or Explode. In the Transform/
Transition submenu, you can choose Transform or Transition.
The Effects Settings dialog box opens for the effect that you select.
Figure 9-3 shows the Effects Settings dialog box for the Drop Shadow
effect.
Figure 9-3:
You can use
the Drop
Shadow
effect to
automati-
cally add a
shadow
behind your
graphics.
190
Part IV: Total Flash-o-Rama
16_121009 ch09.qxp 4/10/07 6:21 PM Page 190
3. In the Effects Settings dialog box, modify any of the default settings if
you want to change them and then click OK.
The Effects Settings dialog box disappears. Flash automatically creates a
new layer. The layer has the same name as the effect but with a number
appended corresponding to the number of Timeline effects that you’ve
created so far.
Flash also automatically puts your object inside a new symbol, which is,
in turn, inside a new graphic symbol that contains all the new tweens
and transformations needed for the effect. Flash transfers all this to the
new layer.
4. Choose Control➪Test Movie to view your animation.
Your movie is exported to a Flash Player (.swf) window.
5. To further adjust your Timeline effect, close the Flash Player (.swf)
window and click the Edit button in the Property inspector.
The Effects Settings dialog box for your Timeline effect reappears.
6. Repeat Steps 4 and 5 as desired.
To delete a Timeline effect, follow these steps:
1. On the Stage, right-click (Windows) or Control+click (Mac) the object
with the Timeline effect that you want to remove.
A contextual menu appears.
2. Choose Timeline Effects➪Remove Effect.
The Timeline effect is removed, and the original layer names are restored.
Animating with Keyframes
Keyframes are the frames that are key to your animation. In frame-by-frame
animation, every frame is a keyframe. In tweened animation, only the first
and last frames of a tween are keyframes. By creating keyframes, you specify
the duration and therefore the speed of an animated sequence.
To create a keyframe, select a frame on the Timeline and choose Insert➪
Timeline➪Keyframe. For faster service, right-click (Windows) or Control+click
(Mac) a frame on the Timeline and choose Insert Keyframe. You can also
press F6.
191
Chapter 9: Getting Animated
16_121009 ch09.qxp 4/10/07 6:21 PM Page 191
You can change the display of the appearance of frames on the Timeline by
clicking the Frame View button in the upper-right corner of the Timeline. This
action brings up the Frame View pop-up menu. With this menu, you can
ߜ Set the width of frame cells to Tiny, Small, Normal, Medium, or Large.
ߜ Decrease the height of frame cells by choosing Short.
ߜ Turn on or off the tinting of frame sequences.
ߜ Choose to display a thumbnail of the contents of each frame. This is an
awesome feature, like unspooling a reel of film. If you choose Preview,
the thumbnail is scaled to fit the Timeline frame; if you choose Preview
in Context, the thumbnail also includes any empty space in the frame.
Frame after frame after frame
If your animation isn’t a simple motion in an easily definable direction or a
change of shape or color — and isn’t one of the prebuilt Timeline effects —
you probably need to use frame-by-frame animation.
If you must, you must. Some complex animations just have to be created
frame by frame. The basic procedure is simple.
To create an animation by using the frame-by-frame technique, follow
these steps:
1. Select a frame in the row of the layer that you want to use.
The animation starts in that frame.
2. Right-click (Windows) or Control+click (Mac) the frame and choose
Insert Keyframe.
The first frame on a movie’s Timeline is automatically a keyframe, so you
don’t have to create it.
3. Create the graphic for the first frame.
You can import a graphic, paste a graphic from the Clipboard, or use the
Flash drawing tools. (Refer to Chapter 3 for help with creating or import-
ing a graphic.)
4. Right-click (Windows) or Control+click (Mac) the next frame and
choose Insert Keyframe again.
The next frame on the Timeline now has the same graphic as the preced-
ing one.
5. Modify the graphic to create the second frame of the animation.
192
Part IV: Total Flash-o-Rama
16_121009 ch09.qxp 4/10/07 6:21 PM Page 192
6. Repeat Steps 4 and 5 until you’ve created all the frames that you need
for your animation.
While you work, you can continually check your cool animation by
pressing Enter (Windows) or Return (Mac) to play it back.
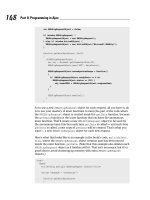
Figure 9-4 shows frames of an animation as the word New! is created from a
few specks on the page.
12
3 4
56
7
Figure 9-4:
Sometimes
a complex
animation
must be
created
frame by
frame.
193
Chapter 9: Getting Animated
16_121009 ch09.qxp 4/10/07 6:21 PM Page 193
Stillness in the night
Regular frames cannot contain changes. Therefore, if you insert a graphic in
the first keyframe, the graphic remains throughout the Timeline until it
reaches another keyframe.
For several reasons, you might need to copy objects over a number of frames.
Sometimes, you want a still image to sit unmoving for a while on a layer of
your animation — as a background image, for example — while your anima-
tion moves in front. A background gives context to your animated objects.
Even animated objects often need to remain on the Stage after they’ve fin-
ished moving about. A key element of animation is timing, and an animated
character is often still for a few moments (even in elaborately animated
Disney cartoons) before taking its next action.
To create an image that remains still over a number of frames, add a new
layer for your background or other unmoving object. With that layer active,
create or paste your object (or objects) at the starting frame you choose.
Then click your chosen ending frame, and choose Insert➪Timeline➪Frame
(or press F5). Flash duplicates your image throughout all intermediate frames.
As a shortcut, after you have your object or objects in the starting frame,
Alt+drag (Windows) or Option+drag (Mac) the frame along the Timeline until
you reach the last frame that you want to contain the object. Flash copies the
contents of the first keyframe through all the frames.
If you copy the objects to a keyframe, they remain on the Stage until the next
keyframe.
The Animation Tween
If your animation follows some simple guidelines, you can save yourself lots of
work (and reduce your file size, too) by using Flash to calculate the in-between
frames for you automatically. You create just the first and last keyframes, and
Flash figures out what should go in between. In animation technobabble, that’s
called tweening — a quick, fun way to create great animations.
You can do a lot with Flash’s tweening capabilities, including
ߜ Motion tweening: This is definitely the most common type of tweening.
With simple motion tweening, you can move your objects in a straight
line from here to there. You can use motion tweening also to animate an
object along any path that you create, even one with lots of curves.
194
Part IV: Total Flash-o-Rama
16_121009 ch09.qxp 4/10/07 6:21 PM Page 194
ߜ Shape tweening: This type of tweening gradually changes any shape to
another shape. You create the first and last shapes. These days, kids call
it morphing. The results may be quite unpredictable and require a lot of
computer processing but are usually interesting. You can add shape
hints to try to tell Flash exactly how you want your shape to morph.
And with both motion tweening and shape tweening, you can
ߜ Change an object’s size: For example, if you make an object smaller as
you move it, the object often appears to be moving away from the viewer.
ߜ Rotate an object: You specify the amount of the rotation. Flash com-
bines the motion or shape tweening with the rotation so that you get
both effects at one time.
ߜ Change color or transparency or both: Flash creates a gradual change
in color based on your starting and ending colors.
Animating your graphic’s transparency is a particularly cool effect because it
lets you fade objects in and out, making them magically appear and disap-
pear at just the right moment.
Of course, you can create several animations, one after another, to mix and
match the effects. You can also combine frame-by-frame animation with
tweened animation. Let your imagination soar!
From here to there — motion tweening
In motion tweening, you move an object from one place to another. The
movement can be a straight line or any path that you can draw with the
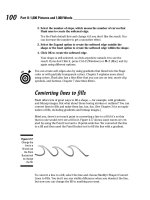
Pencil tool. Figure 9-5 shows a few frames from a motion tween that uses a
looped path. While the animation progresses, the skateboarder image also
scales down to 50 percent of its original size so that it appears to be moving
away from you. In this example, the path is made visible so that you can see
how the animation works. You usually hide the layer that contains the path.
Moving symbols, groups, and type
You can motion tween symbol instances, objects that you’ve made into a
group, or type (text). You can not only move them but also change their size,
rotation, and skew. And, in the case of instances, you can also motion tween
their color. (To change the color of groups or text during motion tween, you
have to convert them into symbols first.) See Chapter 7 for more on symbols
and instances.
195
Chapter 9: Getting Animated
16_121009 ch09.qxp 4/10/07 6:21 PM Page 195
12
3 4
56
7
9
8
Figure 9-5:
You can
draw any
path and
animate an
object along
the path.
196
Part IV: Total Flash-o-Rama
16_121009 ch09.qxp 4/10/07 6:21 PM Page 196
To skew an object means to slant it along one or both axes.
To create a simple motion tween animation, follow these steps:
1. Right-click (Windows) or Control+click (Mac) an empty frame where
you want the animation to start and then choose Insert➪Keyframe.
The Timeline’s first frame is always a keyframe, so if you’re starting from
the first frame, just click the frame.
2. Create a group or text block or drag a symbol instance from the Library.
Refer to Chapter 7 for the details on creating symbols and instances.
Refer to Chapter 2 for the lowdown on using the Library.
3. Create another keyframe where you want to end the animation.
4. Move the object to a new position.
5. If you want to change the object’s size, rotation, or color (as we explain
in the sections that follow), make the adjustments at this point.
See the next two sections of this chapter for details.
6. Click anywhere in the tween before the last keyframe.
The first keyframe is a good place to click.
7. Choose Window➪Properties➪Properties to open the Property inspec-
tor if it’s not already open.
If necessary, expand the Property inspector to its full size.
8. In the Tween drop-down list in the Property inspector, select Motion.
Flash creates the motion tween. If you want to change the object’s size
or rotation, specify the settings in the Property inspector, as we explain
in the next section.
You’re done! Click the first frame and press Enter (Windows) or Return (Mac)
to play the animation.
Here’s a silly phrase to help you remember the procedure for creating a
motion tween:
Funny First keyframe
Objects Object — place it
Love Last keyframe
Moving Move object
In In the middle — click between the keyframes
Tweens Tween — select Motion in the Tween drop-down list
197
Chapter 9: Getting Animated
16_121009 ch09.qxp 4/10/07 6:21 PM Page 197
Scaling and rotating an animated object
Okay, so you’re creative and ambitious and want to do more. Changing other
properties of your graphic while you’re moving it is easy. In Step 5 of the pro-
cedure in the preceding section, you can scale and rotate (including skewing)
your object.
Use the Free Transform tool, located on the Tools panel, or any other method
of changing size or rotation. (Refer to Chapter 4 for instructions on scaling
and rotating objects.)
In Step 7 of the motion tweening procedure in the preceding section, com-
plete the rest of the settings in the Property inspector, as shown in Figure 9-6
(and described in the following text).
After you specify motion tweening, settings appear in the Property inspector,
letting you specify how your motion tweening will work:
ߜ To put into effect any scaling changes you made, select the Scale
check box. Enabling Scale has no effect if you don’t change the object’s
size when you create the motion tween. Clearing the Scale check box
disables the scaling.
ߜ To rotate your graphic, select one of the Rotate options in the drop-
down list. The Auto option automatically rotates the graphic once in the
direction that uses the least movement. Or you can choose to rotate it
clockwise (CW) or counterclockwise (CCW) and then type the number of
times that you want to rotate your graphic. These options rotate your
object even if you didn’t rotate it in Step 5 of the motion tweening proce-
dure. If you did rotate the object, however, Flash adds the two rotations
to end up with the rotation angle you specified.
ߜ To control the acceleration or deceleration of the movement, use the
Easing slider. By default, the slider is in the middle, which creates a con-
stant rate of movement throughout all the frames. Move the slider down
to start slowly and speed up at the end. Move the slider up to slow down
at the end. You can create a sense of anticipation or excitement by using
this technique.
Figure 9-6:
The
Property
inspector.
198
Part IV: Total Flash-o-Rama
16_121009 ch09.qxp 4/10/07 6:21 PM Page 198
ߜ To ensure that your graphic symbol animation loops properly, select
the Sync check box. If your animation is in a graphic symbol and the
number of frames it takes up isn’t an even multiple of the frames that the
symbol occupies on the main Timeline, Flash synchronizes the two time-
lines so that the graphic symbol loops properly in the main Timeline.
(This is a cool feature.)
We explain the Snap and Orient to Path settings later in this chapter, in the
section “Tweening along a path.” For details on the Sound, Effect, and Sync
settings on the right side of the Property inspector, check out Chapter 11.
If you’re doing character animation, use the Free Transform tool to reset the
symbol transformation point to the joint position. For instance, a hand would
rotate from the wrist. This can save you some work. (See Chapter 4 for more
info on changing the transformation point.)
Tweening colors and transparency
To change an object’s color, click the keyframe on the Timeline where you
want to change its color. Then click the object. If your object is a shape
rather than an instance, you can simply change its color and opacity in the
Color panel. (See Chapter 3 for more on the Color panel.) If your object is an
instance, choose Window➪Properties➪Properties to open the Property
inspector if it’s not already open.
To expand the Property inspector to its full size, if necessary, drag the
bottom-right corner of the Property inspector (Mac) or click the Maximize
button near the top right of the Property inspector title bar.
Select one of the options (such as Tint or Alpha) in the Color drop-down list
and make the desired adjustments. (Chapter 7 explains how to modify instances
of symbols and provides much more detail about using the options in the
Color drop-down list.)
You can mix and match motion animation with scaling, rotation, color, and
transparency changes to create exciting effects. If an object spins and gets
smaller while it moves, it can seem to be rolling away from the viewer.
Animating semitransparent objects in front of each other creates interesting
mixtures of color and gives a semblance of texture and depth in the 2-D world
of the Web. Decreasing Alpha (opacity) during a tween makes the object
appear to fade as it becomes more transparent. Try out some possibilities
and come up with ideas of your own.
Color fades are less work for the computer than alpha fades. If you need
an object to fade in or out, your movie loads faster on older computers if
you tween to or from the background color rather than tween to or from
transparency.
199
Chapter 9: Getting Animated
16_121009 ch09.qxp 4/10/07 6:21 PM Page 199
Tweening along a path
You can create animation that doesn’t move in a straight line by motion
tweening along a path that you draw. Suppose that you want to get the skate-
boarder shown in Figure 9-5 to do some tricks. The following steps show you
how to do that.
If you want to follow along with these steps, you can download the skate-
boarder image (skateboarder.bmp) from the companion Web site for this
book at www.dummies.com/go/flashcs3. Then choose File➪Import➪Import
To Library. In the File dialog box that appears, navigate to skateboarder.bmp
and click Import to Library. (We made him in Poser — a cool program for
generating 3-D people, in case you’re interested. You can find out more about
Poser at www.e-frontier.com.)
To tween along a path, follow these steps. (The first steps are the same as
the ones we provide earlier in this chapter for motion tweens, in the section
“Moving symbols, groups, and type.”)
1. Create the first keyframe (if necessary).
2. Place your instance, text block, or group on the Stage.
If you’re using the skateboarder, drag it from the Library to the left side
of the Stage.
3. Create the ending keyframe.
Don’t move the object as you usually do when creating a motion tween.
4. Click anywhere between the two keyframes.
5. Choose Window➪Properties➪Properties to open the Property inspec-
tor if it’s not already open.
To expand the Property inspector to its full size, if necessary, drag the
bottom-right corner of the Property inspector (Mac) or click the
Maximize button near the top right of the Property inspector title bar.
6. In the Tween drop-down list, select Motion.
You now have a motion tween with no motion.
7. In the Property inspector, select the Snap check box to snap the trans-
formation point of the object to the motion path.
8. If you want to rotate the object with the angle of the motion path,
select the Orient to Path check box.
The effect of this is even more dramatic if the object’s transformation
point is not at its center.
9. Choose Insert➪Timeline➪Motion Guide.
A new layer appears on the Timeline. It’s labeled Guide and has a motion
guide icon. (If you want, you can create this layer before you start the
process of creating the animation.)
200
Part IV: Total Flash-o-Rama
16_121009 ch09.qxp 4/10/07 6:21 PM Page 200
10. Click the first frame in the new Guide layer to select it, and draw your
path, making a few curves or loop-the-loops, if you want.
You can use any of the drawing tools: Pen, Pencil, Line, Circle, Rectangle,
or Brush. You can also use the Straighten or Smooth modifiers if you’re
using the Pencil tool. (The path shown in Figure 9-5 was created by using
the Pencil tool with the Smooth modifier.)
Lock the object’s layer while you’re drawing the guide path so that you
don’t move the object by accident. Refer to Chapter 6 for further instruc-
tions on hiding and locking layers.
11. Choose the Selection tool, click the first frame of the animation, and
drag the object to the place on your path where you want your anima-
tion to start; release the mouse button when the transformation point
snaps to the desired place on the path.
12. Click the last keyframe and drag the object to the place on the path
where you want the animation to end; release the mouse button when
the transformation point snaps to the desired place on the path.
13. Press Enter (Windows) or Return (Mac) to play the animation.
You should see a few moments of death-defying skateboarding (or what-
ever animation you’ve created).
You can find the completed animation, skateboarder.fla, on this book’s
companion Web site at www.dummies.com/go/flashcs3.
Getting your tween ready for prime time
The steps listed in the preceding section for tweening along a path provide
only the basic process. You often need to make several refinements to motion
animation along a path.
Not satisfied with your motion path? No problem. Here’s a great feature that
lets you easily modify your path. Select the motion guide layer. Choose the
Selection tool and reshape the line by dragging from any point on the line.
(Just be sure not to break the line apart!) Press Enter (Windows) or Return
(Mac) again, and the skateboarder follows the revised path.
Want to get rid of that unsightly motion guide? That’s easy, too. Click the eye
column of the motion guide layer to hide it. Press Enter (Windows) or Return
(Mac) to play back the animation. (Even if you don’t hide the motion guide
layer in this way, the motion guide isn’t visible when the movie is published.)
Symbols, groups, text, and bitmap images have transformation points that
are usually at the center of the graphic. When you tween along a path, you
might want another point to follow the path. In the section on groups in
Chapter 4, you find out how to change the transformation point to get the
results you want.
201
Chapter 9: Getting Animated
16_121009 ch09.qxp 4/10/07 6:21 PM Page 201
What if you already have a motion guide and you want to link it to an object
on a different layer? Here are two ways you can link your motion guide to
your object:
ߜ Drag the layer: Drag the layer with your graphics so that it’s under the
motion guide layer. The new layer appears indented under the motion
guide layer, showing that it’s linked to the motion guide, as shown in
Figure 9-7. When the new layer appears indented under the motion guide
layer, you know that the layer is linked.
ߜ Modify Layer Properties: Select your graphics layer and then choose
Modify➪Timeline➪Layer Properties. In the Layer Properties dialog box,
select Guided and then click OK. This links the graphics layer to the
nearest motion guide layer above your graphics layer.
After dragging the layer or modifying the layer properties as just
described, you need to connect your graphics to the motion guide. To
do this, add an ending keyframe (if you don’t already have one) in the
graphics layer, and create a motion tween between the starting and
ending keyframes in that layer. Then click the starting keyframe, drag
your object to snap to where you want your animation to start on the
path, click the ending keyframe, and snap to where you want your ani-
mation to end on the path.
Tweening shapes
In shape tweening, you change an object’s shape at one or more points in the
animation, and the computer creates the in-between shapes for you. You can
get some great animation effects by using shape tweening. This process is
often called morphing. You can see an example in Figure 9-8.
When shape tweening, you can combine changes in shape with changes in
position as well as changes in size, color, and transparency. As with motion
tweening, you should work with one shape per layer to avoid problems.
You can shape tween objects that you have created by using the Flash draw-
ing tools.
Figure 9-7:
A guide
layer.
202
Part IV: Total Flash-o-Rama
16_121009 ch09.qxp 4/10/07 6:21 PM Page 202
You can’t shape tween a symbol instance, text (type), or a group unless you
break them apart into shapes by selecting them and choosing Modify➪Break
Apart. And you have to break apart text blocks twice — once to break the
text block into individual letters and again to break the letters into shapes.
You can also try to shape tween a bitmap image after breaking it apart, but
the results are sure to be unpredictable.
If you break apart a symbol instance, text block, bitmap image, or group by
using Modify➪Break Apart, you might have a number of shapes to animate.
Be sure to put each animated object on a separate layer. You can do this
easily by selecting the objects and choosing Modify➪Timeline➪Distribute to
Layers, which we explain in Chapter 6.
21
3 4
5
Figure 9-8:
You can
twist and
deform your
objects by
using shape
tweening,
and a circle
becomes
a star!
203
Chapter 9: Getting Animated
16_121009 ch09.qxp 4/10/07 6:21 PM Page 203
To create a simple shape tween, follow these steps:
1. Right-click (Windows) or Control+click (Mac) an empty frame where
you want the animation to start and then choose Insert➪Timeline➪
Keyframe.
2. Use the drawing tools to create the beginning shape.
You can create complex objects by merging objects of the same color or
creating cutouts with objects of differing colors. (Refer to Chapter 3 for
details.)
3. Create a new keyframe after the first keyframe wherever you want it
on the Timeline by using the same technique you used in Step 1.
4. Create the ending shape.
You can erase the old shape and draw a new one, or you can use the first
shape, still on the Stage, and modify it. You can also move the shape and
change its color or transparency or both. You can quickly change the
color by using the Color modifiers in the toolbox. Use the Color panel to
change opacity (Alpha). Refer to Chapter 3 for more information on
colors and transparency.
5. Click anywhere in the tween before the last keyframe.
The first keyframe is a good place to click.
6. Choose Window➪Properties➪Properties to open the Property inspec-
tor if it’s not already open.
To expand the Property inspector to its full size, if necessary, drag the
bottom-right corner of the Property inspector (Mac) or click the
Maximize button near the top right of the Property inspector title bar.
7. In the Tween drop-down list, select Shape.
8. Select an Angular Blend or Distributive Blend type.
Select the Angular Blend type for blending shapes with sharp corners
and straight lines. It preserves corners and straight lines in the in-
between shapes of your animation. If your shapes don’t have sharp cor-
ners, use the Distributive Blend type (the default) for smoother
in-between shapes.
Using the Angular Blend on irregular shapes may cause the animation
to vanish!
9. You’re finished! Click the first frame and press Enter (Windows) or
Return (Mac) to play the animation.
Getting Flash to take a hint — using shape hints
Does the transformation of your shape animation look strange? Flash tries to
figure out the simplest and most probable way to change one of your shapes
into another, but this solution might not turn out the way you expect or want.
204
Part IV: Total Flash-o-Rama
16_121009 ch09.qxp 4/10/07 6:21 PM Page 204
You can use the Flash shape hints feature to attempt to correct this problem.
A shape hint is a marker you attach to a point on a shape at the beginning and
end of a shape change. The shape hints signal to Flash exactly how you want
this point and the area around it to move from the start to the end of the
shape tweening process.
You can use up to 26 shape hints per layer. Shape hints are displayed on the
Stage as small, colored circles with a letter (a–z) inside. On the starting
keyframe, the shape hint is yellow; and on the ending keyframe, it’s green.
When you first insert a shape hint — before you move it onto your shape —
it’s red. Figure 9-9 shows an example of beginning and ending shapes with
shape hints.
From this book’s companion Web site, at www.dummies.com/go/flashcs3,
you can download the Flash movie file shown in Figure 9-9. It’s the 4 to 5
point star with shape hints.fla file.
To use shape hints, follow these steps:
1. If you haven’t already done so, create a shape animation by using
shape tweening.
Refer to the set of steps in the preceding section if you need help with
this task.
2. Click the keyframe where you want to add your first shape hint.
3. With the object selected, choose Modify➪Shape➪Add Shape Hint or
press Ctrl+Shift+H (Windows) or Ô+Shift+H (Mac).
Your beginning shape hint appears as the letter a in a small, red circle
somewhere on the Stage.
4. Click the small, red circle and drag it to the part of your graphic that
you want to mark.
5. Click the keyframe at the end of the shape animation.
The ending shape hint appears somewhere on the Stage, again as the
letter a in a small, red circle.
Figure 9-9:
Shape hints
guide Flash
as it tweens
your shape.
205
Chapter 9: Getting Animated
16_121009 ch09.qxp 4/10/07 6:21 PM Page 205
6. Click the small, red circle and drag it to the point on your shape
where you want your beginning point to move.
The ending shape hint turns green. If you go back to the first frame of
the animation, the beginning shape hint turns yellow.
7. Press Enter (Windows) or Return (Mac) to play your movie.
You can drag shape hints off the Stage to remove them. Or choose Modify➪
Shape➪Remove All Shape Hints to nuke them all — but the layer with shape
hints must be selected. (Your animation then reverts to its original tween.)
Choose View➪Show Shape Hints to see all the shape hints in your current
layer and keyframe. Choose it again to hide them. (Again, the layer and
keyframe with shape hints must be selected.)
Adjusting shape hints
To tweak your animation, click the keyframe at the start or end of your shape
animation and move your shape hint. Then play your animation again to see
the new result. The more complicated your shape animation, the more shape
hints you need to use. For more complicated shape animations, you can also
add more keyframes between your original starting and ending keyframe.
This creates intermediate shapes at the new keyframes that you can then
tween (using plenty of shape hints, of course). In other words, you can create
two or more shape tweens, one immediately following the other.
If you aren’t getting the results you want, make sure that you have placed
your shape hints logically. If you have a curve with shape hints a, b, and c (in
that order), don’t have them tween to a curve with the shape hints in c, b, a
order unless you want some unusual effects. Flash does a better job with
shape hints when you arrange them in counterclockwise order, starting from
the upper-left corner of your object.
Editing Animation
You may find that you usually don’t get your animation to move perfectly the
first time, but fortunately Flash is quite forgiving. You can edit keyframes in
assorted ways.
You can’t edit tweened frames directly — you can view them, but you can
edit your objects only in the keyframes, not in the in-between frames. You
can overcome this restriction and edit your tweened frames by inserting a
new keyframe between your beginning and ending keyframe and then editing
the new keyframe. You do this by clicking a frame in the Timeline and then
choosing Insert➪Timeline➪Keyframe (or pressing F6). Don’t choose Insert➪
Timeline➪Blank Keyframe unless you want to nuke your existing tween ani-
mation. Of course, you can always edit tweened frames by simply changing
206
Part IV: Total Flash-o-Rama
16_121009 ch09.qxp 4/10/07 6:21 PM Page 206
the starting or ending keyframe that defines them. When you edit a keyframe
of a tweened animation, Flash automatically recalculates the entire tween.
The following sections explain some useful techniques for editing and manag-
ing your animations.
Adding labels and comments
Animation can get complicated after a while. You might find it helpful to add
comments to the Timeline to explain what each part of the Timeline is doing.
Also, when you start adding interactivity to your movies, you can add labels
to frames and then refer to them in your ActionScript. (You can find out more
about ActionScript in Chapter 10.)
To add a label or a comment to a frame, follow these steps:
1. Select a frame.
See the next section for information on selecting a frame.
2. Choose Window➪Properties➪Properties to open the Property inspec-
tor if it’s not already open.
To expand the Property inspector to its full size, if necessary, drag the
bottom-right corner of the Property inspector (Mac) or click the
Maximize button near the top right of the Property inspector title bar.
3. In the Frame Label text box, type the text for the label or comment
and press Enter (Windows) or Return (Mac).
To make the text function as a comment, choose Comment from the
Label Type drop-down list, below the Frame Label Text box.
Adding frame labels can be a nice way to lay out the timing of a movie, by
typing what you want to happen where on your Timeline, for a kind of brief
verbal storyboard. This can be particularly helpful when you’re working with
others on a project.
Selecting frames
Flash offers two styles of making selections on the Timeline:
ߜ Frame-based selection (the default): In this method, if you click a frame
or a keyframe, it’s selected. To select a range of frames, you can click
and drag over the frames that you want to select, or you can click the
first frame, press Shift, and then click the last frame in the range.
207
Chapter 9: Getting Animated
16_121009 ch09.qxp 4/10/07 6:21 PM Page 207