Professional Information Technology-Programming Book part 55 ppsx
Bạn đang xem bản rút gọn của tài liệu. Xem và tải ngay bản đầy đủ của tài liệu tại đây (25.46 KB, 6 trang )
Creating a web gallery is by far the most immediate and efficient way to show your
portfolioyou can then post it on your own web site or on other sites that cater to
photographers. There are also numerous sites that will allow you to display your
web portfolio for the purpose of selling your prints. Best of all, Photoshop CS2 and
Lightroom let you create web portfolios pretty much automatically.
One of the things you can do with those portfolios is use them on your own web
site. You could have a button on your home page for specific categories of work
that you do. And each of those buttons could open a different portfolio. If you own
your own web site domain, you can create different pages for different categories
of photos. For example, you might want to have a link called "portfolios" or
"photographs" on your main menu and have that link direct the viewer to another
page listing different styles, types of subject matter, specific events, or what have
you. Each of these topics could then link to an individual page.
12.3.3.1. Preparing the images for your gallery
There are a number of additional considerations that you'll want to keep in mind if
you're publishing your images on the Web. For example, your images may be
perfectly exposed, color-balanced, and adjusted for viewing individually as prints.
However, when you put them on a web site they're going to be viewed as part of a
group, so it's ideal to have more uniform brightness, contrast, and color values
between them. (For example, compare the three side-by-side photographs in both
Figures 12-31 and 12-32.) You'll also want to crop and transform these images in
such a way as to make them complement one another as much as possible. The
difficult part is doing this efficiently to many images at once so you don't run into
any holdups getting your site up and running.
Figure 12-31. The original images as the camera saw them.
Figure 12-32. After matching the exposure and contrast so that all three images
have a uniform appearance.
The solution to these issues lies in setting up a routine that is likely to produce the
most pleasing and uniform results. Don't have one yet? No problem. Just use mine:
1. First, gather all the files together and place them in individual folders that
will hold the contents for each portfolio category.
2. Use the Image Processor to save the files in each folder to JPEG format at
the highest quality setting mode (12). This keeps the originals in excellent
shape but also compresses them so that they will be easy to store on a CD.
(It also makes them quick to render if the portfolio-making software has to
resize and optimize them.) Feel free to add whatever other changes you need
(e.g., color correction) to the images before you save them.
3. Use the Photoshop File Browser to quickly compare images. Here, you can
eliminate any duplicates, check to make sure all files are large enough for
your purposes, and easily see which images require adjustments in color
saturation, contrast, or brightness when seen in the context of the rest of the
collection (Figure 12-33).
Figure 12-33. Viewing the adjusted images in the Photoshop Browser after
matching their exposure and contrast.
4. If the files have coded names, go through all the images and give them
names that will serve as titles. This will make it much easier to retitle images
when you do the final editing on your gallery in your HTML editor (e.g.,
Macromedia Dreamweaver or Adobe GoLive).
Once you've done all this, use the Photoshop Browser to pick the images that are
most in need of editing. Then use the following routine for each of those images:
A Solid-Color Frame
If you just want a quick, solid-color frame, record the following Action.
First, choose Select All; choose Image Canvas Size and increase the
canvas size by half the number of pixels you want in the frame; choose
Edit Stroke and enter a pixel width for the frame that's twice the
desired width (the other half will be outside the current canvas); choose
the color you want for the frame and click OK. Stop recording the Action.
You can now play it for all the images you want to frame.
1. Crop and transform the image to improve composition and straighten
perspective.
2. Use the Levels command to adjust the range and brightness of that image.
3. Use the Curves command to tweak the brightness and contrast of the image,
if needed.
4. Use the Soft Light layer technique (and/or Photoshop Shadows/Highlights
command) to extend the range of shadows where needed.
5. Use a Brightness/Contrast adjustment layer for vignetting, burning, or
dodging large areas. To do this, use the Lasso to select the general area and
then feather the selection so that the Brightness/Contrast command will
blend smoothly with the rest of the image.
6. Use the Hue/Saturation command to bring the images' colors to life, if
necessary.
7. Consider preframing your images. The quickest way to do fancy framing is
to pick a plug-in that automatically frames images, create an Action that
preframes one image, and then use the Photoshop File Browser's Automate
Batch command to frame all the images in the gallery.
8. You may want to watermark the images that will appear in your web
galleries. Refer to the "Protecting Your Copyright with Watermarks" section
earlier in this chapter.
If you've followed the recommendations above, you'll find that most of the
automated web gallery routines do a decent job of optimization on their own. (If
they don't, see the "Optimize Images for Web Viewing" section earlier in this
chapter for information on how to do it yourself.) Note, however, that what you'll
actually be doing is optimizing the images individually and substituting them for
the images automatically optimized by the web gallery application.
12.3.4. Put Together the Web Gallery
Great web designers are expensive to hire and hard to find. Even if you do end up
having someone else do most of your web design, it's a good idea to learn enough
about it to speak knowledgeably to your designer and to have reasonable
expectations.
You'll probably end up creating web portfolios and email/CD portfolios in
Photoshop or Lightroom since they are the applications you'll have at your disposal
and they get better at it with each new version. However, it would be worth your
while to examine all the products mentioned in this section because each one
creates galleries (portfolios) in different styles and some of them have bigger style
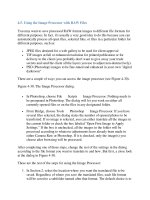
collections. For example, Figure 12-34 shows a web gallery dialog in Photoshop
CS2.
Figure 12-34. Creating web gallery created in Photoshop CS2.
Creating the pages is the easy part; you can do it in either Photoshop (actually
Version 6 and above), in Photoshop Elements 2-4, or in Lightroom, each of which
offer different sets of gallery styles. The styles in Photoshop CS2 are much more
professional and flexible than those in earlier versions. With a basic understanding
of HTML, it is quite easy to customize any gallery you automatically create.
Photoshop writes the end result in legal HTML code, which you can easily edit
using the search and replace command in your HTML editor if you want to change
the positioning, size, text style, or any other characteristic of an element.
NOTE
If you've followed my advice about keeping an original JPEG library for each
gallery, you can even create larger image sizes in your editor. You'll know which
image belongs in each frame, so just run Image Processor to re-size the originals to
the size you want and then paste them into the large space specified in your edited
version of the gallery.
The following method will give you a good idea of how to create an automatic
portfolio in Photoshop. By studying the screen shots, you'll see that you have quite
a few modifiable style and format options.
1. Use the keyword search capability in Bridge to locate, organize, and place
the photos into any of the individual galleries. Once the search is completed,
you'll see all of the thumbnails for the photos in the Bridge Workspace.
Select all the images you want to include or (better yet) use a label color you
rarely use for anything else or that you use to designate pictures to include in
a project. Then use the Unfiltered menu to show only the images with that
label.
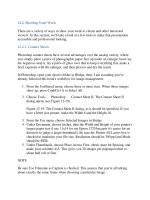
2. From the Bridge menu, choose Tools Photoshop Web Gallery. The
Web Photo Gallery dialog will open, as shown in Figure 12-35.
Figure 12-35. The Web Photo Gallery dialog.
3. Choose the Style you want to use. You'll get a preview of these styles each
time you choose one, so you can go through the list until what you see is as
close as possible to what you want. Actually, I'd suggest you choose about
six images in the Browser and then create a test of each style.
4. When the gallery opens, make a screen capture of each "page" in the gallery.
Then paste the screen capture into a Photoshop New file with an 8x10
dimension at printer resolution. You can then put the gallery style, settings,
and both the thumbnails and large image view on the same page and print
out a catalog. You'll get a much better of what style you want to use for what
purpose. Besides, you can show it to a client and let the client decide.
5. Enter your email address in the email fieldunless you don't want any
feedback from the people who view your gallery, or want to make it really
difficult for them to contact you.
6. Under Source Images, choose Folder as the source and click the Browse
button to locate the folder into which you placed the images for the gallery.
Be sure to uncheck the "Include all Subfolders" box unless you had a very
odd way of storing your images. Next, click the Destination button, browse
to the location where you want to place the finished web gallery and HTML
code, and create a folder.
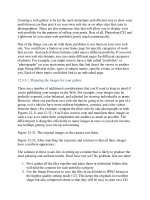
7. Now comes the fun part: choose the Options settings that will allow you to
customize your gallery. In Photoshop CS2, they appear as a set of
configurable items inside the Options box that switch depending on which
drop-down menu is selected (see Figure 12-36).
Figure 12-36. The options in Photoshop Album's Web Photo Gallery dialog.
8. Choose Banner from the Options tab or drop-down menu. In the Site Name
field, enter the name as you want it to appear on your site. In the
Photographer field, enter the name of the person or organization you would
like to designate as the owner of the photo (e.g., yourself). You can actually
enter any information you wish in any of the Banner Options fields. For
instance, I put all my contact information in the Contact Info field, but if I
want to include ordering instructions or comments about the photos, I write
that information in the Date field. (I don't like to "date" my galleries, unless
it's a private gallery for use by a specific client, where the creation date
might be important. Note that the date is automatically entered in the date
field by default, so be sure to delete it if you don't want that information
there.) Finally, you can change the font style and size of the banner textjust
be sure to choose a small enough font size that all your information will fit
within the banner when the gallery is displayed on the Web.
NOTE
In order for the Titles Use settings to have any effect at all, you must have
entered additional EXIF data in the File Browser for the images in your gallery
before you start creating the gallery according to these instructions. To do this,
open the source image folder in the Photoshop CS File Browser. Click the
Metadata tab in the bottom left of the File Browser dialog and scroll down until
you start to see pencil icons in the left columns, which