Professional Information Technology-Programming Book part 30 pot
Bạn đang xem bản rút gọn của tài liệu. Xem và tải ngay bản đầy đủ của tài liệu tại đây (38.2 KB, 8 trang )
7.2. Using Layers to Make Targeted Adjustments
You may have already figured this out from the Chapter 6, but not all adjustments
can be made with adjustment layers. So you make the adjustment nondestructive
by simply merging the layers up to this point into a new layer that is used solely for
making that targeted adjustment. There are many other instances in the course of
employing the "Milburn Method for Nondestructive Editing" when you will want
to do the same thing. Each time one of those instances arises, use the techniques
described in this section.
7.2.1. Lifting a Selection to a New Layer
You already know the keyboard shortcut that raises a selection to a new layer, but
it's easy to repeat in case you've forgotten it: Cmd/Ctrl-J. Be sure you've selected
the layer in the layers palette. This makes a copy of what was inside the selection
so you can always restore the target portion of the image to its original state by
simply deleting or clicking the Eye icon in the layers palette to turn it off.
You can also save the selection before raising the targeted area to a new layer.
Then you wouldn't have to make several selections when you want to raise the
same portion of the image to perform a different adjustment on each.
7.2.2. Making a Layer Mask from a Selection
A layer mask can be created either before or after you create the layer. If you make
a selection before you select a new layer from the Adjustment Layers icon at the
bottom of the layers palette, that layer will be automatically masked. If you create
a new layer and later decide you want to mask it, create the selection you want,
then click the Mask icon at the bottom of the layers palette.
If a layer mask is already in existence for a layer (because you clicked the Layer
Mask icon in the layers palette before
you make the selection), you'll see an icon to
the right of the layer's image or purpose icon (Figure 7-9). If that icon is all white,
you can create a mask by making a selection, inverting it, and then filling with
black orif you want the mask to only let in some of the background image or
effecta shade of gray.
Figure 7-9. The Layer Mask shown in the layers palette.
NOTE
You may want to go back through your layers once you've finished composing,
compositing, and adjusting an image. If you have no reason to keep all of a layer,
select what you don't need and delete it. You'll save a wee amount of disk space.
However, be aware that it's not worth the savings if you think you'll ever need
more of that layer should you modify or replace its mask. "Empty" layers can be a
good reminder that there's more that need to be done later. This can be handy if
you need to get a "good enough" version of the image to the client or subject
before you continue to work on it.
Layer Mask Pros and Cons
Like just about anything in life, there's an upside and downside to using
layer masks:
Pro: Just in case you might wonder why you should bother with a
layer mask instead of just retrieving a saved selection, well that's
what this book is all about. If you use a mask on an adjustment or
to make a partial layer, you can change the settings or the effect on
that layer without affecting the whole image. You could even
adjust the partial layer nondestructively simply by adding a
clipping mask to it. Such adjustments can always be changed at
any time during the remaining construction and adjustment of the
image.
Con: All the adjustment layers will take up a somewhat larger
amount of disk space. Of course, derived partial layers will add a
significant amount to file size, but not as much as if you had to
work with the whole layer.
7.2.3. Using Blend Modes on Regional Adjustment Layers
As we saw in Chapter 6, the Blend Mode function in Photoshop provides nearly
endless possibilities. How a given Blend Mode is applied to an adjustment layer
will depend on both the type of adjustment layer and the settings that are being
used. Suffice it to say, it never hurts to try the following steps because you can
always come right back to where you started. Meantime, you may create a miracle.
Once you've created your masked adjustment layer and made the settings you
desire:
1. Drag the Layer's palette tab up to the palet
te doc, but make sure to then click
the tab so that the palette is extended.
2. Choose the Move toolbut don't move anything.
3. Cycle through all the Blend Modes. Press and hold the Shift key while
tapping the + key.
You may not end up using the results of any of these experiments, but they're very
quick to do and you may find a happy surprise.
7.2.4. Using Multiple Adjustment Layers
You can make specific kinds of adjustments at any time. One of the absolute best
things about using adjustment layers (as if you don't already have enough reason
by now) is that you can aim and overlap them in endless combinations of location
and Blend Mode.
Moreover, by stacking adjustment layers, you can often create effects in multiple
areas of brightness or color. I can exert extremely precise control over contrast
within a masked portion of the image by using multiple Curves layersall with the
same mask but with different portions of the curves adjusted differently. To look at
this more closely, I've constructed a mask for the street-crossing crowd that's used
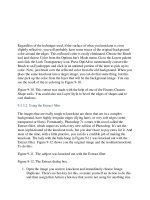
for three stacked curves layers in Figure 7-10.
Figure 7-10. The crowd in this scene has been adjusted with one Curves layer at
left, two in the middle, and three in the right image.
If you stack adjustment layers that are about contrast, rather than color balance, it's
a good idea to put them all in Luminance Blend Mode so that they don't change the
color balance of the image.
7.3. Creating Effects with Targeted Adjustments
There are a number of special effects that you can create with targeted adjustments. This
section suggests a few and you can take it from there.
7.3.1. Adding Colored Light
There are numerous ways to add colored lighting effects, but most of them involve using
commands on the filter menu that are
more destructive than the operations recommended in
this chapter and at this workflow stage. However, you can do just about anything you want
to do for a colored lighting effect by using a combination of the Solid Color adjustment
layer, the Opacity and Fill sliders for that layer, and by painting some layer masks and
using a Blend Mode or two. Moreover, you can do this to create coloring effects in different
colors and in different parts of the image.
Admittedly, these effects aren't as slick or easily predicted as a great many third-party color
effects filters. However, this method is nondestructive, doesn't require another layer (which
doesn't mean you may not find reason to want one), and doesn't cost you extra bucks. In
Figure 7-11, you see an image as I processed it in Camera Raw alongside an image treated
with three color effects layers, each with its own mask.
Figure 7-11. An image with Camera Raw processing (left) and after applying three masked
Solid Color adjustment layers (right).
7.3.2. Opening Up the Shadows
One of the most useful adjustments in Photoshop is Shadow/Highlight. It often does a better
job of fill flash than if you had actually used simple fill flash. Fill flash has a tendency to
cause red eye, create very deep and unnatural looking
shadows just under the chin and nose,
and usually overexposes the subject while underexposing the background. However, we'll
have to save the Shadow/Highlight command itself for Chapter 11, as it makes dramatic
changes to the image that can't later be dismissed or readjusted.
Besides, although it works quite well most of the time, there are other times when you
might be happier with the results from other techniques, namely threshold masking, a
masked Curves layer, or the use of Screen Blend Mode. You could even combine these
techniques.
7.3.2.1. Threshold masking
I already mentioned threshold masking earlier in this chapter and discussed it as a way to
brighten specific areas of brightness in an image in Chapter 6. Brightening shadows is
another very good use for threshold masks. It's not as quick and easy as using the Select
Color command (see the "Select color" section below), but has the advantage of allowing
you to decide the level of brightness to start the masking. Here's how you do it:
1. Duplicate the file you want to mask and flatte
n its layers. Leave both the original and
duplicate files open in Photoshop.
2. Choose Image Adjustments Hue/Saturation. When the Hue/Saturation dialog
opens, drag the Saturation slider all the way to the left. Your image is now grayscale.
This step isn't absolutely necessary, but does help you to judge the level of
brightness.
3. Choose Image Adjustments Threshold. The Threshold dialog appears, as seen
in Figure 7-12. Note that the slider is turning everything black that is 75 percent gray
because I didn't really want to lighten any midtones in this image.
Figure 7-12. The Threshold dialog.
4. Select everything and copy itpress Cmd/Ctrl-A, then Cmd/Ctrl-C.
5. Select the original file and open the Channels palette (Window Channels). Click
the New Channel icon at the bottom of the palette. A channel named Alpha will
appear and it will be selected. To place your mask in that channel, press Cmd/Ctrl-V.
Since you actually want to mask the shadows, press Cmd/Ctrl-I to invert the Alpha
channel. Now click the Make Selection (circle of dots) icon.
6. Choose Select Feather and enter a small amount (410 pixels) of feathering if you
expect your adjustment to be slight or a large amount (80200 pixels) if your
adjustment is going to be drastic. The idea is for your adjustment to blend with the
surrounding image without showing obvious edges or haloes.
7. Click the RGB channel, then open or go to the layers palette and choose an
adjustment layer that will let you control Brightness and Contrast. You should
experiment to see whether Brightness/Contrast, Levels, or Curves works best for
your purposes. Be sure the preview box is checked in the dialog so you can visually
set the effect as you want it. If you want to turn off the marching ants (the pulsing
dashed line around your selection), press Cmd/Ctrl-H.
NOTE
One of the nicest and most controllable ways to darken nearly blown-out highlights is to
select them, lift them to a new layer using the old Cmd/Ctrl-
J trick, and put the new layer in
Multiply Blend Mode. If the highlights are now too dark, just lower the Opacity or Fill of
the layer. If they're still not dark enough, duplicate the Multiply layer as many times as
necessary.
If you want to darken the highlights a bit, go back to the duplicate image, press Cmd/Ctrl-
Opt/Alt-Z until you're back to a full-scale grayscale image, then use the Threshold
command to mask just the very brightest highlights. Copy the result to a new Alpha channel
in the original image, make a mask, feather it, and use your favored Brightness/Contrast
adjustment layer to bring down the highlights. You can see the before and after results of
lightening shadows using this method in Figure 7-13.
Figure 7-13. Note that the shadows have been filled regardless of their distance from the
camera, just as they are when using the Shadow/Highlight command.
7.3.2.2. Select color
You can often emulate extended ranges simply by selecting the highlights or shadows and
then using a duplicate layer in Multiply or Screen Blend Modes or an adjustment layer.
Unlike making a mask from a Threshold adjustment of a duplicate file, your selection will
be either shades that are brighter (highlights) or darker (shadows) than 50 percent gray.
There are two ways to select highlights or shadows:
Use the Channels palette
In my opinion, this is the easiest way to select highlights or shadows. Open the
Channels palette (which, if you're working on regional adjustments, is a good idea to
keep open) and Cmd/Ctrl-
click on the RGB layer. The highlights will be immediately
selected. If you want to select the shadows, just invert the selection with Cmd/Ctrl-
Shift-I.
Use the Select Color Range adjustment
Choose Adjustments Select Color Range. In the Select color dialog (see Figure 7-
14) choose either Highlights or Shadows. I always choose Highlights and then
simply
invert the mask with Cmd/Ctrl-Shift-I.
Figure 7-14. The Select Color Range dialog with Highlights chosen from the Select
menu.
Once you have your highlights selected, you can invert the selection to make a shadow
mask, if that's the area you prefer to work on.
Using the Color Range Selection to Adjust Midtones
You will often find it useful to use the Color Range dialog to select midtones.
For instance, in the example shown in Figure 7-15, I darkened the sky and the
river by selecting Highlights, lifting them to a new layer, using the Multiply
Blend Mode and then duplicating the layer. I then discovered that I wanted to
lighten the shadows in the ridges and some other tonal qualities in the landscape.
So I selected the shadows by inverting the selection made with the RGB Channel
technique, lifted it to a new layer, and then opened the Color Range dialog again.
This time, I clicked the eye dropper on one of the darker areas in the image.
Then I used the Fuzziness slider to narrow the selection to just the areas I wanted
to brighten and click OK. I feathered that selection by 80 pixels and then used a
Curves adjustment layer with a Clipping Mask to brighten the shadows and add
contrast to them.
Figure 7-15. The HDR image on the right was created from the image from
Camera Raw at the left by using the Select Highlights routines for the sky and
river and the Curves method to lighten shadows and add contrast to the
foreground.
7.3.2.3. Curves
If the image you're working on just needs some minor brightening, darkening, and contrast
changes, make your mask by whatever method seems bestincluding those previously
mentioned. Then open a Curves adjustment layer and attach it to the portion of the image
that you lifted from the selection. Add a Clipping Mask to the Curves adjustment layer by
choosing Create Clipping Mask from the layers palette menu. Make your curves so that
they affect the area of brightness you want to affect. If you want the effect to also lighten
the overall selected area, try either the Screen or Lighten Blend Mode.
7.3.2.4. Screen Blend Mode
You can often lighten an area by simply selecting and lifting the selected area to its own
layer, then placing that layer in Screen Blend Mode. This is a technique I often use for
high-key portraits, but it can be useful for lightening all sorts of areas.