Professional Information Technology-Programming Book part 32 potx
Bạn đang xem bản rút gọn của tài liệu. Xem và tải ngay bản đầy đủ của tài liệu tại đây (28.52 KB, 7 trang )
area to be healed.
8.1.3. Cloning
The Clone tool is simply a brush that copies edge-blended portions of an image
from a designated source area to a designated target area. In fact, if you need to do
this to a large area, see the "Copying Areas" later in this chapter.
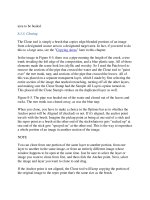
In the image in Figure 8-5, there was a pipe running the length of the creek, a tree
trunk invading the left edge of the composition, and a blue plastic tarp. All of those
elements made the scene look less idyllic and woodsy. So I used the Patch tool to
remove the sections of the pipe that crossed the water and the Clone tool to "paint
over" the tree trunk, tarp, and sections of the pipe that crossed the leaves. All of
this was placed on a separate transparent layer, which I made by first selecting the
entire section of the image that needed retouching, turning off all the other layers,
and making sure the Clone Stamp had the Sample All Layers option turned on.
This placed all the Clone Stamp's strokes on the duplicated layer as well.
Figure 8-5. The pipe was healed out of the water and cloned out of the leaves and
rocks. The tree trunk was cloned away, as was the blue tarp.
When you clone, you have to make a choice in the Options bar as to whether the
Anchor point will be Aligned (if checked) or not. If it's aligned, the anchor point
travels with the brush. Imagine the pickup point as being at one end of a stick and
the repro point as a brush at the other end of the stickwhatever gets "sucked up" at
one end of the stick get
s "sprayed on" at the other end. This is the way to reproduce
a whole portion of an image in another section of the image.
NOTE
You can clone from one portion of the same layer to another portion, from one
layer to another in the same image, or from an entirely different image whose
window happens to be open at the same time. Just be sure to select the layer or
image you want to clone from first, and then click the Anchor point. Next, select
the image and layer you want to clone to and drag.
If the Anchor point is not aligned, the Clone tool will keep copying the portion of
the original image to the repro point that's the same size as the brush.
8.1.4. Clone Detail from Another Photo
Maybe it would've been a great shot if your model had straight teeth, perfect
forearms, or didn't blink. Or maybe you just really want the hat in one image to
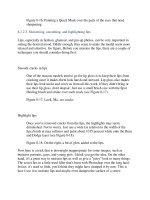
appear with the costume another as in Figure 8-6.
Figure 8-6. The client wanted the hat in this picture to appear with the costume in
another picture.
Details in one photog
raph can be painted in another with a Clone Stamp brush on a
superimposed and transparent layer. There are several advantages to painting on a
layer. First, you can blend that layer with the underlying layers by changing the
Opacity or Blend Mode. Second, you can alter the exposure and color balance of
the layer so that the painted-in detail matches the originals (or, if you have Adobe
Photoshop CS, you can even replace the color by using the Replace Color brush).
You can also use the Free Transform command (Cmd/Ctrl-T) to reshape or rotate
the item so that it appears at the natural-looking angle, size, and perspective.
Perhaps most important of all, you can use the Move tool to drag the contents of
the new layer so that you're cloned object ends up in exactly the right place.
This method is most likely to work if the object or characteristics that you are
transferring from another photo are inside the silhouette of the same part of the
subject. That is, it's much easier to add or subtract muscle tone from inside the
silhouette of an arm, chest, or stomach. If you actually have to reshape the subject,
see the "Punch out the paunch" section later in this chapter. Of course, you can
combine both of these methods.
Here's the typical workflow:
1. Scale or transform the area inside both images that you are cloning to and
from to exactly the same size and orientation. As mentioned previously, it's
best to cut and paste the information you're incorporating onto a new layer in
the target image, temporarily reduce its layer transparency so that you can
see through to the target image on the layer below, and then use the Free
Transform command to scale the "incoming" image properly.
Decide which parts of your image could be improved. Do you need a better-
arching eyebrow, a more elaborate piece of jewelry? Make a list so that you
can deliberately find or make the images to clone from. You'll need photos
with the required detail photographed at the same camera angle and
perspective, and with the same lighting and resolution. I
f you don't have any,
you'll have to shoot new photos. For example, if it's jewelry you want, put
the piece on a mannequin and set up or find lighting that's the same as the
original.
2. Open both photos side by side. Copy the photo you're going to clone from
(the source) to a new layer in the photo you're going to clone to (the
destination). To do this, press Cmd/Ctrl-A to select all, then Cmd/Ctrl-C to
copy to the clipboard. Activate the target image's window and press
Cmd/Ctrl-V to paste the photo to a new
layer. In the Layers palette, place the
new layer (from the source image) above the target image layer.
3. Use the layer palette's Opacity slider to make the new layer blend with the
target image, and use the Eraser tool to brush away any unneeded portions of
the imported layer.
The biggest problem with this method is matching the texture of the original with
the texture of the image you borrow from. This is typically not an issue with eyes
or clothing accessories, but skin is another matter altogether. If you
have to transfer
a tattoo, or some muscle tone, or a different nose, use transparency in the new
layer. If you're using Photoshop CS, it's also a good idea to use the Healing brush
and anchor it on the original layer, then stroke around the parts of the transfer that
show bare skin. The Healing brush will transfer the texture from the anchor point
without transferring the original details. Don't try this on the focal area you've
transferred because the Healing brush will blur it; instead, do it only on the
surrounding skin.
If that approach doesn't work for your particular image, try using the Eraser tool on
the new layer to reveal the skin in the original layer. Be sure to feather your Eraser
brush and set its opacity low enough that your strokes will blend the new layer
with the target image.
8.1.5. Recalling History
There's so much going on in Photoshop that it's easy to overlook some features that
you could probably use many more times a day than you actually do. For me, one
of the most useful features that I tend to overlook until it's too late is History.
History, as referred to in Photoshop, is really two features: the History palette and
the History brush.
The History palette lets you record any state of an image so that you can recall it at
any time that you screw up. I often workaround this by making backup copies of
various states of an image. I'm getting over that habit, slowly but surely. The
problem with too many backup versions is that over time it becomes harder and
harder to find the right ima
geeven if you've labeled them conscientiously. I'd rather
keep lots of layers in the same image. You can't save a Snapshot, but a Snapshot is
nothing more than a flattened version of the image the way it looked at the moment
the snapshot was taken.
Snapshots are useful for keeping a temporary image from which to "paint" an
effect. For instance, imagine what you could do in an image by seriously
oversharpening it and using the History brush to paint over small details that you
really wanted to make pop, e.g., the edge of a blade, the iris of a model's eye and
her lashes, or the collar of a fur coat. Just run your favorite sharpening command or
filter, take a Snapshot, and press Cmd/Ctrl-Z to undo or go back to a History state
before you did the sharpening. Now you can paint in the details you wanted on a
clear layer above the image. If the client later wants a little less sharpening effect
or wants to use a Blend Modeno problem. Apply the client's request to the layer
onto which you painted the History information.
You can use the same technique to brush in localized adjustments. For instance,
you could make the whole image much lighter and higher contrast and then use the
History brush to paint in shadow details or small details on objects that would
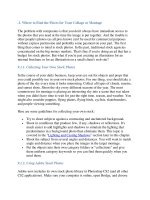
otherwise have been lost. Figure 8-7 is an example of such an image.
Figure 8-7. In the righthand image, notice the area around the hair, eyelashes, and
fur that were painted in from the History snapshot after sharpening the image on
the left. Since it would have been bad to teach you to oversharpen the image, you'll
have to look very carefully to see the difference in the sharpening of an image this
sizebut it would certainly be important in a full-page ad.
Here's the step-by-step routine I used to make Figure 8-7:
1. I ran the Workflow Layers Action so I could burn, dodge, and heal
nondestructively.
2.
I then duplicated the Background and Retouch layers, placed them above the
original layers, selected them both, and then chose Merge Layers from the
Layers palette menu.
3. I selected the new merged layer and named it High Key Curve & Sharpen. I
then gave it a curves adjustment that dramatically brightened the entire
image as well as dramatically increasing contrast.
4. I ran Smart Sharpen and really cranked up the sharpening levels.
5. I chose Window History to open the History palette, scrolled up so I
could see the Snapshot bars, and clicked the Snapshot icon at the bottom of
the palette to record the change that I made in the merge layer. Then I
clicked the box next to the Snapshot I just took so that the History Brush
icon appeared in it. This lets you know which Snapshot the History Brush
will paint from.
6. Back in the Layers palette, I turned off the merged layer, clicked on the
Retouch layer and then used the History brush to paint over the model's hair,
fur, the iris of her eyes, brows, and lashes.
NOTE
Be sure not to throw away or add any layers before you use the History brush.
Otherwise, the cursor will appear as a "no" icon and a dialog tells you that a
corresponding layer is missing. Also, make sure you don't click the Image icon in
the Snapshot bar. The whole image will change to a Snapshot and you'll lose all
your layers. You'll probably be really upset if that happens.
8.1.6. Copying Areas
Sometimes, cloning large areas just takes too long unless you use a very large
brush. Very large brushes are more likely to accidentally pick up details you don't
want. Also, you can transform (resize, stretch, o
r rotate) Clone tool strokes. So you
can't make the pattern disappear off into perspective. The solution is to select a
large area that you want to use to cover another portion of the image, feather the
selection so that it will blend, and lift the contents of the selection to a new layer
(press Cmd/Ctrl-J). Choose the Move tool and drag the new layer into the exact
position where you want it. If appropriate, you can transform the contents of that
layer to resize, rotate, or give it perspective with the Transform tool. You can also
mask the layer if you need to shape it to fit a boundary. Just switch to the layer that
contains the boundary, use the tool that seems most appropriate to select it, select
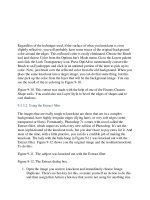
the new texture layer, and click the Mask icon in the Layers palette. In Figure 8-8,
it was more efficient to do a combination of copying areas and cloning. After the
major areas were copied, their layers were merged and the Clone Stamp was used
to blend any seams leftover from merging. The pier was extended one section at a
time by copying the same lifted layer over and over again.
Figure 8-8. Note the layer stack at far right. Several of these layers were merged
from other layers to allow cloning over seams and from merged layers.
8.1.7. Changing an Object's Color
You can recolor objects simply by selecting them and then filling the selection
(Edit Fill) with the Foreground Color. Of course, you have to choose the color
you want from the Color Picker before you issue the Fill command.
The New Color Replacement Brush
If the object you want to recolor has areas of color intermingled with the
color you want to replace, such as a garment that shows through between
strands of hair, it's a good idea to use Photoshop CS2's new Color
Replacement brush with Contiguous selected in the Options bar. Place
the cursor in the area of color that you want to replace and scrub to paint.
As long as you've set the Tolerance low enough, you won't recolor colors
that are different from the color you clicked on. You may have to
experiment a bit with the Tolerance setting. If you see the Color
Replacement Brush recoloring areas you don't want recolored, press
Opt/Alt and click to choose the color of the object you accidentally
colored and re-color it.
Rather than just selecting the item, as I mentioned, it's a good idea to lift the object
whose color you want to change to a new layer. By doing this you preserve the
precolored original on the background layer and isolate the object so that you don't
accidentally recolor the surrounding objects.
In fact, in catalog photography it's often a good idea to make copies of that layer so
that you can have a different color object on each layer. Then when you need to
output a file that shows the object in that color, you turn off the other laye
rs instead
of having to color over and over again.
Figure 8-9 shows a dress by Kashi Stone Designs that comes only in an off-white
natural hemp. However, we wanted to see what some of the items might look like
if they were dyed different colors. Since we'd already shot the entire line in the
style shown at left, I simply used the Extract filter to knockout the model so that
there was no change of overlapping the background. We didn't need to isolate the
skin or hair, since they weren't the same color as the
dress. We simply set the Color
Replacement brush in Contiguous mode, lowered the Tolerance to about 20
percent and painted away. It took less than 10 minutes to recolor the dress.
Figure 8-9. The dress on the right was recolored using the Replace Color brush.