Developing Large Web Applications- P13 potx
Bạn đang xem bản rút gọn của tài liệu. Xem và tải ngay bản đầy đủ của tài liệu tại đây (246.81 KB, 10 trang )
if (this.slider)
{
// Create placeholders for left and right buttons, but only if
// there are more slides than can fit the width given for them.
this.lb = YAHOO.util.Dom.getElementsByClassName
(
"btnl",
"img",
this.slider
);
this.lb = (this.lb && this.lb.length > 0) ? this.lb[0] : null;
}
YAHOO.util.Event.addListener
(
this.lb,
"click",
this.slideL,
this,
true
);
};
PictureSlider.prototype = new Object();
PictureSlider.prototype.slideL = function()
{
// Because when we registered this event handler we specified that
// PictureSlider should be the execution context, we have access here
// to everything encapsulated in the object using the this pointer.
alert(this.state1);
alert(this.state2);
};
Event-Driven Applications
A
good way to achieve further modularity within the JavaScript of a large web appli-
cation is to design your application to be more event-driven. This means using events
instead of method calls directly to communicate between modules. Event-driven ap-
plications define custom events to describe what modules are doing and trigger the
proper events at various points to communicate what has happened. Other parts of the
application listen for those events and respond by doing whatever they need to do.
Working with Events | 101
The reason that event-driven applications tend to be more modular than applications
tied together by method calls directly is that firing events and handling events are in-
dependent actions. That is, you can fire a new event or add or remove a handler without
directly affecting other parts of the system. In addition, JavaScript and its libraries’
support for event handling, presented earlier, give you everything you need to abstract
the tracking of custom events and their delivery to the correct recipients. You just have
to define which events you need and write the code to trigger or handle the events at
the right places.
Suppose you wanted to use a custom event to indicate that there was a change of
location (e.g., a postal code) associated with a web page after it was loaded. This could
occur after a visitor types a new location into an input somewhere, or for any number
of other reasons. Whatever the case, various modules on the page may want to know
about the change so that they can update themselves for the new location (e.g., a list
of new cars might need to update itself via Ajax with different listings).
Custom events usually provide a way to pass data (sometimes called a payload) along
with the event to provide additional details. For example, in the case of a location
change, you would likely want a handler to know what the location was changed to,
and possibly what the location was previously. You can learn more about custom events
from the YUI library at />Working with Animation
Many web developers think that you need to use Flash to achieve animation effects in
web browsers. In actuality, you can accomplish a great number of animated effects
using JavaScript. This section presents a few examples of some common types of ani-
mations that may be helpful in large web applications.
Motion Animation
A motion animation changes the position of an element over the course of time. You
can perform a motion animation with the YUI library using YAHOO.util.Motion. Exam-
ple 5-5 sets up a motion animation that moves an element specified by element over a
span of one second, with easing that starts quickly and decelerates toward the end
(YAHOO.util.Easing.easeOut). The example illustrates a few ways to move an element
using the parameter for attributes:
attr1
Move the element from its current position to position 450,0 on the page. You can
also specify from to use a starting point that is different from the current position.
102 | Chapter 5: Large-Scale JavaScript
attr2
Move the element from its current position 450 pixels to the right relative to its
current position. You can also specify from to use a starting point that is different
from the current position.
attr3
Move the element from its current position to position 450,0 on the page and move
via a smooth curve through point 200,200. You can also use from as usual.
Once you have set up the animation using YAHOO.util.Motion, start the animation by
calling animate on the object that was returned.
Example 5-5. Setting up a motion animation
attr1 =
{
points: {to: [450, 0]}
};
attr2 =
{
points: {by: [450, 0])
};
attr3 =
{
points: {to: [450, 0], control: [[200, 200]])
};
animation = new YAHOO.util.Motion
(
element,
attr1,
1,
YAHOO.util.Easing.easeOut
);
animation.animate();
Sizing Animation
A sizing animation changes the width and height of an element over the course of time.
You can perform a sizing animation with the YUI library using YAHOO.util.Anim. Ex-
ample 5-6 sets up a sizing animation that resizes an element specified by element over
a span of one second, with easing that starts slowly, speeds up, and decelerates again
toward the end (YAHOO.util.Easing.easeBoth). The example illustrates a few ways to
resize an element using the parameter for attributes:
Working with Animation | 103
attr1
Resize the element from its current width to 100 pixels. You can also specify
from to use a starting size that is different from the current size.
attr2
Resize the element from its current width up by 100 pixels. You can also specify
from to use a starting size that is different from the current size.
Once you have set up the animation using YAHOO.util.Anim, start the animation by
calling animate on the object that was returned.
Example 5-6. Setting up a sizing animation
attr1 =
{
width: {to: 100}
};
attr2 =
{
width: {by: 100)
};
animation = new YAHOO.util.Anim
(
element,
attr1,
1,
YAHOO.util.Easing.easeBoth
);
animation.animate();
Color Transition
A color transition changes various color properties of an element over the course of
time. You can perform a color transition using YAHOO.util.ColorAnim. Example 5-7 sets
up a color transition that colors an element specified by element over a span of one
second, with easing that starts slowly and accelerates toward the end (YAHOO.util.Eas
ing.easeIn). The example illustrates a few ways to transition the color of an element
using the attributes parameter:
attr1
Transition the background color for the element from its current color to #fff. You
can also specify from to use a starting color that is different from the current color.
attr2
Transition the foreground color for the element from #fff to #000. This setup
demonstrates how to use the from property.
104 | Chapter 5: Large-Scale JavaScript
Once you have set up the animation using YAHOO.util.ColorAnim, start the animation
by calling animate on the object that was returned.
Example 5-7. Setting up a color transition
attr1 =
{
backgroundColor: {to: "#fff"}
}
attr2 =
{
color: {from: "#fff", to: "#000"}
}
animation = new YAHOO.util.ColorAnim
(
element,
attr1,
1,
YAHOO.util.Easing.easeIn
);
animation.animate();
An Example: Chained Selection Lists
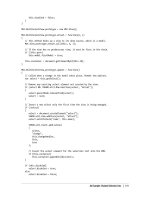
One example of highly modular JavaScript is an implementation for chained selection
lists. These provide a dynamic way to organize selection lists in which a selection in
one list causes a new set of options to be loaded in subsequent lists. For example,
imagine selecting a make-model-trim 3-tuple for a car (e.g., BMW, 09 3-Series, 335i)
from a set of selection lists. Rather than having a huge list of all make-model-trim
combinations, a better user experience is to have three selection lists: one for the makes,
one for the models, and one for the trims. Once you select a make, the model selection
list is populated with models for just that make. Once you select a model, the trim
selection list is populated with trims available for that make-model combination. Fig-
ure 5-1 shows three states of chained selection lists for cars: a) the initial state, b) after
selecting a make, and c) after selecting a model.
One way to implement chained selection lists is to create multiple instances of the same
selection object, which we’ll call MultiSelect, and link them together so that each can
respond to changes in the others based on their positions in the chain. Example 5-8
shows the HTML for the chained selection lists in Figure 5-1. It also shows the
JavaScript for setting up the chain of selection lists.
An Example: Chained Selection Lists | 105
Example 5-8. HTML for chained selection lists
<body>
<div id="nwcsel">
<form action=" " method="GET">
<div id="makesel">
</div>
<div id="modelsel">
</div>
<div id="trimsel">
</div>
<input class="nwcbtnsub" type="submit" value="Go" />
</form>
</div>
<!
Before the JavaScript for MultiSelect, you need to link files required
by the MultiSelect implementation. Chapter 7 presents techniques for
ensuring that everything a module requires (the HTML, CSS, JavaScript,
etc.) is able to travel with the module wherever the module is used.
>
<script src="http:// " type="text/javascript"></script>
<script type="text/javascript">
// Set up the name of the service for populating the chained selections.
Figure 5-1. Chained selection lists in three states
106 | Chapter 5: Large-Scale JavaScript
var proc = " ";
// Create the make selection list.
var makeSelect = new MVC.MultiSelect
(
"Select Make",
proc + "?req=mk",
"makesel",
"mk"
);
// Chain the model selection list.
var modelSelect = new MVC.MultiSelect
(
"Select Model",
proc + "?req=md",
"modelsel",
"md",
makeSelect
);
// Chain the trim selection list.
var trimSelect = new MVC.MultiSelect
(
"Select Trim",
proc + "?req=tr",
"trimsel",
"tr",
modelSelect
);
// Once selection lists in the chain have been created, initialize them.
makeSelect.init();
modelSelect.init();
trimSelect.init();
</script>
</body>
The JavaScript for the MultiSelect component uses Ajax and the MVC (Model-View-
Controller)
design pattern, which are presented in more detail in Chapter 8. MVC and
Ajax work together to let us make a new request for data each time a selection list should
be updated. This is far better than loading all combinations when the page first loads,
since all the combinations require a lot of data and most go unused. Because the
MultiSelect component is a generic component that uses MVC, a logical place to in-
clude it might be in the MVC library. Therefore, Example 5-9 shows that we have placed
the component within the MVC namespace.
Example 5-9. JavaScript for the MultiSelect object
// Place the component within the MVC namespace; create it if needed.
if (!window.MVC)
{
MVC = {};
}
An Example: Chained Selection Lists | 107
MVC.MultiSelect = function(text, url, id, name, prev)
{
// Pass a string for the selection list in text, or pass null for a
// default label; url is the URL to fetch options, id is the ID of
// the container in which to place the selection list, name is the
// select name attribute, and prev is the predecessor list, or null.
t = (text) ? text : null;
p = (prev) ? prev.view : null;
this.model = new MVC.MultiSelectModel(t, url);
this.view = new MVC.MultiSelectView(name, p);
this.view.attach(this.model, id);
}
MVC.MultiSelect.prototype.init = function()
{
// Call this method once the chain of selections has been set up.
this.model.init();
}
MVC.MultiSelect.prototype.getSelect = function()
{
// Return the select element currently in use by the selection list
// so that you can make whatever customizations are needed (e.g., you
// can append your own handlers or perform various DOM operations).
return this.view.getSelect();
}
One
of the most important features of the implementation for the MultiSelect com-
ponent is that it is implemented in a generic and modular fashion. You can chain any
number of them together and they work with any type of data, provided the data is
returned from the server in a data structure like that shown in Example 5-10. This is
an example of JSON (JavaScript Object Notation), presented in Chapter 6. This data
structure is simply an array of objects with two members: value and text. Each pair
represents one option in the list: value is the hidden value for each option, and text is
the displayable string.
Example 5-10. The data structure for loading chained selection lists
{
"options" :
[
{
"value": "bmw",
"text": "BMW"
},
{
"value": "honda",
"text": "Honda"
},
{
"value": "toyota",
"text": "Toyota"
108 | Chapter 5: Large-Scale JavaScript
}
]
}
Examples 5-11 and 5-12
present the implementation details for chained selection lists
using JavaScript. Together, the examples illustrate many of the ideas presented in this
chapter: the use of objects for namespacing, methods for accessing and modifying the
DOM, and event handling using object data instead of global data, among others.
Fundamentally, the implementation works by maintaining a model and a view for each
selection list in the chain.
Example 5-11 shows the implementation for MultiSelectModel. This is the model re-
sponsible for storing the current set of options for one selection list in the chain. When-
ever the model changes, it notifies the view attached to the model automatically so that
the view can update itself with the new options.
You’ll see in Chapter 8 that in MVC, a model tells a view to update itself by calling the
view’s update method. For now, you just need to know that this happens as follows:
setState sets the data in the model; it then calls notify in the model; notify then calls
update for each view attached to the model. The setState and notify methods are
defined by the Model prototype object, so you will not see them defined in the examples
here.
Example 5-11. MultiSelectModel object for the chained selection list implementation
MVC.MultiSelectModel = function(text, url)
{
MVC.Model.call(this);
// All selection lists use an empty string as the marker for the
// label appearing in the selection list before an option is chosen.
this.labelValue = "";
if (text)
this.labelText = text;
else
this.labelText = "Select";
// This is the URL to contact for loading options.
this.proc = url;
// If the model ends up being the model for the first selection list
// in the chain, the view with this model will set this member.
this.firstModel = false;
}
MVC.MultiSelectModel.prototype = new MVC.Model();
MVC.MultiSelectModel.prototype.init = function()
{
if (this.firstModel)
{
An Example: Chained Selection Lists | 109
// Initialize options for the first selection list in the chain.
this.setState("GET", this.proc);
}
else
{
// Initialize other selection lists to an empty array of options.
// Do the view notification explicitly since we're not using the
// setState method here (which would do the notification itself).
this.state.options = new Array();
this.notify();
}
}
MVC.MultiSelectModel.prototype.abandon = function()
{
alert("Timeout occurred while trying to load selection options.");
}
MVC.MultiSelectModel.prototype.recover = function()
{
alert("Problem occurred while trying to load selection options.");
}
Example 5-12
shows the implementation for MultiSelectView. This is the view object
for one selection list in the chain. MultiSelectView defines the update method invoked
by a model whenever there is a new set of options to render. It also defines
changeHandler, an event handler for whenever the selected value in the selection list
changes. When the selection changes, the view sets the next model in the chain to a
new set of selection list options. It does this in changeHandler by calling setState for
the next model. This, in turn, produces a call to the update method of the view attached
to that model. MultiSelectView creates a select element if the view doesn’t already have
one in the HTML.
Example 5-12. MultiSelectView object for the chained selection implementation
MVC.MultiSelectView = function(n, p)
{
MVC.View.call(this);
this.name = n;
if (p)
{
// The selection list is not first in the chained selections.
this.prev = p;
p.next = this;
this.disabled = true;
}
else
{
// This selection list has no predecessor, so it's the first one.
this.prev = null;
this.next = null;
110 | Chapter 5: Large-Scale JavaScript