Developing Large Web Applications- P9 pptx
Bạn đang xem bản rút gọn của tài liệu. Xem và tải ngay bản đầy đủ của tài liệu tại đây (240.26 KB, 10 trang )
Example 4-8. The Popular New Cars module
<div id="nwcpop" class="default">
<div class="hd">
<div class="tagline">
<cite>
View popular cars from Honda
</cite>
</div>
<div class="logo">
<img src="http:// /logo_honda.gif"/>
</div>
</div>
<div class="bd">
<ul class="pri">
<li>
<a href="http:// ">2009 Honda Accord</a>
</li>
<li>
<a href="http:// ">2009 Honda Civic</a>
</li>
<li>
<a href="http:// ">2009 Honda Civic Hybrid</a>
</li>
</ul>
<ul class="sec">
<li>
<a href="http:// ">2009 Honda Civic Sedan</a>
</li>
<li>
<a href="http:// ">2009 Honda CR-V</a>
</li>
<li>
<a href="http:// ">2009 Honda Element</a>
</li>
</ul>
</div>
</div>
Example 4-9. Presentation switching for the Popular New Cars module
/* Apply this CSS to all presentations of the module. */
#nwcpop .hd
{
position: relative;
}
#nwcpop .hd .tagline
{
position: absolute;
padding: 5px 0 0 15px;
}
#nwcpop .hd .tagline cite
{
font: bold 77% verdana;
color: #000;
}
Modular CSS | 61
#nwcpop ul
{
list-style-type: disc;
margin: 0;
padding: 0;
}
#nwcpop li
{
margin-left: 15px;
line-height: 1.3em;
}
/* Apply this CSS to just the default version of the module. */
#nwcpop.default .hd
{
width: 630px;
background: url(http:// /top_630.gif) #fff no-repeat;
padding-top: 8px;
}
#nwcpop.default .tagline
{
width: 475px;
}
#nwcpop.default .logo
{
padding: 0 15px 0 0;
background: url(http:// /mid_630.gif) repeat-y;
text-align: right;
}
#nwcpop.default .bd
{
position: relative;
background: url(http:// /btm_630.gif) no-repeat;
background-position: bottom left;
padding: 10px 15px 15px;
}
#nwcpop.default .pri
{
width: 295px;
}
#nwcpop.default .sec
{
position: absolute;
top: 10px;
right: 15px;
width: 295px;
}
/* Apply this CSS to just the compact version of the module. */
#nwcpop.compact .hd
{
width: 300px;
background: url(http:// /top_300.gif) #fff no-repeat;
62 | Chapter 4: Large-Scale CSS
padding-top: 8px;
}
#nwcpop.compact .tagline
{
width: 145px;
}
#nwcpop.compact .logo
{
padding: 0 15px 0 0;
background: url(http:// /mid_300.gif) repeat-y;
text-align: right;
}
#nwcpop.compact .bd
{
background: url(http:// /btm_300.gif) no-repeat;
background-position: bottom left;
padding: 10px 15px 15px;
}
In Chapter 7,
we’ll examine how to manage presentation switching in a nicely encap-
sulated, programmatic way using PHP. In practice, highly stylized modules often re-
quire a combination of presentation switching and programmatic changes to the
information architecture.
Standard Module Formats
As a general rule, it may be worthwhile to group parts of modules into some common
divisions. Besides adding further elements of structure to your information architec-
ture, they can provide additional hooks for styling. For instance, Examples 4-8 and
4-9 apply background images for the rounded borders in the presentation. These are
conveniently placed on the hd division (the header) and bd division (the body). Divisions
of this type often contain other divisions. For example, an outer division with presen-
tation for the header or body encapsulates an inner division that contains the content
for either section.
Some examples of divisions applicable to most modules (just as they are to entire pages)
are a header, a body, and a footer, to which you might give the classes hd, bd, and ft,
respectively. This is the case in Example 4-8. Even when one of these sections is empty,
it may be useful to add the section for future use, so we could have also added an empty
division with the class ft after the bd division in Example 4-8. Undoubtedly, there are
other standard divisions that you may choose to apply to certain modules in certain
types of applications. Microformats are other examples of standard formats that you
might incorporate within some modules. You can read more about microformats at
.
Examples 4-10 and 4-11 illustrate the use of standard header, body, and footer divisions
for a module. In these examples, a module with the ID nwclst (New Car Listings) is
nested within a module with the ID nwcsrs (New Car Search Results). Examples 4-10
and 4-11 also demonstrate that, although standard formats are useful, you do have to
Modular CSS | 63
be mindful of side effects when applying them within nested modules (in actuality, the
same problem exists when you use any commonly used class within nested modules).
In these situations, when you apply CSS to the outer instance of the class, the cascading
nature of CSS applies the same styles to any inner instances as well because the inner
instances are descendants, too, just deeper ones.
Example 4-10. Nested modules using a standard module format (with side effects)
<div id="nwcsrs">
<div class="hd">
</div>
<div class="bd">
<div class="pri">
<div id="nwclst">
<div class="hd">
<! This hd gets styling from the outer hd too. >
</div>
<div class="bd">
<! This bd gets styling from the outer bd too. >
</div>
<div class="ft">
<! This ft gets styling from the outer ft too. >
</div>
</div>
</div>
<div class="sec">
</div>
</div>
<div class="ft">
</div>
</div>
Example 4-11. Applying CSS for a standard module format (with side effects)
#nwcsrs .hd
{
/* Add styling for the header section of the nwcsrs module. */
}
#nwclst .hd
{
/* The nwclst module hd gets styles from the nwcsrs hd too. */
}
Fortunately, the solution for guarding against side effects within nested modules is
rather simple: use the unique module ID as a prefix for the common classes that may
occur within nested modules. Examples 4-12 and 4-13 illustrate how this resolves the
64 | Chapter 4: Large-Scale CSS
issue. Small, self-contained modules generally do not exhibit this issue; therefore, we
will leave the shorter classes for the nwclst module (the inner one) intact.
Example 4-12. Nested modules using a standard module format (no side effects)
<div id="nwcsrs">
<div class="nwcsrshd">
</div>
<div class="nwcsrsbd">
<div class="nwcsrspri">
<div id="nwclst">
<div class="hd">
<! This hd gets only its own stlying now. >
</div>
<div class="bd">
<! This bd gets only its own styling now. >
</div>
<div class="ft">
<! This ft gets only its own styling now. >
</div>
</div>
</div>
<div class="nwcsrssec">
</div>
</div>
<div class="nwcsrsft">
</div>
</div>
Example 4-13. Applying CSS for a standard module format (no side effects)
#nwcsrs .nwcsrshd
{
/* Add styling for the header section of the nwcsrs module. */
}
#nwclst .hd
{
/* The hd for the nwclst module gets only its own styles now. */
}
Positioning Techniques
When
you eliminate presentation from your information architecture, a significant part
of how you position your modules now must be accomplished within the presentation
layer. The document flow that is inherent in your information architecture will dictate
Positioning Techniques | 65
to some extent certain aspects of positioning intrinsically—for instance, by default,
modules appear on the page in the order specified—but the rest must be accomplished
using CSS. As a result, a good understanding of some basic positioning techniques in
CSS is essential. These provide the foundation for creating the layouts and containers
in which to arrange your modules. The same positioning techniques are useful for
positioning elements within modules as well.
CSS Box Model
Because positioning techniques are often sensitive to the size of our elements, it is
important at the outset to have a fundamental understanding of the CSS box model
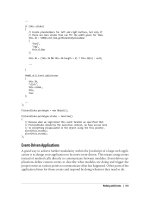
and how it affects an element’s size. The parts of an element that figure into an element’s
size, working from the outermost edge of an element inward, are its margin, border,
padding, and content area (see Figure 4-2).
Figure 4-2. The CSS box model
Margin
The
margin is the buffer zone between the element and others around it. You
specify how much space to leave around each edge. Even if your element has a
background, this margin is empty and transparent.
Border
The border is the line (or other stylized decoration) that forms a perimeter.
You can specify a thickness, style, and color for the border.
Padding
The padding is the buffer zone that appears inside the border of an element. You
specify how much space to leave within each edge before the content begins.
Content area
The content area is the innermost region of an element, holding your content. You
can set its width and height, among other properties.
The size of an element in either direction (width or height) is the space in that direction
(horizontally or vertically) occupied by all four of these properties. If you don’t specify
66 | Chapter 4: Large-Scale CSS
the size of the content area explicitly (using the width or height properties), the content
area expands in that direction to fit the space required by the content.
Although browsers used to be inconsistent in how they calculated the size of an element,
all popular browsers now handle the calculation consistently as just described. Exam-
ple 4-14 shows the CSS for a module that yields a width of 320 pixels:
• 10 pixels for the left margin
• 2 pixels total for left and right borders of 1 pixel each
• 18 pixels total for left and right padding of 9 pixels each
• 290 pixels for the content area
The overall height of the module expands to whatever height is needed for the content
since the height is not specified; however, this height will include an additional 20 pixels
(2 pixels total for both the top and bottom borders of 1 pixel each, plus 18 pixels total
for both the top and bottom padding of 9 pixels each). In the layouts and containers
presented later in the chapter, we will fix the widths and let the heights expand to fit
the content as needed, which is a common approach. In Example 4-14, we’re setting
the margin separately using CSS scoped at the page level to demonstrate margins
changing based on where the module is used.
Example 4-14. Setting CSS properties that affect sizing
/* Styles for the module set for wherever the module will be used. */
#nwcqry
{
width: 290px;
border: 1px solid #fafafa;
padding: 9px;
}
/* Scoping at the page level to target the margin for just one use. */
#nwcsrspage #nwcqry
{
margin-left: 10px;
}
Document Flow
Although the goal is to keep information architecture and presentation separate in a
large web application, they are, of course, related. The information architecture is
largely responsible for the normal flow of elements on a page, and many CSS rules are
applied based on the structure of the HTML markup. In the normal document flow,
by default, inline elements (e.g., span, strong, img, etc.) flow side by side; block-level
elements (e.g., div, p, form, etc.) appear on their own line. However, you can always
alter this using CSS. To make an inline element appear as a block-level element, you
Positioning Techniques | 67
can set display: block for the element. Similarly, to make a block-level element appear
as an inline element, you can set display: inline. If you set display: none, you remove
the element from the document flow altogether, and elements around it are closed up
as if the element were never there. To conceal an element without removing it from the
document flow, use visibility: hidden.
Even though you can change the CSS display property for an element,
you must always honor the original HTML-level display of an element
within your information architecture. For example, regardless of what
you do in CSS, you cannot put block-level HTML elements within inline
HTML elements, because it may cause serious bugs in some scenarios.
You can also use CSS to move elements around the page and make them appear out of
their normal order. The default, where elements flow down and across the page, is
called static positioning. The most useful alternatives are relative positioning,
absolute positioning, and floating.
Relative Positioning
You specify relative positioning by setting the CSS property position to relative. Rel-
ative positioning lets you position an element relative to where it would have appeared
in the normal document flow without disrupting the normal flow of other elements on
the page. It’s often used to nudge an element slightly into a desired position without
affecting neighboring elements. The following CSS uses relative positioning to position
a citation within the nwclst module five pixels higher than it would appear otherwise.
#nwclst cite
{
position: relative;
top: -5px;
}
Absolute Positioning
You specify absolute positioning by setting the CSS property position to absolute.
Absolute positioning removes an element from the normal document flow and posi-
tions it relative to the containing block. Because absolutely positioned elements are
removed from the document flow, other elements are superimposed on the same lo-
cation as if the absolutely positioned elements were not there.
The containing block is the first block-level ancestor of the absolutely positioned ele-
ment that has something other than static positioning itself; if no ancestor qualifies,
the absolutely positioned element is positioned relative to either the html or body ele-
ment, depending on the browser. This lesser-known nuance of absolute positioning is
68 | Chapter 4: Large-Scale CSS
very important because it has dramatic implications for the actual location where an
absolutely positioned element ends up.
The logical choice, then, for establishing the containing block explicitly is to apply
relative positioning to a chosen ancestor element. If you avoid specifying coordinates
for the ancestor (i.e., using top, left, etc.), the element remains in its original position
within the document flow, visually unaffected.
One important use of absolute positioning is to position block-level elements side by
side, especially div elements with a set width (you cannot simply set display: inline,
because for layout purposes, you usually require other benefits that block-level ele-
ments provide related to margins, borders, and padding). As long as you know which
of the elements will be the tallest, you can use that element to occupy the necessary
vertical space in the document flow while you absolutely position the other element or
elements beside it. This approach to positioning elements side by side provides you
with the benefit of not having to worry about special measures to get the parent
element to size itself appropriately, unlike with floating elements (see “Float-
ing” on page 70). Absolute positioning often works well for positioning small sections
of HTML markup side by side.
Examples 4-15 and 4-16 show the HTML markup and CSS relevant to absolutely po-
sitioning the tagline and logo blocks for the default presentation of the Popular New
Cars module presented in Figure 4-1. Notice that the tagline block, the first division in
the module’s normal flow, is the one that we absolutely position. This is required so
that the logo block is superimposed at the same vertical position; otherwise, because
the logo division follows the tagline division, the tagline would hog its own vertical
block and the logo would get the next block down.
Now that we have positioned the tagline and logo at the same position vertically, the
text-align attribute, applied to the logo block at the end of Example 4-16, pushes it
to the right. Also notice that the hd division for the module has position set to
relative so that it becomes the containing block for the tagline block.
Example 4-15. The Popular New Cars divisions for absolute positioning
<div id="nwcpop" class="default">
<div class="hd">
<div class="tagline">
<cite>
View popular cars from Honda
</cite>
</div>
<div class="logo">
<img src="http:// /logo_honda.gif" />
</div>
</div>
</div>
Positioning Techniques | 69
Example 4-16. Absolute positioning in the Popular New Cars module
#nwcpop .hd
{
position: relative;
}
#nwcpop .hd .tagline
{
position: absolute;
padding: 5px 0 0 15px;
}
#nwcpop .hd .tagline cite
{
font: bold 77% verdana;
color: #000;
}
#nwcpop.default .hd
{
width: 630px;
background: url(http:// /top_630.gif) #fff no-repeat;
padding-top: 8px;
}
#nwcpop.default .tagline
{
width: 475px;
}
#nwcpop.default .logo
{
padding: 0 15px 0 0;
background: url(http:// /mid_630.gif) repeat-y;
text-align: right;
}
Floating
To
float an element, set the CSS property float to left or right. In some ways, floated
elements are removed from the normal flow of the document, but they still affect the
document’s layout. In general, when you float an element, other content flows around
it. However, if you float a series of elements in sequence, floating provides a powerful
means of arranging block-level elements side by side as well.
The rule with floating is that if multiple elements occupy the same vertical location and
all of them have float set to left, they appear in order from left to right. Therefore,
you can use this technique to place two elements side by side. You could float one to
the left and one to the right, but floating everything to the left makes for simpler code
if you want to expand the layout to include more than two sections.
70 | Chapter 4: Large-Scale CSS