Adobe illustrator cs4- P14 pptx
Bạn đang xem bản rút gọn của tài liệu. Xem và tải ngay bản đầy đủ của tài liệu tại đây (3.12 MB, 30 trang )
CHAPTER 11: EXPLORING THE WORLD OF 3D
364
The most important part of this exercise is to try to visualize where the
invisible axis is. When you think of a barbell, you may think of it as you
normally see it—lying on the ground in a horizontal format. Because the
Illustrator Revolve effect always uses a vertical axis, you had to think of the
barbell as standing on its side. Once it’s created, you can use the track cube
to rotate it into any position or orientation you need.
The examples you’ve tried so far should help fuel your creativity and give
you the information you need to create complex 3D objects on your own.
The Importance of Applying 3D E ects to Groups
When applying any 3D e ect, it’s important to understand its limitations so you can gure out how to make it
do what you want. Previously in this chapter , we stated that the Illustrator 3D e ects have two main limitations:
3D objec
ts cannot intersect each other, and each 3D object lives in its own 3D world. Hence, each object main-
tains its own individual vanishing point or invisible axis. Basically, multiple objects in your document cannot
share a single vanishing point, shar
e the same perspective, or revolve around the same axis.
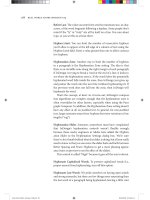
If you were paying attention in Chapter 5, “Organizing Your Artwork,” you remember that e ects produce a
di erent appearance when applied at the group or layer level instead of at the object level. Because 3D is a
live e ect, the same rules for how groups work apply here as well. If you apply a 3D e ect at the group level,
all objects inside that group can share the same vanishing point or perspec
tive.
In the example of the barbell you just created, you were able to create a single axis that all the objects shared
by grouping all the objects together before applying the 3D e ect. Had you selected the objects in the le and
applied the 3D Revolve e ect without rst creating a group, the result would be di erent and not what you
would expect (Figure 11.46).
Figure 11.46 If you take the same barbell
example but skip the step that collects all
the shapes within a single group, the result
is quite di erent.
LOOKING INSI DE THE 3D EFFECT
365
Applying the 3D Rotate Effect
The Revolve effect doesn’t add dimension to an object. Rather, the effect
allows you to position a 2D object in a 3D space. Basically, the 3D Rotate
effect does the same as the 3D Extrude effect without adding any depth. To
apply this effect, select a vector object on the artboard, and choose Effect >
3D Rotate to open the 3D Rotate Options dialog box. The settings for this
3D effect are identical to those we’ve already discussed, although take note
that the 3D Rotate effect is limited to far fewer options (Figure 11.47).
Most notably, you can specify only the Diffuse Shading or No Shading
option, there are no bevels, and there is no support for artwork mapping
(which we’ll cover next).
The 3D Rotate effect can be useful for applying distortion to artwork, such
as making artwork look as if it’s mounted on a billboard. It also enables you
to add perspective to your artwork.
Figure 11.47 Although
there is a More Options
button in the 3D Rotate
Options dialog box, you’ll
nd it doesn’t really o er
that much.
CHAPTER 11: EXPLORING THE WORLD OF 3D
366
Mapping Artwork to 3D Surfaces
One of the features that really sets the Illustrator 3D effect apart from the
3D effects in other vector applications is the ability to map 2D artwork onto
the surface of a 3D object. This method of combining 2D and 3D graphics
is called artwork mapping.
So that you understand what artwork mapping really is, let’s take a closer
look at a 3D cube. As we discussed earlier in the chapter, a 3D cube has six
surfaces. Each of these surfaces is treated as a separate entity, and artwork
mapping is the process of placing artwork on these surfaces (Figure 11.48).
You need to know a few facts before working with artwork mapping:
• Artwork must fi rst be defi ned as a symbol before it can be mapped to a
3D surface. This is actually pretty cool because as you modify a symbol,
you will see it automatically update on any 3D surfaces. Refer to
Chapter 9, “Drawing with Effi ciency,” for detailed information on how
to create and modify symbols.
• You can’t map (wrap) a single symbol across multiple surfaces of a 3D
object. If your 3D object has multiple surfaces, you can map symbols
to each side individually (Figure 11.49).
Figure 11.48 Starting
with a normal square, a 3D
Extrude e ect produces a
cube with six surfaces. When
2D artwork is placed onto
these surfaces, the result is
a 3D object with artwork
mapping.
Figure 11.49 To create the
appearance of art work that
wraps ar
ound multiple sides
of an object, you have to
create multiple symbols
and map each section
separately.
LOOKING INSI DE THE 3D EFFECT
367
• When rendering a 3D object, Illustrator uses corner anchor points to
defi ne a new surface. Smooth anchor points will not defi ne a new surface.
When drawing your art, carefully specifying where corner or smooth
anchor points appear on your path gives you greater control over how
many surfaces are created and where they appear (Figure 11.50).
• Stroked objects make things more complicated. As you learned earlier
in
the chapter, objects with fi lls and strokes applied result in an object
that has many more surfaces, which makes it diffi cult to work with.
When you’re creating a 3D object that will have artwork mapped to it,
it’s best to avoid using stroked paths.
• Although the 3D effect in Illustrator produces vector results, some-
times the 3D effect has to rasterize mapped artwork. If your mapped
artwork contains gradients or raster images (such as those placed from
Photoshop), Illustrator renders them at the resolution that is set in the
Figure 11.50 By using cor-
ner anchor points at certain
points on the path of this
pro le of a water bottle, you
can specify several surface
areas to which you can
map art.
CHAPTER 11: EXPLORING THE WORLD OF 3D
368
Document Raster Effects Settings dialog box. Even if your mapped art
contains a high-resolution Photoshop fi le, Illustrator resamples it to
match the resolution set in the Document Raster Effects Settings dialog
box. For best results, make sure the resolution setting in this dialog box
is high enough for your output needs. Refer to “Massaging Pixels in
Illustrator” in Chapter 7 for more information about the settings in this
dialog box.
Specifying Mapped Artwork
To map artwork onto the surface of a 3D object, you must fi rst apply a 3D
effect to an object. Then, from either the 3D Extrude & Bevel Options dia-
log box or the 3D Revolve Options dialog box, click the Map Art button to
open the Map Art dialog box (Figure 11.51). If the Preview check box in
the resulting Map Art dialog box isn’t selected, select it so you can see what
your mapped artwork will look like as you adjust it.
Before you can map art onto your object, you have to choose onto which
surface of the object you want to place your artwork. At the top of the
Map Art dialog box, the buttons with arrows allow you to navigate or step
through each of the surfaces of your object. As you step through each sur-
face, Illustrator displays the selected surface in the center of the Map Art
dialog box. In addition, Illustrator tries to help you identify the selected
surface by highlighting it with a red outline on the artboard (Figure 11.52).
Depending on the color of your object, this red outline could be helpful, or
it could be barely visible.
Figure 11.51 The Map Art
button appears directly
below the Cancel button in
the 3D Revolve Options or
3D Extrude & Bevel Options
dialog box.
LOOKING INSI DE THE 3D EFFECT
369
The surface that appears in the Map Art dialog box is shaped as if it is laid
fl at. You’ll notice as you step through the different surfaces on your object
that some show a light gray background whereas others show a dark gray
background. Some surfaces may even show a background that is dark gray
only in certain areas. This is Illustrator letting you know which surfaces, or
which parts of a surface, are not visible or are hidden from view (Figure
11.53). As you would expect, if you choose to use the track cube to view
your object from a different perspective, the shaded surface areas in the Map
Art dialog box update accordingly.
Once you’ve chosen the surface you want to map art onto, use the Symbol
pop-up menu to choose a symbol. The selected symbol appears on the sur-
face area in the Map Art dialog box with a bounding box. You can drag the
symbol to position it to your liking on the surface, and you can also drag the
Figure 11.52 Illustrator
tries to help you iden-
tify each of the surfaces,
although the alignment of
the red outlines isn’t always
perfect on the artboard.
Figure 11.53 This surface,
which is the section that
connects the body and
neck of the wat
er bottle,
has both shaded and non-
shaded sections.
TIP It’s easier if you
create your symbols at
the correct size before you
map them to a surface; this
way , you won’t have to worry
about getting just the right
size or position in the Map Art
dialog box.
CHAPTER 11: EXPLORING THE WORLD OF 3D
370
handles to resize it (Figure 11.54). As you adjust the position of the symbol,
you will see the preview update on the actual 3D object on the artboard.
Alternatively, you can use the Scale to Fit button at the bottom of the Map
Art dialog box to have Illustrator resize your symbol to fi t to the surface,
although it does so nonproportionally.
Once you’re happy with the size and position of your symbol on the selected
surface, use the arrows at the top of the dialog box to navigate to another
side to map additional symbols, as needed. At any time, you can click the
Clear button to remove a symbol from a selected surface, or you can click
the Clear All button to remove symbols from all surfaces at once.
By default, Illustrator calculates shading and lighting only for the actual sur-
face of a 3D object, not artwork that is mapped to a 3D surface. Illustrator
does this purely for performance reasons. We mentioned earlier that
Illustrator uses blends to calculate shading, and the process of breaking
down intricately mapped artwork and shading each element with blends
takes quite a bit of processing. However, to get a realistic appearance, most
likely you will want your mapped artwork to be shaded, even if it takes a
bit longer to do so. Selecting the “Shade Artwork (slower)” check box forces
Illustrator to shade both the surface of your object and the mapped artwork.
Figure 11.54 You can move
and rotate a symbol so that
it appears as you need it to
on the surface of the object.
NOTE A surface can
contain only one sym-
bol. If you want multiple art
items to appear on a single
surface, you have to de ne
a single symbol with all the
elements in it.
LOOKING INSI DE THE 3D EFFECT
371
This setting applies to the entire object, and you don’t need to turn it on for
each individual surface.
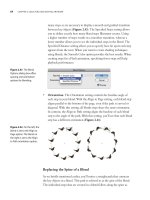
The last setting in the Map Art dialog box is the Invisible Geometry check
box; invisible geometry is a slightly technical phrase. When this option is
selected, Illustrator hides the actual 3D object on your artboard and displays
just the mapped artwork. The result is a symbol that appears to fl oat in space.
A good example of when this setting might be useful is when you want to
make text appear as if it were wrapped around a sphere (Figure 11.55).
When you’re happy with your artwork mapping settings, click OK to accept
the settings in the Map Art dialog box, and then click OK to close the 3D
dialog box.
What If…You Add Transparency to 3D?
Throughout this entire book, you’ve seen how transparency is integrated
into the Illustrator feature set with features such as soft drop shadows and
opacity masks. You might ask yourself, “What if I added transparency to a
3D object?” After all, wouldn’t it be cool to make a 3D object that was also
transparent so that you could see right through to the back of the object?
Have no fear—as if the 3D effect weren’t cool enough, you can also create
transparent 3D objects—but you’ll have to address two issues in order to get
transparency and 3D to work together.
Figure 11.55 You can map
artwork around a sphere
(left), and by using the
Invisible Geometry option in
the Map Art dialog box, you
can hide the sphere leaving
just the artwork (right).
CHAPTER 11: EXPLORING THE WORLD OF 3D
372
Applying Transparency
As you learned earlier in the chapter, before Illustrator applies a 3D effect to
an object, it breaks the object down into its components (fi lls and strokes). In
that process, transparency attributes are tossed out, and just the appearance
remains. For example, if you set an object to 50% opacity, the 3D effect sets
the object to a 50% tint of that color, but you won’t be able to see through to
what’s behind the object. The trick is that you have to sneak transparency into
the 3D effect without letting the effect know about it. You can accomplish this
in one of two ways:
• If you have a single object that you’re working with, you can target
just the fi ll of the object in the Appearance panel and then change the
Opacity value (Figure 11.56).
• Alternatively, you can create a group (you can create a group of one
object, if you’d like). If transparency is applied to any object within a
group, that transparency makes it through the 3D effect unscathed.
Drawing Hidden Sides
Another useful nugget of information that you learned earlier is that, by
default, Illustrator renders only the parts of a 3D object that are visible. To
speed up the rendering process, Illustrator doesn’t bother drawing the sides of
a 3D object that are hidden from view. Well, this presents a problem if you’re
creating an object that is transparent and you expect to see through the front
of the object to the back side. After all, if Illustrator isn’t drawing the hidden
side of an object, how does Illustrator know what the back side of the object
looks like? The answer is that you have to force Illustrator to draw the hidden
NOTE If your symbol
contains transparency
or overprint settings, those
will not interact with the 3D
object itself. For example, if a
symbol uses a blending mode
and you mapped that symbol
to a 3D object, you wouldn’t
see the symbol multiplying
with the 3D shape, because
the appearanc
e is limited to
the symbol itself.
Figure 11.56 When you’re
using the Appearance panel,
targeting the ll allows you
to apply transparency to just
the ll and not the entire
object.
LOOKING INSI DE THE 3D EFFECT
373
sides—you do this by turning on the Draw Hidden Faces option in the 3D
Extrude & Bevel Options or 3D Revolve Options dialog box.
Once you’ve addressed the issues of transparency and hidden sides, you’ll
end up with a 3D object that is truly transparent (Figure 11.57). Adding
transparency to 3D objects opens new doors to creativity, such as when
creating transparent glass bottles and vases. And don’t forget to throw some
artwork mapping in there as well. If you map art to a transparent 3D object,
you’ll be able to see through to the art on the other side. Now you’ve got to
admit—that’s pretty freakin’ cool, no?
What If…You Blend 3D Objects?
In Illustrator, you can select two objects and choose the Object > Blend >
Make feature to morph one vector shape into another. This technique, cov-
ered in Chapter 2, can be useful for a variety of tasks including shading,
special effects, and object distribution. However, what if you created a blend
using two 3D objects? Would the 3D effect morph as well, along with the
blend?
The answer is, yes, it will! If you apply a 3D effect to an object and then
duplicate that object (so you have two identical objects), you can create a
blend between them. Because 3D is a live effect, you can edit the 3D effect
of one of the objects and change the position so you’re viewing the object
Figure 11.57 This martini
glass is transparent, allowing
you to see what is inside.
CHAPTER 11: EXPLORING THE WORLD OF 3D
374
from a completely different angle. The blend will then update—and gener-
ate the intermediate steps (Figure 11.58).
Not impressed? Well, in Chapter 13, “Web and Mobile Design,” you’ll learn
how to use blends to create instant Flash animations that you can put on
your website. That means you can create a box and have it rotate in space.
Hey, wait—don’t go running off to that chapter yet—we still have plenty of
cool stuff to cover here.
What If…You Apply a 3D Effect to a Graph?
In Chapter 10, “Drawing with Data,” you learned that a graph consists of a
group of objects. And because a 3D effect applied at the group level results
in all the objects in that group sharing the same effect, what happens if you
apply a 3D Extrude effect to a graph? The answer is that you get a powerful
way to present numbers in an eye-catching manner (Figure 11.59). And if
you add transparency to a 3D graph—well, you can see where that might
lead.
At the end of the day, the 3D effect in Illustrator has many creative uses.
Now that you understand everything there is to know about 3D in
Illustrator, the only limit is your own imagination.
Figure 11.58 By creating
a blend between spheres
with mapped artwork, you
can create the illusion of the
sphere rotating.
Figure 11.59 Adding
3D e ects to just about
anything, such as graphs,
for example, can turn
something ordinary into
something unique and
att
ention-grabbing.
Chapter
Twelve
Working with Images
There’s no velvet rope barring entry to the Adobe
Illustrator exclusive vector graphics club. Pixels
are always welcome inside. In fact, you’ve already
learned how certain live effects use pixels to pro-
duce their appearance. In Illustrator, vectors and
pixels peacefully coexist, and you can benefi t by
combining both vectors and pixels (such as adding
a soft drop shadow to text). You shouldn’t feel you
have to choose only one graphic type or the other.
Although Illustrator does have the ability to sup-
port pixels in some ways (as you’ll see throughout
this chapter), it in no way replaces the need for applications such as Adobe
Photoshop CS4. Quite the contrary; in this chapter, you’ll see how you can
bring pixel-based images from Photoshop into Illustrator documents. You
will also learn how both Photoshop and Illustrator can work together by
enabling you to share editable content between them. You can then focus
on producing the kinds of graphics you need by relying on the strengths of
each of these powerful applications.
So, turn up the music and feel the pulsing beat of vectors dancing with pix-
els, because this chapter will also cover the Illustrator ability to assimilate
pixels and convert them into vector paths using a feature called Live Trace.
375
CHAPTER 12: W ORKING WITH IMAGES
376
PLACING RASTER-BASED FILES
When creating designs and layouts in Illustrator, at times you will need to
incorporate raster-based content, such as photographs. Naturally, these images
are neither created nor edited in Illustrator—raster-based applications such
as Photoshop take care of doing that. However, you can place raster-based
content into your Illustrator fi le. In fact, Illustrator works very much like a
page layout application in this way.
When you place an image, Illustrator can incorporate that image in the fi le
in two ways. In the fi rst technique, Illustrator places a preview of the image
on your artboard, but the image fi le itself is not incorporated into the
Illustrator fi le. The image fi le exists as an external reference, separate from
the Illustrator fi le. This technique is referred to as place-linking because the
image fi le is linked to the Illustrator document. If you were to misplace
the linked fi le, Illustrator would not be able to print the image.
In the second technique, Illustrator places the actual image fi le in the
Illustrator document and incorporates the image into the Illustrator fi le.
This is referred to as place-embedding, where the image becomes part of
the Illustrator fi le.
You can choose which technique you want to use when you physically
place the fi le. For a detailed explanation of the numerous benefi ts and
caveats of using each technique, refer to the sidebar “Place-Linked Files
and Place-Embedded Files.”
Placing an Image
You can place a raster fi le into an Illustrator document using one of three
methods. You can either place a fi le, open it directly, or drag it right onto
your artboard. Each method has its own benefi ts; your task is to determine
which one you will use.
Method One: Placing a File
When you already have a fi le open and you need to place an image into your
document, this method offers the most options and is one of the most com-
monly used ways to place a fi le:
PLAC ING RASTERBASED FILES
377
1. From an open document, choose File > Place, and navigate to a raster
fi le on your hard drive or server.
2. In the Place dialog box are three check boxes (Figure 12.1). Select one
of the following options:
• Select the Link check box to place-link the fi le (deselecting the
Link check box place-embeds the fi le).
• Select the Template check box to have the image automatically
placed on a template layer.
• Select the Replace check box to have the image replace one that
is already selected on the artboard.
3. Click the Place button to place the fi le into your document.
Method Two: Opening a File
Choose File > Open, choose a raster fi le on your hard drive or server, and
then click the Open button. Illustrator creates a new letter-sized document
and places the image in the center of it. When you’re opening a raster fi le in
this way, the image is always place-embedded in your Illustrator document.
The document takes on the color mode of the image.
Method Three: Dragging a File
From Adobe Bridge, from the Finder on Mac OS, or from any Windows
Explorer window, drag a raster fi le right onto your Illustrator artboard.
You can also select multiple fi les and place them all at once (Figure 12.2).
Using this method, Illustrator place-links the fi les. To place-embed images
while dragging them into your document, hold the Shift key while
dragging the images.
TIP See “Using
Template Layers to
Manually Trace” later in this
chapter for more information
on creating a template layer.
Figure 12.1 When placing a
le, you can control whether
an image is place-linked by
selecting the Link check box
in the Place dialog box.
Figure 12.2 When you’re
dragging several images at
once from Bridge, an icon
indicates the placement
of multiple les into your
Illustrator document.
CHAPTER 12: W ORKING WITH IMAGES
378
Place-Linked Files and Place-Embedded Files
When placing an image into Illustrator, you can choose to have the image
linked to your document or embedded within it. Each method has its own
bene ts, and which you choose depends on your needs and your work ow.
When you plac
e -link an image, a preview of the image appears in your layout,
but the actual image exists in a completely separate le. At all times, Illustrator
needs to know where this le is. Otherwise, Illustrator won’t be able to print
the le c
orrectly. In fact, if you were to save your Illustrator le and send it o
to someone else (such as a service provider, for example), you would have to
send the external linked image along with the le. If yo
u have several linked
images in your document, you have to keep track of many les. In contrast,
a place-embedded le exists in your Illustrator document, and therefore,
the original external image that yo
u placed is no longer required. When you
send the document to another user, the image travels along with the single
Illustrator le.
Images—especially high-resolution ones—feature hefty le sizes. When you
choose to embed a plac
ed image, the le size of the image is added to the size
of your Illustrator le. For example, if your Illustrator le is 1 MB in size and you
place-embed a 30 MB image int
o your document, the size of your Illustrator
document grows to 31 MB. When you place-link an image, however, the le is
never added to your document, so the Illustrator le stays at 1 MB.
Although manag
ing multiple les and le size is an issue that will a ect your
decision to link or embed image les, one of the main reasons you will choose
to link a le rather than embed it is so you can easily updat
e the image when
necessary. When you place-link a le, the image you see in your layout is a
preview of the le that really exists elsewhere. When you make an adjustment
to the original image (sa
y, in Photoshop), the preview in your layout updates
to re ect those changes. Illustrator even has a feature called Edit Original
that assists in this process of updating linked images (see “Managing Placed
Images” later in this chapter). However, if you place-embed an image, yo
u can
no longer update that image easily.
PLAC ING RASTERBASED FILES
379
Placing Native Photoshop Files (PSD)
Typically, the interchange fi le formats for images that are used in print
design layouts are TIFF or EPS, but Illustrator allows you to place native
Photoshop fi les (PSD) as well.
Generally, placing a native Photoshop fi le isn’t any different from placing
any other fi le. Illustrator enjoys a wonderful relationship with Photoshop,
however, and you can take advantage of extended functionality when plac-
ing Photoshop fi les.
If the PSD fi le you are placing contains Photoshop layer comps, Illustrator
presents you with the Photoshop Import Options dialog box, where you can
choose which layer comp will be visible in the fi le from the Layer Comp
pop-up menu (Figure 12.3). Select the Show Preview check box to see
what the layer comp looks like before you place the fi le. You can also choose
whether Illustrator or Photoshop controls how layer visibility is updated
by choosing from the When Updating Link pop-up menu. The Photoshop
Import Options dialog box offers additional options, which are covered later
in this chapter in the “Working with Adobe Photoshop” section.
TIP Illustrator CS4
can also place layered
TIFF les.
NOTE The Layer Comps
feature in Photoshop
allows you to create named
sets of visible layers. For more
information on the Layer
Comps feature, refer to
Photoshop Help or Real World
Adobe Photoshop CS4 by
David Blatner and Conrad
Chavez (Peachpit Press).
Figure 12.3 The Photoshop
Import Options dialog box
lets you control the appear-
ance of your Photoshop le
before you place it into your
document.
CHAPTER 12: W ORKING WITH IMAGES
380
Unfortunately, once you place an image into an Illustrator document, you
don’t have any way to access the Photoshop Import Options dialog box to
change to a different layer comp. To work around this apparent oversight,
you can use the Relink function, which effectively places the fi le again and
opens the dialog box (see “Managing Placed Images” for information on
relinking fi les).
Working with Placed Images
Once you’ve placed an image into an Illustrator document, the image acts
like a single rectangular shape that can be transformed (moved, scaled,
rotated, sheared, and refl ected). You can apply opacity and blending mode
values from the Transparency panel, and you can also apply many different
live effects to a placed image, including Feather and Drop Shadow.
Sometimes a design calls for showing only a portion of a placed image.
Programs such as Photoshop (which can crop images) and page layout
applications such as Adobe InDesign CS4 (which use picture frames) are
able to display only portions of an image. Illustrator, however, has no such
tool or functionality. To have only a portion of an image display on your
artboard, you have to create a mask (Figure 12.4). (See Chapter 9,
“Designing with Effi ciency,” for more information on creating masks.)
You can also apply color to certain kinds of placed images. Illustrator lets
you apply either a solid process or a spot color to a 1-bit TIFF image or to
NOTE For a detailed
description of the dif-
ferent le formats and their
bene ts and roles in a design
work ow, refer to Chapter 14,
“Saving and Exporting Files.”
Figure 12.4 Using a
clipping mask, you can
display just a portion of
a placed image.
PLAC ING RASTERBASED FILES
381
any image that uses the grayscale color model. Simply select the image on
the artboard, and choose a fi ll color as you would for any vector object.
Using Template Layers to Manually Trace
Sometimes you may want to place an image into Illustrator—not as a design
element but rather as a design guide. For example, you might sketch an idea
for a design on paper and then scan that sketch into your computer. Then,
you would place that scan into your Illustrator document as a guide for
drawing fi nal shapes with the Illustrator vector tools. Alternatively, you may
place a map into Illustrator so that you can create your own customized
directions to an event.
In these cases, you may not actually want to trace the scan exactly as it
appears (using the Live Trace feature in Illustrator, covered later in this
chapter, might be a better choice for such a task), but rather, you may just
want the image to act as a reference. To prevent the image from getting in
the way of your design, you might want to adjust the opacity of the image
(Figure 12.5). Additionally, you may want to lock the image so that you
don’t move it accidentally.
Rather than going through the process of adjusting and locking images,
Illustrator has a way to manage this process in a more dignifi ed manner—
using a template layer. Once a template layer has been created, the image on
that layer automatically becomes locked, and the opacity level of the image
is set to 50%. You can select the Template option at the bottom of the Place
dialog box when placing an image to have the image automatically appear
on a template layer, or you can double-click any layer and select the
Template option in the Layer Options dialog box (Figure 12.6 on the
next page).
NOTE Template layers
are not to be confused
with Illustrator templates,
which are actual Illustrator
les that contain elements
already inside them.
Illustrator templates are
covered in Chapter 1,
“Creating and Managing
Documents.”
Figure 12.5 Drawing on
top of an image at full
strength may be di cult
(left). Placing an image on
a dimmed template layer
allows you to trace over the
image with ease (right).
CHAPTER 12: W ORKING WITH IMAGES
382
Adding Keylines to Placed Images
Often, when you place a photograph in an Illustrator document, you want to create a keyline, or an outline
around the photo. It’s important to understand that a placed image is not a vector object and, hence, can’t
have a ll or stroke. So, yo
u’ll need to create another vector object to contain your stroke. Rather than create
this new shape on your own, there are two methods you can use: have Illustrator automatically create a mask
for the image or use an e ect to co
nvert the bounds of the object into a vector object.
To add a keyline using a mask, follow these steps:
1. Choose File > Place, and pick an image to place into your Illustrator document. You can either link or
embed the image. Onc
e you’ve chosen the image, click the Place button.
2. The image is selected (or if your image already exists in your document, select it), so you’ll see the Mask
button in the Control panel. Click it. This creates a mask at the exact bounds of the image.
3. Press the D key for Default. This gives the mask a black 1-point stroke. Feel free to adjust the stroke per
your design needs (who uses a 1-point stroke anyway?).
An additional bene t to this method of using a mask is that yo
u now have the elements in place to simulate
a “frame and image” paradigm like InDesign uses. Once you’ve created your mask, you can decide to “crop”
your image by double-click
ing the photo. This will put you into isolation mode. Now click the frame edge and
resize at will. When you’re done, double-click outside the image to exit isolation mode and continue working.
This method works wonderfully when yo
u’re using the Selection tool (black arrow) and have the Bounding Box
option selected (in the View menu).
To add a keyline using a live e ect, follow these steps:
1. Choose File > Place, and pick an image to plac
e in your Illustrator document. You can either link or embed
the image. Once you’re chosen the image, click the Place button.
2. With the image selected, open the Appearance panel, and click Add New Stroke. You won’t see the stroke
appear just yet, but don’t worry, it will show up in the next step.
3. With the stroke highlighted in the Appearance panel, choose E ect > Path > Outline Object. The stroke will
appear around the boundary of the photograph.
To make the live e ect easier to apply in the future, de ne a graphic style. For details on graphic styles, refer to
Chapter 9.
Figure 12.6 The Template
option appears in the Layer
Options dialog box and
applies to a single layer .
MANAGI NG PLACED IMAGES
383
MANAGING PLACED IMAGES
Whether the images you place in a fi le are linked or embedded, it’s important
to be able to track where those images came from and to access additional
information about the images. To manage all the placed images in your doc-
ument, choose Window > Links to open the Links panel.
By default, the Links panel lists all the images in your document. However,
from the Links panel menu, you can specify that the Links panel should
display only missing, modifi ed, or embedded images (Figure 12.7). In addi-
tion, you can choose to have the Links panel list images sorted by name (fi le
name), kind (fi le type), or status (up-to-date or modifi ed).
Double-clicking any fi le listed in the Links panel opens a Link Information
dialog box, offering additional information about the image. Besides listing
the fi le size of the image, the Link Information dialog box also gives you the
location of the image (the fi le path) and detailed scaling and rotation infor-
mation (Figure 12.8 on the next page).
Figure 12.7 Icons in the
Layers panel indicate addi-
tional information about
the images that are placed
in your document. No icon
indicates a place-linked le.
Missing Image
Linked Image
Embedded Image
Modi ed Image
Relink
Go to Link
Edit Original
Update Link
CHAPTER 12: W ORKING WITH IMAGES
384
Along the bottom of the Links panel are four buttons (Figure 12.7) that
allow you to perform certain functions with the images in your document.
To use these functions, fi rst highlight an image in the Links panel, and then
click the desired button:
• Relink. The Relink button allows you to replace one image with a
different one. When you click the Relink button, the Place dialog box
appears, allowing you to choose another fi le, which replaces the selected
image. You can use Relink either to swap high-resolution fi les for low-
resolution ones or to replace FPO (For Position Only) placeholder
images with fi nal copies. Additionally, you can use the Relink function
and choose to replace your fi le with the same image (replacing it with
itself), which allows you to access different Place settings or to replace
an embedded image that was updated.
• Go to Link. The Go to Link button adjusts the view setting of your
document window so that the highlighted image in the Links panel is
centered on your screen. In addition, the image becomes selected. This
makes it easy to quickly fi nd an image, and it is especially useful in
documents that contain many placed images.
• Update Link. The Update Link button allows you to update place-
linked images when Illustrator detects that external fi les have been
modifi ed outside of Illustrator. Images that have been modifi ed appear
with a yellow warning icon in the Links panel. The Update Link button
is dim when an embedded image is chosen.
• Edit Original. You can click the Edit Original button when you want
to modify a place-linked image in the image’s creator application. When
you highlight an image in the Links panel and click Edit Original,
Figure 12.8 Double-
clicking a listing in the
Links panel opens Link
Information, a dialog
box containing useful
information about the
linked image.
NOTE Refer to the
Appendix, “Application
Preferences,” for information
on the Update Links setting in
the File Handling & Clipboard
panel in Preferences that
controls whether I llustrator
updates modi ed les
automatically or manually.
MANAGI NG PLACED IMAGES
385
Illustrator launches the application that was used to create the fi le (or
that is set to open fi les of that type on your system) and then opens the
fi le for you. Once you perform any necessary edits on the fi le, simply
save and close it and return to Illustrator, where the image updates
accordingly. The Edit Original button is dim when you highlight an
embedded image.
Additional Links Panel Functionality
In addition to the functions in the Links panel that we’ve already discussed,
you can take advantage of several important settings in the Links panel
menu (Figure 12.9).
Here are a few of the options:
• Placement Options. When you relink or replace a fi le, you can use
the Placement Options setting to defi ne how an image appears once it
has been placed into your document. By default, Illustrator preserves
Figure 12.9 The Links panel
menu grants you access to
additional features for work-
ing with placed images.
CHAPTER 12: W ORKING WITH IMAGES
386
any transforms you’ve applied to the image that you’re replacing, but
you can also choose from four other settings. A helpful illustration in
the Placement Options dialog box explains what each setting does
(Figure 12.10).
• Embed Image. If you have a place-linked image in your document,
you can select the image in the Links panel and choose the Embed
Image option from the Links panel menu to embed that image in
your fi le.
• Link File Info. Images and fi les can contain metadata (refer to
Chapter 1 for more information), and at times, you may need to view
the metadata of images you’ve placed into your document. For example,
you may want to know whether you have the rights to reproduce the
image or whom you need to credit for using an image. The Link File
Info option in the Links panel menu allows you to view the placed
image’s metadata (you won’t be able to edit it, however).
• Panel Options. Always trying to accommodate, Illustrator lets you
customize the Links panel by choosing Panel Options from the Links
panel menu. You can choose to display images in a thumbnail size, or
if you prefer, you can eliminate thumbnails altogether (Figure 12.11),
which is useful when you have many placed images in your document.
Figure 12.10 Each setting
in the Placement Options
dialog box o ers an illustra-
tion and a description for
what it does.
NOTE Illustrator
supports linked
DCS 2.0 les that interact
with transparency.
MANAGI NG PLACED IMAGES
387
Additionally, you can choose the Show DCS Transparency Interactions
option to have Illustrator alert you when placed Desktop Color Separa-
tions (DCS) 1.0 fi les interact with transparency in your document. This
setting results in slower performance, though.
Getting Faster Access to Image Settings
with the Control Panel
Although the Links panel offers a single location from which to track
information about your placed images, you can also use the Control panel
to quickly access certain settings and features that pertain to a selected
image. The Control panel displays the fi le name, the color mode, and the
resolution of a selected image. In addition, for linked images, the Control
panel offers options to embed or edit the fi le via the Edit Original feature,
which was discussed earlier in the chapter. You can also click the image’s fi le
name in the Control panel to access additional features in the Links panel
(Figure 12.12).
Figure 12.11 With thumb-
nails turned o , the Links
panel can display more
items in less space—perfect
for documents with lots of
placed images.
TIP When you select
an image on your art-
board, a Mask button appears
in the Control panel, making
it easy to quickly apply a
mask and crop the image.
Refer to Chapter 9 for more
information on using masks.
Figure 12.12 Clicking the
le name of a linked image
in the Control panel o ers
a shortcut to several often-
used functions.
CHAPTER 12: W ORKING WITH IMAGES
388
Using the Document Info Panel
The Links panel isn’t the only place where you’ll nd information about
place-linked and place-embedded images. You can choose Window >
Document Info to open the Document Info panel that o ers information
on a lot mor
e than just images. In fact, the Document Info panel can
prove quite useful for providing document information on a variety of
attributes and settings (Figure 12.13).
By default, the Document Info panel shows information about only
those objec
ts that are selected on the artboard. To nd out information
about all the objects in a le, deselect the Selection Only option in the
Document Info panel menu.
To nd out information about c
ertain aspects of an Illustrator document,
choose from one of these settings in the Document Info panel menu:
• Document. The Document setting displays the color mode for your
document, along with a listing of other important document settings
such as text editability and color pro le.
• Objects. This setting displays the total number of objects in your le,
broken down by object type. This setting o ers a quick way to nd
out how many linked or embedded images you have in your document,
how many objec
ts are colored with spot colors, or how many transparent objects there are.
• Graphic Styles. To see a list of all the graphic styles that are used in your document, as well as to how
many objects each style is applied, choose this setting.
• Brushes. The Brushes option lists all the brushes used in your document.
• Spot Color Objects. This setting lists the spot colors used in your document.
• Pattern Objects. The Pattern Objects option lists all the patterns used in your document. This is especially
helpful because it includes patterns that are used inside complex appearances and Pattern brushes.
• Gradient Objects. This setting lists all the gradients that are used in your document.
• Fonts. The Fonts option lists all the fonts used in your document.
• Linked Images. The Linked Images option lists all the linked images that appear in your document, along
with information about each image.
• Embedded Images. The Embedded Images setting lists all the embedded images that appear in your
document, along with information about each image.
• Font Details. The Font Details option lists information about the fonts used in your document. This is
helpful when you want to quickly nd out whether you are using OpenType, TrueType, or PostScript fonts
in your document.
You can save all the information list
ed in the Document Info panel by choosing Save from the Document Info
panel menu. A text le is created that contains the information for all the items just outlined.
Figure 12.13 The Document Info
panel provides detailed informa-
tion on just about anything you
could ask for about your le,
including linked images.