Real World Adobe InDesign CS4- P7 pptx
Bạn đang xem bản rút gọn của tài liệu. Xem và tải ngay bản đầy đủ của tài liệu tại đây (1.25 MB, 30 trang )
Category Type Placeholder Example
Time Hour (1-12) h 1
Hour (01-12) hh 01
Hour (1-23) H 1
Hour (01-23) HH 01
Minute m 1
Minute (00) mm 01
Second s 1
Second (00) ss 01
AM/PM a* AM
Time Zone zzzz Pacic Daylight
Time**
Time Zone (Short) z PDT
Day Number d 1
Number (01) dd 01
Name EEEE Tuesday
Name (Short) E Tue
Month Number M 4
Number (01) MM 04
Name MMMM April
Name (Short) MMM Apr
Year Number yyyy 2007
Number (Short) y 07
Era G*** AD
Era (Long) GGGG Anno Domini
* Simply enters “AM” or “PM,” does not provide for other capitalization,
punctuation, or formatting options.
** On the Mac OS, “(CA)” is appended to this example. We don’t know why,
as there are plenty of people who live in this time zone who do not live in
California. It’s vaguely oensive.
*** Simply enters “AD” or, we assume, “BC.” Does not provide for other
capitalization, punctuation (e.g., “A.D.”), or alternative formats (e.g., “CE”
or “BCE”). If your system clock is entering dates from an earlier or later era,
there’s probably something wrong.
-
Date Format Shortcuts
Real_World_Adobe_InDesign_CS4b.pdf 181Real_World_Adobe_InDesign_CS4b.pdf 181 08/04/2009 05:54:29 p.m.08/04/2009 05:54:29 p.m.
.
-
Inserting a
Text Variable
Select a text variable from the
Insert Variable submenu of
the Context menu.
InDesign inserts a text
variable instance in the text.
4. Select a text variable type from the Type pop-up menu. e
dialog lls in with the options for that variable type.
5. Make changes to the options shown in the dialog box to dene
your new text variable. When the settings look the way you want
them to, click the OK button to close the dialog box and return
to the Text Variables dialog box.
6. Click the Done button to close the Text Variables dialog box.
Text variables are stored within the current le. If you want to
create a text variable that is available in all new documents, dene
it when no documents are open. When you do this, the variable will
appear in each new document you open.
You can change the denition of a text variable at any time. When
you edit a text variable, all of the text variable instances of that vari-
able will update to reect the changes you’ve made. If your variable
instances are inside paragraphs, be prepared for text to reow and
line endings of composed text to change when you edit a variable.
To change the denition of a text variable, follow these steps.
1. Choose Dene from the Text Variables submenu of the Type
menu. InDesign displays the Text Variables dialog box.
2. Select a text variable and click the Edit button. InDesign opens
the Edit Text Variable dialog box.
3. Make changes in the Edit Text Variable dialog box. When the
settings look the way you want them to, click the OK button to
close the dialog box and return to the Text Variables dialog box.
Editing a Text Variable
Real_World_Adobe_InDesign_CS4b.pdf 182Real_World_Adobe_InDesign_CS4b.pdf 182 08/04/2009 05:54:29 p.m.08/04/2009 05:54:29 p.m.
-
Creating a Text Variable
Choose Dene from the
Text Variables submenu
of the Type menu.
InDesign displays the
Text Variables dialog box.
Click the New button.
Select the type of text
variable you want from
the Type pop-up menu.
Aer you select a text variable
type, the dialog box lls in
with the default settings for
that type of variable.
Dene the text variable by entering text or
making selections from pop-up menus.
As you edit the text variable, InDesign displays a
preview of the variable at the bottom of the dialog box.
4. Click the Done button to close the Text Variables dialog box.
At this juncture, we are obligated to point out that you can modify
any of the built-in text variable instances. You could, for example,
change the Chapter Number instance to enter the creation date, as
Ole accidentally did when he rst tried to create a new text variable.
We urge you not to do this.
Real_World_Adobe_InDesign_CS4b.pdf 183Real_World_Adobe_InDesign_CS4b.pdf 183 08/04/2009 05:54:30 p.m.08/04/2009 05:54:30 p.m.
.
To load text variables from another document, follow these steps (see
Figure 3-34).
1. Choose Dene from the Text Variables submenu of the Type
menu. InDesign displays the Text Variables dialog box.
2. Click the Load button in the Text Variables dialog box. InDesign
displays the Open A File dialog box.
3. Locate and select an InDesign document, then click the Open
button. InDesign imports the text variables from the selected
document into the current document.
4. InDesign will display the Load Text Variables dialog box, which
shows a list of the incoming text variables. If the document
you’ve selected contains text variables with the same name as
text variables in the current document, you can choose whether
to override the denitions of the existing text variables or to
leave then unchanged (by renaming the incoming variable).
Click the OK button once you’ve nished, and InDesign will
import the text variables from the selected document.
As usual, if the denition of any text variable used in your text has
changed, check for text reow.
To delete a text variable, follow these steps (see Figure 3-35). Note
that you can use this process to merge two text variables.
1. Choose Dene from the Text Variables submenu of the Type
menu. InDesign displays the Text Variables dialog box.
2. Select the text variable you want to delete and click the Delete
button. If the variable has been used in the document, InDesign
displays the Delete Text Variables dialog box.
3. If you want to replace the text variable with another text vari-
able, select the replacement variable from the Existing Variable
pop-up menu. To convert all instances of the text variable to text,
select the Text option. To delete all of the text variable instances
linked to the selected text variable, select the Nothing option.
4. Click OK to close the dialog box. InDesign applies the changes
you’ve specied.
You can delete an individual text variable instance as you would
delete any other text: Select it and press Delete.
Loading Text Variables
Deleting a
Text Variable
Real_World_Adobe_InDesign_CS4b.pdf 184Real_World_Adobe_InDesign_CS4b.pdf 184 08/04/2009 05:54:30 p.m.08/04/2009 05:54:30 p.m.
-
Loading Text Variables
Choose Dene from the Text Vari-
ables submenu of the Type menu.
InDesign displays the Text Variables
dialog box.
Click the Load button.
Locate and select
the le containing
the text variables
you want to load.
InDesign displays a list of the text variables
in the le. To keep a text variable from being
loaded, turn o (uncheck) the option.
If there are text variables in the selected
document whose names match the names
of text variables in the current document,
InDesign shows that there is a conict.
Use the pop-up menu to specify
the way you want InDesign to
resolve the conict.
Aer you click OK, InDesign
loads the text variables into
the current document.
Real_World_Adobe_InDesign_CS4b.pdf 185Real_World_Adobe_InDesign_CS4b.pdf 185 08/04/2009 05:54:30 p.m.08/04/2009 05:54:30 p.m.
.
-
Deleting a Text Variable
Choose Dene from the Text
Variables submenu of the Type
menu. InDesign displays the
Text Variables dialog box.
If the text variable has not been used
in the document, InDesign deletes
the variable, and you’re done.
If the text variable has been used in
the document, InDesign displays the
Delete Text Variables dialog box, which
lets you choose what to do with the text
variable’s instances.
Click the Delete button.
You can, at any time, convert text variable instances to normal text,
in eect “freezing” them in their current state. Of course, if the vari-
able instance is inside a paragraph, this will oen cause text to reow,
as InDesign is now free to apply its normal text composition rules
to the text of the variable. You can choose to convert individual text
variable instances to text, or you can convert all of the text variable
instances associated with a text variable to text.
To convert an individual text variable instance to text, follow
these steps (see Figure 3-36).
1. Select the text variable instance with the Type tool.
2. Choose Convert Variable to Text from the Context menu (or
from the Text Variables submenu of the Type menu). InDesign
converts the text variable instance to normal text.
Converting Text
Variable Instances
to Text
-
Converting a Text
Variable Instance to
Text
Select the text variable instace using the Type
tool, then Choose Convert Variable to Text
from the Context menu.
InDesign converts the text variable instance to normal
text. is will almost certainly cause text recomposition.
Real_World_Adobe_InDesign_CS4b.pdf 186Real_World_Adobe_InDesign_CS4b.pdf 186 08/04/2009 05:54:31 p.m.08/04/2009 05:54:31 p.m.
To convert all instances of a text variable to text, follow these
steps. Note that this does not delete the text variable itself.
1. Choose Dene from the Text Variables submenu of the Type
menu. InDesign displays the Text Variables dialog box.
2. Select a text variable and click the Convert to Text button.
InDesign converts all instances of the text variable to text.
3. Click OK to close the Text Variables dialog box.
Again, we have to point out that this may cause text recomposition
and reow. Make certain that the line breaks in the document are
where they should be aer converting the text variable.
You can also use nd and change to work with text variable
instances—see the section on nding and changing text, later in this
chapter, for more information.
In the following sections, we’ll present a series of “recipes” that show
you how to use text variables for a variety of common page layout
tasks.
Creating a Time and Date Stamp. We oen like to enter the date and
time a le was printed, but we can’t always use the built-in time and
date stamp from the Print dialog (because the page size is the same
as the printer paper size). In the past, Ole has created custom print-
er’s marks les that move the page information up onto the page, but
text variables have rendered that bit of esoteric knowledge obsolete.
Note, however, that if you plan to omit the time and date stamp from
your nal printed version, you’ll need to make arrangements to sup-
press the printing of the text variables (such as moving them to a
non-printing layer).
To create a text variable that will print the time and date a le was
printed, follow these steps.
1. Choose Dene from the Text Variables submenu of the Type
menu. InDesign displays the Text Variables dialog box.
2. Click the New button.
3. Enter a name for the variable and choose Output Date from the
Type pop-up menu.
4. Enter the placeholders and any punctuation or spacing for the
date format in the Date Format Field. We use “EEEE, d MMMM,
yyyy h:mm a zzzz”—not only does it print the date and time in a
civilized format, but it’s fun to say aloud.
Text Variable Examples
Real_World_Adobe_InDesign_CS4b.pdf 187Real_World_Adobe_InDesign_CS4b.pdf 187 08/04/2009 05:54:31 p.m.08/04/2009 05:54:31 p.m.
.
5. Click OK to close the dialog box, then click Done to close the
Text Variables dialog box.
Simple Custom Text. Many people, on rst hearing about custom
text variables, immediately think that they’d be a good way to
enter commonly-used text. Don’t do that. ere are many other,
better ways to accomplish the same end (for example, you can trick
autocorrect into entering text for you, as shown in the section on the
autocorrect feature, later in this chapter).
Instead, think of custom text variables as a way to enter short
pieces of text which might change before your layout is nished. To
do this, follow these steps.
1. Choose Dene from the Text Variables submenu of the Type
menu. InDesign displays the Text Variables dialog box.
2. Click the New button.
3. Enter a name for the variable and choose Custom Text from the
Type pop-up menu.
4. Enter the text you want to have appear when you insert the text
variable.
5. Click OK to close the dialog box, then click Done to close the
Text Variables dialog box.
Page X of Y. Ever wonder why so many nancial and legal docu-
ments use a page numbering scheme that tells you how many pages
there are in the document? For some documents, the simple knowl-
edge that there is an end is required to maintain one’s sanity.
If, for whatever reason, you need to extend this sort of reassur-
ance to the reader, it’s easy to do using text variables. Just enter an
automatic page number special character, the text “to,” and insert
the predened Last Page Number text variable (see Figure 3-37).
Why didn’t we enter the “to” as part of the text variable? It’s
because we’re following a general rule of keeping text inserted by
text variables to a minimum to avoid potential composition prob-
lems. No, you can’t specify the last page of a multi-document book.
Running Headers. Many documents feature a layout in which the
text of key paragraphs—usually, headings of a given level—appears
in the header or footer of each page. Note that this text could also
appear in a footer, in a tab on the side of the page, or, really, anywhere
on the page. ere’s nothing special about the text variable type that
Real_World_Adobe_InDesign_CS4b.pdf 188Real_World_Adobe_InDesign_CS4b.pdf 188 08/04/2009 05:54:31 p.m.08/04/2009 05:54:31 p.m.
Enter an
automatic page
number marker
and static text
(“Page” and “of’’
in this example).
Use the Context menu
to insert the default
Last Page Number text
variable.
Header on a master page Header on a document page
-
Creating a Page X of Y
Running Header
limits its use to text frames at the top of the page. at said, InDesign
refers to this text variable type as a “header,” so we will, too.
To do this, you create a text variable, then insert that text vari-
able in text on the page or on a master page. Follow these steps (see
Figure 3-38).
1. Choose Dene from the Text Variables submenu of the Type
menu. InDesign displays the Text Variables dialog box.
2. Click the New button.
3. Enter a name for the variable and choose Running Header
(Paragraph Style) or Running Header (Character Style) from the
Type pop-up menu.
4. Select the style you want to use from the Style pop-up menu.
5. Choose Last on Page or First on Page from the Use pop-up menu.
6. Set up the controls in the Options section of the dialog box as
necessary. For example, you’ll almost always want to turn on the
Delete End Punctuation option.
7. Click OK to close the dialog box, then click Done to close the
Text Variables dialog box.
8. Insert the text variable in text using the Insert Variable submenu
of the Context menu.
Real_World_Adobe_InDesign_CS4b.pdf 189Real_World_Adobe_InDesign_CS4b.pdf 189 08/04/2009 05:54:31 p.m.08/04/2009 05:54:31 p.m.
.
-
Creating a Running
Header Using Text
Variables
In this example, we created
two text variables using the
Running Header (Paragraph
Style) variable type. We
then inserted text variable
instances in text frames on
the master spread.
InDesign uses the text from
the rst or last instance of
the specied paragraph style
in the header on each
document page.
In some layouts, you might need to create a pair of text variables.
In a dictionary-style layout, for example, the le hand page header
usually contains the rst instance of text in a given style on the page,
while the right hand page contains the last instance of the style (see
Figure 3-39). If the right hand page is the rst page in a section, how-
ever, it typically uses the rst instance of the specied style (not the
last, as would normally be the case for a right hand page). You can
change the header of the page manually, or you can create a special
master page to accomplish the same task.
When a page does not contain text formatted with the specied
style, the variable in the header repeats the text from the previous
instance of the same text variable. However, InDesign will not carry
over the last instance of a given style when another instance of the
same style appears on the page (see Figure 3-40). If this is the style
of running heading your document calls for, you may have to adjust
some pages manually.
Phone book Style Running Header. Another use for a running
header is to show the range of a certain type of paragraph style on a
given page. In a telephone directory or dictionary, for example, the
Real_World_Adobe_InDesign_CS4b.pdf 190Real_World_Adobe_InDesign_CS4b.pdf 190 08/04/2009 05:54:31 p.m.08/04/2009 05:54:31 p.m.
-
Dealing with
Special Cases in
Running Headers
In a spread, the header of this right-
hand page would be correct, as it
lists the text of the last heading on
the page. If it’s the rst page in the
section, however, it should show the
text of the rst heading, instead.
You can solve this problem
by creating a new master
spread. In this master
spread, the right hand page
header is set to show the text
of the rst paragraph of a
given style, rather than the
last paragraph of that style.
Apply the master spread to the
opening page, and the text of the
header will reect the text of the
correct paragraph.
page headers will show you the alphabetical range of names or topics
shown on the page. Ole, for example, proudly shares a phone book
page containing family names from “Kustyukov” to “Kwok.”
To set up this type of running header, you’ll need to create two
text variables: one for the rst instance of a given paragraph or char-
acter style on a page, another for the last instance of the same style.
en you create a page header that contains instances of both text
variables, as shown in Figure 3-41.
Cross References
Cross references are a type of hyperlink, but we want to make the
point that they’re incredibly useful for print publishing, as well. We
think that they’re most useful for entering text, which is why we’ll
talk about them in this chapter, rather than in Chapter 13, “Interac-
tive PDF,” where we discuss hyperlinks.
Real_World_Adobe_InDesign_CS4b.pdf 191Real_World_Adobe_InDesign_CS4b.pdf 191 08/04/2009 05:54:32 p.m.08/04/2009 05:54:32 p.m.
.
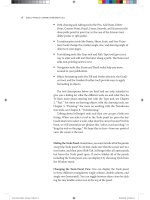
-
Problems in
Running Headers
-
Phonebook Style
Running Header
e header on the master page
contains two text variables and a
page number.
With the help of a nested character
style and two additional text variables,
you can add a navigational tab on the
master spread.
e text variables pick up the rst
two characters of the rst and last
appearances of the character style
on the page.
In many designs, the text of
this header should reect the
text of the previous heading
style, not the text of the rst
or last paragraph of that
style on the page. We have
not found a way to do this
using text variables.
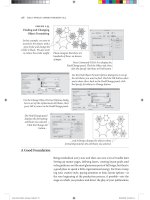
Cross references give you a way to insert a marker (which Adobe
calls the “source cross reference”) in text that refers to another piece
of text (which Adobe calls the “destination text”). We’ll refer to these
two things as the “marker” and “destination,” respectively. When the
destination changes, the marker can change.
is is a feature that is particularly dear to our tiny hearts,
because it means that we can nally number the gures in this book
Real_World_Adobe_InDesign_CS4b.pdf 192Real_World_Adobe_InDesign_CS4b.pdf 192 08/04/2009 05:54:32 p.m.08/04/2009 05:54:32 p.m.
automatically, rather than doing it manually or relying on a script
(which worked, but exhausted authors could not always remember
to run it).
A cross reference is really made up of four parts: the marker and
destination we’ve already mentioned, a cross reference format, which
denes the appearance of the text in the marker, and the text of the
destination itself. is last is important—the text of the destination
determines a great deal about the way you’ll construct all of the parts
of the cross reference.
Cross reference markers can refer to two types of destinations:
the text of a paragraph, or a text anchor. Because text anchors refer to
hyperlink text destinations, we’ll discuss them in Chapter 13, “Inter-
active PDF.” In this section, we’ll talk about using paragraphs as our
cross reference destination.
Finally, creating a cross reference pretty much requires that the
document use paragraph styles. If you don’t use paragraph styles, it
will be much harder to locate the text you want to refer to. Go to the
discussion of paragraph styles in Chapter 4, “Type,” and learn how
to stop working so hard.
To create a cross reference, follow these steps (see Figure 3-42).
1. Move the text cursor to the location at which you want to insert
the cross reference marker (or select text you want to replace
with the marker).
2. Choose Insert Cross Reference from the Hyperlinks and Cross
References submenu of the Type menu. InDesign displays the
New Cross Reference dialog box.
3. Choose Paragraph from the Link To pop-up menu if it’s not
already selected. If the destination paragraph is in another
document, select the (open) document containing the paragraph
from the Document pop-up menu.
4. Use the two scrolling lists in the Destination section to set the
destination paragraph. e list on the le shows the paragraph
styles in the document; the list on the right displays the text of
each paragraph in a particular style.
5. Select the cross reference format you want to use from the
Format pop-up menu. To create a new format, click the pencil
icon to the right of the pop-up menu (see “Creating or Editing a
Cross Reference Format,” below).
Creating a Cross
Reference
Real_World_Adobe_InDesign_CS4b.pdf 193Real_World_Adobe_InDesign_CS4b.pdf 193 08/04/2009 05:54:32 p.m.08/04/2009 05:54:32 p.m.
.
6. e controls in the Appearance section dene the format of the
hyperlink associated with the cross reference. For most cross
references in print publications, we think you’ll probably want to
select Invisible Rectangle from the Type pop-up menu and leave
it at that. For more on hyperlink appearances, see Chapter 13,
“Interactive PDF.”
7. Click the OK button to insert the cross reference marker.
-
Creating a
Cross Reference
…then choose Insert Cross Reference
from the Hyperlinks and Cross References
submenu of the Type menu.
Or click the Insert Cross
Reference icon on the
Hyperlinks panel.
Select a paragraph
style in this list. Select a specic
paragraph in this
list (what you see
is the text of the
paragraph).
Choose Paragraph.
Select a document.
Select a cross
reference format.
Click this icon
to create or edit
a cross reference
format.
InDesign adds the cross
reference marker at the
location of the selection.
Use the controls in the
Appearance section to
change the format of the
hyperlink, if necessary.
Select some text, or click
a text cursor in text…
Real_World_Adobe_InDesign_CS4b.pdf 194Real_World_Adobe_InDesign_CS4b.pdf 194 08/04/2009 05:54:32 p.m.08/04/2009 05:54:32 p.m.
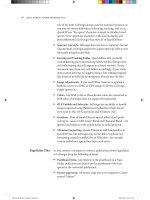
Cross reference formats dene the appearance of the marker, includ-
ing both the text of the marker and the formatting applied to it. Just
as applying a character or paragraph style creates a link between the
style and the text, applying a cross reference format creates a link
between the marker and the cross reference format. If you change
the cross reference format, the corresponding markers will change.
Before you create a cross reference format of your own, it’s a good
idea to look through the existing ones—you might nd exactly what
you need—and you’ll get an idea of how to construct your own.
To create a new cross reference format, follow these steps (see
Figure 3-43).
1. Choose Dene Cross Reference Formats from the Hyperlinks
panel menu (display the panel if it’s not already visible). If you’re
looking at the New Cross Reference dialog box, you can also
click the pencil icon to the right of the Format pop-up menu.
InDesign displays the Cross Reference Formats dialog box.
2. Click the Create Format (the “+” below the list of formats) button
to create a new format. e new format will be based on the
selected format. InDesign adds a new format to the list. is also
displays the denition of the format in the Denition eld.
3. Enter a name for the format.
Creating or Editing
a Cross Reference
Format
Click the + button to add a
cross reference format.
Click the - button to delete
the selected cross reference
format.
Use the + pop-up menu to add cross
reference “building blocks” to the
cross reference format denition.
e cross reference format
denition can look pretty
arcane, but don’t let it bother
you: just select building
blocks and then enter the
static text you want.
-
Creating a Cross
Reference Format
Real_World_Adobe_InDesign_CS4b.pdf 195Real_World_Adobe_InDesign_CS4b.pdf 195 08/04/2009 05:54:33 p.m.08/04/2009 05:54:33 p.m.
.
4. Construct the format using the other “+” (this one is a pop-up
menu, and is known as the “Building Block icon”) and the “@”
pop-up menu (known as “Special Characters icon”). ese two
pop-up menus insert text in the Description eld. You can also
enter the text yourself, once you’re familiar with the syntax.
5. If you want to apply a character style to the marker, turn on the
Character Style for Cross Reference option and choose a charac-
ter style from the associated pop-up menu.
6. Once everything looks the way you want it to, click the Save
button to save the cross reference format, then click the OK
button to close the dialog box.
Importing Text
Most of the time, text isn’t originally written using a page layout pro-
gram—it’s written using a word processor (such as Microso Word)
or text editor (such as BBEdit). To get the text into InDesign, you
must either copy-and-paste or import (or “place”) the text les.
Pasting text. A surprising number of people tell us that their pri-
mary source of text is their e-mail program or Web browser. e
best way to get text from there into InDesign is to use copy and paste.
InDesign ignores all formatting when you paste from another pro-
gram. If you want to retain the formatting, turn on the All Infor-
mation option in the When Pasting Text from Other Applications
section of the Type panel of the Preferences dialog box. is only
aects text pasted from other programs. To paste text that was copied
from within InDesign without its formatting, choose Paste Without
Formatting from the Edit menu (or press Command/Ctrl-Shi-V).
Placing text. InDesign can import text les in a variety of formats,
including Microso Word, Microso Excel, text-only (ASCII or Uni-
code), Rich Text Format (RTF), and InDesign tagged text. You can
view the complete list of available import lters in the Files of Type
pop-up menu in the Place Document dialog box in Windows.
If you don’t see your word processor or text editor listed as one of
the available import lters, don’t despair. InDesign can import text
in common “interchange” formats, such as text-only and RTF, and
chances are good that your word processor or text editor can save
text in one of those formats.
Real_World_Adobe_InDesign_CS4b.pdf 196Real_World_Adobe_InDesign_CS4b.pdf 196 08/04/2009 05:54:33 p.m.08/04/2009 05:54:33 p.m.
In addition, InDesign’s tagged text lter can import formatted
text from any application that can write a text-only le. e tagged
text format is something like RTF—it’s a text-only format that uses
special codes to dene the typesetting of the text in the le (see
“Working with InDesign Tagged Text,” later in this chapter).
To place a text le, follow these steps (see Figure 3-44).
1. Choose Place from the File menu (or press Command-D/Ctrl-D).
InDesign displays the Place dialog box.
2. Locate and select the text le you want to import.
3. Check Show Import Options to set up the import options you
want (if necessary), and/or check Replace Selected Item.
Show Import Options. Turn on the Show Import Options
checkbox to display another dialog box containing more
import options for the specic type of le you’re placing. is
dialog box appears aer you click the Open button to import
the text le. We use a shortcut: Hold down the Shi key
while clicking the Open button or while double-clicking a
text le in the Place dialog box.
Replace Selected Item. If you had a frame selected before you
displayed the Place dialog box, InDesign makes the Replace
Selected Item option available. Turn this option on to replace
the contents of the frame (if any) with the text le. If you
had text selected, or if you had clicked the Type tool in a text
frame, turning the Replace Selected Item option on inserts
the text from the le into the text frame.
4. Click the Open Button. If Show Import Options was on (or you
held down the Shi key), InDesign displays a dialog box con-
taining options for the type of le you selected (see below).
5. If no frames were selected, InDesign displays the Text Place
cursor and waits for you to click on a frame or drag one out (see
“Flowing Text,” earlier in this chapter). If the incoming text le
contains fonts that aren’t currently loaded, InDesign warns you
of their presence. If you had selected a frame before opening the
Place dialog box, and you turned on the Replace Selected Item
checkbox, InDesign lls the frame with the le you selected—
even if it was a graphic frame with a picture in it! is can be
very annoying if you had forgotten to deselect all frames rst.
Fortunately, you can always press Command-Z/Ctrl-Z to undo
the Place and reload the Text Place cursor.
Real_World_Adobe_InDesign_CS4b.pdf 197Real_World_Adobe_InDesign_CS4b.pdf 197 08/04/2009 05:54:33 p.m.08/04/2009 05:54:33 p.m.
.
Select an unlinked frame
(optional), then press
Command-D/Ctrl-D to
display the Place dialog box.
Turn this option on to replace the
contents of the selected frame or
text, or to insert the le at the
current text cursor position.
Turn this option on to
display further import options.
Click the Open button.
Turn this option on to
have InDesign replace any
“straight quotes” in the text
le with proper typographic
quotation marks.
If you turned on the Show
Import Options option or
held down the Shi key when
clicking Open, InDesign
displays the Import Options
dialog box for the le format
you’re importing.
Click the OK
button.
InDesign places the text le. If a frame is
selected, InDesign places the text inside it;
otherwise, InDesign displays the text place icon.
-
Placing a Text File
Select a le.
InDesign imports the text formatting in Word and RTF text les,
without any page layout (“page geometry”) information saved in the
le. is means that InDesign imports paragraph indents, but does
not import page margins. For a more complete list of the formatting
imported—or not—by the Word and RTF import lters, see the Fil-
ters ReadMe.pdf le (you’ll nd it in your InDesign folder).
When you turn on the Show Import Options option and place
a Word or RTF le, InDesign displays the corresponding Import
Options dialog box (see Figure 3-45).
Table of Contents Text. Turn this option on to import the table of
contents text (if any) in the Word/RTF le. However, the table of con-
tents entries lose their special qualities. e page numbers appear as
Word and RTF
Import Options
Real_World_Adobe_InDesign_CS4b.pdf 198Real_World_Adobe_InDesign_CS4b.pdf 198 08/04/2009 05:54:33 p.m.08/04/2009 05:54:33 p.m.
they were in the document the last time the le was saved, and do not
change as you place the text on the pages of your InDesign publica-
tion. e table of contents also loses its navigational (i.e., hyperlink)
properties. To InDesign, it’s just text. InDesign’s Table of Contents
feature is not linked with this at all; if you’re going to build a table
of contents with the InDesign feature, you might as well leave this
checkbox turned o.
Index Text. Turn this option on to import an index (or indices)
you’ve inserted in the Word/RTF document. Note that individual
index entries that you make in Word are imported whether this
option is on or o; this only controls whether any built indexes get
imported. We usually leave this turned o.
Footnotes/Endnotes. When you turn on this option, InDesign
places any footnotes or endnotes at the end of the story. Leave this
option o to omit any footnote or endnote text.
Use Typographer’s Quotes. Turn on the Use Typographer’s Quotes
option to convert any straight quotes (i.e., foot and inch marks) to
proper typographic quotation marks and apostrophes.
Remove Styles and Formatting from Text and Tables. When you
turn this option on, InDesign strips out any text formatting in your
le (paragraph and character styles, font, size, color, and so on) and
places the text using the current default formatting.
Preserve Local Overrides. Turn this option on to retain bold, italic,
underline, and other local formatting in the incoming text.
Convert Tables To. If you’ve chosen to remove text and table format-
ting (see above), you can choose Unformatted Tables or Unformatted
Tabbed Text to tell InDesign how to deal with tables.
Preserve Styles and Formatting from Text and Tables. When you
turn this option on, InDesign will import text formatting used in the
Word/RTF document. How, exactly, it does this is determined by the
controls that become available when you choose this option, which
are described in the following paragraphs.
Manual Page Breaks. What should InDesign do when it nds a page
break in the Word/RTF le? We typically want InDesign to ignore
these, so we choose No Breaks. However, if those breaks are there
Real_World_Adobe_InDesign_CS4b.pdf 199Real_World_Adobe_InDesign_CS4b.pdf 199 08/04/2009 05:54:33 p.m.08/04/2009 05:54:33 p.m.
.
-
RTF Import Options
If you nd yourself
repeatedly making the
same choices in this
dialog box, click Save
Preset—your preset will
show up in the Preset
pop-up menu. is is
especially helpful when
using the Customize Style
Import mapping feature.
for a good reason, you can choose Preserve Page Breaks or Convert
to Column Breaks to have InDesign automatically apply the page
and column break settings (which is usually done manually using
the Start Paragraph pop-up menu in the Keep Options dialog box).
Import Inline Graphics. If you want to include graphics from the
Word le, turn this option on. Note, however, that many of the
graphics embedded in Word/RTF documents are not suitable for
high resolution printing. In general, it’s best to save the graphics as
separate les (see the le format discussion in Chapter 7, “Importing
and Exporting”) and then place them in InDesign.
Import Unused Styles. When this option is turned on, InDesign will
import character and paragraph styles that are not used in any of
the text in the incoming document. When it’s o, InDesign does not
attempt to import the unused styles.
Import Styles Automatically. e two pop-up menus below this
option tell InDesign what to do when character and paragraph
styles in the Word document match the names of existing styles in
the InDesign document. For both character and paragraph styles,
you can choose to use the InDesign style denition, redene the
InDesign style to match the Word style, or to create a new style for
each style name conict. If you choose to take the latter approach,
InDesign will automatically generate a new name for each style.
Customize Style Import. To get more control over style import, turn
this option on and click the Style Mapping button. When you do this,
InDesign displays the Style Mapping dialog box (see Figure 3-46).
Real_World_Adobe_InDesign_CS4b.pdf 200Real_World_Adobe_InDesign_CS4b.pdf 200 08/04/2009 05:54:33 p.m.08/04/2009 05:54:33 p.m.
Beware the Fast Save. It’s hard to resist the impulse to turn on the
Allow Fast Saves option in Word’s Options dialog box. It sounds like
a good idea, but in this case, it isn’t. e Word le format is very com-
plicated, and using this option sometimes produces les that import
lters can’t read. Heck, when you turn this option on, Word some-
times writes les that Word can’t read. Stop it before it kills again!
Text-only les oen arrive full of extra characters—usually spaces
and carriage returns added to change the appearance of text on
screen. Text prepared for online viewing, for example, oen contains
a carriage return at the end of each line, as well as carriage returns
between paragraphs. e options in the Text Import Options dialog
box give you a way to have the import lter do some of the clean-up
for you (see Figure 3-47).
Character Set. If you’re seeing odd characters in the text les you
import, it might be that the character set of the computer used to
create the les is not the same character set as the one in use by your
copy of InDesign. As you import a text le, you can choose a charac-
ter set that matches the character set of the text le.
Platform. Windows and the Mac OS use dierent character sets
and also use dierent ways of ending a paragraph. If you’re using
Windows and know the le came from the Mac OS—or vice versa—
choose the appropriate platform from this pop-up menu.
Set Dictionary To. Use this pop-up menu to apply a default spelling
and hyphenation dictionary to the incoming text.
Extra Carriage Returns. e people who prepare the text les for
you want to help. ey really do. at’s why they entered all of those
carriage returns (to force a page break). ey are trying to do some
of the work so that you don’t have to. e only trouble, of course, is
Text-Only
Import Options
-
Mapping Styles
on Import
Real_World_Adobe_InDesign_CS4b.pdf 201Real_World_Adobe_InDesign_CS4b.pdf 201 08/04/2009 05:54:34 p.m.08/04/2009 05:54:34 p.m.
.
that they usually make a mess that you’re le to x. InDesign’s Text
Import lter can solve many of the problems your co-workers create.
e options in the Extra Carriage Returns section of the Text Import
Options dialog box help you clean up the extra carriage returns.
Use Typographer’s Quotes. We recommend turning on the Use
Typographer’s Quotes option so that InDesign converts the straight
quotes to proper typographic quotation marks and apostrophes.
Extra Spaces. Why do people enter extra spaces in text? Usually,
they’re trying to indicate to you, their trusted typesetter, that they
want to enter some amount of horizontal space. In other words, a tab.
InDesign can replace some number of spaces in the incoming text
le with tabs—just enter a value for the number of contiguous space
characters you want replaced. Note that this approach oen enters
multiple tab characters in the story, but that problem is easily cleaned
up using Find and Change.
Use the options in the Excel Import Options dialog box to specify the
range of cells you want to import and the formatting applied to those
cells (see Figure 3-48). See Chapter 6, “Where Text Meets Graphics,”
for more on what you can do with tables. Remember that InDesign
can only import Excel tables, not charts. If you need to import a
graphic chart from Excel, you should probably export it as a PDF le
(and possibly even open that PDF in Illustrator to ne-tune it before
saving and importing into InDesign).
View, Sheet, and Cell Range. Use these options to dene which
custom view, worksheet, and range of cells you want. By default, the
Cell Range eld selects cells of the worksheet you’ve selected.
Import Hidden Cells Not Saved in View. Turn this option on to
import any hidden cells in the Excel le.
Excel Import Options
-
Text Import Options
Real_World_Adobe_InDesign_CS4b.pdf 202Real_World_Adobe_InDesign_CS4b.pdf 202 08/04/2009 05:54:34 p.m.08/04/2009 05:54:34 p.m.
Table. By default, InDesign tries to match as much of Excel’s table
formatting as possible. If you’d prefer to handle formatting your
table in InDesign, choose Unformatted Table. You can also import
the table as tab-delimited text by choosing Unformatted Text.
Cell Alignment. How do you want InDesign to align the text from
the cells you’re importing? e default setting is Current Spreadsheet,
which tells InDesign to copy the alignment from Excel.
Import Inline Graphics. Turn this option on to include any inline
graphics in the spreadsheet. As with importing graphics embed-
ded in Word/RTF les, this can be useful or dangerous, depending
on the graphics and on your printing process. Again, we think it’s
best to save the graphics as separate les, in a high-quality graphics
format, and then place them in InDesign (see Chapter 7, “Importing
and Exporting,” for more on le formats).
Decimal Places. You can choose the number of decimal places you
want to use in the imported cells. e cell might show 3.1415926, but
if you specify three decimal places, 3.142 will appear in the table.
Use Typographer’s Quotes. Unless there’s a good reason to stick with
straight quote marks in your Excel data, turn on the Use Typogra-
pher’s Quotes to get curly quotes.
InDesign’s Tagged Text import lter gives you a great way to get
formatted text from any application that can create a text-only le.
When you import a tagged text le, you can set some import options
(see Figure 3-49). For more on creating tagged text les, see “Work-
ing with InDesign Tagged Text,” later in this chapter.
Use Typographer’s Quotes. At this point, we’re going to assume you
know what it does.
Tagged Text
Import Options
-
Excel Import Options
Real_World_Adobe_InDesign_CS4b.pdf 203Real_World_Adobe_InDesign_CS4b.pdf 203 08/04/2009 05:54:34 p.m.08/04/2009 05:54:34 p.m.
.
Remove Text Formatting. Just because someone gave you a tagged
text le doesn’t mean you can’t strip out the styles and import simple
text. To do this, turn on the Remove Text Formatting option.
Remove Text Style Conicts Using. If the name of an incoming style
(character or paragraph) matches a style that exists in the publication,
which style denition should InDesign use? Choose the Publication
Denition option to apply the formatting dened by your document,
or Tagged File Denition to import the style dened in the tagged
text le. When you choose the latter method, InDesign adds the style
to the publication and appends the word “copy” to the style’s name.
is does not aect the formatting of any text in the publication
tagged with the original style.
Show List of Problem Tags Before Place. If you’re not getting the for-
matting you expect from your tagged text les, turn this option on
to have InDesign display a list of errors. If InDesign does nd errors,
you can choose to place the le, or to cancel the place operation. You
can write the error list to a text le by clicking the Save Log button.
Text Files and File Linking
Just as you can choose to link or embed graphics les, you can choose
to link or embed text les. By default, InDesign embeds text les—to
maintain a link to the les, turn on the Create Links When Placing
Text and Spreadsheet Files option in the Text Preferences dialog box.
Linking to text les sounds cool, but watch out: Updating the le
is the same as re-importing it, so you will lose any edits or formatting
Turn this option on…
…and InDesign will list any
errors it nds in your tagged
text le. It will also list a
number of things that aren’t
errors, but might be good to
know about.
-
Tagged Text
Import Options
Real_World_Adobe_InDesign_CS4b.pdf 204Real_World_Adobe_InDesign_CS4b.pdf 204 08/04/2009 05:54:34 p.m.08/04/2009 05:54:34 p.m.
you’ve applied in InDesign. We recommend that you embed your
text les. To do this, turn this preference o. If you have already
imported the le, you can break the link—select the le name in the
Links panel and choose Embed File from the panel menu.
Exporting Text
When you need to get your text back out of an InDesign publication
and back into some other program. You can export the text in a vari-
ety of text formats. To export a story, follow these steps.
1. Select the story you want to export (click the Type tool in the
story) and choose Text from the Export submenu of the File
menu (or press Command-E/Ctrl-E). InDesign displays the
Export dialog box.
2. Choose an export format for the text from the Format pop-up
menu. Note that some of the items in this pop-up menu, like
EPS or PDF, don’t export your story; they export the whole page
(or document). To export the text, choose Text Only (which
will export the text without any formatting), Rich Text Format
(RTF), or Adobe InDesign Tagged Text
3. Specify a name and location for the le.
4. Click the Save button to export the story.
Editing Text
Once you’ve entered or imported text, chances are good you’re going
to have to change it. InDesign includes most common word process-
ing features, such as the ability to move the cursor through text using
keyboard shortcuts, check the spelling of text, or nd and change
text and formatting.
When we’re entering text, one of the last things we want to do is take
our hands away from the keyboard. We don’t want to have to use the
mouse to move the text cursor or select text. at’s why we like to use
keyboard shortcuts to move the cursor and select text—they keep
our hands where they belong: on the keyboard.
InDesign comes with a fairly complete set of keyboard shortcuts,
as shown in Table 3-5. Note that some of the shortcuts have several
keys associated with them—pick the combination that works best
Moving the Cursor
rough Text
Real_World_Adobe_InDesign_CS4b.pdf 205Real_World_Adobe_InDesign_CS4b.pdf 205 08/04/2009 05:54:34 p.m.08/04/2009 05:54:34 p.m.