Adobe illustrator cs4- P5 potx
Bạn đang xem bản rút gọn của tài liệu. Xem và tải ngay bản đầy đủ của tài liệu tại đây (1.25 MB, 30 trang )
CHAPTER 4: CREATIVE DRAWING
94
DRAWING WITH LIVE PAINT
Although you can appreciate the power and precision that vector graphics
have to offer, you can also appreciate how easy it is to use pixel-based paint
programs such as Adobe Photoshop CS4 or Corel Painter to easily apply
color to artwork. In a paint program, you can perform fl ood fi lls, in which
you choose a color and use a paint bucket–like tool to fi ll areas of the illus-
tration with color. When working with vectors, you know that you have
to create distinct paths and shapes in order to apply a fi ll to add color. In
other words, you can’t just apply a fi ll to any arbitrary area on your artboard;
rather, you need to select a distinct object to which to apply the fi ll. This
need to create distinct objects can make drawing in Illustrator seem
nonintuitive or time-consuming at best.
Live Paint introduces a new concept of working with vector paths, where
you can colorize vectors and edit them without having to follow the tradi-
tional vector rules we’ve been covering up to this point. This feature makes
it a lot easier to draw (and edit) in Illustrator. Let’s take a closer look.
Using Live Paint to Color Paths
First let’s draw something using Live Paint so you can get a feel for what
the feature is all about. Then we’ll discuss how the feature works, and at
that point, you’ll better understand how to use it in a meaningful way. The
art itself may not be that exciting to look at, but the concepts you learn will
be priceless.
1. Using the Line Segment tool, draw two parallel vertical lines and two
parallel horizontal lines to create a rough outline of a rectangle. It
doesn’t matter if the lines or spacing aren’t perfect; for this exercise,
you just want to make sure the lines cross each other (Figure 4.1).
Figure 4.1 Using the Line
Segment tool, you can
create a simple tic-tac-toe
graphic.
DRAWING WITH LIVE PAINT
95
2. Select the four lines, and select the Live Paint Bucket tool. As you
move your pointer over the four paths, the paths become highlighted
(Figure 4.2).
3. Click once to create a Live Paint group.
4. Pick a fi ll color (a solid color, gradient, or pattern) from the Control
or Swatches panel, and move your pointer over the center area of the
four paths.
The enclosed area in the middle becomes highlighted in red, which
indicates an area that you can fi ll with color (Figure 4.3).
Figure 4.2 If you have
the Live Paint Bucket tool
selected, Illustrator shows a
tool tip to create a Live Paint
group when your pointer
passes over a valid selection.
Figure 4.3 Illustrator’s Live
Paint Bucket tool highlights
areas that can be lled as
your pointer moves over
them, even if the Live Paint
groups aren’t selected.
CHAPTER 4: CREATIVE DRAWING
96
5. Click once with the Live Paint Bucket tool to fi ll the highlighted area
(Figure 4.4).
The resulting behavior is very “Photoshopesque”—you’ve fi lled an area
that looks like it is enclosed on all sides, but you didn’t apply a fi ll to an
actual object.
6. Select the Direct Selection tool, select one of the anchor points on one
of the paths, and move it just a bit.
Notice that the color in the area updates to fi ll the center (Figure 4.5).
If you move one of the paths far enough so that it no longer touches the
other paths, you’ll fi nd that the fi ll color disappears, because there is no
longer an enclosed area to fi ll (Figure 4.6).
Figure 4.4 With one click of
the Live Paint Bucket tool,
you can ll areas that appear
to be enclosed, even though
there isn
’
t an actual vector
object there.
Figure 4.5 The ll areas in a Live
Paint group update automatically
when you’re moving the paths with
the Direct Selection tool.
Figure 4.6 When editing the paths in
a Live Paint group, creating an opened
area results in the loss of the ll.
DRAWING WITH LIVE PAINT
97
Understanding Live Paint groups
Let’s take a moment to understand how Live Paint works. When you select
several overlapping paths or shapes and click them with the Live Paint Bucket
tool, you are creating a Live Paint group. This is a special kind of group in
which the object stacking order is thrown out the window. All objects in a
Live Paint group are seemingly combined onto a single fl at world, and any
enclosed area acts as a closed shape, which can be fi lled with color.
Although clicking several selected paths with the Live Paint Bucket tool (K)
is the easiest way to create a Live Paint group, you can also select several paths
and choose Object > Live Paint > Make (or press Command-Option-X
[Ctrl-Alt-X]) to create a Live Paint group. Once you’ve created a Live Paint
group, however, you may fi nd that you want to add paths or shapes to the
group. To do so, draw the new paths, and use the Selection tool to select the
existing Live Paint group and the new paths. Then choose Object > Live
Paint > Add Paths. The new paths will become part of the group, and any
intersecting areas will act as individual areas that you can fi ll with color.
Live Paint groups can also use the isolation mode feature that enables you to
draw objects directly in existing groups. Using the Selection tool, double-
click an existing Live Paint group to enter isolation mode, indicated by a gray
bar that appears across the top of the document window. Now switch to any
shape or path tool to add paths directly to the Live Paint group (Figure 4.7).
This ability to add paths directly to a Live Paint group is extremely power-
ful because it allows you to defi ne regions for color in just a few quick steps.
Using Pathfi nder fi lters to create multiple overlapping shapes is no longer
required for such tasks. Exit isolation mode by pressing the Escape key.
Figure 4.7 In group isolation
mode, you can draw new paths
in an existing Live Paint group to
instantly create additional regions
that can be lled with color.
TIP If you move a path
so that an enclosed
painted area becomes
unpainted, Illustrator doesn’t
remember that the region
was lled with a color prior to
the edit. Moving the path to
its original position will not
bring back the ll; you’ll need
to reapply the ll color.
TIP You can use the
Live Paint Bucket tool
to color multiple regions with
a single color in one step by
clicking one region and drag-
ging the pointer across addi-
tional contiguous regions.
CHAPTER 4: CREATIVE DRAWING
98
It’s important to understand that the geometry of the paths themselves
defi ne the paintable regions. So if you wanted, you could set the stroke
attributes for the additional paths to none (Figure 4.8).
Figure 4.8 Even though
the strokes aren’t visible,
they still allow you to ll the
areas they de ne.
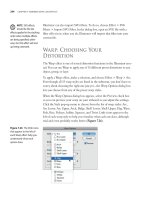
In the Tools panel, double-click the Live Paint Bucket tool to change its
behavior. By default, the Live Paint Bucket tool affects only the fi ll of a path,
but you can also set the tool to apply color to strokes as well (Figure 4.9).
The Pointer Watch Preview option refers to the three boxes that fl oat above
the Live Paint Bucket tool pointer (Figure 4.10). These boxes represent
swatches that appear in the Swatches panel, and when the Live Paint Bucket
tool is active, you can press the arrow keys on your keyboard to select a
color swatch. This allows you to choose colors and quickly fi ll areas without
having to return to the Swatches panel. Additionally, you can specify the
color that the Live Paint tool uses to highlight closed regions.
Figure 4.9 You can set the
Live Paint Bucket tool to
apply color to strokes in a
Live Paint group as well.
TIP When using the
Live Paint Bucket tool,
you can press the Shift key to
toggle between painting the
ll and painting the stroke.
NOTE Unfortunately,
the Live Paint feature
doesn’t work with paths that
have brush attributes applied.
If you do try to turn paths
with brushes into a Live Paint
group, the appearance of the
brush will disappear, leaving
just the appearance of
the stroke. The exception to
this rule is Illustrator's new
Blob Brush, covered later in
this chapter.
Figure 4.10 The three
colors that appear above
the Live Paint Bucket
tool represent the selected
color in the Swatches
panel and each swatch
immediately to the left
and right of that swatch.
DRAWING WITH LIVE PAINT
99
Dealing with Gaps in Your Artwork
Until now, all the regions you were fi lling with color were completely
closed. But what happens if your paths don’t exactly meet each other? That’s
where the Gap Detection feature can really make a difference. You need to
choose Object > Live Paint > Gap Options to control the settings for this
feature (Figure 4.11). If you don’t have any Live Paint groups selected when
you choose this option, the settings you pick become the default settings
for all new Live Paint groups. You can specify different gap options for each
selected Live Paint group in a document as well.
With Gap Detection turned on, you can specify that paint will fi ll areas con-
taining small, medium, or large gaps (Figure 4.12). Additionally, you can
specify an exact amount for how big a gap can be before Live Paint consid-
ers it an open area instead of a closed one. Illustrator previews gaps in the
selected color, and you can also have Illustrator fi ll any gaps in an object
with physical paths (Illustrator always uses straight paths to do so).
TIP If you want to sim-
ply see where gaps
occur in your artwork, you
can choose View > Show Live
Paint Gaps, and Illustrator will
preview those areas in red.
Figure 4.11 The Gap
Options dialog box makes
it possible to ll areas in a
Live Paint group even if they
aren’t completely enclosed.
Figure 4.12 Even though
the paths don’t actually
enclose the areas
completely, you can still
ll the areas with the Gap
Detection feature.
CHAPTER 4: CREATIVE DRAWING
100
Releasing and Expanding Live Paint Groups
Live Paint groups can be expanded, at which time they behave like ordinary
vector paths. The appearance of an expanded Live Paint group remains
identical to the original, but it is split into multiple objects for both fi lls
and strokes. This is similar in concept to expanding live effects. To expand
a selected Live Paint group, either click the Expand button in the Control
panel or choose Object > Live Paint > Expand.
From a production standpoint, you don’t need to expand Live Paint groups
in order to prepare a fi le for print. Live Paint groups print perfectly, because
Illustrator performs the necessary expansion of paths at print time (similar
to live effects).
Additionally, you can choose Object > Live Paint > Release to return a
Live Paint group to the original paths used to create it. Whereas expanding
a Live Paint group results in objects being broken up in order to preserve
appearance, releasing such a group preserves the geometry of the original
paths, but the appearance or colors are lost.
Merging Live Paint Groups
If you have several separate Live Paint groups, you may want to combine
them to edit them as one entire group. You can do so easily by selecting the
different groups and clicking Merge Live Paint in the Control panel. Alter-
natively, you can choose Object > Live Paint > Merge. Just note that for
Live Paint groups that consist of many complex paths, the Gap Detection
feature impedes performance. You may experience better performance by
splitting very large Live Paint groups into several smaller ones or by turning
off Gap Detection.
Using Live Paint to Edit Paths
Live Paint allows you to apply attributes—such as fi lls and strokes—to
paths based on their appearance as opposed to their actual makeup. It would
be even nicer if you could actually edit your paths based on appearance
as well, don’t you think? Adobe was apparently reading your mind and
added another tool to the mix—the Live Paint Selection tool (Shift-L)—
NOTE The Live Trace
feature in Illustrator
can quickly convert traced
vector art into Live Paint
groups for easy coloring.
Refer to Chapter 12,
“Working with Images,”
for more information.
TIP When working
with Live Paint groups,
you can use both the Direct
Selection tool to edit the
individual paths and the
Live Paint Selection tool to
edit, giving you the best of
both worlds.
DRAWING WITH LIVE PAINT
101
that enables you to select portions of objects based on their appearance
(Figure 4.13).
Figure 4.13 With the Live
Paint Selection tool you can
make selections based on
the appearance of artwork,
not the underlying vector
construction of it.
Let’s work through an example:
1. Use the Line Segment tool to draw two perpendicular lines, creating
an x.
2. Select both paths, and press Command-Option-X (Ctrl-Alt-X) or
choose Object > Live Paint > Make to convert the two paths into
a Live Paint group.
3. Select the Live Paint Selection tool, and click one of paths.
You’ll notice that you can select each segment of the line individually.
What were two paths before are now four line segments (Figure 4.14).
Figure 4.14 Using the
Live Paint Selection tool,
you can select visual
segments of a path.
4. With one segment selected, press the Delete key to remove that segment
from the path.
5. Select another segment, and change its stroke (Figure 4.15).
Figure 4.15 In a Live Paint
group, you can easily apply
di erent strokes to the
segments of a path.
CHAPTER 4: CREATIVE DRAWING
102
The Live Paint Selection tool can also select Live Paint areas (fi lls). If you
have two overlapping shapes in a Live Paint group, you can select the over-
lap and delete it (Figure 4.16). You can also double-click to select continu-
ous areas of similar attributes and triple-click to select similar attributes
across the entire Live Paint group.
At the end of the day, Live Paint adds a more fl exible way to color and edit
paths, and it also adds more value to the Pencil tool, because complete
closed paths aren’t required. The important point to remember is that a Live
Paint group is a group, and anything you can do with a group in Illustrator
you can do with Live Paint groups as well. For example, you can add
attributes such as strokes to the Live Paint group for interesting effects.
Experimenting with the Live Paint feature certainly helps you when you’re
editing paths, and the good news is that it’s a fun feature to use.
DRAWING WITH THE PENCIL TOOL
To draw with the Pencil tool, simply click and drag on the artboard. As
you drag, you’ll see a light path trail the movement of your pointer
(Figure 4.17). After you release the mouse button, Illustrator creates the
anchor points necessary and creates a vector path for you (Figure 4.18).
Figure 4.16 The Live Paint
Selection tool enables you
to select any area of a Live
Paint group.
DRAWING WITH THE PENCIL TOOL
103
Figure 4.17 As you
drag with the Pencil
tool, a faint line traces
the path of your
pointer.
Figure 4.18 After you
release the mouse but-
ton, Illustrator creates
anchor points as neces-
sary and displays the
drawn path. Depending
on how well you
control the mouse (or
pressure-sensitive pen),
the path may have a
jittery appearance.
Because drawing with the Pencil tool relies on how steadily you handle your
mouse or tablet pen, you can employ several tools and settings to help create
better-looking paths.
The Smooth tool, which you’ll fi nd grouped with the Pencil tool in the
Tools panel, is a tool you can use to iron out the wrinkles of any selected
vector path. Select any vector path, and click and drag over it with the
Smooth tool. Doing this repeatedly makes the vector path smoother and
smoother. The angles in the path become smoother, and the path modifi es
to match the contour of the direction in which you drag with the Smooth
tool (Figure 4.19).
TIP Pressing the
Option (Alt) key with
the Pencil tool selected will
temporarily switch to the
Smooth tool.
CHAPTER 4: CREATIVE DRAWING
104
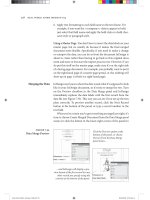
Double-clicking the Pencil tool or the Smooth tool opens the Pencil
Tool Options dialog box, allowing you to specify that tool’s behavior
(Figure 4.20).
Figure 4.20 Selecting the
“Edit selected paths” option
allows you to easily reshape
or adjust existing paths.
The Pencil Tool Options dialog box offers the following settings:
• Fidelity and Smoothness. Available for both the Pencil and Smooth
tools, the Fidelity setting determines how close the vector path is drawn
in relation to the movement of your mouse or input pen. A lower
Fidelity setting results in a path that more closely matches the exact
movement of your mouse. A higher Fidelity setting results in a path that
is smoother and less jittery but that may not match your stroke exactly.
If you’re good with handling the mouse or if you’re using an input pen,
you might go with a lower setting. If you have trouble controlling the
mouse or pen precisely, you might benefi t from a higher Fidelity set-
ting. The Smoothness setting refers to how much smoothing Illustrator
applies to paths as you draw them. The higher the Smoothness setting,
Figure 4.19 Using the
Smooth tool on a path can
enhance its appearance.
NOTE If necessary, the
Smooth tool removes
excess anchor points.
TIP The preferences
for the Pencil and
Smooth tools are saved when
you quit Illustrator so that you
don’t have to set these for
each new le you create
or each time you launch
Illustrator. If you trash your
preferences le, however,
you’ll need to reset these
preferences to your liking.
DRAWING WITH THE PENCIL TOOL
105
the fewer anchor points you’ll see on your paths. If you’re looking for
more fl uid strokes, increasing the Smoothness setting will help.
• Fill new pencil strokes. By default, Illustrator creates paths drawn
with the Pencil tool as paths with a stroke but no fi ll. Selecting this
option gives you the ability to choose a fi ll color and create fi lled paths
as you draw them with the Pencil tool. This setting is available for the
Pencil tool only, not for the Smooth tool.
• Keep selected and Edit selected paths. With Illustrator’s default
behavior, when you draw a path with the Pencil tool, the path becomes
selected as soon as you complete it. You can change this behavior by
deselecting the “Keep selected” option. When the “Edit selected paths”
option is selected and your pointer is within the specifi ed number of
pixels from an existing selected path, Illustrator allows you to modify
the selected path by simply drawing over it with the Pencil tool. This
can be helpful because it allows you to tweak a path to perfection as
you are drawing it, almost as if you were using the Smooth tool. Where
this gets in the way, however, is when you intend to draw a new path
but inadvertently end up editing a path that is selected instead. This can
happen often if you have the “Keep selected” option selected. Many
designers prefer to deselect the “Keep selected” option but leave the
“Edit selected paths” option selected. This way, if they do need to edit
a path, they can Command-click (Ctrl-click) a path to select it; at this
point, the “Edit selected paths” option lets them draw over it.
Pen Tool vs. Pencil Tool
In contrast to the Pen tool, the process of drawing with the Pencil tool mimics that of drawing with a real
pen on paper. In reality, the Pencil tool is the exact opposite of the Pen tool. With the Pen tool, you de ne
the anchor points, and Illustrator completes the paths. With the Pencil tool, you draw the path, and Illustrator
creates the anchor points for you.
If using the Pencil tool to draw paths sounds a lot easier than creating anchor points with the Pen tool,
remember that the mouse isn’t the easiest tool to control when you’re trying to draw. Although the Pencil
tool is easier to use to create paths, it’s not as easy to create exact or precise paths with it. However, if you
have a pressure-sensitive tablet available, the Pencil tool is a bit easier to control.
For technical drawing and precise illustration work, including logo creation and letterforms, you’ll most likely
nd that the Pen tool o ers the ne control you need. You’ll nd the Pencil tool useful when you’re working
with creative illustrations, cartoons, and projects that require a more natural feel.
TIP Remember
that you can use the
Smooth and Path Eraser
tools on any vector path in
Illustrator—even those that
were not created with the
Pencil tool.
CHAPTER 4: CREATIVE DRAWING
106
UNLEASHING THE POWER
OF
BRUSHES
Each version of Illustrator brings new features and tools to the hands of
designers. Some are cool effects, and some add useful functionality. And
every once in a while, a feature is introduced that is so unique and powerful
that it changes everything. The brushes in Illustrator are such a feature.
The concept is simple: Instead of drawing a predictable, boring line using
the Pencil tool, the Paintbrush tool can create fl ourishes, lines with tapered
ends, and artsy elements that mimic the strokes you can create with Speed-
ball or calligraphy pens. More powerful than you might think, brushes sup-
port pressure-sensitive tablets and can even distribute art and patterns along
a drawn path. By using brushes, you can streamline your work by creating
complex artwork with just a few paths. Brushes are also easy to modify.
Under the hood, the Paintbrush tool functions exactly like the Pencil tool
and allows you to click and drag to create a vector path. The difference is in
the appearance of the path it creates. The Paintbrush tool applies predefi ned
vector artwork to the paths you draw. When using a pressure-sensitive tab-
let, you can also control how the artwork is applied to the vector paths.
Exploring the Illustrator Brush Quartet
Illustrator has four kinds of brushes; each offers a different kind of behavior
in which art is applied to a path:
• Calligraphic brush. The Calligraphic brush allows you to defi ne a nib,
or tip, of a pen. The art that is drawn with a Calligraphic brush takes
into account the angle and shape of the nib, resulting in natural thicks
and thins and variable thickness (Figure 4.21).
UNLEASHING THE POWER OF BRUSHES
107
• Scatter brush. The Scatter brush allows you to defi ne any vector art as
a brush (except the ones listed in the sidebar “What’s in a Brush?”). The
art that is drawn with a Scatter brush consists of copies of the art, scat-
tered across the vector path. You can control the way art is scattered in
each brush’s settings (Figure 4.22).
Figure 4.21 With the help
of a pressure-sensitive
tablet, the Calligraphic
brush can create strokes
with natural thicks and thins
to achieve a hand-drawn
look and feel, as in this
illustration of a skier.
Figure 4.22 You can use
a Scatter brush to create
consistent borders or to
quickly ll an illustration
with random art, such
as the sparkles in this
illustration.
CHAPTER 4: CREATIVE DRAWING
108
• Art brush. The Art brush allows you to defi ne any vector art as a
brush (except the ones listed in the sidebar “What’s in a Brush?”). The
art drawn with an Art brush is stretched across the entire length of the
path, resulting in the controlled distortion of art along a vector path
(Figure 4.23).
• Pattern brush. The Pattern brush allows you to specify up to fi ve
already-defi ned patterns as a brush. The art that is drawn with a Pattern
brush is distributed along a vector path based on the brush’s settings,
resulting in perfect corners and art that is contoured to the vector path
(Figure 4.24).
What’s in a Brush?
When you’re creating artwork that will be used to de ne a brush, be aware that brushes cannot understand all
kinds of vector objects. Brushes cannot contain gradients, mesh objects, bitmap images, graphs, placed les,
or masks. For Art and Pattern brushes speci cally, the artwork also cannot contain editable type objects. If you
want to include these kinds of objects, you either need to expand them or convert them to outlines rst.
Figure 4.23 You can use an
Art brush to apply artistic
brush strokes or to stretch
art along a path.
Figure 4.24 A Pattern brush
can bend art to match the
curve of a path and can also
contain a variety of settings
that change based on the
makeup of the path.
UNLEASHING THE POWER OF BRUSHES
109
Applying Brush Strokes
To paint with a brush, choose the Paintbrush tool in the Tools panel, and
then select a brush from the Brushes panel. You create brush strokes the
same way you create paths with the Pencil tool, so once you’ve selected a
brush to use, click and drag on the artboard to defi ne a path. When you
release the mouse button, Illustrator applies the brush stroke to the newly
created vector path (Figure 4.25). Illustrator also indicates the applied brush
stroke in the Appearance panel, making it easy to identify when a particular
brush has been used (Figure 4.26).
Figure 4.25 When you cre-
ate a brush stroke, a single
vector path is de ned, and
the appearance of that path
displays the brush art.
You don’t have to use the Paintbrush tool to apply a brush stroke to a vec-
tor path. Simply selecting a vector path and clicking a brush in the Brushes
panel applies the brush to the selected path. The only benefi t you gain by
using the Paintbrush tool is the ability to defi ne a brush shape using a
pressure-sensitive tablet (see the sidebar “Can You Handle the Pressure?”).
Can You Handle the Pressure?
Illustrator has full support for pressure-sensitive pen tablets such as the line of Wacom tablets. You can set
Calligraphic or Scatter brushes to use variable settings based on pressure, thus enabling you to easily draw
lines of varying thickness or to apply di erent scatter settings.
The natural lines you can achieve with a Calligraphic brush and a Wacom tablet are perfect for sketching or
drawing in Illustrator. It would seem that the next logical step after creating a sketch with the Paintbrush
tool is to convert the art to a Live Paint group to quickly colorize the art. Unfortunately, the Live Paint fea-
ture doesn’t support brushes, and converting a brushed path to a Live Paint group results in the loss of the
appearance of the brush. Instead, you might try using the Blob Brush tool, covered later in this chapter.
When using either the Calligraphic or Scatter brush, Illustrator also supports Wacom’s 6D Art pen. You can nd
a library of 6D Art pen brushes that is lled with 18 Calligraphic and 6 Scatter brushes by choosing Window >
Brush Libraries > Wacom 6D Brushes > 6D Art Pen Brushes.
NOTE If you double-
click the Paintbrush
tool, you’ll nd that the pref-
erences are identical to those
of the Pencil tool.
Figure 4.26 By identifying
the brush applied to a path,
the Appearance panel gives
yet another reason for why
it should always be open
and visible on your screen.
CHAPTER 4: CREATIVE DRAWING
110
Defi ning a Calligraphic Brush
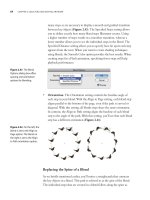
To defi ne a new Calligraphic brush, click the New Brush icon in the Brushes
panel, or choose New Brush from the Brushes panel menu. Select New
Calligraphic Brush in the New Brush dialog box, and click OK to open the
Calligraphic Brush Options dialog box (Figure 4.27).
The Calligraphic Brush Options dialog box allows you to specify the shape
a
nd behavior of the nib using three settings:
• Angle. You can set the angle of a Calligraphic brush to a fi xed angle
or to a random number. When the Roundness setting is set to 100%,
the Angle setting does not produce any noticeable change in the shape
of the brush. With pressure-sensitive tablets, you can set the angle to
change based on pressure, stylus wheel, tilt, bearing, or rotation. When
you’re not using the Fixed option, the Variation slider allows you to
specify a range that the angle can change, which you can also see in the
preview area of the dialog box.
• Roundness. You can set the roundness of a Calligraphic brush to a
fi xed or random number. When the roundness is set closer to 100%,
the tip of the nib becomes circular in shape (like a traditional ink pen).
When the roundness is set closer to 0%, the tip of the nib becomes fl at
(like a traditional calligraphy pen). With pressure-sensitive tablets, you
can set the roundness to change based on pressure, stylus wheel, tilt,
bearing, or rotation. When you’re not using the Fixed option, the
Variation slider lets you specify a range that the roundness can change,
which you can also see in the preview area of the dialog box.
Figure 4.27 The Calligraphic
Brush Options dialog box
lets you click and drag the
nib shape in the preview
area to de ne its settings.
UNLEASHING THE POWER OF BRUSHES
111
• Diameter. You can set the diameter, or size, of a Calligraphic brush to
a fi xed or random number. With pressure-sensitive tablets, you can set
the diameter to change based on pressure, stylus wheel, tilt, bearing, or
rotation. When you’re not using the Fixed option, the Variation slider
allows you to specify a range that the diameter can change, which you
can also see in the preview area of the dialog box.
Defi ning a Scatter Brush
To defi ne a new Scatter brush, start by creating the art for the brush on
the artboard. Once it is complete, drag the artwork directly to the Brushes
panel. Alternatively, you can select the art and click the New Brush icon
in the Brushes panel or choose New Brush from the Brushes panel menu.
Select New Scatter Brush in the New Brush dialog box, and click OK to
open the Scatter Brush Options dialog box (Figure 4.28).
You can fi
ne-tune the Scatter brush with the following settings:
• Size. The Size setting can be a fi xed or random number; this setting
determines how big or small the art is drawn on the path, relative to
the actual size of the art used to defi ne the brush. For example, if you
create a design that is 1 inch tall and use it to defi ne a Scatter brush, a
Size setting of 50% results in a Scatter brush that creates designs that
are .5 inches tall. With pressure-sensitive tablets, you can set the size to
change based on pressure, stylus wheel, tilt, bearing, or rotation. When
you are not using the Fixed option, the two values determine the range
that the size can change.
TIP When you’re using
a pressure-sensitive
tablet, giving the Diameter
setting a variation based
on pressure enables you to
create strokes that appear
thicker as you press harder.
If you have Wacom’s 6D Art
pen, it makes sense to set
the angle to the pen’s
Rotation attribute.
Figure 4.28 The Scatter
Brush Options dialog box
presents a plethora of
settings you can use to
create a wide variety
of results.
CHAPTER 4: CREATIVE DRAWING
112
• Spacing. The Spacing setting can be a fi xed or random number; this
setting determines the amount of space that appears between each
instance of art that is drawn on the path. Higher values add more space
between each copy of the art, and lower values make the copies of art
appear closer together. With pressure-sensitive tablets, you can set the
spacing to change based on pressure, stylus wheel, tilt, bearing, or rota-
tion. When you’re not using the Fixed option, the two values determine
the range that the spacing can change.
• Scatter. The Scatter setting can be a fi xed or random number; this
setting determines how far away each instance of art that is drawn
deviates from the path. Negative values shift art lower and to the left
of the path; positive values shift art higher and to the right of the path.
With pressure-sensitive tablets, you can set the scatter to change based
on pressure, stylus wheel, tilt, bearing, or rotation. When you’re not
using the Fixed option, the two values determine the range that the
scatter can change.
• Rotation. The Rotation setting can be a fi xed or random number; this
setting determines the angle that each instance of art is drawn on the
path. With pressure-sensitive tablets, you can set the rotation to change
based on pressure, stylus wheel, tilt, bearing, or rotation. When you’re
not using the Fixed option, the two values determine the range that the
rotation can change.
• Rotation relative to. You can set the rotation so that it is relative either
to the page, in which case all instances of the art appear consistent, or to
the path, in which case all instances of the art rotate in accordance with
the direction of the path (Figure 4.29).
Figure 4.29 Depending on
your desired result, you can
specify art to rotate in rela-
tion to the page (top) or the
path (bottom).
UNLEASHING THE POWER OF BRUSHES
113
• Colorization. The Colorization option lets you choose from one of four
settings. If you choose the None setting, the Scatter brush creates art in
the same color that is used to defi ne it. If you choose the Tints setting,
the Scatter brush creates art in varying tints of the current stroke color. If
you choose the Tints and Shades setting, the Scatter brush creates art in
varying tints of the current stroke color while preserving black objects.
If you choose the Hue Shift setting, the Scatter brush creates art and
changes the key color of the art to the current stroke color. To defi ne a
key color, click the Eyedropper icon in the dialog box, and click part of
the art in the preview area.
Defi ning an Art Brush
To defi ne a new Art brush, start by creating the art for the brush on the art-
board. Once it’s complete, drag the artwork directly into the Brushes panel.
Alternatively, you can select the art and click the New Brush icon in the
Brushes panel or choose New Brush from the Brushes panel menu. Select
New Art Brush in the New Brush dialog box, and click OK to open the
Art Brush Options dialog box (Figure 4.30).
Figure 4.30 The Art Brush
Options dialog box gives
you a visual preview of
the direction of the art in
relation to the path.
CHAPTER 4: CREATIVE DRAWING
114
You can fi ne-tune the Art brush with the following settings:
• Direction. The Direction setting determines the orientation of the
art with respect to the path to which the brush is applied. A blue arrow
appears in the preview area, allowing you to visually understand how
the art will be drawn on a path.
• Width. The Width setting determines how big or small the art is drawn
on the path relative to the actual size of the art that was used to defi ne
the brush. For example, if you create a design that is 1 inch tall and use
it to defi ne an Art brush, a Size setting of 50% results in an Art brush
that creates designs that are .5 inches tall. When specifying width val-
ues, you can also choose to keep the artwork scaled in proportion.
• Flip. The Flip Along and Flip Across settings enable you to refl ect the
artwork on both the horizontal and vertical axes.
• Colorization. The Colorization option lets you choose from one of
four settings. When you choose the None setting, the Art brush cre-
ates art in the same color that is used to defi ne it. If you choose the
Tints setting, the Art brush creates art in varying tints of the current
stroke color. If you choose the Tints and Shades setting, the Art brush
creates art in varying tints of the current stroke color while preserving
black objects. If you choose the Hue Shift setting, the Art brush creates
art and changes the key color of the art to the current stroke color. To
defi ne a key color, click the Eyedropper icon in the dialog box, and click
part of the art in the preview area.
Defi ning a Pattern Brush
To defi ne a new Pattern brush, it’s easier to fi rst defi ne the pattern swatches
that will be used in the brush (defi ning pattern swatches is covered in Chap-
ter 6, “Coloring Artwork”). A Pattern brush can contain up to fi ve different
pattern tiles, which are used for different parts of a path (see the “Pattern
tiles” bullet in the following list). Once you’ve defi ned the necessary pattern
swatches, click the New Brush icon in the Brushes panel, or choose New
Brush from the Brushes panel menu. Select New Pattern Brush in the New
Brush dialog box, and click OK to open the Pattern Brush Options dialog
box (Figure 4.31).
TIP It’s always a good
idea to learn from
existing examples, and that
goes for Pattern brushes too.
You can nd a wide variety
of Pattern brushes in the
Window > Brushes menu.
UNLEASHING THE POWER OF BRUSHES
115
The various settings of the Pattern Brush Options dialog box are as follows:
• Scale. The Scale setting determines how big or small the pattern
swatch is drawn on the path, relative to the actual size of the art that
was used to defi ne the pattern (by default, a Pattern brush applies art
at the size the art was originally created). For example, if you create art
that is 1 inch tall and use it to defi ne a pattern swatch, a Scale setting of
50% results in a Pattern brush that creates tiles that are .5 inches tall.
• Spacing. The Spacing setting determines the amount of space that
appears between each pattern tile that is drawn on the path. By default,
all pattern tiles touch each other, and specifying higher values adds
more space between them.
• Pattern tiles. A Pattern brush can use up to fi ve pattern tiles for the
different parts of a drawn path. The side tile is used along the middle
of the path, the outer and inner corner tiles are used whenever the path
encounters a corner anchor point at 90 degrees, and the start and end
tiles are used at the beginning and end of an open path. We’ll cover each
tile type in detail later in this chapter. To set a tile, click the preview box
above each tile, and choose from the list of defi ned pattern swatches
that appears. Only pattern swatches from the current document appear
in the list. It is not necessary to assign a pattern swatch to every tile in
order to defi ne a Pattern brush. For example, some Pattern brushes do
not have start or end tiles defi ned.
Figure 4.31 Though it
might appear complicated
at rst, the Pattern Brush
Options dialog box makes
it easy to de ne powerful
Pattern brushes.
TIP To create a dashed
line on a rectangle
that will always have perfect
corners, create two pattern
swatches, one for a dash and
one for a corner. Then create
a Pattern brush that uses the
dash pattern as the side tile
and the corner pattern as the
outer corner tile, and choose
the “Add space to t” option.
CHAPTER 4: CREATIVE DRAWING
116
• Flip. The Flip Along and Flip Across settings enable you to refl ect the
pattern tiles on both the horizontal and vertical axes.
• Fit. The Fit setting, arguably one of most powerful settings among all
the brushes, allows you to specify how pattern tiles are drawn on a path.
The “Stretch to fi t” option modifi es the brush’s Scale setting to ensure
a perfect fi t across the entire path, with no spaces between tiles. The
“Add space to fi t” option modifi es the brush’s Spacing setting to ensure
the tiles fi t evenly across an entire path. The “Approximate path” option
actually changes the size of the path so that it fi ts to the size of the pat-
tern tiles.
• Colorization. The Colorization option lets you choose from one of
four settings. When you choose the None setting, the Pattern brush
creates tiles in the same color used when the pattern swatches are
defi ned. If you choose the Tints setting, the Pattern brush creates tiles
in varying tints of the current stroke color. If you choose the Tints and
Shades setting, the Pattern brush creates tiles in varying tints of the
current stroke color while preserving black objects. When you choose
the Hue Shift setting, the Pattern brush creates tiles and changes the
key color of the tiles to the current stroke color. To defi ne a key color,
click the Eyedropper icon in the dialog box, and click part of the tile in
the preview area (which is extremely diffi cult considering how small the
previews for each tile are).
These next options let you defi ne the fi ve parts of a Pattern brush. Pattern
brushes comprise up to fi ve different individual pattern tiles: side, outer
corner, inner corner, start, and end. It’s rare you would defi ne a single
Pattern brush with all fi ve of these types of tiles, though, because the corner
tiles are mostly benefi cial when creating borders, which are closed paths and
therefore have no need for start or end tiles. Likewise, Pattern brushes with
start and end tiles are generally applied to open paths that may not require
corner tiles.
• Side tiles. The most common type of tile used, the side tile simply
repeats itself along the path to which it is applied (Figure 4.32).
NOTE Most of the
information about
Pattern brushes here comes
from the genius mind of
Teri Pettit, one of the engi-
neers on the Illustrator team
at Adobe. You can nd more
detailed information from
Teri on a variety of topics on
her website at http://tpettit.
best.vwh.net/adobe/.
UNLEASHING THE POWER OF BRUSHES
117
• Outer corner and inner corner tiles. The terms inner corner and
outer corner refer to the corners of a clockwise path. On such a path, the
corners that point outward will use the outer corner tile, and the cor-
ners that point inward will use the inner corner tile. On counterclock-
wise paths, these roles will be reversed.
If a rectangle is created by dragging it from top left to bottom right, or
vice versa, the top of the rectangle runs from left to right, and all cor-
ners will use the outer corner tile. If the rectangle is drawn by dragging
between the top-right and bottom-left corners, then the bottom of the
rectangle runs from left to right. Thus, the brush pattern as displayed
along the top of the rectangle will be upside down, and all corners will
use the inner corner tile (Figure 4.33).
Figure 4.32 This is a Pattern
brush comprised of just a
side tile (inset) to simulate
stitching as it might appear
on a baseball. The stitches
follow the contour of the
path and appear seamless.
Figure 4.33 The arrows that appear within the rectangles indicate the direction
in which they were drawn, while the arrows that appear along the outside of the
rectangles indicate the direction the paths run in. The rectangle on the left runs
clockwise and uses the outer corner tile, while the rectangle on the right runs
counterclockwise and uses the inner corner tile.
CHAPTER 4: CREATIVE DRAWING
118
• Start and end tiles. Start and end tiles appear, respectively, at the
beginning and end of an open path. If a brush does not have start or
end tiles defi ned, then the side tile will be used instead. Note that if
a brush doesn’t have inner or outer corner tiles defi ned, those sections
of the path will appear blank.
A few things are somewhat confusing with regard to how Illustrator
displays pattern tiles in the user interface. For example, the tiles appear in
one particular order when listed in the Pattern Brush Options dialog box
(Figure 4.34), yet they appear listed in a completely different order when
viewed in the Brushes panel (Figure 4.35). Although the order doesn’t
really make a difference, it’s easy to get confused when you’re assigning
patterns to each tile.
In addition, because of the way inner corner tiles are drawn along paths,
they are fl ipped (or refl ected) –45 degrees, which means you need to com-
pensate for that when defi ning the artwork for such tiles. It gets confusing
because the Brushes panel shows a preview of the tile as though it appears
correct, but the same tile appears refl ected when viewed in the Pattern
Brush Options dialog box (Figure 4.36). So that you remain sane, it’s best
to draw your pattern art normally and simply refl ect it 45 degrees before
defi ning it as a pattern.
Figure 4.34 The order
in which Pattern brushes
appear within the Pattern
Brush Options dialog box.
A diagonal line (slash)
means there is no pattern
speci ed for that tile.
Figure 4.35 The order in
which Pattern brush tiles
appear within the Brushes
panel.
Side Tiles Start
Tile
End
Tile
Outer
Corner
Tile
Inner
Corner
Tile
Side Tiles Start Tile End TileOuter
Corner
Tile
Inner
Corner
Tile