Real World Adobe InDesign CS4- P19 potx
Bạn đang xem bản rút gọn của tài liệu. Xem và tải ngay bản đầy đủ của tài liệu tại đây (1.23 MB, 30 trang )
6. Apply text formatting to each eld name in the text frame. For
example, if you want the <<company>> data to appear in bold,
just select that eld name and apply the bold style or a bold char-
acter style or paragraph style.
Using a Master Page. You don’t have to insert the data labels on your
master page, but we usually do because it makes the nal merged
document more exible. Specically, if you need to make a change
or reimport the data, you can do so from the document InDesign is
about to create rather than having to go back to this original docu-
ment and more or less start the import process over. However, if you
do put this stu on the master page, make sure it’s on the right side
of a facing page document. For example, you probably want to put it
on the right-hand page of a master page spread, or else nothing will
show up on page 1 (which is a right-hand page).
InDesign now knows where the data is and what it’s supposed to look
like in your InDesign document, so it’s time to merge the two. Turn
on the Preview checkbox in the Data Merge panel and InDesign
immediately replaces the data labels with the rst record from the
data le (see Figure 7-35). is way you can see if you set up the tem-
plate correctly. To preview another record, click the Next Record
button at the bottom of the panel, or type a record number in the
text eld.
When you’re certain you’ve got everything arranged just right, it’s
time to choose Create Merged Document from the Data Merge panel
menu (or click the button in the lower-right corner of the panel) to
Merging the Data
-
Data Merge Preview
Click the Preview option at the
bottom of the panel, or choose
Preview from the Data Merge
panel menu…
…and InDesign will display a pre-
view layout of the rst record (or any
other record you specify using the
controls at the bottom of the panel.
Real_World_Adobe_InDesign_CS4b.pdf 541Real_World_Adobe_InDesign_CS4b.pdf 541 08/04/2009 05:55:40 p.m.08/04/2009 05:55:40 p.m.
.
create a merged document (see Figure 7-36). Alternately, you can
skip creating an InDesign document and create a PDF le instead by
choosing Export to PDF from the panel menu.
-
Doing the
Data Merge
Choose Create Merged Document
(or click the button at the bottom of
the Data Merge panel).
InDesign displays the Create Merged
Document dialog box. Set up the
data merge using the controls in this
dialog box and click the OK button.
InDesign creates a new document and merges the
data from the data le into the data template you
created, duplicating frames and applying formatting
as necessary. In this example, we chose to lay out
multiple records per page.
e headline is on the master spread—if
it weren’t, it would have been duplicated
with everything else.
Real_World_Adobe_InDesign_CS4b.pdf 542Real_World_Adobe_InDesign_CS4b.pdf 542 08/04/2009 05:55:40 p.m.08/04/2009 05:55:40 p.m.
InDesign then oers you a number of options in the Create Merged
Document dialog box.
Records. e rst tab of this dialog box lets you choose which
records you want to import from the data le. You can also choose
whether you want each data record to appear on its own page (choose
Single Record from the Records per Document Page pop-up menu)
or whether you want more than one record (like a sheet of mailing
labels). We’ll cover the more-than-one record choice below.
If you turn on the Generate Overset Text Report with Document
Creation checkbox, InDesign will save a text le to your hard disk if
the import process causes any text frames to become overset. at’s
handy so we generally turn it on. Similarly, we turn on the Alert
When Images are Missing checkbox, because we want to know if
something has gone wrong during the import process.
Multiple Record Layout. If you choose Multiple Records from the
Records per Document Page pop-up menu, InDesign attempts to
duplicate your page objects in a grid on your page. For example, let’s
say you were making name tags for several hundred people. You
could create one or more text frames on your page (it doesn’t matter
where on the page you put them), insert the data merge labels, and
then specify Multiple Records. e Create Merged Document dialog
box has a Preview Multiple Record Layout checkbox that shows you
what the layout will look like before you commit to the data merge
procedure. It takes a little time to process, but it’s well worth the wait,
as you’ll inevitably nd you need to tweak something the rst time
you try it.
You can control how InDesign lays out the frames on your page
in the Multiple Record Layout tab of the dialog box, including how
much space you want between the rows and columns. e Margins
elds here simply overrides those in the Margins and Columns
dialog box. We wish we could save these settings as a preset to recall
them quickly later, but no can do.
Note that if you have laid out your initial template with more
than one frame, InDesign treats them all as a single “group” that gets
duplicated multiple times across the page. Also, if you have more
than one page in your template le, you can’t do multiple record
layout (n-up layout) because well, because it’ll just get too confus-
ing.
Options. e Options tab of the Create Merged Document dialog
box lets you control how Data Merge handles imported images, blank
Data Merge
Layout Options
Real_World_Adobe_InDesign_CS4b.pdf 543Real_World_Adobe_InDesign_CS4b.pdf 543 08/04/2009 05:55:40 p.m.08/04/2009 05:55:40 p.m.
.
lines in the data le, and large numbers of imported records. Choose
a method from the Fitting pop-up menu to control what happens to
images that don’t match the frame size you’ve drawn in the template.
For instance, you might want to choose Fill Frame Proportionally to
get the largest image possible in the frame, but that will crop out a
portion of the image if the image height/width ratio isn’t the same as
the frame. If you want imported images to be placed in the center of
the frame rather than in the upper-le corner, turn on the Center in
Frame checkbox. (Of course, if you have no images in your data le,
then you can ignore both of these.)
If Link Images is disabled, InDesign embeds all the images into
the document itself. When enabled, InDesign acts as though you
placed the images, linking them to the le on disk.
What should InDesign do when a whole line ends up being blank?
For example, let’s say you’re inserting someone’s name on one line,
their company name on the second line, and their address on the
third line. If someone isn’t aliated with a company, then you’d nor-
mally end up with a blank line. However, if you turn on the Remove
Blank Lines for Empty Fields checkbox, InDesign will simply delete
that line from the nal merged document. Note that this only works
when there would be no text on that line—even a blank space aer
the text label will foil this feature.
e last option, Page Limit Per Document, lets you control how
large the nal document will be. InDesign will import records
and keep adding pages until this limit is reached. However, if you
wanted only single-page InDesign documents, you could change this
number to 1. (at’s a good way to max out InDesign’s resources and
possibly cause mayhem.)
Doing the Merge. When you’re condent that all is well and you’ve
chosen your options wisely, click OK. InDesign creates a new docu-
ment based on the one you built (the template) and the settings you
made. If your data merge labels were placed on the master page, they
will also be on the master page of this new document, which will
allow you to update the data, should the need arise.
When you rst import the data source into the Data Merge panel,
InDesign creates a link between the InDesign le and the .txt or .csv
le—you can even see this link in the Links panel. en, when you
create the new merged document, it, too, has that link (as long as
the template elds were sitting on the master page rather than the
document page). at means if some of the data changes, you don’t
necessarily have to go back to the original and create a new merged
Updating Your Data
Real_World_Adobe_InDesign_CS4b.pdf 544Real_World_Adobe_InDesign_CS4b.pdf 544 08/04/2009 05:55:40 p.m.08/04/2009 05:55:40 p.m.
le. Instead, you can choose Update Content in Data Fields from the
Data Merge panel menu. However, this appears to work only when
the data elds appear in a single text frame—if you used more than
one text frame, it gives you an error message. We think this is prob-
ably a bug.
(You might think that clicking the Update button in the Links
panel should do the same thing as Update Content in Data Fields.
No such luck.)
If the names or number of elds in each record change in the data
source (perhaps you decided to export from the database with more
elds), you should to be able to choose Update Data Source from the
panel menu. We have never gotten this to work correctly. Unfortu-
nately, it appears that the best solution is to remove all of the data
elds from your original template, choose Update Data Source (or
Select Data Source again), and then reapply the data elds manually.
Ultimately, we nd Data Merge very handy for small or simple
jobs, but it’s buggy enough and limited enough that we try not to
lean too hard on it.
e Best of All Possible Worlds
Can you get there from here? When you’re working with InDesign,
you can almost always export or save les in a form you can use in
another program, and you can usually produce les in other pro-
grams you can import or open using InDesign. ere are denitely
bumps in the road—sometimes, you’ve got to go through an inter-
mediate program to convert les from one format to another (par-
ticularly if the les came from another type of computer).
Someday, we’ll have a more complete, universal, and sophisti-
cated le format for exchanging publications. PDF is getting very
close to being that format, and it’s certainly making steps in the
right direction. When the great day arrives, we’ll be able to take page
layouts from InDesign to Illustrator to QuarkXPress to Photoshop,
using each program for what it’s best at without losing any format-
ting along the way.
And the streets will be paved with gold, mounted beggars will
spend the day ducking winged pigs, and the Seattle Mariners will
win the World Series.
Real_World_Adobe_InDesign_CS4b.pdf 545Real_World_Adobe_InDesign_CS4b.pdf 545 08/04/2009 05:55:40 p.m.08/04/2009 05:55:40 p.m.
Long Documents
8
What constitutes a long document? Die-hard denizens of the Frame-
Maker universe insist that if a document isn’t over a thousand pages,
it’s not a long document. Poster designers, on the other hand, main-
tain that folded yers and newsletters qualify.
We’re not sure what our denition of a “long document” is, but we
think that anyone building a book, a magazine, a newspaper, a jour-
nal, or a catalog—just about any document, really, of any number
of pages—can benet from the long document features in InDesign.
ere are three features in InDesign that relate directly to pub-
lishing long documents.
Books. You can tie multiple documents together into a book,
which appears in the form of a panel in InDesign. From here,
you can control page numbering, printing, and synchronize
document attributes as styles, colors, and master pages.
Table of Contents. If you use paragraph styles regularly, you’re
going to love the Table of Contents feature, which can build a
table of contents (or a list of gures, or a table of advertisers, or
any number of other things) quickly and easily.
Indexes. Building an index is a hardship we wouldn’t wish on
anyone (we’ve done enough of them ourselves), but InDesign’s
indexing features go a long way toward making it bearable.
Real_World_Adobe_InDesign_CS4b.pdf 546Real_World_Adobe_InDesign_CS4b.pdf 546 08/04/2009 05:55:40 p.m.08/04/2009 05:55:40 p.m.
Books
Even though an InDesign document can be thousands of pages long,
it’s best to split long documents up into smaller parts. Splitting a
large project into smaller parts is generally more ecient, especially
when more than one person is working on the project at the same
time. e burning question is: if you break up your project into small
documents, how can you ensure style consistency and proper page
numbering among them? e answer is InDesign’s Book feature.
Most people think of a book as a collection of chapters bound
together to act as a single document. In InDesign, a book is a collec-
tion of InDesign documents on your disk or network that are loosely
connected with each other via the Book panel. In other words, just
because it’s called a “book” doesn’t mean it’s not relevant for maga-
zines, catalogs, or any other set of documents.
ere are ve benets to using the Book panel.
It’s a good way to organize the documents in a project, and it’s
faster to open them using the Book panel than with File > Open.
If you use automatic page numbering in your document (see
“Numbering Pages” in Chapter 2, “Page Layout”), InDesign
can manage the page numbering throughout the entire book.
You can print, package, or export one or more documents from
the Book panel using the same settings without even having the
documents open.
e Synchronize feature helps you ensure that styles, colors, and
other settings are consistent among the documents.
By associating les together as a book, you can mix page sizes
and page orientations in a publication—which you can’t do in a
single InDesign document (without a third-party plug-in).
e more documents there are in your project, and the more
pages, styles, colors, and whatnot are used in each document, the
more useful the Book feature will be to you. Even if you’re juggling
two or three documents, it may be worth the minor inconvenience it
takes to build a book.
Building a Book To build a new book, select Book from the New submenu of the File
menu. At this point, InDesign displays the New Book dialog box.
Tell the program where to save your new book le (you can put it
anywhere you want on your hard drive or network, but you should
put it somewhere easy to nd—because you’ll be using it a lot).
Real_World_Adobe_InDesign_CS4b.pdf 547Real_World_Adobe_InDesign_CS4b.pdf 547 08/04/2009 05:55:41 p.m.08/04/2009 05:55:41 p.m.
.
Book les appear in InDesign as panels. When you’ve saved your
new book, InDesign displays a new Book panel.
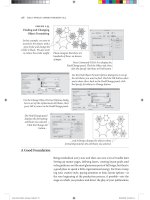
Adding and Removing
Book Documents
To add a document to your Book panel, click the Add Document
button in the panel and choose a document from your disk or net-
work (see Figure 8-1). If no documents on the panel are selected
when you add a new document, the new document is added at the
end of the list. If you select a document rst, the new document is
added aer the selected document. You can also drag les directly
from Windows Explorer or from the Mac OS X Finder windows into
a book panel; this is oen the fastest way to get a folder full of les
into a book.
To add a document
to an empty book
panel, click the Add
button.
Synchronize
Save
Print Add
Delete
-
Adding a
Book Document
Select the le you
want to add.
InDesign adds the
document to the book.
If you accidentally insert a document in the wrong place in a
Book panel, don’t worry—you can move a document up and down
on the list. To do this, select the book document and drag it to a new
location in the list (see Figure 8-2).
Although Adobe’s documentation points out that you can copy a
document from one book panel to another by Option-dragging/Alt-
dragging, we don’t recommend this in most cases. Having the same
document in more than one book can cause pagination problems
and general confusion.
Real_World_Adobe_InDesign_CS4b.pdf 548Real_World_Adobe_InDesign_CS4b.pdf 548 08/04/2009 05:55:41 p.m.08/04/2009 05:55:41 p.m.
-
Moving a
Book Document
Drop the document,
and InDesign moves
the document to a new
position in the list.
…and drag it up or
down in the list.
To change the position
of a book document in
the book list, select the
document…
To remove a document from a Book panel, select the document
and click the Remove Document button. If you want to remove more
than one document, select the documents (use Shi for contiguous
selections, or Command/Ctrl for discontinuous selections on the
list) and then click the Remove Document button. Note that deleting
a document from the Book panel does not delete the le from disk; it
simply removes it from the list.
To replace a book document, select the document in the Book
panel and choose Replace Document from the Book panel menu.
InDesign displays the Replace Document dialog box. Locate and
select the le you want to replace the document with, then click the
OK button to close the dialog box and replace the document.
Converting Books
from Past Versions
InDesign CS4 can open and convert books saved in previous ver-
sions of InDesign. It’s pretty straightforward—just open the book.
ere are, however, a couple of options that can help you—or hurt
you—during the process of converting the book and the documents
in the book.
If, aer opening the book, you choose Save Book from the Book
panel menu, InDesign will over write the InDesign book le
with the converted book. Unless you have a backup copy of the
book le, we think that you should save the converted book to
a new book le by choosing Save Book As. Our experience is
that every time we save over a previous version le—in any
program—we end up regretting it at some point.
Aer you’ve opened and converted a book from an earlier ver-
sion of InDesign, you can select the Automatic Document Con-
version option from the Book panel menu. While this sounds
like a great idea, it will over write every InDesign document in
Real_World_Adobe_InDesign_CS4b.pdf 549Real_World_Adobe_InDesign_CS4b.pdf 549 08/04/2009 05:55:41 p.m.08/04/2009 05:55:41 p.m.
.
the book with an InDesign CS4 version of the document. Again,
unless you have a backup of the previous version les, we think
you should avoid this option. If you do not use this option,
however, you’ll need to save each document in the book to a new
le, which can be tedious if your book contains a large number
of documents.
Using a Book As a
Navigational Tool
Because there is only a very loose connection among the various
documents in the Book panel, you could use this feature as an infor-
mal database of documents. For instance, let’s say you’ve built 15
dierent product data sheets and three small brochures for a client,
and the client is forever updating them. Even though the documents
may each use very dierent colors, styles, and so on, you could put
them all on one Book panel and save this collection under the client’s
name. Next time the client calls for a quick x, you don’t have to go
searching for a document; just open the Book panel and double-click
the document name to open it.
However, if you do this, you probably rst want to turn o the
book panel’s autorenumbering feature (see “Page Numbering and
Sections,” later in this chapter).
Editing Your Book Once you’ve added documents to your Book panel, you can go about
your regular routine of editing and preparing the documents. ere
are, as usual, a few things you should keep in mind.
Whenever possible, you should open your book’s documents
while the Book panel is open. (e fastest way to open a docu-
ment is to double-click the document name in the Book panel.)
When you open and modify a document while the panel is not
open, the panel isn’t smart enough to update itself (see “File
Status,” below). If InDesign can’t nd your document (perhaps
it’s on a server that is not mounted), it’ll ask you where it is.
In general, if you’re going to use automatic page numbering, you
should let the Book panel handle your page numbering for you
(see “Page Numbering and Sections,” later in this section).
Each time we use Save As, we change the name slightly (“mydoc-
ument1,” “mydocument2,” and so on), so we can always go back
to an earlier version if necessary. However, note that the Book
panel doesn’t catch on to what you’re doing; it just lists and
keeps track of the original document. So every time you use
Save As, you have to select the original le and select Replace
Document from the Book panel’s menu.
Real_World_Adobe_InDesign_CS4b.pdf 550Real_World_Adobe_InDesign_CS4b.pdf 550 08/04/2009 05:55:41 p.m.08/04/2009 05:55:41 p.m.
Note that you cannot Undo or use Revert to Saved for changes
in the Book panels, so be careful what you do in these beasts. Also,
the changes you make to your Book panel, including adding, remov-
ing, and reordering documents, aren’t saved until you close the panel,
quit InDesign, or select Save Book from the panel’s menu.
File Status As you work with book documents, the Book panel monitors and
displays the status of each document in the book. ere are ve pos-
sible icons in the Status column of the panel: Available, Open, Modi-
ed, Missing, or In Use (see Figure 8-3).
Available. e normal status of a document is Available (no
icon). is means that no one has the document open for editing
and that the document has not changed since the last time it was
open on the computer you’re using.
Open. When you have a document open on your system, the
status of that le is listed as Open (an open book icon).
Modied. When you or anyone else who has access to the le
opens and changes a document while the Book panel is not open,
the status will be listed as Modied in the Book panel (triangle
icon). It’s easy to change the status back to Available: open the
le while the Book panel is open, then close the document again.
Or, even easier: select Update Numbering from the panel’s menu.
Missing. If you move a document aer adding it to the Book
panel, InDesign won’t be able to nd it, and the status is listed
as Missing (red stop sign icon). To “nd” a le again, double-
click the chapter name in the Book panel; InDesign displays the
Replace Document dialog box in which you can tell it where the
document now resides.
In Use. If someone else on your network opens one of the docu-
ments in your book via the Book panel, the Status eld of the
Book panel lists that chapter as in use (padlock icon).
It’s important to pay attention to the Status column readings,
because documents must be either Available or Open in order to
synchronize, print, or renumber properly.
Books and Networks People are increasingly working on projects in groups rather than
individually. Adobe anticipated this, and if you put your book le
and documents on a server, more than one person can open the
panel at the same time. (Only one person can open an InDesign
document at a time, however.) While this isn’t nearly as powerful as
Real_World_Adobe_InDesign_CS4b.pdf 551Real_World_Adobe_InDesign_CS4b.pdf 551 08/04/2009 05:55:41 p.m.08/04/2009 05:55:41 p.m.
.
a full-blown document management system, it’s certainly useful if a
group of people have to work on dierent documents in the book at
the same time.
We don’t like working on documents when they’re on a server. It
makes us nervous, and it’s also really slow. Instead, we prefer to copy
the le to our local hard drive, edit it at our leisure, and then return
the le to the server when we’re done with it.
ere are two problems with this. First, the Book panel doesn’t
update properly. Second, other people on your network might not
realize that you’ve got the “live” le, so make it clear to them: hide
the document on the server, or put it in another folder called “work
in progress” or something like that.
Synchronizing Your
Book Documents
e more documents you’re working with, the more likely it is that
one or more of them contain settings inconsistent with the others
in the book. Perhaps you decided to change a style denition in one
document out of 20, and then forgot to change it in the other 19. Or
perhaps your art director decided to change a Pantone color in a
document and you now need to update the color in all of the other
documents in the book.
Fortunately, the Synchronize Book button on the Book panel lets
you ensure that all styles, color settings, variables, numbered lists,
and master pages are consistent throughout the documents in a
book. Here’s how it works.
e Master
Document
One document on the Book panel is always marked as the master
document (by default, it’s the rst document you add to the panel;
InDesign’s documentation refers to this document as the style source
document). e master document—which has a cryptic little icon
to the le of it—is the document to which all the other documents
will be synchronized. at means that if you add a new color to the
master document and click the Synchronize Book button, the color
will be added to all of the other documents in the book. If you add a
new color to a document that is not the master document, the color
won’t be added when you synchronize the documents.
-
Book Panel
Status Icons
Modied
Open
Available
Missing
Real_World_Adobe_InDesign_CS4b.pdf 552Real_World_Adobe_InDesign_CS4b.pdf 552 08/04/2009 05:55:41 p.m.08/04/2009 05:55:41 p.m.
You can always change which document is the master document.
To do that, click in the le column of the Book panel next to the
document you want to set as the master document.
Synchronize In order to synchronize your book documents, you must rst select
which les you want to synchronize in the Book panel; remem-
ber that you can Shi-click to select contiguous documents or use
Command-click/Ctrl-click to select discontinuous documents. Or, if
you want to synchronize all the les, make sure that no documents
(or all documents) are selected in the panel.
A style, color swatch, variable, numbered list, or master page that
is dened in the master document but not in another document
gets added to that other document.
If a setting is named the same in both the master document and
another document, the denition for that setting in the master
document overrides the one in the non-master document.
If a setting is not dened in the master document but exists in
some other document, it’s le alone. (is means you can have
“local” settings that exist in one document that don’t have to be
copied into all the others.)
By selecting Synchronize Options in the Book panel’s menu,
you can choose which settings will be synchronized among
the documents (see Figure 8-4). However, if the master docu-
ment contains table of contents styles (which we talk about
later in this chapter) and you turn on the TOC Styles check box
in the Synchronize Options dialog box, all the character and
-
Synchronization
Options
Choose Synchronize Options
from the Book panel menu.
Turn options on (to include them
in the synchronization) or o (to
exclude them).
Real_World_Adobe_InDesign_CS4b.pdf 553Real_World_Adobe_InDesign_CS4b.pdf 553 08/04/2009 05:55:42 p.m.08/04/2009 05:55:42 p.m.
.
paragraph styles are synchronized, even if you’ve turned o the
Character Styles and Paragraph Styles check boxes. Select Smart
Match Style Groups if you have moved styles in or out of style
groups (folders) and all your styles are uniquely named.
Synchronizing a document can be a time-consuming process—
the more documents and the more settings, the longer it takes.
Page Numbering
and Sections
Perhaps the most helpful aspect of the Book feature is that it keeps
track of your page numbering for you and updates the page numbers
when you add pages to or delete them from a document, or if you add
a new document between two other documents in a book. Of course,
this only works if you’ve placed automatic page numbers on your
document pages (see “Numbering Pages” in Chapter 2).
Let’s say you’ve got one 16-page document in your Book panel
already. When you add another document, InDesign automatically
sets its rst page number of the new document to 17 (provided you
had not already specied the rst page as a section start in the Num-
bering and Section Options dialog box). If you later open the rst
document and add two pages, InDesign automatically renumbers
the second document—the next time you open it, you’ll see that it
starts on page 19.
If, on the other hand, you use the Numbering and Section Options
dialog box (you can jump to this feature quickly by double-clicking
on the page numbers in the Book panel) to create a section start, the
Book panel respects that. Any subsequent documents in the Book
panel continue the page numbering from where the previous docu-
ment’s page numbering le o.
If you don’t use automatic page numbers, or you have manually
specied page numbers for each document in your book, you will
probably tire of watching InDesign repaginate your book. Fortu-
nately, you can turn this feature o by selecting Book Page Num-
bering Options from the Book panel’s menu, and unchecking
Automatically Update Page and Section Numbers (see Figure 8-5).
Odd Versus Even
Page Numbers
When chapter 2 ends on page 45, what page number does InDesign
assign to the rst page of chapter 3? If you’re in the book business, you
probably want chapter 3 to start on page 47, because it’s a right-hand
page. (Olav insists on editing and/or adjusting the layout to avoid
a blank le-hand page.) Catalog and magazine publishers would
want the third le to begin on page 46, even though it’s a le-hand
page. You can specify what you want InDesign to do by choosing
Book Page Numbering Options from the Book panel’s menu. You’ve
Real_World_Adobe_InDesign_CS4b.pdf 554Real_World_Adobe_InDesign_CS4b.pdf 554 08/04/2009 05:55:42 p.m.08/04/2009 05:55:42 p.m.
got three choices: Continue from Previous Document, Continue on
Next Odd Page, and Continue on Next Even Page.
When you turn on the Insert blank page option, InDesign adds
a page to ll any gaps between chapters. For example, if chapter 2
ends on page 45 and you turn on the Continue on Next Odd Page,
then InDesign adds a blank page at the end of chapter 2. is page is
truly blank—it’s not based on any master page. If you want a running
head on that page, you’ll have to apply the master page yourself. (By
the way, David once almost drove himself mad trying to gure out
why he couldn’t delete the last page from a document. e answer, of
course, was that he had forgotten this feature was on.)
Chapter Numbering If you’d like to number each document in your book, you can let
InDesign handle the numbering for you using chapter numbers. To
set up chapter numbering, select the rst page in the document, then
choose Numbering & Section Options from the Layout menu (or
from the Pages panel menu). In the Document Chapter Numbering
section of the dialog box (see Figure 8-6), choose a numbering Style
(such as regular numerals, roman numerals, or letters). en choose
whether you want to specify a chapter number for this book or base
the number o the chapter number of the previous document in the
book panel. Note that even though a single document can have mul-
tiple sections, it can have only one chapter number.
Once you have set up the Numbering & Section Options dialog
box, you can “type” the chapter number in a text frame by inserting
a chapter number text variable. For more information on text vari-
ables, see Chapter 3, “Text.”
Note that when your chapter numbering changes (for example,
if you rearrange the order of the documents in the book panel), the
chapter numbers in your documents are not updated until you choose
-
Book Page
Numbering
Options
Choose Book Page
Numbering Options from
the Book panel menu.
Select page numbering options
in the Book Page Numbering
Options dialog box.
Real_World_Adobe_InDesign_CS4b.pdf 555Real_World_Adobe_InDesign_CS4b.pdf 555 08/04/2009 05:55:42 p.m.08/04/2009 05:55:42 p.m.
.
Update All Numbers or Update Chapter & Paragraph Numbers from
the Update Numbering submenu in the book panel’s menu. If the
number on the screen in front of you still doesn’t update, remember
that text variables only change when you force the screen to redraw.
Printing and
Exporting Books
Even though we cover printing documents in Chapter 11, “Printing,”
we should take this opportunity to mention a few things that are
specic to printing, packaging, or exporting books.
First, each chapter in a book must be listed as Open, Available, or
Modied on the Book panel in order for the document to print. is
is because InDesign invisibly opens each document at print or export
time (you don’t see the document open on screen, but it does).
Second, if you only want certain documents in a book to print or
be exported, select them in the Book panel. Remember that you can
select contiguous documents on the list by holding down the Shi
key, and discontinuous documents with Command/Ctrl. If no docu-
ments are selected, then they’ll all print. (Click in the blank area at
the bottom of the panel to deselect all the documents.)
When you’re ready to print, click the Print Book button in the
Book panel or select Print Book (or Print Selected Documents) from
the panel’s menu. e settings you choose in the Print dialog box
apply to every document in the book.
You can export your book as an Acrobat PDF le by choosing
Export Book to PDF (or Export Selected Documents to PDF) from
the panel’s menu. If you turn on the Create Acrobat Layers checkbox
when you export the PDF, InDesign merges all layers that have the
same name into a single PDF layer. However, if you rst deselect
Merge Identically Name Layers on Export in the book panel’s menu,
the PDF will include individual layers for each document.
Similarly, to package all the documents in the book, plus their
required fonts and linked images, you can choose Package Book
for Print from the panel’s menu. When you package a book, all the
linked images are copied into a single Links folder—though if your
documents have placed images that are unique but have the same
name, InDesign is smart enough to automatically rename them.
Table of Contents
Don’t get fooled into thinking the Table of Contents feature (under
the Layout menu) is only for making book tables of contents. is
feature lets you build collections of paragraphs that have been tagged
with specic styles. For instance, if you use even two styles when
Real_World_Adobe_InDesign_CS4b.pdf 556Real_World_Adobe_InDesign_CS4b.pdf 556 08/04/2009 05:55:42 p.m.08/04/2009 05:55:42 p.m.
you’re formatting a book—one for the chapter name and another for
your rst-level headings—you can build a basic table of contents by
collecting all the paragraphs tagged with these two styles. But if you
use paragraph styles to tag your product names, you could just as
easily build an index of products for a catalog. Anything you can tag
with a paragraph style, you can build into a “table of contents.”
is all depends entirely on your using styles. You should be using
styles anyway—if you’re not, you’re working way too hard; refer to
Chapter 4, “Type,” to see why you should.
Making a Table
of Contents
Making a table of contents (or a list of gures, or whatever) is easy,
but it requires a methodical approach to the Table of Contents dialog
box (see Figure 8-7).
1. If you only have one list (table of contents, list of gures, etc.)
in your document, you can leave the Style pop-up menu set to
[Default]. We’ll cover table of contents styles later in this section.
2. Fill in a name for your list in the Title eld. InDesign places
this title at the beginning of the list, so you might want to type
“Table of Contents” or “Advertisers” or something like that. We
usually leave this eld blank and later make our own title on
the document page. If you do include a title, choose a paragraph
style for it from the Style pop-up menu to the right of the Title
eld. (InDesign automatically adds a paragraph style called
“TOC title” to your document when you open this dialog box,
but you don’t have to use that style if you don’t want to.)
3. Choose the paragraph styles that you want included from the list
on the right. You can click the Add button to add them to the
list, but double-clicking the style names is faster. You can also
-
Chapter Numbering
Real_World_Adobe_InDesign_CS4b.pdf 557Real_World_Adobe_InDesign_CS4b.pdf 557 08/04/2009 05:55:42 p.m.08/04/2009 05:55:42 p.m.
.
-
Creating a Table
of Contents
Select a paragraph style from
the Other Styles list and click
the Add button.
InDesign adds the style to
the Include Paragraph Styles
list (the list of styles included
in the table of contents).
Choose a paragraph
style to use to format
the selected table of
contents style.
Add other paragraph styles
to the list as necessary.
When you’re ready to build
your table of contents, click
the OK button.
Unless you’ve chosen to
replace an existing table of
contents, InDesign displays
a place icon. Click the place
icon to place the table of
contents story.
Real_World_Adobe_InDesign_CS4b.pdf 558Real_World_Adobe_InDesign_CS4b.pdf 558 08/04/2009 05:55:42 p.m.08/04/2009 05:55:42 p.m.
select more than one style (by Command/Ctrl-clicking each one)
and then click Add to add them all at once (in which case they’re
added alphabetically—if you want to rearrange the order, just
click and drag the style names aer adding them).
4. One by one, click each style in the Include Paragraph Styles list
and choose a paragraph style for it from the Entry Style pop-up
menu. is is helpful because you’d rarely want a heading from
your document to appear in your table of contents in the actual
Heading style; instead, you’d probably create a new style called
“TOC-head” or something like that. If you want certain para-
graphs to be indented on your nal list, you should apply styles
here that include indentation. InDesign adds a paragraph style
called “TOC body text” to your document when you open this
dialog box, but you don’t have to use it—we just roll our own.
5. If your document is included in a Book panel, you can choose
to include the entire book in your list by turning on the Include
Book Documents check box. We’ll talk about the Replace Exist-
ing Table of Contents check box below.
6. Finally, when you click OK, InDesign builds the table of contents
(which might take a little while, especially if you have many doc-
uments in a book). When it’s done, InDesign displays the text
place icon, just as if you had imported a text le (see Chapter 4,
“Text,” if you need to know more about placing text).
More Table of
Contents Options
e default Table of Contents dialog box gives you the basic controls
you need for a simple table of contents, but for most lists we make we
click the More Options button, which gives us more options for ne-
tuning the table of contents (see Figure 8-8).
Page Number. You may not want every entry in your table of
contents to be followed by a page number. Perhaps you want
page numbers aer the headings, but not aer the chapter titles
in a book. You can control how page numbers will appear with
the Page Number pop-up menu. You’ve got three options for
numbering: Aer Entry, Before Entry, and None. e rst two
tell InDesign to include the page number (either before or aer
the entry), separated from the text of the paragraph by a tab
character. We typically create a character style for the page num-
bers and select it from the Style pop-up menu to the right of the
Page Number menu. is way, all the page numbers appear the
same rather than appearing in the Entry Style.
Real_World_Adobe_InDesign_CS4b.pdf 559Real_World_Adobe_InDesign_CS4b.pdf 559 08/04/2009 05:55:43 p.m.08/04/2009 05:55:43 p.m.
.
Between Entry and Number. By default, InDesign places a tab
character between the entry and the page number (whether the
page number is before or aer the entry). However, you can
change this to some other character or characters. For instance,
we usually replace the ^t character (which is code for a tab) with
^y (a right-indent tab, which always sits ush on the right margin,
even if you haven’t placed a tab stop). If you’re planning on
including dot leaders between the entries and the page numbers
(which you would set up in the Tabs panel), you may want to
pick a character style from the Style pop-up menu. A regular
dot leader looks too much like periods in a row (which is exactly
what it is), so we oen make a character style of 7-point text with
500 units of tracking, then apply this style to the leader.
Sort Entries in Alphabetical Order. If you turn on the Sort
Entries in Alphabetical Order option in the Table of Contents
dialog box, InDesign sorts the list in alphabetical order when
you build it. Whether or not you want your nal list alphabet-
ized is up to you; you probably wouldn’t want it when you build
the table of contents for a book, but you might if you’re creating
a list of items in a catalog.
Level. Each paragraph style you include appears with a dierent
indent in the Include Paragraph Styles list. You can control how
much indent with the Level feature. is only adjusts the display
in this dialog box; it has no eect on the nal list unless your
-
More Table of
Contents Options
Use the Page Number pop-up
menu to specify the position
of the page number relative
to the table of contents text.
You can select a character style to apply to the
page number and/or to the separator character.
Real_World_Adobe_InDesign_CS4b.pdf 560Real_World_Adobe_InDesign_CS4b.pdf 560 08/04/2009 05:55:43 p.m.08/04/2009 05:55:43 p.m.
list is alphabetized—in which case, the entries are alphabetized
by level.
Run-in. Some tables of contents, such as those found in
academic journals, are “run-in”—that is, the headings are all
in one paragraph, separated by semicolons. If you want this
sort of list, turn on this option (see Figure 8-9).
-
e Run-in Option
Normal.
Run-in.
Include Text on Hidden Layers. is option is pretty self-
explanatory. If you have multiple layers in your document, you
can choose whether to include the text on those layers even
when the layers are hidden. While it’s rare that you’d turn this
on, you might do so if you have made a layer that contains key-
words or explanatory text that you want in the table of contents
but don’t want in print (see the next section).
Numbered Paragraphs. If you have used automatic paragraph
numbering in your document, you have a choice of what will
appear in the table of contents: the entire paragraph (with the
numbering), the paragraph with no number, or only the number.
Using Dummy
Text for Lists
One of the things we like most about tables of contents is that they’re
document-wide rather than simply story-wide. at means that any
text in any text frame can be included in a table of contents—even
text in a nonprinting text frame. With this in mind, you can add
“tags” to items on your page that don’t appear in print, but do appear
in your table of contents.
One of the best examples of this is an advertiser index. You can
place a text frame with an advertiser’s name on top of that company’s
ad in your document. Set the text frame’s color to None and turn on
Nonprinting Object in the Attributes panel (or put the frame on a
hidden layer), and it’s almost as though this were a “non-object”—the
Real_World_Adobe_InDesign_CS4b.pdf 561Real_World_Adobe_InDesign_CS4b.pdf 561 08/04/2009 05:55:43 p.m.08/04/2009 05:55:43 p.m.
.
text won’t print, and it won’t aect the ad underneath. But if that
advertiser’s name is tagged with a style, you can include it on a list
of advertisers.
e same trick applies to building a list of pictures in a catalog, or
for any other instance where what you want on the list doesn’t actu-
ally appear on the page.
Building and
Rebuilding Tables
of Contents
ere is nothing magic about the text or page numbers in your table
of contents—they’re just regular text and numbers. at means if you
update the document on which the list is based (such as adding pages
or changing the text), the entries and page numbers in the table of
contents don’t automatically update, and you will have to rebuild it.
We nd that we build and rebuild a table of contents several times for
each document or book. It isn’t that we’re having so much fun with
the feature—it’s that we make mistakes.
To update a table of contents, use the Selection tool or Text tool
to select the text frame containing the list, then choose Update Table
of Contents from the Layout menu. Or, if you want to make a change
to the Table of Contents dialog box settings, you can choose Table
of Contents from the Layout menu, make the changes, turn on the
Replace Existing Table of Contents check box, and click OK.
Table of Contents
Styles
Everything we’ve said about table of contents so far is based on the
idea that you have only one of these in your document. However, you
can dene lots of dierent table of contents styles in a single docu-
ment—one for headings, one for gures, one for bylines, and so on.
e easiest way to do this is to build various table of contents styles,
which are simply saved collections of settings. Once you set up the
Table of Contents dialog box just the way you want it, you can click
the Save Style button to save this setup as a style (see Figure 8-10).
Later, you can reload those settings by choosing your style from the
TOC Style pop-up menu at the top of the dialog box.
A second way to build a “style” is to select Table of Contents Styles
from the Layout menu and click New. You get a nearly identical
dialog box, but when you click OK your settings are saved for use
later. You can also use the Table of Contents Styles feature to delete
and edit styles, or load them from other InDesign documents.
Note that if you save your table of contents style aer building a
table of contents in your document, InDesign isn’t smart enough to
match your built list to the style name. at means you can’t use the
Replace Existing Table of Contents feature. Instead, you’ll have to
delete the already-built list and replace it with a new one.
Real_World_Adobe_InDesign_CS4b.pdf 562Real_World_Adobe_InDesign_CS4b.pdf 562 08/04/2009 05:55:43 p.m.08/04/2009 05:55:43 p.m.
Indexes (Or Indices)
Sitting down and indexing a book is—in our experience—the most
painful, horrible, mind-numbing activity you could ever wish on
your worst enemy. And yet, where this is the kind of task that a com-
puter should be great at, it’s actually impossible for a computer to do
a good job of indexing a book by itself. A good index requires careful
thought, an understanding of the subject matter, and an ability to
keep the whole project in your head at all times. In short, it requires
comprehension—a quality computer soware, at this early stage of its
evolution, lacks. Until recently, it also required a large stack of note
cards, highlighter pens, Post-It notes, and serious medication.
Fortunately, InDesign has a built-in indexing feature, which,
while it won’t make the index for you, does remove the note card and
highlighter requirements.
Some people ask us, “Why can’t a computer build an index?
InDesign should just give me a list of all the words in my document
and what page they’re on.” Unfortunately, this is not an index; it’s
a concordance. A concordance records the location of words; an
-
Creating a Table of
Contents Style
To save the current settings
of the Table of Contents
dialog box as a table of
contents style, click the Save
Style button.
Enter a name for the style in
the Save Style dialog box and
click the OK button.
InDesign adds the style to
the list of available styles.
Real_World_Adobe_InDesign_CS4b.pdf 563Real_World_Adobe_InDesign_CS4b.pdf 563 08/04/2009 05:55:43 p.m.08/04/2009 05:55:43 p.m.
.
index records the location of ideas. ere are times when a concor-
dance can be useful, especially in catalogs. In those cases, you might
want to use a plug-in such as Sonar Bookends, which can build con-
cordances automatically and very quickly. But in general, if you’re
looking for an index, you’re going to have to do it manually with
InDesign’s indexing features.
You can index a document at any time in the production cycle,
but it’s almost always best to wait until the text has become xed—
until no text in the document will be deleted, copied, cut, pasted, and
so on. e reason: as you edit the text, you may accidentally delete
index markers.
e Index panel (choose Index from the Type & Tables submenu,
under the Window menu) lets you add either single words or whole
phrases to the index, and it displays a list of currently indexed words
and phrases (see Figure 8-11). First we’re going to discuss how to
add, edit, and remove index entries with the Index panel. en we’ll
explore how to collect all the tagged entries and build a nished
index on your document pages.
-
e Index Panel
Index panel in Reference mode. Index panel in Topic mode.
Go to Selected Marker
Update Preview
Generate Index
Create a New Index Entry
Delete Selected Entry
A Note to the Author Contemplating Self-Indexing. Hire a profes-
sional indexer. You simply know the material too well to create a
useful index. A professional indexer will read and understand your
text, and will create an index that opens it up to a wider range of pos-
sible readers than you ever could. It’s what they do.
Real_World_Adobe_InDesign_CS4b.pdf 564Real_World_Adobe_InDesign_CS4b.pdf 564 08/04/2009 05:55:44 p.m.08/04/2009 05:55:44 p.m.
Adding a New First-
Level Index Entry
ere’s very little that is automatic about building an index. Again, it’s
not dicult, but you have to be methodical about it. Here are the steps
you should go through for each new index entry. (Note that we always
dierentiate between a new index entry or topic and a new reference
to an index entry. For example, “Pigs” might be a new entry for page
34, but when it appears again on page 59, it would simply be a new
reference to your already added index entry—see “Adding a New
Reference to an Entry,” later in this section.)
To add an index entry, follow these steps (see Figure 8-12).
1. If the word or phrase you want indexed appears on the page,
select it and click the New Entry button at the bottom of the
Index panel, or select New Page Reference from the panel’s
menu (or better yet, just press Command-7/Ctrl-7). If the index
entry isn’t found on the page, place the text cursor anywhere in
the text related to the topic and click the New Entry button. For
example, a page may include a discussion of cows, but you want
to index the word under the phrase “Farm animals.” In this case,
you would simply insert the cursor in the text and click New
Entry (or press the keystroke).
2. In the New Page Reference dialog box, edit the entry under the
Topic Levels heading, if needed. Whatever you type here will be
what shows up in the index. Since we’re focusing on rst-level
entries right now, you can just skip over the other two Topic
Levels elds. (We’ll discuss the ner points of second-level
entries in “Adding a New Second-Level Index Entry,” later.)
3. Index entries always appear in alphabetical order. However,
occasionally you may not want your index entry to appear
where it would normally be alphabetized. For instance, the
famous “17-Mile Drive” would ordinarily be placed at the begin-
ning of the index, before the “A”s. You can place it along with
other words that begin with “S” by typing “Seventeen” in the
rst Sort As eld of the New Page Reference dialog box. You’ll
probably leave this eld blank most of the time.
4. e Number Style Override feature is yet one more control that
you will ignore most of the time. Let’s say you want the page
numbers that refer to an illustration (rather than to just text on
the page) to appear bold in the nal index. You can build a char-
acter style to dene how you want the page numbers to appear
and—when you’re indexing that illustration—you can turn on
the Number Style Override check box and choose that character
style from the pop-up menu.
Real_World_Adobe_InDesign_CS4b.pdf 565Real_World_Adobe_InDesign_CS4b.pdf 565 08/04/2009 05:55:44 p.m.08/04/2009 05:55:44 p.m.