Lập trình Androi part 50 doc
Bạn đang xem bản rút gọn của tài liệu. Xem và tải ngay bản đầy đủ của tài liệu tại đây (347.22 KB, 5 trang )
CHAPTER 35: Development Tools
326
Placing Calls and Messages
If you want to simulate incoming calls or SMS messages to the Android emulator, DDMS
can handle that as well.
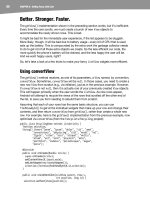
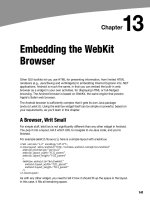
On the Emulator Control tab, above the Location Controls group, is the Telephony
Actions group, as shown in Figure 35–13.
Figure 35–13. DDMS telephony controls
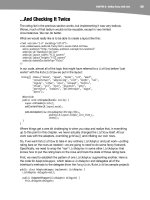
To simulate an incoming call, fill in a phone number, choose the Voice radio button, and
click Call. At that point, the emulator will show the incoming call, allowing you to accept
it (via the green phone button) or reject it (via the red phone button), as shown in Figure
35–14.
CHAPTER 35: Development Tools
327
Figure 35–14. Simulated incoming call
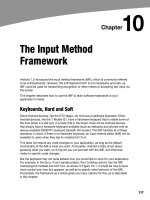
To simulate an incoming text message, fill in a phone number, choose the SMS radio
button, enter a message in the provided text area, and click Send. The text message will
then appear as a notification, as shown in Figure 35–15.
Figure 35–15. Simulated text message
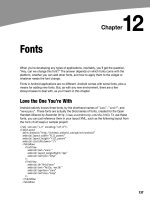
And, of course, you can click the notification to view the message in the full-fledged
messaging application, as shown in Figure 35–16.
CHAPTER 35: Development Tools
328
Figure 35–16. Simulated text message, in messaging application
Put It on My Card
The T-Mobile G1 has a microSD card slot. Many other Android devices are likely to have
similar forms of removable storage, which the Android platform refers to generically as
an SD card.
It’s strongly recommended that developers use SD cards as the holding pen for large
data sets: images, movie clips, audio files, and so on. The T-Mobile G1, in particular,
has a relatively paltry amount of on-board flash memory, so the more you can store on
an SD card, the better.
Of course, the challenge is that, while the G1 has an SD card by default, the emulator
does not. To make the emulator work like the G1, you need to create and “insert” an SD
card into the emulator.
Creating a Card Image
Rather than require emulators to somehow have access to an actual SD card reader and
use actual SD cards, Android is set up to use card images. A card image is simply a file
that the emulator will treat as if it were an SD card volume. If you are used to disk
images used with virtualization tools (e.g., VirtualBox), the concept is the same. Android
uses a disk image representing the SD card contents.
CHAPTER 35: Development Tools
329
To create such an image, use the mksdcard utility, provided in the tools/ directory of
your SDK installation. This takes two main parameters:
The size of the image, and hence the size of the resulting “card.” If you
just supply a number, it is interpreted as a size in bytes. Alternatively,
you can append K or M to the number to indicate a size in kilobytes or
megabytes, respectively.
The filename under which to store the image.
So, for example, to create a 1GB SD card image, to simulate the G1’s SD card in the
emulator, you could run the following:
mksdcard 1024M sdcard.img
Inserting the Card
To have your emulator use this SD card image, start the emulator with the -sdcard
switch, containing a fully qualified path to the image file you created using mksdcard.
While there will be no visible impact—you won’t see an icon or anything else in Android
showing that you have a card mounted—the /sdcard path will now be available for
reading and writing.
To put files on the /sdcard, either use File Explorer in DDMS or adb push and adb pull
from the console.
CHAPTER 35: Development Tools
330