Using a DataReader Object in Visual Studio .NET
Bạn đang xem bản rút gọn của tài liệu. Xem và tải ngay bản đầy đủ của tài liệu tại đây (36.77 KB, 4 trang )
Using a DataReader Object in Visual Studio .NET
You can't visually create a DataReader object in Visual Studio .NET (VS .NET); you can
only create them using program statements.
In this section, you'll see how to create a SqlDataReader object and use it to retrieve the
result set from a SqlCommand object, which you saw how to create using VS .NET in the
previous chapter
. That SqlCommand object contained a SELECT statement that retrieved
the CustomerID, CompanyName, and ContactName columns from the Customers table.
You'll see how to execute this SELECT statement, read the result set using the
SqlDataReader object, and display the result set in a ListView control. A ListView
control allows you to view information laid out in a grid.
Note You can either modify the MyDataReader project you created in the previous
chapter, or if you don't want to follow along with the instructions in this section,
you can simply open the completed VS .NET project contained in the DataReader
directory. To open the completed project, select File ➣ Open ➣ Project, browse to
the VS .NET projects\DataReader directory, and open the
WindowsApplication4.csproj file.
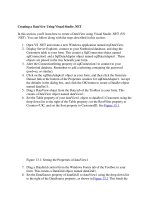
If you are modifying your existing Windows application, drag a ListView control to your
form. Figure 9.2
shows a form with a ListView control. Make sure the Name property of
your ListView is set to listView1 (this is the default name, so you shouldn't have to
change it).
Figure 9.2: Adding a ListView control to the form
Warning If you opened the completed project, you don't have to add a ListView controI;
it's already on the completed form. You will need to change the
ConnectionString property of the sqlConnection1 object so that it connects to
your SQL Server Northwind database. Once you've set your ConnectionString,
you can run the form by selecting Debug ➣ Start Without Debugging.
Next, double-click an area on your form outside the ListView control. This causes VS
.NET to display the code editor, and you'll see the cursor positioned in the Form1_Load()
method; this method is called when your form is initially loaded at runtime. Typically,
this is the method by which you want to execute your database operations. Set your
Form1_Load() method to the following code:
private void Form1_Load(object sender, System.EventArgs e)
{
sqlConnection1.Open();
System.Data.SqlClient.SqlDataReader mySqlDataReader =
sqlCommand1.ExecuteReader();
while (mySqlDataReader.Read())
{
listView1.Items.Add(mySqlDataReader["CustomerID"].ToString());
listView1.Items.Add(mySqlDataReader["CompanyName"].ToString());
listView1.Items.Add(mySqlDataReader["ContactName"].ToString());
}
mySqlDataReader.Close();
sqlConnection1.Close();
}
Notice you add an item to the ListView control using the Add() method, which is
accessed using the Items property. The Add() method expects a string parameter, and you
therefore call the ToString() method to convert the object returned by the SqlDataReader
object to a string. Also notice you include the namespace when referencing the
SqlDataReader class: you use System.Data.SqlClient .SqlDataReader when creating the
SqlDataReader object.
The previous code opens the database connection, creates a SqlDataReader object, and
uses it to read the rows from the result set returned by the SqlCommand object. Each
column of the result set is then added to the ListView control using the Add() method.
Figure 9.3
shows the completed Form1_Load() method.
Figure 9.3: The completed Form1_Load() method
Before you run your form, you'll need to add a substring containing the password for the
database connection to the ConnectString property of your SqlConnection object. For my
installation of SQL Server, the password to access the Northwind database is sa, and my
ConnectionString property is set to:
data source=localhost;initial catalog=Northwind;persist security info=False;user
id=sa;pwd=sa;workstation id=JMPRICE-DT1;packet size=4096
Notice the substring pwd=sa in this string to set the password.
Finally, run your form by pressing Ctl+F5 on your keyboard, or select Debug â Start
Without Debugging. Figure 9.4
shows the running form.
Figure 9.4: The running form
Save your MyDataReader project by selecting File ➣ Save All. You'll use this project in
later chapters. If you used the completed DataReader project rather than modifying your
existing project, don't worry: you'll be able to use the completed DataReader project in
the later chapters also.