Photoshop cs2 Essential skills
Bạn đang xem bản rút gọn của tài liệu. Xem và tải ngay bản đầy đủ của tài liệu tại đây (6.1 MB, 29 trang )
312
essential skills: photoshop CS
essential skills
>>>>>>
PHOTOSHOP CS
>>>
Existing actions can also be accessed and edited from within the actions palette. Open the
‘Commands’ actions set and double-click on any action to edit its keyboard shortcut. A color or
keystroke combination can be assigned to the action sequence and the order of the commands
can be rearranged by dragging them to new positions in the palette.
When the actions palette is switched to ‘button
mode’ the commands can be played with a single
click of the mouse. By applying different colors to
groups of actions those that perform similar editing
or enhancement functions can be easily identifi ed
from the myriad listed.
Downloading actions from the Net
There is a large and active community of Photoshop users who regularly write and share
sophisticated ‘actions’ via the Net. At web sites like www.actionfx.com you can select from many
different types of actions. After downloading the action it is installed into the Photoshop CS\Presets\
Photoshop Actions directory. After restarting Photoshop the new action will be attached to the list
of actions in the actions palette and be ready to use.
Top tip:
Actions are not only a great way to speed up regular tasks, they can also be used to make sure that
exactly the same results are obtained when processing a group of fi les. If I applied the ‘Make blue tone’ action
described in the tutorial to a folder of pictures I could be sure that all the altered photographs would be the same
color blue.
313
automated features
essential skills
>>>>>>
PHOTOSHOP CS
>>>
Editing an action
Photoshop includes some pre-recorded ‘actions’ that can be applied or edited to suit your own
requirements. Additional actions can be loaded from the palette options or created ‘from scratch’.
The default ‘Sepia Toning’ action leaves the layers used to create the effect intact but the action
can be further edited so that the image is fl attened after the effect has been applied.
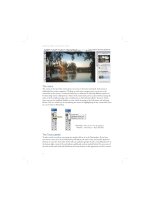
In the illustration above the Sepia action is edited by fi rst playing the action and then clicking on
the record button. When the action is in record mode simply fl atten the image from the layers
palette options and press the ‘Stop’ button. Photoshop records the additional command to the
existing action. Actions can be renamed, grouped in sets and saved as action fi les to be shared
or used for back-up.
Actions can be applied to a folder of images by using the
Batch command which is part of the ‘Automate’ menu (go to
File > Automate > Batch). An action can also be saved and
placed as a ‘droplet’ on the desktop or in a folder of images.
An image, or folder of images, can be dragged onto a droplet
to apply the same sequence of commands to multiple
images.
314
essential skills: photoshop CS
essential skills
>>>>>>
PHOTOSHOP CS
>>>
Actions and Batch commands
A sequence of commands that are commonly applied to a series of images can be recorded as an
‘action’ in the actions palette. The sequence is recorded when editing the fi rst image and can be
played back on any subsequent image that has been opened. The action can also be applied to
images that have not yet been opened by selecting them in the fi le browser or selecting the folder
of images from the ‘Batch’ dialog box (go to ‘File > Automate > Batch’).
To select multiple images in the ‘File Browser’ fi rst locate the folder and then either Shift-click to
select all images between two selections or Command/Ctrl-click to select specifi c images.
Choosing a ‘Destination’ folder will ensure the original images are not modifi ed. Various options
are available in the Batch dialog box so that the batch processing can suppress commands within
the action or suppress warnings that would otherwise interrupt and stop the batch processing
procedure. Some actions include dialog boxes that require the user to choose a particular setting
before the action can continue. These too can be suppressed.
315
automated features
essential skills
>>>>>>
PHOTOSHOP CS
>>>
Contact Sheet
Several labor intensive operations that image-makers frequently fi nd themselves performing are
handled quickly and easily by the automated features available in Photoshop. The ‘Contact Sheet’
automated feature prepares all the images within a folder as thumbnails at either screen resolution
or print resolution.
The creation of a CD cover size contact sheet allows the image-maker to create inserts for CDs
containing archived images. The option of including ‘Subfolders’ allows the user to create fi le
sheets for large cataloged image collections that are kept by cataloging software packages such
as ‘iPhoto’. When the fi rst contact sheet is full Photoshop automatically creates additional pages
until all of the images in the folder are represented.
316
essential skills: photoshop CS
essential skills
>>>>>>
PHOTOSHOP CS
>>>
Picture Package
The Photoshop Print Package option provides a great way to lay out multiple images on a single
page. Found in the same Automate section of the File menu as the Contact Sheet command,
Picture Package allows you to select one of a series of pre-designed, multi-print layouts that have
been carefully created to fi t many images neatly onto a single sheet of standard paper.
There are designs that place multiples of the same size pictures together and those that surround
one or two larger images with many smaller versions. This feature was fully revised for Photoshop
CS and now provides a preview of the pictures in the layout thumbnail. You can also choose to
repeat the same image throughout the design, or by double-clicking on any print in the layout,
select and add different photographs. There is also the ability to add labels to the printed images.
The Label dialog provides a variety of text options which are added to the Picture Package when
the OK button is pressed.
The fi nal CS refi nement to the feature involves the inclusion of a Layout Editor feature. Now it is
possible to resize, rearrange, add and delete image ‘zones’ within the Picture Package layout.
Using this feature you can customize and save your Picture Package designs.
317
automated features
essential skills
>>>>>>
PHOTOSHOP CS
>>>
Photomerge
In recent years shooting multiple pictures of a scene and then stitching them to form a panoramic
picture has become a popular activity with digital photographers. This is the fi rst time that Photoshop
has shipped with Photomerge. The stitching program that fi rst found its feet in Photoshop Elements
has been included as a standard feature in Photoshop. This tool combines a series of photographs
into a single picture by ensuring that the edge details of each successive image are matched and
blended so that the join is not detectable. Once all the individual photographs have been combined
the result is a picture that shows a scene of any angle up to a full 360°.
The feature can be started from the File menu (File > Automate > Photomerge) or via the Automate
> Photomerge setting in the fi le browser. The later approach allows the user to select suitable
source pictures from within the browser before activating the feature. At this point Photoshop
attempts to automatically arrange and match the edge details of successive pictures.
In most circumstances Photomerge will easily position and stitch your pictures but there will be
occasions where one or more images will not be stitched. These pictures are stored in the Light
box area (top) of the Photomerge dialog where you can click-drag them to the correct position in
the composition.
Individual pieces of the panorama can be moved or rotated at any time using the tools from
the toolbar on the left-hand side of the dialog. Advanced Blending and Perspective options are
set using the controls on the right. Photoshop constructs the panorama when the OK button is
clicked.
Ensuring accurate stitching
To ensure accurate stitching successive images need to be shot with a consistent overlap of between
15 and 30%. The camera should be kept level throughout the shooting sequence and should be
rotated around the nodal point of the lens wherever possible. The focal length, white balance, exposure
and aperture need to remain constant whilst shooting all the source pictures.
318
essential skills: photoshop CS
essential skills
>>>>>>
PHOTOSHOP CS
>>>
PDF presentation
A slide show can be created using the PDF
presentation automated feature. In the
presentation options it is possible to select the
time that each slide will be displayed for and the
transition effect between each slide. The slide
show can be looped to start again after the last
slide has been displayed.
Automatic advance
The slide show will play automatically when the PDF fi le is launched. After the last slide is displayed
the user can exit the slide show by pressing the ‘esc’ key. The slide show is then visible as a multi-
paged PDF document. The slide show can be returned to the fi rst page using the Adobe Acrobat
page controls and viewed again by using the ‘Full Screen View’ option from the ‘Window’ menu.
Manual advance options
If the slide show is created without a time allocated to the ‘Advance Every’ option the slide show
can be navigated by using the page up or page down keys or the arrow keys on the keyboard
when in full screen view.
319
automated features
essential skills
>>>>>>
PHOTOSHOP CS
>>>
Web Photo Gallery
Photoshop can create a ‘Web Photo Gallery’ of your images quickly and easily. All the additional
software you may need to get your gallery online is available for free from the Internet. Apart from
being exposed to a little jargon on the way the procedure is a remarkably painless process.
Photoshop prepares all of your images and generates a homepage called an ‘Index’ page, on
which is displayed a sequence of thumbnails (small versions of your images). These thumbnails
are linked to the larger images that are displayed individually on their own pages. When a
thumbnail is clicked, the web browser (Explorer, Navigator, etc.) loads the full sized version of
the image. Photoshop allows control over the size of the thumbnails, the size of the images, the
amount of JPEG compression used and the appearance of the page itself. The resulting web
gallery is quick and a very effi cient use of valuable time.
Uploading to the web
To place the gallery on the ‘World Wide Web’ (www) you must either send (upload) the fi les to
your own ‘Internet Service Provider’ (ISP), or use an Internet Service Provider that offers free
hosting of your site, e.g. Netfi rms.com or Tripod.com. The activity that follows uses a ‘simple’
gallery style that does not require the more sophisticated use of ‘frames’ that partition the page
into separate sections.
320
essential skills: photoshop CS
essential skills
>>>>>>
PHOTOSHOP CS
>>>
ACTIVITY 1
1. Place a collection of your own images into a new folder (multiples of 3, 4 or 5 will make a neat
arrangement). Photoshop will make copies of these images and resize them for the web gallery.
Ensure the images look good with the color management switched off (see ‘Images for the Web’ >
‘Preparing Images and Graphics’). Ensure that the largest dimension of each image is at least 500
pixels. Images prepared by Photoshop for a web gallery will be stripped of their embedded profi les
and should therefore be prepared with this in mind. These master images can be in any fi le format.
Photoshop will handle the conversion to JPEG and will sequence the images in the web gallery
according to the numerical or alphabetical beginning of the fi le names. Files starting with numbers
are placed before fi les starting with letters in the sequence. Images should be numbered with a
zero preceding the fi rst nine numbers, i.e. 01 to 09 to sequence them in a preferred order in the
gallery, e.g. 01.Stone.jpg, 02.Slate.jpg, etc. Image 11 will come after 1 if the zero is not included.
Note > Use short single-word fi le names with no spaces to avoid linking problems.
2. Choose ‘File > Automate > Web Photo Gallery’. Choose ‘Simple’ from the ‘Styles’ menu and
enter your email address if you would like to provide visitors with a useful point of contact.
3. From the ‘Source Images’ section of the dialog box click on the ‘Choose’ button to select the
image directory or folder in which you have placed the images you would like to be featured in your
gallery. Click on the ‘Destination’ button to select the folder the fi nished gallery will be saved to
.
Note > Do not open the image folder – ‘choose’ it (locate the folder, select it, and then click
on the ‘Choose’ button).
4. From the ‘Options’ menu select ‘Banner’. Enter
the gallery details that you would like to appear at
the top of your gallery page. This will become your
web page banner. You can enter alternative text
in these boxes. Select a ‘Font’ and ‘Font Size’ to
set the appearance of the text.
321
automated features
essential skills
>>>>>>
PHOTOSHOP CS
>>>
5. Select ‘Large Images’ from the ‘Options’ menu. Select ‘Resize Images’ and choose ‘Custom’
from the menu and enter a size of 500 pixels in the box. Choose ‘Constrain: Both’ and ‘High’ from
the JPEG quality menu. Choose whether your images will be displayed with or without a border (a
1-pixel border was used in the example) and the source for the image title.
6. Choose ‘Thumbnails’ from the Options menu. If you think most of the people visiting your
site will be using a high-resolution monitor (1024 × 768 or greater) you can choose quite large
thumbnails, e.g. select ‘Custom’ from the ‘Size’ menu and enter 150 in the box. The gallery used
in the example uses 3 columns and 3 rows. Avoid creating a gallery which leads to excessive
scrolling which many web designers try to avoid. Finally select a border if required. One-pixel
borders if selected are enough to separate the images from the background.
7. Choose ‘Custom Colors’ from the Options menu and click on the color swatches to change
the colors. White text was used on a dark gray background. The same color was chosen for the
banner to avoid the appearance of a box at the top of the page. As the thumbnails will be links,
the link color will also become the border color for the gallery thumbnails. The link colors in the
example gallery were selected from a limited palette of grays to avoid the gallery becoming too
colorful and distracting from the imagery.
8. Click OK to create the web gallery. The web pages and images for the web gallery are placed
in the destination folder. Once fi nished, your web browser is automatically launched and your Web
Photo Gallery is displayed. If the browser does not launch, simply open the destination folder and
double-click the ‘index’ fi le.
322
essential skills: photoshop CS
essential skills
>>>>>>
PHOTOSHOP CS
>>>
Upload your web gallery to the ‘World Wide Web’
To upload your fi les to the World Wide Web you may need to acquire ‘FTP’ (fi le transfer protocol)
software that can be downloaded for free from the web, e.g. Fetch () for
the Macintosh, and CuteFTP for Windows ().
Using your own ‘Internet Service Provider’
If you choose to use your own Internet Service Provider you will need to obtain some information
from them in order to gain access to their server on which your fi les will be placed. You will need
the address where your fi les will be uploaded, your user name and password, which will ensure
that you can gain access to this server, and the directory your images will be placed in. You will
also require the URL of your account with the ISP as it will be different to the ISP address you
uploaded the site to.
The web gallery should be placed in a folder
(called a ‘directory’ on the web) and so the URL
may be as follows: fi rms.com/
portraits/index.html. The advantage of placing
the web gallery in its own directory on the server
is that it allows the fi le name ‘index.html’ to be
used again in a different folder or directory. This
will allow you to have multiple galleries or link the
gallery you have just created to a ‘homepage’,
or master index.html, that you may create in a
future activity.
Once you have entered the FTP location (Host), your User ID and Password you will be presented
with the option of selecting fi les and folders to upload. Modern FTP software such as Fetch
demands no more than simply to drag your folders and fi les into the FTP window. If your FTP
software seems unhappy with this procedure simply look for the command ‘Put folders and fi les’.