Tài liệu động cơ FORD 6.4L P1- Chapter 5
Bạn đang xem bản rút gọn của tài liệu. Xem và tải ngay bản đầy đủ của tài liệu tại đây (13.95 MB, 8 trang )
73
131
U n i q U e s e r v i c e P r o c e d U r e s
132
133
Oil Filter: Replacement
• First loosen the oil filter cap which will open
the oil filter drain and allow the oil from the
filter housing to drain into the crankcase.
• Drain the oil from the oil pan.
• After all of the oil has drained from the oil pan remove
the oil filter and discard it in the appropriate location.
• Install the new oil filter element and tighten
the oil filter cap to the recommended torque.
This will close the oil filter drain.
• Refill crankcase with the correct
volume of recommended oil.
Note: The oil filter snaps into the oil filter lid.
Fuel Filter: Replacement
NOTE: Use proper cleanliness practices while servicing
the fuel system, do not let any dirt get into the housing!
• Clean all dirt and debris from the engine mounted
fuel filter lid thoroughly. Make sure your hands
and any tools involved are clean also!
• Remove the fuel filter lid and lift the filter element out
of the housing and discard in the appropriate location.
• To avoid fuel spills, use a suction gun or similar device to
remove the remaining fuel from the fuel filter housing.
• Install the new filter and tighten the fuel
filter lid to the specified torque.
NOTE: Before starting the vehicle, turn the key
to the on position for 30 seconds, then key off.
Do this 6 times to ensure the fuel filter housing
is full of fuel before starting the vehicle.
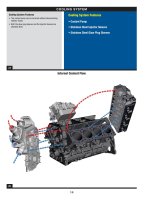
Fuel System Service Cleanliness:
Fuel Injectors, Fuel Rail
NOTE: Use proper cleanliness practices
while servicing the fuel system!
• Always use fuel system caps when servicing
the fuel injectors or replacing fuel lines.
• Do not have the fuel system open to the elements any
longer than is necessary to perform the job at hand.
• Tool # 310-158 (fuel caps)
Fuel Rail Caps
Fuel Injector Caps
Fuel Filter Lid
Fuel Filter Element
Oil Filter Lid
Oil Filter Element
74
134
U n i q U e s e r v i c e P r o c e d U r e s
135
136
Fuel System Service: High Pressure Fuel Tubes
NOTE: Use proper cleanliness practices
while servicing the fuel system!
• High pressure fuel supply tubes must always be replaced
once loosened. Never re-use a high pressure tube once
it has been loosened under any circumstances!
NOTE: Always use the fuel injector connector
disconnect tool (tool # 310-157) whenever
disconnecting the fuel injector electrical connector.
Failure to use this tool can damage the connector.
Fuel System Service: High
Pressure Fuel Tube Service
NOTE: Use proper cleanliness practices
while servicing the fuel system!
NOTE: Follow the proper service procedures while servicing
the fuel system and always use the correct torque!
• Proper torque is crucial with the 6.4L Power
Stroke
®
Diesel’s high pressure fuel system.
• When replacing high pressure fuel tubes, always follow
the correct procedure for installation and torque.
Fuel System Service Cleanliness: High
Pressure Fuel Injection Pump
NOTE: Use proper cleanliness practices
while servicing the fuel system!
• Always use fuel system caps when servicing
the high pressure fuel injection pump.
• Do not have the fuel system open to the elements any
longer than is necessary to perform the job at hand.
• Tool # 310-158 (fuel caps)
Fuel Rail Caps
High Pressure Fuel
Injection Pump Caps
High Pressure Fuel Tubes
75
137
U n i q U e s e r v i c e P r o c e d U r e s
138
139
Fuel System Service: Fuel Injector Service
NOTE: Use proper cleanliness practices
while servicing the fuel system!
NOTE: Follow the proper sercive procedures while servicing
the fuel system and always use the correct torque!
• Proper torque is crucial with the 6.4L Power
Stroke
®
Diesel’s high pressure fuel system.
• When replacing fuel injectors, always follow the
correct procedure for installation and torque.
• Always use proper protective fuel system
caps whenever a tube is removed.
• Avoid cleaning parts near fuel system components.
• Tool # 310-158 (fuel caps)
Fuel System Service: Fuel Injector Lubrication
NOTE: Use proper cleanliness practices
while servicing the fuel system!
• Always replace the O-ring and the steel gasket at the
tip of the injector when reinstalling an injector. New
injectors come with these items already installed.
• Always lightly lubricate the new O-ring with
clean engine oil prior to assembly.
Fuel System Service: Removing
and Installing Injector Gasket
NOTE: Use proper cleanliness practices
while servicing the fuel system!
• To remove the gasket, use a razor blade to get between the
gasket and injector body, then slowly work the gasket off.
• To install the new gasket, use a 9mm 12 point
deep well socket and press the gasket on
by hand making sure it is fully seated.
• Make sure the gasket is installed correctly.
The raised portion of the gasket should be
facing away from the injector body.
76
140
U n i q U e s e r v i c e P r o c e d U r e s
141
142
Turbocharger Lifting Bracket
• Anytime removal or installation of the turbocharger
is performed, always use the turbocharger
lifting bracket to ensure proper engagement and
disengagement of the turbocharger drain tubes.
• The tool is designed to balance the turbochargers
and hold the two turbine housings in alignment.
• Tool # 303-1266
Checking Fuel Pressure
NOTE: Use proper cleanliness practices
while servicing the fuel system!
• There is a fuel return presure test valve (schrader) located
on the front of the fuel cooler on the left side of the engine.
• Proper fuel pressure is very important. Too much
or too little pressure could be detrimental.
• Follow the proper procedure for checking fuel
pressure and make sure the correct specification
for supply pressure is achieved.
NOTE: Supply pressure needs to be checked at the
horizontal fuel conditioning module (HFCM) outlet.
Test Port (return pressure)
Turbocharger Assembly Tool
• The series sequential turbocharger is comprised
of two turbochargers, low pressue turbocharger
and high pressure turbocharger. When assembling
these two turbochargers together, always use the
turbocharger assembly tool shown at right.
• Tool # 303-1269
• Follow the proper assembly procedure.
• The turbocharger assembly tool is necessary
to ensure that proper alignment/engagement
of the two turbochargers is achieved.
77
143
U n i q U e s e r v i c e P r o c e d U r e s
144
145
EGR Valve Removal
• Removing the EGR valve must be performed using the
proper EGR valve removal tool.
• This tool is comprised of numerous pieces that
must be put together around the EGR valve.
• Once the removal tool is assembled on the valve,
the valve can be slowly pulled from its housing.
• Tool # 303-1267
NOTE: Pay close attention that the removal tool is
installed and used correctly while removing the valve
or damage can occur to the EGR valve and/or tool.
Crossover Tube Seal Removal
• Crossover tube seal removal requires the use of special
service tools; slide hammer, seal removal tools.
• There is a different size removal tool for
each opening of the crossover tube.
• Tool # 303-1264
Crossover Tube Seal Installation
• When installing new seals into the turbocharger crossover
tube, always use the appropriate installation tools.
• The seals for each passage are two (2) different
sizes. Make sure you use the correct sized
seal installation tool for each sized seal.
NOTE: Make sure you have the crossover tube mounted
securely to assure proper seal installation.