Seven Deadliest Microsoft Attacks phần 4 doc
Bạn đang xem bản rút gọn của tài liệu. Xem và tải ngay bản đầy đủ của tài liệu tại đây (480.38 KB, 16 trang )
Dangers with Privilege Escalation Attacks
33
After sending the e-mail to the entire customer list, the attacker logs into the
Microsoft Internet Information Services (IIS) server and modifies the home page of the
restaurant to notify the customers the restaurant is temporarily closed for “renovations.”
The attacker then changes the passwords of all the domain administrators’ accounts, so it
will not be easy for legitimate administrators to revert the malicious acts of the attacker.
As you can imagine, a situation like this can be absolutely devastating to small
and large companies alike. Winning back customers and reestablishing a good repu-
tation by word of mouth for how good the restaurant really is will be a significant
challenge. This type of attack can cause a large loss of revenue for the restaurant and
can ultimately lead to the failure of the business altogether.
Think of ways an attack similar to this can be used against your organization.
Can you think of similar attacks that would be such devastating? How long would
your organization be able to withstand a significant decrease in revenue? What is the
likeliness an attack like this will or can occur?
Scenario 3: Horizontal Escalation
Horizontal privilege escalation can allow an attacker to gain access to data that may
not necessarily belong to him. In poorly designed applications, an attacker may have
the capability of identifying flaws within a Web application that allows him access to
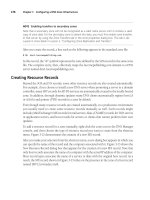
FIGURE 2.5
Example E-mail
chapter 2 Active Directory – Escalation of Privilege 34
other users’ information. Once access is gained to another users’ data or account via
leveraging aws, he may modify, copy, destroy, or use the data for his needs.
In this scenario, the attacker works as a telemarketer for a training company that
sells training to potential students who want to pass information technology (IT) cer-
tications. The job is okay, but sometimes it feels like all our attacker does is make
calls and cross his fingers whether the call will result in a sale. Part of the job is to
track all of the potential sales or “leads” in a custom Web application developed by
corporate application developers. All telemarketers are required to keep track of their
leads and the progress made toward a sale.
Our attacker is having a slow month and needs to make sure he is performing
well so he can keep his job. He notices that if he changes the employee ID number
displayed in the URL of the lead-tracking Web application, he can see and mod-
ify other telemarketers’ leads. He decides to change the employee ID to one of the
employees he works with (but is not too fond of) and views the status of several of
the coworker’s leads.
Since the attacker has successfully performed a horizontal escalation of privileges
attack and can view and modify the coworker’s leads, he decides to use this access
to make his productivity numbers look better than they currently are. The attacker
deletes a few of the coworker’s leads and can now re-create the leads under the con-
text of his own account. The attacker has now “skimmed” several of the accounts
and improved his productivity numbers, keeping him well within range of another
successful sales month.
Attacks such as the one described in this scenario are still relevant today and pose
a significant security threat to organizations. Imagine if this type of scenarios was
played out against your online backing account. What dangers could you think of?
What if another customer from your bank was able to access your account by using
horizontal privilege escalation attacks?
FUTURE OF PRIVILEGE ESCALATION ATTACKS
As some of these attack scenarios have illustrated, attacks may be executed in
ways that developers and administrators never thought of. Attackers have a keen
eye and thought process for finding methods of increasing access to target systems
and networks. Flaws in application development and implementations have been
a rigid backbone for fostering new avenues of exploitation of privilege escalation
attacks.
As new technologies are introduced and methods of development are rened,
attackers will most likely be only a few steps behind, and they will identify aws
that allow similar attacks to what we are experiencing today. It is unlikely that
programming and administrative practices will become inherently stronger in the
near future to help defend against these types of attacks, so it is very likely that the
success of attackers today will continue to remain worthwhile for similar attacks in
the future.
Defenses Against Escalation of Privilege Attacks
35
DEFENSES AGAINST ESCALATION OF PRIVILEGE ATTACKS
At the end of the day, you ultimately need to protect your most valuable assets – your
organization’s data. In escalation of privilege attacks, the compromised account or
application is the vehicle that delivers the attack. This means, therefore, that your
layers of defense need to be laid out so that you first prevent the compromise or at
least make it very difcult. Second, you will need to implement measures to prevent
the attacker from doing much with the compromised account or application.
As a security professional, you can deploy the following measures on a Windows
server or workstation platform to reduce the risk and impact of privilege escalation:
• Use of up-to-date antivirus software
• Patching
• Data execution prevention
• Running applications with least privilege required
• Data encryption
These measures, when deployed systematically in layers, are effective in slowing
the progress of the would-be attacker. Hopefully, the attacker would become increas-
ingly frustrated and give up or start being careless and give himself away. These
measures are described in detail in the sections that follow.
First Defensive Layer: Stop the Enemy at the Gate
The first step in preventing escalation of privilege is to prevent the potential attacker
from gaining a toehold in the server or service that he can use to escalate his privi-
leges. If the door is slammed in the face of the would-be attacker and he cannot find
another way in, then the attack is thwarted. Otherwise, the defenses serve to slow
down the attacker, at the very least, in order to bolster defenses at another layer.
Defense at this layer begins by setting up a defensive perimeter with up-to-
date antivirus software and routine scanning for viruses, rootkits, and malware.
Hearkening back to the description of the defense-in-depth approach in Chapter 1,
“Windows Operating System – Password Attacks,” these scanners are set up
on the perimeter of your network and on each device that needs to be protected
from the vandals that send these things out into the wild. The difficulty is sift-
ing through all traffic to positively identify activities executed by the would-be
attacker. If the attacker has compromised an Active Directory, database, or Web
application account in your organization, any activity would be virtually indis-
tinguishable from legitimate activities. Your perimeter defenses – human and
technological – need to be attuned to watch for particular patterns of behavior.
For example, your systems could be configured to watch for database access by
a single user account that originates from multiple locations, such as the case
where there are two simultaneous database connections with one originating
from outside your network and the other originating from inside your network,
or from two different network segments.
chapter 2 Active Directory – Escalation of Privilege 36
Another critical defensive activity is to reduce the attack surface by stopping,
disabling, or even removing services that are unnecessary. This is one of those fun-
damental rules of IT security, but it can be frequently and easily ignored or applied
poorly. Before a single piece of third-party software is installed, Windows XP
offers 104 services depending on the edition that has been chosen and the additional
Windows components that are installed; Windows Vista offers 152 potential running
services and Windows 7 offers 164.
1
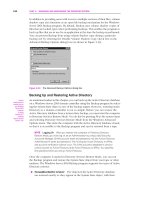
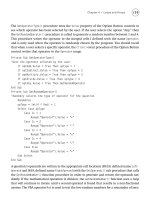
The Services applet, depicted in Figure 2.6, is
used to view and manage the status of installed services.
Since the Windows server and workstation operating systems share the same
code base, there are many services that are not required or desired for a particular
platform. For example, there are services that are required to run a server, which
would not be required for a fully functional workstation, and vice versa. A specic
example is Windows XP ships with a full version of IIS, which could turn a work-
station or server into a fully functional Web server. It may not be desirable to grant
individual end users to install, run, and administer their own Web servers, especially
after a string of IIS exploits are published, and it is up to you to root out and patch
all of these servers. Even one unpatched instance of IIS can wreak havoc on your
network. Patch management will be covered in the section “Third Defensive Layer:
Set the Rules for the Playground.”
To defend against the exploitation of a aw in an unnecessary service, you will
need to implement safeguards around what users can and need to do with their
workstations. You need to ensure that the right services are enabled and are secured
FIGURE 2.6
Managing Installed Services in Windows Vista
Defenses Against Escalation of Privilege Attacks
37
properly (for example, running with an appropriate safeguarded service account and
the correct level of privilege), or you may want to go to the extent of removing
the permissions required to install Windows components or simply not making the
components available for installation. This can be done by preparing the deployed
image with only the required services or using group policy objects and domain-level
security to prevent the installation of unnecessary services.
Second Defensive Layer: Privileges Must Be Earned
There are two opposing viewpoints on the assignment of privileges to users. One
extreme suggests that users should have complete access to their workstations. If
there are no barriers to the activities they can perform, such as installing software,
changing conguration settings, and accessing network services, they will be more
productive, will require less help to do routine things, such as adding network print-
ers and installing hardware and software, and will have the ability to learn how to
do more with a computer. The other position is that users should start off with no
privileges and only be granted access as they discover they need it. Ultimately the
computer is a tool (owned by the organization, not the user) and the best compromise
between the two is to give users only enough access to do the work they have been
assigned and nothing more, which embodies the principle of least privilege. Please
refer to the following sidebar for a denition. From a security point of view, this is
the safest position to take and defend.
TIP
“Every program and every user of the system should operate using the least set of privileges
necessary to complete the job.”
2
Principle of least privilege, also known as the principle of least authority, is a principle
of systems design that requires that every module in a particular abstraction layer of a
computing environment must be able to access only such information and resources that
are necessary to its legitimate purpose. When applied to users, this means that all users
at all times should run with as few privileges as possible and also launch applications with
as few privileges as possible. The best practice is to begin with users having minimal or no
privilege and adding privilege only when properly authorized.
End-user accounts are not the only accounts that require careful management of
privileges. It is one thing for an attacker to mount a horizontal privilege escalation from
one end-user account to another in order to gain access to another set of files. It is much
worse to compromise an account with elevated privileges – a vertical privilege escala-
tion – because the potential for damage is much greater in impact and in breadth.
Privileges are not assigned just to users; applications need them as well.
Applications need to be assigned specific privileges so that they are used and behave
in a specic and predictable way. In addition, privileges are required to reduce the
ability of buffer overrun exploits to abuse the privileges of an elevated user. If we
recall attack Scenario 3, “Horizontal Escalation,” an enterprising user with too much
chapter 2 Active Directory – Escalation of Privilege 38
time on his hands, not the willful, intentional attacker, changed a number in a URL
and instantly had access to a colleague’s information. It is certain that this is not the
way the application developers intended users to make use of the application. In all
likelihood, poor programming, lack of attention to secure coding best practices, and a
probable lack of involvement or oversight by IT security personnel contributed to the
application not having the proper “fences” around it. Proper safeguards, in the form
of application privileges, would prevent this situation from occurring. Applications
that work with personal information or host sensitive data need to run in their own
memory spaces (please refer to data execution protection [DEP] in the next section
as an example) and their users need explicitly assigned permissions that restrict their
use of an application to the purpose for which it was originally intended.
Third Defensive Layer: Set the Rules for the Playground
This layer and the next could just as easily be considered layers 3a and 3b. In this
layer, we attempt to prevent an attacker from exploiting holes in applications or the
operating system to launch applications. In the next layer, we look into preventing an
attacker who has successfully escalated his privileges from accessing stored data.
Patching
Applying the latest security patches will prevent an attacker from using known exploits
to compromise your system. Running workstations and servers without patching them
or letting patches sit uninstalled for a prolonged period is a recipe for disaster. It is like
leaving a ladder outside the house that a potential burglar can use to break in. Sometimes
exploits are discovered, documented, and the vendor is informed so that it can prepare
a patch as a defense for its customers. In many cases, exploits are documented and pub-
lished on the Internet before informing the vendor and sadly long before a fix is avail-
able. In reference to “The Playground” in the title for this defensive layer, patching and
patch management dictates what “toys” can be played with and which ones cannot.
A prominent example occurred in 2001. The Nimda virus and Code Red and
Code Red II worms exploited well-known and long-solved vulnerabilities in IIS. The
initial news coverage focused on the speed and virulence of the infections. Nimda
was reported to have become the most widespread virus in the space of 22 minutes.
The reason that they were so successful was that many server administrators had
failed to patch their IIS servers with a set of security patches that had been available
for over one year. Once the reason was discovered, news coverage turned to adminis-
trators’ procrastination and negligence, questioning the inherent security of IIS, and
the need for more rigorous patch management.
3
From a security perspective, the key to effective patch management is reducing the
amount of time between the release of the patch and the installation of the patch on
affected servers and workstations. While speed is important, it has to be balanced with
the need to test the patch (or collection of patches) to ensure that it does not destabilize
the platform. The risk (probability and impact) of being exposed to attack needs to be
weighed against the risk of interrupting business operations if a patch is rushed into
the production environment without the proper care exercised with its release.
Defenses Against Escalation of Privilege Attacks
39
Data Execution Prevention
As mentioned in the section “Second Defensive Layer: Privileges Must Be Earned,”
applications need boundaries within which they can run and be used securely. If
you run UNIX or Linux systems, you may be familiar with creating chroot jails for
applications. A chroot jail is the directory to which a program is confined. It changes
the apparent top of the file system (the root of the file system) to be the directory for
the current running process and any child processes. A program that is “rerooted” to
another directory cannot access or name files outside that directory. Since this is a
book on Microsoft attacks, we will turn our attention to DEP, a tool that goes much
further than simply conning users to a dened space within a le system, in that it
uses hardware and software to set boundaries for running applications in memory and
prevent applications from using memory to which they were not originally assigned.
Going back to “The Playground” analogy in the title for this layer, setting application
boundaries and privileges through tools such as DEP is telling every kid where they
can play and what parts of the playground are off limits.
According to Microsoft, DEP is “a set of hardware and software technologies that
perform additional checks on memory to help prevent malicious code from running
on a system…The primary benefit of DEP is to help prevent code execution from
data pages. Typically, code is not executed from the default heap and the stack.”
4
Note that DEP is not merely a security application that exists solely in the operating
system. It is a system that is comprised of both hardware and software. The hard-
ware portion of DEP, entitled hardware-enforced DEP, detects code that is running in
memory, specically the default heap and stack, and raises an exception when execu-
tion occurs. Software-enforced DEP prevents malicious code from exploiting built-in
exception-handling within Windows.
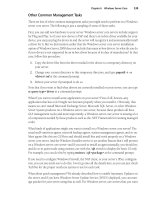
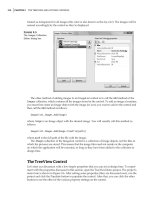
DEP configuration for the system is controlled through a switch in the boot.ini
file. The DEP settings can be configured through the System applet in the Control
Panel. You must be logged on with administrator privileges to change this. The set-
ting in boot.ini employs the following syntax: /noexecute=[policy_level], circled in
the screenshot in Figure 2.7.
FIGURE 2.7
Selecting the System-Wide Policy Level for DEP in Boot.Ini
chapter 2 Active Directory – Escalation of Privilege 40
Because it is initialized during the boot process, DEP is enforced system-wide.
There are four system-wide configurations for both hardware-enforced and software-
enforced DEP.
1. OptIn (Default Setting): On systems with processors that can implement
hardware-enforced DEP, DEP is enabled by default for limited system binaries
and programs that “opt-in.” With this option, only Windows system binaries are
covered by DEP by default.
2. OptOut: DEP is enabled by default for all processes. You can manually create a
list of specific programs that do not have DEP applied by using the System dialog
box shown in Figure 2.8.
3. AlwaysOn: This setting provides full DEP coverage for the whole system and
all processes always run with DEP applied. With this option, the exceptions list
shown in Figure 2.8 is not available.
4. AlwaysOff: This setting does not provide any DEP coverage for any part of the
system, regardless of hardware DEP support.
TIP
Hardware-enforced and software-enforced DEP are configured in the same manner. If the
system-wide DEP policy is set to OptIn, the same Windows core binaries and programs will
be protected by both hardware-enforced and software-enforced DEP. If the system cannot
use hardware-enforced DEP, the Windows core binaries and programs will be protected only
by software-enforced DEP. Similarly, if the system-wide DEP policy is set to OptOut, pro-
grams that have been exempted from DEP protection will be exempted from both hardware-
enforced and software-enforced DEP.
The process and applet for enabling DEP are same in Windows XP, Vista, and
Windows 7. Open the System applet in the Control Panel. Click Advanced System
Settings and either enter the administrator password or if you are using any edi-
tion of Windows Vista or Windows 7, conrm your assent to continue through User
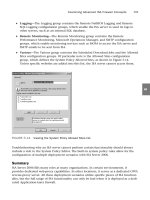
Account Control (UAC). Under the Performance tab, click Settings and click on the
Data Execution Prevention tab. The open tab is displayed in Figure 2.8.
The default setting is that DEP is enabled for essential Windows programs and
services only. Selecting the other radio button will enable DEP for all programs and
services; you can manage what programs and services are excluded by using the
Add… and Remove buttons. Clicking on the Add… button will bring up an Open
File dialog box where you can select individual executable files to add to the list.
One note of caution: DEP has been and can be circumvented by skilled attackers.
This is yet another defense-in-depth approach that should be taken to help prevent
malicious attacks.
Fourth Defensive Layer: You’ll Need That Secret Decoder Ring
Imagine for a second that an attacker has targeted you and has managed to penetrate
all three of the layers in this chapter that you have prepared. All that is left is the asset
your organization holds most dear: its data – information on its payroll and financial
Defenses Against Escalation of Privilege Attacks
41
health, intellectual property, proprietary product data, and documented analysis of
your competitors. The last thing you will want is this most valuable asset being left
bare for all to see (and take). There is one last line of defense that you can implement
to safeguard your files: data encryption. The use of encryption technology would
have prevented the disgruntled patron of Casa de Marginal in Scenario 2 (Attacking
Customer Confidence) from reading and altering files.
There are a host of third-party vendors offering encryption software for Windows.
There are too many options on the market to give any of them the justice they are due.
This chapter focuses on the native Microsoft tools that ship with various versions of
Windows. In recent versions – Windows XP and newer – there are two options to
encrypt the contents of a volume on a hard disk: Encrypting File System (EFS) and
BitLocker. Each tool is used for different purposes. EFS is designed to encrypt and
decrypt individual les; BitLocker is used to encrypt an entire hard disk.
TIP
BitLocker Drive Encryption and EFS are not mutually exclusive. In fact, they can be used
together in a rather effective combination. When using EFS, encryption keys are stored
with the computer’s operating system. Although the keys used with EFS are encrypted,
their security could still be compromised if a hacker is able to access the operating system
drive. Using BitLocker to encrypt, the operating system drive can help protect these keys by
preventing itself from booting or being accessed if it is installed in another computer.
FIGURE 2.8
Changing DEP Settings
chapter 2 Active Directory – Escalation of Privilege 42
Using EFS
EFS encrypts les and folders individually based on the user account associated with
them. If a computer has multiple users or groups, each user or group can encrypt their
own les independently. EFS has been around since Windows 2000 and has been
steadily improved with every new version of the Windows code base, either client or
server. Unlike BitLocker, it neither requires nor uses any special hardware.
Although EFS has been available in all versions of Windows client and server
operating systems since Windows 2000, it is fully implemented only in certain
editions, specically any of the Windows Server editions, Vista Enterprise and
Ultimate, and Windows 7 Ultimate. It is not fully supported on Windows Vista
Starter, Home Basic and Premium, and Business, or on Windows 7 Home Premium
or Professional. On those versions, you can decrypt and modify encrypted les, but
cannot encrypt them.
Working with encrypted folders and files is much the same as other file opera-
tions. Open Windows Explorer and right-click the folder or le you want to encrypt,
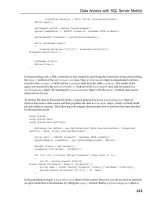
and then click Properties in the context menu. Select the General tab and then click
Advanced. The dialog box shown in Figure 2.9 will appear. Select the Encrypt con-
tents to secure data (circled in the screenshot in Figure 2.9) check box and click OK.
Finally click OK to confirm the operation. The encrypted folder or file in the file list
FIGURE 2.9
Encrypting a File Using EFS
Defenses Against Escalation of Privilege Attacks
43
in Windows Explorer will turn green once the encryption attribute is set. Decrypting
a folder or file is nearly identical except that you will clear the Encrypt contents to
secure data check box in the Advanced Attributes window and click OK to accept
the change.
NOTE
The first time you encrypt a folder or file, an encryption certificate is automatically cre-
ated. You should back up your encryption certificate. If your certificate and key are lost or
damaged and you don’t have a backup, you won’t be able to use the files that you have
encrypted.
Using BitLocker
If your requirements suggest that encrypting the entire hard disk is preferred to work-
ing with individual les, BitLocker Drive Encryption is a better choice than EFS.
Road warrior employees who truck laptops everywhere they go are very suitable can-
didates. A laptop left in an airport is an attractive target, especially because employ-
ees on the road tend to be self-contained, carrying all of the les they need to work on
and anything they pick up on the road. An encrypted disk makes it extremely difficult
to extract the data from the purloined computer.
A further benet of BitLocker is that it can be used to encrypt the contents of
removable media. BitLocker To Go works with many media, notably the ubiquitous
Universal Serial Bus (USB) drives that are the bane of IT security professionals’
existences and seem to proliferate at an alarming rate. Because it encrypts the entire
disk, another unique characteristic of BitLocker and BitLocker To Go is that they dis-
regard individual user accounts associated with files; it is either enabled or disabled
for all users or groups on the system.
TIP
Like EFS, your options for encrypting the contents of your hard drive depend on the version
of Windows that you are running. BitLocker is available only in Windows Vista Enterprise
andUltimate,WindowsServer2008andWindows7Ultimate,whichmeansitisnotavail-
ableinVistaHomeBasic,HomePremiumorBusiness,orinWindows7HomePremiumor
Professional.
Unlike EFS, BitLocker requires the use of special hardware before it can be
enabled. A trusted platform module (TPM) is a secure cryptoprocessor that can store
cryptographic keys, which is embedded in the workstations microprocessor. It must be
enabled in the Basic Input/Output System (BIOS), which may or may not be by default.
Once enabled, it will be displayed in Device Manager under Security Devices, as
shown in Figure 2.10. The TPM must be of version 1.2 or later in order to be used with
BitLocker. If a TPM is not installed or is an earlier version, you can also use a removable
chapter 2 Active Directory – Escalation of Privilege 44
USB memory device, such as a USB ash drive to store its key. For this chapter, we will
focus on enabling BitLocker on systems that have an embedded TPM.
Once the TPM has been enabled in the BIOS and you have veried in Device
Manager that Windows acknowledges its existence, you can manage it. Unlike other
hardware on your system, there is a specic and rather robust applet for managing
the TPM. The applet, shown in the screenshot in Figure 2.11, allows you to initialize
the TPM, enable or disable it, and change the password, among other functions. The
initial setup of the TPM is performed during the setup process for BitLocker; after
verifying that the TPM has been initialized, you do not need to change the settings in
order for BitLocker to be set up correctly.
Once you have the TPM enabled in the BIOS and have veried that it is recog-
nized by Windows, you can proceed to congure BitLocker. The applet, shown in
Figure 2.12, can be found through Control Panel | System and Security | BitLocker
Drive Encryption. As shown in the screenshot in Figure 2.12, you use this single
applet to configure it on both fixed disks and removable media. Please bear in mind
that you need to be an administrator to work with BitLocker on xed disks and once
you click on Turn On BitLocker, you will need to conrm your permission to pro-
ceed through UAC. “Normal” users can enable and disable BitLocker To Go on their
removable media.
FIGURE 2.10
Verifying that the TPM is Enabled
Defenses Against Escalation of Privilege Attacks
45
FIGURE 2.11
Managing the TPM
FIGURE 2.12
Selecting the Drive to Encrypt with BitLocker
chapter 2 Active Directory – Escalation of Privilege 46
If your hardware and software satises the system requirements for BitLocker,
you will be presented with the screen shown in Figure 2.14. To get to this screen, the
TPM has been discovered; if the TPM is not enabled, you will be instructed to enable
it and start the process again. Since the TPM needs to be enabled in the BIOS, you
will need to reboot before you restart the process.
Once BitLocker or BitLocker To Go is congured on your desired disk, you are
free to use your system the way you did before it was enabled. You will not notice a
difference. The TPM provides the required credentials for the boot process to con-
tinue on a hardware restart. If you are not using a TPM (e.g., your hardware is not
suitably equipped or you do not want to enable it for some reason), you will need the
key that is installed on a USB drive in order for the computer to start.
As mentioned earlier, data encryption is the defense of last resort. By the time
that an attacker encounters an encrypted le or disk, he has compromised an appli-
cation that was vulnerable (perhaps it was left un-patched) or a user account with
elevated privileges. Fortunately, Windows ships with a number of these defenses
The setup process takes care of everything. Once you click on Turn On
BitLocker or BitLocker To Go, it runs a check of your hardware and software to
verify that your system satises the requirements to enable BitLocker. If you are
enabling BitLocker in a hard disk drive, you will need to respond to the prompts that
pop up in any UAC windows. The system check is depicted in Figure 2.13.
FIGURE 2.13
Verifying that BitLocker Can Be Enabled
47
Summary
FIGURE 2.14
Setting Up BitLocker
that simply await configuration. Your job is to ensure that the proper safeguards
are in place.
SUMMARY
In looking back on the attack scenarios, none of these attacks look terribly sophis-
ticated. The attackers just used their creativity to think outside the box with respect
to how an application can be used or manipulated. The trouble in defending against
these types of attacks is that the defenses need to be in play before the attack is
launched, and while the attackers are dynamic and can maneuver at will, the defenses
are static and need to be strong enough to counter any creative force that the attackers
can exert.
Another aid for attackers (and corresponding difficulty for defenders) is the
speed of information dissemination. A vulnerability is discovered and news of
it travels at wire speed through well-established avenues of communication. The
exploit can be developed and tested collaboratively and released before any vendor
has the chance to respond. The only defense is the careful planning to ensure that
the defenses are available and a speedy response to stand up the defenses when
called upon.
chapter 2 Active Directory – Escalation of Privilege 48
Finally, privilege escalation is not easily detected because it can be difcult to dis-
tinguish between routine and malicious behavior. If you had only one user to super-
vise, you could easily determine whether he is permitted to view a particular le.
It is virtually impossible to do this for more than a handful of users, let alone
hundreds or thousands of them. The attack and defense technologies mentioned in
this chapter are readily available. Much care has been taken to stay true to the book
in order to describe native Windows applications that can be used to defend your
organization. Prevention and planning are truly your best defenses.
Endnotes
1. www.blackviper.com/WinXP/servicecfg.htm, www.blackviper.com/WinVista/servicecfg
.htm, www.blackviper.com/Windows_7/servicecfg.htm, Accessed on November 30, 2009.
2. Saltzer, J. and Schroeder, M., The Protection of Information in Computer Systems, 1975.
3.
Accessed on December 6, 2009.4. Accessed on
November 23, 2009.