Microsoft ISA Server 2006 UNLEASHED phần 4 docx
Bạn đang xem bản rút gọn của tài liệu. Xem và tải ngay bản đầy đủ của tài liệu tại đây (13.16 MB, 59 trang )
155
5
Examining Advanced ISA Firewall Concepts
. Logging—The Logging group contains the Remote NetBIOS Logging and Remote
SQL Logging configuration groups, which enable the ISA server to send its logs to
other servers, such as an internal SQL database.
. Remote Monitoring—The Remote Monitoring group contains the Remote
Performance Monitoring, Microsoft Operations Manager, and SMTP configuration
groups, which enable monitoring services such as MOM to access the ISA server and
SMTP emails to be sent from ISA.
. Various—The Various group contains the Scheduled Download Jobs and the Allowed
Sites configuration groups. Of particular note is the Allowed Sites configuration
group, which defines the System Policy Allowed Sites, as shown in Figure 5.14.
Unless specific websites are added into this list, the ISA server cannot access them.
Troubleshooting why an ISA server cannot perform certain functionality should always
include a visit to the System Policy Editor. The built-in system policy rules allow for the
configuration of multiple deployment scenarios with ISA Server 2006.
Summary
ISA Server 2006 fills many roles at many organizations. In certain environments, it
provides dedicated web-proxy capabilities. In other locations, it serves as a dedicated OWA
reverse-proxy server. All these deployment scenarios utilize specific pieces of ISA function-
ality, but the full range of ISA functionality can only be had when it is deployed as a dedi-
cated Application-layer firewall.
FIGURE 5.14 Viewing the System Policy Allowed Sites list.
156
CHAPTER 5 Deploying ISA Server 2006 as a Firewall
The capability of ISA firewalls to provide for robust and secure stateful inspection of all
traffic passing through them gives them an added edge over traditional packet-filtering
firewalls. In addition, the capability to provide for advanced logging, server publishing,
and VPN functionality positions ISA squarely in many environments for the long term.
Best Practices
. Deploy an ISA-secured perimeter network to isolate Internet-facing services from the
rest of the internal network.
. Get acquainted with the System Policy Editor, and understand what default system
policy rules are in place on the ISA server.
. Use the Network Template wizard for the initial configuration of a new ISA server,
but manually create networks and network rules for any changes that are made after
the server goes into production.
. Create access rules on the firewall only when there is a specific business need to do
so. If there is not, leave the traffic denied.
. Create networks in ISA to correspond with each network card that is connected to a
logical grouping of subnets connected by network routers. Do not create individual
networks for multiple subnets to which ISA is not directly connected.
CHAPTER 6
Deploying ISA Server
Arrays with ISA Server
2006 Enterprise Edition
IN THIS CHAPTER:
. Understanding ISA Server 2006
Enterprise Edition
. Deploying the Configuration
Storage Server (CSS)
. Setting Up Enterprise Networks
and Policies
. Creating and Configuring Arrays
. Installing and Configuring ISA
Enterprise Servers
. Configuring Network Load
Balancing and Cache Array
Routing Protocol (CARP) Support
. Summary
. Best Practices
ISA Server 2006 is a remarkably adaptable, scalable system
that provides for a variety of deployment scenarios for orga-
nizations of many sizes. The Standard version of ISA Server
2006, for example, can be deployed as an edge firewall,
reverse-proxy server, content-caching box, VPN server, or a
combination of these roles. These capabilities satisfy the
needs of many small to mid-sized organizations, but for
those mid-sized to large organizations wanting to take
advantage of those same features, Microsoft offers the
Enterprise version of the software.
The Enterprise version of ISA Server 2006 enables organiza-
tions to scale their ISA implementations outward, providing
for redundancy through Network Load Balancing (NLB) and
making it possible to create standardized security configura-
tions. With the Enterprise Edition, all the capabilities of the
Standard Edition are extended and made more manageable,
enabling ISA to scale to deployments of multiple sizes.
This chapter focuses on deployment scenarios involving the
Enterprise version of ISA Server 2006. Differences between
the Standard and Enterprise versions are discussed, and
best-practice design considerations for the Enterprise
version are outlined. In addition, a step-by-step process for
configuring a load-balanced ISA Server 2006 Enterprise
environment is outlined.
158
CHAPTER 6 Deploying ISA Server Arrays with ISA Server 2006 Enterprise Edition
NOTE
The focus of this chapter is directly on those features of the Enterprise Edition that are
different from the Standard, and that require different design and configuration. All
other chapters in this book apply to the Standard Edition. The functionality in those
chapters is the same as with the Enterprise Edition. Subsequently, if additional infor-
mation on specific topics is desired, such as VPN support with the Enterprise Edition,
the VPN chapters of this book should be referenced.
Understanding ISA Server 2006 Enterprise Edition
Unlike most Microsoft products, the Standard and Enterprise versions of the old version of
ISA Server, ISA Server 2004 were released separately, approximately a half year apart from
each other. This caused some confusion over what the Enterprise Edition was, and what
distinguished it from the Standard version and the previous Standard and Enterprise
versions of ISA 2000. With ISA Server 2006, however, they were released together, but
there was still considerable confusion between the two different products. To more fully
understand the Enterprise version, it is important first to note the differences between
Standard and Enterprise.
Exploring the Differences Between the Standard and Enterprise
Versions of ISA Server 2006
The Enterprise version of ISA Server 2006 contains all the features and functionality of the
Standard version, in addition to the following features:
. Network Load Balancing (NLB) Support—Only the Enterprise version of ISA Server
2006 supports Network Load Balancing (NLB) clusters, allowing for automatic
failover and load balancing of services across array members.
. Cache Array Routing Protocol (CARP) Support—The Enterprise version supports
the Cache Array Routing Protocol (CARP) to properly balance web proxy requests
across an array.
. Configuration Storage Server (CSS)—One of the biggest differences between
Standard and Enterprise is that the Enterprise Edition uses a Configuration Storage
Server (CSS) to store ISA rules and configuration. A CSS is an Active Directory in
Application Mode (ADAM) implementation (essentially a “light” version of an Active
Directory forest) and can be installed on non–ISA servers. This also allows for
centralized management of ISA servers.
. Enterprise and Array Policy Support—As opposed to the Standard version, which
allows only a single set of rules to be applied, ISA Enterprise allows a combination of
global Enterprise policy rules, and individual array rules that are used in combina-
tion with one another.
159
Deploying the Configuration Storage Server (CSS)
6
Designing an ISA Server 2006 Enterprise Edition Environment
The Enterprise version of ISA Server 2006 is designed in a different way than the Standard
version is. For instance, the CSS component itself changes the entire design equation. The
concept of arrays also makes an ISA Enterprise version unique. It is subsequently important
to understand what design factors must be taken into account when dealing with the EE.
The first design decision that must be made with the Enterprise Edition is where to store
the CSS. The CSS is a critical server in an ISA topology, and can be installed on any
Windows 2000/2003 server in an environment. In certain cases, it is installed on the
actual ISA server itself, and in other cases, it is installed on a dedicated machine or on a
domain controller.
In smaller environments, the CSS would be installed directly on the ISA server. In larger
and more secure environments, however, the CSS would be installed on systems within
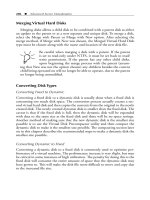
the network, such as in the ISA environment displayed in Figure 6.1.
Because the Content Storage Server is essentially an LDAP-compliant, scaled-down version
of an Active Directory forest, it can easily be replicated to multiple areas in an organiza-
tion. It is ideal to configure at least one replica of the CSS server to maintain redundancy
of ISA management.
NOTE
Although the ISA servers get their configuration information from a CSS server, they do
not shut down or fail if the CSS is down. Instead, they continue to process rules based
on the last configuration given to them from the CSS server.
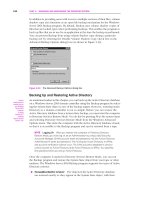
The example illustrated in this chapter uses a single CSS server installed on an internal
domain controller, as shown in Figure 6.2. In addition, step-by-step deployment guides to
setting up two ISA Server 2006 Enterprise servers running as edge firewalls in a network
load balanced array of ISA servers are outlined.
Although ISA Server Enterprise allows for a myriad of deployment models, this deploy-
ment scenario illustrates one of the more common ISA deployment scenarios, which is
one that takes full advantage of ISA functionality. Other common deployment models,
such as ISA deployment in a workgroup and unihomed ISA reverse-proxy systems, are
similar in many ways, with slight variations to implementation.
Deploying the Configuration Storage Server (CSS)
The Configuration Storage Server (CSS) is the central repository for all of ISA’s rules and
configuration information, and is therefore an extremely important piece of the ISA
Enterprise Environment. ISA Standard version does not have a CSS equivalent because the
rules and configuration of the Standard version are all stored locally. It is important to
understand how to deploy and work within the CSS model before deploying and adminis-
tering ISA Server 2006 Enterprise Edition.
160
CHAPTER 6 Deploying ISA Server Arrays with ISA Server 2006 Enterprise Edition
Exchange
Mailbox
Server
AD Domain
Controller /
CSS Replica
Edge-Array
SMTP Mail
Filter
Front-end OWA
AD Domain
Controller
CSS Server
NY-Email-Array
Exchange Mailbox
Server
New York
Paris Tokyo
Paris-Email-Array
Tokyo-Email-Array
Internet
New York Internal Network
Clients
Clients
AD Domain Controller /
CSS Replica
New York Internal Network
New York DMZ Network
Paris Internal Network
Clients
Tokyo Internal Network
Paris Email Network Tokyo Email Network
Remote
Clients
FIGURE 6.1 Examining a complex ISA Enterprise deployment.
Determining CSS Placement
As previously mentioned, there are several deployment scenarios for the CSS, starting with
simpler, smaller deployments and moving up to larger deployments. These scenarios are
as follows:
. CSS installed on the ISA server itself
. CSS installed on a separate server or servers running other services, such as a
domain controller
161
Deploying the Configuration Storage Server (CSS)
Internet
AD Domain Controller /
CSS
Server
NLB Network
Internal Network
172.16.1.101
Edge-Array
172.16.1.102
IP: 10.10.10.101
VIP: 10.10.10.1
IP: 10.10.10.102
VIP: 10.10.10.1
IP: 10.10.10.20
SM: 255.255.255.0
GW: 10.10.10.1
IP: 64.155.166.150
VIP: 64.155.166.151
IP: 64.155.166.149
VIP: 64.155.166.151
FIGURE 6.2 Conceptualizing the CSS deployment model illustrated in this chapter.
6
. CSS on a dedicated server
. Multiple CSS servers on multiple types of different servers
With CSS, the important thing to remember is that it should be secured and made highly
redundant. In addition, there should be a local CSS replica relatively close to the ISA
arrays themselves. The ISA servers need to constantly communicate to the CSS server to
check for changes in policy.
Installing CSS
As soon as the decision has been made about where to install the CSS server, the install
process can begin. The following procedure describes the installation of CSS onto a sepa-
rate server—in this case, a domain controller:
1. Insert the ISA Server 2006 Media in the server’s CD drive and wait for the setup
dialog box to automatically appear. If it does not appear, double-click on the
ISAAutorun.exe file in the root of the media directory.
2. Click on Install ISA Server 2006.
3. At the welcome screen, click Next to continue.
4. Select I Accept the Terms in the License Agreement and click Next.
5. Enter a User Name, Organization Name, and the Product Serial Number and
click Next.
162
CHAPTER 6 Deploying ISA Server Arrays with ISA Server 2006 Enterprise Edition
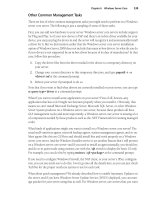
6. From the Setup Scenarios dialog box, shown in Figure 6.3, select to Install
Configuration Storage Server and click Next.
7. In the Component Selection dialog box, where ISA Server Management and
Configuration Storage Server are selected for installation, leave the selections at the
default and click Next.
8. From the Enterprise Installation Options, shown in Figure 6.4, select to Create a New
ISA Server Enterprise and click Next.
9. At the warning dialog box about creating a new CSS, click Next.
FIGURE 6.3 Installing the Configuration Storage Server.
FIGURE 6.4 Creating a new ISA Server Enterprise.
163
6
Setting Up Enterprise Networks and Policies
10. If the CSS will be installed on a domain controller, the dialog box shown in Figure 6.5
will prompt for credentials that the CSS service will run under to be displayed. Enter
the username and password of a domain admin account and click Next to continue.
11. Click the Install button to begin installing files.
12. After installation, click Finish.
13. Following installation, review the Protect the ISA Server Computer recommenda-
tions provided. This web file provides best-practice information on securing ISA
components.
Setting Up Additional CSS Replicas
After the initial Enterprise has been created, it’s possible to generate additional replicas of
the Enterprise itself by re-running the setup and choosing to create a replica instead of a
new Enterprise.
Setting Up Enterprise Networks and Policies
With a CSS Enterprise in place, the groundwork can be laid for the eventual introduction
of the ISA servers. The key is to preconfigure information that will be global for all ISA
servers and arrays within an organization. The ISA admin console, a default installation
option on a CSS server, is used in this capacity, and can be run even before official ISA
servers are installed. The console, shown in Figure 6.6, is slightly different than the
Standard Edition console. Several Enterprise options have been added.
FIGURE 6.5 Configuring the login account for the CSS service.
164
CHAPTER 6 Deploying ISA Server Arrays with ISA Server 2006 Enterprise Edition
Although it is possible to wait to configure the options in the console until the servers are
installed, it is often preferable to preconfigure them.
Delegating Administration of ISA
The first step that should be performed after the CSS Enterprise has been established is the
delegation of administration to individual users or, preferably, groups of users. To delegate
administration to a group, for example, perform the following steps:
1. On the server where CSS was installed, start the ISA Server 2006 Enterprise Admin
Console (Start, All Programs, Microsoft ISA Server, ISA Server Management).
2. From the console tree, click on the Enterprise node.
3. In the Tasks tab of the Tasks pane, click on the link Assign Administrative Roles.
4. Click the Add button.
5. Enter the DOMAIN\Groupname into the Group or User field (or use the Browse
button) and select a role that matches the group chosen, as is illustrated in Figure 6.7.
6. Click the Add button to add groups as necessary.
7. Click OK to close the dialog box.
8. Click Apply and then click OK to save the changes.
FIGURE 6.6 Exploring the ISA Enterprise admin console.
165
6
Setting Up Enterprise Networks and Policies
FIGURE 6.7 Delegating administration in ISA Enterprise Edition.
Defining Enterprise Networks
The Enterprise Console enables Enterprise networks to be defined and configured before
ISA servers are installed. An Enterprise network is one that is defined for use by all ISA
servers and arrays within an organization. For example, if a company’s network were
composed of three locations—Miami, Kiev, and Sapporo—and each location utilized a
different network subnet, then each of these subnets could be defined within CSS as
Enterprise networks. This makes it easier to create rules that apply to traffic to and from
these networks and ensures that any changes made to the networks (such as new subnets
added) are applied globally across all ISA servers.
In this example, a single internal network (10.10.10.0/24) is defined in the CSS Console
as follows:
1. From the ISA Enterprise Console, navigate through the console tree to Enterprise,
Enterprise Networks.
2. In the Tasks tab of the Tasks pane, click the link for Create a New Network.
3. When the wizard appears, enter a name for the network, such as CompanyABC-
Internal, and click Next.
4. Under the Network Addresses dialog box, click Add Range.
5. Enter a Start address and an End address that define the internal network, as shown
in Figure 6.8, and click OK.
6. Click Next.
7. Click Finish, Apply, and OK.
166
CHAPTER 6 Deploying ISA Server Arrays with ISA Server 2006 Enterprise Edition
Establishing Enterprise Network Rules
Along with the Enterprise networks, Enterprise network rules can be defined to describe
the relationship, either Route or NAT, between the various networks. In this example, a
NAT relationship is configured between the newly created CompanyABC-Internal network
and the external network as follows:
1. From the Enterprise Networks node in the console tree, click on the Create a
Network Rule link in the Tasks tab of the Tasks pane.
2. Enter a name for the network rule, such as NAT—External and Internal, and click Next.
3. In the Network Traffic Sources, click the Add button.
4. Under Enterprise Networks, choose CompanyABC-Internal (or equivalent) and click
Add.
5. Select External and click Add.
6. Click Close and click Next.
7. Under the Network Traffic Destinations dialog box, click Add.
8. Under Enterprise Networks, choose CompanyABC-Internal and click Add, then
repeat for External. Click Close and Next when done.
9. Under Network Relationship, shown in Figure 6.9, choose Network Address
Translation (NAT) and click Next to continue.
10. Click Finish, Apply, and OK to save the changes.
Creating Enterprise Policies
An Enterprise policy is one that, as the name suggests, is global to the entire ISA
Enterprise. Enterprise policies are vessels for Enterprise access rules, and can be populated
with various access rules that are global for all parts of an organization. It is convenient to
create Enterprise policies to make it easier to implement global changes that may be
dictated at an organization. For example, an Enterprise policy could be set up with several
Enterprise access rules that allow web access and FTP access. A change in organizational
policy to allow the Remote Desktop Protocol for all networks could be easily modified by
adding an additional Enterprise access rule to an existing Enterprise policy.
FIGURE 6.8 Defining the Enterprise internal network.
167
6
Setting Up Enterprise Networks and Policies
FIGURE 6.9 Defining the network relationship between ISA Enterprise networks.
By default, a single Enterprise policy already exists, with a default access rule to deny all
connections. This is by design for security purposes. To create an additional Enterprise
policy, do the following:
1. From the ISA Enterprise Console, click on the Enterprise Policies node.
2. In the Tasks tab of the Tasks pane, click the link for Create New Enterprise Policy.
3. Enter a name for the policy, such as CompanyABC Policy, and click Next.
4. Click Finish, Apply, and OK.
Creating Enterprise Access Rules for the Enterprise Policy
Each Enterprise policy can be populated with various Enterprise access rules. To create a
single rule allowing web access, for example, perform the following steps:
1. From the ISA Console, navigate to Enterprise, Enterprise Policies, CompanyABC
Policy (or equivalent).
2. From the Tasks tab in the Tasks pane, click the link for Create Enterprise Access Rule.
3. Enter a name for the Access rule, such as Web Access, and click Next.
4. Under Rule Action, select Allow and click Next.
5. Under the Protocols dialog box, choose Selected Protocols and click the Add button.
168
CHAPTER 6 Deploying ISA Server Arrays with ISA Server 2006 Enterprise Edition
6. Under Common Protocols, choose HTTP and click Add, choose HTTPS and click
Add, choose DNS and click Add, and then click Close.
7. At the dialog box displayed in Figure 6.10, click Next to continue.
8. From the Access Rule sources, click the Add button.
9. Under Enterprise Networks, choose CompanyABC-Internal (or equivalent), click Add,
and then click Close.
10. Click Next to continue.
11. Under Access Rule Destinations, click the Add button.
12. Under Enterprise Networks, select the External network and click Add and Close.
13. Click Next to continue.
14. Under User Sets, accept the default of all users and click Next.
15. Verify the configuration in the final dialog box, shown in Figure 6.11, and click Finish.
16. Click Apply and OK to save the changes.
Changing the Order of Enterprise Policy Rules
With ISA Server 2006 Standard Edition, firewall policy rules are implemented in order
from top to bottom. This is true as well with the Enterprise Edition, with one twist on the
theme. Enterprise policies can be implemented either before array rules (described in later
sections of this book) or after those array rules. They can be moved from one section to
another, similar to what is displayed in Figure 6.12.
This concept can be useful if it’s necessary to specify which rule is applied, and whether it
is applied before or after different array rules are applied.
FIGURE 6.10 Adding a Web Access rule to the Enterprise policy.
169
6
Creating and Configuring Arrays
FIGURE 6.11 Finalizing a Web Access rule in the Enterprise policy.
FIGURE 6.12 Changing the order of an Enterprise policy rule.
Creating and Configuring Arrays
ISA 2000 Enterprise Edition introduced the concept of an array, and ISA Server 2006
Enterprise improved upon it. Essentially, an array is a grouping of ISA servers that have
the same NIC configuration and are connected to the same networks. They are meant to
170
CHAPTER 6 Deploying ISA Server Arrays with ISA Server 2006 Enterprise Edition
act as redundant load-balanced members of a network team, either with integrated
Windows Load Balancing or through the use of a third-party load balancer.
For example, an organization may have an array of ISA servers acting as edge firewalls for
an organization. If one of the array members were to go down, the other one would
shoulder the load. There also may be other arrays within the organization that protect
other critical network segments from internal intrusion. Essentially, arrays provide a criti-
cal measure of load balancing and redundancy to a security environment.
Creating Arrays
Arrays can be defined in CSS before the ISA servers have been installed. In this example, a
single edge-firewall array is created via the following procedure:
1. From the ISA Enterprise Admin Console, click on the Arrays node in the console tree.
2. In the Tasks tab, click the Create New Array link.
3. Enter a name for the array, such as Edge-Array.
4. Under the Array DNS Name dialog box, shown in Figure 6.13, enter the Fully
Qualified Domain Name (FQDN) of the array, such as edge-array.companyabc.com,
and click Next to continue.
5. In the Assign Enterprise Policy dialog box, select the customized policy previously
created from the drop-down box, such as CompanyABC Policy, and click Next to
continue.
6. Under the types of array firewall policy rules that can be created, leave all checked,
as displayed in Figure 6.14, and click Next to continue.
FIGURE 6.13 Creating an array.
171
6
Creating and Configuring Arrays
NOTE
The Array Policy Rule Types dialog box allows the array to be restricted to specific
types of rules, such as deny, allow, or publishing rules. This can be useful for secur-
ing an array.
7. Click Finish, OK, Apply, and OK to save the settings.
Configuring Array Settings
Creating an array opens up an entirely new set of nodes in the ISA Enterprise Admin
Console, as shown in Figure 6.15. In fact, the array nodes may look familiar to an adminis-
trator familiar with the Standard version because they are nearly identical to that version.
To view and modify properties for the array, right-click on the array name and choose
Properties. The following tabs, shown in Figure 6.16, are available for review of an array:
. General—Name and description of the array.
. Policy Settings—Which Enterprise policy to apply to the array and what types of
policy rule can be applied.
. Configuration Storage—The FQDN of the main CSS server and an alternate server (if
necessary), in addition to the definition of how often the CSS is checked for updates.
. Intra-Array Credentials—Defines what type of credentials (domain or workgroup)
are used for intra-array communications.
. Published Configuration Storage—Used for environments where the CSS server is
secured across a VPN connection.
. Assign Roles—Allows for delegation of administration at the array level.
FIGURE 6.14 Defining array policy rule types.
172
CHAPTER 6 Deploying ISA Server Arrays with ISA Server 2006 Enterprise Edition
FIGURE 6.15 Examining the newly created array console settings.
FIGURE 6.16 Examining the array properties tabs.
173
6
Creating and Configuring Arrays
Creating the NLB Array Network
If Windows Network Load Balancing (NLB) will be used for the ISA servers, then an addi-
tional NIC needs to be added and an isolated network created between those two servers,
as shown in Figure 6.2. This network is solely devoted to NLB traffic, which is required
because the NLB operates only in unicast mode.
As well as being physically set up to provide for NLB, the network needs to be defined
within the array. To define this network, do the following:
1. In the ISA Enterprise Admin Console, click on Arrays, Edge-Array (Array Name),
Configuration, Networks node in the console tree.
2. In the Tasks tab of the Tasks pane, click the link for Create a New Network.
3. In the Network Name field, enter
Edge-Array-NLB and click Next.
4. In the Network Type dialog box, shown in Figure 6.17, select Perimeter Network and
click Next.
5. Under Network Addresses, click Add Range.
6. Enter a start address and end address, such as 172.16.1.0 and 172.16.1.255, and
click OK.
7. After the address is entered, click Next to continue.
8. Click Finish, Apply, and OK.
FIGURE 6.17 Creating the NLB Array network.
174
CHAPTER 6 Deploying ISA Server Arrays with ISA Server 2006 Enterprise Edition
Defining Array Policies
After the array has been configured, standard firewall policies can be defined for the array.
These policies follow the same concepts as the Standard version follows, and specific chap-
ters in this book can be used to configure these policies. For example, a mail publishing
rule can be used to secure an OWA site through the array, or a SQL Server can be
published. The options are nearly endless.
As previously mentioned, the specific array policies are applied after the initial enterprise
policies are, and before the final enterprise policies.
Installing and Configuring ISA Enterprise Servers
After all the preconfiguration via the CSS has been performed, the actual installation of
ISA Server 2006 Enterprise Edition can be accomplished. Many of the same design factors
that applied to the Standard version also apply to the Enterprise version, but it is useful to
review these prerequisites and best practices before installing ISA.
Satisfying ISA Server Installation Prerequisites
ISA Server 2006 Enterprise version has the same hardware prerequisites as the Standard
version, with Microsoft recommending a minimum of 256MB of RAM, a 550MHz Pentium
II, and 150MB of disk space to operate. That said, an Enterprise deployment of ISA Server
should never be installed on hardware as limited as that, and additional RAM (1GB or
more), faster processors, and more disk space will invariably be needed.
It is difficult to pin down the exact hardware that will be required, but ISA itself does not
require much in terms of resources. Performance metrics allow for up to a T3 of network
input into an ISA server before an additional server is needed, so it is not common to run
into performance issues when a system is properly sized.
ISA Server 2006 Enterprise Edition can run on either Windows Server 2003 or Windows
2000 Server versions, but it is highly recommended to install it on Windows Server 2003
only. This version is the most secure and integrates better with ISA Server 2006.
ISA Server 2006 operates if it is installed onto servers that are domain members, and it
also functions on servers that are not domain members (workgroup members). Workgroup
member ISA servers require server certificates to be installed between CSS members,
however, and also are limited to authenticating users using the RADIUS protocol.
Adding the ISA Server(s) to the Managed ISA Server Computer Set
Before any ISA servers can be added to an array, they must be defined on the CSS server,
in a group known as the “Managed ISA Server Computers” computer set. This predefined
computer set exists to further secure the ISA environment by ensuring that only the
proper servers are installed into the ISA Enterprise.
175
6
Installing and Configuring ISA Enterprise Servers
To add a server or servers into this computer set, perform the following steps:
1. From the ISA Management console on the CSS server, navigate to Arrays -
ArrayName (i.e., Edge-Array) - Firewall Policy.
2. In the Tasks pane, click on the Toolbox tab.
3. Navigate to Network Objects - Computer Sets.
4. Right-click on the Managed ISA Server Computers computer set and choose
Properties.
5. Click the Add button and choose Computer from the drop-down box.
6. Enter the name of the ISA server that will be added and an IP address, as illustrated
in Figure 6.18.
7. Click OK to save the changes.
8. Repeat steps 5–7 for any additional ISA servers to be installed.
9. When servers have been added, as illustrated in Figure 6.19, click OK, Apply, and OK
to save the changes.
Installing the Enterprise Edition on the Server
After a server for ISA has been identified, the operating system should be installed with
default options. See Chapter 2, “Installing ISA Server 2006,” for a step-by-step guide to this
process. After the OS is installed, the server should be added to the domain (if it will be a
domain member). Afterward, ISA can be installed via the following process:
1. Insert the ISA Server 2006 Enterprise Edition media into the server and wait for the
autorun screen to be displayed (or double-click on the
ISAAutorun.exe file).
2. Click the Install ISA Server 2006 link.
3. Click the Next button.
4. At the license agreement dialog box, click I Accept the Terms in the License
Agreement and click Next.
FIGURE 6.18 Adding an ISA server to the Managed ISA Server computer set.
176
CHAPTER 6 Deploying ISA Server Arrays with ISA Server 2006 Enterprise Edition
FIGURE 6.19 Finalizing the addition of the servers to the computer set.
5. Enter a User Name, Organization Name, and Product Serial Number and click Next.
6. Under Setup Scenarios, select Install ISA Server Services and click Next.
7. In the Component Selection dialog box, leave the defaults and click Next to continue.
8. On the Locate Configuration Storage Server dialog box, shown in Figure 6.20, enter
the FQDN of the CSS server (for example, server2.companyabc.com) and click Next
to continue.
FIGURE 6.20 Installing the ISA Server services.
177
6
Installing and Configuring ISA Enterprise Servers
9. Under Array Membership, select Join an Existing Array and click Next.
10. Under the Join Existing Array dialog box, shown in Figure 6.21, enter the Array
name (or browse to select) and click Next.
11. The subsequent dialog box allows for the type of authentication to be selected.
This enables nondomain ISA servers to have a certificate installed. In this example,
because the servers are domain members, choose Windows authentication and
click Next.
12. In the Internal Network dialog box, click the Add button. In the subsequent
Addresses dialog box, click the Add Network button.
13. Check the box for the previously defined internal network, such as what is displayed
in Figure 6.22, and then click OK.
14. Click OK, Next, and Next to continue.
15. Click Install.
16. Click the Finish button when installation completes.
After ISA setup, the install process opens Internet Explorer and provides links to ISA
resources at Microsoft. It is important to check the latest list of patches and downloads on
these links and install them if they are required.
In this scenario, two ISA servers are installed and deployed. The second server should be
installed through the same process as was defined previously. The one difference to this
process is that the internal network is not prompted for definition; it is defined already.
FIGURE 6.21 Joining the server to an array.
178
CHAPTER 6 Deploying ISA Server Arrays with ISA Server 2006 Enterprise Edition
FIGURE 6.22 Picking an Enterprise network.
Configuring the Intra-Array Communication IP Address
Each array member needs to be configured to use the proper IP address on the NLB
isolated network for communications between array members. To configure this setting,
do the following:
1. From the ISA Console on the newly installed server, navigate to Arrays, Edge-Array,
Configuration, Servers.
2. In the Details pane, right-click the server name and choose Properties.
3. Select the Communication tab.
4. Choose the IP address of the array network adapter from the drop-down box, as
shown in Figure 6.23.
5. Click OK, Apply, and OK.
Perform the same process on the second server as well. The array members are now ready
for additional rule and array configuration. The final step in this scenario is to enable load
balancing of network traffic and cache traffic.
Configuring Network Load Balancing and Cache
Array Routing Protocol (CARP) Support
Network Load Balancing (NLB) is a Windows service that enables network traffic to be
shared between multiple servers, while appearing to the client to be captured and
processed by a single server’s IP address. It provides for load sharing between NLB cluster
179
6
Configuring Network Load Balancing and CARP Support
FIGURE 6.23 Selecting the intra-array communication IP address.
Understanding Bi-Directional Affinity with Network Load Balancing (NLB)
One of the main challenges faced by the ISA team in regards to Network Load Balancing
was enabling and supporting bi-directional affinity with NLB. Bi-directional affinity is
basically needed to ensure that traffic sent from one network to another, and sent back to
the client from that remote network, is properly sent and received through the same ISA
server the entire time. If bi-directional affinity is not enabled, then traffic sent through
one ISA server might be routed through the NLB cluster to the wrong server, which causes
sporadic serious issues.
Enabling NLB for ISA Networks
To enable NLB on an ISA member server, perform the following procedure on each server:
1. From the ISA Server Admin Console, navigate through the console tree to Arrays,
Edge-Array, Configuration, Networks node.
2. In the Tasks tab of the Tasks pane, click the link for Enable Network Load Balancing
Integration.
3. At the welcome screen, click Next to continue.
members, and also provides for redundancy if one of the NLB members becomes unavail-
able. Only the Enterprise version of ISA Server 2006 natively supports NLB.
The Cache Array Routing Protocol (CARP) is a protocol that helps to balance content-
caching traffic sent to a network server. It is also supported only with the Enterprise version.