Server Load Balancing phần 9 docx
Bạn đang xem bản rút gọn của tài liệu. Xem và tải ngay bản đầy đủ của tài liệu tại đây (200.03 KB, 18 trang )
Redundancy 137
Use the flat-based architecture for now and get the MAC address of 00e0.5205.80l6
for this particular switch port.
To mark this port as redundant and to set up the protocol, use the following com-
mand:
SSH@lb-l(config)#server backup
ethernet
1
00e0.
5205.8016
With this configuration, one switch will be active while the other switch will be
inactive, not forwarding IP or Layer 2 traffic.
To get lb-2 configured, copy the config from lb-1 to lb-2, changing only the 192.
168.0.11 address to 192.168.0.12. Do a write mem, and then reload the switch.
Assuming it is the secondary unit, the switch will boot up and see that it is indeed
the secondary unit.
To show redundancy status, use the command show server backup:
SSH@lb-l(config)#show server backup
IV
Appendixes
Quick Command
Guide
This appendix provides a quick reference to commonly performed administration
tasks involving the load balancers featured in this book. It is designed to save time
and help in a crisis situation, when reading through a chapter would take too long.
The quick command guide assumes you have set up the SLB units in a manner
consistent with the examples and network architectures detailed in this book; how-
ever, these commands should work in most other circumstances as well. The
syntax and information are based on the software and hardware versions of the
products at the time of writing and may vary depending on your version.
Alteon (WebOS)
These commands are based on WebOS Version 8.0.x, but most will apply to newer versions
and the earlier 6.0.x releases. Unless specified, all changes need to have an apply done to
make them effective. Shortcuts can be used where needed. For example, /info/vrrp can be
shortened to /i/vrpp.
Reboot switch /boot/reset
Fail-over status /info/vrrp
Default to original factory config
Enter:
/boot/conf factory
Then reset the switch.
Take a real server out of production temporarily
Use
/oper/slb/dis
[server
number], such
as
/oper/slb/dis
4, to
disable real server
4
temporarily.
141
A
142 Appendix A: Quick Command Guide
Put a suspended real server back in production
Use
/oper/slb/ena
[server
number] such
as
/oper/slb/ena
4, to
enable real server
4.
Fail-over to standby unit
There is no easy way to fail-over units with Alteons unless the VRRP priorities on both
boxes are the same (which is a bad idea). There are two choices. First, you can change the
VRRP priorities on the standby unit to a higher value than the active unit. This can be quite
tedious, especially if you have many VRRP entries configured.
/cfg/vrrp/vr 1/prio 50
/cfg/vrrp/vr 2/prio 50
/cfg/vrrp/vr 3/prio 50
Alternatively, you can unplug all network connections to the active Alteon unit. The backup
unit will then take over.
Change admin password
The default admin account password is admin. To change it, use the command:
/cfg/sys/user/admpw
Show status of real servers
To show which real servers are up or down, use the following command:
/info/slb/dump
This will dump all of the real, group, and virtual server stats. The first entries will be the
stats for the real server:
Real server state:
1: ws-1, 00:d0:b7:66:9a:10, vlan 1, port 1, health 4, up
2: ws-2, 00:d0:b7:66:9a:6f, vlan 1, port 1, health 4, up
3: ws-3, 00:d0:b7:66:9a:77, vlan 1, port 1, health 4, up
4: ws-4, 00:d0:b7:66:9a:5a, vlan 1, port 1, health 4, up
Show software version
The command /info/sys will give you the version of code that is currently running:
>> Main# /info/sys
System Information at 0:17:09 Sun Sep 10, 2000
ACEswitch 184
sysName:
sysLocation:
Last boot: 14:12:49 Tue Aug 29, 2000 (reset from Telnet)
MAC address: 00:60:cf:45:9d:60 IP (If 1) address: 0.0.0.0
Hardware Revision: B
Hardware Part No: C05_5A-D_6A-D
Software Version 8.0.39 (FLASH image2), active configuration.
>> Information#
Foundry ServerIron Series (Ironware) 143
Foundry Serverlron Series (Ironware)
These configurations apply to Ironware Version 7.0 and, most likely, later versions as well.
All changes take effect immediately, but a write mem is needed to save them to flash so
they are active upon the next boot.
Reboot switch reload
Fail-over
Status
SSH@lb-l(config)#
show
server
backup
Default to original factory config
To go back to the original factory config, use the command erase startup-config and reload
the switch. It will come back up with a blank configuration and no password:
ServerIron# erase startup-config
Take a real server out of production
To take a real server out of production, first go into the virtual server in which the real
server is enabled, and then issue the no command to take the real server (ws-1 in this case)
out of rotation:
SSH@lb-l(config)#
server
virtual
vip-1
SSH@lb-l(config-rs-vip-l)# no bind http ws-1 http
If you'd prefer to make that real server unavailable for all VIPs, simply unconfigure the real
server outright:
SSH@lb-l(config)#
no
server
real
ws-1
Put a suspended real server back in production
To add an already configured real server (back) into production, go into the virtual server
menu and add the server:
SSH@lb-l(config)#
server
virtual
vip-1
SSH@lb-l(config-vs-vip-l)# bind http ws-1 http
And the real server is back in production.
Fail-over to standby unit
The best way to fail-over to a standby is to reboot (or power-cycle) the active unit. The
standby unit will become active and won't become standby again unless the now-active
unit fails.
Change admin password
The default password for the login and superuser accounts is null, so it should be set as
soon as possible:
lb-1(config)# enable superuser-password admin
144 Appendix A: Quick Command Guide
Recovery of a lost password
If you've lost the superuser password for a ServerIron and have console access to the
device, you can recover the password. Plug a serial connection into the switch and hit Enter
a few times to make sure you've got an active connection. Then power-cycle the switch:
Enter 'b' to go to boot monitor
BOOT MONITOR>
Then type "no password" and hit Enter:
BOOT
MONITOR>
no
password
OK! Skip password check when the system is up.
Then give the command boot system flash primary and hit Enter. This will boot the unit.
BOOT
MONITOR>
boot
system
flash
primary
BOOT
INFO:
load
from
primary
copy
BOOT
INFO:
code
decompression
completed
BOOT
INFO:
branch
to
04001500
The
system will
boot
up and you
will
get a
read-only prompt. Type
enable
and
you'll
be
in the privileged-enable mode, where you can reset the superuser password:
ServerIron>enable
No password has been assigned yet
ServerIron#
Show status of real servers
To show the status of a given real server, use the command show server real followed by
the name of the real server (or leave this blank for info on all of the real servers):
SSH@lb-l# show
server
real
ws-1
Real Servers Info
Name : ws-1 Mac-addr: 0800.20c0.7bb0
IP:192.168.0.100 Range:1 State:Active Wt:l Max-conn:1000000
Src-nat
(cfg:op):(off:off)
Dest-nat
(cfg:op):(off:off)
Remote server : No Dynamic : No Server-resets:0
Mem:server: 02009eae Mem:mac: 0458efOO
Port State Ms CurConn TotConn Rx-pkts Tx-pkts Rx-octet Tx-octet Reas
http
default
Server
active
unbnd
Total
0
0
0
0
0
0
0
0
0
0
0
0
0
0
0
0
0
0
0
0
0
0
0
Show
status
of
VIPs
To show the status of a given VIP, use the command show server virtual followed by the
name of the virtual server (or leave this blank for info on all of the virtual servers):
SSH@lb-l# show
server
virtual
vip-1
Virtual Servers Info
Cisco's WebNS (ArrowPoint) 145
Server
Name:
vip-1
IP :
192.168.0.200
: 1
Status: enabled Predictor: least-conn TotConn: 0
Dynamic:
No
HTTP
redirect:
disabled
Intercept: No
ACL:
id = 0
Sym: group
= 1
state
= 5
priority
= 0
keep
= 0
Activates = 1, Inactive= 0
Port
State
Sticky
Concur
Proxy
CurConn TotConn PeakConn
http enabled NO NO NO 0 0 0
default enabled NO NO NO 0 0 0
Show software version
To
show
the
version
of the
software
you are
running,
use the
command
show
version:
SSH@lb-l#show version
SW: Version 07.0.07T12 Copyright (c) 1996-1999 Foundry Networks, Inc.
Compiled on Jul 28 2000 at 11:35:12 labeled as SLB07007
HW: ServerIron Switch, serial number 058016
400 MHz Power PC processor 740 (revision 8) with 32756K bytes of DRAM
24 100BaseT interfaces with Level 1 Transceiver LXT975
2 GIGA Fiber uplink interfaces, SX
256 KB PRAM and 8*2048 CAM entries for DMA 0, version 0807
256 KB PRAM and 8*2048 CAM entries for DMA 1, version 0807
256 KB PRAM and 8*2048 CAM entries for DMA 2, version 0807
256 KB PRAM and 1*2048 CAM entries for DMA 4, version 0104, SEEQ GIGA MAC 8100
256 KB PRAM and 1*2048 CAM entries for DMA 5, version 0104, SEEQ GIGA MAC 8100
128 KB boot flash memory
4096 KB code flash memory
2048 KB BRAM, BM version 10
128 KB QRAM
512 KB SRAM
Octal System, Maximum Code Image Size Supported: 1965568 (0x00ldfe00)
The system uptime is 17 days 21 hours 26 minutes 51 seconds
SSH@lb-l#
Cisco's WebNS (ArrowPoint)
The following commands are for Version 4.0 and later, but most will work with earlier
versions. All changes take effect immediately but must be saved to take effect upon
rebooting.
Reboot switch reboot
Fail-Over Status show redundancy
Default to original factory config
To restore to the no config, you must clear out the running-config (the configuration in
memory) as well as the startup-config (the configuration on the disk):
lb-l# clear running-config
running-config
will
be
permanently
lost.
Continue, [y/n]:y
146 Appendix A: Quick Command Guide
Clearing(\) 100%
lb-l# clear startup-config
startup-config will be permanently lost. Continue, [y/n]:y
lb-l#
If you have used the save_config command, you must also execute the clear archive
startup-config command:
lb-l# c,lear archive startup-config
Then reboot the machine. When it comes back up, it will have no configuration and will
prompt you to use the startup configuration script. Log in with the username and password
configured in the NVRAM.
Take a real server out of production temporarily
To take a real server out of service, go into conf mode and the real server's configured
service. Then give the suspend command:
lb-l(config)# service ws-1
lb-1(config-service[ws-1])# suspend
lb-1(config-service
[ws-1])# show
service
ws-1
With a show service ws-1, we see that the state is now suspended:
Name: ws-1 Index: 1
Type: Local State: Suspended
Rule ( 192.168.0.100 ANY ANY )
Redirect Domain:
Keepalive:
(ICMP
5 3 5 )
Mtu: 1500 State Transitions: 1
Connections: 0 Max Connections: 0
Total Connections: 1 Total Reused Conns: 0
Weight: 1 Load: 255
lb-1(config-service[ws-l])#
Put a suspended real server back in production
To add a real server back into production, go into conf mode and the real server's config-
ured service. Simply give the active command, and the real server is restored into load-
balancing rotation:
lb-1(config)# service ws-1
lb-1(config-service[ws-1])# active
lb-1(config-service[ws-1])#
Fail-over to standby unit
On the standby unit, issue the command redundancy force-master. This will make the
standby unit temporarily active. To switch back, use the same command on the old active
unit (now standby), or the command ip redundancy master.
Change admin password
There is no single administrator superuser account; any account can have superuser access.
There are two places where ArrowPoint keeps username and password information: in the
NVRAM and in the configuration file (encrypted).
Cisco's WebNS (ArrowPoint) 147
In the NVRAM, only one account is stored, and it is always superuser. It will not show up in
the configuration file. If an account of the same username is added in the configuration file,
it will supercede the password in the NVRAM. To change or add a non-NVRAM account, go
into config mode and use the username command:
lb-l(config)# username tony password test123
If you want the account to have superuser access, append the command with superuser.
Even if you are just changing an existing user's password, you still need to specify
superuser, or else the account will become a nonsuperuser account:
lb-l(config)# username tony password test123 superuser
To change the NVRAM password, use the username-offdm command:
lb-l(config)# usemame-offdm admin password test123
The command does not appear in the configuration. The information is written
only to the NVRM.
Recovery of a lost password
The NVRAM account is the only account that you can change when you can't log in as an
administrative user. To do this, boot the machine up with a serial cable attached. You'll be
given the chance during the boot-up process to exit into the Offline Diagnostic Monitor
menu by hitting any key:
BootRom
Fast Boot - Skipping DIAGS - BOOTING
Reading configuration records OK
Checking previous shutdown OK
Initializing the disk OK
Press any key to access the Offline Diagnostic Monitor menu.
Doing
so
will
bring
you to
this
menu:
Transferring to menu
CS-150 Offline Diagnostic Monitor menu, Version: 4.00 Build 3
MAIN MENU
Enter the number of a menu selection:
1* Set Boot Configuration
2. Show Boot Configuration
3* Advanced Options
4. Reboot System
148 Appendix A: Quick Command Guide
Select
option
3,
which
will
bring
you to
this
menu:
Enter the number of a menu selection:
1. Delete a Software Version
2* Security Options
3* Disk Options
r. Return to previous menu
>
Select option 2:
CS-150 Offline Diagnostic Monitor menu, Version: 4.00 Build 3
SECURITY OPTIONS
Enter
the
number
of a
menu
selection:
1. Set Password Protection for Offline Diagnostic Monitor
2. Set Administrative Username and Password
r. Return to previous menu
>
Option 2 of this menu will prompt you to change the administrator username and
password:
Enter <administrator>
username
(Minimum
4
characters):
tony
Enter <administrator> password:
Confirm <administrator> password:
The active configuration file will supercede any existing account, so be sure to create or
change the password of an account that does not exist in the configuration file. When the
unit boots up again, you will be able to log in as an administrator.
Show status of real servers
Use the command show service on a given real server or the command by itself to list the
status of all real servers:
lb-l# show service ws-1
Name: ws-1 Index: 1
Type: Local State: Alive
Rule ( 192.168.0.100 ANY ANY )
Redirect Domain:
Keepalive: (ICMP 5 3 5 )
Mtu: 1500 State Transitions: 0
Connections: 0 Max Connections: 0
Total Connections: 0 Total Reused Conns: 0
Weight: 1 Load: 2
lb-l#
F5's BIG-IP 149
Show
status
of
VIPs
To show the status of a VIP, use the show rule-summary command:
lb-l#
show
rule-summary
VIP
Address Port Prot
Url
CntRuleName
OwnerName
State
192.168.0.100 80 TCP ws-1 tony Active
lb-l#
The command doesn't allow you to specify any particular VIP; it gives info on all config-
ured VIPs.
F5's BIG-IP
The following configurations apply to F5's BIG-IP.
Reboot switch reboot
Fail-over status
The fail-over status can be found on either the main page of the WUI or with the command
bigpipe fo:
lb-l:~# bigpipe fo
BIG/ip is in STANDBY failover state
Default to original factory config
Log in via SSH and delete /etc/hosts:
lb-l:~# rm /etc/hosts
Then reboot the box and the unit will come up the same as when it came from the factory,
awaiting a fresh config.
Take a real server out of production temporarily
From the main menu on the left, select Node and then the node of the real server you want
to disable. There is an Enable checkbox; simply uncheck the box and click Apply.
Put a suspended real server back in production
From the main menu on the left, select Node and then the node of the real server you want
to reenable. Check the Enable checkbox and click Apply.
Fail-over to standby unit
This can be done through either the WUI or the CLI. On the WUI of the active unit (not
possible on the standby unit), click on the Make Standby button on the main page. With the
CLI, use the following command on the active unit:
lb-l:~# bigpipe fo slave
150 Appendix A: Quick Command Guide
Do not issue the command bigpipefo master on the standby unit or
issue a WUI command to the slave to become master. This will most
likely cause serious ARP problems with the VTPs, resulting in a VIP
outage. If the master machine is still active, it should be told to
become slave, rather than the slave told to become master.
Change admin password
There are two types of accounts on the BIG-IP: the WUI and the CLI. In the WUI, use the
User Admin menu to change passwords and administer accounts. For the CLI, use the Unix
command passwd:
lb-l:~# passwd
Changing local password for root.
New password (128 significant characters):
Retype new password:
passwd: updating passwd database
passwd: done
lb-l:~#
Direct Server Return
Configuration
The purpose of this appendix is to provide configuration examples for the setup of
Direct Server Return (DSR) on various operating systems. As stated earlier, DSR is
a way for outbound traffic to bypass the load balancer, sending traffic directly to
the default router of that subnet. This can represent significant time savings. Not
all SLB devices support DSR, and some have limitations on the types of features
that are compatible with DSR, so check your vendor's documentation. This
appendix is meant to serve as a general guide; different vendors may implement
slightly different variations of DSR. Many vendors also have different names for
DSR, such as nPath™ with F5's BIG-IP and SwitchBack
TM
with Foundry's Server-
Iron, so keep that in mind.
DSR uses the loopback interface on a machine to spoof the address of the VIP on
the load balancer when sending traffic out, making it look as if the load balancer
sent the packet instead of the server, thus eliminating the need for the load bal-
ancer to process that traffic. The loopback interface is a special kind of network
interface inside the machine. Usually, it is used only by the operating system for
internal network communications, but it can be used for other purposes, such as
DSR.
Generally, there are four necessary steps for the configuration of DSR:
1. Configure the IP alias on the server's loopback interface with the IP address of
the VIP on the load balancer.
2. Configure the server to bind to both the real IP address (may be necessary so
the load balancer can still perform health checks) and the new loopback IP
address.
3. Point the default route directly towards the router (rather than through the
load balancer).
4. Configure the load balancer to enable DSR.
151
B
152 Appendix B: Direct Server Return Configuration
IP Loopback Configuration
The first step is OS-specific. We've included the necessary steps to configure the
loopback interface for Linux (tested with the 2.2 kernel, which should work with
other versions), Solaris (tested with Solaris 7, which should also work with other
versions), and Windows 2000. If you are using another operating system, check
your documentation if you are unsure of how to configure the loopback address.
We'll use the IP address of 192.168.0.200 to represent the VIP address and 192.168.
0.100 to represent the real IP of the server.
Solaris Loopback Configuration
On a Solaris machine, if you run an ifconfig —a command (the Unix command to
show information on all network interfaces), you'll get something similar to the
following output:
[tony@vegan]# ifconfig -a
lo0: flags=1000849<UP,LOOPBACK,RUNNING,MULTICAST,IPv4> mtu 8232 index 1
inet 127.0.0.1 netmask ff000000
hme0: flags=1000843<UP,BROADCAST,RUNNING,MULTICAST,IPv4> mtu 1500 index 2
inet 192.168.0.100 netmask ffffff00 broadcast 192.168.0.255
ether 8:0:20:c0:7b:b0
[tony@vegan]#
You need to create an additional lo0 interface. To do this, plumb it first with the
Unix ifconfig command. In Solaris, IP aliases for an interface are appended with a
":x", where x is the number of the IP alias. Since this is the first IP alias we are
adding to the loopback interface, we'll give it the name lo0: 1:
[tony@vegan]#
ifconfig
lo0:l
plumb
Now
when
you run
ifconfig—a,
it
will
show
the
lo0:l
interface:
lo0:l: flags=1000848<LOOPBACK,RUNNING,MULTICAST,IPv4> mtu 8232 index 1
inet 0.0.0.0 netmask 0
Give the newly created interface the IP address of the VIP configured on the load
balancer, 192.168.0.200. Don't forget to include the appropriate netmask information.
[tony@vegan]#
ifconfig
lo0:l
192.168.0.200
netmask
255.255.255.0
up
Now the ifconfig-a command will show the configured interface:
lo0:l:
flags=1000849<UP,LOOPBACK,RUNNING,MULTICAST,IPv4>
mtu
8232
index
1
inet
192.168.0.200
netmask
ffffff00
The loopback interface is now configured for DSR. If you have more than one VIP
serviced by this server, you can add as many extra loopback interfaces as you
require.
IP Loopback Configuration 753
Linux Loopback Configuration
On a Linux machine, the ifconfig—a command will show something similar to this:
[tony@vegan]# ifconfig -a
eth0 Link encap:Ethernet HWaddr 00:DO:B7:66:99:4A
inet addr:192.168.0.100 Bcast:192.168.0.255 Mask:255.255.255.0
UP BROADCAST RUNNING MULTICAST MTU: 1500 Metric:1
RX packets:6079071 errors:0 dropped:0 overruns:0 frame:0
TX packets:1177762 errors:0 dropped:0 overruns:12 carrier:0
collisions:0 txqueuelen:100
Interrupt:9 Base address:0xde80
lo Link encap:Local Loopback
inet addr=127.0.0.1 Mask:255.0.0.0
UP LOOPBACK RUNNING MTU :3924 Metric:1
RX packets:40794 errors:0 dropped:0 overruns:0 frame:0
TX packets:40794 errors:0 dropped:0 overruns:0 carrier:0
collisions:0 txqueuelen:0
[tony@vegan]#
The
interface
eth0
is the
Ethernet interface, while
lo is the
loopback
interface.
To create an additional lo interface (an IP alias), we'll use the ifconfig command.
Like Solaris, additional IP addresses on a physical interface are appended with an
":x", where x is the number of the additional interface. For the first alias, we'll use
lo:l:
[tony@vegan]# ifconfig lo:l 192.168.0.200 netmask 255.255.252.0
Make sure you have the IP aliases compiled as options in the ker-
nel. If you don't, you'll get an error when attempting to bring one
up.
This is all that is required to add an IP alias to a Linux loopback interface. An
ifconfig-a command shows the new loopback interface:
lo:1 Link encap:Local Loopback
inet addr:192.168.0.200 Mask:255.255.255.0
UP LOOPBACK RUNNING MTU=3924 Metric:1
The loopback interface is now configured for DSR. If you have more than one VIP
serviced by this server, you can add as many extra loopback interfaces as you
require.
Windows 2000
Setting up a loopback interface is much more complicated with Windows 2000
than with Linux or Solaris. By default, Windows 2000 does not typically come
154 Appendix B: Direct Server Return Configuration
installed with a loopback interface, so you must add one. Here are the steps nec-
essary:
1. Go into the Control Panel and select Add/Remove Hardware.
2. Click on Add/Troubleshoot a device, then select Next.
3. Windows will probably try to find some new hardware. Just wait until you get
to the next menu, which will be a list of hardware Windows has detected.
4. Click on Add a new device and then select Next.
5. You'll get a prompt asking to have Windows search for new hardware. You'll
want to select the No, I want to select option.
6. There will be a list of hardware types; select Network adapters.
7. There will be a list of manufacturers; select Microsoft. The only adapter avail-
able will be the Microsoft Loopback Adapter. Select that and then Next, and
Next again to install the adapter.
8. When it is complete, click on Finish.
9. Go into the Control Panel window and select Network and Dialup Connec-
tions. Windows has probably named the new loopback adapter something like
"Local Area Connection 2." It's a good idea to rename it something more
appropriate, like "Loopback Interface."
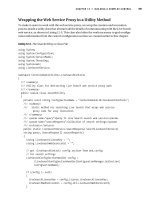
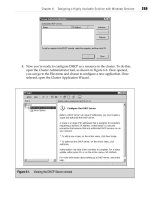
10. Click on Properties for the Loopback Interface, then on TCP/IP Properties,
which will bring up the screen shown in Figure B-l. Give it the IP address of
192.168.0.200 (the IP address of the VIP).
The loopback interface is now ready for DSR. If you have more than one VIP ser-
viced by this machine, you can click on Advanced in the TCP/IP properties of the
Loopback Interface and add additional IPs.
Web Server Configuration
Once the loopback interface on a server has been configured, the web server (or
other type of server) must be set to listen to that loopback interface. As an
example, let's take Apache, the popular open source web server. This would be
part of an Apache configuration for a non-DSR-configured web server:
<VirtualHost 198.168.0.100>
ServerAdmin
DocumentRoot /www/docs/
ServerName www1.vegan.net
ErrorLog logs/error_log
CustomLog logs/access_log common
</VirtualHost>
Web Server Configuration
155
Figure
B-l.
TCP/IP
properties
in
Windows
2000
With DSR enabled, we would also add the following configuration to listen to the
loopback interface:
<VirtualHost 198.168.0.200>
ServerAdmin
DocumentRoot /www/docs/
ServerName www1.vegan.net
ErrorLog /www/logs/error_log
CustomLog /www/logs/access_log common
</VirtualHost>
It is a good idea to configure both 192.168.0.200 and 192.168.0.100, even though
they are essentially duplicates. This is so the load balancer can perform health
checking on the 192.168.0.100 interface, and so you can browse the server individ-
ually without going through the load balancer, while the 192.168.0.200 instance
provides DSR functionality.
This is just an example. Your web or other server configuration may vary
depending on software and version.
156 Appendix B: Direct Server Return Configuration
Layer 3 Path
To ensure that the traffic isn't unnecessarily hitting the load balancer on the way
out, make sure the default route path doesn't pass through the load balancers. To
do this, just change the default route of the servers to point to the router on the
subnet, rather than to the load balancer.
DSR does not generally work with bridge-path, because there can be only one
path for Layer 2 traffic in and out, which is through the load balancer. Enabling
DSR does not bypass the load balancer with bridge-path. Doing so would defeat
the purpose.