Unix for mac your visual blueprint to maximizing the foundation of mac osx phần 6 ppsx
Bạn đang xem bản rút gọn của tài liệu. Xem và tải ngay bản đầy đủ của tài liệu tại đây (3.02 MB, 36 trang )
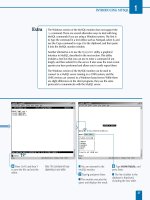
CHANGE THE OWNER
AND GROUP OF A FILE
⁄ Type sudo chown
followed by a space.
¤ Type the name of a user
on your system followed by a
colon (
:).
‹ Type the name of a group
on your system followed by a
space, then type the name of
a file, and press Return.
› Type ls -l followed by a
space, the name of the file,
and then press Return.
■ The file now has a new
owner and group.
CHANGE THE GROUP OF
AN ENTIRE DIRECTORY
⁄ Type sudo chgrp followed
by a space.
¤ Type -R followed by a
space.
‹ Type the name of a group
on your system followed by a
space.
› Type the name of a
directory, and press Return.
■ All the files in the directory
now have a new owner and
group.
SYSTEM ADMINISTRATION COMMANDS
11
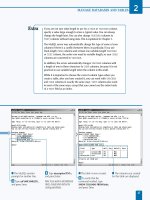
When you change the group and
ownership of a file, you do not affect the
contents of the file in any way. Information
about a file, referred to as metadata, is
stored in a separate location from the file
itself. You affect this metadata when you
change ownership or the permissions
associated with a file. Metadata is stored in
a file system structure known as an inode.
You see metadata every time you list file
information using the ls –l command.
You can list files with the numbers of the
inodes that are associated with these files
by using the –i option instead. It is
sometimes useful to know which inodes
are being used. For example, two files in
the same file system with the same inode
refer to the same content.
167
TYPE THIS:
[ferro:~] user % ls -i *
RESULT:
139742 AnnaRoof.JPG 140953 NoLaneBridge.JPG
143416 AnnaSky.JPG 140093 OldBarn.JPG
141835 AugSky1.JPG 140095 OldBarn2.JPG
11 53730X Ch11.qxd 3/25/03 8:58 AM Page 167
CREATE A SYMBOLIC LINK
⁄ Type ln -s followed by a
space.
¤ Type the full pathname of
a text file, and press Return.
■ A symbolic link is created
which points to the file.
‹ Type ls -l followed by
space.
› Type the name of your
new symbolic link, and press
Return.
■ A long listing of your
symbolic link appears.
■ The l in the first column
indicates that this file is a
symbolic link.
Y
ou can simplify the navigation of your file system by
creating symbolic links. A symbolic link is a special
file that acts as a pointer or shortcut to another file or
directory at another location in the system.
By creating a symbolic link to a directory with a long or
difficult pathname, you can move to the directory by typing
cd followed by the name of the link you create. If you want
to create a shortcut for moving into or listing the contents
of the directory /Applications/Utilities, you can type the
command ln -s /Applications/Utilities util. The full
pathname specifies where you want your link to point,
while the final argument specifies what you want to call
your link. The -s argument tells the ln command that you
want to create a symbolic link.
After you type this command and press Return, you can
type commands such as ls utils or cd utils. If you
only specify the file or directory that you want to point to
when you type the ln -s command, the link receives the
same name as the original file.
If you share a set of files with other users, and those files
are not stored in your home directories, you can use
symbolic links to simplify the sharing process and better
organize the shared files. If you do not include the -s
argument, you create a hard link instead of a symbolic one.
A hard link is a special copy of a file, in that it is a reference
to the original file. Though it looks like a file that is
completely independent of the original, it is the original file
with a new file system reference; any changes to the
original file are reflected in the link.
CREATE SYMBOLIC LINKS
UNIX FOR MAC
168
CREATE SYMBOLIC LINKS
11 53730X Ch11.qxd 3/25/03 8:58 AM Page 168
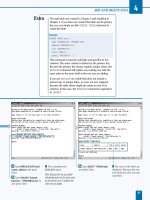
ˇ Type less followed by a
space.
Á Type the name of your
symbolic link, and press
Return.
■ The contents of the
original file appear, showing
that your symbolic link
connects to the original file.
⁄ Type ln followed by a
space.
¤ Type the name of a text
file in your directory followed
by a space.
‹ Type a new filename, and
press Return.
› Type ls -l followed by a
space, the names of the two
files separated by a space,
and then press Return.
■ The files appear identical
except for their names.
SYSTEM ADMINISTRATION COMMANDS
11
169
You can use hard links to make files easier to
access or to give them additional names. Hard
links offer a particular advantage over copies of
files, unlike copies, hard links require no
additional disk space. The contents of the file are
stored in only one place on the system,
regardless of how many hard links you create.
If you and another user maintain personal copies
of a file, the contents of those files can easily
become out of synch. However, if you use a hard
link, you can both keep a hard link file in your
home directory, with the assurance that any
changes that either of you makes are reflected in
both hard link files.
You create hard links with the ln command. For
example, the command ln java myapp allows
you to refer to java as myapp.
Hard links are similar to symbolic links, except
that hard links point to the contents of a file,
while symbolic links point to the name of a file.
When two files use the same inode, you know
they are hard links.
TYPE THIS:
[ferro:~] ls -l /bin/csh
[ferro:~] ls -l /bin/tcsh
RESULT:
167100 /bin/csh
167100 /bin/tcsh
11 53730X Ch11.qxd 3/25/03 8:58 AM Page 169
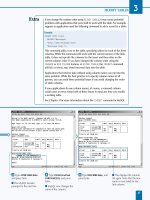
DISPLAY DISK FREE
SPACE IN BLOCKS
⁄ Type df and press Return.
■ The system displays your
file system usage in blocks.
DISPLAY DISK FREE
SPACE IN KILOBYTES
⁄ Type df -k and press
Return.
■ The system displays your
file system usage in kilobytes.
Y
ou can use the df and du commands to determine
how much space is available on your disks and how
much space is used, respectively. The df command
tells you how much disk space is allocated, used, and
available. When you use the df command with a -k
argument, disk space appears in kilobytes instead of
512-byte blocks.
One of the columns that appears in the df output is
Capacity. This column shows you how much room in that
file system is already used as a percentage of the overall
space available. Most Unix system administrators try to
keep file systems at less than 90 percent of capacity simply
because they perform better when there is adequate free
space.
You can use the du command to determine how much
space a particular directory uses. This command can help
you track down files that consume a lot of space in a file
system that is running out of space. For example, if you cd
into a particular directory and use the command du –sk *
| sort –n, you receive a list of the contents of that
directory sorted in size order. This is very helpful if you
want to know where most of the disk space is being
consumed.
You can use the df -k command periodically to see how
much space remains on your disk. When a file system
approaches full capacity, the responsiveness of the system
decreases, although any file system that is less than 90
percent full is not a reason for concern. At the same time,
any file system that jumps in size by 10 percent in a short
amount of time may do so again. The rate at which a file
system is growing suggests how soon you will run out of
space.
CHECK DISK USAGE
UNIX FOR MAC
170
CHECK DISK USAGE
11 53730X Ch11.qxd 3/25/03 8:58 AM Page 170
DISPLAY DISK USAGE
IN KILOBYTES
⁄ Type du followed by a
space.
¤ Type -sk followed by a
space.
‹ Type * and press Return.
■ The system displays the
sizes of your files and
directories.
DISPLAY DISK USAGE
IN ORDER OF SIZE
⁄ Type du -sk * followed by
a space.
¤ Type | followed by a
space.
‹ Type sort -n and press
Return.
■ The system displays the
sizes of your files and
directories in order of size.
SYSTEM ADMINISTRATION COMMANDS
11
The df command can also report on the
number of inodes allocated and used on your
file systems. While this may not be an issue on
your system, it is possible for a file system to
run out of inodes just as it is possible for a file
system to run out of disk space. In either case,
you cannot create new files until you solve
the disk space or the inode issue. When you
first create a file system, the system also
creates a generous allocation of inodes. When
you type the command df -i, the system
displays the number of inodes used as iused
and the number available as ifree. Unless
the ifree value is extremely small, you are
unlikely to have any problems. The ratio of
inodes to disk space is usually set so that
running out of inodes is nearly impossible.
171
TYPE THIS:
[ferro:~] df -i
RESULT:
Filesystem 512-blocks Used Avail Capacity iused ifree %iused Mounted on
/dev/disk0s 53545168 17462872 35570296 32% 2246857 4446287 33% /
devfs 201 201 0 100% 644 0 100% /dev
fdesc 2 2 0 100% 4 253 1% /dev
<volfs> 1024 1024 0 100% 0 0 100% /.vol
11 53730X Ch11.qxd 3/25/03 8:58 AM Page 171
EXAMINE THE PRINT QUEUE
⁄ Type lpr followed by a
space.
¤ Type the name of a text
file, and press Return.
■ The file queues for
printing.
‹ Type lpq and press
Return.
■ The print queue displays.
Y
ou can use the lpq command to examine your print
queue and cancel print requests. This command also
lists print jobs that are waiting in the queue. As the
printer handles each print request, the job disappears
from the queue and the next job in line starts printing. The
cancel command cancels a selected print job, removing it
from the queue and leaving the remaining jobs to be
printed.
You have numerous reasons to examine a print queue and
to cancel jobs. For example, if you are waiting a long time
for a printout, you can check the queue to see what other
jobs are printing or should be printing. If the printer has
been out of paper for a while, you can view where your
print job is in the queue, and decide whether to cancel
the job.
Some users request a printout of a document several times
in a row before checking to see if the reason that it does
not print is because there is no paper. When this happens,
it is a good idea to cancel all but one of these print jobs.
Other users may print a document in the wrong format and
end up printing a pile of paper that they cannot use.
Canceling these jobs can save you both time and paper.
To submit a print job from the command line, you can use
the lpr command followed by the name of the file you
want to print. Applications, such as Photoshop, also submit
print jobs and these also appear in your print queue. You
can view all of the pending print jobs using lpq, whether
the print requests are generated by applications or the lpr
command and regardless of who submitted each print
request.
MANAGE THE PRINT QUEUE
UNIX FOR MAC
172
MANAGE THE PRINT QUEUE
11 53730X Ch11.qxd 3/25/03 8:58 AM Page 172
CANCEL A PRINT JOB
⁄ Type lpq and press
Return.
■ The print queue displays.
¤ Type cancel followed by a
space.
‹ Type a job number from
one of the print jobs in the
list, and press Return.
■ The print job is cancelled.
CHECK ON THE PRINTER STATUS
⁄ Type lpc followed by a
space.
¤ Type status and press
Return.
■ The status of the printer
displays.
SYSTEM ADMINISTRATION COMMANDS
11
If you need to cancel all of the jobs in a print queue, you can use the cancel
command with a -s argument. This command option saves you the time of
canceling jobs individually.
The Print Center is a useful tool for monitoring and controlling your printer; it
allows you to: determine the status of a printer; restart the printer; view the
jobs that are waiting to print; and determine whether the printer is active. If
the lpq command indicates that your printer is not ready, you can set it back
to operational status using the Print Center. To do this, double-click the name
of the printer that the lpq command tells you is inactive, and activate it again.
The Print Center is located in the /Applications/Utilities folder.
173
TYPE THIS:
[ferro:~] user% lpq
RESULT:
DESKJET_930C is ready and printing
Rank Owner Job File(s) Total Size
active user 3 Chap11.txt 36864 bytes
1st user 4 oldhouse.jpg 919552 bytes
Each job in the queue has a rank, an owner, and a job number. To cancel a
job in the queue, use the command cancel followed by a space and the job
number.
11 53730X Ch11.qxd 3/25/03 8:58 AM Page 173
OPEN THE CONSOLE
APPLICATION
⁄ On the desktop, click
Finder in the Dock.
¤ Double-click your system
disk.
‹ Double-click
Applications.
Y
ou can learn a lot about system operations and
problems by inspecting your system logs for error
messages and various anomalies. System logs, stored
in /var/log, record the activities of many system services
such as e-mail and printing. You will find these files to be
valuable as they can be an important source of information
when system problems arise.
The most important messages about your current logon
sessions appear in a log file called console.log. You can view
these messages using the Console tool, available in
/Applications/Utilities. The scrollable window allows you to
read the messages that accumulate after you log on. These
messages include authentication failures and mounting
problems.
A system daemon called syslog maintains most system log
files. Like numerous other daemons, the syslog daemon,
syslogd, has a configuration file that it reads when it starts
up. This configuration file tells syslogd where to write each
type of log message. By using the services of syslogd, other
services do not have to do their own logging. The syslog
configuration file, /etc/syslogd.conf, provides you with an
opportunity to change where logs are written or to
deactivate certain types of logging. To modify the logging
operations of syslogd, you can modify the configuration file
for syslogd and instruct the daemon to check the file for
changes. Do not edit the default /etc/syslogd.conf file
unless you want to separate particular messages or stop
collecting them altogether.
If you keep the Console tool open while you work, you can
see these messages display as the daemon generates them.
This is a good troubleshooting technique as it informs you
of problems immediately and reminds you to check your
log files.
INSPECT SYSTEM LOGS
UNIX FOR MAC
174
INSPECT SYSTEM LOGS
11 53730X Ch11.qxd 3/25/03 8:58 AM Page 174
■ The Applications folder
appears in a Finder window.
› Scroll down until the
Utilities icon is visible.
ˇ Double-click Utilities.
■ The Utilities folder appears
in a Finder window.
Á Double-click Console.
■ The Console application
opens.
SYSTEM ADMINISTRATION COMMANDS
11
The log file that gathers the most information
on most Mac OS X systems is system.log. The
system writes many routine messages to this file,
and the system.log file is routinely rotated. Older
system.log files are renamed system.log.0,
system.log.1, and so on, and are compressed
with gunzip to save space. At any point, you may
have a number of these files available to you to
help you track down a problem. Any log file may
have thousands of records — far too many for
you to read the file from top to bottom. Using
commands like grep and awk to extract some
of this data can make the job of reviewing log
data much easier. You might consider writing
scripts that check for certain types of errors in
your log files and report the findings to you.
You can check the /etc/syslog.conf file to see
where particular types of messages are written.
175
11 53730X Ch11.qxd 3/25/03 8:58 AM Page 175
COMPRESS A FILE WITH GZIP
⁄ Type gzip followed by
a space.
¤ Type the name of a file,
and press Return.
‹ Type ls -l followed by a
space.
› Type the name of the
original file followed by
.gz
and then press Return.
■ The listing shows that the
file is compressed.
UNCOMPRESS A GZIPPED FILE
⁄ Type gunzip followed by
a space.
¤ Type the name of a
gzipped file, and press
Return.
‹ Type ls -l followed by a
space.
› Type the name of the
original file.
■ The listing shows that the
file is uncompressed.
Y
ou can greatly reduce the size of a file by
compressing it — down to a sixth or less of its
original size when you use a good compression tool.
Compression is a good solution for managing your disk
space while not sacrificing files that you may need later on.
For most files, gzip is one of the best compression tools
available. It is both quick and effective, reducing files down
to a fraction of their original size. It is also available on
many systems, allowing you to move your compressed files
to another system, confident that you can unzip them. To
compress a file, you can type gzip followed by the name of
the file. The gzip command creates a new file with the
extension .gz appended to the end of the filename. For
example, when you compress the /var/log/system.log.0 file,
the resultant file is called system.log.0.gz. Unlike Windows,
Unix does not care how many extensions a file has.
The other command that you can use to compress a file is
called compress. The compress command compresses a
file using a different algorithm than gzip. It also uses a
different file extension. Files compressed with the
compress command take on the extension .Z.
The gzip and gunzip tools are members of the GNU tools
that many Unix systems use whether they are included in
the distribution or added later. These commands are
included in the standard distribution of Mac OS X.
Both the gzip and the compress commands use the
filenames to determine whether a file is already
compressed. It is possible to compress a file again after
renaming it, but the subsequent gain is small, and the
likelihood of confusion high.
COMPRESS LARGE FILES
UNIX FOR MAC
176
COMPRESS LARGE FILES
11 53730X Ch11.qxd 3/25/03 8:58 AM Page 176
COMPRESS A FILE
WITH COMPRESS
⁄ Type compress followed
by a space.
¤ Type the name of a file,
and press Return.
‹ Type ls -l followed by a
space.
› Type the name of the
original file followed by
.Z
and then press Return.
■ The listing shows that the
file is compressed.
UNCOMPRESS A
COMPRESSED FILE
⁄ Type uncompress
followed by a space.
¤ Type the name of a
compressed file, and press
Return.
‹ Type ls -l followed by a
space.
› Type the name of the
original file, and press
Return.
■ The listing shows that the
file is uncompressed.
SYSTEM ADMINISTRATION COMMANDS
11
Most software that you download from FTP sites is compressed to
reduce both the storage space requirements on the server and
the time required to download the file. You can determine the
type of compression used by looking at the file extensions. Files
that end in .Z have been compressed with the compress command,
while those that end in .gz have been compressed with gzip.You
may also see file endings such as .zip, .tar.Z, and .tgz.
FILE EXTENSION DESCRIPTION BENEFIT
ZIP Files ending in .zip are ZIP files. Many systems have zip and unzip commands
and can both create and extract from these files.
TAR Files ending in .tar are tape These files are not compressed
archive or TAR files. but contain a number of files that you can
individually or collectively extract with the
tar
-xf command.
TARZ/TGZ Files ending in .tar.Z or .tgz To extract the contents of one of these files, you
are TAR files that have also must first uncompress it. This leaves you with a
been compressed with the TAR file. You then use the
tar -xf command
compress command. to extract the contents.
177
11 53730X Ch11.qxd 3/25/03 8:58 AM Page 177
LIST NETINFO FORMATS
⁄ Type nidump and press
Return.
■ The nidump command
displays a usage statement
along with a list of the
formats that it can
dump for you.
DUMP INFORMATION
FROM NETINFO
⁄ Type nidump followed by
a space.
¤ Type the name of a format
followed by a space.
‹ Type . and press Return.
■ The contents of that format
are displayed.
Y
ou can explore and modify the contents of your
NetInfo database. NetInfo is a service that replaces
the simply formatted text files that were once used
exclusively in Unix to store information about systems,
users, and so on. The early Unix systems stored all user
information in the /etc/passwd file, and information about
the local system and other systems in /etc/hosts. Along with
some additional files, also stored in /etc, the records in
these files determined who could log on and what services
the system could support.
In the past, new lines were added to the /etc/passwd file
as new user logons were created. New hosts were added to
the /etc/hosts file so that the systems could communicate.
Today, we use network information and lookup services
such as NetInfo, NIS, and LDAP on many systems to replace
the simple text files.
NetInfo is a lookup service or database that contains many
types of system information. In fact, if you look for your
account in the /etc/passwd file, you are not likely to find it.
The system does not use these files; it uses NetInfo.
Therefore, learning to browse the NetInfo information base
and make changes is essential for understanding and
monitoring your system.
The most important NetInfo commands are nidump,
niload, and niutil. The nidump command displays the
NetInfo contents. The command nidump passwd .
displays the passwd entries that were stored in the
/etc/passwd file on older Unix systems.
You can use the niload command to load new contents
into NetInfo, and the niutil command for various read
and write processes. NetInfo refers to the types of
information that it contains as formats. There are also
nifind, nigrep, and nireport commands. Read about
these by entering a man command; for example, man
nigrep.
USING NETINFO
UNIX FOR MAC
178
USING NETINFO
11 53730X Ch11.qxd 3/25/03 8:58 AM Page 178
BACK UP NETINFO
INFORMATION IN A FILE
⁄ Type nidump followed by
a space.
¤ Type the name of a format
followed by a space.
‹ Type . followed by a
space.
› Type > followed by a
space, a filename, and then
press Return.
■ The nidump command
dumps the contents of that
format into your file.
ˇ Type sudo niutil –destroy .
/users/zoe and press Return.
■ The user zoe is removed
from NetInfo.
RELOAD NETINFO
FROM YOUR FILE
⁄ Type sudo niload followed
by a space.
¤ Type the name of a format
followed by a space.
‹ Type . followed by a
space, and then
< followed
by a space.
› Type the name of the file
into which you dumped the
contents of the format, and
press Return.
■ The system reloads
the dumped data back
into NetInfo, including the
account information for zoe.
SYSTEM ADMINISTRATION COMMANDS
11
While the nidump and niload commands are
relatively straightforward, the niutil command
has a number of options, each of which is like a
separate command. These options include
-create, -destroy, -createprop,
-appendprop, -mergeprop, -insertval,
-destroyprop, -destroyval, -renameprop,
-read, and -list.
Although NetInfo works well, you should
consider making your changes with a carefully
written and well-tested script, and not attempt
to enter all of the necessary netutil commands
manually. Read the man pages for niload,
nidump, and netutil to learn more about how
you can use these commands.
NetInfo uses terminology that is different from that
of the system. For example, not only does NetInfo
maintain formats in place of files, but it also has
directories in place of records and properties in
place of fields. If you use the niutil command to
create a new user record, you can use the niutil
-create command, which creates a new directory.
You can then set the values associated with the full
name of the user, their Home directory, and so on,
by using the niutil -createprop command.
179
11 53730X Ch11.qxd 3/25/03 8:58 AM Page 179
⁄ Insert the Developer Tools
CD-ROM into your drive.
■ The tools CD icon appears
on your screen.
¤ Double-click the icon that
appears on your desktop
■ The Developer Tools
window opens.
‹ Double-click the
Developer.mpkg icon.
Y
ou can load a variety of software development tools
onto your Mac OS X system. The Developer Tools CD
that ships with the OS contains a complete set of
development tools. This includes a number of standard
programming languages, utilities, and libraries along with
software management tools and debuggers. There are
compilers that allow you to turn your source code into
programs your system can run from scratch, debuggers —
special tools that help you to locate errors in your code,
and tools to help you analyze performance.
You can load all of the tools available on the Developer
Tools CD at once, or you can open the Packages folder and
select any of six individual packages that you want to install.
These are BSDSDK, DevDocumentation, DevExamples,
DevPBW0, DevSDK, and DevTools.
During the installation of the developer tools, the installer
goes through a number of phases, including an optimization
phase in which the installer attempts to improve the overall
performance of your system. Do not be alarmed if your
system slows down during this part of the installation
process; this is not uncommon. The installation process may
take longer than you think it should. Be patient and allow it
to complete.
To make your system easier to manage, you should install
the developer tools on the same disk as your Mac OS X
installation, if possible. You can load the developer tools
from the CD in roughly half an hour. If you are operating on
a local area network, you can make the developer tools
available on one system and install them on other systems
over the network.
The README.html file is a good starting point to help you
find the documentation that you need to get started. You
can keep your developer tools current by periodically
looking for updates at www.apple.com.
INSTALL DEVELOPER TOOLS
UNIX FOR MAC
180
INSTALL DEVELOPER TOOLS
12 53730X Ch12.qxd 3/25/03 8:58 AM Page 180
■ The Authenticate dialog
box appears.
› Enter your password to
continue with the installation.
■ The welcome screen
appears.
ˇ Click Continue.
INSTALL UNIX APPLICATIONS
12
The developer tools include the gcc 3.1 compiler. This GNU C
compiler compiles code written in C, C++, Objective-C, and
Objective-C++. Developers on other Unix systems — Linux,
Solaris, FreeBSD, and others, use this same compiler
extensively. In fact, gcc is used to compile Mac OS X. This
particular version of the compiler has been enhanced to
compile faster, and produce more efficient executables.
If you load the entire contents of the Developer Tools CD, you
will also install Project Builder, Interface Builder, AppleScript
Studio, New BSD SDK, gdb debugger, Thread Viewer, and
Sampler along with the associated documentation. Project
Builder is Apple’s integrated developer environment and
assists with development tasks from editing and searching
through building and debugging.
If you are a seasoned developer, you will appreciate all the
tools that are packaged in this tool kit. If you are a new
developer, you will probably appreciate all the documentation
and sample code that will help you get off to a productive
start. Many other features of Mac OS X, such as fine-grained
multithreading, make this operating system an extremely
versatile development environment.
181
CONTINUED
12 53730X Ch12.qxd 3/25/03 8:58 AM Page 181
■ The Software License
Agreement appears.
Á Read the license
agreement and click
Continue.
‡ Click Agree.
A
fter you have loaded the Developer Tools on your
system, you may notice that a new directory has been
added to your system — /Developer. This directory
contains the sample code and documentation that is
provided with the software. The subdirectories inside
/Developer are set so that anyone on the system can read
their contents.
In the Applications directory, you can find many useful tools
to help with your development projects. Among these, you
find PackageMaker — a tool to help you package your
software for easy installation. You can also find Interface
Builder — a graphical interface editor for Cocoa and
Carbon applications and MallocDebug — to measure an
application's use of dynamic memory. The Java Browser can
make it easier to analyze and view your Java code. More
than 20 tools are available.
The Documentation directory contains documentation on
many aspects of development. To get started with the Java
development documentation, for example, you can open
Developer/Documentation/Java/java.html with a browser or
by double-clicking the file. This page provides links to
essential information on using Java on Mac OS X, including
information about the Java 2 API, WebObjects, and so on.
Before viewing the Java 2 API reference for the first time,
type sudo /Developer/Documentation/Java/scripts/
unjarJavaDocumentation.sh in a Terminal window. This
command extracts Java API documentation from a Java
archive file — a jar file — so that you can read it. There is
also a PDF file entitled Java Development on Mac OS X that
introduces you to Java development on your Mac OS X
system, including Basic Java, double-clickable applications,
and how to use Project Builder. QuickTime for Java provides
cross-platform APIs to allow you to build multimedia
components, such as streaming audio and video, for both
Macintosh and Windows systems.
INSTALL DEVELOPER TOOLS (CONTINUED)
UNIX FOR MAC
182
INSTALL DEVELOPER TOOLS (CONTINUED)
12 53730X Ch12.qxd 3/25/03 8:58 AM Page 182
° Click the disk you want
the tools installed on, if not
already selected.
· Click Continue. ■ The Easy Install screen
appears.
‚ Click Install or Upgrade.
INSTALL UNIX APPLICATIONS
12
You can begin your browsing of the developer
documentation by opening
/Developer/Documentation in your Finder. The
README file, README.html, provides a gentle
introduction to the thousands of pages of
documentation that you find on the system from
tutorials and conceptual overviews to detailed
release notes.
ProjectBuilder allows you to move smoothly
from looking at your code to viewing
documentation. By holding down the option
button and double-clicking on the particular API
element, the tool takes you swiftly to the proper
document or provides you with a list of relevant
choices.
The developer tools are installed with a large
collection of pages to help you learn about various
commands. These pages should have been installed
during the installation of the developer tools. You
need to have /usr/share/man on your MANPATH to
view the pages. You can add this directory to your
path by typing setenv MANPATH $MANPATH":"/usr/
share/man or by adding to the path defined in your
.tcshrc file. The latter method is a better choice as it
adds this to your path every time you log on.
183
CONTINUED
12 53730X Ch12.qxd 3/25/03 8:58 AM Page 183
■ The system prepares to
load the new software.
■ The system continues
loading the new software.
W
hile many of the tools on the developers CD are
intended for Java development, there is also a
large set of tools to help you build applications in
other languages. The version of gcc that is included is a
compiler for C, C++, and Objective-C applications. The
cpp-precomp and cpp tools are preprocessors. The first
works with C and Objective-C. The latter works with C++.
The as command is the system assembler. gdb is a
debugger from the GNU Foundation that is well known in
the industry. The developer tools provide a debugging guide
as well as a quick reference to get you started.
ld is the static link editor. It combines object files into
binary files such as those that make up applications and
shared libraries.
dyld is the dynamic link editor for Mac OS X. This tool is
used by applications that load libraries as needed, rather
than incorporating them as is the case when libraries are
linked statically.
libtool creates both dynamic and status libraries and is
used by gcc as needed.
The developer tools also provide CVS, a tool for
maintaining source code that also comes from the GNU
Foundation. CVS allows you to maintain multiple versions
of an application and to create any particular version as
needed. CVS also allows multiple developers to work on
the same code without the danger of overwriting each
other's changes. Code is checked in and checked out so
that only one individual can change a module at a time. You
can determine differences between multiple versions of the
same code and merge code as needed to facilitate
incorporating changes from more than one individual.
INSTALL DEVELOPER TOOLS (CONTINUED)
UNIX FOR MAC
184
INSTALL DEVELOPER TOOLS (CONTINUED)
12 53730X Ch12.qxd 3/25/03 8:58 AM Page 184
■ The installation software
optimizes performance.
— Installation is complete. ± Click Close.
INSTALL UNIX APPLICATIONS
12
The release notes provided with the developer tools help
you to understand what has changed in a tool since the last
release. If you are new to development on Mac OS X, the
release notes may not mean a lot to you today, but you may
find them important after you have spent considerable time
developing software and are ready to upgrade to a newer
release of the developer tools. In this case, reading the release
notes is a great idea as it tells you what to watch out for as you
begin to work with the newer software.
For an unusual introduction to Java programming, double-click
/Developer/Examples/Java/Sound/Sound. After clicking Start,
you can read the README.txt file and begin to learn how this
sample application was created. The application loops, so you
may want to hit the Stop button after several times.
You can find two of the Aqua dots,
DotBlue.tif and DotGray.tif, in the
Developers directory. These TIFF
images look like the dots in the
upper-left hand corner of your
Terminal window.
Sample Applescript programs are
available to help with your
scripting efforts.
185
12 53730X Ch12.qxd 3/25/03 8:58 AM Page 185
⁄ Click Apple OS X ➪
Get Mac OS X Software.
■ Your browser opens and
takes you to the Mac OS X
Downloads site.
¤ Locate the software you
want to download.
‹ Command-click the
download link for the
software you select.
Get Mac OS X Software
Download Link to Disk
Y
ou can download software in one of two forms: as
precompiled binaries that you can run after a quick
installation process, or as source code that you must
compile before you can run it. The easiest way to obtain
new tools for your Mac OS X system is to find precompiled
binaries. While many sources of precompiled binaries exist
on the Web, you can only use those that are built
specifically to run on Mac OS X.
The advantages of starting with source code are first, that
you can study the source code and determine exactly how
a tool works, and second, that you can modify the code for
your own purposes.
As you might expect, one of the best sources of
precompiled tools for Mac OS X is Apple Computer. In fact,
to facilitate your access to their software tools, Apple has
included the Get Mac OS X Software option in the Apple
drop-down menu on your desktop, which takes your
browser to their comprehensive download site.
When you download a software tool from the Apple site,
the Download Manager appears, allowing you to monitor
the progress of your downloads. At this point, you can close
your browser window. The software continues
downloading, although you must remember not to shut
down your network connection if you are on a dial-up line.
There are several sites that provide Mac OS X precompiled
binaries. For example, you can obtain a precompiled binary
for Fink, a sophisticated software package manager for Mac
OS X, from www.fink.sourceforge.net. Other useful tools
include Mozilla from www.mozilla.org, PHP from
www.entropy.ch/software/macosx/php, and XFree86 from
www.apple.com/downloads. OpenOffice, an office suite
that rivals Microsoft Office, may be officially released by the
time you read these words.
FIND UNIX APPLICATIONS ON THE WEB
UNIX FOR MAC
186
FIND UNIX APPLICATIONS FROM THE WEB
12 53730X Ch12.qxd 3/25/03 8:58 AM Page 186
■ The Save dialog box
appears.
› Select the location
where you want to save
the downloaded file.
ˇ Click Save. ■ The Download Manager
downloads your file.
INSTALL UNIX APPLICATIONS
12
There are literally thousands of programs that you can
download and install to increase the usefulness and versatility
of your Mac OS X system; some of these programs may prove
to be essential add-ons to your system, while you may install
others simply because they are interesting or fun. The most
beneficial programs are those that either complement the tools
that you already have, or do a much better job than the tools
delivered with the OS.
For example, Mac OS X does not include a spell checker. If you
intend to do a lot of writing on your Mac system, installing
ispell provides you with a versatile spell-checking system.
Another tool, aspell, purports to be a more intelligent spell
checker, but requires some additional configuration.
Programs that need to generate character-based displays in a
terminal-independent manner require a copy of libtermcap,
another program that is not included in the standard Mac OS X
installation. You can find libtermcap at www.gnu.org.
187
12 53730X Ch12.qxd 3/25/03 8:58 AM Page 187
⁄ Open Internet Explorer in
the Dock.
¤ Type .
org/copyleft/gpl.html into the
URL field.
‹ Press Return.
■ The GNU General Public
License page appears.
› Scroll down to view the
GNU General Public License.
■ Your browser displays the
content of the license
agreement.
188
USING OPEN SOURCE SOFTWARE
Y
ou can download, install, and use open source
software to great advantage. Open source software is
free, and is developed and tested by some of the
most dedicated people in the industry. The intention of
open source licensing is to encourage collaboration and
innovation while shifting the focus of control from large
companies to end-users.
The Open Source movement is dedicated to quality and fair
practice. The basic idea behind open source is that, with the
potential to have hundreds of people improving and testing
code, the software development cycle is shortened and the
quality of the software improves. In addition, no individual
or company can leverage that development toward goals
that are against the interests of the overall population of
users.
Now roughly twenty years old, the Open Source movement
is finally achieving a presence in the commercial world. As a
result, companies like Red Hat can achieve financial success
even though they are selling software that is essentially free.
Commercial success and open source software are not
incompatible with each other. In fact, Mac OS X is itself
built on an open source foundation, a core operating
system known as Darwin.
Although the development of Linux has been very
important to the Open Source movement, open source
development has also brought us tools that are critical to
the Internet such as BIND, sendmail, and Apache.
A sizable portion of open source software falls under the
GNU public licensing (GPL) agreement that states that any
software incorporating GPL-based software must itself be
licensed as GPL software. Not all open source, however, falls
under this licensing agreement, so you need to know how
source code is licensed to know how you can use it. While
open source code is available for anyone to use, the original
developers may retain some intellectual property rights.
USING OPEN SOURCE SOFTWARE
UNIX FOR MAC
12 53730X Ch12.qxd 3/25/03 8:58 AM Page 188
⁄ Type http://fink.
sourceforge.net/download/
index.php into a browser.
■ The Web page for
downloading Fink appears.
¤ Scroll down the page to
the link for downloading
Fink.
189
Y
ou can find plenty of open source software on the
Web and even participate in open source
development if it interests you. The best sites for
open source software are those that are dedicated only to
open source. These sites include www.freshmeat.org and
www.sourceforge.net. You can also find useful links and a
lot of additional information about open source software by
visiting www.opensource.org.
You can also look for source code on the original
development sites of software applications. For example,
you can go to www.apache.org to download the latest or
earlier versions of the Apache server. You can get sendmail
from www.sendmail.com, and you can get GNU tools from
www.gnu.org.
If you intend to use open source software for your business
or projects, the issue of open source certification can
become very important to you. Open source certification,
performed by Open Source Initiative (OSI), assures you that
the source code that you are using meets all the
requirements that qualify it as open source.
The process of compiling an application from source code
can range from straightforward to extremely difficult.
Fortunately, most popular tools have the development bugs
removed from them a long time before you obtain a copy
of the source code. These include bugs in the compilation
process as well as bugs in the code. If you are wary of code
with bugs, you should avoid any code that is described as
Beta. Beta is a word for code that has not been fully tested.
A useful tool that you can download first is Fink. Fink is an
open source tool for managing software installation and can
save you a tremendous amount of time in finding,
downloading, and installing other software.
FIND OPEN SOURCE SOFTWARE
INSTALL UNIX APPLICATIONS
12
FIND OPEN SOURCE SOFTWARE
12 53730X Ch12.qxd 3/25/03 8:58 AM Page 189
⁄ Download an application
package from the Web.
¤ Click the application
package icon to view the
contents of the folder.
■ A window opens,
displaying the contents
of the folder.
‹ Double-click the package
icon.
■ The installation window
appears, followed by an
authentication window.
› Type your password in the
Password or phrase field.
ˇ Click OK.
Á Click Continue until you
reach the License Agreement.
Y
ou can install an application package on Mac OS X
quite easily. This is because a package is a specially
formatted application file that is designed for easy
installation. To let you know that a file is prepared for easy
installation on your system, the Finder uses an icon that
looks like an opened parcel.
To install an application package, you can simply double-click
the icon for the package in the Finder. This initiates a process
that walks you through each step in the installation. You are
asked to enter your password to authenticate yourself as a
privileged user, to accept the license agreement, and to select
the disk for the installation. You can monitor the progress of
the installation by watching the progress bar. When the
installation is complete, a message appears informing you that
the installation was successful. You install all software
packages in this manner.
Mac OS X also includes an install command, which you
can use to move binary files into a chosen location from
where you want to run them. You can specifically avoid
overwriting earlier versions of the software if you use a -b
option with the install command. With a -o option, you
can specify who owns the application when it moves into
the target directory. Similarly, a -g option allows you to
specify the group. You can use a -d option to create missing
directories. With a -m option, you can override the default
mode of the file, restricting access as needed.
While downloading and installing software is relatively easy,
managing it can be much more challenging. Mac OS X does
not place restrictions on where you install software, so you
should maintain and enforce a convention to prevent your
system from becoming disorganized.
INSTALL APPLICATION PACKAGES
UNIX FOR MAC
190
INSTALL APPLICATION PACKAGES
12 53730X Ch12.qxd 3/25/03 8:58 AM Page 190
‡ Scroll down to read the
agreement.
° Click Continue. ■ The Select a Destination
screen appears.
· Click the appropriate
device to select a hard drive
for your installation.
‚ Click Continue.
■ The installation proceeds
and installs the software on
your disk.
INSTALL UNIX APPLICATIONS
12
When you install software in many different locations on your hard
drive, it can become difficult to keep track of both where you have
installed your software and what software you have installed. This
situation is exacerbated when you frequently download new tools
and utilities.
While you can manually organize your software, you have another
option for making the software easier to find and use: You can
update your search path to include all directories into which you
install software.
You can update your search path by editing your shell configuration
file. If you are using the default shell in Mac OS X, tcsh, your shell
configuration file is defined in the .tcshrc file in the root of your
Home directory. The system reads this file every time you log on, as
well as every time you open a new shell or a new Terminal window.
To update your path in tcsh, edit your .tcshrc file by adding the line,
setenv PATH $PATH":"/usr/local/bin:/sw/bin", where
the specified paths match the locations of your new software. Each
system user needs to make this change in order to find software
without knowing the software locations.
191
12 53730X Ch12.qxd 3/25/03 8:58 AM Page 191