Brushes iPhone and iPod touchUser’s Guide phần 3 pot
Bạn đang xem bản rút gọn của tài liệu. Xem và tải ngay bản đầy đủ của tài liệu tại đây (3.44 MB, 11 trang )
To add a new layer, tap the + button on the right of the toolbar.
Add a transparent layer.
You can also import a photo as a new layer, by tapping the album or camera buttons in the
top-left corner. (These buttons will be disabled if your painting already has four layers.)
To delete a layer, tap the trash button. (This button will be disabled if your painting has only
one layer.)
Delete the active layer.
To merge the contents of the active layer with the layer below it, tap the merge button. (This
button will be disabled if the bottom layer is active—there is nothing to merge it with.)
Merge the active layer with the layer below.
To ll the entire layer with a color, tap the ll button on the left side of the toolbar:
Fill the layer with a color.
This will show a Color panel asking you to choose a color. Set the color‘s opacity to less than
the maximum, if you want lower layers to show through.
Brushes User’s Guide
21
Copying and Pasting Layers
Brushes lets you copy a layer and paste it into the current painting, or into another painting.
To show the Copy/Paste menu, tap on a layer and hold your nger down. (If your painting
already has four layers, you will be able to copy, but not paste.)
Undo and Redo
Just like painting and erasing, you can undo and redo any changes to layers.
Undo Redo
Brushes User’s Guide
22
Exporting
Brushes provides several methods for exporting paintings. You can add paintings to your
photo album, email them, or directly access your gallery via a built-in web server.
Add to Photos
To add a painting to your photo album, make sure that you are in viewing mode and not
painting mode. If you’re painting, tap Done in the navigation bar to switch to viewing mode.
Tap the action button in the toolbar.
Activate the
action pop up.
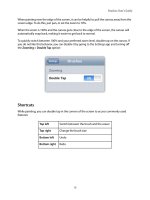
In the menu that appears, tap Add to Photos:
Brushes User’s Guide
23
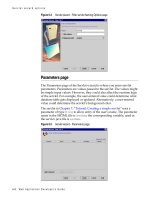
Brushes will show this panel:
Tap the thumbnail
to rotate the
painting to the
proper orientation
before exporting.
Add the painting
to your photo
album.
Cancel export.
Tap the painting thumbnail to rotate it. When you’re ready, tap Export to add the painting to
your photo album.
The next time you launch the built-in Photos app, the painting will appear in your album. It
will also get sent to your computer when you sync with iTunes or iPhoto. From the Photos
app, you can assign it to a contact, set it as your wallpaper, and more.
NOTE: When added to your photo album, paintings are saved in the JPEG format, which uses
lossy compression. Some amount of detail may be lost, and the painting may lose
transparency if it isn’t completely opaque. To get the highest-quality results, use a different
method to export your painting.
Emailing a Painting
Emailing a painting works just like adding it to your photo album. In the menu, just tap Email
Painting.
Brushes User’s Guide
24
Sharing with Wi-Fi
You can see the paintings in your gallery from any computer on the local Wi-Fi network, using
Brushes' built-in web server.
1. Start the web server.
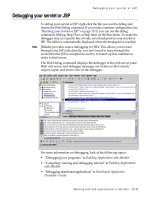
Tap the Connect button in the Gallery:
Open the Connect panel and start the Brushes web server.
The Connect panel will appear.
Enter the
displayed URL in
a web browser
to connect
directly to your
Brushes gallery.
NOTE: The URL
on your device
will likely not
match the one
displayed here.
Tap here to
dismiss the
Connect panel
and stop
sharing your
gallery.
Brushes User’s Guide
25
If you are not on a Wi-Fi network, the web server will not be able to start, and you will see “No
Wi-Fi Connection”.
2. Connect with your computer.
Make sure that your computer is on the same Wi-Fi network as your iPhone or iPod touch.
Open your web browser (Safari, Firefox, Internet Explorer, etc.). Enter the URL exactly as it
appears in the Connect panel. Do not close the Connect panel.
3. View your paintings.
In your web browser, click the [PNG] links to view the full-size paintings. You can save the full-
size PNGs by dragging them out of your web browser, or right-clicking (control-clicking) on
them and selecting “Save Image As…”. (The exact details depend on what web browser you’re
using.)
Brushes User’s Guide
26
4. Download .brushes les.
Brushes records all of your actions while painting and saves them in a special .brushes le.
Using the free Brushes Viewer application on a Mac, you can watch replays of your paintings,
generate much higher resolution images, and export movies. To download your .brushes les,
tap the [brushes] links. See the next section, Brushes Viewer, for more details.
5. Stop the web server.
When you are done accessing your paintings from your web browser, tap Done in the
Connect panel. Your paintings will no longer be accessible.
NOTE: Brushes will not allow your iPhone or iPod touch to sleep while the Connect panel is
open. Make sure you close the panel when you are done accessing your gallery, or your
battery will be drained more quickly than usual.
Brushes User’s Guide
27
Brushes Viewer
Brushes Viewer is an application for Mac OS X that allows you to open the .brushes les that
are created by Brushes. See the Sharing with Wi-Fi section to learn how to transfer
the .brushes les from your iPhone or iPod touch to your Mac.
Brushes Viewer will run on Mac OS X 10.5 (Leopard) and higher, on both PowerPC and Intel-
based Macs. To download the latest version of Brushes Viewer, go to:
/>Opening .brushes Files
To open a .brushes le, double-click on it in the Finder or drop it on the Brushes Viewer
application icon. Brushes Viewer will open the painting in a new window. The viewer
generates a preview of the painting from the data in the .brushes le. You can drag the
preview image out of the window and drop it on another app.
Brushes User’s Guide
28
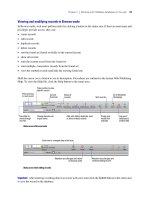
Replaying the Painting
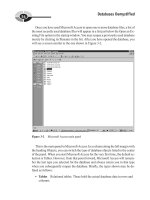
The painting window displays several controls for replaying the painting.
Play. Click here to start
playing the painting.
During replay this button
switches to Pause.
Advance one frame. When
the painting is paused
(and not at the end) this
will display the next
stroke in the painting.
Advance to the nal
frame.
Replay speed.
While the painting is playing, a small triangle will move along the bottom of the preview
image to indicate the progress.
Rotating
If your painting should be in the “landscape” orientation—that is, wider than it is tall—simply tap
the Rotate Left or Rotate Right buttons in the toolbar, or use the menu items in the Tools
menu.
Brushes User’s Guide
29
Exporting an Image
Brushes Viewer can generate images with up to 6x the resolution of native iPhone paintings
(1920 x 2880). To export an image at a higher resolution, click on the Export Image button in
the toolbar or choose File > Export Image…
This sheet will let you choose the export options:
Choose the export size, image format, and image quality, then click Next…
NOTE: Quality is applicable only for the JPEG format, since it uses lossy compression.
Choose a lename in the save panel, and click Save. While the image is being exported you
will see a sheet indicating the progress.
NOTE: Exporting at high resolution, or exporting paintings with many strokes, may take some
time.
Brushes User’s Guide
30
Exporting a Movie
Brushes Viewer can also generate movies from your painting. Each stroke in your painting
becomes a frame in the movie. To export a movie, click on the Export Movie button in the
toolbar or choose File > Export Movie…
This sheet will let you choose the export options:
You can export movies at up to 3x the resolution of a native iPhone painting (960 x 1140).
Choose the export size, compression type, quality, and frame rate, then click Next…
Choose a lename in the save panel, and click Save. While the movie is being exported you
will see a sheet indicating the progress.
NOTE: If your painting has many strokes, exporting a movie may take some time, and the
resulting le may be quite large (depending on the settings).
Brushes User’s Guide
31