Pro MySQL experts voice in open source phần 7 docx
Bạn đang xem bản rút gọn của tài liệu. Xem và tải ngay bản đầy đủ của tài liệu tại đây (496.26 KB, 77 trang )
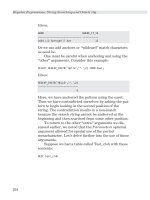
Listing 12-12. Output of a View with a HAVING Clause
mysql> SELECT * FROM small_ship_dates;
+ + +
| ship_date | number_of_orders |
+ + +
| 2005-08-27 | 1 |
| 2005-08-28 | 1 |
| 2005-08-31 | 1 |
| 2005-09-10 | 1 |
| 2005-09-27 | 1 |
+ + +
5 rows in set (0.00 sec)
Unioned Tables
Views can also be created by two or more SELECT statements joined together with a UNION
statement. As explained in Chapter 7, the UNION statement allows you to join multiple queries
that have the same fields.
To illustrate how multiple SQL statements might be joined with a UNION, suppose our
online ordering system forwards the order to a certain fulfillment center based on the geo-
graphic location of the person placing the order. Each center keeps a separate record of the
customers. We want to provide a way to query customers across all centers, so we pull their
databases onto a single server and create a view that centralizes their databases onto a single
table using a UNION statement. Listing 12-13 shows a sample of the customer table from the
region 1 database.
Listing 12-13. Sample Customer Database from Region 1
mysql> SELECT * FROM region1.customer;
+ + +
| customer_id | name |
+ + +
| 1 | Mike |
| 2 | Jay |
+ + +
2 rows in set (0.00 sec)
We can easily create a view that pulls data from all three regions with the CREATE statement
shown in Listing 12-14.
Listing 12-14. Creating a View with UNION
mysql> CREATE VIEW all_customers AS
SELECT * FROM region1.customer
UNION SELECT * FROM region2.customer
UNION SELECT * FROM region3.customer;
CHAPTER 12 ■ VIEWS430
505x_Ch12_FINAL.qxd 6/27/05 3:32 PM Page 430
A simple SELECT statement will now present results from all three tables, as shown in
Listing 12-15.
Listing 12-15. Output of Selecting from the View Created with UNION
mysql> SELECT * FROM all_customers;
+ + +
| customer_id | name |
+ + +
| 1 | Mike |
| 2 | Jay |
| 3 | Johanna |
| 4 | Michael |
| 5 | Heidi |
| 6 | Ezra |
+ + +
6 rows in set (0.00 sec)
Listing 12-15 offers a convenient snapshot of the customer data pulled from the three
different regions. The view might be more useful if, along with the combined data, we also
included the data source for each customer record. Listing 12-16 presents a statement for
creating a view that will include a column indicating from which region the customer record
originates.
Listing 12-16. Creating a UNION View with a Data Source
mysql> CREATE OR REPLACE VIEW all_customers (region, customer_id, name) AS
SELECT 1, customer_id, name FROM region1.customer
UNION SELECT 2, customer_id, name FROM region2.customer
UNION SELECT 3, customer_id, name FROM region3.customer;
The output from a simple SELECT statement applied to the all_customers table now
includes the number of the region where the data resides, as shown in Listing 12-17.
Listing 12-17. Output of a UNION View with a Data Source
mysql> SELECT * FROM all_customers;
+ + + +
| region | customer_id | name |
+ + + +
| 1 | 1 | Mike |
| 1 | 2 | Jay |
| 2 | 3 | Johanna |
| 2 | 4 | Michael |
| 3 | 5 | Heidi |
| 3 | 6 | Ezra |
+ + + +
6 rows in set (0.00 sec)
CHAPTER 12 ■ VIEWS 431
505x_Ch12_FINAL.qxd 6/27/05 3:32 PM Page 431
Check Options
When creating an updatable view (a view that is part of an UPDATE, INSERT, or DELETE state-
ment, as described in the next section), MySQL allows you to specify how much the parser will
do when processing an update. This is done with the WITH CHECK OPTION syntax tacked onto the
end of your SQL statement when creating a view. Enabling check options tells the parser to
review the WHERE clause that defines the view when processing a statement to update a record
or set of records in the view. With check options enabled, you aren’t allowed to insert, update,
or delete any records from the view (and subsequently the underlying table) unless the INSERT,
UPDATE, or DELETE statement affects rows available within the view.
Two keywords can be added to the WITH CHECK OPTION statement: LOCAL and CASCADING.
The default, LOCAL, tells the query parser that when a user is attempting to update a view, a
check should be made of the SELECT statement that defines the view to ensure that the data
being updated is part of the view. Consider a previous example from Listing 12-2, which cre-
ated a view to display customer records from region 1. The view is updatable, but its CREATE
statement doesn’t include the CHECK OPTION syntax. In this case, a user can create an entry in
the table for region 2, even though the view doesn’t permit the user to see customers from
region 2. Listing 12-18 shows the CREATE statement with the WITH LOCAL CHECK OPTION set to
limit updates.
Listing 12-18. Creating a View with Check Options
mysql> CREATE OR REPLACE VIEW customer_region1 AS
SELECT customer_id, name, region FROM customer
WHERE region = 1 WITH LOCAL CHECK OPTION;
An attempted update to the customer_region1 view to set the region to a value not
included in the view results in a MySQL error is shown in Listing 12-19.
Listing 12-19. Illegal Update of a View with Check Options
mysql> UPDATE customer_region1 SET region = 2 WHERE customer_id = 1;
ERROR 1369 (HY000): CHECK OPTION failed 'shop.customer_region1'
■Note WITH CHECK OPTION is used with only an updatable view. If the algorithm is set to TEMPTABLE,or
the SQL statement uses syntax or a keyword that makes the view not updatable, specifying
WITH CHECK
OPTION
will result in a MySQL error: ERROR 1368 (HY000) at line 5: CHECK OPTION on ➥
non-updatable view.
CHAPTER 12 ■ VIEWS432
505x_Ch12_FINAL.qxd 6/27/05 3:32 PM Page 432
The CASCADING option checks both the current view, and if the current view is based on
another view, the check looks at that view as well to verify that the change conforms to the
view definition. With the CASCADING keyword, the query parser continues down through all
views until the parser reaches a table to verify that all column and row changes that are in the
issued statement are defined in the hierarchy of views. Creating views based on other views
is covered in the “Defining Views of Views” section later in this chapter.
■Caution The CASCADE modifier to WITH CHECK OPTION is not part of the SQL:2003 specification. Use of
this option, while helpful for views of views, may result in incompatible
CREATE statements in other database
systems.
Creating Updatable Views
Depending on the complexity of your views, you may be able to create views that can do more
than provide output of data. Views in MySQL are meant to be updatable, as long as the SQL
statement that creates the view doesn’t represent the underlying tables in such a way that an
update to the underlying data would be impossible to map through the view. We use the term
updatable to mean that a view can be a part of an UPDATE, an INSERT, or a DELETE statement.
To be updatable, the records in the view must have a one-to-one relationship with the
records in the underlying tables. Beyond that general restriction, a few other rules determine
if a view can be updated. The easiest way to describe what kinds of views are updatable is to
define the conditions under which a view becomes disqualified from being updatable. Views
are not updatable in the following cases:
• The view is created with the algorithm specified as TEMPTABLE.
•A table in the FROM clause is reference by a subquery in the WHERE statement.
• There is a subquery in the SELECT clause.
• The SQL statement defining the view joins tables.
•One of the tables in the FROM clause is a non-updatable view.
• The SELECT statement of the view contains an aggregate function such as SUM(),
COUNT(), MAX(), MIN(), and so on.
• The keywords DISTINCT, GROUP BY, HAVING, UNION, or UNION ALL appear in the defining
SQL statement.
As MySQL parses the query, it will consider the rules and mark the view as non-updatable
if any of the conditions are met. If none of these conditions is met, you will have an updatable
view.
CHAPTER 12 ■ VIEWS 433
505x_Ch12_FINAL.qxd 6/27/05 3:32 PM Page 433
To illustrate, let’s go back to our example where we created a view to control which cus-
tomers could be viewed for employees in different regions. The data in the customer table is
shown in Listing 12-20.
Listing 12-20. Records in the customer Table
+ + + +
| customer_id | region | name |
+ + + +
| 1 | 1 | Mike |
| 2 | 1 | Jay |
| 3 | 2 | Johanna |
| 4 | 2 | Michael |
| 5 | 3 | Heidi |
| 6 | 3 | Ezra |
+ + + +
Creating a view that shows just the records from region 3 will give us a one-to-one rela-
tionship between the records in the view and those in the customer table. Listing 12-21 shows
the creation of the customer_region3 view.
Listing 12-21. Creating an Updatable View
CREATE OR REPLACE VIEW customer_region3 AS
SELECT customer_id, name, region FROM customer
WHERE region = 3 WITH LOCAL CHECK OPTION;
A SELECT statement of all the records in this view shows that we’re getting only the appro-
priate records, as shown in Listing 12-22.
Listing 12-22. Records in the customer_region3 View
mysql> SELECT * FROM customer_region3;
+ + + +
| customer_id | name | region |
+ + + +
| 5 | Heidi | 3 |
| 6 | Ezra | 3 |
+ + + +
2 rows in set (0.00 sec)
Because this view doesn’t violate any of the criteria for creating an updatable view, we are
allowed to update one of the records:
mysql> UPDATE customer_region3 SET name = 'David' WHERE customer_id = 6;
Query OK, 1 row affected (0.01 sec)
CHAPTER 12 ■ VIEWS434
505x_Ch12_FINAL.qxd 6/27/05 3:32 PM Page 434
If we had specified TEMPTABLE as the algorithm, or had used some other syntax that would
cause the parser to mark the view as non-updatable, we would have a different response to
our attempt to update:
mysql> UPDATE customer_region3 SET name = 'David' WHERE customer_id = 6;
ERROR 1288 (HY000): The target table customer_region3 of the UPDATE is not updatable
Becoming familiar with the different rules for making a view updatable takes some time
and practice. For more reading on MySQL’s view implementation and the rules regarding
updatable views, see
Defining Views of Views
Not only does MySQL allow you to create virtual representations of data in tables, you can also
create a virtual representation of a view, or a view of a view. This can go as many levels deep as
you can maintain.
Creating a view of a view is identical to creating a view of a table. You use the same CREATE
➥
VIEW statement, but instead of naming a table in the SQL statement, you use the name of a view.
A view of a view can be a handy way to create cascading levels of access to data. One sce-
nario might involve a table filled with customer order and payment information. At the global
level, you might have a view that excludes payment information, for the global support staff.
At the regional level, you might provide two views: one with all information for a particular
region and a second view of everything except for the payment information. This scenario is
outlined in Table 12-1.
Table 12-1. Cascading Levels of Information for an Online Ordering System
View Name Staff Position Available Information
manage_all_orders Global manager Customer number, address, ordered
items, payment information for all
regions
support_all_orders Global customer support Customer number, address, ordered
items for all regions
manage_region_orders Regional manager Customer number, address, ordered
items, payment information for single
region
support_region_orders Regional customer support Customer number, address, ordered
items for single region
As discussed earlier in the section on creating views, the CASCADING parameter of WITH ➥
CHECK OPTION is designed to ensure that when you are using views of views, the statement
checks to determine if permissions on making updates to a table will cascade down through
all the view levels. As the check moves down through the levels of views, it checks to make sure
the INSERT, UPDATE, or DELETE operation is being made on data that is available in your view.
As you add more layers with views, it’s important to consider performance issues with
views. View performance is discussed near the end of this chapter. Also, consider if using
views of views adds an extra layer of unnecessary complexity.
CHAPTER 12 ■ VIEWS 435
505x_Ch12_FINAL.qxd 6/27/05 3:32 PM Page 435
Managing Views
Once you have a set of views in place, you’ll likely need to manage those views. MySQL pro-
vides commands to display, change, and remove views.
Displaying Views
You can use the SHOW CREATE VIEW command to view the entire CREATE syntax used when cre-
ating a view:
SHOW CREATE VIEW [<database name>.]name
Listing 12-23 displays the output from the SHOW CREATE VIEW for the all_customers view
(using the \G option for output in rows).
Listing 12-23. Output of SHOW CREATE VIEW
mysql> SHOW CREATE VIEW all_customers\G
*************************** 1. row ***************************
View: all_customers
Create View: CREATE ALGORITHM=UNDEFINED VIEW `shop`.`all_customers`
AS select 1 AS `region`,`region1`.`customer`.`customer_id`
AS `customer_id`,`region1`.`customer`.`name`
AS `name` from `region1`.`customer`
union select 2 AS `2`,`region2`.`customer`.`customer_id`
AS `customer_id`,`region2`.`customer`.`name`
AS `name` from `region2`.`customer`
union select 3 AS `3`,`region3`.`customer`.`customer_id`
AS `customer_id`,`region3`.`customer`.`name`
AS `name` from `region3`.`customer`
1 row in set (0.00 sec)
SHOW CREATE VIEW doesn’t produce the most readable output (we’ve inserted some line
breaks for formatting), but it will provide you with a statement that can be used to re-create
the view. If you require something more readable, and are more interested in seeing the col-
umn names and data types, the DESCRIBE statement works on a view just as it does on a table.
Listing 12-24 shows the output from a DESCRIBE on the all_customers table.
Listing 12-24. Output of DESCRIBE all_customers
mysql> DESCRIBE all_customers;
+ + + + + + +
| Field | Type | Null | Key | Default | Extra |
+ + + + + + +
| region | bigint(20) | NO | | 0 | |
| customer_id | int(11) | NO | | 0 | |
| name | varchar(10) | YES | | NULL | |
+ + + + + + +
3 rows in set (0.00 sec)
CHAPTER 12 ■ VIEWS436
505x_Ch12_FINAL.qxd 6/27/05 3:32 PM Page 436
One other place to find information about your views is in the data dictionary file. The data
dictionary file is stored in the directory with the data files for the database. The view name is
used to name the .frm file. If your data directory is /data/mysql, the ship_summary view diction-
ary file can be found at /data/mysql/shop/ship_summary.frm. A look inside this file reveals
numerous expected fields and values, plus some additional ones, as shown in Listing 12-25.
Listing 12-25. The ship_summary.frm Data Dictionary File
shell> cat /data/mysql/shop/ship_summary.frm
TYPE=VIEW
query=select `shop`.`cust_order`.`ship_date` AS `date`,
count(`shop`.`cust_order`.`ship_date`) AS `number_of_orders`
from `shop`.`cust_order`
group by `shop`.`cust_order`.`ship_date`
md5=492eb8a32a6bd3b57b5f9f73be4db621
updatable=0
algorithm=1
with_check_option=0
revision=1
timestamp=2005-04-27 19:44:43
create-version=1
source=CREATE ALGORITHM = TEMPTABLE VIEW ship_summary\n
(date,number_of_orders) AS\n
SELECT ship_date, count(ship_date)\n
FROM cust_order\n
GROUP BY ship_date
The TYPE, updatable, algorithm, with_check_option, and source fields contain values we
set and would expect to be in the definition. The following fields are used internally by
MySQL, but they can provide valuable information:
• query: This information is the internal representation of the view’s SELECT statement.
• md5: This field stores a hash of the view for verification that the data dictionary hasn’t
changed.
• revision: This keeps track of the version number of the view.
• timestamp: This maintains the date and time of the CREATE or last ALTER statement.
• create-version: This is always set to 1 and doesn’t appear to be currently in use, but
perhaps will serve a purpose in the future.
■Note You may notice that in the ship_summary.frm data dictionary file, the query field looks different
from the source. When MySQL gets the
CREATE statement, it takes the field labels specified after the view
name and maps them to the
<column name> AS <label> syntax for internal use. While we continue to
recommend using the label definitions instead of the
AS statement, it is interesting to see how MySQL trans-
forms the
CREATE statement for internal use. In this case, we’re seeing the syntax of the SQL:2003 standard
being mapped to the syntax understood by the existing MySQL query parser.
CHAPTER 12 ■ VIEWS 437
505x_Ch12_FINAL.qxd 6/27/05 3:32 PM Page 437
Changing Views
The ALTER VIEW statement is the same as the CREATE statement, except for the omission of
the OR REPLACE option. In fact, the ALTER VIEW statement does the same thing as CREATE OR
➥
REPLACE, except that in the case of ALTER, a view of the same name must already exist. Lack of
a view with the same name will result in a MySQL error. In altering a view, you are required to
specify the attributes, columns, and SQL statement. None of these items is required to stay the
same as the currently defined view, except for the name. The full ALTER statement looks like this:
ALTER [<algorithm attributes>] VIEW [<database>.]< name> [(<columns>)] AS
<SELECT statement> [<check options>]
The algorithm attributes, database, name, columns, SELECT statement, and check options
are covered in detail in the previous section detailing the syntax of the CREATE statement.
To demonstrate using the ALTER VIEW command, suppose the customer support staff has
been using the view created in Listing 12-16, which uses a UNION of multiple customer tables,
but now they have started complaining about it. They would like to see the following changes:
• The query results return a region number, but the regions had been recently assigned
names, and nobody remembers the region numbers anymore. Rather than seeing
region numbers in their SELECT statements, they want to have the appropriate region
name instead.
•Case-sensitivity issues involving the customer table’s name have prompted requests to
capitalize the output of the name column (the names are being used to programmati-
cally compare customer data with names from a purchased mailing list).
• The shipping labels have problems if the names are too long, prompting a request to
provide a column highlighting the name length, so they can scan down and ensure
none of the labels will be misprinted.
All of these requests are easy to accommodate with a few changes to the previous view
definition: change the region to the appropriate names, add a function that changes the name
to uppercase, and add a new column that is a count of the characters in the name column.
The ALTER VIEW statement to make these changes is shown in Listing 12-26.
Listing 12-26. ALTER VIEW Statement
mysql> ALTER VIEW all_customers (region,customer_id,name,name_length)
AS SELECT 'northeast', customer_id, upper(name), length(name) FROM region1.customer
UNION SELECT 'northwest', customer_id, UPPER(name), LENGTH(name)
FROM region2.customer
UNION SELECT 'south', customer_id, upper(name), length(name) FROM region3.customer;
Now the customer support folks will be happier with the query results, and perhaps be
less prone to making mistakes with the zones and package labels. Listing 12-27 shows the
output of the altered view.
CHAPTER 12 ■ VIEWS438
505x_Ch12_FINAL.qxd 6/27/05 3:32 PM Page 438
Listing 12-27. Output from the Altered View
mysql> SELECT * FROM all_customers;
+ + + + +
| region | customer_id | name | name_length |
+ + + + +
| northeast | 1 | MIKE | 4 |
| northeast | 2 | JAY | 3 |
| northwest | 3 | JOHANNA | 7 |
| northwest | 4 | MICHAEL | 7 |
| south | 5 | HEIDI | 5 |
| south | 6 | EZRA | 4 |
+ + + + +
6 rows in set (0.00 sec)
■Note Listings 12-26 and 12-27 demonstrate a simple example of using functions in the view definition to
create new data, which isn’t part of the underlying tables. In the
all_customers view, the name_length
column doesn’t exist in the underlying tables, but is the value returned from a function. Views are an excel-
lent way to present new results derived from performing functions on or calculations with existing data.
Removing Views
To delete a view, use the DROP VIEW command. As with all DROP commands (index, table, proce-
dure, database, and so on), DROP VIEW takes one argument: the name of the view to be dropped.
DROP VIEW [IF EXISTS] [<database>.]<name>
For example, to drop the all_customers view, issue this statement:
mysql> DROP VIEW all_customers;
A database name can be prepended to the view name if you want to be explicit or are
dropping a view in a database other than the current, active database. You can add the
IF EXISTS syntax if you would like to prevent an error from occurring if the view does not
exist. A warning is generated when removing a nonexistent view with the IF EXISTS syntax.
■Tip When a view is altered or replaced, MySQL makes a backup copy of the data dictionary file in
<datadir>/<database name>/arc.A copy is not made when the view is dropped. If you accidentally drop
a view, check the
arc directory for an old copy that was saved on an ALTER or REPLACE operation. You may
be able to use that copy for re-creating the view.
CHAPTER 12 ■ VIEWS 439
505x_Ch12_FINAL.qxd 6/27/05 3:32 PM Page 439
View Permissions
Permissions on views are fairly straightforward. To create views, you must have the CREATE VIEW
privilege in the database where you are creating a new view. In addition, the creator must have
some privilege on each of the columns specified to be used in the view output, and SELECT privi-
lege for columns used in the WHERE clause of the SQL statement that is a part of the view creation.
To use the ALTER VIEW statement, you must have CREATE VIEW and DROP privileges for the
view you’re attempting to change. As when you’re creating a view, you must have permissions
on the underlying table.
When removing a view, you are required to have the DROP privilege for the view. The DROP
privilege can be granted globally in the mysql.user table or for a specific view in the
tables_priv table.
To use a view, users can be granted SELECT privileges for a specific view, and they can then
select from that view without having any additional privileges on the underlying tables:
GRANT SELECT ON shop.all_customers TO mkruck@localhost;
To update the data in a view, the updating user needs to INSERT, UPDATE, or DELETE permis-
sions on the underlying table or tables to be changed. Managing table permissions is covered
in Chapter 15.
Performance of Views
Perhaps you’re wondering what kind of impact going through a view to the data will have on
the performance of your SQL statements.
First, it’s important to remember that the performance of a view is not going to be any
better than the performance of the underlying tables. If your tables aren’t optimized, or are
organized poorly, a view to clean things up might help the interface, but it won’t help perform-
ance of your queries.
Second, views rely on the indexes of the underlying tables. If your view is created on a
table with ten million records, using a WHERE clause referencing columns without indexes, the
view will perform just as poorly as the query. For the best performance, indexes on underlying
tables should be designed to match the SELECT statement used in defining views.
■Note Views do not have indexes of their own. They rely on the indexes of the underlying tables to provide
optimized lookups.
If your data is well organized and your indexes are in good condition, your views will per-
form well. In essence, when using the MERGE algorithm, MySQL creates a new, single query, which
pulls the appropriate data from the table or tables. There is minimal processing between the
view and the data, meaning your query can execute quickly without a lot of layers or logic to go
through to get to the data. In addition, queries against views are stored in the buffer subsystem
and query cache, if enabled. This means that, in some instances, your query of a view doesn’t
even look at the view or underlying table, but goes directly to the query cache. (See Chapter 4
for more information about MySQL’s buffer subsystem and query cache.)
CHAPTER 12 ■ VIEWS440
505x_Ch12_FINAL.qxd 6/27/05 3:32 PM Page 440
You will see more of a performance hit if your view uses the TEMPTABLE algorithm. As
explained earlier in the chapter, using this method, the database first retrieves the records
from the underlying tables and puts them in a temporary table, where it then runs the incom-
ing SELECT statement. Depending on the size of your underlying tables, creating and populating
a temporary table can be a significant performance hit.
Running Performance Tests
We ran a number of tests to try to get a sense of the performance implications of using views.
For SELECT, INSERT, UPDATE, and DELETE, we ran a million statements into the database and
averaged the amount of queries processed every second, both when running directly against
the customer table and when running against a view of the customer table, customer_view. The
SELECT statement grabbed all rows in the customer table or customer_view view, sending the
output of eight records into a log file a million times. The INSERT created a million new cus-
tomer records in the customer table or customer_view view, and the UPDATE performed a
million updates on existing records in the customer table or customer_view view. The DELETE
statement removed all million customer records, one at a time. The customer table uses the
MyISAM storage engine.
The metrics were performed on MySQL 5.0.2, running on a single AMD64 2800+, with
1GB of RAM and a 10,000 RPM SCSI data disk. The database is the prebuilt binary for AMD64
and was configured with all default options (no .my.cnf file used on startup), except for when
using the query cache, where the only configuration item was query_cache_size=1000000.
(See Chapter 14 for details on configuring MySQL.) Table 12-2 shows the results in queries
per second.
Table 12-2. Performance Tests for MySQL Views
SQL Statement Queries/Second on Table Queries/Second on View
Select all rows in customer table, 11,494 7,936
query cache disabled
Select all rows in
customer table, 21,052 21,052
query cache enabled
Insert
customer record 16,694 10,111
Update
customer record 17,241 9,803
Delete customer record 13,698 8,984
Both the insert and update metrics are against views with simple definitions, not including
WHERE clauses and check options. We ran some additional tests, using a view with a definition
that included a WHERE clause and check options. The difference between a simple view and a
complex view was negligible, adding only a total of five or six seconds when processing a mil-
lion records.
We also tested the performance of views of views and found that adding in another view
layer was comparable to the difference between the table and the first view, meaning that
every view you add will decrease your performance by that much again.
We did not perform tests with views that used temporary tables. Why? We really wanted
to get at how much overhead it takes for MySQL to process a SQL statement, merge it with the
view definition, and return results from the new statement. When you use views with temporary
CHAPTER 12 ■ VIEWS 441
505x_Ch12_FINAL.qxd 6/27/05 3:32 PM Page 441
tables, performance is largely affected by how much data is in your tables. The bottom line is
that test results on temporary tables will be more useful if the tests are performed in your
environment.
Using EXPLAIN
As with queries against tables, you can use the EXPLAIN syntax on a query of a view:
EXPLAIN SELECT * FROM all_orders WHERE customer_id = 1;
The output of the EXPLAIN will reflect the indexes of the underlying tables, not the view
itself, as views do not have indexes. See Chapters 6 and 7 for details on interpreting the output
of EXPLAIN.
Summary
In this chapter, we’ve introduced you to the general concept of views, and some ideas for gen-
eral application of view technology. We discussed the views as implemented by MySQL and
dug into the details of creating and maintaining views. We also went through the updatable
nature of views, using views of views, and performance issues in implementing a view of a real
table. The examples throughout this chapter demonstrated the power of using views in your
application.
As we’ve emphasized throughout the book, it is always important to make technology a
part of your larger application, or even organizational, plans. Using views can be extremely
helpful, but can also cause problems if they aren’t the right fit for the particular need. Always
make an assessment of the organizational, application, and data needs before jumping to a
conclusion about which technology to implement to meet that need.
That being said, views can be a lifesaver to a database administrator, application developer,
end user, or anyone who comes in contact with your database or data. The ability to rearrange,
compile, combine, limit, relabel, hide, and sort data in virtual tables opens up endless possibili-
ties in meeting the demands of your data destinations.
CHAPTER 12 ■ VIEWS442
505x_Ch12_FINAL.qxd 6/27/05 3:32 PM Page 442
Triggers
With the introduction of triggers in versions 5.0.2 and greater, MySQL provides more built-in
support for helping you manage changes to your data. Triggers are a powerful tool for associ-
ating a set of SQL statements with a particular event in your database. As with the other new
features we covered in the previous chapters—stored procedures, stored functions, and cur-
sors—triggers are available in other database systems, such as DB2, Oracle, SQL Server, and
PostgreSQL.
We have a lot of ground to cover in using MySQL’s trigger functionality. This chapter will
discuss the following topics:
•Database trigger basics
• The advantages and disadvantages of using triggers
•MySQL’s implementation of triggers
• How to create triggers
• An example of using triggers
•Trigger permissions
•Performance of triggers
Database Triggers
A database may process changes to its data on the order of thousands of requests per second.
Each request may INSERT, ALTER, or DELETE data from any number of tables. While this possibil-
ity of robust data management is what brought a database into the picture in the first place, it
stands to reason that with each change in the data, you may want to associate particular pieces
of logic. Perhaps you want to avoid inconsistencies by doing some extra data validation before
saving a row. Maybe you would also like to keep track of changes in your tables by saving the
current values into an audit table, before the data changes are made to the table.
Prior to version 5.0.2, you could rely on MySQL to ensure columns matched, and even use
foreign key restraints to ensure integrity, but any further validation would be left to the appli-
cation. Maintaining an audit table would require the application to load the rows that would
be affected by the change prior to making the INSERT, UPDATE, or DELETE; save those rows to the
audit table; and then perform the changes in the data. With MySQL version 5.0.2 and later, you
can now accomplish these tasks with triggers.
443
CHAPTER 13
■ ■ ■
505x_Ch13_FINAL.qxd 6/27/05 3:34 PM Page 443
A trigger is a statement, or set of statements, that is stored and associated with a particu-
lar event happening on a particular column or table. The current SQL standard, SQL:2003,
specifies that the events allowed to activate a trigger are INSERT, UPDATE, or DELETE. The inten-
tion is to provide a mechanism to run any number of SQL statements whenever data changes
in a given table as a result of one of the activating events. When the specified event occurs, the
trigger is activated, and the statements defined in the trigger are run—either before or after
the event, based on the definition of the trigger. Additionally, triggers are similar to stored pro-
cedures in that you can tap into the power of variables and control structures when creating
the body of the trigger.
Before we look at more details of how MySQL implements triggers, let’s consider the pros
and cons of using triggers in your database applications.
■Note As we write this chapter, MySQL has released version 5.0.6, which is labeled a beta release. While
the database is stable enough to test and document the functionality of triggers, production users are
encouraged to wait until a release of the 5.0.x branch that is labeled for production.
The Debate Over Using Triggers
As you might expect, some application developers and database administrators believe that
using triggers is good practice, and others are passionately against it. A review of some of the
arguments both for and against triggers will give you a sense of the strengths and weaknesses
of development that relies on having triggers in the database. As with all technologies, you
need to determine how your unique application might benefit or suffer from using triggers.
The statements for and against triggers are not MySQL-specific, and include points
pertaining to triggers in general, across all varieties of database systems. Thus, some of the
arguments might apply specifically to functionality available in other database systems but
not currently available in MySQL.
■Note The debate over whether to use a specific technology is often based on favorable or unfavorable
experience with that technology, which may include forced use of technology where it was actually inappro-
priate. This can lead to some vehement and emotional opinions about how useful and appropriate a particular
technology is for an application. When making decisions on how to use technology, you should attempt to be
objective and see both sides of the argument, focusing on how the technology might meet the requirements
for your database or application needs.
CHAPTER 13 ■ TRIGGERS444
505x_Ch13_FINAL.qxd 6/27/05 3:34 PM Page 444
Trigger Advantages
Since this chapter is about using triggers, let’s start with a review of the reasons you may find
triggers appropriate for your database:
•Triggers provide a complementary, and more robust, integrity checking mechanism to
foreign keys. Triggers can check more than just the presence of a certain foreign key;
they can verify that the foreign key record has certain other characteristics. Using the
advanced capabilities for integrity checking available with triggers, you can avoid
needing to put some or all data integrity checks in your application.
•You can catch business process errors using triggers. This goes beyond simple data
validation and into the enforcement of more complex rules. For example, if you want
to limit the number of unprocessed orders for an individual customer to five, a trigger
on INSERT could check to make sure there weren’t already five unprocessed orders.
• When enforcing complex rules with triggers, you ensure that in every case where a
change is made, the trigger code is run. If the data rules were contained only in the
code that makes up your web-based application, any changes made in the database
from the MySQL client tools or from other programs outside your web pages wouldn’t
get the same functionality.
•If scheduled tasks or scripts run periodically to perform checks or cleanup of data, trig-
gers can provide a method to put those checks directly in the database. This means you
don’t need to wait for the cron task to run to have the data changed. One example of
this is a cache table that removes expired entries when a new entry is inserted.
•If you need to make changes in one table based on changes in another table, a trigger
handles moving the existing values into a new table more efficiently than the applica-
tion can. An example might be a customer_history table that keeps track of all changes
in the customer table. Before you change a customer record, you write a record to the
customer_history table with the current field values. If you were to put this kind of
functionality in the application, you would need to first select the row of the customer
table and insert the values into the customer_history table before updating the
customer record. That involves execution of three queries from your application. With
a trigger, this functionality is handled in the database, and the application only needs
to send the UPDATE statement.
•Triggers are useful if you need to perform a calculation before inserting or updating a
row. For example, you might want to calculate the total cost based on the item cost and
the shipping, and insert that value in another column. A trigger can take care of auto-
matically calculating and setting the value for the total cost column.
Before you run off to your database and start moving your validation and business logic
into database triggers, let’s consider the reasons why you might not want to use triggers.
CHAPTER 13 ■ TRIGGERS 445
505x_Ch13_FINAL.qxd 6/27/05 3:34 PM Page 445
Trigger Disadvantages
Although there aren’t as many arguments against using triggers as there are in favor, you
should nonetheless weigh them carefully:
• While triggers might provide extended validation, they aren’t a replacement for all vali-
dation. For instance, using a client-side scripting language to validate a web form is a
simple, user-friendly way to alert the user of an issue, without needing to submit the
form. In most cases, going all the way from the user’s browser through the network and
application to the database just to validate a form field doesn’t make a lot of sense.
• The proliferation of triggers across many tables could result in a situation where a
change in one table sets off a chain of trigger activations that are ultimately difficult
to track and therefore hard to debug. An example might be an update in the customer
table that triggers a change in the address table that activates a trigger in the order
table. If one of the triggers is dropped, or has a bug in how it processes data, tracking
down a problem spread across many triggers on a number of tables can quickly turn
into a nightmare.
•Development tools for triggers aren’t as slick and sophisticated as application develop-
ment tools. If you need a proven development environment for developing your business
logic, the tools for writing database triggers won’t be as readily available as tools for writing
business logic in languages such as PHP, Perl, and Java.
•Editing a PHP script on the file system is more straightforward than getting the trigger
statement out of the database, making changes, and going through the steps to drop
and re-create the trigger.
■Note Chapter 9 includes a discussion regarding the practicality of using stored procedures. That discus-
sion contains a number of points similar to the arguments presented in this chapter for using triggers, and
might provoke some additional thoughts on how to decide to use database technology.
Triggers in MySQL
MySQL aims at using the SQL standards when implementing new or updating existing func-
tionality. MySQL triggers adhere to this rule. With one exception—the use of the NEW and OLD
keywords—the syntax used in MySQL matches the syntax defined for the SQL:2003 standard.
However, there is syntax in the standard that MySQL doesn’t support, such as the ATOMIC and
REFERENCING keywords, the ability to specify column names for an UPDATE trigger, and a WHERE
clause for conditional checks.
If you’re coming from another database environment where you’ve used triggers, you may
find that MySQL’s implementation is similar. In most cases, the MySQL syntax is a smaller sub-
set of the functionality that is used elsewhere.
1
Most database systems have trigger support
with helpful syntax extensions, which are not available in MySQL.
CHAPTER 13 ■ TRIGGERS446
1. While the concepts for creating triggers are similar, SQL Server has a unique syntax for creating trig-
gers that differs from the syntax in the current documentation for Oracle, DB2, and PostgreSQL.
505x_Ch13_FINAL.qxd 6/27/05 3:34 PM Page 446
MySQL triggers are independent of the storage engines used to store the data. They can
be used with any of the available storage engines. (See Chapter 5 for details on MySQL storage
engines.)
In MySQL, triggers are stored in <data directory/<database name>/<table name>.TRG, a
text file that contains the definitions of all triggers created for events on that table. This file can
contain multiple trigger definitions, which are added to and removed from the file as they are
created and dropped from the MySQL client. Since the file is plain text, it is possible to view
the file in a text viewer or editor. Within the file, you’ll find triggers=, followed by numerous
trigger statements, each surrounded in single quotation marks. Be warned, with longer trigger
definitions, the file becomes seriously unreadable.
■Caution We advise against editing the .TRG file manually with a text editor. It can be done, but direct
editing of the
.TRG file could lead to problems in future versions of MySQL if the internal storage mechanism
or format changes.
MySQL triggers are loaded into the database memory when they are created or when the
database is started. Each time an update is made that activates the trigger, the SQL statements
of the trigger are already in memory and don’t need to be read from the trigger file.
When you’re using triggers in MySQL, you should be aware of the following restrictions:
•Triggers cannot call stored procedures.
2
•Triggers cannot be created for views or temporary tables.
•Transactions cannot be started or ended within a trigger. This means you can’t do
something like start a transaction in your application, and then close the transaction
with a COMMIT or ROLLBACK statement from within the trigger. (See Chapter 3 for details
on MySQL transactions.)
•Creating a trigger for a table invalidates the query cache. If you rely heavily on the query
cache, be warned that queries being pulled from the cache will need to be regenerated
from the data tables after a trigger is created. (See Chapter 4 for details on the query
cache.)
•Triggers share table-level namespaces. This means that currently you can’t have two
triggers with the same name on a particular table. MySQL encourages using unique
trigger names across an entire database, should the namespace be moved to the data-
base level.
3
CHAPTER 13 ■ TRIGGERS 447
2. We found that you can actually put the CALL statement in a trigger, but when the trigger fires, it fails
on a procedure does not exist error, even if the procedure exists and can be called from outside the
trigger.
3. The SQL:2003 specification calls for the trigger namespace to be at the database level. MySQL hints at
a future release moving the trigger namespace to the database level, requiring unique trigger names
across an entire database, not just for a specific table.
505x_Ch13_FINAL.qxd 6/27/05 3:34 PM Page 447
■Note MySQL is constantly under active development. While we feel it’s important to document the exist-
ing implementation details of triggers in MySQL, we also want to note that the functionality is improving and
will likely mean some of the noted implementation details and limitations will be changed. You can find more
details and current information about MySQL’s trigger implementation at
/>mysql/en/triggers.html.
Now that we’ve gone through the significant pieces that characterize MySQL’s implemen-
tation of triggers, let’s move on to the details of writing SQL to create database triggers.
Creating MySQL Triggers
To get started, let’s go through a simple example. Going back to the scenario introduced earlier
in the chapter, suppose that we need to track changes to our customer table. Rather than need-
ing to program our application to keep a history of the changes, we want to use the database
to take care of the audit trail, creating a record of the current data before it is changed. This
seems like a perfect place to put trigger functionality.
To demonstrate how triggers work, we’ll begin with the same customer table we’ve used in
previous chapters, as shown in Listing 13-1.
Listing 13-1. Records in the customer Table
mysql> SELECT * FROM customer;
+ + +
| customer_id | name |
+ + +
| 1 | Mike |
| 2 | Jay |
| 3 | Johanna |
| 4 | Michael |
| 5 | Heidi |
| 6 | Ezra |
+ + +
6 rows in set (0.00 sec)
In order to keep track of changes in the customer table, we want to add a customer_audit
table. The customer_audit table structure is shown in Listing 13-2.
CHAPTER 13 ■ TRIGGERS448
505x_Ch13_FINAL.qxd 6/27/05 3:34 PM Page 448
Listing 13-2. Description of the customer_audit Table
mysql> DESC customer_audit
+ + + + + + +
| Field | Type | Null | Key | Default | Extra |
+ + + + + + +
| id | int(11) | NO | PRI | NULL | auto_increment |
| action | char(50) | YES | | NULL | |
| customer_id | int(11) | YES | | NULL | |
| name | varchar(50) | YES | | NULL | |
| changed | datetime | YES | | NULL | |
+ + + + + + +
Every time either an UPDATE or DELETE is made to the customer table, we want to record the
action, current customer_id, name, and the time of the change. While doing this in the applica-
tion is possible, it requires getting all matching records before the UPDATE or DELETE statement
and using the application to insert the records into the audit table. With a trigger, the database
can be programmed to take care of creating the log of changes.
To be sure updates are saved as a part of the audit, we create a trigger on the customer
table that will be activated on any UPDATE to the table. Listing 13-3 shows a trigger that is built
to handle updates, named before_customer_update.
Listing 13-3. Creating the before_customer_update Trigger
DELIMITER //
CREATE TRIGGER before_customer_update BEFORE UPDATE ON customer
FOR EACH ROW
BEGIN
INSERT INTO customer_audit
SET action='update',
customer_id = OLD.customer_id,
name = OLD.name,
changed = NOW();
END
//
DELIMITER ;
CHAPTER 13 ■ TRIGGERS 449
505x_Ch13_FINAL.qxd 6/27/05 3:34 PM Page 449
We will look more closely at the CREATE TRIGGER statement shortly. This trigger, as indi-
cated in the CREATE TRIGGER statement, is set to activate prior to an update to records in the
table. The before_customer_update trigger inserts a row into the customer_audit table each
time a record is updated. We can see this in action by issuing an UPDATE statement, as shown in
Listing 13-4.
Listing 13-4. Updating customer Records
mysql> UPDATE customer SET name=UCASE(name);
Query OK, 6 rows affected (0.01 sec)
■Note As of MySQL version 5.0.6, there is a bug with locking the correct tables when a trigger is activated.
If your trigger contains data-changing statements, you will need to lock the tables used in your trigger. For
this example, the
customer and customer_audit tables need to be locked, changing the UPDATE statement
in Listing 13-4 to
LOCK TABLES customer WRITE, customer_audit WRITE; UPDATE customer SET ➥
name = ucase(name); UNLOCK TABLES;. As of this writing, this bug is marked as critical and should be
resolved in an upcoming release.
The UPDATE statement in Listing 13-4 will change all the values in the name column of the
customer table to uppercase, as shown in Listing 13-5.
Listing 13-5. Records in the customer Table After Updating
mysql> SELECT * FROM customer;
+ + +
| customer_id | name |
+ + +
| 1 | MIKE |
| 2 | JAY |
| 3 | JOHANNA |
| 4 | MICHAEL |
| 5 | HEIDI |
| 6 | EZRA |
+ + +
Listing 13-5 demonstrates that the record change to uppercase took effect. Now, let’s see
if the trigger activated and logged the previous record. Listing 13-6 shows the records in the
customer_audit table.
CHAPTER 13 ■ TRIGGERS450
505x_Ch13_FINAL.qxd 6/27/05 3:34 PM Page 450
Listing 13-6. Records in the customer_audit Table After Updating
mysql> SELECT * FROM customer_audit;
+ + + + + +
| id | action | customer_id | name | changed |
+ + + + + +
| 1 | update | 1 | Mike | 2005-05-10 22:20:44 |
| 2 | update | 2 | Jay | 2005-05-10 22:20:44 |
| 3 | update | 3 | Johanna | 2005-05-10 22:20:44 |
| 4 | update | 4 | Michael | 2005-05-10 22:20:44 |
| 5 | update | 5 | Heidi | 2005-05-10 22:20:44 |
| 6 | update | 6 | Ezra | 2005-05-10 22:20:44 |
+ + + + + +
6 rows in set (0.00 sec)
As you can see in Listing 13-6, the customer_audit table contains the previous value for
name and the time it was changed.
As part of our audit trail, we also want to keep track of any records that are removed from
the customer table. The before_customer_delete trigger defined in Listing 13-7 does this for
deletions to the customer table.
Listing 13-7. Creating the before_customer_delete Trigger
DELIMITER //
CREATE TRIGGER before_customer_delete BEFORE DELETE ON customer
FOR EACH ROW
BEGIN
INSERT INTO customer_audit
SET action='delete',
customer_id = OLD.customer_id,
name = OLD.name,
changed = NOW();
END
//
DELIMITER ;
Listing 13-7 looks a lot like the before_customer_update trigger, but the trigger is modified
to respond to DELETE statements against the customer table. Before any row is deleted from the
customer table, a record is inserted into the customer_audit table with the values of that row.
To test the trigger, we issue a command to delete all the records in the customer table:
mysql> DELETE FROM customer;
Query OK, 6 rows affected (0.01 sec)
CHAPTER 13 ■ TRIGGERS 451
505x_Ch13_FINAL.qxd 6/27/05 3:34 PM Page 451
This statement removes all the records from the customer table and activates the customer
table’s trigger for record deletions. If we look at the customer_audit table, we’ll see a row
inserted for each of the deletions from the customer table, as shown in Listing 13-8.
Listing 13-8. Records in the customer_audit Table After Deletions
mysql> SELECT * FROM customer_audit;
+ + + + + +
| id | action | customer_id | name | changed |
+ + + + + +
| 1 | update | 1 | Mike | 2005-05-10 22:20:44 |
| 2 | update | 2 | Jay | 2005-05-10 22:20:44 |
| 3 | update | 3 | Johanna | 2005-05-10 22:20:44 |
| 4 | update | 4 | Michael | 2005-05-10 22:20:44 |
| 5 | update | 5 | Heidi | 2005-05-10 22:20:44 |
| 6 | update | 6 | Ezra | 2005-05-10 22:20:44 |
| 7 | delete | 1 | MIKE | 2005-05-10 23:00:20 |
| 8 | delete | 2 | JAY | 2005-05-10 23:00:20 |
| 9 | delete | 3 | JOHANNA | 2005-05-10 23:00:20 |
| 10 | delete | 4 | MICHAEL | 2005-05-10 23:00:20 |
| 11 | delete | 5 | HEIDI | 2005-05-10 23:00:20 |
| 12 | delete | 6 | EZRA | 2005-05-10 23:00:20 |
+ + + + + +
12 rows in set (0.00 sec)
As you can see, the table has entries for both the UPDATE and the DELETE statements we
ran, giving us a history of the changes to the customer table.
Now that you’ve seen some of the syntax and a working example, let’s take a look at the
details of each piece of the CREATE TRIGGER statement.
■Tip When you’re building triggers, we recommend you use a versioning system like CVS or subversion for
the source of the trigger creation statements. Trigger development, like other pieces of your database and
application, results in a piece of code that is valuable to your organization.
The CREATE Statement
The CREATE TRIGGER statement is used to define a trigger and associate it with changes occur-
ring in a table. It has the following syntax:
CREATE TRIGGER <name> <time> <event>
ON <table>
FOR EACH ROW
<body statements>
CHAPTER 13 ■ TRIGGERS452
505x_Ch13_FINAL.qxd 6/27/05 3:34 PM Page 452
As you can see here, and in Listings 13-3 and 13-7, the CREATE TRIGGER statement takes
five required pieces: the name, time, event, table name, and one or more body statements.
With the time and event, you must choose from an enumerated set of options:
CREATE TRIGGER <name> [BEFORE | AFTER] [INSERT | UPDATE | DELETE]
As with stored procedures, functions, and cursors, when entering multiple-statement
blocks into MySQL, change the default delimiter to something other than the semicolon (;),
so MySQL will allow you to enter a semicolon without having the client process the input.
Change the delimiter by using the delimiter statement: DELIMITER //. This will change the
delimiter to //, meaning that you can use ; as many times as necessary. When you’re ready to
have your trigger created, type //, and the client will process your entire trigger statement.
When you’re finished working on the trigger, change the delimiter back to the standard semi-
colon with DELIMITER ;.
ALSO IN SQL:2003
MySQL contains a subset of the SQL:2003 syntax for database triggers. More of the syntax will be added in
the future, but currently, the following key items of the SQL:2003 database trigger specification are not
included in MySQL’s trigger syntax:
• When a trigger is declared using the UPDATE event, SQL:2003 allows you to specify a list of specific
columns, restricting the firing of the trigger to updates happening to the defined columns, not just the
entire row.
•Trigger definitions can contain a WHERE clause as a part of FOR EACH ROW. This clause lets you per-
form conditional checks on data in the record and limit running the trigger statements to specific rows
of data.
• The SQL:2003 standard indicates that the BEGIN statement can be followed by an optional ATOMIC
keyword, to make the block execute as one unit.
• The SQL:2003 standard specifies the use of a REFERENCING keyword that can follow the table name.
This part of the statement allows you to assign a name to the current record as well as to the incoming
record. Rather than needing to use OLD and NEW in your body statements, you can assign the old and
new records names like existing_customer and updated_customer, which make the trigger
statements more readable.
An update to the trigger functionality is coming with MySQL 5.1, which promises to have a more full-
featured implementation of the SQL:2003 syntax.
Trigger Name
When you name a trigger, it must conform to database rules for naming objects. The rules for
legal names can be found at Also, the
trigger name must be unique for the table.
CHAPTER 13 ■ TRIGGERS 453
505x_Ch13_FINAL.qxd 6/27/05 3:34 PM Page 453
Since tables can have multiple triggers defined for different time and event types, we
recommend using a combination of the event type, time, and table name when naming your
triggers. This allows for creating multiple triggers on a single table without having conflicting
names. The SQL:2003 standard calls for unique trigger names across the entire database, so
we also recommend that you use the name of the table when naming your triggers, to avoid
conflicts with other triggers in the database.
Before adding triggers to your database, you should choose a naming convention that can
be used for triggers throughout your database and help clarify the purpose of the trigger. For
example, the names we used in the customer_audit example gave an indication of the scope
of the trigger:
CREATE TRIGGER before_customer_update . . .
CREATE TRIGGER before_customer_delete . . .
Activation Time
You must specify an activation time when you define a trigger. The time can be BEFORE or
AFTER, to run the statements in the trigger either before or after the event occurs. For example,
if you define the trigger to run AFTER an update, when the UPDATE statement is received by the
database, it will perform the update on the table, and then run the statements in the trigger
body. If you need to check the integrity of the fields in an INSERT statement, you will want the
statements in the body of the trigger to run BEFORE the record is inserted into the table.
How do you know what trigger timing is right?
•Use BEFORE when you want to perform an action prior to the change being made in the
table. This might include calculating a value or getting the current record’s values for
use elsewhere.
•Use AFTER if the action you want needs to happen after the changes are made in the table.
For example, if you need to create an empty placeholder entry in a customer_address
table after a new customer record is created, you probably don’t want to create the
customer_address record until after the customer record insertion is completed.
Choosing the trigger time affects what can be done in the body of SQL statements. When
you choose AFTER, the trigger is activated after the event completes, which means you cannot
change the values of the incoming query because the record has already been written to the
table.
In our earlier customer_audit example, both triggers had BEFORE timing:
CREATE TRIGGER before_customer_update BEFORE . . .
CREATE TRIGGER before_customer_delete BEFORE . . .
Event for Activation
When defining a trigger, you are required to specify the event during which the trigger will
activate: INSERT, UPDATE, or DELETE. To make a trigger fire on more than one event, you must
create multiple triggers, one for each event.
CHAPTER 13 ■ TRIGGERS454
505x_Ch13_FINAL.qxd 6/27/05 3:34 PM Page 454