Adobe Photoshop CS4 for Photographers phần 4 pot
Bạn đang xem bản rút gọn của tài liệu. Xem và tải ngay bản đầy đủ của tài liệu tại đây (10.57 MB, 71 trang )
187
Camera Raw image processing
Chapter 3
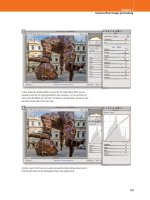
3 I then tackled the Shadow detail by raising the Fill Light setting. When you are
required to push the Fill Light adjustment to such extremes, it is not uncommon to
have to raise the Blacks (as I did here). The picture is not yet perfect, but we can now
see detail at both ends of the tonal scale.
4 Lastly, I went to the Tone Curve panel and used the slider settings shown here to
carefully add contrast to the photograph where it w
as needed most.
Martin Evening
Adobe Photoshop CS4 for Photographers
188
HSL/Grayscale panel
The HSL controls provide eight color sliders with which
to control the Hue, Saturation and Luminance. These
work in a similar way to the Hue/Saturation adjustment
in Photoshop, but are in many ways better; from my
experience I fi nd that these controls are more predictable
in their response. In Figure 3.41 I used the Luminance
controls to darken the blue sky and add more contrast in the
clouds, plus I lightened the grass and trees slightly. Do this
using Hue/Saturation in Photoshop and you will fi nd that
the blue colors will tend to lose saturation as you darken
the luminosity. You will also notice that instead of using the
traditional additive and subtractive primary colors of red,
green, blue, plus cyan, magenta and yellow, the color slider
controls in the HSL panel are based on colors that are of
more actual relevance when editing photographic images.
For example, the Oranges slider is useful for adjusting skin
tones and Aquas can target the color of a swimming pool,
but without affecting the color of a sky.
Figure 3.41
In this example, the HSL/Grayscale panel was used to add more cloud
contrast to the sky by going to the Luminance section and darkening the Aquas and
Blues sliders.
HSL color controls
The choice of color ranges for the HSL
sliders is really quite logical when you
think about it. We may often want to adjust
skin tone colors, but skin tones aren’t red
or yellow – they are more of an orange
color. And the sea is often not blue but
more of an aqua color. Basically, the hue
ranges in the HSL controls are designed to
provide a more applicable range of colors
for photographers to work with.
Detail panel information
In case you are wondering, there is a whole
section on working with the Detail panel
coming up in the following chapter.
189
Camera Raw image processing
Chapter 3
Figure 3.43
These two screen shots show a dramatic improvement between the
before version where the reds in the fl owers appeared fl at (top) and after applying a
negative luminance adjustment to darken the red, orange and yellow colors (bottom).
Figure 3.42
This diagram shows a plot of the
color gamut of an LCD monitor (the solid shape
in the center) compared to the actual color gamut
of a digital camera. Assuming you are using a
wide gamut RGB space such as Adobe RGB or
better still ProPhoto RGB, the colors you are able
to edit will almost certainly extend beyond what
can be seen on the screen.
Tech note
The previews shown here are not simple
screen grabs, but mocked up using fully
processed ProPhoto RGB images. You can
judge the effectiveness of this adjustment
by how they are printed in the book.
Recovering out-of-gamut colors
Figure 3.42 highlights the problem of how the camera you
are shooting with is almost certainly capable of capturing
a greater range of colors than can be displayed on the
monitor or seen in print. Just because you can’t see them
doesn’t mean they’re not there! Although a typical monitor
can’t give a true indication of how colors will print, it is all
you have to rely on when assessing the colors in a photo.
The HSL Luminance and Saturation sliders can sometimes
be used to reveal hidden color detail (Figure 3.43).
Martin Evening
Adobe Photoshop CS4 for Photographers
190
Adjusting the hue and saturation
The Hue sliders in the HSL/Grayscale panel can be used
to fi ne-tune the hue color bias for each of the eight color
sliders. In Figure 3.44 I adjusted the Reds hue slider to
make the reds look less magenta and more orange. In
other words, this is a useful HSL/Grayscale panel tip
for improving the look of snapshot pictures taken with
a compact digital camera, where the skin tones can
sometimes look too pink.
The Saturation sliders allow you to decrease or increase
the saturation of specifi c colors. In Figure 3.45 you can
see how I was able to use these to knock back specifi c
colors so that everything in the photograph ended up in
monochrome, except for the red guitar in the foreground.
I could have used the new adjustment brush to do this, but
adjusting the Saturation sliders offers a very quick method
for selectively editing the colors in this way.
Figure 3.44
This snap shot was taken of my friend Jeff Schewe at a party in New
York. Here, I used a positive Reds Hue adjustment to take some of the redness out
of the picture to make the skin tones look more natural, but I may have needed to
increase the amount used here as extra glasses of wine were consumed.
Grayscale conversions
To fi nd out about how to apply grayscale
conversions in Camera Raw, please refer
to pages 358–359 in the Black and White
chapter.
Emulating Hue/Saturation behavior
In Photoshop’s Hue/Saturation dialog
there is a Hue slider that can be used to
apply global hue shifts, which can be
useful if you are interested in shifting all
of the hue values in one go. With Camera
Raw you can create preset HSL settings
where all the Hue sliders are shifted
equally in each direction. Using such
presets you can quickly shift all the hues in
positive or negative steps, without having
to drag each slider in turn.
191
Camera Raw image processing
Chapter 3
Figure 3.45
In this example I have shown the before version (top) and a modifi ed
version (below), where I used the HSL/Grayscale panel Saturation sliders to
selectively desaturate some of the colors in this scene.
Martin Evening
Adobe Photoshop CS4 for Photographers
192
Lens Corrections panel
The Lens Corrections controls can help correct some of the
optical problems that are associated with digital capture. If
you inspect an image closely towards the edge of the frame
area you may notice some color fringing, which will be
most apparent around areas of high contrast (Figure 3.46).
This is mainly a problem you get with cheaper lens optics,
but it can even occur with a good lens when photographing
Figure 3.46
The top screen shot shows a 200% close-up view of an image where
you can see strong color fringing around the strong contrast edges. In the lower
version I used a Chromatic Aberration correction to remove the color fringes.
% c
lo
se
p
i
e
o
f
an
i
ma
ge
he
re
Lens Correction fi lter
The Chromatic Aberration controls
discussed here are also available in the
Photoshop Lens Correction fi lter.
193
Camera Raw image processing
Chapter 3
Figure 3.47
If you hold down the O A
key as you make adjustments to the Blue/Yellow
Chromatic aberration controls you can hide the
Red/Cyan color fringing (but you must be viewing
at 100% magnifi cation or higher). Do the same
with the Red/Cyan Chromatic aberration controls
to hide the Blue/Yellow color fringing.
brightly colored subjects. The Chromatic Aberration
controls in the Lens Corrections panel can be used to help
remove any visible color fringing.
To correct for chromatic aberrations you do need to be
viewing the photo at a magnifi cation of 100% or higher.
The Red/Cyan Fringe adjustment works by adjusting the
scale size of the Red channel relative to the Green channel,
and the Blue/Yellow Fringe slider will adjust the scale
size of the Blue channel relative to the Green channel. The
net result is that with careful manipulation of both these
sliders you should be able to remove all signs of chromatic
aberration across the whole image, even though you are
only analyzing one small section of the photo.
Defringe
The Defringe options provide an extra level of defringing
in addition to the manual slider adjustments. To be honest,
the Highlight Edges and All Edges settings usually have a
very subtle effect, but if you are going to use this I would
suggest choosing the All Edges option (Figure 3.48). It can
also sometimes help clean up any remaining color fringes.
Figure 3.48
The left half of this Camera Raw preview shows the before version and
the right half view shows the same image with the All Edges Defringe option selected.
Martin Evening
Adobe Photoshop CS4 for Photographers
194
Lens Vignetting control
With certain camera/lens combinations you may see some
brightness fall-off occur towards the edges of the picture
frame. This is a problem you are more likely to encounter
with wide-angle lenses, and you may only notice this
particular lens defi ciency if the subject contains a plain,
evenly-lit background. The Lens Vignetting Amount slider
can be used to correct for this by lightening the corners
relative to the center of the photograph, while the Midpoint
slider can be used to offset the rate of fall-off. As you
increase the Midpoint value, the exposure compensation will
be accentuated more towards the outer edges.
Vignetting is not always a result of the lens used. In
the studio I am fond of shooting with extreme wide-angle
lenses and the problem here is that it’s often diffi cult to
get the backdrop evenly lit for the area of coverage that is
required. In these kinds of situations I fi nd it helps to use the
Lens Vignetting slider to compensate for the fall-off in light
towards the corners of the frame by lightening the edges (as
shown in Figure 3.49 below).
Figure 3.49
An example of the Lens Vignetting sliders being used to compensate
for the light fall-off on a studio backdrop, to produce a more even-balanced white.
UV fi lters and edge detail
Fixing a UV fi lter over the lens is generally
considered a good way to fi lter out the UV
light when photographing outdoors, plus it
can also offer a fi rst line of defence against
the lens getting damaged. However, this
not such a good idea for wide-angle
or wide-angle zoom lenses as the light
entering the lens from the extreme edges
is forced to go through the UV fi lter at
an angle and this can cause the image to
degrade more at the edges of the frame
since the light passes through the fi lter
glass at an oblique angle.
Client: Clipso.
Model: Lucy Edwards @ Bookings.
195
Camera Raw image processing
Chapter 3
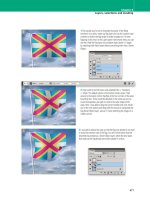
1 Here is an example of a photograph shot with a wide-angle lens, where lens
vignetting can be seen in the corners of the frame.
2 In this example I used the Lens Corrections panel to compensate for the Vignetting.
I set the Amount slider to +28, and adjusted the Midpoint to fi ne-tune the cor
rection.
The aim here was to obtain an even exposure at the corners.
Martin Evening
Adobe Photoshop CS4 for Photographers
196
Post Crop vignetting control
A lot of photographers have got into using the Lens
Vignetting controls as a creative tool for darkening or
lightening the corners of their pictures. The only problem
with this is that the lens vignetting can only be applied
to the whole of the image frame area. But with Camera
Raw 5 you can now use the Post Crop Vignette sliders to
apply a vignette relative to any cropped image area. This
means that you can use the Lens Vignetting controls for
the purpose they were intended (to counter any fall-off
that occurs towards the edges of the frame) and use the
Post Crop Vignette sliders as a creative tool for those times
when you deliberately wish to lighten or darken the edges
of a photo via Camera Raw.
The Post Crop Vignetting Amount and Midpoint sliders
work identically to the Lens Vignetting controls, except
in addition to this you can adjust the Roundness and the
Feathering of the vignette adjustment.
1 In this fi rst example I applied a −70, darkening vignette offset with a +45 Midpoint
setting. This adjustment was not too different from a normal Lens Vignetting
adjustment, except it was applied to the cropped area of an image.
Combined effects
Now that we have post crop vignette
controls as well as the standard Lens
correction vignette sliders, you can achieve
even more varied results by combining
different combinations of slider settings,
whether a photo is cropped or not.
Client: Andrew Collinge Hair & Beauty. Hair by
Andrew Collinge artistic team. Make-up: Liz
Collinge.
197
Camera Raw image processing
Chapter 3
2 In this next version I adjusted the Roundness slider to make the vignette shape less
elliptical and adjusted the Feather slider to make the vignette edge harder.
3 For this fi nal version I applied a +100 vignette Amount to lighten the corners of the
cropped image, combined with a nar
row Midpoint and a softer Feather setting.
Martin Evening
Adobe Photoshop CS4 for Photographers
198
Camera Calibration panel
Everyone wants or expects their camera to be capable of
capturing perfect colors, whether they really need to or
not. For a start, what is perfect color? Some photographers
will look at the results they get when looking at a JPEG
version of an image and judge everything according to that,
while others, who shoot raw, may prefer the default look
they get from a particular raw processing program. Apart
from anything else, is the display you are using capable of
showing all the colors that your camera can capture?
Camera Raw is the product of much camera testing and
raw fi le analysis carried out by Thomas Knoll at Adobe.
Test cameras were used to build a two-part profi le of each
camera sensor’s spectral response under standardized
tungsten and daylight balanced lighting conditions. From
this, Camera Raw is able to calculate a pretty good color
interpretation under these lighting conditions, and beyond,
across a wide range of color temperatures. This method
may not be as accurate as having a proper profi le built
for your camera, but to be honest profi ling a camera is
something that can only really be done where the light
source conditions are always the same, because you would
otherwise need to reprofi le the camera every time the
lighting was changed.
The Camera Calibration panel controls (Figure 3.50)
provide a mechanism for fi ne-tuning the color adjustments
in Camera Raw so that you can address any slight
differences between your camera and the ones Thomas
used to test with, and customize the Camera Raw output to
produce a custom calibration for each individual camera
body. This system of calibration does require a little extra
effort to set up, but it is worth doing if you want to fi ne-
tune the color calibration for each individual camera you
shoot with.
You also have to bear in mind that many of the default
Camera Raw settings were achieved through testing a
limited number of cameras. It has been reported that there
can be a discernible variation in color response between
individual cameras. So it was as a result of testing a wider
Figure 3.50
The Camera Calibration panel
controls can be used to fi ne-tune the Camera Raw
color interpretation. The Camera Profi le setting
at the top can offer a choice of camera profi le
settings, depending on whether there is more
than one Camera Calibration profi le to choose
from.
ACR compatible cameras
The list of cameras compatible with the
latest version of Camera Raw can be found
at the Adobe website by following this link:
www.adobe.com/products/photoshop/
cameraraw
.html
Figure 3 5
0
The Camera Calibration panel
199
Camera Raw image processing
Chapter 3
pool of cameras that Thomas Knoll decided to update the
default settings for certain makes of camera and in some
cases provide later version default camera profi les (in
addition to keeping the legacy profi le available for use).
This is why you will sometimes see extra profi les listed that
refer to earlier builds of Camera Raw, such as ACR 2.4 or
ACR 3.6, etc. (see sidebar on choosing the right profi le). In
addition to this, Adobe have also provided a range of new
profi les for Camera Raw where the Adobe profi le should
now be the new default profi le for Camera Raw 5.
Some writers have tended to gloss over the Camera
Calibration panel and suggest that you ‘tweak the sliders
until the photograph kind of looks right’. Well, there is a
more scientifi c approach to using this panel and although
it may look complicated, it is in fact quite easy to carry out
and only needs to be done once for each camera.
The ACR Calibrator script
In the early days of Camera Raw I used to shoot an X-Rite
ColorChecker chart and use a visual color comparison
technique with a synthetic ColorChecker chart to adjust
the Calibrate settings. It was all very complex! But
fortunately there is now an easier way to calibrate your
camera equipment. First of all, you still need to buy an
X-Rite ColorChecker chart (either the standard or Mini
size will do). One of these can be ordered on-line and will
cost you around $100 (Figure 3.52). You will then need to
photograph the chart with your camera in raw mode. It is
important that the chart is evenly lit and exposed correctly,
and the best way to do this is to use two studio lights in a
copy light setup or, failing that, use a diffuse light source.
Apart from that it does not matter what other camera
settings are used, although I would recommend you shoot at
a low ISO rating.
The next thing you will need is the ACR Calibrator script
which will work for Mac or PC with Photoshop CS, CS2,
CS3 or CS4. This is free and can be downloaded from Tom
Fors Chromaholics website:
Once installed, the
A
CR Calibrator script will be available
for use via the File
➯
Scripts menu in Photoshop.
Accurate white balance measurement
An X-Rite ColorChecker chart is essential
for measuring the color response of your
camera, but it is generally felt that the
white and gray patches on these cards
are a tad warm. If you want to get a really
accurate white balance measurement for
individual shots I can recommend you use
a WhiBal™ card as sold by RawWorkfl ow.
com. These are available in various sizes
and of
f
er one of the most accurate ways
you can measure the white balance in any
lighting setup (see Figure 3.22).
Choosing the right profi le
When a profi le is updated for a particular
camera, it is necessary for Camera Raw
to preserve the older profi les since
these need to be kept in order to satisfy
customers who have relied on the previous
profi le setting. It wouldn’t do to fi nd that
all your existing Camera Raw processed
images suddenly looked different because
the profi le had been updated. So in order
to maintain backward compatibility, Adobe
leave you a choice of which profi les to use.
Figure 3.51
X-Rite ColorChecker charts can
be bought as a mini chart or the full-size chart
you see here.
Martin Evening
Adobe Photoshop CS4 for Photographers
200
1
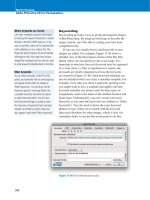
To use the script, you will need to open a raw image that was taken of the X-Rite
ColorChecker chart and open it in Photoshop via the Adobe Camera Raw dialog. Use
the white balance tool to measure the patch next to the white patch (circled). Crop the
image tightly around the ColorChecker chart. Go to the Workfl ow options, set the crop
size to the smallest pixel size possible and set the bit depth to 8-bits per channel. There
are no other settings you need concern yourself with. It does not matter if auto settings
have been applied and it does not matter which RGB output color space is selected.
Now click ‘Open’ to open the image in Photoshop.
2
With the image open in Photoshop, select the pen tool with the Paths mode option
selected in the Options panel (circled). Click with the pen tool on the brown patch.
Now hold down the S key and click on the white patch, the black patch and
lastly the b
lue-green patch. Now go to the File ➯ Scripts menu and select the ACR
Calibrator script that you installed earlier.
201
Camera Raw image processing
Chapter 3
3
The ACR Calibrator script will automatically open the raw fi le many times over and
gradually build a status report in a new Photoshop document. This process can take
a long time to complete, which is why it is important to keep the bit depth at 8-bits
per channel and the image size small. It will also help if you hide all the Photoshop
panels fi rst before you run the script. Shown here is the ACR Calibrator status
window after the script had run its full course; I have highlighted the calibration
settings in yellow.
4
You’ll need to make a note of the fi gures highlighted in Step 3 and enter them in
the Camera Calibration panel in Camera Raw and save this as a custom calibration
setting for your camera. When you save the Camera Raw settings, check only the
Camera Calibration checkbox. You can now apply this setting to all photos that have
been shot using this camera and expect to see more accurate color results.
Skin tone calibration settings
Going back to what I said earlier about
‘what is proper color’… it is all very
well creating a perfect calibration, but
sometimes the most accurate color doesn’t
always quite match expectations. For
example, proper camera calibrations tend
to produce Caucasian skin tones that look
slightly too magenta for most people’s
liking. You may therefore want to tweak
the settings slightly. Try adding 10 units
to the red hue measurement and save this
modifi ed setting as a camera calibration for
use with Caucasian skin tone subjects.
Martin Evening
Adobe Photoshop CS4 for Photographers
202
New Camera Raw profi les
I mentioned earlier the ACR profi les and how these were
updated as Thomas chose to revise the earlier Camera
Raw profi les and provide newer ones based on improved
testing. More recently, Eric Chan on the Camera Raw
team has worked to improve many of the standard ACR
profi les as well as extending the range of profi les that can
be applied via Camera Raw (Figure 3.52). Older profi les
such as ACR 3.6 and ACR 4.4 will still be honored and
made available where appropriate. But for Camera Raw 5,
the ‘Adobe’ profi le is now the new default and this and the
other profi les you see listed in the Profi le menu options are
the result of improved analysis as well as an effort to match
some of the camera vendor ‘look settings’.
If you are happy to trust the new ‘Adobe’ profi le,
then I suggest you leave this as the default setting. The
differences you will see with this profi le are going to
be slight, but I think you will fi nd these still represent
an improvement and are worth keeping as the default.
The ‘Standard’ profi le is rather clever because Eric has
managed to match the default camera vendor settings for
most of the main cameras supported by Camera Raw. So,
if you choose the Standard profi le you can get the Camera
Raw interpretation to match the default color renderings
applied by the camera manufacturer software. This means
that if you apply the Standard profi le as the default,
Camera Raw will apply the exact same kind of default
color rendering as the camera vendor’s software and it will
also match the default camera JPEG renderings. When you
next bring your photos into Camera Raw, you won’t see
any jumps in color as the Camera Raw processing kicks
in because Camera Raw is now able to match the JPEG
rendering for many of the supported cameras.
The other profi les you may see listed are designed to
let you match some of the camera vendor ‘look settings’.
These profi les include: Faithful, Landscape, Neutral and
Portrait. In Figure 3.53 you can see an example of how
these can compare with the standard ACR and Adobe
profi les.
Figure 3.52
The Camera Calibration panel
showing the new Camera Profi le options.
DNG Profi le editor
The DNG Profi le editor is a separate
program that you can download free from
the Adobe website. If you are feeling up
to the task, this utility program will allow
you to edit your own ‘profi le look settings’
and add these to the ones offered here in
Camera Raw 5.
New Camera Profi le availability
Not all the Camera Raw supported cameras
have new profi les so you may not see the
full list of profi le options for every Camera
Raw compatible camera, just the newer
and most popular camera models.
203
Camera Raw image processing
Chapter 3
Figure 3.53
This page shows a comparison of the different camera profi les one
can now choose from and the effect these will have on the appearance of an image
shot using a Canon EOS 1Ds MkIII camera that has been processed via Camera Raw.
Photo: © Jeff Schewe 2008.
Model: Alex Kordek @ MOT.
ACR 4.4
Faithful
Portrait
ACR 4.3
Landscape
Standard
Adobe
Neutral
Martin Evening
Adobe Photoshop CS4 for Photographers
204
Spot removal tool
You can use the spot removal tool (
b
) to retouch spots
and blemishes. Whenever the spot removal tool is active
you will see the Spot Removal options appear in the panel
section on the right, where you can choose between Heal
and Clone type retouching (Figure 3.54) and, ideally, you
should work on the image at a 100% magnifi cation. In
Clone mode, the tool behaves like a cross between the
spot healing brush and clone stamp in Photoshop. It will
carry out a straightforward clone of the image with a soft
feathered edge circle and automatically select the area to
sample from. In Heal mode, the tool behaves like a cross
between the spot healing and normal healing brush in
Photoshop, where it auto-selects an area to sample from
and blends the sampled data with the surrounding data
outside the spotting circle. In either case, you can click to
select an applied clone circle and use the Type menu to
switch from one mode to the other. With both the Clone
and Heal modes you have the option to adjust the radius of
Mouse down on a circle edge and
drag to adjust the size of a circle
Mouse down inside a source or
destination circle and drag to
move the circle’s position
Click with the retouch tool,
centered on a blemish, to apply an
instant clone or heal retouch
Click and drag with the
mouse to set a specifi c radius
size for a retouch circle
Figure 3.54
This screen shot shows the retouch tool in action, with explanations
of how to apply and modify the retouch spot circles.
Clearing the retouching work
You can remove individual retouch circles
by selecting them and hitting the
D
key. Or, you can click on the Clear All
button to delete all retouch circles.
Turning off the preview
In Camera Raw 5, you can now use the
Preview option to toggle showing/hiding
the spot removal retouching.
205
Camera Raw image processing
Chapter 3
Figure 3.55
Here is an example of the Camera Raw dialog being used to carry out
synchronized spotting.
Keeping the sensor clean
Dust marks are the bane of digital
photography and ideally you want to do
as much as you can to avoid dust or dirt
getting onto the camera sensor. I have
experimented with various products
and fi nd that the Sensor Swabs used
with the Eclipse cleaning solution from
Photographic Solutions Inc (
www.
photosol.com) are reliable products. I use
these from time to time to k
eep the sensors
in my cameras free from marks.
the spot removal tool as well as the opacity. You can use
the
[]
keys to tweak the radius, but it is usually simpler
to follow the instructions in Figure 3.54 and drag with the
cursor instead.
The opacity slider is new and this allows
you to lower the opacity setting should you wish. You can
also click on the Show Overlay box or use the
h
key to
toggle sho
wing and hiding the circles so that you can vie
w
the retouched image without seeing the retouch circles.
Synchronized spotting with Camera Raw
You can also synchronize the spot removal as you apply it!
Make a selection of images in Bridge and open them up via
Camera Raw (as shown in Figure 3.55). Now click on the
Select All button. This will select all the photos and if you
now use the spot removal tool you can retouch the most
selected photo (the one shown in the main preview), and
the spotting work will automatically be updated to all the
other selected images.
Martin Evening
Adobe Photoshop CS4 for Photographers
206
Red eye removal
The remove red eye tool is useful for correcting photos
taken of people where the direct camera fl ash has caused
the pupils to appear bright red. To apply a red eye
correction, select the red eye removal tool and mouse drag
over the eyes that need to be adjusted. In Figure 3.56
I dragged with the mouse to roughly select one of the
eyes. As I did this, Camera Raw was able to detect the
area that needed to be corrected and automatically adjusted
the marquee size to fi t. The Pupil Size and Darken sliders
can then be used to fi ne-tune the Pupil Size area that you
want to correct as well as the amount you want to darken
the pupil by. You can also revise the red eye removal
settings by clicking on a rectangle to reactivate it, or use
the D key to remove individual red eye corrections.
If you don’t lik
e the results you are getting, you can
al
ways click on the Clear All button to delete the red eye
retouching and start over again.
Figure 3.56
Here is an example of the red eye tool in action.
Hiding the red eye rectangles
As with the spot removal tool, you can
click on the Show Overlay box to toggle
showing and hiding the rectangle overlays
(or use the h key).
207
Camera Raw image processing
Chapter 3
Localized adjustments
We now come to the adjustment brush and graduated
fi lter tools, which can be used to apply localized edits to
photos in Camera Raw. Although localized editing made an
appearance in Aperture 2.1, the Camera Raw tools are quite
different as they truly do allow non-destructive editing.
Just like the spot removal and red eye removal tools you
can revise the edits as many times as you like, without
having to render an interim pixel version of the raw master.
Not only that, these are more than just dodge and burn
tools. There are a total of seven adjustment effects to
choose from, not to mention an Auto Mask option.
Adjustment brush
When you select the adjustment brush tool (
k
) the tool
options shown in Figure 3.57 will appear in the panel
section on the right with the New button selected, and
below that a set of sliders you can use to confi gure the
brush adjustment before you apply it.
Camera Raw versus Aperture
It is worth making the point here that
Camera Raw 5 and Aperture 2.1 have
adopted completely different approaches
to localized editing. Aperture creates
a rendered pixel image that can be
manipulated via what is essentially a
basic pixel image editing program, and
to be honest, if you are going to render
a pixel image, you might as well edit in
Photoshop. Camera Raw on the other hand
offers true non-destructive raw image
editing.
Figure 3.57
The Adjustment brush options.
Toggle the main panel controls
Hit the k key to revert to toggle between
the main edit panel mode and the
Adjustment Brush panel.
Increase Exposure button
Increase Brightness buttonDecrease Brightness button
Increase Contrast buttonDecrease Contrast button
Increase Saturation buttonDecrease Saturation button
Increase Clarity buttonDecrease Clarity button
Increase Sharpness buttonDecrease Sharpness button
Make color warmer buttonMake color cooler button
Decrease Exposure button
Create new adjustment/Add to adjustment/Erase
Brush size radius
Click to select a swatch color
Feather brush radius
Brush fl ow
Brush opacity
Click to clear all brush edits
Mask options
Toggle show/hide pins
Martin Evening
Adobe Photoshop CS4 for Photographers
208
Initial Adjustment brush options
To apply a brush adjustment, click on the New Brush button
at the top of the panel and then select the effect options
you wish to apply by using either the plus or minus buttons
or the sliders. For example, clicking on the Exposure plus
button will increase the exposure setting to +0.50 and
clicking on the negative button will set it to −0.50 (these
are your basic dodge and burn settings). The effect buttons
therefore make it fairly easy for you to quickly create the
kind of effect you are after. You can only select one effect
setting at a time using the buttons, but if you use the slider
controls you can fi ne-tune the adjustment brush effect
settings and combine multiple types of effects.
Brush settings
Below this are the brush settings. The Size slider adjusts
the brush radius, plus you can also use the
[]
keys to
make the brush smaller or lar
ger. The Feather slider adjusts
the softness of the brush and you can also use the
S]
k
e
ys to make the brush edge softer and
S[
to make
the brush harder. Note that these settings will be refl ected
in the cursor shape sho
wn in Figure 3.58.
The Flow slider is a bit like an airbrush control. If you
select a low Flow setting, you can apply a series of brush
strokes that successively build to create a stronger effect.
As you brush back and forth with the brush, you will notice
how the paint effect gains opacity and, if you are using a
pressure-sensitive tablet such as a Wacom™, the Flow of
the brush strokes is automatically linked to the pen pressure
that you apply.
The Density slider determines the maximum opacity
for the brush. This means that if you have the brush set to
100% Density, the fl ow of the brush strokes can build to a
maximum density of 100%. If on the other hand you reduce
the Density, this will limit the maximum brush opacity to a
lower opacity value. For example, if you lower the Density
and paint over an area that was previously painted at a
density of 100% you can paint with the adjustment brush
to reduce the opacity in these areas and, if you reduce the
Density to 0%, the adjustment brush will act like an eraser.
Hiding and showing brush edits
Use the Preview button in the Camera Raw
dialog to toggle showing and hiding all
Adjustment brush edits.
Return to the main panels
Click k to toggle between the Adjustment
Brush tool mode and other panel modes.
On-screen brush resizing
If you hold down the
L
key (Mac) or use
a right-mouse click (Mac and PC), you can
drag to resize the cursor before you start
using it to retouch the image.
209
Camera Raw image processing
Chapter 3
Figure 3.58
The outer edge of the adjustment
brush cursor represents the overall size of the
brush, while the inner circle represents the
softness (feathering) of the brush relative to the
overall brush size.
Figure 3.59
In this example I added several pin markers representing groups of
brush strokes. The one at the top was used to darken and the one that is currently
active was used to lighten the bucket with a positive Exposure value.
Adding a new brush effect
You are now ready to start painting. When you click on the
image, a pin marker is added and the Adjustment Brush
panel will show that it is now in Add mode (Figure 3.59).
As you start adding successive brush strokes these will be
collectively associated with this marker and will continue
to do so until you click on the New button and click to add
a new set of brush strokes.
The pin markers therefore provide a tag for identifying
groups of brush strokes and you can click on a pin marker
whenever you need to add or remove brush strokes or
re-edit the brush settings that were used previously. If you
want to hide the markers you can do so by clicking on the
Show Pins box to toggle showing/hiding, or use the
h
key
shortcut.
Martin Evening
Adobe Photoshop CS4 for Photographers
210
Figure 3.60
In this screen view, the ‘Show Mask’ option is checked and you can
see an overlay mask for the selected brush group. Click on the swatch next to it if you
wish to choose a different color for the overlay display.
Undoing and erasing brush strokes
As you work with the Adjustment brush,
you can undo a brush stroke or series of
strokes using the Undo command (
Cz
Lz
).
Previewing the mask more clearly
Sometimes it is useful to initially adjust
the settings to apply a stronger effect
than is desired. This will let you judge the
effectiveness of your masking more clearly.
You can then reduce the effect settings to
reach the desired strength for the brush
strokes.
Resetting the sliders
Double-clicking a slider name will reset to
zero, or to its default value.
k’ ti i h k d d
Editing brush adjustments
To edit a series of brush strokes, just click on an existing
pin marker to select it (a black dot will appear in the center
of the pin). This takes you into the Add mode, where
you can add more brush strokes or edit the current brush
settings. For example, in Step 2 (opposite) I might have
wanted to drag the Exposure slider to lighten the selected
brush group more. You might also want to erase portions of
a brush group, which you can do by clicking on the Erase
button at the top of the Adjustment Brush panel where you
can independently edit the brush settings for the eraser
mode (except for the Density slider which is locked at
zero). Alternatively, you can hold down the
O A
key to
temporarily access the adjustment brush in eraser mode.
When you are done editing, click on the New button to
return to the New adjustment mode where you can now
click on the image and add a new set of brush strokes.
Previewing the brush stroke areas
If you click on the Show Mask option, you’ll see a
temporary overlay view of the painted regions (Figure 3.60).
The color overlay represents the areas that have been painted
and can also be seen as you roll the cursor over a pin marker.
211
Camera Raw image processing
Chapter 3
1
Here is a portrait of Rod Wynne-Powell who tech-edited the book for me. To add a
new adjustment brush group, I adjusted the effect sliders, clicked on the image and
started painting. In this fi rst step I applied a darkening effect to the background.
2
I then added further brush groups. In this step I added a new brush group to lighten
the eyes and a third brush group (highlighted here) to lighten Rod’s forehead.
Photograph: © Jeff Schewe 2008