3D in Photoshop The Ultimate Guide for Creative Professionals PHẦN 6 doc
Bạn đang xem bản rút gọn của tài liệu. Xem và tải ngay bản đầy đủ của tài liệu tại đây (1.27 MB, 21 trang )
The image is de-saturated. Using Levels (Image > Adjustments > Levels), the
contrast is increased, similar to what you see in Figure 8.32.
The layer with the reflection for the bottle is clipped with the layer of the
bottle (Figure 8.33).
Using the Warp Tool, the reflection is distorted to the shape of the bottle as
seen in Figure 8.34.
FIG 8.32 The color for the scene of the reflection is desaturated.
FIG 8.33 The scene is clipped with the layer of the bottle.
FIG 8.34 The layer with the reflection is distorted to match the
angles of the glass using the Warp Tool.
3D and Compositing with Bert Monroy
|
95
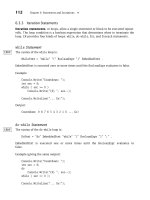
In the layer containing the bottle, the top, green glass area is selected
(Figure 8.35).
Back in the layer containing the reflection, a layer mask is applied to the layer
through the selected area. The result will show the reflection only in the glass
area at the top of the bottle (Figure 8.36).
You don't want reflection over the label. Two reasons for this masking of the
reflection is that the paper of the label is not reflective and, most importantly,
you don't want to cover the product name.
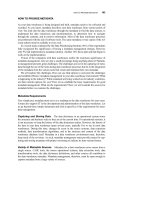
The opacity is lowered for the layer and the result is the floating wine bottle
you see in Figure 8.37.
FIG 8.35 The top glass portion of the bottle is
selected.
FIG 8.36 The layer with the reflection is masked through
the selection of the bottle.
FIG 8.37 The final scene for the ad with the bottle floating in the water.
|
3D in Photoshop
96
8.1. Simple Complexity
3D programs often seem so complex. Even with the simplified approach that
Adobe has taken in providing 3D tools within Photoshop, it still might seem
far too complex for many to get into.
To put your minds at ease, I want to show you how simple a complex job can
be using the Photoshop 3D tools. You are going to create the universe! How's
that for complexity?
This is an effect that you have seen many times in movies. It is an effect that
took quite a bit of work and computing power to create.
In the beginning of this chapter I used the 3D Postcard feature to create
a simple plane so that I could put it into 3D space. 3D Postcard From Layer is
the first choice of the multiple 3D object generating functions. It is the
simplest. It takes the contents of a layer and allows you to move it around in
space as if it were a flat piece of art.
Using a little ingenuity you will see how this simple feature can accomplish the
monumental task of creating the universe. Oh, did I forget to mention e we'll
be flying through it as well? Photoshop has great animation tools, so what
better segue into both animation and 3D than to fly there through space?
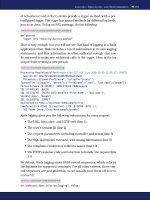
Start with a new file that measures 600 pixels by 600 pixels at 72 pixels per
inch with a black background (Figure 8.38). Note that you are going to use
this low resolution so things will happen fast. You can work at higher reso-
lutions provided you have a powerful enough computer to handle it.
Choose the Paintbrush Tool and the fifth brush in the Panel (13). This brush
tip is a hard-edged circle.
Open the Brushes panel (Window > Brushes). Here you will alter the brush to
create star fields of various sized stars.
Increase the Spacing in the Brush Tip Shape section (Figure 8.39).
In the Shape Dynamics section, push the Size Jitter to 100%. Set the
Minimum Diameter to 5% (Figure 8.40).
FIG 8.38 New File with the background in
black.
3D and Compositing with Bert Monroy
|
97
In the Scattering section, push the Scatter on Both Axis to 1000%. Raise the
Count to 2 and the Count Jitter to 100% (Figure 8.41).
Create a new, blank layer.
Using white for the Foreground color, stroke the canvas with the brush you
just created. The result should be a loosely spaced stroke like the one seen in
Figure 8.42. You want it to look airy.
FIG 8.39 The Spacing for the brush tips is increased
in the Brushes panel.
FIG 8.40 The Shape Dynamics is altered.
FIG 8.41 The Scattering is applied to the brush tips.
FIG 8.42 In a layer, a star field is created.
|
3D in Photoshop
98
Create three more layers that contain similar strokes like the ones seen in
Figures 8.43e8.45.
Figure 8.46 shows the four layers laying over each other in the file.
Convert each layer into a 3D Postcard (3D > New 3D Postcard From Layer).
You want all four layers to work as one. In order to achieve this, select two
layers and choose Merge 3D Layers from the 3D menu. You can only merge
two layers at a time. Once two are merged, merge them to the third and then
to the fourth.
FIG 8.43 A second star field is created.
FIG 8.45 A fourth star field is created.
FIG 8.44 A third star field is created.
FIG 8.46 All four star field layers over each other.
3D and Compositing with Bert Monroy
|
99
Now that all four layers are merged into one, using the Object Rotate
Tool from the Tool panel, rotate the layers towards you as shown in
Figure 8.47.
You will now separate the four layers from each other to increase the
distance between them.
Select the layer that is at the top of the stack. The first layer you created
(Layer 1) should be at the top of the list.
Using the Mesh Pan Tool from the list of tools found in the 3D panel (Note:
Mesh Pan is in the group that has the Mesh Rotate Tool visible by default as
shown in Figure 8.48), move the layer up, away from the rest of the stack
(Figure 8.49).
FIG 8.47 The merged 3D layers are rotated onto their sides.
FIG 8.48 3D Mesh Pan Tool in the 3D panel.
FIG 8.49 The topmost layer is moved up to
separate it from the stack.
|
3D in Photoshop
100
Select the second layer and move it up so it is centered between the top layer
and the rest of the stack.
Select the fourth layer and move it down so that all four layers are equidistant
to each other (Figure 8.50).
Using the Object Rotate Tool from the Tool panel, rotate the layers back to
their original, upright position as shown in Figure 8.51.
You will notice that they don't look exactly as they did in Figure 8.46 before
they were adjusted. This is because two of the layers are closer to you and
one is farther than the original view.
Open the Animation panel (Window > Animation).
Click the arrow for Layer 1, the 3D object, to expose the controls
(Figure 8.52).
FIG 8.50 The space between all four layers is
increased.
FIG 8.51 The final 3D star field ready to be
animated.
FIG 8.52 In the Animation panel a keyframe is
created.
3D and Compositing with Bert Monroy
|
101
Click on the tiny stopwatch icon for the 3D Object Position. This will create
a keyframe for the animation.
Move the Current Time Indicator (small, blue triangle in the timeline) over to
the end of the animation time sequence.
Using the Object Slide Tool from the Tool panel (Figure 8.53), move the layers
towards you.
Note: Clicking in the center and dragging downward will move the object
towards the viewer.
When you have moved it close enough so the star fields look similar to the
ones in Figure 8.54, release the mouse button.
A new keyframe will automatically appear at the end of the animation where
the Current Time Indicator was placed.
Rewind the animation, sit back and watch. The first time it loads into memory
so it runs a little slow. The second time you watch it. well, do it.
Add a few titles and you now have a great intro to your movie!
Throughout this book you learn many ways to create and manipulate 3D
objects. They are beautiful! Once you try 3D in Photoshop, the real fun
starts!
FIG 8.54 The final animation ready to be played.
FIG 8.53 The 3D Object Slide Tool in
the Tools panel.
|
3D in Photoshop
102
Adobe Repoussé with
Corey Barker
Well, at this point in the book you have no doubt discovered that 3D in
Photoshop is an extremely powerful new feature; one that I believe is a game
changer for anyone working in Photoshop, especially if you are a designer.
While some 3D features have been available in Photoshop in the last couple
versions, getting really involved, seemingly complex 3D art (like the 3D art
you will see in this chapter) into Photoshop would have involved another 3D
application in which you would have had to export the 3D art then import
into Photoshop as a regular layer. This would have meant that if you wanted
to make changes you would have had to go back to the 3D app then re-
import back to Photoshop. And on top of all that, dedicated 3D applications
are hard to learn.
Repoussé brings a whole new level of 3D into Ph otoshop, allowing you
to create 3D text, objects, and abstract elements all without leaving
Photoshop. The best part is that it is easy to learn. In this chapter we will
examine the numerous ways you c an create different types of 3D
objects and then combine them to create a complete 3D environment
CHAPTER 9
|
3D in Photoshop. DOI: 10.1016/B978-0-240-81377-6.10009-2
Copyright Ó 2010 Elsevier Inc. All rights reserved.
103
all within Photoshop. Now as we progress through these lessons you
will see that 3D r equires you to think a little differently in Photoshop.
While Photoshop may have always been a two-dimensional application,
going into that third dimension can be confusing for some; so
throughout this chapter I have added some of my workflow suggestions
to help your work go smoother. One thing I stress throughout is to save
often. You have no doubt heard this before but with 3D I feel it's more
important. You only h ave to spend an hour building some cool 3D art
and then have it crash without savi ng once and you will never do it
again. Tr ust me!
With that, let us press on with our Photoshop 3D journey by starting with
a simple exercise of building 3D elements from scratch and applying simple
reflection and shadow effects.
9.1. Text and Reflections
In this exercise we will take a look at creating 3D elements from vector paths
and text to create a metallic looking film reel with a title. I have always made
it a habit to build elements in separate documents and then bring them
together into a finished design file. It especially makes sense with 3D since
the center point of a 3D layer is determined by the center of the document.
So if you have more of a rectangular document the perspective of your 3D
object will be slightly off.
Step 1: Open the film_reel.psd file and open the Paths panel to locate the
saved path shape of the film reel. Grab the Path selection tool on the toolbar
and select the entire film reel path.
|
3D in Photoshop
104
Step 2: Now go into the Layers panel and create a new blank layer. Open the
Swatches panel and choose the pure yellow orange color swatch. Then fill
the new layer with this new color by pressing Option-Delete (Windows: Alt-
Backspace).
Step 3: With the path selected, go to the Window menu and choose 3D to
open the 3D panel. You should see the Create New 3D Object section of the
panel. Under the source menu choose Work Path and check on 3D Repoussé
Object. Then click the Create button to open the Repoussé panel.
You will notice that a default extrusion of the shape has been applied but the
holes in the reel are filled in. There is a quick and easy fix for this.
Adobe Repoussé with Corey Bark er
|
105
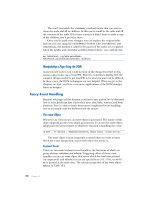
Step 4: At the bottom of the Repoussé panel there
is a section called Internal Constraints. Among the
many functions of this small section, one of the
most common is perhaps knocking out holes in
shapes e in this case the reel holes. Go into the
Type menu and change the setting from Inactive
to Hole. This will knock out one of the shapes. You
will then need to select one of the tools to the left
of the menu and use it to select the remaining
holes. As you drag the cursor over the shapes they
will be highlighted. Simply click once to select
then go into the Type menu once again and
change the setting from Inactive to Hole again. Do
this to all the remaining holes in the shape. Don't
click OK yet.
Step 5: In the Repoussé panel go up to the
Extrude section and set the Depth to .1 to make
the film reel a bit thinner. You can use the mesh
tools on the side of the panel to modify the
position of the shape as you edit the Repoussé
settings, but I would recommend that when you
are done editing click the Home button at the
bottom to set back to the original position then
click OK. This will ensure that no matter how much
you change the 3D object with the 3D tools you
can always click the Home button in the options
bar to return to the original position. Now click OK.
Here is a good place to save your work.
|
3D in Photoshop
106
Step 6: Now that we have the reel created we need
to create the text element. Here I have a text layer
with the words MIDNIGHT MOVIES set in a font
called Eurostile and filled with gray. It is ultimately
going to be filled with the same yellow color of the
reel but I am using gray for the sake of visibility.
With the text layer selected, go under the 3D menu,
go to Repoussé and choose Text Layer.
Just as before, it will apply a default extrusion and
open the Repoussé panel. In the Extrude section set
the Depth to .5. Then go over to the Bevel section
and set the Height and Width to 2. Also once again
click the Home button to set the original position
and click OK.
Step 7: Now we have two 3D Repoussé layers we need to merge together.
Merging them will not flatten the art; it will simply group multiple 3D objects
into a single 3D layer. Select both the layers in the Layers panel. Go to the 3D
menu and choose Merge 3D Layers.
Adobe Repoussé with Corey Bark er
|
107
Step 8: Often when you merge 3D layers, objects tend to shift around.
Sometimes objects will be hiding behind other shapes. Open the 3D panel
and click the second icon at the top to open the Mesh panel. Highlight the
text mesh in the list that is the same name as the layer. Then just below to the
left there are a number of different 3D tools. Click on the Mesh Tool icon
(third one down) and hold to reveal all the mesh tools. Choose the 3D Mesh
Slide Tool. Now when you move your cursor over the canvas you will notice
the tool is context sensitive. Place a box around the mesh as you drag over it.
This will override whatever you have selected in the mesh list so be careful.
Click on the text then click and drag down to bring the text forward.
Step 9: Now, with the text in place, we can change the color to match the rest
of the graphic. Open the Layers panel and you will see some sub-layers
attached to the master 3D layer. These contain the textures for the shapes.
Double-click the MIDNIGHT MOVIES layer to open the texture file.
When it opens you will see the original text in gray. Instead of filling the text
create a new blank layer and fill it with the same pure yellow orange we used
on the reel graphic. You do not have to flatten the image as the texture files
will support layered documents. Close the document and save the changes
and the color of the text will be updated.
|
3D in Photoshop
108
Step 10: Now we have our 3D elements created, let's add some environ-
mental elements to enhance the realism a bit more. Don't worry about
shadows yet e we will get to that. Open the 3D panel and click on the
Materials section (third icon over). At the top, you will see a list of all the
material surfaces in the layer. What we want to do here is add a reflective
environment to some of the surfaces of this shape. To do this, we need to
select the material surface first. First highlight the Layer 1 Front Inflation
Material. This is the front of the reel graphic. Go to the bottom part of the
panel to the Environment setting. Click on the folder icon next to it and
choose Load Texture. When the windows open locate whatever texture file
you want to use. Here I have a cool black and white graphic of a film called
“environment.jpg” to go along with the movie theme. Click OK.
Step 11: Now set the Reflection property just below that to 25%. This setting
can be adjusted; you may want to start at a low setting. Also set the Gloss and
Shine properties just below that to 50%.
Step 12: Repeat the last two steps on the Layer 1 Extrusion and also on the
Midnight Movies Front Inflation and the Midnight Movies Extrusion to finish
off the shiny reflective look on the whole graphic.
I would save again right here.
Adobe Repoussé with Corey Bark er
|
109
Step 13: Now create a new document to place the 3D elements into. Since
we used a square document to create the 3D object we can now take this
into the final design. Here I created a wide format document at 12” Â 6.75”
and set the background to black by pressing Command-I (PC: Ctrl-I). Then go
to the 3D file and grab the layer in the Layers panel and drag it into the new
file. Hold the Shift key as you drag it over to make it drop in the center.
Step 14: Click and hold on the 3D Object Rotate Tool to reveal all the other
tools and choose 3D Object Slide Tool. Then click inside the canvas and drag
down to slide the whole 3D object forward. This the cool part about
compositing in 3D in that you can slide your object back and forth, side to
side, on any axis to get the best composition. Here I want the graphic really
close in so use the slide to bring it forward and tilt it slightly. Feel free to
experiment and get used to the way the tools work and feel.
|
3D in Photoshop
110
Step 15: One last thing. if you remember earlier I mentioned shadows.
They are there, but we can't see them because of the Draft render mode we
are working in. When we created the 3D objects, Photoshop put some
default lights on them. You can see them by going into the 3D panel and
clicking on the light bulb icon at the top. This will reveal all the Light settings.
You can see from the list of light types that we have three infinite lights on
this subject. Modifying the position of these lights can change the overall
appearance of the object; notice that among the other 3D tools in the panel
there is a light set of the tools. These allow you to change just the lights.
Editing lights can be a bit tricky because it's not a solid shape. What you need
to do is go to the bottom of the 3D panel and you will see the eyeball and the
grid icon. Click on this and select 3D light.
This will reveal the wire frame of the light so you can edit easier. Select a light
from the list and click and drag around the canvas to change the light
direction. You will see the lighting of the scene change as you drag around.
You can turn lights off or change the intensity right here in the Light panel.
Now would be a good time to save!
Adobe Repoussé with Corey Bark er
|
111
Step 16: With the lights in place, go into the 3D panel one last time and click
on the first icon at the top to access the Scene settings. Go down to the
quality menu and choose Ray Traced Draft. This will execute a rough render
complete with more reflections and shadows.
If all looks well then go ahead and do a final render or continue to tweak the
graphic with all the tools we have used thus far.
|
3D in Photoshop
112
9.2. Creating Realistic 3D Product Shots
In this tutorial we are going to explore Photoshop's 3D tools even further by
creating a 3D product shot from a 2D image. Another tremendous advantage
of these new features is the ability to apply extrusions to images. Pretty much
anything that is on a layer can be made 3D e it just depends on how far you
want to take it.
Step 1: For this exercise, all we need is a flat two-
dimensional image of the product. In this case it's
a smart phone product. You can choose to follow
this exercise along with the supplied image if you
wish but make sure you experiment with other
images. You will need to extract whatever product
shot you use from its background or at least have
a good selection made around it. If the image is
extracted, as it is here, then hold down the
Command key (Windows: Ctrl) and right-click on
the layer icon to load it as a selection.
Step 2: Go under the 3D menu and go to
Repoussé and select Current Selection. This will
apply a default extrusion to the selected shape
and open the Repoussé panel. You can use the
mesh tools in the Repoussé window to change the
orientation of the object as you make changes. Go
into the Extrude section and change the Depth to
0.1. Then go over to the Bevel section and set the
Height to 2 and the Width to 3. This will help give
the product a more realistic edge. Also, to clean up
the edges a bit, go to the Scene settings just
below and change Mesh Quality to Better. When
done, click the Home button at the bottom of the
tools to set the object back to its original position.
Click OK.
Adobe Repoussé with Corey Bark er
|
113
Step 3: Now we need to change the color of the sides. By default, Repoussé
filled it with a neutral gray. If you grab the 3D Object Rotate Tool from the
toolbar you can rotate the object to get a better view of the sides. We need
the sides to be the same color as the rest of the phone. Grab the Eyedropper
Tool from the toolbar and click in the dark gray area of the phone to sample
the color.
Now open the Layers panel. Select the layer that
contains the product. You will notice there are
smaller sub-layers attached to the main layer. These
contain the texture files for each of the surfaces of
the 3D layer. Double-click the Layer 1 Extrusion
Material to open the texture file as a separate
document. Then fill this file with the sampled dark
gray color. Close the document and save the
changes. Then return to the original document and
the sides should update automatically.
|
3D in Photoshop
114
Step 4: Notice on the sides there is a little bit of a white edge that is a bit
distracting. Here's a quick fix for that. Go into the Layers panel again and
open the Layer 1 sub-layer that contains the phone face. Double-click to
open. Then create a new blank layer right under the product layer and fill
with the same dark gray you filled the sides with. You do not have to flatten
texture images like this for 3D layers. They will support multi-layered texture
files. That's a big help! Close the document and save the changes.
Notice that back in the original file you'll see those little white edges magic-
ally disappear. Use the 3D tools once again to move the object around to see
if all the sides are good. You can also change view by selecting a position
angle in the options bar or use the Axis Widget in the canvas. When done,
click the Home button in the options bar again to reset the object back to its
original position.
Adobe Repoussé with Corey Bark er
|
115