Oracle9i Installation Guide phần 7 ppsx
Bạn đang xem bản rút gọn của tài liệu. Xem và tải ngay bản đầy đủ của tài liệu tại đây (189.52 KB, 24 trang )
Configuration Tasks to Perform as the root User
Post-Installation 4-3
$ORACLE_HOME/bin/ 755
rwxr-xr-x
The oracle user should have read, write
and execute privileges and all users should
have read and execute privileges to this
directory.
The oracle executable, and
the following executables:
$ORACLE_HOME/bin/dbsnmp
$ORACLE_
HOME/bin/oradism
6751
rws-r-s x
The 6 sets the setuid bit and the setgid
bit so the executables run as the oracle
user and OSDBA group, regardless of who
executes them.
All other executables 755
rwxr-xr-x
The oracle user should have read, write
and execute privileges and all users should
have read and execute privileges to this
directory.
$ORACLE_HOME/lib/ 755
rwxr-xr-x
The oracle user should have read, write
and execute privileges and all other users
should have read and execute privileges to
this directory.
All files under
$ORACLE_HOME/lib/
644
rw-r r
The oracle user should have read, write
and execute privileges and the other users
should have read-only privileges to these
files.
$ORACLE_HOME/rdbms/log 751
rwxr-x x
The oracle user and ORAINVENTORY
group have restricted access to files in the
directory. The other users have execute
privileges.
Product subdirectories such as
$ORACLE_HOME/sqlplus
or
$ORACLE_HOME/rdbms
751
rwxr-x x
The oracle user and ORAINVENTORY
group have restricted access to log files.The
other users have execute privileges.
Files in
$ORACLE_HOME/sqlplus
or
$ORACLE_HOME/rdbms
644
rw-r r
The oracle user should have read and
write privileges and the other users should
have read-only privileges to these files.
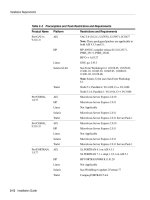
Table 4–1 Access Permissions on Oracle Directories and Files (Cont.)
Directories/Files Permissions Comments
Configuration Tasks to Perform as the root User
4-4 Installation Guide
Changing Group Membership of the Apache User
After installing the Oracle9i database, the APACHE account access to the
oraInventory directory needs to be removed in order to ensure database security.
Perform the following tasks:
1. Create a new group to which no other group or user has access.
2. Assign ownership of this group to Apache.
3. Change the APACHE account primary Group Identifier (GID) from the one that
has ownership of the oraInventory directory (typically ORAINVENTORY) to
the new group name.
Automating Database Startup and Shutdown for HP, Linux and Solaris (Optional)
Oracle Corporation recommends that you configure your system to automatically
start Oracle databases when your system starts up, and to shut down Oracle
databases when your system shuts down. Automatic database startup and
shutdown protects against improper shutdown of the database.
The dbstart and dbshut scripts are located in the $ORACLE_HOME/bin directory
and can be used to automate database startup and shutdown. The dbstart and
dbshut scripts reference the same entries in the oratab file, so the scripts must
apply to the same set of databases. For example, you cannot have the dbstart
script automatically start up databases sid1, sid2, and sid3, and the dbshut
script shut down only databases sid1 and sid2. You can, however, specify that the
dbshut script shut down a set of databases while the dbstart script is not used at
$ORACLE_HOME/network
/trace
777
rwxrwxrwx
or
730
rwx-wx
The oracle user and members of the
ORAINVENTORY group have access to
trace files when 730 is used in the
production environment. 777 allows broad
access to view and create trace files during
development.
All files under product admin
directories, like
$ORACLE_HOME/rdbms
/admin and
$ORACLE_HOME/sqlplus
/admin
644
-rw-r r
SQL scripts should typically be run as the
SYS user.
Table 4–1 Access Permissions on Oracle Directories and Files (Cont.)
Directories/Files Permissions Comments
Configuration Tasks to Perform as the root User
Post-Installation 4-5
all. To do this, include a dbshut entry in the system shutdown file but omit the
dbstart entry from the system startup files.
Perform the following tasks to set up the dbstart and dbshut scripts so that they
are called at system startup. This process must be completed for every new
database that you want to configure for automated startup and shutdown.
1. Edit the /var/opt/oracle/oratab file for Solaris and /etc/oratab file for
HP and Linux.
Database entries in the oratab file appears in the following format:
ORACLE_SID:ORACLE_HOME:{Y|N}
In the preceding command, Y or N specifies whether you want the dbstart
and dbshut scripts to start up and shut down the database. For each database
that you want to start up, find the ORACLE_SID entry identified by the sid in
the first field. Change the last field for each to Y.
For Oracle Real Application Clusters installation, this entry appears in the
following format:
DB_NAME:ORACLE_HOME:{Y|N}
In the preceding command, DB_NAME is the cluster database name. Y or N
specifies whether you want the dbstart and dbshut scripts to start up and
shut down the database.
2. In the /etc/init.d directory, create a dbora script similar to the following, if
it does not already exist. Be sure to give the full path of the dbstart utility.
#!/bin/sh
# Set ORA_HOME to be equivalent to the $ORACLE_HOME
# from which you wish to execute dbstart and dbshut;
#
# Set ORA_OWNER to the user id of the owner of the
# Oracle database in ORA_HOME.
ORA_HOME=/u01/app/oracle/product/9.2.0.1.0
ORA_OWNER=oracle
if [! -f $ORA_HOME/bin/dbstart]
See Also: init command in your UNIX system documentation
for more information on system startup and shutdown procedures.
Configuration Tasks to Perform as the root User
4-6 Installation Guide
then
echo "Oracle startup: cannot start"
exit
fi
case "$1" in
’start’)
# Start the Oracle databases:
# The following command assumes that the oracle login
# will not prompt the user for any values
su - $ORA_OWNER -c $ORA_HOME/bin/dbstart &
;;
’stop’)
# Stop the Oracle databases:
# The following command assumes that the oracle login
# will not prompt the user for any values
su - $ORA_OWNER -c $ORA_HOME/bin/dbshut &
;;
esac
3. Create symbolic links to the dbora script in the appropriate run-level script
directories, as follows:
# ln -s /etc/init.d/dbora /etc/rc0.d/K10dbora
# ln -s /etc/init.d/dbora /etc/rc3.d/S99dbora
Automating Database Startup and Shutdown for AIX (Optional)
Oracle Corporation recommends that you configure your system to automatically
start Oracle databases when your system starts up, and to shut down Oracle
databases when your system shuts down. Automatic database startup and
shutdown protects against improper shutdown of the database.
Automating Database Startup
Perform the following tasks to set up the dbstart and dbshut scripts so that they
are called at system startup. This process must be completed for every new
database that you want to configure for automated startup:
1. Edit the /etc/oratab file.
Configuration Tasks to Perform as the root User
Post-Installation 4-7
Database entries in the oratab file appears in the following format:
ORACLE_SID:ORACLE_HOME:{Y|N}
In the preceding command, Y or N specifies whether you want the dbstart
and dbshut scripts to start up and shut down the database.
For Oracle Real Application Clusters installation, this entry appears in the
following format:
DB_NAME:ORACLE_HOME:{Y|N}
In the preceding command, DB_NAME is the cluster database name. Y or N
specifies whether you want the dbstart and dbshut scripts to start up and
shut down the database.
2. For each database that you want to start up, find the ORACLE_SID entry
identified by the sid in the first field. Change the last field for each to Y.
3. Add the dbstart script to the /etc/inittab file:
# mkitab "oradb:2:wait:/bin/su oradb -c|/$ORACLE_HOMES/bin/dbstart"
In the preceding command, oradb is the identifier of the oracle user for
which you want to start the database.
Automating Database Shutdown
Automate database and system shutdown by creating a script, shut, to start
dbshut and the system executable /etc/shutdown. Complete the following steps
to create the script:
1. If you have not already done so, edit the database entries of your
/etc/oratab file to enable dbstart and dbshut, as described in step 1 of
the dbstart instructions.
2. As root, create the shut shell script:
# cd /etc
cat > shut << EOF
? su oracle_owner -c /usr/oracle/bin/dbshut
? /etc/shutdown $* \
? [Ctrl-D]
# chmod u+x shut
3. Execute the following command to run the shut script and shut down the
database:
Configuration Tasks to Perform as the root User
4-8 Installation Guide
# /etc/shut -h now
This closes Oracle databases and shuts down the system with the specified options.
Automating Database Startup and Shutdown for Tru64 (Optional)
This process must be completed for every new database that you want to configure
for automated startup and shutdown. Perform the following tasks to start up and
shut down listeners and set up the dbstart and dbshut scripts so that they are
called at system startup:
1. Log in as root user.
2. Edit the /etc/oratab file.
Database entries in the /etc/oratab file appear in the following format:
ORACLE_SID:ORACLE_HOME:{Y|N}
In the preceding command, Y or N specifies whether you want the dbstart
and dbshut scripts to start up and shut down the database.
For Oracle Real Application Clusters installation, this entry appears in the
following format:
DB_NAME:ORACLE_HOME:{Y|N}
In the preceding command, DB_NAME is the cluster database name. Y or N
specifies whether you want the dbstart and dbshut scripts to start up and
shut down the database.
3. For each database that you want to start up, find the ORACLE_SID entry
identified by the sid in the first field. Change the last field for each to Y.
4. Change directory to /sbin/init.d.
5. Create a file named oracle, and use chmod to set the privileges to 750.
6. Add the following contents to the /sbin/init.d/oracle file:
Note: This script assumes that a password is not set for the
listener. If a password is set, the listener will not be stopped.
The ORACLE_HOME and ORACLE variables are examples. Use
information as appropriate for your installation.
Configuration Tasks to Perform as the root User
Post-Installation 4-9
#!/bin/sh
#
# change the value of ORACLE_HOME to be correct for your
# installation
ORACLE_HOME=/opt/oracle/product/9.2.0.1.0
PATH=${PATH}:$ORACLE_HOME/bin
HOST=‘hostname‘
#
# change the value of ORACLE to the login name of the
# oracle owner at your site
#
ORACLE=oracle
export ORACLE_HOME PATH
#
if [ ! "$2" = "ORA_DB" ] ; then
rsh $HOST -l $ORACLE /sbin/init.d/oracle $1 ORA_DB
exit
fi
#
LOG=$ORACLE_HOME/startup.log
touch $LOG
chmod a+r $LOG
#
case $1 in
'start')
echo "$0: starting up" >> $LOG
date >> $LOG
# Start Oracle Net
if [ -f $ORACLE_HOME/bin/tnslsnr ] ;
then
echo "starting Oracle Net listener"
$ORACLE_HOME/bin/lsnrctl start >> $LOG 2>&1 &
fi
echo "starting Oracle databases"
$ORACLE_HOME/bin/dbstart >> $LOG 2>&1
;;
'stop')
echo "$0: shutting down" >> $LOG
date >> $LOG
# Stop Oracle Net
if [ -f $ORACLE_HOME/bin/tnslsnr ] ;
then
echo "stopping Oracle Net listener"
$ORACLE_HOME/bin/lsnrctl stop >> $LOG 2>&1
Configuration Tasks to Perform as the oracle User
4-10 Installation Guide
fi
echo "stopping Oracle databases"
$ORACLE_HOME/bin/dbshut >> $LOG 2>&1
;;
*)
echo "usage: $0 {start|stop}"
exit
;;
esac
#
exit
7. Change the .rhosts file in the oracle user login home directory to allow
root login access to the account.
your_host_name root
8. Link files into the startup and shutdown directories by using the ‘ln -s’
command.
# ln -s /sbin/init.d/oracle /sbin/rc3.d/S99oracle
# ln -s /sbin/init.d/oracle /sbin/rc0.d/K01oracle
This file automatically starts and stops Oracle9i when the system is started or
stopped.
Configuration Tasks to Perform as the oracle User
Perform the following tasks as the oracle user:
❏ Updating UNIX Account Startup Files
❏ Setting Environment Variables
❏ Initializing the oraenv Script
❏ Backing Up the root.sh Script
❏ Setting Initialization Parameters
Updating UNIX Account Startup Files
Update the startup files of the oracle user and the UNIX accounts of oracle
users.
Configuration Tasks to Perform as the oracle User
Post-Installation 4-11
Setting Environment Variables
Set the following environment variables in the.profile or.login file of the
oracle user before using Oracle9i products. The settings that you use here should
correspond to the settings used during installation as described in "Set Environment
Variables" on page 2-36. The syntax for setting environment variables is as follows.
For the Bourne or Korn shell:
variable_name=value; export variable_name
For the C shell:
setenv variable_name value
Table 4–2 describes the Environment Variable Settings.
Caution: Do not define environment variables with names that
are identical to those used for Oracle processes such as CKPT, PMON,
and DBWR.
Table 4–2 Environment Variable Settings
Environment Variable Recommended Setting
ORACLE_HOME Set the ORACLE_HOME variable to specify the directory
containing the Oracle software for a particular release. The
OFA recommended value is:
$ORACLE_BASE/product/release
For example,
ORACLE_BASE variable is:
/u01/app/oracle, then the
ORACLE_HOME variable would be:
/u01/app/oracle/product/9.2.0.1.0
CLASSPATH Set the CLASSPATH variable to ensure Java functionality. The
CLASSPATH variable is different for various products.
CLASSPATH must include the following:
$ORACLE_HOME/jlib/<product jar file>:
$ORACLE_HOME/product/jlib/product_jar_file
See Also: Oracle9i Java documentation for more information
on setting the CLASSPATH variable.
Configuration Tasks to Perform as the oracle User
4-12 Installation Guide
LD_LIBRARY_PATH Set the LD_LIBRARY_PATH variable as $ORACLE_HOME/lib
for HP, Linux, Tru64, and Solaris 32-bit.
Set the LD_LIBRARY_PATH variable as
$ORACLE_HOME/lib32 for Solaris 64-bit.
LD_LIBRARY_PATH_64 Set the LD_LIBRARY_PATH_64 variable as
$ORACLE_HOME/lib for Solaris 64-bit.
SHLIB_PATH Set the SHLIB_PATH variable as $ORACLE_HOME/lib32 for
HP.
LIBPATH Set the LIBPATH variable as $ORACLE_HOME/lib32:
$ORACLE_HOME/lib for AIX.
ORACLE_SID Set the ORACLE_SID variable to specify the name of the
Oracle Server instance name. Oracle Corporation recommends
restricting it to no more than four characters to avoid filename
problems on different operating systems, as the sid is
incorporated in many files. If you do not remember the value
you entered when you were prompted by the Oracle Universal
Installer, you can find it listed in the installActions.log
file located in the oraInventory_location/ logs directory.
The oraInventory_location directory is defined in the
/etc/oraInst.loc file in AIX and
/var/opt/oracle/oraInst.loc file in HP, Linux, Solaris
and Tru64.
Table 4–2 Environment Variable Settings (Cont.)
Environment Variable Recommended Setting
Configuration Tasks to Perform as the oracle User
Post-Installation 4-13
PATH Make sure the new $ORACLE_HOME/bin directory is included
in the PATH setting.
AIX Path is $ORACLE_HOME/bin,/etc,
/usr/bin,/usr/bin/X11,/usr/lbin, and
/usr/local/bin, if it exists
HP Path is $ORACLE_HOME/bin,/usr/bin,/etc,
/usr/bin/X11 and /usr/local/bin, if it exists
Linux Path is $ORACLE_HOME/bin,/usr/bin,/bin,
/usr/bin/X11 and /usr/local/bin,if it exists
Solaris Path is $ORACLE_HOME/bin,/usr/ccs/bin,
/usr/bin,/etc,/usr/openwin/bin and
/usr/local/bin, if it exists
Tru64 Path is $ORACLE_HOME/bin,/usr/bin,/etc,
/usr/bin/X11 and /usr/local/bin,if it exists
See Also: Chapter 2, "Pre-Installation Requirements" for more
information on other PATH requirements.
TNS_ADMIN TNS_ADMIN specifies the directory containing the Oracle Net
Services configuration files.
Oracle Net Services configuration files are typically, but not
always located in the $ORACLE_HOME/admin/network
directory. Depending on the file, Oracle Net uses a different
search order to locate the file.
The search order for the sqlnet.ora and ldap.ora files is as
follows:
1. The directory specified by the TNS_ADMIN environment
variable, if set
2. /var/opt/oracle directory for Solaris and /etc
directory for AIX, HP, Linux, and Tru64.
3. The $ORACLE_HOME/admin/network directory
Table 4–2 Environment Variable Settings (Cont.)
Environment Variable Recommended Setting
Configuration Tasks to Perform as the oracle User
4-14 Installation Guide
Initializing the oraenv Script
You can use the oraenv script to set a common environment for Oracle software
users.
Single-Instance System
On a single-instance system, set the ORACLE_SID environment variable in the
.profile or.login file of the oracle user account. Enter the following
commands to initialize the oraenv file at login.
For the Bourne or Korn shell:
ORAENV_ASK=NO
. /usr/local/bin/oraenv
For the C shell:
set ORAENV_ASK = NO
source /usr/local/bin/coraenv
unset ORAENV_ASK
TWO_TASK Set the TWO_TASK variable to the default connect identifier to
use in the connect string. The default connect identifier does
not need to be specified in the connect string. For example, if
the TWO_TASK environment variable is set to sales, you can
connect to a database using the CONNECT
username/password command rather than the CONNECT
username/password@sales command.
See Also: Oracle9i Net Services Administrator’s Reference and
Oracle9i Administrator’s Reference Release 2 (9.2.0.1.0) for UNIX
Systems: AIX-Based Systems, Compaq Tru64 UNIX, HP 9000 Series
HP-UX, Linux Intel, and Sun Solaris for more information on
connect identifiers.
Note: The C shell uses the settings in coraenv file instead of the
oraenv file.
Table 4–2 Environment Variable Settings (Cont.)
Environment Variable Recommended Setting
Configuration Tasks to Perform as the oracle User
Post-Installation 4-15
Multiple-Instance System
On a multiple-instance System, include a list of instance names and commands
necessary to initialize the oraenv script at the end of the startup file of the oracle
user account.
Table 4–3 shows the required Bourne or Korn shell commands for initializing the
oraenv script on UNIX platforms.
Table 4–4 describes the C shell commands for initializing the oraenv script on UNIX
platforms.
Table 4–3 Bourne/Korn Commands to Initialize the oraenv Script on Multiple-Instance
Systems
Platforms Bourne or Korn Shell
Solaris
#!/bin/sh
echo "The SIDs on this machine are:"
cat /var/opt/oracle/oratab | awk -F: ’{print $1}’ |\
grep -v "#"
ORAENV_ASK="YES"
. /usr/local/bin/oraenv
AIX, HP, Linux and Tru64
#!/bin/sh
echo "The SIDs on this machine are:"
cat /etc/oratab | awk -F: ’{print $1}’ | grep -v "#"
ORAENV_ASK="YES"
. /usr/local/bin/oraenv
Table 4–4 C Shell Commands to Initialize the oraenv Script on Multiple-Instance
Systems
Platforms C shell
Solaris
#!/usr/bin/csh
echo "The SIDs on this machine are:"
cat /var/opt/oracle/oratab | awk -F: ’{print $1}’ |\
grep -v "#"
set ORAENV_ASK="YES"
source /usr/local/bin/coraenv
AIX, HP, Linux and Tru64
#!/usr/bin/csh
echo "The SIDs on this machine are:"
cat /etc/oratab | awk -F: ’{print $1}’ | grep -v "#"
set ORAENV_ASK="YES"
source /usr/local/bin/coraenv
Configuration Tasks to Perform as the oracle User
4-16 Installation Guide
Other Oracle User Startup Files
To create the same environment for all Oracle software user accounts, modify each
oracle user startup file to include the following addition at the end of the file:
■ For .profile files used by the Bourne or Korn shells, add:
. /usr/local/bin/oraenv
■ For .login files used by the C shell, add:
source /usr/local/bin/coraenv
■ The ORACLE_HOME and PATH environment variables are described in
"Setting Environment Variables" on page 4-11.
Update the oratab File
If you have created a database manually instead of using Database Configuration
Assistant, you must ensure the system configuration is reflected in the oratab file.
The oratab file is located in the /var/opt/oracle directory on Solaris and in the
/etc directory on AIX, HP, Linux and Tru64.
Add an entry for each server instance on the system in the following format:
ORACLE_SID:ORACLE_HOME:{Y|N}
In the preceding command, Y or N indicates whether you want to activate the
dbstart and dbshut scripts. Database Configuration Assistant automatically
adds an entry for each database it creates.
For Oracle Real Application Clusters installation, this entry appears in the following
format:
DB_NAME:ORACLE_HOME:{Y|N}
In the preceding command, DB_NAME is the cluster database name. Y or N
specifies whether you want the dbstart and dbshut scripts to start up and shut
down the database.
Backing Up the root.sh Script
Oracle Corporation recommends that you back up the root.sh script after a
successful product installation. If you install another product category later into the
same Oracle home directory, then the Oracle Universal Installer replaces the
contents of the existing root.sh script during the installation. If after a later
Configuration Tasks to Perform as the oracle User
Post-Installation 4-17
installation you require information from the original root.sh script, then you can
recover it from the backed up root.sh file.
For example, if you install Oracle9i Management Infrastructure into the same Oracle
home directory as a successful Oracle9i Server installation, then the Oracle
Universal Installer replaces the contents of the existing root.sh script during the
installation. Backing up the root.sh file after each product installation insures that
you have all root.sh files available for reference if necessary.
Setting Initialization Parameters
When you create a typical startup database using Database Configuration Assistant,
the initsid.ora parameters are automatically set. Change initialization
parameters to configure and tune the system for optimal performance. The default
initsid.ora file is located in the $ORACLE_BASE/admin/sid/pfile directory.
A template init.ora file is also in the $ORACLE_HOME/dbs directory. The file
contains settings for small, medium, and large databases, with the settings for
medium and large databases commented out in the file. The size settings are
relative to each other, but do not represent an empirical size of the database.
Manually modify the initialization parameters in the initsid.ora file with a
UNIX text editor. To activate the modified initsid.ora file, shut down and
restart the database.
Oracle Corporation recommends that you do not use symbolic character
representations such as question marks (?) for the ORACLE_HOME environment
variable in parameter files, as they might lead to startup errors.
To bring rollback segments online automatically with database startup, uncomment
the rollback_segments command in the initsid.ora file.
For example, change:
# rollback_segments = (r0, r1, r2, r3)
to:
rollback_segments = (r0, r1, r2, r3)
See Also: Oracle9i Administrator’s Reference Release 2 (9.2.0.1.0) for
UNIX Systems for more information on initsid.ora parameters
and other tuning and configuring initialization parameters.
Post-Installation for Installed Oracle Products
4-18 Installation Guide
Post-Installation for Installed Oracle Products
Perform the following required post-installation steps as necessary for your
installation. Not all products require post-installation steps.
■ Configuring Shared Server Parameters
■ Post-Upgrade Tasks for Oracle Internet Directory
■ Configuring Oracle Net Services
■ Configuring Oracle Messaging Gateway
Configuring Shared Server Parameters
Oracle servers configured with Shared Server require a higher setting for the
SHARED_POOL_SIZE initialization parameter, or a custom configuration that uses
the LARGE_POOL_SIZE initialization parameter. If you installed your server with
Oracle Universal Installer, then the value of the SHARED_POOL_SIZE parameter is
set automatically by Database Configuration Assistant. However, if you created a
database manually, increase the SHARED_POOL_SIZE parameter in the
initsid.ora file. Typically, you should add 1 KB for each concurrent user.
Post-Upgrade Tasks for Oracle Internet Directory
Perform the following post-upgrade tasks for Oracle Internet Directory:
■ Job Queue Processes Parameter in init.ora file
■ Default Subscriber Configuration
Job Queue Processes Parameter in init.ora file
Set the Job Queue Process parameter in the init.ora file of the database to the
following values:
■ For single-node, set the parameter to at least 1.
■ For multi-node, set the parameter to (Number of nodes - 1)
Perform the following tasks for single-node and multi-node upgrades.
Default Subscriber Configuration
The following information needs to be added to the root Oracle Context in the entry
identified by the following DN "cn=Common, cn=Products,
Post-Installation for Installed Oracle Products
Post-Installation 4-19
%RootOracleContextDN%". By default, the RootOracleContextDN is
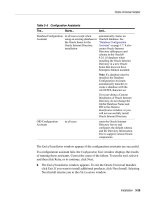
"cn=OracleContext". Table 4–5 lists the attributes in the Root Oracle Context.
The following information needs to be added in the subscriber-specific Oracle
Context in the entry identified by the following DN "cn=Common,
cn=Products, cn=oracleContext, <subscriber DN>." Table 4–6 lists the
attributes in the Default Subscriber Oracle Context.
Table 4–5 Attributes in the Root Oracle Context
Attributes Description
Subscriber Search Base
(orclSubscriberSearchBase)
This attribute identifies the node in the DIT under
which all subscribers are placed.
Subscriber Nick Name Attribute
(orclSubscriberNickNameAttribute)
This attribute identifies the nickname attribute to be
used when searching for a subscriber under the
subscriber search base.
Default Subscriber
(orclDefaultSubscriber)
This attribute identifies the root of your organization
(same as the value specified in the Upgrading
Subscriber screen of the OID Configuration Assistant.
Table 4–6 Attributes in the Default Subscriber Oracle Context
Attributes Description
User Search Base
(orclCommonUserBase)
This attribute identifies the node in the DIT
under which all users are placed. During the
upgrade, this attribute value is set to the
subscriber DN value.
Note: If this attribute is not set, then the
password policy under the Root Oracle Context
will be applied.
User Nick Name Attribute
(orclCommonNickNameAttribute)
This attribute identifies the nickname attribute to
be used when searching for a user under the user
search base.
Group Search Base
(orclCommonGroupSearchBase)
This attribute identifies the node in the DIT
under which all the groups are placed.
Note: You can update these attributes by using the Oracle
Directory Manager.
Post-Installation for Installed Oracle Products
4-20 Installation Guide
Password Policy Configuration
If the password policy exists in the earlier version of Oracle Internet Directory
(located under the DN "cn=pwdpolicyentry, cn=Oracle Internet
Directory"), then this policy will be applied to both the Root Oracle Context and
the default Subscriber Oracle Context. The original DN containing the policy
"cn=pwdpolicyentry, cn=Oracle Internet Directory" will be removed
from the earlier version. Otherwise, the default password policy is set up as part of
the Subscriber Oracle Context creation. By default, the password policy for the
default subscriber is set to the following values:
■ The user passwords expire in 60 days (pwdmaxage=5184000)
■ The account is locked out after 10 successive failed login attempts
(pwdlockout=1 and pwdmaxfailure=10)
■ Password syntax checking is enabled and the minimum length of user
passwords is five (pwdchecksyntax=1 and pwdminlength=5)
■ User passwords must contain at least one numeric character
(orclpwdalphanumeric=1).
See Also: Oracle Internet Directory Administrator’s Guide for more
information on these attributes.
Note: You can find the above attribute values in the
"cn=PwdPolicyEntry, cn=Common, cn=Products,
cn=oracleContext, <subscriber DN>".
The password policy under Root Oracle Context applies to all
entries under the root DSE. However, it does not apply to entries
under Root Oracle Context.
See Also: Oracle Internet Directory Administrator’s Guide for more
information on how to change the default password policy.
If the upgraded Oracle Internet Directory is integrating with other
Oracle components, appropriate access control policies will need to
be set up to grant necessary privileges to the Oracle components.
See Oracle Internet Directory Administrator’s Guide for more
information.
Post-Installation for Installed Oracle Products
Post-Installation 4-21
Configuring Oracle Net Services
Basic configuration of Oracle Net Services is done by Oracle Net Configuration
Assistant when it is started by Oracle Universal Installer during installation.
Verify and complete your initial configuration with the following steps:
1. Log in as root and reserve a port for the Oracle Net listener by making the
following entry in the /etc/services file of each Oracle Net Services node
on the network:
listener_name 1521/tcp #Oracle Net listener
In the preceding command, 1521 is the default port number. If you chose a
different port when you configured the Oracle Net listener, specify that port in
the /etc/services file.
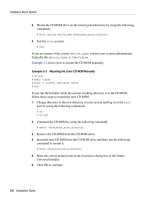
2. Check the status of the listener following the installation by using the following
command:
$ lsnrctl status listener_name
The listener_name field is required if the listener has a name other than the
default listener.
■ If the listener is not running, start it by using the following command:
$ lsnrctl start listener_name
3. Install and configure Oracle client software on a remote system, if necessary,
then start SQL*Plus to test the connection to the server.
$ sqlplus username/password@net_service_name
If you can successfully connect to the server with SQL*Plus, you have established
network connectivity over TCP/IP.
See Also: Oracle9i Net Services Administrator’s Reference for more
information on configuring a complete Oracle network.
"Oracle Net Configuration Assistant" on page 1-9 for more
information on how Oracle Net Configuration Assistant configures
your installation or how to run it as a standalone tool.
Post-Installation for Installed Oracle Products
4-22 Installation Guide
Configuring Oracle Messaging Gateway
Perform the following post-installation tasks before running the Oracle Messaging
Gateway.
■ Load Database Objects into the Database
■ Modify listener.ora file for External Procedure for Linux, Solaris 32-bit, and
Tru64
■ Modify listener.ora file for External Procedure for AIX, HP, and Solaris 64-bit
■ Modify tnsnames.ora file for External Procedure
■ Modify mgw.ora file for External Procedure
■ Create Users
■ Installation Verification for Oracle Messaging Gateway
Load Database Objects into the Database
1. Log in as SYSDBA.
2. Use SQL*Plus to run the catmgw.sql script located in the
$ORACLE_HOME/mgw/admin directory.
The catmgw.sql script does the following:
■ Loads the necessary database objects for Oracle Messaging Gateway, such
as roles, tables, views, object types, and the PL/SQL packages.
■ Creates public synonyms for Oracle Messaging Gateway PL/SQL packages
and types.
■ Creates two roles, MGW_ADMINISTRATOR_ROLE and MGW_AGENT_ROLE.
■ Creates a library alias for the agent's external procedure.
Modify listener.ora file for External Procedure for Linux, Solaris 32-bit, and Tru64
This section describes the procedure to modify the listener.ora file for external
procedure. Create a backup copy of the listener.ora file before you start.
The following example is specific to Solaris 32-bit.
1. Verify that the default IPC protocol address for external procedure is set. For
example,
LISTENER = (ADDRESS_LIST=
(ADDRESS=
Post-Installation for Installed Oracle Products
Post-Installation 4-23
(PROTOCOL=IPC)(KEY=EXTPROC))
2. Add static service information for the listener by setting a SID_DESC in the
listener.ora file. For example,
# Add a SID_DESC
SID_LIST_LISTENER= (SID_LIST=
(SID_DESC =
(SID_NAME= mgwextproc)
(ENVS="LD_LIBRARY_PATH=/private/oracle/orcl9i/jdk/jre/lib/
sparc:/private/oracle/orcl9i/lib")
(ORACLE_HOME=/private/oracle/orcl9i)
(PROGRAM = extproc))
In the preceding example, SID_NAME is the net service name in
tnsnames.ora file, ORACLE_HOME is the name of the Oracle home
directory, and PROGRAM is the name of the external procedure agent,
extproc. ENVS defines the LD_LIBRARY_PATH environment.
The LD_LIBRARY_PATH must contain the following paths for Linux and
Tru64:
■ For Linux, LD_LIBRARY_PATH=$ORACLE_HOME/jdk/jre/lib/i386:
$ORACLE_HOME/jdk/jre/lib/i386/server:
$ORACLE_HOME/rdbms/lib:$ORACLE_HOME/lib:
$ORACLE_HOME/mgw/lib
■ For Tru64, LD_LIBRARY_PATH=$ORACLE_HOME/jdk/jre/lib/alpha:
$ORACLE_HOME/jdk/jre/lib/alpha/classic:
$ORACLE_HOME/rdbms/lib:$ORACLE_HOME/lib:
$ORACLE_HOME/mgw/lib
Modify listener.ora file for External Procedure for AIX, HP, and Solaris 64-bit
This section describes the procedure to modify the listener.ora file for external
procedure for AIX, HP, and Solaris 64-bit.
The following example is specific to Solaris 64-bit.
1. Verify that the default IPC protocol address for External Procedure is set.
LISTENER = (ADDRESS_LIST=
(ADDRESS=
(PROTOCOL=IPC)(KEY=EXTPROC))
Post-Installation for Installed Oracle Products
4-24 Installation Guide
2. Add static service information for the listener by setting a SID_DESC in the
listener.ora file. For example,
# Add a SID_DESC
SID_LIST_LISTENER= (SID_LIST=
(SID_DESC =
(SID_NAME= mgwextproc)
(ENVS="LD_LIBRARY_PATH_32=/private/oracle/orcl9i/jdk/jre/lib/sparc:
/private/oracle/orcl9i/lib32")
(ORACLE_HOME=/private/oracle/orcl9i)
(PROGRAM = extproc32))
(SID_DESC =
(SID_NAME= ep_agt1)
(GLOBAL_DBNAME=sales.us.acme.com)
(ENVS=LD_LIBRARY_PATH=/private/oracle/orcl9i/lib)
(ORACLE_HOME=/private/oracle/orcl9i)
(PROGRAM = extproc))
)
For HP, replace the LD_LIBRARY_PATH_32
with SHLIB_PATH
.
The
LD_LIBRARY_PATH
will remain the same. For example,
■ SHLIB_PATH=$ORACLE_HOME/jdk/jre/lib/PA_RISC:
$ORACLE_HOME/jdk/jre/lib/PA_RISC/classic:
$ORACLE_HOME/rdbms/lib32:$ORACLE_HOME/lib32:
$ORACLE_HOME/mgw/lib32
For AIX, use LIBPATH for both LD_LIBRARY_PATH_32
and
LD_LIBRARY_PATH
.
For example,
■ LIBPATH=$ORACLE_HOME/jdk/jre/bin:
$ORACLE_HOME/jdk/jre/bin/classic:
$ORACLE_HOME/rdbms/lib32:$ORACLE_HOME/mgw/lib32
Modify tnsnames.ora file for External Procedure
This section describes the procedure to modify tnsnames.ora file for external
procedure. Create a backup copy of tnsnames.ora file before you start.
1. Add the net service name MGW_AGENT to the tnsnames.ora file. For example,
MGW_AGENT =
(DESCRIPTION=
(ADDRESS_LIST= (ADDRESS= (PROTOCOL=IPC)(KEY=EXTPROC)))
(CONNECT_DATA= (SID=mgwextproc) (PRESENTATION=RO)))
Post-Installation for Installed Oracle Products
Post-Installation 4-25
In the preceding example, the KEY value is the IPC Protocol defined in the
listener.ora file, and the SID value is the net service name defined in the
SID_DESC section of the listener.ora file.
2. Add the gateway agent to the tnsnames.ora file. For example,
AGENT_SERVICE =
(ADDRESS_LIST= (ADDRESS= (PROTOCOL=IPC)(KEY=EXTPROC))
(CONNECT_DATA= (SID=mgwsid)))
In the preceding example, the KEY value is the IPC Protocol defined in the
listener.ora file, and the SID value is the net service name defined in the
SID_DESC section of the listener.ora file.
Modify mgw.ora file for External Procedure
This section describes the procedure to modify mgw.ora file for external procedure.
1. Set the library path environment variable in the mgw.ora file. For example:
■ For AIX, LIBPATH=$ORACLE_HOME/jdk/jre/bin:
$ORACLE_HOME/jdk/jre/bin/classic:
$ORACLE_HOME/rdbms/lib32:$ORACLE_HOME/lib32:
$ORACLE_HOME/mgw/lib32
■ For HP, SHLIB_PATH=$ORACLE_HOME/jdk/jre/lib/PA_RISC:
$ORACLE_HOME/jdk/jre/lib/PA_RISC/classic:
$ORACLE_HOME/rdbms/lib32:$ORACLE_HOME/lib32:
$ORACLE_HOME/mgw/lib32
■ For Linux, LD_LIBRARY_PATH=
$ORACLE_HOME/jdk/jre/lib/i386:
$ORACLE_HOME/jdk/jre/lib/i386/server:
$ORACLE_HOME/rdbms/lib:$ORACLE_HOME/lib:
$ORACLE_HOME/mgw/lib
■ For Solaris 32-bit, LD_LIBRARY_PATH=
$ORACLE_HOME/jdk/jre/lib/sparc:$ORACLE_HOMErdbms/lib:
$ORACLE_HOME/lib:$ORACLE_HOME/mgw/lib
■ For Solaris 64-bit, LD_LIBRARY_PATH_32=
$ORACLE_HOME/jdk/jre/lib/sparc:
$ORACLE_HOME/rdbms/lib32:$ORACLE_HOME/lib32:
$ORACLE_HOME/mgw/lib32
Post-Installation for Installed Oracle Products
4-26 Installation Guide
■ For Tru64, LD_LIBRARY_PATH=$ORACLE_HOME/jdk/jre/lib/alpha:
$ORACLE_HOME/jdk/jre/lib/alpha/classic:
$ORACLE_HOME/rdbms/lib:$ORACLE_HOME/lib:
$ORACLE_HOME/mgw/lib
■ Any additional libraries needed for the Oracle Messaging Gateway agent to
access non-Oracle messaging systems, for example, the MQSeries libraries,
must be included in LD_LIBRARY_PATH for Linux, Solaris, and Tru64,
SHLIB_PATH for HP, and LIBPATH for AIX.
2. Set the CLASSPATH environment variable to include the following:
■ Oracle Messaging Gateway classes:
[ORACLE_HOME]/mgw/classes/mgw.jar
■ JDK internationalization classes:
[ORACLE_HOME]/jdk/jre/lib/i18n.jar
■ JDK runtime classes: [ORACLE_HOME]/jdk/jre/lib/rt.jar
■ Oracle JDBC classes: [ORACLE_HOME]/jdbc/lib/classes12.zip
■ Oracle internationalization classes:
[ORACLE_HOME]/jdbc/lib/nls_charset12.zip
■ SQLJ classes
– [ORACLE_HOME]/sqlj/lib/translator.zip
– [ORACLE_HOME]/sqlj/lib/runtime12.zip
■ Any additional classes needed for Oracle Messaging Gateway to access
non-Oracle messaging systems, for example, MQSeries classes
3. Set the log_directory and log_level parameters. (Optional)
4. Set the oracle_sid parameter in the mgw.ora file to avoid providing the
database connect string when configuring the Oracle Messaging Gateway
connection information.
Create Users
Perform the following steps to configure the Oracle Messaging Gateway.
■ Create Administration User
■ Create Agent User
■ Configure Oracle Messaging Gateway Connection