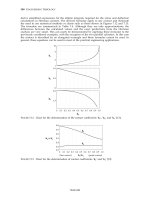
Engineering Analysis with Ansys Software Episode 2 Part 13 doc
Bạn đang xem bản rút gọn của tài liệu. Xem và tải ngay bản đầy đủ của tài liệu tại đây (1.72 MB, 20 trang )
Ch07-H6875.tex 24/11/2006 18: 34 page 424
424 Chapter 7 Application of ANSYS to contact between machine elements
A
Figure 7.162 Real Constants (Sets No. 2
and 12 shown).
A
B
Figure 7.163 Element Typefor RealConstant.
A
Figure 7.164 Real Constant Set for LINK1.
Next, the circular area, representing O-ring, is meshed.
From ANSYS Main Menu select Preprocessor → Meshing → MeshTool.
Figure 7.167 shows the resulting frame.
Ch07-H6875.tex 24/11/2006 18: 34 page 425
7.2 Example problems 425
Figure 7.165 Real Constants (Sets No. 2, 3, and 12 shown).
A
Figure 7.166 Circular Area by Dimensions.
Ch07-H6875.tex 24/11/2006 18: 34 page 426
426 Chapter 7 Application of ANSYS to contact between machine elements
A
C
D
B
Figure 7.167 MeshTool.
Ch07-H6875.tex 24/11/2006 18: 34 page 427
7.2 Example problems 427
A
Figure 7.168 Element Size on Picked Lines.
In the frame of Figure 7.167 select [A] Lines – Set and [B] Close. A new frame is
produced (see Figure 7.168).
Pick all four arcuate segments on the circumference of the circular area and click
[A] OK. A new frame shown in Figure 7.169 appears.
In the frame of Figure 7.169 enter: number of element divisions, [A] NDIV =
6 and uncheck box [B] NDIV can be changed. Clicking [C] OK implements the
selections made.
In the frame shown in Figure 7.167 (MeshTool), activate [C] Free button and
click [D] Mesh. In the appearing frame (Figure 7.170) click [A] Pick All to have the
circular area meshed.
Figure 7.171 shows the circular area after meshing process.
7.2.4.5 CREATING CONTACT INTERFACE
Next, the wall and the groove are modeled as nodal components with an area
equal to 1.
From ANSYS Main Menu select Preprocessing → Modelling → Create →
Nodes →In Active CS. The frame shown in Figure 7.172 appears.
The input into the frame of Figure 7.172 is as follows: node number =401 (it
is arbitrary selection but it has to be greater than any number allocated to existing
nodes), X =−2,Y =−2.5.
Ch07-H6875.tex 24/11/2006 18: 34 page 428
428 Chapter 7 Application of ANSYS to contact between machine elements
A
B
C
Figure 7.169 Element Sizes on Picked Lines.
A
Figure 7.170 Mesh Areas. Figure 7.171 Meshed O-ring.
Ch07-H6875.tex 24/11/2006 18: 34 page 429
7.2 Example problems 429
Figure 7.172 Create Nodes in Active Coordinate System.
In a similar way, the other nodes required for the groove and the wall as nodal
components are created. The input coordinates are as follows: Node number =402,
X =2.5, Y=−2.5; node number =403, X =2.5, Y =3; node number =404, X =−2,
Y =3; node number =405, X =−2.5, Y =5; node number =406, X =−2.5, Y =−5.
The nodes are shown in Figure 7.139.
Next, the groove and the wall elements are to be created using existing nodes with
numbers from 401 to 406.
From ANSYS Main Menu select Preprocessing → Modelling → Create →
Elements →Element Attributes. The frame shown in Figure 7.173 appears.
A
Figure 7.173 Element Attributes.
In the frame of Figure 7.173, the following selections were made: element type
number,TYPE =3 LINK1; material number, MAT =3; and real constant set number,
Ch07-H6875.tex 24/11/2006 18: 34 page 430
430 Chapter 7 Application of ANSYS to contact between machine elements
REAL =3. The selections are implemented by clicking on [A] OK button. All these
data refer to the wall and the groove for which LINK1 was selected as the element
type at the beginning of the analysis.
A
Figure 7.174 Select Entities (elements of Type 1:
HYPER74).
Now, the nodal components are going to
be created.
O-ring as a component
From ANSYS Utility Menu select Select →
Entities. The frame shown in Figure 7.174
appears.
The selections made are shown in Fig-
ure 7.174. Pressing [A] Sele All button imple-
ments the selections made.
Next, from ANSYS Utility Menu select
Select →Entities. The frame shown in Fig-
ure 7.175 appears.
Selections made are shown in Figure 7.175.
This time [A] Nodes which are attached to
elements already selected by action described
above (see Figure 7.174) are selected. That
is why the selection in Figure 7.175 is [B]
Attached to and [C] Elements is activated. The
selection of nodes takes place from a full set
of elements; therefore, [D] From Full button
is activated. Pressing [E] OK implements the
selections.
Finally, from ANSYS Utility Menu select
Select →Entities. Figure 7.176 shows the
frame resulting from the selection.
This time [A] Nodes located on [B] Exte-
rior of the circular area (representing O-ring) are selected. The selection of nodes
takes place from the set of nodes already selected in the process described above
(see Figure 7.175). This is why, [C] Reselect button is activated. Pressing [D] OK
implements the selections made.
From ANSYS Utility Menu select Select →Comp/Assembly →Create Compo-
nent. In response to this selection, the frame shown in Figure 7.177 appears.
As it is seen in Figure 7.177, component name, Cname =O-ring was entered.
Pressing [A] OK creates nodal component with the name O-ring.
From ANSYS Utility Menu select Select → Entities to call up frame shown in
Figure 7.178.
In order to select all elements involved in the model, [A] SeleAll should be pressed
followed by [B] OK. Pressing OK creates another frame of Figure 7.179.
[A] Pick All should be clicked in order to implement the selection of all nodes.
Groove as a component
From ANSYS Utility Menu select
Select →Entities. The frame shown in Figure 7.180
appears.
Ch07-H6875.tex 24/11/2006 18: 34 page 431
7.2 Example problems 431
A
B
C
D
E
Figure 7.175 Select Entities (nodes
attached to elements).
A
B
C
D
Figure 7.176 Select Entities (nodes,
exterior).
A
Figure 7.177 Create Component (O-ring).
Ch07-H6875.tex 24/11/2006 18: 34 page 432
432 Chapter 7 Application of ANSYS to contact between machine elements
A
B
Figure 7.178 Select Entities (all elements
of Type 1: HYPER74).
A
Figure 7.179 Select elements.
Nodes and By Num/Pick should be selected. Pressing [A] OK creates another
frame shown in Figure 7.181.
Nodes from 401 to 404, belonging to the groove, should be picked and afterward
[A] OK button pressed to implement the selection.
Next, from ANSYS Utility Menu select Select → Comp/Assembly → Create
Component. The frame shown in Figure 7.182 appears.
Enter Groove in the component name box and press [A] OK to create nodal
component called “groove.”
Wall as a component
From ANSYS Utility Menu select Select →Entities. The frame shown in Figure 7.180
appears. As shown in Figure 7.180, Nodes and By Numb/Pick should again be selected
and implemented by pressing [A] OK. This recalls frame shown in Figure 7.181. This
time nodes 405 and 406, belonging to the wall, should be picked and [A] OK pressed.
Next, from ANSYS Utility Menu select Select → Comp/Assembly → Create
Component. Then, a frame shown in Figure 7.183 appears.
As shown in Figure 7.183, component name is Wa ll . Pressing [A] OK implements
the selection.
Ch07-H6875.tex 24/11/2006 18: 34 page 433
7.2 Example problems 433
A
Figure 7.180 Select Entities.
A
Figure 7.181 Select nodes (nodes
401 to 404 defining groove).
A
Figure 7.182 Create Component (groove).
Finally,from ANSYS Utility Menu select Select →Entities and in the frame enter
selections as shown in Figure 7.184.
Click [A] Sele All button and in the next appearing frame press Pick All in order
to select all nodes belonging to the model of the O-ring assembly.
This action ends the process of creating the model of the O-ring assembly. The
plot of all elements involved looks like that shown in Figure 7.185.
Ch07-H6875.tex 24/11/2006 18: 34 page 434
434 Chapter 7 Application of ANSYS to contact between machine elements
A
Figure 7.183 Create Component (wall).
A
Figure 7.184 Select Entities (all nodes).
Figure 7.185 Plot of elements in the
O-ring assembly.
Contact elements
The final stage in the modeling process is the creation of contact elements.
From ANSYS Main Menu select Preprocessing → Modelling → Create →
Elements → Element Attributes. As a result of this selection, the frame shown in
Figure 7.186 appears.
Ch07-H6875.tex 24/11/2006 18: 34 page 435
7.2 Example problems 435
A
Figure 7.186 Element Attributes.
It is seen in Figure 7.186 that Type 2 CONTACT48 elements were selected as
well as material number, MAT =2 and the real constant set number, REAL =2.
This selection is pertinent to contact elements at the groove and is implemented by
pressing [A] OK button. Next, from ANSYS Main Menu select Preprocessing →
Modelling →Create → Elements →Surf/Contact →Node to Surf. This selection
creates a frame shown in Figure 7.187.
A
Figure 7.187 Create Elements at Contact Surfaces (the groove).
Ch07-H6875.tex 24/11/2006 18: 34 page 436
436 Chapter 7 Application of ANSYS to contact between machine elements
A
Figure 7.188 Element Attributes (the wall).
Selections made and shown in Figure 7.187 are as follows: contactor node compo-
nent, Ccomp =O-RING;target surf node compon, Tcomp =GROOVE; and number
of elements to generate, NUMC =9. Selections are implemented by clicking [A] OK.
From ANSYS Main Menu select Preprocessing → Modelling → Create →
Elements → Element Attributes. As a result of this selection, the frame shown in
Figure 7.188 appears.
The selections made, as shown in Figure 7.188, are as follows: element type
number, TYPE 2 =CONTACT48; material number, MAT =2; and real constant set
number, REAL =12. All selections made are associated with the wall. By clicking [A]
OK selections made are implemented.
Next, from ANSYS Main Menu select Preprocessing →Modelling →Create →
Elements → Surf/Contact → Node to Surf. This creates a frame shown in Fig-
ure 7.189. Inputs into the frame are shown and they are implemented by clicking
[A] OK.
The final action is to reorder elements in the X-direction.
From ANSYS Main Menu select Preprocessor →Numbering Ctrls →Element
Reorder →Reorder by XYZ. This creates a frame shown in Figure 7.190.
In the pull down menu [A] Coord direction for sort the option [B] X direction
only was selected.
7.2.4.6 SOLUTION
In the solution stage, various selections are made affecting execution of the solution.
Ch07-H6875.tex 24/11/2006 18: 34 page 437
7.2 Example problems 437
A
Figure 7.189 Create Elements at Contact Surfaces (the wall).
A
B
Figure 7.190 Reorder Elements by Geometric Sort.
From ANSYS Main Menu select Solution →Analysis Type: Sol’n Controls.In
response, the frame shown in Figure 7.191 appears.
As shown in Figure 7.191, the following selections are made: Analysis
Options =Large Displacement Static (because a hyper-elastic material is involved);
Time at end of load step =1; and Automatic time stepping =On. [A] Time incre-
ment should be activated and then, Time step size =1 ×10
−2
; Minimum time
step =1 ×10
−4
. In the [B] Frequency tab, select Write N number of substeps and
use N =5.
Ch07-H6875.tex 24/11/2006 18: 34 page 438
438 Chapter 7 Application of ANSYS to contact between machine elements
A
B
C
Figure 7.191 Solution Controls.
Next, press [C] Nonlinear tab located at the top of the frame of Figure 7.191. New
frame shown in Figure 7.192 appears.
In this frame, showing nonlinear options, the following selection is made: DOF
solution predictor =On after 1 substep. Additionally, [A] Set convergence criteria
button ought to be pressed in order to set convergence value appropriate for the
analysis to be performed here. The frame shown in Figure 7.193 is produced.
Button [A] Replace should be pressed in order to modify the default convergence
criteria. The frame shown in Figure 7.194 is produced.
In the box minimum reference value, [A] MINREF =0.1, should be typed and
[B] OK button pressed to implement the selection.
After defining solution options, loads acting on the O-ring should be applied.
There are two types of loading to be considered here. First type of loading is produced
by moving the wall 0.2 units in X-direction. This results in squeezing of the O-ring.
The second type of loading is produced by simultaneously applying squeeze and
pressure over the upper surface of the O-ring.
From ANSYS Main Menu select Solution →Define Loads →Apply → Struc-
tural → Displacement → On Nodes. The frame shown in Figure 7.195 appears.
Nodes belonging to the wall and the groove should be picked (nodes with numbers
401–406).
When that is done, [A] OK button should be pressed and the frame shown in
Figure 7.196 appears.
As it is seen in Figure 7.196, All DOF option is selected and the displacement
value, VAL U E =0 entered. Pressing [A] OK button implements the selection, which
means that both the groove and the wall are initially constrained in all direction.
Ch07-H6875.tex 24/11/2006 18: 34 page 439
7.2 Example problems 439
A
Figure 7.192 Solution Controls.
A
Figure 7.193 Default Nonlinear Convergence Criteria.
Ch07-H6875.tex 24/11/2006 18: 34 page 440
440 Chapter 7 Application of ANSYS to contact between machine elements
A
B
Figure 7.194 Nonlinear Convergence Criteria (modified).
A
Figure 7.195 Apply U,ROT on Nodes.
Ch07-H6875.tex 24/11/2006 18: 34 page 441
7.2 Example problems 441
A
Figure 7.196 Apply U,ROT on Nodes (All DOF selected).
Next, the wall should be moved by 0.2 units in the X-direction to squeeze the
O-ring and, through that, apply load on it.
From ANSYS Main Menu select Solution →Define Loads →Apply → Struc-
tural →Displacement →On Nodes. The frame shown in Figure 7.195 appears. This
time nodes 405 and 406 (belonging to the wall) should be picked and [A] OK button
pressed. This action produces a frame shown in Figure 7.197.
A
Figure 7.197 Apply U,ROT on Nodes.
Ch07-H6875.tex 24/11/2006 18: 34 page 442
442 Chapter 7 Application of ANSYS to contact between machine elements
Selections made and shown in Figure 7.197 are as follows: DOFs to be
constrained =UX; and displacement value, VALUE =0.2. Clicking [A] OK button
implements the selections made.
First load step (solution)
Load on the O-ring is due to the movement of the wall in X-direction. This load was
applied in the way described above. Now, the solution stage ought to be initiated.
From ANSYS Main Menu select Solution → Solve → Current LS. A frame
shown in Figure 7.198 appears together with another frame, which gives a summary
of solution options selected.
A
Figure 7.198 Solve Current Load Step.
After checking the correctness of information it should be closed by selecting File
→Close. Next, [A] OK button should be pressed to initiate the solution.
7.2.4.7 POSTPROCESSING (FIRST LOAD STEP)
In order to observe deformations and stresses produced by the load applied to the
O-ring through the movement of the wall in X-direction by 0.2 units, a postprocessing
facilities of ANSYS should be used.
From ANSYS Main Menu select General Postproc → Read Results → By Load
Step. Figure 7.199 shows the resulting frame.
Entries to the frame are shown in Figure 7.199. Pressing [A] OK button
implements the selections made.
From ANSYS Main Menu select General Postproc → Plot Results →Contour
Plot →Nodal Solu. The frame shown in Figure 7.200 appears.
Selections made and shown in Figure 7.200 are as follows: Item to be
contoured =Stress and von Mises SEQV. Clicking [A] OK button results in the
plot shown in Figure 7.201.
In order to see, simultaneously, deformed and undeformed shapes, a button [B]
Def +undef edge should be activated in the frame shown in Figure 7.200 and [A]
OK tab pressed. Figure 7.202 shows the resulting image.
Ch07-H6875.tex 24/11/2006 18: 34 page 443
7.2 Example problems 443
A
Figure 7.199 Read Results by Load Step Number.
A
B
Figure 7.200 Contour Nodal Solution Data.