Manning Windows Forms Programming (phần 11) ppsx
Bạn đang xem bản rút gọn của tài liệu. Xem và tải ngay bản đầy đủ của tài liệu tại đây (469.28 KB, 50 trang )
466 CHAPTER 14 LIST VIEWS
We employ the using statement to ensure that our dialog is properly disposed of at
the end of the handler. Also note how multiple exceptional handling blocks are used
to catch errors that occur. You may wonder if it is expensive to perform such opera-
tions, especially if you are familiar with exception-handling mechanisms in languages
like C and C++ where it indeed can be an expensive proposition to call
try multiple
times. In C#, the exception handling is built into the language and the compiler, so
checking for exceptions as we do here is not much more expensive than an
if state-
ment. The expense comes if an exception actually occurs, since the compiler must
7 Display an error message if the
album could not be opened.
Note: Here and throughout the
remainder of the book, we use
the simplest form of the
Mes-
sageBox dialog. Feel free to use
an alternate form if you prefer.
See chapter 8 for detailed infor-
mation on the
MessageBox
class.
if (album == null)
{
MessageBox.Show("The properties for "
+ "this album cannot be displayed.");
return;
}
8 Display the AlbumEditDlg if the
album is opened successfully.
using (AlbumEditDlg dlg
= new AlbumEditDlg(album))
{
9 If any changes are made by the
user, save these changes into the
album file. Catch any errors that
occur.
if (dlg.ShowDialog() == DialogResult.OK)
{
// Save changes made by the user
try
{
album.Save();
}
catch (Exception)
{
MessageBox.Show("Unable to save "
+ "changes to album.");
return;
}
10 Also update any subitem text that
might be affected by the user’s
changes.
// Update subitem settings
item.SubItems[MainForm.
AlbumTitleColumn].Text
= album.Title;
bool hasPwd = (album.Password != null)
&& (album.Password.Length > 0);
item.SubItems[MainForm.
AlbumPwdColumn].Text
= (hasPwd ? "y" : "n");
}
}
11 Dispose of the album at the end
of the method.
album.Dispose();
}
ADD A MENU TO DISPLAY ALBUM PROPERTIES (continued)
Action Result
SELECTION AND EDITING 467
then construct the
Exception object, unravel the call stack and clean up any objects
as required, plus locate the appropriate
catch block for the particular exception.
The fact that exception clean up can impact a program’s performance is one more
reason to ensure that you throw exceptions only for truly exceptional conditions.
Common problems or situations should be handled through the use of an error code.
As a case in point, this is one reason why file-related read and write methods in the
.NET Framework do not raise an exception when the end of a file is reached.
Back to our code, this discussion tells us that our use of
try and catch here
should not affect our performance very much since we do not normally expect an
exception to occur other than when opening an invalid album. We could improve the
performance if we kept track of the invalid albums during the
OnLoad method, since
then we would not need to re-open these albums again here. We will not actually do
this here, but it was worth a mention.
The remainder of the previous code is fairly self-explanatory. One other point
worth mentioning is our use of the
Tag property. This works well in our Display-
AlbumProperties
method since all we need to keep track of is the album’s file
name. It is also possible here to assign a
PhotoAlbum instance to the Tag property
rather than a
string instance, although this requires extra memory and other
resources to maintain the album for each item in memory.
An alternative approach often used to track more complex relationships is to
derive a new class from the
ListViewItem class. For our application, an excerpt of
such a class might look something like the code shown in listing 14.1. Since this class
is a
ListViewItem object, instances of it can be assigned to and manipulated within
the
ListView control. Whenever the PhotoAlbum object for an album is required,
a list view item can be downcast to the
PhotoAlbumListItem class, where the
Album property and other members may be used to manipulate the album.
public class PhotoAlbumListItem : ListViewItem, IDisposable
{
private string _fileName;
private PhotoAlbum _album;
PhotoAlbumListItem(string file)
{
_fileName = file;
_album = null;
}
public void Dispose()
{
// Dispose implementation
. . .
}
public PhotoAlbum Album
Listing 14.1 Example deriving a new class from ListViewItem (not our approach)
468 CHAPTER 14 LIST VIEWS
{
get
{
if (_album == null)
{
_album = new PhotoAlbum();
_album.Open(_fileName);
}
return _album;
}
}
// Other methods as required
. . .
}
For our purposes the use of a simple string value in the Tag property was sufficient to
display the album’s properties dialog. Another feature worth supporting here is the
ability to edit item labels.
14.4.2 S
UPPORTING LABEL EDITS
Editing an item label in place is one of the advantages the ListView class has over
ListBox objects. In our application it would be nice if the user could edit the album
name in order to rename an album file. This section will show how to support this
feature.
Label editing is disabled by default, and turned on by setting the
LabelEdit
property to true. An actual edit of an item is initiated by the BeginEdit method
of the
ListViewItem class. The corresponding ListView control receives two
events during the editing process. The
BeforeLabelEdit event occurs before the
edit process begins, while the
AfterLabelEdit event occurs when the user com-
pletes the edit by pressing the Enter key or clicking outside of the edit area. Event han-
dlers for both events receive the
LabelEditEventArgs class as their event handler.
See .NET Table 14.7 for an overview of this class.
We will allow an item to be edited in two ways. The first way is through a Name
menu under the top-level Edit menu, and the second way is by selecting an item and
pressing the F2 key. This matches the keyboard shortcut supported by Windows
Explorer, so it seems appropriate here.
In a production environment, we would probably handle both events in our
application. In the
BeginLabelEdit event handler we would make sure the album
is valid and can be successfully opened. This provides some assurance that the edit will
be successful before the user begins typing. The
AfterLabelEdit event handler
would update the album with a new title and store the album to disk. It would also
update the album file on disk with the change.
SELECTION AND EDITING 469
Since we are not in a production environment, we will take the easy way out and only
handle the
AfterLabelEdit event. This means a user may edit an album only to
find that he or she cannot save his changes, which is not the best interface from a
usability perspective.
The code changes required are given in the following steps:
.NET Table 14.7 LabelEditEventArgs class
The LabelEditEventArgs class represents the event arguments received by BeforeLa-
belEdit and AfterLabelEdit event handlers for the ListView class. This class is part of
the
System.Windows.Forms namespace, and inherits from the System.EventArgs class.
Public
Properties
CancelEdit Gets or sets whether the edit operation should be cancelled.
This property can be set both before and after the item is
edited.
Item Gets the zero-based index into the list view’s
Items collection
of the
ListViewItem to be edited.
Label Gets the new text to assign to the label of the indicated item.
INITIATE LABEL EDITING
Action Result
1 In the MainForm.cs [Design]
window, set the
LabelEdit
property of the
ListView control
to
true.
Item labels in the list view may now be edited.
2 Add a Name menu to the top of
the Edit menu.
3 Add a
Click event handler for
this menu.
private void menuEditLabel_Click
(object sender, System.EventArgs e)
{
4 Within this handler, if an item is
selected, edit the item.
if (listViewMain.SelectedItems.Count == 1)
listViewMain.SelectedItems[0].BeginEdit();
}
Note: This code only edits the label if a single item
is selected. While we do not permit multiple items
to be selected in our
ListView control, this code
establishes an appropriate behavior in case such
selection is ever permitted in the future.
5 Add a
KeyDown event handler for
the ListView control.
private void listViewMain_KeyDown
(object sender, System.Windows.
Forms.KeyEventArgs e)
{
Settings
Property Value
(Name) menuEditLabel
Text &Name
470 CHAPTER 14 LIST VIEWS
That’s all it takes to begin an edit. The actual work of interacting with the user is han-
dled by the framework. When the user is finished, we can pick up the result in an
AfterLabelEdit event handler. There is also a BeforeLabelEdit event that is
useful for selectively permitting an edit or altering an item before the edit begins. For
our purposes, the
AfterLabelEdit event will suffice.
6 If the F2 key is pressed and an
item is selected, edit the item.
if (e.KeyCode == Keys.F2)
{
if (listViewMain.SelectedItems.Count == 1)
{
listViewMain.SelectedItems[0].
BeginEdit();
e.Handled = true;
}
}
}
INITIATE LABEL EDITING (continued)
Action Result
PROCESS A LABEL EDIT
Action Result
7 Add an
AfterLabelEdit
event handler for the
ListView control.
private void listViewMain_AfterLabelEdit
(object sender, System.Windows.
Forms.LabelEditEventArgs e)
{
8 If the user cancelled the edit,
then we are finished.
Note: For example, if the
user presses the Esc key dur-
ing editing, this handler is
invoked with a
null label.
if (e.Label == null)
{
// Edit cancelled by the user
e.CancelEdit = true;
return;
}
9 In this handler, locate the item
to be edited.
ListViewItem item = listViewMain.Items[e.Item];
10 Update the album name, and
cancel the edit if an error
occurs.
Note: Once again we sepa-
rate the logic to operate on
our album into a separate
method.
if (UpdateAlbumName(e.Label, item) == false)
e.CancelEdit = true;
}
SELECTION AND EDITING 471
This code uses some methods from the
Path and File classes to manipulate the file
name strings and rename the album file. Our application now supports displaying
album properties and editing of album labels. The next topic of discussion is item
activation.
11 Add the UpdateAlbumName
method to update the title of
the album.
private bool UpdateAlbumName
(string newName, ListViewItem item)
{
string fileName = item.Tag as string;
string newFileName
= RenameFile(fileName, newName, ".abm");
if (newFileName == null)
{
MessageBox.Show(
"Unable to rename album to this name.");
return false;
}
// Update Tag property
item.Tag = newFileName;
return true;
}
12 Implement the RenameFile
method to construct the new
name for the file.
private string RenameFile
(string origFile, string newBase, string ext)
{
string fileName = Path.
GetDirectoryName(origFile) + "\\" + newBase;
string newFile = Path.ChangeExtension(fileName,
ext);
13 Rename the file using the
Move method in the File
class.
try
{
File.Move(origFile, newFile);
return newFile;
}
14 Return null if an error
occurs.
catch (Exception)
{
// An error occurred
return null;
}
}
PROCESS A LABEL EDIT (continued)
Action Result
How-to
a. Retrieve the file name from
the
Tag property for the
item.
b. Rename the file using a pri-
vate method that returns
the new name.
c. Inform the user if the file
could not be renamed.
d. Otherwise, update the
Tag
property with the new
name.
How-to
a. Use the GetDirecto-
ryName method to retrieve
the directory for the file.
b. Use the
ChangeExtension
method to ensure the file
has the correct extension.
472 CHAPTER 14 LIST VIEWS
14.5 ITEM ACTIVATION
As you might expect, item activation is the means by which an item is displayed or
otherwise activated by the control. Normally, activation is just a fancy way to say
double-click. In our
ListBox class in chapter 10, we activated an item in the list by
handling the
DoubleClick event and displaying the properties dialog associated
with the item. Such behavior is activation.
The reason for the fancy term is that the
ListView class allows activation other
than a double-click to be supported. The
Activation property determines the type
of activation supported, based on the
ItemActivation enumeration. The possible
values for this enumeration are shown in .NET Table 14.8. Note that the
OneClick
style is similar to an HTML link in a Web browser. In our program, we will stick with
the standard activation.
Regardless of how items are activated, an
ItemActivate event occurs whenever an item
is activated. The event handler for this event receives a standard
System.EventArgs
parameter, so the activated item is obtained from the SelectedItems collection.
The activation behavior for our MyAlbumExplorer application will display the
Photographs in the selected album. This is a rather complicated change, since the
columns and list item behavior must now accommodate the display of both albums
and photos here. The fact that we were careful to separate much of the album logic
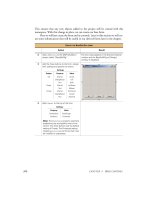
into individual methods along the way will help us keep our code straight. Figure 14.6
shows our application with photographs displayed in the
ListView control. These
photographs are sorted by the date each photo was taken. The icon used here might
not be your first choice for a photograph icon, but it will suffice for our purposes. If
you find another icon you prefer, or are feeling creative, you can use an alternate icon
in your application.
.NET Table 14.8 ItemActivation enumeration
The ItemActivation enumeration specifies the type of activation supported by a control.
This enumeration is part of the
System.Windows.Forms namespace.
Enumeration
Values
OneClick A single click activates an item. The cursor appears as a
hand pointer, and the item text changes color as the mouse
pointer passes over the item.
Standard A double-click activates an item.
TwoClick A double-click activates an item, plus the item text changes
color as the mouse pointer passes over the item.
ITEM ACTIVATION 473
14.5.1 H
ANDLING ITEM ACTIVATION
The ultimate goal here is to display either the list of albums or the list of photos in an
album within our
ListView control. To do this, we must keep track of whether
albums or photographs are currently shown in the view, and whether the
PhotoAl-
bum
object corresponds to the view when photographs are displayed. The following
steps create private fields in our
Form to track this information, and also implement
an event handler for the
ItemActivate event. Once these are available, we will look
at the additional steps required to fully support activation.
Set the version number of the MyAlbumExplorer application to 14.5.
Figure 14.6
In this detailed view
of Photographs, note
how three dots auto-
matically appear
when the text length
exceeds the width of
the column.
HANDLE THE ITEMACTIVATE EVENT FOR THE LIST VIEW
Action Result
1 Add private fields to track the
current
ListView control contents
in the MainForm.cs code window.
private bool _albumsShown = true;
private PhotoAlbum _album = null;
2 Add an ItemActivate event
handler to the
ListView control.
private void listViewMain_ItemActivate
(object sender, System.EventArgs e)
{
3 If albums are currently shown and
an item is selected, then open the
album corresponding to the
selected item.
if (_albumsShown &&
listViewMain.SelectedItems.Count > 0)
{
ListViewItem item
= listViewMain.SelectedItems[0];
string fileName = item.Tag as string;
// Open the album for this item
PhotoAlbum album = null;
if (fileName != null)
album = OpenAlbum(fileName);
if (album == null)
{
MessageBox.Show("The photographs for "
+ "this album cannot be displayed.");
return;
}
4 If the album loads successfully,
load the album’s photographs into
the list view.
// Switch to a photograph view
LoadPhotoData(album);
}
}
474 CHAPTER 14 LIST VIEWS
Of course, we need to implement the LoadPhotoData method that appears in this
code. This method should set up the view to display photographs, including an
appropriate set of columns, and reset the list of items to hold the set of photographs.
Once this is done, there is also the support we created for our albums that must now
be implemented for photographs. To help us keep our facts straight, let’s make a list
of the tasks we need to perform here.
• Define new columns for displaying photographs.
• Populate the
ListView control with the photographs in the album.
• Support column sorting.
• Display the photo properties dialog.
• Support item editing on photographs.
• Allow the user to select the desired view, albums or photos.
We will cover each of these topics in a separate section, in the same order as shown here.
14.5.2 D
EFINING NEW COLUMNS
As you’ll recall, we defined the list of columns for our control using the Column-
Header Collection Editor dialog in Visual Studio .NET. Now that we need to display
different columns depending on what is displayed, this method no longer makes
sense. Instead, we will create the columns programmatically in the
LoadAlbumData
method. Our new LoadPhotoData method we have yet to implement will define
the columns for displaying photographs.
The easiest way to add columns to a
ListView control programmatically is
through the
Columns property. The following steps remove the columns we created
in Visual Studio and will add them via the
LoadAlbumData method.
CREATE THE ALBUM COLUMNS PROGRAMMATICALLY
Action Result
1 In the MainForm.cs [Design]
window, remove the four
columns currently defined for
the
Columns property.
How-to
Use the ColumnHeader
Collection Editor dialog.
Note: This is not strictly required since we clear the
contents of the list, including the column defini-
tions, as part of the next step. Reducing unneces-
sary clutter in your code is always a good idea, so
performing this step makes sense.
2 Modify the
LoadAlbumData
method to initially clear the
existing contents of the control.
private void LoadAlbumData(string dir)
{
listViewMain.Clear();
3 Reset the fields that track the
current album.
_albumsShown = true;
if (_album != null)
{
_album.Dispose();
_album = null;
}
ITEM ACTIVATION 475
The
Columns property refers to a ColumnHeaderCollection object. This collec-
tion class includes an
Add method that creates a new column for the control. One
version of this method simply accepts a
ColumnHeader class instance. Our code uses
a slightly more convenient form, with the following signature:
void Add(string columnText, int width, HorizontalAlignment align);
We can use this same method to add columns when photographs are displayed. The
following table summarizes the columns we will use for this purpose.
The following table defines constants for our new albums as well as the beginnings of
our
LoadPhotoData implementation. This table continues our previous steps.
4 Define the columns for the
control before the album items
are loaded.
How-to
Use the Add method available
through the
Columns property
for the control.
// Define the columns
listViewMain.Columns.Add("Name",
80, HorizontalAlignment.Left);
listViewMain.Columns.Add("Title",
100, HorizontalAlignment.Left);
listViewMain.Columns.Add("Pwd",
40, HorizontalAlignment.Center);
listViewMain.Columns.Add("Size",
40, HorizontalAlignment.Right);
// Load the albums into the control
. . .
}
CREATE THE ALBUM COLUMNS PROGRAMMATICALLY (continued)
Action Result
Columns for displaying photographs
Column Text Description
0 Caption The caption for this photo.
1 Taken The date the photograph was taken.
2 Photographer The photographer for this photo.
3 File Name The fully qualified image file name.
CREATE THE PHOTO COLUMNS PROGRAMMATICALLY
Action Result
5 In the MainForm.cs code
window, create constants to
hold the positions of the
columns when photographs are
displayed.
private const int PhotoCaptionColumn = 0;
private const int PhotoDateTakenColumn = 1;
private const int PhotoPhotographerColumn = 2;
private const int PhotoFileNameColumn = 3;
6 Add a private LoadPhotoData
method.
private void LoadPhotoData(PhotoAlbum album)
{
476 CHAPTER 14 LIST VIEWS
This code defines the four columns required to display photographs. We are now
ready to populate the list view with the photos from a selected album.
14.5.3 P
OPULATING THE LISTVIEW
This section completes the implementation of the LoadPhotoData method by cre-
ating the
ListViewItem objects for the control. The following steps add an item to
our control for each
Photograph in the album, and define the subitems associated
with each item.
In the course of implementing support for photographs, we will need the
Pho-
tograph
object itself. We had a similar requirement for PhotoAlbum objects, and
were able to use the file name setting to load the album into memory. While the file
name is available for our photos as well, our
PhotoAlbum class does not provide a
good mechanism for locating a
Photograph in an album based on the file name.
The most convenient means for locating a specific photograph is based on the
index. What we need, then, is a way to look up the index. This value will be stored
in the
Tag property for our list view item, in a manner similar to how we used this
property for photo albums.
Of course, an alternate technique here would be to derive a new class from the
ListView class as we discussed at the end of section 14.4. The Tag property is fine
for our purposes. In your application, you can use whichever technique seems appro-
priate for your current and expected requirements.
7 To implement this method, clear
the list and set the album fields.
listViewMain.Clear();
if (_album != null && album != _album)
_album.Dispose();
_albumsShown = false;
_album = album;
Note: Disposing and assigning the _album field as
shown is not strictly required here. This will come in
useful in chapter 15 when we call this method with
an album other than the default
_album used in this
chapter.
8 Define the columns required for
displaying photographs.
// Define the columns
listViewMain.Columns.Add("Caption",
100, HorizontalAlignment.Left);
listViewMain.Columns.Add("Taken",
70, HorizontalAlignment.Center);
listViewMain.Columns.Add("Photographer",
100, HorizontalAlignment.Left);
listViewMain.Columns.Add("File Name",
200, HorizontalAlignment.Left);
}
CREATE THE PHOTO COLUMNS PROGRAMMATICALLY (continued)
Action Result
ITEM ACTIVATION 477
This code initializes the control with the contents of the open album. Note in partic-
ular how we define the
Tag property to hold the integer index. Since the Tag prop-
erty holds an
object instance, this line boxes the integer value in order to store it as
a reference type. Boxing was mentioned in chapter 5, and is discussed in detail in
appendix A.
You can compile and run this code if you like. Double-click on an album to acti-
vate it and display the contained photographs. Most of the support for photographs
is still missing, so you’ll find it rather easy to cause an error.
The remainder of this section implements the support required for both albums
and photographs to coexist in our
ListView control. We begin with column sorting.
14.5.4 S
ORTING A COLUMN (AGAIN)
Our users will want to sort the columns for both the album and photograph display,
so we need to make some changes in our
MyListViewComparer class to enable this
support. Of key importance is the ability to tell which type of object we are compar-
ing. When comparing photos, we also need to know the
PhotoAlbum they come
ADD THE PHOTOS IN AN ALBUM TO THE LIST
Action Result
1 Modify the
LoadPhotoData
method to simply return if the
given
album is null or empty.
private void LoadPhotoData(PhotoAlbum album)
{
. . .
// Handle null or empty album
if (album == null || album.Count == 0)
return;
2 Iterate over the photographs in
the album.
How-to
Use a for loop to permit access
to the index values.
// Load the photo items
for (int i = 0; i < album.Count; i++)
{
3 Create a new ListViewItem for
each photo.
Photograph photo = album[i];
ListViewItem item = new ListViewItem();
4 Assign the caption as the item
label, and the image list index to
our small photograph image.
item.Text = photo.Caption;
item.Tag = i;
item.ImageIndex = MainForm.PhotoIndex;
5 Add the subitem values.
// Add the subitems
item.SubItems.Add(photo.
DateTaken.ToShortDateString());
item.SubItems.Add(photo.Photographer);
item.SubItems.Add(photo.FileName);
6 Add the new item to the control.
listViewMain.Items.Add(item);
}
}
How-to
a. Use the short date format
for the Taken column.
b. Also place the photo’s index
value in a hidden subitem.
478 CHAPTER 14 LIST VIEWS
from. We can handle both requirements through a private album field. When the
album is
null, we are comparing PhotoAlbum objects. When an album is assigned,
we are comparing
Photograph instances.
Let’s add this field and update our
Compare method to make use of this value.
Now all we have to do is implement the
ComparePhotos method to compare two
Photograph items. Much of this will be similar to the CompareAlbums method.
The one difference is when we need to compare items using the Taken column. This
column holds a date value, so a string comparison is not appropriate. It turns out the
DateTime structure provides a Compare method for just this purpose.
We can use this method in the
ComparePhotos method to our comparer class.
IDENTIFY THE TYPE OF OBJECT TO COMPARE
Action Result
1 Locate the
MyListViewComparer
class defined in the MainForm.cs
source file.
private class MyListViewComparer
: IComparer
{
. . .
2 Add a PhotoAlbum field and
corresponding property.
PhotoAlbum _album = null;
public PhotoAlbum CurrentAlbum
{
get { return _album; }
set { _album = value; }
}
3 Use this property to identify which
object to compare in the
Compare
method.
Note: Since the label for both types
of items is a string, the existing
code for the non-
Details case will
work for both objects.
public int Compare(object a, object b)
{
. . .
// Handle the nonDetails case
if (ListView.View != View.Details)
{
return CaseInsensitiveComparer.
Default.Compare(
item1.Text, item2.Text);
}
if (CurrentAlbum == null)
return CompareAlbums(item1, item2);
else
return ComparePhotos(item1, item2);
}
}
ITEM ACTIVATION 479
.
The last change required for column sorting is to update the CurrentAlbum prop-
erty for our comparer field whenever the contents of the
ListView control are
refreshed. This ensures that our
Compare implementation performs the proper com-
parison based on the contents of the control.
IMPLEMENT METHOD TO COMPARE TWO PHOTO ITEMS
Action Result
4 Add a new
ComparePhotos
method to the
MyListView-
Comparer class.
public int ComparePhotos
(ListViewItem item1, ListViewItem item2)
{
ListViewItem.ListViewSubItem sub1;
ListViewItem.ListViewSubItem sub2;
switch (SortColumn)
{
5 For the columns containing text
strings, use the default
comparer provided by the
CaseInsensitiveComparer
class.
case MainForm.PhotoCaptionColumn:
case MainForm.PhotoPhotographerColumn:
case MainForm.PhotoFileNameColumn:
sub1 = item1.SubItems[SortColumn];
sub2 = item2.SubItems[SortColumn];
return CaseInsensitiveComparer.
Default.Compare(sub1.Text,
sub2.Text);
6 For the Taken column, determine
the index into the album for each
photo.
case MainForm.PhotoDateTakenColumn:
// Find the indices into the album
int index1 = (int)item1.Tag;
int index2 = (int)item2.Tag;
7 Then determine the
corresponding
DateTime value
for each photo.
// Look up the dates for each photo
DateTime date1
= CurrentAlbum[index1].DateTaken;
DateTime date2
= CurrentAlbum[index2].DateTaken;
8 Use the Compare method
provided by the
DateTime
structure to calculate the result.
return DateTime.Compare(date1, date2);
9 Throw an exception if an
unrecognized column is
provided.
default:
throw new IndexOutOfRangeException(
"unrecognized column index");
}
}
UPDATE THE CURRENTALBUM PROPERTY WHEN REQUIRED
Action Result
10 Update the
LoadPhotoData
method to assign the current
album to the comparer.
private void LoadPhotoData(PhotoAlbum album)
{
. . .
_albumsShown = false;
_album = album;
_comparer.CurrentAlbum = _album;
. . .
}
480 CHAPTER 14 LIST VIEWS
Our application can now sort both photographs and albums. Once again you can
compile and run the program if you are careful not to use any photograph functional-
ity we have not yet implemented. Our next task is the Properties dialog.
14.5.5 U
PDATING THE PROPERTIES MENU
You may think we are moving through this code rather quickly, and you would be
right. While these changes are required as a result of our defined item activation
behavior, there are not a lot of new concepts to cover. This is especially true here. As a
result, we will simply run through the steps in the following table and then move on
to our final topic of editing the item label.
11 Update the LoadAlbumData
method to assign a
null album
to the comparer.
private void LoadAlbumData(string dir)
{
listViewMain.Clear();
_comparer.CurrentAlbum = null;
. . .
}
UPDATE THE CURRENTALBUM PROPERTY WHEN REQUIRED (continued)
Action Result
UPDATE THE CLICK HANDLER FOR THE PROPERTIES MENU
Action Result
1 In the MainForm.cs code
window, update the
Click event
handler for the Properties menu
to call a new
DisplayPhoto-
Properties method when
photographs are shown in the
control.
private void menuProperties_Click
(object sender, System.EventArgs e)
{
if (listViewMain.SelectedItems.Count <= 0)
return;
ListViewItem item
= listViewMain.SelectedItems[0];
if (this._albumsShown)
DisplayAlbumProperties(item);
else
DisplayPhotoProperties(item);
}
2 Add the new DisplayPhoto-
Properties method.
private void DisplayPhotoProperties
(ListViewItem item)
{
3 Determine the index of the
selected photo in the current
album.
Note: While the
is keyword
works fine with integer types,
the
as keyword can only be used
with reference types.
if (!(item.Tag is int))
return;
int index = (int)item.Tag;
4 Assign the current position in the
album to this index.
_album.CurrentPosition = index;
ITEM ACTIVATION 481
14.5.6 U
PDATING LABEL EDITING
Updating the label for our photographs again does not use any new constructs, so we
will hurry through this code as well. As you’ll recall, the caption for each photograph
is displayed as the item label. We should note that the
menuEditLabel_Click han-
dler does not require any changes, since this simply initiates the edit. The
After-
LabelEdit
event handler is where the new value is processed.
5 Display the properties dialog for
the photo.
using (PhotoEditDlg dlg
= new PhotoEditDlg(_album))
{
if (dlg.ShowDialog() == DialogResult.OK)
{
6 If any changes were made in the
dialog, save the entire album to
disk.
Note: As you’ll recall, we permit
multiple photographs to be mod-
ified in the dialog. As a result,
the entire album must be saved
and reloaded into the control to
pick up any changes.
// Save any changes made
try
{
_album.Save(_album.FileName);
}
catch (Exception)
{
MessageBox.Show("Unable to save "
+ "changes to photos in album.");
}
7 Reload the entire album into the
control to pick up the new
changes.
// Update the list with any new settings
LoadPhotoData(_album);
}
}
}
UPDATE THE CLICK HANDLER FOR THE PROPERTIES MENU (continued)
Action Result
UPDATE THE AFTERLABELEDIT EVENT HANDLER
Action Result
1 In the MainForm.cs code
window, modify the
After-
LabelEdit
event handler to call
a new
UpdatePhotoCaption
method to process an edit when
photographs are displayed.
private void listViewMain_AfterLabelEdit
(object sender, System.Windows.
Forms.LabelEditEventArgs e)
{
if (e.Label == null)
{
// Edit cancelled by the user
e.CancelEdit = true;
return;
}
ListViewItem item =
listViewMain.Items[e.Item];
if (this._albumsShown)
e.CancelEdit = !UpdateAlbumName(e.Label,
item);
else
e.CancelEdit = !UpdatePhotoCaption(e.Label,
item);
}
482 CHAPTER 14 LIST VIEWS
One further change we can make here is to alter the text displayed in the correspond-
ing menu item. This will provide visual feedback to the user on which property they
are actually changing, especially when the
Details view is not displayed.
2 Add the UpdatePhotoCaption
method to the
MainForm class.
private bool UpdatePhotoCaption
(string caption, ListViewItem item)
{
3 Make sure the new caption is
not empty.
if (caption.Length == 0 || !(item.Tag is int))
{
MessageBox.Show("Invalid caption value.");
return false;
}
4 Determine the index for this
photograph.
int index = (int)item.Tag;
5 Set the photograph’s caption to
the new value.
_album[index].Caption = caption;
6 Save the album to store the new
value.
try
{
_album.Save(_album.FileName);
}
catch (Exception)
{
MessageBox.Show("Unable to save new "
+ "caption to album file.");
}
return true;
}
UPDATE THE AFTERLABELEDIT EVENT HANDLER (continued)
Action Result
MODIFY THE TEXT DISPLAYED IN THE EDIT LABEL MENU
Action Result
7 In the MainForm.cs [Design]
window, add a
Popup event
handler for the
menuEditLabel
menu.
private void menuEdit_Popup
(object sender, System.EventArgs e)
{
8 Enable the contained menus
only if a single item is selected
in the view.
menuEditLabel.Enabled
= (listViewMain.SelectedItems.Count == 1);
menuProperties.Enabled
= (listViewMain.SelectedItems.Count == 1);
9 Set the menu’s text to “Name”
or “Caption” depending on
which type of object is displayed
in the list.
if (this._albumsShown)
menuEditLabel.Text = "&Name";
else
menuEditLabel.Text = "&Caption";
}
RECAP 483
14.5.7 R
EDISPLAYING THE ALBUMS
As a final change, we need to give our user the opportunity to redisplay the album
view. We may as well provide a menu to display the photo view as well, as an alterna-
tive to double-clicking on the album.
14.6 RECAP
This completes our discussion of the ListView class. In this chapter we discussed
list views in detail, and created a new MyAlbumExplorer interface to display the col-
lection of albums available in our default album directory. We supported all four pos-
sible views available in a
ListView control, and provided support for column
ALLOW USER SELECTION OF THE KIND OF OBJECT TO DISPLAY
Action Result
1 In the MainForm.cs [Design]
window, add three menu items
to the bottom of the View menu.
2 Add a
Click handler for the
Albums menu.
private void menuAlbums_Click
(object sender, System.EventArgs e)
{
// Display albums in the list
if (!_albumsShown)
{
LoadAlbumData(PhotoAlbum.DefaultDir);
}
}
3 Add a Click handler for the
Photos menu.
Note: This is the same as acti-
vating an album item.
private void menuPhotos_Click
(object sender, System.EventArgs e)
{
// Activate the selected album
listViewMain_ItemActivate(sender, e);
}
4 Update the Popup handler for
the View menu to enable or
disable the Photos menu as
appropriate.
private void menuView_Popup
(object sender, System.EventArgs e)
{
View v = listViewMain.View;
. . .
if (_albumsShown && listViewMain.
SelectedItems.Count > 0)
menuPhotos.Enabled = true;
else
menuPhotos.Enabled = false;
}
Settings
Menu Property Value
separator Text -
Albums (Name) menuAlbums
Text &Albums
Photos (Name) menuPhotos
Text &Photos
484 CHAPTER 14 LIST VIEWS
sorting, item selection, and label editing. We finished by implementing this same
support for the photos in an album, so that our application can display albums or
photographs in the control.
Along the way we looked at a number of classes provided to support this control,
most notably the
ListViewItem, ListViewItem.ListViewSubItem, and Col-
umnHeader
classes. We also examined the IComparer interface as a way to define
how two objects should be compared, and implemented a class supporting this inter-
face in order to sort the columns in our detailed view of the list.
The next chapter looks at a close cousin to the
ListView class, namely the
TreeView control.
485
CHAPTER 15
Tree views
15.1 Tree view basics 486
15.2 The TreeView class 486
15.3 Dynamic tree nodes 497
15.4 Node selection 505
15.5 Fun with tree views 513
15.6 Recap 524
In the previous chapter we created the MyAlbumExplorer application incorporating a
ListView control. This program presents the default set of photo albums available
and the collection of photographs contained within these albums.
In this chapter we extend this program to include a
TreeView control in order
to present a more traditional explorer-style interface. Specific topics we will cover in
this chapter include the following:
• Exploring the
TreeView class.
• Using the
Splitter control to divide a container.
• Populating a tree with the
TreeNode class, both in Visual Studio and pro-
grammatically.
• Selecting nodes in a tree.
• Editing the labels for a tree.
• Integrating a
ListView and TreeView control into an application.
As we did for list views, we begin this chapter with a general discussion of tree views
and a discussion of the terms and classes used for this control.
486 CHAPTER 15 TREE VIEWS
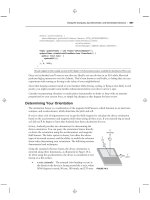
15.1 TREE VIEW BASICS
The TreeView class is a close cousin of the ListView class. List views display a col-
lection as a list, while tree views display collections as a tree. Each item in a tree view
is called a tree node, or just a node. Tree nodes can contain additional nodes, called
child nodes, to arbitrary levels in order to represent a hierarchy of objects in a single
control. Various elements of a
TreeView control are illustrated in figure 15.1.
The explorer-style interface shown in the figure and used by other applications such
as Windows Explorer is a common use of the
TreeView and ListView classes. In
this chapter we build such an interface by extending the MyAlbumExplorer project
constructed in chapter 14.
15.2 THE TREEVIEW CLASS
The TreeView class is summarized in.NET Table 15.1. Like the ListView class,
this class inherits directly from the
Control class, and provides an extensive list of
members for manipulating the objects displayed by the tree.
b
c
d
e
An icon taken from an
instance is
associated with each node.
ImageList
b
An alternate icon from the
I can be displayed
when a node is selected.
mageList
c
The class
represents a single
element, or node,
in the list.
TreeNode
e
The primary text
associated with each
node is called the
node .
label
d
Figure 15.1 The TreeView control automatically shows the entire label in a tool tip style for-
mat when the mouse hovers over a node, as was done for the “From the Walking Path” entry
in this figure.
THE TREEVIEW CLASS 487
A
TreeView object is created much like any other control in Visual Studio .NET:
you simply drag the control onto the form. In our MyAlbumExplorer application, we
already have a
ListView on our form, so it looks like all we need to add is a tree
view in order to support the interface shown in figure 15.2.
.NET Table 15.1 TreeView class
The TreeView class represents a control that displays a collection of labeled items as a tree-
style hierarchy. Typically an icon is displayed for each item in the collection to provide a graphi-
cal indication of the nature or purpose of the item. Items in the tree are referred to as nodes,
and each node is represented by a
TreeNode class instance. This class is part of the Sys-
tem.Windows.Forms namespace, and inherits from the Control class. See .NET Table 4.1 on
page 104 for a list of members inherited by this class.
Public
Properties
CheckBoxes Gets or sets whether check boxes are displayed next to each
node in the tree. The default is
false.
HideSelection Gets or sets whether a selected node remains highlighted
even when the control does not have focus.
ImageIndex Gets or sets an index into the tree’s image list of the default
image to display by a tree node.
ImageList Gets or sets an
ImageList to associate with this control.
LabelEdit Gets or sets whether node labels can be edited.
Nodes Gets the collection of
TreeNode objects assigned to the
control.
PathSeparator Gets or sets the delimiter used for a tree node path, and in
particular the
TreeNode.FullPath property.
SelectedNode Gets or sets the selected tree node.
ShowPlusMinus Gets or sets whether to indicate the expansion state of
parent tree nodes by drawing a plus ‘+’ or minus ‘-‘ sign next
to each node. The default is
true.
Sorted Gets or sets whether the tree nodes are sorted alphabetically
based on their label text.
TopNode Gets the tree node currently displayed at the top of the tree
view control.
Public
Methods
CollapseAll Collapses all the tree nodes so that no child nodes are visible.
GetNodeAt Retrieves the tree node at the specified location in pixels
within the control.
GetNodeCount Returns the number of top-level nodes in the tree, or the total
number of nodes in the entire tree.
Public
Events
AfterExpand Occurs after a tree node is expanded.
AfterLabelEdit Occurs after a tree node label is edited.
BeforeCollapse Occurs before a tree node is collapsed.
BeforeSelect Occurs before a tree node is selected.
ItemDrag Occurs when an item is dragged in the tree view.
488 CHAPTER 15 TREE VIEWS
15.2.1 CREATING A TREE VIEW
There is, in fact, an issue here with how a tree view and list view are arranged on the
form. The gray vertical bar in the middle of our interface is a special control called a
splitter to separate the two controls. We will talk about splitters in a moment. First,
let’s add a
TreeView to our form and see what happens.
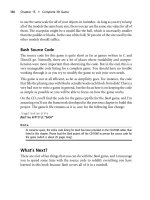
Set the version number for the MyAlbumExplorer application to 15.2.
Figure 15.2
A traditional explorer-style interface
displaying photo albums.
CREATING A TREE VIEW CONTROL
Action Result
1 In the MainForm.cs [Design]
window, drag a
TreeView
control onto the form and set its
properties.
2 Bring the list view to the top of
the z-order.
How-to: Right-click the
List-
View control and select the
Bring to Front option.
3 Set the
HideSelection
property in both the
ListView
and the
TreeView to false.
Note: This will highlight the selected object in both
controls even when these controls do not have the
focus.
Settings
Property Value
(Name) treeViewMain
Dock Left
THE TREEVIEW CLASS 489
So far, so good. We have a
TreeView on the left and a ListView on the right. If you
run this program, you will see the interface shown in figure 15.3. The tree control is
on the left, and the list view on the right. We have not added any nodes to our tree yet,
but the photo albums from the default album directory appear in the list view as was
discussed in chapter 14. Note here that the
ListView must be brought to the top of
the z-order in step 2 to ensure it is not obscured by the
TreeView control.
TRY IT!
Send the ListView control to the bottom of the z-order using the Send to
Back menu item. Run the application to see what happens. Because the con-
trols are placed on the form starting at the bottom of the z-order, the List-
View
in this case fills the entire client window. The TreeView is then
docked to the left of the form. When the
ListView is at the top, the
TreeView is docked first, and then the ListView fills the remaining area.
You will note that if you resize the form in figure 15.3, the size of the tree view does
not change. In addition, the line between the two controls cannot be dragged as is the
case in other explorer-style programs such as Windows Explorer.
We can enable this behavior by adding a
Splitter control to our form. We will
do this next, after which we will look at populating our tree with some items.
15.2.2 U
SING THE SPLITTER CLASS
As a short aside to our discussion on tree views, the Splitter class is useful for divid-
ing all or part of a form or other container into two resizable sections. While some
readers may not consider a splitter control to be an advanced concept, it fits nicely into
our discussion of the MyAlbumExplorer application, so this is where it goes.
Typically a splitter provides separate areas for two collection or container con-
trols, normally one of the
ListBox, ListView, TreeView, or Panel controls. An
overview of the
Splitter class is given in .NET Table 15.2.
A splitter can appear horizontally or vertically. When docked to the top or bottom
of a container, it is a horizontal splitter; when docked to the left or right, it is a vertical
Figure 15.3
The ListView control here
works as before, just within a
smaller area.
490 CHAPTER 15 TREE VIEWS
splitter. We will create a vertical splitter in our MyAlbumExplorer application, and
then discuss how to turn this into a horizontal splitter.
The steps to create a vertical splitter are detailed in the following table.
Compile the application to see the splitter in action. Figure 15.4 shows our window
with the splitter dragged far to the right. The
MinExtra property setting ensures that
the items in the
ListView cannot be obscured by dragging the splitter all the way to
the right side of the window. The
ListView can still disappear when the form is
resized, which we will fix in a moment.
.NET Table 15.2 Splitter class
The Splitter class represents a control that divides a container into two sections. Each sec-
tion contains a docked control, and the splitter permits the user to resize each section at run-
time. This class is part of the
System.Windows.Forms namespace, and inherits from the
Control class. See .NET Table 4.1 on page 104 for a list of members inherited by this class.
Public
Properties
BorderStyle Gets or sets the border style for the control.
Cursor
(overridden from
Control)
Gets or sets the cursor for the control. A horizontal splitter
uses the
HSplit cursor by default, while a vertical splitter
uses the
VSplit cursor by default.
Dock
(overridden from
Control)
Gets or sets the docking style. A splitter must be docked
to one side of its container. This setting determines the
orientation, either vertical or horizontal, of the splitter. The
None and Fill values are not permitted. The position of
the splitter in the z-order determines the location of the
splitter within its container.
MinExtra Gets or sets the minimum size for the remainder of the
container, which is occupied by the subsequent control in
the docking order.
MinSize Gets or sets the minimum size for the target of the
splitter, which is the previous control in the docking order.
SplitPosition Gets or sets the position of the splitter, in pixels.
Public
Events
SplitterMoved Occurs when the splitter has moved.
SplitterMoving Occurs when the splitter is moving.
ADD A SPLITTER CONTROL
Action Result
1 In the MainForm.cs [Design]
window, drag a
Splitter object
onto the form.
2 Set the
MinExtra property for
the splitter to 100.
Note: This ensures that the large icons in our List-
View will always be visible.
3 Move the
ListView control to
the front of the z-order.
The window looks much the same as before. The
difference occurs when the application is executed.