Professional Information Technology-Programming Book part 50 docx
Bạn đang xem bản rút gọn của tài liệu. Xem và tải ngay bản đầy đủ của tài liệu tại đây (26.63 KB, 6 trang )
11.3. Converting Photos to Paintings
There are as many ways to turn a photograph into something that looks more like a
painting as there are little round O's in a truckload of Cheerios. So I'm not going to
cram a book of those techniques into this chapter. However, I will tell you that,
like most everything else in this chapter, you should start with a layer that is a
consolidation of all the other layers you've created up until now (Cmd/Ctrl-
Opt/Alt-E, remember?). Since it's a fair likelihood that you'll want to somehow
blend or merge your "painting" with your photo, it's also not a bad idea to make a
copy of that merged layer.
Although I've just told you that there are more ways to make a painting from a
photo than grains of sand in Death Valley that applies to the individual techniques.
There are only two main methodical categories: natural media brushes and
Photoshop-compatible plug-ins. Both of these categories are available from inside
Photoshop and both are available in far more sophisticated versions from
competitive or third-party vendors of both independent software and Photoshop
plug-
ins. Of course, you can also mix natural media brushes and filters, which may
be the most efficient way to produce something that actually looks like a painting.
11.3.1. Using Plug-in Filters
Plug-in filters are the most accessible way to make a painting from a photograph.
In fact, it's possible to do a fairly credible job by simply running any of a number
of filters on a copy of that merged layer. Since the only way to find out which of
these will work best for the image you have in mind is experimentation, there's no
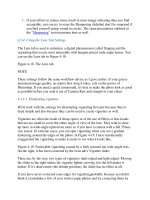
point in even going in to all the possibilities. Figure 11-15 shows you an image
before and after filtering with the Photoshop Colored Pencil filter.
Figure 11-15. The figure on the right definitely looks more like a painting or
drawing than a photograph, but would only momentarily fool most into thinking it
wasn't some sort of digital trick.
The biggest problem with single built-in Photoshop filters is that they've been
around for so long that their effects tend to look cliché and fake. One way to get
partially around that is to combine filters using the Filter Gallery. In Photoshop
CS2, the Filter Gallery opens every time you use a filter. Then you can combine
the effects of multiple filters as though they were one. This process explains how
to use a single filter and combine the effects in the Filter Gallery.
1. Open your image and make a merged layer of it.
2. Choose Filter Filter Gallery (if you choose any filter that's in the filter
gallery, it will open in the Filter Gallery anyway, see Figure 11-16). If you
have already used a filter since you last opened Photoshop, it will already be
the one (or ones) loaded. If not, pick a filter from any of the menus by
clicking the down arrow key for that menu. You'll see a preview thumbnail
of the effect that each filter will create. As soon as you pick a filter, it will
start to process the image. You'll see a progress bar moving at the very
bottom of the image preview window.
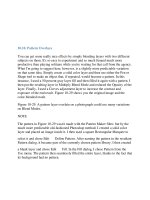
Figure 11-16. The Filter Gallery.
3. In the far right column you can see the Filters menu and the adjustments
sliders. Some filters also have a texture menu and sliders. Make your
adjustments and wait to see the results in the preview window. You can
switch from one magnification to another by using the Zoom menu at the
bottom of the screen. I like to switch from Fit on Screen, where I can see the
whole effect to 100 percent, where I can see how each stroke looks.
4. If you want to add another filter, simply click the New Filter icon at the
bottom of the righthand column, then either choose another filter from the
thumbnail menus or from the Filter menu at the top of the righthand column.
The name of the new filter and an On/Off icon will appear in the gray
window at the bottom of the column. Follow the same procedures for the
new filter as in Step 3.
You can add as many filters as you like, as well as change the order in which they
are processed, which changes the look of the end result. To change the processing
order, simply drag the filter name in the window at the bottom of the righthand
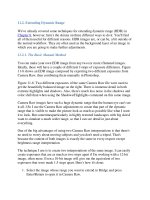
palette. You can see the result of combining three filters in Figure 11-17.
Figure 11-17. Two filters have been combined in the Filter Gallery to produce the
effect on the right. At least it's a little less cliché.
11.3.1.1. Combine filters by erasing through layers
The results from combining filters will look more natural if you copy the merged
layer two or three times, probably for the object of importance, less important
background objects, and the background itself. Put the foreground object (subject)
layer on top, less important but not too distant objects in the middle, and the layer
for background objects at the bottom (this is not the Photoshop Background layer).
Choose the Eraser tool and select the top layer, then erase or partially erase (lower
the eraser opacity) everything but the subject. If you're in a hurry, you could make
a feathered selection and then hit Backspace/Delete. Now select the middle layer
and erase all of what you want to be the background objects. Finally, select each
layer and use either a different filter or very different size and intensity settings for
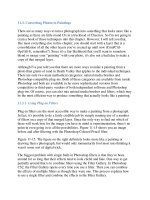
the same filter for each of the three layers. Figure 11-18 clearly shows that this is
the superior method for semi-automatically creating something that looks like a
painting.
Figure 11-18. The image on the right is the result of using Xaos Tool's natural
media filters to paint each of three layers with a different stroke and size. The
result bears more resemblance to techniques a real artist might use.
NOTE
You don't need to have a texture in a filter to make the "painting" look as though it
were printed on canvas, watercolor, or sandstone. All of those textures are
available in
Photoshop's Lighting Effects filter, which you can add to the end result
by copying the filtered image(s) to a new (merged?) layer.
11.3.2. Using Natural Media Brushes
Natural media brushes actually don't exist in the digital photography world; they
are digital techniques that can do an amazingly good job of imitating the brushes
and media used in traditional painting. In fact, they can be so good at it that many
traditional painters and illustrators have switched over to digital so that they can
offer their clients multiple interpretations of the same painting. A good many
photographersparticularly portrait and wedding photographershave also found
digital painting to be a highly profitable additional service.
You can do "natural media" painting in Photoshop or you can opt to do it quite a
bit faster and more believably by using Corel Painter. Frankly, I find the "junior"
version of Painter, Painter Essentials 3, quite adequate for my needs. This software
is free with the Wacom Graphire tablet, which comes in a 4x5-inch version that
costs only $10 more than the software.
11.3.2.1. Using Photoshop's natural media brushes
Unbeknownst to many photographers, you can choose brush shapes in Photoshop
and other options that allow you to come pretty close to imitating natural media
brushes. So if you wanted to create a painting from a photograph that looked
something like it was painted in oils or watercolor, you can do it. Merge a copy of
your layers so you can paint or clone the end result from the original onto a new
layer. To do this, duplicate the image, choose the Brush tool, and then use the
Brush Presets menu in the Options bar to load natural media brushes. I'm not very
good at using Photoshop for this purpose, but here's how I usually go about it
(getting good at it is mostly a matter of practice, practice, practice).
1. Open the image you want to paint, make a consolidated layer so you'll have
the tonal values and details from all the layers and then duplicate the image.
You're going to use the original image for picking up color, as though it
were a traditional artist's color palette.
2. Select the Brush tool and go to the Brushes palette in the Options bar (the
icon on the right end of the bar that looks sort of like a jukebox menu). Click
it and a menu drops down. From the Brushes Palette menu, choose Natural
Brushes and click OK when you're asked if you want to replace the current
brushes.
3. Go to the Brush Presets and make sure you have Shape Dynamics checked
(unless you don't have a pressure-sensitive padin which case you should
probably forget trying to imitate natural media except in filters such as Xaos
tools or in Painter by doing automatic cloning).
4. Check any of the other Brush Tip shape boxes and adjustments to give you
the effect you want.
5. Go to the original image and click the color you want to start painting in.
6.
Go to the target image and create a new, blank layer. You're going to use the
photo below the blank layer to "trace over" with your brush.
7. As you paint, keep picking up color from the original image. Press Opt/Alt
and place the cursor on the color you want to make the foreground color.
Then paint all the strokes for all the areas you want in that color.
8. When you have the basic painting painted, temporarily lower the opacity of
the painting layer to 50 percent so you can see the details from the original
photo. If you see small details that you'd like to add to the painting, make
your brush smaller, pick up the right colors from the original, and paint in
the small details.
9. When you're done, return the painting layer to 100 percent opacity. Then
copy and paste it into the original image. You then have both versions of the
image in the same file.
11.3.2.2. Using Corel Painter or Painter Essentials
Corel's Painter and its "junior" Painter Essentials are the de facto standards in
software that imitates the tools, brushes, and media used by traditional 2D artists of
all stripes. If you're familiar with these programs, you already know what I'm
talking about and how to use it. If you've never explored this area, you probably
should. There will always be times when one of your photographs could be the
idea basis for some sort of non-objective illustration.
What I'd recommend for starters is Corel Painter Essentials (see Figure 11-19). If
you own a Wacom Graphire pressure-sensitive pen and pad, you already have this
program. If you don't, the pad will make it much easier to do a score of things that
don't have anything to do with painting. The combination of the two will give you
a good head start on converting your photos to something that really does look like
a painting. From there, with some practice, you can take it to much higher levels.
When you get pretty good at it, you're ready to tackle the complexity of Painter a
bit further:
Figure 11-19. The Painter Essentials interface.
1. Choose the Brush tool from the Toolbox.
2. In the Options Bar, from the Stamp menu, choose Cloners.
3. From the Cloners menu, choose any brush style.
4. Choose Canvas Tracing Paper. The image will appear to fade.
5. Size your brush with the square bracket keys.
6. Start painting and stop when you like what you get, then save the file.
You can change the brush style and other characteristics at any time. I used a large,
impressionist brush to make the background less detailed. I then used a Camel's
Hair brush to paint the face. If the large brush mushed things up too much, I just
painted over it with a smaller brush to get more detail. You can also use a Restore
brush to gradually restore detail to the finished photo, in case there are important
details such as eyes or a diamond ring. Figure 11-20 shows the original and the
finished portrait of Kolle.
Figure 11-20. A portrait of a famous model before and after turning it into a
"photopainting."
Chapter 12. Presenting Your Work to the World
The last and perhaps most crucial step in the digital photographer's workflow is
finding ways to share your images with the world, perhaps even to create income
from something you enjoy doing so much. Even if you're not a pro, surely you'd
rather be able to afford a 5D than a 20D. Photography is like a sailboat: a hole in
the water that you throw money into. Hopefully, this chapter will suggest some
cool and easy ways to become better known and more highly paid. "You gotta find
a way to be recognized," as my old studio partner Ed Zak used to say.
Output, at Last
This chapter assumes you've already completed the winnowing, image
management, and digital darkroom workflows. Now you're ready to
market your work. Just be advised that if you've done everything in the
sequence suggested, you'll be in much better shape to efficiently market
your work. There are a thousand ways to do that, this chapter has
suggestions to jumpstart and perhaps help you think of more
possibilities. More possibilities mean more moneyeven if this is only a
part-time pursuit.