lập trình android (phần 5) pdf
Bạn đang xem bản rút gọn của tài liệu. Xem và tải ngay bản đầy đủ của tài liệu tại đây (1.28 MB, 50 trang )
176 CHAPTER 6 Networking and web services
try {
socket = new Socket(ip, Integer.parseInt(port));
writer = new BufferedWriter(
new OutputStreamWriter(
socket.getOutputStream()));
reader = new BufferedReader(
new InputStreamReader(
socket.getInputStream()));
String input = socketData;
writer.write(input + "\n", 0, input.length() + 1);
writer.flush();
output = reader.readLine();
this.socketOutput.setText(output);
// send EXIT and close
writer.write("EXIT\n", 0, 5);
writer.flush();
. . . catches and reader, writer, and socket closes omitted for brevity
. . . onCreate omitted for brevity
return output;
}
Here we use the
onCreate
method to call a private helper
callSocket
method
B
and set the output to a
TextView
C
. Within the
callSocket
method we create a
Socket
to represent the client side of our connection
D
, and we establish a writer
for the input
E
and a reader for the output
F
. With the housekeeping taken care
of, we then write to the socket
G
, which communicates with the server, and get the
output value to return
H
.
A socket is probably the lowest-level networking usage in Android you will encoun-
ter. Using a raw socket, while abstracted a great deal, still leaves many of the details up
to you (especially server-side details, threading, and queuing). Although you may run
up against situations in which either you have to use a raw socket (the server side is
already built) or you elect to use one for one reason or another, higher-level solutions
such as leveraging
HTTP normally have decided advantages.
6.4 Working with HTTP
As we discussed in the previous section, you can use a raw socket to transfer IP data to
and from a server with Android. This is an important approach to be aware of so that
you know you have that option and so that you understand a bit about the underlying
details. Nevertheless, you may want to avoid this technique where possible and instead
take advantage of existing server products to send your data. The most common way
to do this is to use a web server and leverage
HTTP.
Here we are going to take a look at making
HTTP requests from an Android client
and sending them to an
HTTP server. We will let the HTTP server handle all the socket
details, and we will focus on our client Android application.
The
HTTP protocol itself is fairly involved. If you are unfamiliar with it and or want
the complete details, they are readily available via
RFCs (such as for version 1.1:
D
Create client
Socket
Establish BufferedWriter for input
E
Establish BufferedReader for output
F
G
Write to
socket
H
Get socket
output
Licensed to Deborah Christiansen <>
Download at Boykma.Com
177Working with HTTP
The short story is that the pro-
tocol is stateless and involves several different methods that allow users to make
requests to servers, and those servers return responses. The entire web is, of course,
based on
HTTP. Beyond the most basic concepts, there are ways to pass data into and
out of requests and responses and to authenticate with servers. Here we are going to
use some of the most common methods and concepts to talk to network resources
from Android applications.
To begin we will retrieve data using
HTTP
GET
requests to a simple HTML page
using the standard java.net
API. From there we will look at using the Android-included
Apache HttpClient
API. After we use HttpClient directly to get a feel for it, we will also
make a helper class,
HttpRequestHelper
, that we can use to simplify the process and
encapsulate the details. This class—and the Apache networking
API in general—has a
few advantages over rolling your own networking with java.net, as we shall see. Once
the helper class is in place, we will use it to make additional
HTTP and HTTPS
requests, both
GET
and
POST
, and we will look at basic authentication.
Our first
HTTP request will be an HTTP
GET
call using a
HttpUrlConnection
.
6.4.1 Simple HTTP and java.net
The most basic HTTP request method is a
GET
. In this type of request any data that is sent
is embedded in the
URL using the query string. The next class in our NetworkExplorer
application, which is shown in listing 6.4, has an
Activity
that demonstrates this.
public class SimpleGet extends Activity {
. . . other portions of onCreate omitted for brevity
this.getButton.setOnClickListener(new OnClickListener() {
public void onClick(View v) {
getOutput.setText("");
String output =
getHttpResponse(getInput.getText().toString());
if (output != null) {
getOutput.setText(output);
}
}
} ) ;
} ;
. . .
private String getHttpResponse(String location) {
String result = null;
URL url = null;
try {
url = new URL(location);
} catch (MalformedURLException e) {
// log and or handle
}
Listing 6.4 The SimpleGet Activity showing java.net.UrlConnection
B
Invoke
getHttpResponse
method
Construct URL
object
C
Licensed to Deborah Christiansen <>
Download at Boykma.Com
178 CHAPTER 6 Networking and web services
if (url != null) {
try {
HttpURLConnection urlConn =
(HttpURLConnection) url.openConnection();
BufferedReader in =
new BufferedReader(
new InputStreamReader(
urlConn.getInputStream()));
String inputLine;
int lineCount = 0; // limit lines for example
while ((lineCount < 10)
&& ((inputLine = in.readLine()) != null)) {
lineCount++;
result += "\n" + inputLine;
}
in.close();
urlConn.disconnect();
} catch (IOException e) {
// log and or handle
}
} else {
// log and or handle
}
return result;
}
}
In order to get an HTTP response and show the first few lines of it in our
SimpleGet
class, we are calling a
getHttpResponse
method that we have built
B
. Within this
method we construct a
java.net.URL
object
C
, which takes care of many of the details
for us, and then we open a connection to a server using an
HttpURLConnection
D
.
We then use a
BufferedReader
E
to read data from the connection one line at a
time
F
. Keep in mind that as we are doing this, we are using the same thread as the UI
and therefore blocking the UI. This isn’t a good idea. We are doing this here only to
demonstrate the network operation; we will explain more about how to use a separate
thread for this shortly. Once we have the data, we append it to the result
String
that
our method returns
G
, and we close the reader and the connection
H
. Using the
plain and simple java.net support that has been ported to Android this way provides
quick and dirty access to
HTTP network resources.
Communicating with
HTTP this way is fairly easy, but it can quickly get cumber-
some when you need to do more than just retrieve simple data, and, as noted, the
blocking nature of the call is bad form. We could get around some of the problems
with this approach on our own by spawning separate threads and keeping track of
them and by writing our own small framework/
API structure around that concept for
each
HTTP request, but we don’t have to. Fortunately, Android provides another set of
APIs in the form of the Apache HttpClient library that abstract the java.net classes fur-
ther and that are designed to offer more robust
HTTP support and help handle the
separate-thread issue.
Open
connection using
HttpURLConnection
D
Create BufferedReader
for output
E
Read data
F
Append to result
G
Close reader
and connection
H
Licensed to Deborah Christiansen <>
Download at Boykma.Com
179Working with HTTP
6.4.2 Robust HTTP with HttpClient
To get started with HttpClient we are going to look at using core classes to perform
HTTP
GET
and
POST
method requests. Here we will concentrate on making network
requests in a
Thread
separate from the UI, using a combination of the Apache
ResponseHandler
and Android
Handler
(for different but related purposes, as we
shall see). Listing 6.5 shows our first example of using the HttpClient
API.
. . . .
private final Handler handler = new Handler() {
public void handleMessage(Message msg) {
progressDialog.dismiss();
String bundleResult =
msg.getData().getString("RESPONSE");
output.setText(bundleResult);
}
};
. . . onCreate omitted for brevity
private void performRequest() {
final ResponseHandler<String> responseHandler =
new ResponseHandler<String>() {
public String handleResponse(HttpResponse response) {
StatusLine status = response.getStatusLine();
HttpEntity entity = response.getEntity();
String result = null;
try {
result = StringUtils.inputStreamToString(
entity.getContent());
Message message = handler.obtainMessage();
Bundle bundle = new Bundle();
bundle.putString("RESPONSE", result);
message.setData(bundle);
handler.sendMessage(message);
} catch (IOException e) {
// log and or handle
}
return result;
}
} ;
this.progressDialog =
ProgressDialog.show(this, "working . . .",
"performing HTTP request");
new Thread() {
public void run() {
try {
DefaultHttpClient client = new DefaultHttpClient();
HttpGet httpMethod =
new HttpGet(
urlChooser.getSelectedItem().toString());
Listing 6.5 Apache HttpClient with Android Handler and Apache ResponseHandler
Create Android
Handler
B
Use Handler
to update UI
C
Create
ResponseHandler
for asynchronous
HTTP
D
E
Implement
onResponse
callback
F
Get HTTP response
payload
Use a separate
Thread for HTTP call
Create
HttpGet
object
Licensed to Deborah Christiansen <>
Download at Boykma.Com
180 CHAPTER 6 Networking and web services
client.execute(
httpMethod, responseHandler);
} catch (ClientProtocolException e) {
// log and or handle
} catch (IOException e) {
// log and or handle
}
}
}.start();
}
The first thing we do in our initial
HttpClient
example is create a
Handler
that we can
send messages to from other threads
B
. This is the same technique we have used in
previous examples, and it is used to allow background tasks to send
Message
objects to
hook back into the main
UI thread
C
. After we create an Android
Handler
, we also cre-
ate an Apache
ResponseHandler
D
. This class can be used with
HttpClient
HTTP
requests to pass in as a callback point. When an HTTP request that is fired by
HttpCli-
ent
completes, it will call the
onResponse
method (if a
ResponseHandler
is used)
E
.
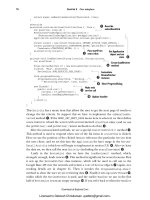
When the response does come in, we then get the payload using the
HttpEntity
the
API returns
F
. This in effect allows the HTTP call to be made in an asynchronous man-
ner—we don’t have to block and wait the entire time between when the request is fired
and when it completes. The relationship of the request, response,
Handler
,
Response-
Handler
, and separate threads is diagrammed in figure 6.3.
Now that you have seen
HttpClient
at work and understand the basic approach,
the next thing we will do is encapsulate a few of the details into a convenient helper
class so that we can call it over and over without having to repeat a lot of the setup.
Execute HTTP
with HttpClient
Apache HttpClient
execute(method, responseHandler)
HTTP request
HTTP response
HTTP
server
Apache ResponseHandler
handleResponse(httpResponse)
Android Handler
sendMessage(message)
onMessage(message)
Non UI Thread - network request
UI Thread - UI updates
Figure 6.3 HttpClient,
ResponseHandler, and Android
Handler relationship diagram
Licensed to Deborah Christiansen <>
Download at Boykma.Com
181Working with HTTP
6.4.3 Creating an HTTP and HTTPS helper
The next
Activity
in our NetworkExplorer application, which is shown in listing 6.6,
is a lot more straightforward and pure Android focused than our other
HTTP-related
classes up to this point. This is made possible by the helper class we mentioned previ-
ously, which hides some of the complexity (we will examine the helper class itself after
we look at this first class that uses it).
public class ApacheHTTPViaHelper extends Activity {
. . . other member variables omitted for brevity
private final Handler handler = new Handler() {
public void handleMessage(Message msg) {
progressDialog.dismiss();
String bundleResult = msg.getData().getString("RESPONSE");
output.setText(bundleResult);
}
} ;
@Override
public void onCreate(final Bundle icicle) {
super.onCreate(icicle);
. . . view inflation and setup omitted for brevity
this.button.setOnClickListener(new OnClickListener() {
public void onClick(final View v) {
output.setText("");
performRequest(
urlChooser.getSelectedItem().toString());
}
} ) ;
} ;
. . . onPause omitted for brevity
private void performRequest(String url) {
final ResponseHandler<String> responseHandler =
HTTPRequestHelper.getResponseHandlerInstance(
this.handler);
this.progressDialog =
ProgressDialog.show(this, "working . . .",
"performing HTTP request");
new Thread() {
public void run() {
HTTPRequestHelper helper = new
HTTPRequestHelper(responseHandler);
helper.performGet(url, null, null, null);
}
}.start();
}
}
Listing 6.6 Using Apache HttpClient via a custom HttpRequestHelper
Create a
Handler
B
C
Update UI
from Handler
Call local
performRequest
D
Get ResponseHandler
from RequestHelper
E
Instantiate RequestHelper
with ResponseHandler
F
G
Perform HTTP
via helper
Licensed to Deborah Christiansen <>
Download at Boykma.Com
182 CHAPTER 6 Networking and web services
First in this class we create another
Handler
B
, and from within it we simply update a
UI
TextView
based on data in the
Message
C
. Further in the code, in the
onCreate
method, we call a local
performRequest
method when the “go” button is clicked, and
we pass a selected
String
representing a URL
D
.
Inside the
performRequest
method we use a static convenience method to return an
HttpClient
ResponseHandler
, passing in our Android
Handler
, which it will use
E
. We
will examine the helper class next to get a look at exactly how this works, but the impor-
tant part for now is that the
ResponseHandler
is created for us by the static method. With
the
ResponseHandler
instance taken care of, we instantiate an
HttpRequestHelper
instance
F
and use it to make a simple HTTP
GET
call (passing in only the
String
URL)
G
. Similar to our previous example, when the request completes, the
Response-
Handler
will fire the
onResponse
method, and therein our
Handler
will be sent a
Mes-
sage
completing the process.
The example
Activity
in listing 6.6 is fairly clean and simple, and it’s asynchro-
nous and doesn’t block the
UI thread. The heavy lifting is taken care of by
HttpClient
itself and by the setup our custom
HttpRequestHelper
makes possible. The first part
of the all-important
HttpRequestHelper
, which we will explore in three sections, is
shown in listing 6.7.
public class HTTPRequestHelper {
private static final int POST_TYPE = 1;
private static final int GET_TYPE = 2;
private static final String CONTENT_TYPE = "Content-Type";
public static final String MIME_FORM_ENCODED =
"application/x-www-form-urlencoded";
public static final String MIME_TEXT_PLAIN = "text/plain";
private final ResponseHandler<String> responseHandler;
public HTTPRequestHelper(ResponseHandler<String> responseHandler) {
this.responseHandler = responseHandler;
}
public void performGet(String url, String user, String pass,
final Map<String, String> additionalHeaders) {
performRequest(null, url, user, pass,
additionalHeaders, null, HTTPRequestHelper.GET_TYPE);
}
public void performPost(String contentType, String url,
String user, String pass,
Map<String, String> additionalHeaders,
Map<String, String> params) {
performRequest(contentType, url, user, pass,
additionalHeaders, params, HTTPRequestHelper.POST_TYPE);
}
public void performPost(String url, String user, String pass,
Map<String, String> additionalHeaders,
Listing 6.7 The first part of the HttpRequestHelper class
Require
ResponseHandler
to construct
B
C
Provide
simple GET
method
Provide simple
POST methods
D
Licensed to Deborah Christiansen <>
Download at Boykma.Com
183Working with HTTP
Map<String, String> params) {
performRequest(HTTPRequestHelper.MIME_FORM_ENCODED,
url, user, pass,
additionalHeaders, params, HTTPRequestHelper.POST_TYPE);
}
private void performRequest(
String contentType,
String url,
String user,
String pass,
Map<String, String> headers,
Map<String, String> params,
int requestType) {
DefaultHttpClient client = new DefaultHttpClient();
if ((user != null) && (pass != null)) {
client.getCredentialsProvider().setCredentials(
AuthScope.ANY,
new UsernamePasswordCredentials(user, pass));
}
final Map<String, String> sendHeaders =
new HashMap<String, String>();
if ((headers != null) && (headers.size() > 0)) {
sendHeaders.putAll(headers);
}
if (requestType == HTTPRequestHelper.POST_TYPE) {
sendHeaders.put(HTTPRequestHelper.CONTENT_TYPE, contentType);
}
if (sendHeaders.size() > 0) {
client.addRequestInterceptor(
new HttpRequestInterceptor() {
public void process(
final HttpRequest request, final HttpContext context)
throws HttpException, IOException {
for (String key : sendHeaders.keySet()) {
if (!request.containsHeader(key)) {
request.addHeader(key,
sendHeaders.get(key));
}
}
}
} ) ;
}
. . . POST and GET execution in listing 6.8
}
The first thing of note in the
HttpRequestHelper
class is that a
ResponseHandler
is
required to be passed in as part of the constructor
B
. This
ResponseHandler
will be
used when the
HttpClient
request is ultimately invoked. After the constructor, we see
a public
HTTP
GET
-related method
C
and several different public HTTP
POST
-related
methods
D
. Each of these methods is a wrapper around the private
performRequest
method that can handle all the HTTP options
E
. The
performRequest
method
D
Provide simple
POST methods
Handle combinations
in private method
E
Instantiate
DefaultHttpClient
F
Add credentials
if needed
G
Use Interceptor for
request headers
H
Licensed to Deborah Christiansen <>
Download at Boykma.Com
184 CHAPTER 6 Networking and web services
supports a content-type header value, URL, username, password,
Map
of additional
headers, similar
Map
of request parameters, and request method type.
Inside the
performRequest
method a
DefaultHttpClient
is instantiated
F
. Next,
we check to see if the user and pass method parameters are present, and if so we set
the request credentials with a
UsernamePasswordCredentials
type (
HttpClient
sup-
ports several types of credentials, see the Javadocs for details)
G
. At the same time we
set the credentials, we also set an
AuthScope
. The scope represents which server, port,
authentication realm, and authentication scheme the credentials supplied are appli-
cable for.
You can set these as fine or coarse grained as you want; we are using the default
ANY
scope that matches anything. What we notably have not set in all of this is the spe-
cific authentication scheme to use.
HttpClient
supports various schemes, including
basic authentication, digest authentication, and a Windows-specific
NTLM scheme.
Basic authentication, meaning simple username/password challenge from the server,
is the default. (Also, if you need to, you can use a preemptive form login for form-
based authentication—just submit the form you need and get the token or session
ID
and so on.)
After the security is out of the way, we use an
HttpRequestInterceptor
to add
HTTP headers
H
. Headers are name/value pairs, so this is pretty easy. Once we have
all of these properties that apply regardless of our request method type, we then add
further settings that are specific to the method. Listing 6.8, the second part of our
helper class, shows the
POST
- and
GET
-specific settings and the execute method.
. . .
if (requestType == HTTPRequestHelper.POST_TYPE) {
HttpPost method = new HttpPost(url);
List<NameValuePair> nvps = null;
if ((params != null) && (params.size() > 0)) {
nvps = new ArrayList<NameValuePair>();
for (String key : params.keySet()) {
nvps.add(new BasicNameValuePair(key,
params.get(key)));
}
}
if (nvps != null) {
try {
method.setEntity(
new UrlEncodedFormEntity(nvps, HTTP.UTF_8));
} catch (UnsupportedEncodingException e) {
// log and or handle
}
}
execute(client, method);
} else if (requestType == HTTPRequestHelper.GET_TYPE) {
HttpGet method = new HttpGet(url);
execute(client, method);
Listing 6.8 The second part of the HttpRequestHelper class
Handle POST
requests
B
C
Create HttpPost
object
D
Add name/value
parameters
Call execute
method
E
Licensed to Deborah Christiansen <>
Download at Boykma.Com
185Working with HTTP
}
. . .
private void execute(HttpClient client, HttpRequestBase method) {
BasicHttpResponse errorResponse =
new BasicHttpResponse(
new ProtocolVersion("HTTP_ERROR", 1, 1),
500, "ERROR");
try {
client.execute(method, this.responseHandler);
} catch (Exception e) {
errorResponse.setReasonPhrase(e.getMessage());
try {
this.responseHandler.handleResponse(errorResponse);
} catch (Exception ex) {
// log and or handle
}
}
}
When the specified request is a
POST
type
B
, we create an
HttpPost
object to deal
with it
C
. Then we add
POST
request parameters, which are another set of name/
value pairs and are built with the
BasicNameValuePair
object
D
. After adding the
parameters we are ready to perform the request, which we do with our local private
execute method using the method object and the client
E
.
Our execute method sets up an error response handler (we want to return a
response, error or not, so we set this up in case)
F
and wraps the
HttpClient
execute
method, which requires a method object (either
POST
or
GET
in our case, preestab-
lished) and a
ResponseHandler
as input
G
. If we don’t get an exception when we
invoke
HttpClient execute
, all is well and the response details are placed into the
ResponseHandler
. If we do get an exception, we populate the error handler and pass
it through to the
ResponseHandler
.
We call the local private execute method with the established details for either a
POST
or a
GET
request. The
GET
method is handled similarly to the
POST
, but we don’t
set parameters (with
GET
requests we expect parameters encoded in the URL itself).
Right now our class supports only
POST
and
GET
(which cover 98 percent of the
requests we generally need), but it certainly could be easily expanded to support
other
HTTP method types.
The final part of the request helper class, shown in listing 6.9, takes us back to the
first example that used the helper, as it outlines exactly what the convenience
getRe-
sponseHandlerInstance
method returns (constructing our helper requires a
Respon-
seHandler
, and this method returns a default one).
public static ResponseHandler<String>
getResponseHandlerInstance(final Handler handler) {
final ResponseHandler<String> responseHandler =
new ResponseHandler<String>() {
Listing 6.9 The final part of the HttpRequestHelper class
Set up an
error handler
F
G
Call HttpClient
execute
B
Require Handler
parameter
Licensed to Deborah Christiansen <>
Download at Boykma.Com
186 CHAPTER 6 Networking and web services
public String handleResponse(final HttpResponse response) {
Message message = handler.obtainMessage();
Bundle bundle = new Bundle();
StatusLine status = response.getStatusLine();
HttpEntity entity = response.getEntity();
String result = null;
if (entity != null) {
t r y {
result = StringUtils.inputStreamToString(
entity.getContent());
bundle.putString(
"RESPONSE", result);
message.setData(bundle);
handler.sendMessage(message);
} catch (IOException e) {
bundle.putString("
RESPONSE", "Error - " + e.getMessage());
message.setData(bundle);
handler.sendMessage(message);
}
} else {
bundle.putString("RESPONSE", "Error - "
+ response.getStatusLine().getReasonPhrase());
message.setData(bundle);
handler.sendMessage(message);
}
return result;
}
} ;
return responseHandler;
}
}
As we discuss the
getResponseHandlerInstance
method of our helper, we should
note that although we find it helpful, it’s entirely optional. You can still make use of
the helper class without using this method. To do so, construct your own
Response-
Handler
and pass it in to the helper constructor—which is a perfectly plausible case.
The
getResponseHandlerInstance
method builds a convenient default
Response-
Handler
that hooks in a
Handler
via a parameter
B
and parses the response as a
String
C
. The response
String
is sent back to the caller using the
Handler Bundle
and
Message
pattern we have seen used time and time again to pass messages between
threads in our Android screens.
With the gory
HttpRequestHelper
details out of the way, and having already
explored basic usage, we will next turn to more involved uses of this class in the con-
text of web service calls.
6.5 Web services
The term web services means many different things depending on the source and the
audience. To some it’s a nebulous marketing term that is never pinned down; to oth-
ers it’s a very rigid and specific set of protocols and standards. We are going to tackle it
Get response
content as String
C
Put result value into Bundle
Set Bundle as data
into Message
Send Message
via Handler
Licensed to Deborah Christiansen <>
Download at Boykma.Com
187Web services
as a general concept, without defining it to death, but not leaving it entirely unde-
fined either.
Web services is a means of exposing an
API over a technology-neutral network end-
point. It’s a means to call a remote method or operation not tied to a specific platform
or vendor and get a result. By this definition
POX over the network POX is included,
so is
REST, and so is SOAP—and really so is any other method of exposing operations
and data on the wire in a neutral manner.
POX, REST, and SOAP are by far the most common web services around, so they are
where we will focus in this section. Each provides a general guideline for accessing
data and exposing operations, each in a more rigorous manner than the previous,
respectively.
POX basically exposes chunks of XML over the wire, usually over HTTP.
REST is a bit more detailed in that it uses the concept of resources to define data and
then manipulates them with different
HTTP methods using a URL-style approach
(much like the Android
Intent
system in general, which we have explored in previous
chapters).
SOAP is the most formal of them all, imposing strict rules about types of
data, transport mechanisms, and security.
All of these approaches have advantages
and disadvantages, and these differences are
amplified on a mobile platform like Android.
Though we can’t possibly cover all the details
here, we will touch on the differences as we
discuss each of these concepts. We will exam-
ine the use of a
POX approach to return
recent posts from the del.icio.us
API, and we
will then look at using
REST with the Google
Data AtomPub
API. Up first is what is proba-
bly the most ubiquitous type of web service in
use on the internet today, and therefore one
you will come across again and again when
connecting Android applications—
POX.
6.5.1 POX—Putting it together
with HTTP and XML
To work with POX we are going to make net-
work calls to the popular del.icio.us online
social bookmarking site. We will specify a
username and password to log in to an
HTTPS resource and return a list of recent
posts, or bookmarks. This service returns raw
XML data, and we will then parse it into a Jav-
aBean-style class and display it as shown in
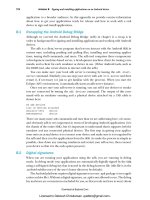
figure 6.4.
Figure 6.4 The del.icio.us recent posts
screen from the NetworkExplorer application
Licensed to Deborah Christiansen <>
Download at Boykma.Com
188 CHAPTER 6 Networking and web services
Listing 6.10 shows the del.icio.us login and HTTPS
POST Activity
code from our
NetworkExplorer application.
public class DeliciousRecentPosts extends Activity {
private static final String CLASSTAG =
DeliciousRecentPosts.class.getSimpleName();
private static final String URL_GET_POSTS_RECENT =
"
. . . member var declarations for user, pass, output,
and button (Views) omitted for brevity,
private final Handler handler = new Handler() {
public void handleMessage(final Message msg) {
progressDialog.dismiss();
String bundleResult = msg.getData().getString("RESPONSE");
output.setText(parseXMLResult(bundleResult));
}
} ;
@Override
public void onCreate(final Bundle icicle) {
super.onCreate(icicle);
this.setContentView(R.layout.delicious_posts);
. . . inflate views omitted for brevity
this.button.setOnClickListener(new OnClickListener() {
public void onClick(final View v) {
output.setText("");
performRequest(user.getText().toString(),
pass.getText().toString());
}
} ) ;
} ;
. . . onPause omitted for brevity
private void performRequest(String user, String pass) {
this.progressDialog = ProgressDialog.show(this,
"working . . .", "performing HTTP post to del.icio.us");
final ResponseHandler<String> responseHandler =
HTTPRequestHelper.getResponseHandlerInstance(this.handler);
new Thread() {
public void run() {
HTTPRequestHelper helper =
new HTTPRequestHelper(responseHandler);
helper.performPost(URL_GET_POSTS_RECENT,
user, pass, null, null);
}
}.start();
}
private String parseXMLResult(String xmlString) {
StringBuilder result = new StringBuilder();
Listing 6.10 The del.icio.us HTTPS POX API with authentication from an Activity
Include
del.icio.us URL
B
Provide Handler
to update UI
C
D
Call local performRequest
with user and passttpClient
execute
Use helper
for HTTP
E
Parse XML
String result
F
Licensed to Deborah Christiansen <>
Download at Boykma.Com
189Web services
try {
SAXParserFactory spf = SAXParserFactory.newInstance();
SAXParser sp = spf.newSAXParser();
XMLReader xr = sp.getXMLReader();
DeliciousHandler handler = new DeliciousHandler();
xr.setContentHandler(handler);
xr.parse(new InputSource(new StringReader(xmlString)));
List<DeliciousPost> posts = handler.getPosts();
for (DeliciousPost p : posts) {
result.append("\n" + p.getHref());
}
} catch (Exception e) {
// log and or handle
}
return result.toString();
}
To utilize a POX service we need to know a little bit about it, beginning with the URL
endpoint
B
. To call the del.icio.us service we will again use a
Handler
to update the
UI
C
, and we will use the
HttpRequestHelper
we previously built and walked through
in the last section. In this example we again have many fewer lines of code than if we
did not use the helper (lines of code we would likely be repeating in different
Activ-
ity
classes). With the helper instantiated we call the
performRequest
method with a
username and password
D
. This method, via the helper, will log in to del.icio.us and
return an
XML chunk representing the most recently bookmarked items
E
. To turn
the raw
XML into useful types we then also include a
parseXMLResult
method
F
.
Parsing
XML is a subject in its own right, and therefore we will cover it in more detail
in chapter 13, but the short takeaway with this method is that we walk the
XML struc-
ture with a parser and return our own
DeliciousPost
data beans for each record.
That’s it—that’s using
POX to read data over HTTPS.
Building on the addition of
XML to HTTP, above and beyond POX, is the REST
architectural principle, which we will explore next.
6.5.2 REST
While we look at REST, we will also try to pull in another useful concept in terms of
Android development: working with the various Google Data
APIs (http://
code.google.com/apis/gdata/). We used the
GDATA APIs for our RestaurantFinder
review information in chapter 3, but there we didn’t authenticate, and we didn’t get
into the details of networking or
REST. Here we will uncover the details as we perform
two distinct tasks: authenticate and retrieve a Google
ClientLogin
token and retrieve
the Google Contacts data for a specified user. Keep in mind that as we work with the
GDATA APIs in any capacity, we will be using a REST-style API.
The main concepts with
REST are that you specify resources in a URI form and you
use different protocol methods to perform different actions. The Atom Publishing
Protocol (AtomPub) defines a
REST-style protocol, and the GDATA APIs are an imple-
mentation of AtomPub (with some Google extensions). As noted, the entire
Intent
Licensed to Deborah Christiansen <>
Download at Boykma.Com
190 CHAPTER 6 Networking and web services
approach of the Android platform is a lot like REST. A URI such as content://
contacts/1 is in the
REST style. It includes a path that identifies the type of data and a
particular resource (contact number 1).
That
URI does not say what to do with contact 1, however. In REST terms that’s
where the method of the protocol comes into the picture. For
HTTP purposes REST
utilizes various methods to perform different tasks:
POST
(create, update, or in special
cases delete),
GET
(read),
PUT
(create, replace), and
DELETE
(delete). True HTTP REST
implementations use all the HTTP method types and resources to construct APIs.
In the real world you will find very few true
REST implementations. It is much more
common to see a
REST-style API. That means an API that doesn’t typically use the HTTP
DELETE
method (many servers, proxies, and so on have trouble with
DELETE
) and over-
loads the more common
GET
and
POST
methods with different URLs for different tasks
(by encoding a bit about what is to be done in the
URL, or as a header or parameter,
rather than relying strictly on the method). In fact, though many people refer to the
GDATA APIs as REST, they are technically only REST-like, not true REST. That’s not nec-
essarily a bad thing; the idea is ease of use of the
API rather than pattern purity. All in
all,
REST is a very popular architecture or style, because it’s easy yet powerful.
Listing 6.11 is a quick example that focuses on the network aspects of authentica-
tion with
GDATA to obtain a
ClientLogin
token and using that token with a subse-
quent
REST-style request to obtain Contacts data by including an email address as a
resource.
public class GoogleClientLogin extends Activity {
private static final String URL_GET_GTOKEN =
" /> private static final String URL_GET_CONTACTS_PREFIX =
" /> private static final String URL_GET_CONTACTS_SUFFIX = "/full";
private static final String GTOKEN_AUTH_HEADER_NAME = "Authorization";
private static final String GTOKEN_AUTH_HEADER_VALUE_PREFIX =
"GoogleLogin auth=";
private static final String PARAM_ACCOUNT_TYPE = "accountType";
private static final String PARAM_ACCOUNT_TYPE_VALUE =
"HOSTED_OR_GOOGLE";
private static final String PARAM_EMAIL = "Email";
private static final String PARAM_PASSWD = "Passwd";
private static final String PARAM_SERVICE = "service";
private static final String PARAM_SERVICE_VALUE = "cp";
private static final String PARAM_SOURCE = "source";
private static final String PARAM_SOURCE_VALUE =
"manning-unlockingAndroid-1.0";
private String tokenValue;
. . . View member declarations omitted for brevity
private final Handler tokenHandler = new Handler() {
Listing 6.11 Using the Google Contacts AtomPub API with authentication
Create Handler
token request
B
Licensed to Deborah Christiansen <>
Download at Boykma.Com
191Web services
public void handleMessage(final Message msg) {
progressDialog.dismiss();
String bundleResult = msg.getData().getString("RESPONSE");
String authToken = bundleResult;
authToken = authToken.substring(authToken.indexOf("Auth=")
+ 5, authToken.length()).trim();
tokenValue = authToken;
GtokenText.setText(authToken);
}
} ;
private final Handler contactsHandler =
new Handler() {
public void handleMessage(final Message msg) {
progressDialog.dismiss();
String bundleResult = msg.getData().getString("RESPONSE");
output.setText(bundleResult);
}
} ;
. . . onCreate and onPause omitted for brevity
private void getToken(String email, String pass) {
final ResponseHandler<String> responseHandler =
HTTPRequestHelper.getResponseHandlerInstance(
this.tokenHandler);
this.progressDialog = ProgressDialog.show(this,
"working . . .", "getting Google ClientLogin token");
new Thread() {
public void run() {
HashMap<String, String> params =
new HashMap<String, String>();
params.put(GoogleClientLogin.PARAM_ACCOUNT_TYPE,
GoogleClientLogin.PARAM_ACCOUNT_TYPE_VALUE);
params.put(GoogleClientLogin.PARAM_EMAIL, email);
params.put(GoogleClientLogin.PARAM_PASSWD, pass);
params.put(GoogleClientLogin.PARAM_SERVICE,
GoogleClientLogin.PARAM_SERVICE_VALUE) ;
params.put(GoogleClientLogin.PARAM_SOURCE,
GoogleClientLogin.PARAM_SOURCE_VALUE);
HTTPRequestHelper helper =
new HTTPRequestHelper(responseHandler);
helper.performPost(HTTPRequestHelper.MIME_FORM_ENCODED,
GoogleClientLogin.URL_GET_GTOKEN,
null, null, null, params);
}
}.start();
}
private void getContacts(String email, String token) {
final ResponseHandler<String> responseHandler =
HTTPRequestHelper.getResponseHandlerInstance(
this.contactsHandler);
this.progressDialog = ProgressDialog.show(this,
C
Set
tokenValue
Create Handler for
contacts request
D
Implement
getToken
E
Include
necessary
parameters
for
ClientLogin
F
G
Perform POST
to get token
H
Implement
getContacts
Licensed to Deborah Christiansen <>
Download at Boykma.Com
192 CHAPTER 6 Networking and web services
"working . . .", "getting Google Contacts");
new Thread() {
public void run() {
HashMap<String, String> headers =
new HashMap<String, String>();
headers.put(GoogleClientLogin.GTOKEN_AUTH_HEADER_NAME,
GoogleClientLogin.GTOKEN_AUTH_HEADER_VALUE_PREFIX
+ token);
String encEmail = email;
try {
encEmail = URLEncoder.encode(encEmail,
"UTF-8");
} catch (UnsupportedEncodingException e) {
// log and or handle
}
String url =
GoogleClientLogin.URL_GET_CONTACTS_PREFIX + encEmail
+ GoogleClientLogin.URL_GET_CONTACTS_SUFFIX;
HTTPRequestHelper helper = new
HTTPRequestHelper(responseHandler);
helper.performGet(url, null, null, headers);
}
}.start();
}
}
After a host of constants that represent various
String
values we will use with the
GDATA services, we have several
Handler
instances in this class, beginning with
a
tokenHandler
B
. This handler updates a UI
TextView
when it receives a message,
like the previous similar examples we have seen, and updates a non–
UI member
tokenValue
variable that other portions of our code will use
C
. The next
Handler
we
have is the
contactsHandler
that will be used to update the UI after the contacts
request
D
.
Beyond the handlers we have the
getToken
method
E
. This method includes all
the required parameters for obtaining a
ClientLogin
token from the GDATA servers
(
F
. After the setup to obtain the
token, we make a
POST
request via the request helper
G
.
Once the token details are taken care of, we have the
getContacts
method
H
.
This method uses the token obtained via the previous method as a header
I
. After
you have the token you can cache it and use it with all subsequent requests (you don’t
need to re-obtain the token every time). Next we encode the email address portion of
the Contacts
API URL
J
, and we make a
GET
request for the data—again using the
HttpRequestHelper
1)
.
With this approach we are making several network calls (one as
HTTPS to get the
token and another as
HTTP to get data) using our previously defined helper class.
When the results are returned from the
GDATA API, we parse the XML block and
update the
UI.
I
Add token
as header
Encode email
address in URL
J
Make GET request
for Contacts
1)
Licensed to Deborah Christiansen <>
Download at Boykma.Com
193Web services
Now that we have explored some REST-style networking, the last thing we need to dis-
cuss with regard to
HTTP and Android is SOAP. This topic comes up frequently in dis-
cussions of networking mobile devices, but sometimes the forest gets in the way of the
trees in terms of framing the real question.
6.5.3 To SOAP or not to SOAP, that is the question
SOAP is a powerful protocol that has many uses. We would be remiss if we didn’t at
least mention that while it’s possible, it’s not generally recommended on a small,
embedded device like a smartphone, regardless of the platform. The question within
the limited resources environment Android inhabits is really more one of should it be
done rather than can it be done.
Surely some experienced developers, who may have been using
SOAP for years on
other devices, are snarling at this sentiment right now. To those of you in that camp
we would ask you to bear with us as we try to explain. The things that make
SOAP great
are its support for strong types (via
XML Schema), its support for transactions, its secu-
rity and encryption, its support for message orchestration and choreography, and all
the related
WS-* standards. These things are invaluable in many server-oriented com-
puting environments, whether or not they involve the enterprise. And these things
add a great deal of overhead, especially on a small, embedded device. In fact, in many
situations where people use
SOAP on embedded devices, they often don’t bother with
the advanced features—and they use plain
XML with the overhead of an envelope at
the end of the day anyway. On an embedded device you will often get better perfor-
mance, and a simpler design, by using a
REST- or POX-style architecture and avoiding
the overhead of
SOAP.
There are, of course, some situations where it makes sense to investigate using
SOAP directly with Android. In the case where you need to talk to existing SOAP ser-
vices that you have no control over,
SOAP might make sense. Also, if you already have
J2ME clients for existing SOAP services, you may be able to port those in a limited set
of cases. Yet, either of these approaches makes it easier on only you, the developer,
and has either no effect or a negative one in terms of performance on the user. Even
when you are working with existing
SOAP services, remember that you can often write
a
POX/REST-style proxy for SOAP services on the server side and call that from
Android, rather than using
SOAP directly from Android.
If you feel like
SOAP is still the right choice, you can use one of several ports of the
k
SOAP toolkit ( which is specially designed exactly
GDATA ClientLogin and CAPTCHA
While we have included a working
ClientLogin
example here, we have also skipped
over an important part—
CAPTCHA
. Google may optionally require a
CAPTCHA
with the
ClientLogin
approach. To fully support
ClientLogin
you need to handle that re-
sponse and display the
CAPTCHA
to the user, then resend a token request with the
user’s entered
CAPTCHA
value. For details see the GDATA documentation.
Licensed to Deborah Christiansen <>
Download at Boykma.Com
194 CHAPTER 6 Networking and web services
for SOAP on an embedded Java device. Keep in mind, though, even the kSOAP docu-
mentation states, “
SOAP introduces some significant overhead for web services that
may be problematic for mobile devices. If you have full control over the client and the
server, a
REST-based architecture may be more adequate.” In addition, you may be
able to write your own parser for simple
SOAP services that don’t use fancy SOAP fea-
tures and just use a
POX approach that includes the SOAP XML portions you require
(you can always roll your own, even with
SOAP).
All in all, in our minds the answer to the question is not to use
SOAP on Android,
even though you can. Our discussion of
SOAP, even though we don’t advocate it,
rounds out our more general web services discussion, and that wraps up our network-
ing coverage.
6.6 Summary
In this chapter we started with a brief lesson on the background of basic networking con-
cepts, from nodes and addresses to layers and protocols. With that general background
in place, we covered details concerning obtaining network status information and
showed several different ways to work with the
IP networking capabilities of the platform.
In terms of networking we looked at using basic sockets and the
java.net
package.
Then we also examined the included Apache HttpClient
API. HTTP is one of the most
common, and most important, networking resources available to the Android plat-
form. Using HttpClient we covered a lot of territory in terms of different request
types, parameters, headers, authentication, and more. Beyond basic
HTTP we also
extended into the concepts of
POX and REST, and we discussed a bit of SOAP—all of
which use
HTTP as the transport mechanism.
Now that we have covered a good deal of the networking possibilities, and hope-
fully given you at least a glint of an idea of what you can do with server-side
APIs and
integration with Android, we are going to turn to another very important part of the
Android world—telephony.
Licensed to Deborah Christiansen <>
Download at Boykma.Com
195
Telephony
With an Android device you can surf the web, store and retrieve data locally, access
networks, access location information, use many types of applications, and—get
this— actually make phone calls.
After all is said and done, one of the most fundamental components of the plat-
form is the mobile phone. Dialing out, receiving calls, sending and receiving text and
multimedia messages, and other related telephony services are all available. The add-
ed bonus with Android is that all of these items are accessible to developers through
simple-to-use
APIs and built-in applications that make use of intents and services. You
can use the telephony support Android provides quite easily, and you can combine
it and embed it in your own applications (as you have seen in previous examples).
In this chapter we will examine a bit of telephony background and cover terms
involved with a mobile device. We will move on to basic Android telephony pack-
ages, which will take us through handling calls using built-in
Intent
actions and
This chapter covers:
■
Making and receiving phone calls
■
Capturing call-related events
■
Obtaining phone and service information
■
Using SMS
Licensed to Deborah Christiansen <>
Download at Boykma.Com
196 CHAPTER 7 Telephony
examining the
TelephonyManager
and
PhoneStateListener
classes. The
Intent
actions are what you will use on a day-to-day basis to initiate phone calls in your appli-
cations.
TelephonyManager
is, on the other hand, not related to making calls but
rather is used to retrieve all kinds of telephony-related data, such as the state of the
voice network, the device’s own phone number, and Subscriber Identity Module (
SIM)
card details. Using
TelephonyManager
is also how you attach a
PhoneStateListener
,
which can alert you when call or phone network states change.
Once we have basic telephony
APIs in hand, we will move on to working with
another very common mobile phone feature—sending and receiving
SMS messages.
Android provides intents and built-in applications for handling
SMS messages as well
as
APIs that allow you to send SMS messages and be notified when SMS messages are
received.
We will also touch on emulator features that allow you to send in test calls and/or
messages to exercise your applications.
We are once again going to use a sample application to carry us through the con-
cepts related to the material in this chapter. We will be building a TelephonyExplorer
application to demonstrate dialing the phone, obtaining phone and service state
information, adding listeners to the phone state, and working with
SMS. Our Telepho-
nyExplorer application will have several basic screens, as shown in figure 7.1.
Figure 7.1 TelephonyExplorer main screen, showing all the related activities the sample application
performs
Licensed to Deborah Christiansen <>
Download at Boykma.Com
197Telephony background and terms
TelephonyExplorer, as you can see from the screen shot, is not pretty, nor is it very prac-
tical outside of learning the concepts and
API details involved. This application is fo-
cused on touching the telephony-related
APIs while remaining simple and uncluttered.
Before we begin to build TelephonyExplorer, the first thing we first need to clarify
what telephony is and learn the terminology.
7.1 Telephony background and terms
This basic information about telephony may not be new to experienced mobile devel-
opers (if that describes you, feel free to skip to the next section), but it’s important to
clarify terms and set out some background for those who are new to these concepts.
First, telephony is a general term that refers to the details surrounding electronic
voice communications over telephone networks. Our scope is, of course, the mobile
telephone network that Android devices will participate in, specifically the Global Sys-
tem for Mobile Communications (
GSM) network.
NOTE Telephone The term telephone means “speech over a distance.” The Greek
roots are tele, which means “distant,” and phone, which means “speech.”
GSM is a cellular telephone network. Devices communicate over radio waves and spec-
ified frequencies using the cell towers that are common across the landscape. This
means the
GSM standard has to define a few important things, such as identities for
devices and “cells,” along with all of the rules for making communications possible.
We won’t delve into the underlying details of
GSM, but it’s important to know that
it’s the standard that the Android stack currently uses to support voice calls—and
it’s the most widely used standard in the world across carriers and devices, Android
or otherwise. All
GSM devices use a SIM card to store all the important network and
user settings.
A
SIM card is a small, removable, and secure smart card. Every device that operates
on a
GSM network has specific unique identifiers, which are stored on the SIM card:
■
Integrated Circuit Card ID (ICCID) —Identifies a SIM card (also known as a SIM
Serial Number, or SSN).
■
International Mobile Equipment Identity (IMEI) —Identifies a physical device. (The
number is usually printed underneath the battery).
■
International Mobile Subscriber Identity (IMSI) —Identifies a subscriber (and the
network that subscriber is on).
■
Location Area Identity (LAI) —Identifies the region the device is in within a pro-
vider network.
■
Authentication Key (Ki) —A 128-bit key used to authenticate a SIM card on this
provider network. A 128-bit key.
These numbers are important for the obvious reasons that they are used to validate
and authenticate a
SIM card itself, the device it is in, and the subscriber on the net-
work (and across networks if need be).
Licensed to Deborah Christiansen <>
Download at Boykma.Com
198 CHAPTER 7 Telephony
Along with storing unique identifiers and authentication keys, SIM cards often are
capable of storing user contacts and
SMS messages. This is convenient for users
because they can move their
SIM card to a new device and carry along contact and
message data easily. At present there are no public
APIs for interacting with the SIM
card on an Android device directly, though this may become possible in the future.
(At present, the platform handles the
SIM interaction, and developers can get read-
only access via the telephony
APIs).
The basic background for working with the Android telephony packages really is
that short and simple. You need to know that you are working with a
GSM network,
and then you need to be aware that you may come across terms like
IMSI and IMEI,
which are stored on the
SIM. Getting at this information, and more, is done with the
TelephonyManager
class.
7.2 Accessing telephony information
Android provides a very informative manager class that supplies information about
many telephony-related details on the device. Using this class,
TelephonyManager
, you
can access many of the
GSM/SIM properties we have already discussed, and you can
obtain phone network state information and updates.
Attaching an event listener to the phone, in the form of a
PhoneStateListener
,
which is done via the manager, is how you can make your applications aware of when
phone service is and is not available and when calls are started, in progress, or ending,
and more.
Here we are going to examine several
parts of the TelephonyExplorer example
application to look at both of these classes
and concepts, starting with obtaining a
TelephonyManager
instance and using it
to query useful telephony information.
7.2.1 Retrieving telephony properties
The
android.telephony
package con-
tains the
TelephonyManager
class, and it
has details on all of the information you
can obtain using it. Here we are going to
get and display a small subset of that infor-
mation to demonstrate the approach.
The first
Activity
, beyond the main
screen, our TelephonyExplorer applica-
tion will have is a simple screen that shows
some of the information we can obtain via
TelephonyManager
, as shown in fig-
ure 7.2.
Figure 7.2 Displaying device and phone
network metainformation obtained from
the
TelephonyManager class
Licensed to Deborah Christiansen <>
Download at Boykma.Com
199Accessing telephony information
The
TelephonyManager
class is the information hub for telephony-related data in
Android. Listing 7.1 demonstrates how you obtain a reference to this class and use it
to retrieve data (such as the data shown in figure 7.2).
// . . . start of class omitted for brevity
final TelephonyManager telMgr =
(TelephonyManager) this.getSystemService(
Context.TELEPHONY_SERVICE) ;
// . . . onCreate method and others omitted for brevity
public String getTelephonyOverview(
TelephonyManager telMgr) {
int callState = telMgr.getCallState();
String callStateString = "NA";
switch (callState) {
case TelephonyManager.CALL_STATE_IDLE:
callStateString = "IDLE";
break;
case TelephonyManager.CALL_STATE_OFFHOOK:
callStateString = "OFFHOOK";
break;
case TelephonyManager.CALL_STATE_RINGING:
callStateString = "RINGING";
break;
}
GsmCellLocation cellLocation =
(GsmCellLocation) telMgr.getCellLocation();
String cellLocationString =
cellLocation.getLac() + " " + cellLocation.getCid();
String deviceId = telMgr.getDeviceId();
String deviceSoftwareVersion =
telMgr.getDeviceSoftwareVersion();
String line1Number = telMgr.getLine1Number();
String networkCountryIso = telMgr.getNetworkCountryIso();
String networkOperator = telMgr.getNetworkOperator();
String networkOperatorName = telMgr.getNetworkOperatorName();
int phoneType = telMgr.getPhoneType();
String phoneTypeString = "NA";
switch (phoneType) {
case TelephonyManager.PHONE_TYPE_GSM:
phoneTypeString = "GSM";
break;
case TelephonyManager.PHONE_TYPE_NONE:
phoneTypeString = "NONE";
break;
}
Listing 7.1 Obtaining a TelephonyManager reference and using it to retrieve data
Get TelephonyManager
from Context
B
Implement information
helper method
C
D
Obtain call state
information
Get cell location
information
E
F
Get device
information
Licensed to Deborah Christiansen <>
Download at Boykma.Com
200 CHAPTER 7 Telephony
String simCountryIso = telMgr.getSimCountryIso();
String simOperator = telMgr.getSimOperator();
String simOperatorName = telMgr.getSimOperatorName();
String simSerialNumber = telMgr.getSimSerialNumber();
String simSubscriberId = telMgr.getSubscriberId();
int simState = telMgr.getSimState();
String simStateString = "NA";
switch (simState) {
case TelephonyManager.SIM_STATE_ABSENT:
simStateString = "ABSENT";
break;
case TelephonyManager.SIM_STATE_NETWORK_LOCKED:
simStateString = "NETWORK_LOCKED";
break;
// . . . other SIM states omitted for brevity
}
StringBuilder sb = new StringBuilder();
sb.append("telMgr - ");
sb.append(" \ncallState = " + callStateString);
// . . . remainder of appends omitted for brevity
return sb.toString();
}
The Android
Context
is used, through the
getSystemService
method with a con-
stant, to obtain an instance of the
TelephonyManager
class
B
. Once you have a handle
to the manager, you can use it as needed to obtain information. In this case we have
created a helper method to get data from the manager and return it as a
String
we
later display on the screen
C
.
The manager allows you to access phone state data, such as whether or not a call is
in progress
D
, cell location information
E
, the device ID and software version
F
, the
phone number registered to the current user/
SIM
G
, and many other SIM details
such as the subscriber
ID (IMSI)
H
. There are additional properties that we are not
using in this example (see the Javadocs for complete details).
Note one more detail here not shown in the listing. In order for this class to work,
the
READ_PHONE_STATE
permission has to be set in the manifest (without it security
exceptions will be thrown when you try to read data from the manager). We have con-
solidated the phone-related permissions into table 7.1, in section 7.3.1.
This handle to the telephony-related information, including metadata about
the device, network, and
SIM card, is one of the main purposes of the
Telephony-
Manager
class. The other main purpose of
TelephonyManager
is to allow you to
attach a
PhoneStateListener
.
7.2.2 Obtaining phone state information
Obviously a phone has various states that it as a device can be in. The most basic
phone states are idle, in a call, or in the process of initiating a call. When building
applications on a mobile device, there are times when you not only need to know the
current phone state but also want to be alerted anytime the state changes.
Get cellGet
phone number
of device
location
information
G
H
Obtain SIM
information
Licensed to Deborah Christiansen <>
Download at Boykma.Com