Professional ASP.NET 3.5 in C# and Visual Basic Part 29 pps
Bạn đang xem bản rút gọn của tài liệu. Xem và tải ngay bản đầy đủ của tài liệu tại đây (312.17 KB, 10 trang )
Evjen c05.tex V2 - 01/28/2008 12:47pm Page 235
Chapter 5: Working with Master Pages
Start by reviewing the code for the master page. The first line is the directive:
<
%@ Master Language="VB" %
>
Instead of using the
Page
directive, as you would with a typical
.aspx
page, you use the
Master
directive
for a master page. This master page uses only a single attribute,
Language
.The
Language
attribute’s value
here is
VB
, but of course, you can also use
C#
if you are building a C# master page.
You code the rest of the master page just as you would any other
.aspx
page. You can use server controls,
raw HTML and text, images, events, or anything else you normally would use for any
.aspx
page. This
means that your master page can have a
Page_Load
event as well or any other event that you deem
appropriate.
In the code shown in Listing 5-1, notice the use of a new server control — the
<
asp:ContentPlaceHolder
>
control. This control defines the areas of the template where the content page can place its content:
<
tr
>
<
td
>
<
asp:ContentPlaceHolder ID="ContentPlaceHolder1"
runat="server"
>
<
/asp:ContentPlaceHolder
>
<
/td
>
<
td
>
<
asp:ContentPlaceHolder ID="ContentPlaceHolder2"
runat="server"
>
<
/asp:ContentPlaceHolder
>
<
/td
>
<
/tr
>
In the case of this master page, two defined areas exist where the content page can place content. Our
master page contains a header and a footer area. It also defines two areas in the page where any inheriting
content page can place its own content. Look at how a content page uses this master page.
Coding a Content Page
Now that you have a master page in place in your application, you can use this new template for any
content pages in your application. Right-click the application in the Solution Explorer and choose Add
New Item to create a new content page within your application.
To create a content page or a page that uses this master page as its template, you select a typical Web
Form from the list of options in the Add New Item dialog (see Figure 5-5). Instead of creating a typical
Web Form, however, you check the Select Master Page check box. This gives you the option of associating
this Web Form later to some master page.
After you name your content page and click the Add button in the Add New Item dialog, you are pre-
sented with the Select a Master Page dialog, as shown in Figure 5-6.
This dialog allows you to choose the master page from which you want to build your content page. You
choose from the available master pages that are contained within your application. For this example,
select the new master page that you created in Listing 5-1 and click OK. This creates the content page.
The created page is a simple
.aspx
page with only a couple of lines of code contained in the file, as shown
in Listing 5-2.
235
Evjen c05.tex V2 - 01/28/2008 12:47pm Page 236
Chapter 5: Working with Master Pages
Figure 5-5
Figure 5-6
Listing 5-2: The created content page
<
%@ Page Language="VB" MasterPageFile="~/Wrox.master" Title="Untitled Page" %
>
<
script runat="server"
>
<
/script
>
236
Evjen c05.tex V2 - 01/28/2008 12:47pm Page 237
Chapter 5: Working with Master Pages
<
asp:Content ID="Content1" ContentPlaceHolderID="head" Runat="Server"
>
<
/asp:Content
>
<
asp:Content ID="Content2" ContentPlaceHolderID="ContentPlaceHolder1"
Runat="Server"
>
<
/asp:Content
>
This content page is not much different from the typical
.aspx
page you coded in the past. The big
difference is the inclusion of the
MasterPageFile
attribute within the
Page
directive. The use of this
attribute indicates that this particular
.aspx
page constructs its control’s based on another page. The
location of the master page within the application is specified as the value of the
MasterPageFile
attribute.
The other big difference is that it contains neither the
<
form id="form1" runat="server"
> tag nor any
opening or closing HTML tags that would normally be included in a typical
.aspx
page.
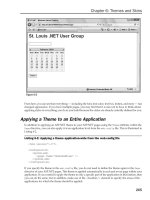
This content page may seem simple, but if you switch to the design view within Visual Studio 2008, you
see the power of using content pages. What you get with visual inheritance is shown in Figure 5-7.
Figure 5-7
237
Evjen c05.tex V2 - 01/28/2008 12:47pm Page 238
Chapter 5: Working with Master Pages
In this screenshot, you can see that just by using the
MasterPageFile
attribute in the
Page
directive, you
are able to visually inherit everything that the
Wrox.master
file exposes. From the design view within
Visual Studio, you can also see what master page you are working with as the name of the referenced
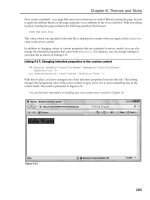
master page is presented in the upper-right corner of the Design view page. If you try and click into the
gray area that represents what is inherited from the master page, you will see that your cursor changes
to show you are not allowed. This is illustrated in Figure 5-8 (the cursor is on the word Page in the title).
Figure 5-8
All the common areas defined in the master page are shown in gray, whereas the content areas that you
specified in the master page using the
<
asp:ContentPlaceHolder
> server control are shown clearly and
available for additional content in the content page. You can add any content to these defined content
areas as if you were working with a regular
.aspx
page. An example of using this
.master
page for a
content page is shown in Listing 5-3.
Listing 5-3: The content page that uses Wrox.master
VB
<
%@ Page Language="VB" MasterPageFile="~/Wrox.master" %
>
<
script runat="server"
>
Protected Sub Button1_Click(ByVal sender As Object, ByVal e As System.EventArgs)
Label1.Text = "Hello " & TextBox1.Text & "!"
End Sub
<
/script
>
<
asp:Content ID="Content1" ContentPlaceHolderId="ContentPlaceHolder1"
runat="server"
>
<
b
>
Enter your name:
<
/b
><
br /
>
<
asp:Textbox ID="TextBox1" runat="server" /
>
<
br /
>
<
br /
>
<
asp:Button ID="Button1" runat="server" Text="Submit"
OnClick="Button1_Click" /
><
br /
>
<
br /
>
<
asp:Label ID="Label1" runat="server" Font-Bold="True" /
>
<
/asp:Content
>
<
asp:Content ID="Content2" ContentPlaceHolderId="ContentPlaceHolder2"
runat="server"
>
<
asp:Image ID="Image1" runat="server" ImageUrl="wrox.gif" /
>
<
/asp:Content
>
C#
<
%@ Page Language="C#" MasterPageFile="~/Wrox.master" %
>
238
Evjen c05.tex V2 - 01/28/2008 12:47pm Page 239
Chapter 5: Working with Master Pages
<
script runat="server"
>
protected void Button1_Click(object sender, System.EventArgs e)
{
Label1.Text = "Hello " + TextBox1.Text + "!";
}
<
/script
>
Right away you see some differences. As stated before, this page has no <
form id="form1"
runat="server"
> tag nor any opening or closing <
html
> tags. These tags are not included because they
are located in the master page. Also notice a new server control — the
<
asp:Content
> server control.
<
asp:Content ID="Content1" ContentPlaceHolderId="ContentPlaceHolder1"
runat="server"
>
<
/asp:Content
>
The <
asp:Content
> server control is a defined content area that maps to a specific <
asp:ContentPlace
Holder
> server control on the master page. In this example, you can see that the <
asp:Content
> server
control maps itself to the
<
asp:ContentPlaceHolder
> server control in the master page that has the
ID
of
ContentPlaceHolder1
. Within the content page, you don’t have to worry about specifying the location
of the content because this is already defined within the master page. Therefore, your only concern is to
place the appropriate content within the provided content sections, allowing the master page to do most
of the work for you.
Just as when you work with any typical
.aspx
page, you can create any event handlers for your content
page. In this case, you are using just a single event handler — the button click when the end user submits
the form. The created
.aspx
page that includes the master page and content page material is shown in
Figure 5-9.
Figure 5-9
Mixing Page Types and Languages
One interesting point: When you use master pages, you are not tying yourself to a specific coding model
(inline or code-behind), nor are you tying yourself to the use of a specific language. You can feel free to
mix these elements within your application because they all work well.
239
Evjen c05.tex V2 - 01/28/2008 12:47pm Page 240
Chapter 5: Working with Master Pages
You could use the master page created earlier, knowing that it was created using the inline-coding model,
and then build your content pages using the code-behind model. Listing 5-4 shows a content page created
using a Web Form that uses the code-behind option.
Listing 5-4: A content page that uses the code-behind model
.aspx (VB)
<
%@ Page Language="VB" MasterPageFile="~/Wrox.master" AutoEventWireup="false"
CodeFile="MyContentPage.aspx.vb" Inherits="MyContentPage" %
>
<
asp:Content ID="Content1" ContentPlaceHolderID="head" Runat="Server"
>
<
/asp:Content
>
<
asp:Content ID="Content2" ContentPlaceHolderId="ContentPlaceHolder1"
runat="server"
>
<
b
>
Enter your name:
<
/b
><
br /
>
<
asp:Textbox ID="TextBox1" runat="server" /
>
<
br /
>
<
br /
>
<
asp:Button ID="Button1" runat="server" Text="Submit" /
><
br /
>
<
br /
>
<
asp:Label ID="Label1" runat="server" Font-Bold="True" /
>
<
/asp:Content
>
<
asp:Content ID="Content3" ContentPlaceHolderId="ContentPlaceHolder2"
runat="server"
>
<
asp:Image ID="Image1" runat="server" ImageUrl="ineta.JPG" /
>
<
/asp:Content
>
VB Code-Behind
Partial Class MyContentPage
Inherits System.Web.UI.Page
Protected Sub Button1_Click(ByVal sender As Object, _
ByVal e As System.EventArgs) Handles Button1.Click
Label1.Text = "Hello " & TextBox1.Text & "!"
End Sub
End Class
C# Code-Behind
public partial class MyContentPage : System.Web.UI.Page
{
protected void Button1_Click (object sender, System.EventArgs e)
{
Label1.Text = "Hello " + TextBox1.Text + "!";
}
}
Even though the master page is using the inline-coding model, you can easily create content pages (such
as the page shown in Listing 5-4) that use the code-behind model. The pages will still work perfectly.
240
Evjen c05.tex V2 - 01/28/2008 12:47pm Page 241
Chapter 5: Working with Master Pages
Not only can you mix the coding models when using master pages, you can also mix the program-
ming languages you use for the master or content pages. Just because you build a master page in C#
doesn’t mean that you are required to use C# for all the content pages that use this master page. Y ou
can also build content pages in Visual Basic. For a good example, create a master page in C# that uses
the
Page_Load
event handler and then create a content page in Visual Basic. Once it is complete, run the
page. It works pe rfectly well. This means that even though you might have a master page in one of the
available .NET languages, the programming teams that build applications from the master page can use
whatever .NET language they want. You have to love the openness that the .NET Framework˜offers!
Specifying Which Master Page to Use
You just observed that it is pretty easy to specify at page level which master page to use. In the
Page
directive of the content page, you simply use the
MasterPageFile
attribute:
<
%@ Page Language="VB" MasterPageFile="~/Wrox.master" %
>
Besides specifying the master page that you want to use at the page level, you have a second way to
specify which master page you want to use in the
web.config
file of the application. This is shown in
Listing 5-5.
Listing 5-5: Specifying the master page in the web.config file
<
configuration
>
<
system.web
>
<
pages masterPageFile="~/Wrox.master" /
>
<
/system.web
>
<
/configuration
>
Specifying the master page in the
web.config
file causes every single content page you create in the
application to inherit from the specified master page. If you declare your master page in the
web.config
file, you can create any number of content pages that use this master page. Once specified in this manner,
the content page’s
Page
directive can then be constructed in the following manner:
<
%@ Page Language="VB" %
>
You can easily override the application-wide master page specification by simply declaring a different
master page within your content page:
<
%@ Page Language="VB" MasterPageFile="~/MyOtherCompany.master" %
>
By specifying the master p age in the
web.config
, you are really not saying that you want all the
.aspx
pages to use this master page. If you create a normal Web Form and run it, ASP.NET will know that
the page is not a content page and will run the page as a normal
.aspx
page.
If you want to apply the master page template to only a specific subset of pages (such as pages contained
within a specific folder of your application), you can use the
<
location
> element within the
web.config
file, as illustrated in Listing 5-6.
241
Evjen c05.tex V2 - 01/28/2008 12:47pm Page 242
Chapter 5: Working with Master Pages
Listing 5-6: Specifying the master page for a specific folder in the web.config file
<
configuration
>
<
location path="AdministrationArea"
>
<
system.web
>
<
pages masterPageFile="~/WroxAdmin.master" /
>
<
/system.web
>
<
/location
>
<
/configuration
>
With the addition of this <
location
> section in the
web.config
file, you have now specified that a
specific folder (
AdministrationArea
) will use a different master file template. This is done using the path
attribute of the
<
location
> element. The value of the
path
attribute can be a folder name as shown, or
it can even be a specific page — such as
AdminPage.aspx
.
Working with the Page Title
When you create content pages in your application, by default all the content pages automatically use
the title that is declared in the master page. For instance, you have primarily been using a master page
with the title
My Company Master Page
. Every content page that is created using this particular master
page also uses the same
My Company Master Page
title. You can avoid this by specifying the page’s title
using the
Title
attribute in the
@Page
directive in the content page. You can also work with the page title
programmatically in your content pages. To accomplish this, in the code of the content page, you use the
Master
object. The
Master
object conveniently has a property called
Title
. The value of this property is
the page title that is used for t he content page. You code it as shown in Listing 5-7.
Listing 5-7: Coding a custom page title for the content page
VB
<
%@ Page Language="VB" MasterPageFile="~/Wrox.master" %
>
<
script runat="server"
>
Protected Sub Page_LoadComplete(ByVal sender As Object, _
ByVal e As System.EventArgs)
Master.Page.Title = "This page was generated on: " & _
DateTime.Now.ToString()
End Sub
<
/script
>
C#
<
%@ Page Language="C#" MasterPageFile="~/wrox.master" %
>
<
script runat="server"
>
protected void Page_LoadComplete(object sender, EventArgs e)
{
Master.Page.Title = "This page was generated on: " +
242
Evjen c05.tex V2 - 01/28/2008 12:47pm Page 243
Chapter 5: Working with Master Pages
DateTime.Now.ToString();
}
<
/script
>
Working with Controls and Properties
from the Master Page
When working with master pages from a content page, you actually have good access to the controls
and the properties that the master page exposes. The master page, when referenced by the content page,
exposes a property called
Master
. You use this property to get at control values or custom properties that
are contained in the master page itself.
To see an e xample of this, create a GUID (unique identifier) in the master page that you can retrieve
on the content page that is using the master. For this example, use the master page that was created in
Listing 5-1, but add a Label server control and the
Page_Load
event (see Listing 5-8).
Listing 5-8: A master page that creates a GUID on the first request
VB
<
%@ Master Language="VB" %
>
<
script runat="server"
>
Protected Sub Page_Load(ByVal sender As Object, ByVal e As System.EventArgs)
If Not Page.IsPostBack Then
Label1.Text = System.Guid.NewGuid().ToString()
End If
End Sub
<
/script
>
<
html xmlns=" />>
<
head runat="server"
>
<
title
>
My Company Master Page
<
/title
>
<
asp:ContentPlaceHolder id="head" runat="server"
>
<
/asp:ContentPlaceHolder
>
<
/head
>
<
body
>
<
form id="form1" runat="server"
>
<
table cellpadding="3" border="1"
>
<
tr bgcolor="silver"
>
<
td colspan="2"
>
<
h1
>
My Company Home Page
<
/h1
>
<
b
>
User’s GUID:
<
asp:Label ID="Label1" runat="server" /
><
/b
>
<
/td
>
<
/tr
>
<
tr
>
<
td
>
<
asp:ContentPlaceHolder ID="ContentPlaceHolder1"
runat="server"
>
<
/asp:ContentPlaceHolder
>
243
Evjen c05.tex V2 - 01/28/2008 12:47pm Page 244
Chapter 5: Working with Master Pages
<
/td
>
<
td
>
<
asp:ContentPlaceHolder ID="ContentPlaceHolder2"
runat="server"
>
<
/asp:ContentPlaceHolder
>
<
/td
>
<
/tr
>
<
tr
>
<
td colspan="2"
>
Copyright 2008 - My Company
<
/td
>
<
/tr
>
<
/table
>
<
/form
>
<
/body
>
<
/html
>
C#
protected void Page_Load(object sender, EventArgs e)
{
if (!Page.IsPostBack)
{
Label1.Text = System.Guid.NewGuid().ToString();
}
}
Now you have a Label control on the master page that you can access from the content page. You have
a couple of ways to accomplish this task. The first is to use the
FindControl()
method that the master
page exposes. This approach is shown in Listing 5-9.
Listing 5-9: Getting at the Label’s Text value in the content page
VB
<
%@ Page Language="VB" MasterPageFile="~/Wrox.master" %
>
<
script runat="server" language="vb"
>
Protected Sub Page_LoadComplete(ByVal sender As Object, _
ByVal e As System.EventArgs)
Label1.Text = CType(Master.FindControl("Label1"), Label).Text
End Sub
Protected Sub Button1_Click(ByVal sender As Object, _
ByVal e As System.EventArgs)
Label2.Text = "Hello " & TextBox1.Text & "!"
End Sub
<
/script
>
<
asp:Content ID="Content1" ContentPlaceHolderID="head" Runat="Server"
>
<
/asp:Content
>
<
asp:Content ID="Content2" ContentPlaceHolderId="ContentPlaceHolder1"
244