Easy PHP Websites with the Zend Framework (phần 2) pot
Bạn đang xem bản rút gọn của tài liệu. Xem và tải ngay bản đầy đủ của tài liệu tại đây (1.52 MB, 50 trang )
31CHAPTER 2 • INTRODUCING PHP
Taking Advantage of Functions
Earlier in this chapter you learned what a function is: a bit of code packaged in such a way that it can
be repeatedly executed by referring to its dened name. For example, in this chapter you've already
encountered the printf() function. As you might imagine, PHP offers many more functions capable
of performing a seemingly countless number of tasks, ranging from rounding fractions down to count-
ing the number of characters in a string, to redirecting a visitor to another website. To obtain a better
idea of just how many functions are at your disposal, take some time to peruse PHP's manual.
In this section you'll become better acquainted with functions by formally introducing a function
you'll repeatedly return to when building PHP-powered websites.
Introducing the date() Function
The date() function is very powerful, allowing you to format not only the current date, but also the
current time in a wide variety of ways. For example, presuming today's date was July 4, 2009, among
many other formats you could easily output the current date and time using any of the following
formats:
July 4, 2009
07/04/2009
07/04/09
Saturday
Sat, 04 July 2008
The
date() function can also output the current time in a wide variety of formats such as:
08:15 pm
20:15
11:40 am EST
11:40 am -0500
Although not mandatory, many functions accept one or more input parameters which help determine
how the function behaves. Indeed, the
date() function accepts two, a required parameter which tells
it how to return the date and/or time, and an optional parameter which tells it to format a specic date
and time in accordance with a supplied timestamp (more about what a timestamp is in a moment).
Additionally, a function will always return a value, even if that value is nothing (or void, as they say
in computer science-ese). In the date() function's case, it returns a string, consisting of the desired
formatted date and time.
NOTE. Typically you'll learn about a function by consulting the PHP manual. Incidentally, if you
already know the function's name you can navigate directly to it by using the following URL:
where function is a placeholder for the name of the function
you'd like to consult. Therefore to consult the date() function's page, navigate to http://www.
php.net/date.
When consulting the PHP manual to learn more about a specic function, keep in mind that each
function's page clearly identies the return value, and which input parameters are optional by enclos-
Download at Boykma.Com
32 CHAPTER 2 • INTRODUCING PHP
ing them within square brackets. For instance if you navigate over to
you'll see the date() function dened like this:
string date( string $format [, int $timestamp] )
So what do you assign the
$format input parameter in order to specify what sort of date/time it
should return? This is done by assigning format speciers to the parameter in a certain order. For-
mat speciers are simply a variety of different characters, with each having a specic meaning. For
example, to have date() return just the current day of the week, you would assign the lowercase l to
$format, like so:
echo date('l');
Presuming today is Tuesday, it will return:
Tuesday
If you're just looking for the current month, you use the
F character:
echo date('F');
Let's consider a more involved example. Suppose you want to return the current date using this for-
mat:
March 11, 2008:
echo date('F j, Y');
Finally, let's return the current date and time using this format:
11-13-09 2:47 pm:
echo date('m-d-y g:i a');
So how do you keep all of these parameters straight in your head? The simple answer is, you don't.
The PHP manual is always just a few keystrokes away, and you can even download a copy to your
computer by navigating to
/>Hopefully this brief section has provided you with some insight into not only how to use functions,
but also into one of PHP's most popular features,
date(). Try building upon what you've learned
here by experimenting with some of my other favorite functions, including
strtoupper(), str_
word_count(), and pi(). Remember you can easily look these up by appending the function name to
/>Dening Your Own Functions
While the PHP language is bundled with an amazing array of diverse functions, sooner or later you'll
want a function capable of carrying out a task very specic to your own needs. For example, suppose
some future version of your gaming web site started selling copies of used video games, and because
your business is run out of Ohio you need to calculate sales tax for Ohio-based purchasers. This sort
of task might be used at several locations throughout your website, so creating a function capable of
calculating the sales tax seems like a good idea. The following listing demonstrates how such a func-
Download at Boykma.Com
33CHAPTER 2 • INTRODUCING PHP
tion is created and subsequently called:
01 <?php
02
03 function calculateSalesTax($price, $tax) {
04 return ($price * $tax) + $price;
05 }
06
07 echo "Total cost: {calculateSalesTax(9.99, .0575)}";
08
09 ?>
Let's review this script:
• Line 03 begins the function denition, assigning a name and identifying any input param-
eters.
• Within the function body (line 04) you'll see the total cost is calculated, with the
return key-
word used to return that value to the caller.
Of course, you're not constrained to immediately output the returned value. For instance, if you
wanted to assign the return value to another variable, perhaps in order to perform additional process-
ing, you could call
calculateSalesTax() like this:
$total = calculateSalesTax(9.99, .0575);
Conditional Statements
Most computer programs are like owcharts, with their execution dependent upon a select set of
conditions. In order to determine which route the program will take, conditional statements are often
used. These statements are used to validate a given condition, such as what rating applies to which
denition. For example, suppose you wanted to offer a user-friendly message based on the video
game's rating:
if ($rating == 'T') {
echo 'Rated T for Teens!';
}
Notice I used two equal signs here. This is because we're comparing
$rating to 'T' rather than assign-
ing $rating the value of 'T'.
Of course, you might want to offer an alternative message to the visitor in case the rating isn't avail-
able. This is easily accomplished with the if-else statement:
if ($rating == 'T') {
echo 'Rated T for Teens!';
} else {
echo 'No rating available!';
}
Download at Boykma.Com
34 CHAPTER 2 • INTRODUCING PHP
As a nal example, what if you wanted to check a value against more than two conditions? For
instance, you could use PHP's if-elseif-else conditional statement to create a custom suggestion
based on a game's rating and whether it has support for multiple players:
if ($rating == 'T' AND $multiplayer == 'Y'){
echo 'Suitable for playing with your friends after school!';
} elseif ($rating == 'M' AND $multiplayer == 'Y') {
echo 'Bring your coworkers together with a night of gaming!';
} else {
echo 'Sorry, no suggestion available for this game!';
}
Looping Statements
Even the simplest of web applications will likely require you to iterate over a set of data. For ex-
ample, in the earlier introduction to arrays you learned how to selectively output array elements,
but what if you wanted to output all of them? Explicitly identifying each array index in an
echo()
statement wouldn't make much sense, so instead you'll logically want an easier solutions for doing so.
PHP's looping statements offer that solution.
In this section I'll introduce you to the three most popular looping statements, although you're encour-
aged to consult the PHP manual to review other less commonly used alternatives.
The while Loop
The while loop iterates until a certain condition is met. For example, the script shown next (while1.
php in your code download) will output 'I love video games!' ten times.
01 <?php
02
03 // Set a looping counter
04 $count = 1;
05
06 // Output 'I love video games!' until the counter reaches 10
07 while ($count <= 10) {
08
09 echo 'I love video games! <br />';
10
11 // Increment the counter
12 $count++;
13
14 }
15 ?>
Let's review this script:
• Line 04 sets a starting point for subsequently comparing
$count to 10. Because the while
loop condition (line 07) species it will execute until $count equals 10, the loop will execute
a total of ten times.
Download at Boykma.Com
35CHAPTER 2 • INTRODUCING PHP
• Line 12 increments the counter using the increment operator (++). This is just a shortcut for
incrementing an integer by 1. For instance, you could alternatively use the longhand version
of this line:
$count = $count + 1. Similarly, a decrement operator ( ) exists for decre-
menting an integer value by 1.
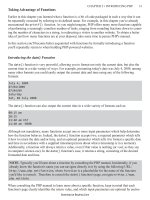
As you might have guessed, executing this script produces output identical to that shown in Figure
2-3.
Figure 2-3. Using a while loop
Let's consider a more practical example. Recalling the
$games single-dimensional array created in
the introductory section on arrays, suppose you wanted to output each game name to the browser.
The counter would logically be equivalent to the size of the array, which you can determine using the
count() function. The next example demonstrates how to use count() alongside an introduction to
using the while loop to output the
$games array:
01 <?php
02
03 // Create the array
04 $games = array('Arkanoid Live!', 'Tekken 6', 'Duke Nukem 3D');
05
06 // Start the counter at 0 in order to retrieve the rst element
07 $count = 0;
08
09 // Loop through the array until the end is reached
10 while ($count < count($games)) {
11 echo "{$games[$count]}<br />";
Download at Boykma.Com
36 CHAPTER 2 • INTRODUCING PHP
12 $count++;
13 }
14 ?>
Let's review this script (while2.php in your code download):
• Line 10's conditional statement might leave you scratching your head. Why are we only loop-
ing while
$count is less than the size of $games, rather than until it's equal to the array size?
Remember that PHP considers array offsets to begin at 0, meaning when $count is equal to
count($games) - 1, we've reached the end of the array.
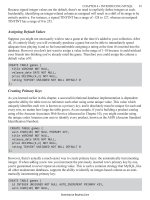
Executing this script produces the output shown in Figure 2-4.
Figure 2-4. Displaying array elements using the while loop
The for Loop
The for loop accomplishes the same task as while, looping over a group of statements until a certain
condition is met. The only difference is the counter is managed alongside the conditional statement
rather than within the looping body. Whether you choose while or for is simply a matter of prefer-
ence.
As an example, the following script (
for.php) outputs the $games array in the same fashion as was
demonstrated in the previous example:
Download at Boykma.Com
37CHAPTER 2 • INTRODUCING PHP
01 <?php
03
04 // Create the array
05 $games = array('Arkanoid Live!', 'Tekken 6', 'Duke Nukem 3D');
07
08 // Loop through the array until the end is reached
09 for ($count = 0; $count < count($games); $count++) {
10 echo "{$games[$count]} <br />";
11 }
12
13 ?>
Let's review the script:
• The
for loop ultimately produces identical results to a similarly constrained while loop, only
that the initial value, condition, and iterator are packaged into the loop arguments. So in this
case $count is rst set to 0 (this rst argument executes only once). Subsequently with each
iteration the second argument is executed, followed by the execution of the third. If the sec-
ond evaluates to true, the loop body will execute.
The output of this script is identical to that shown in Figure 2-4.
The foreach Loop
You learned how the for loop consolidates a bit of code otherwise required when using a while loop
by packaging the iterator and conditional into a single line. However when iterating over an array
there exists yet another looping mechanism which can further cut down on this code.
The
foreach looping statement will iterate over an array, automatically retrieving the next element
each time it loops. For example, the following foreach loop reproduces the same output as that shown
in Figure 2-4 when passed the same array:
01 <?php
02
03 foreach ($games as $game) {
04 echo "{$game}<br />";
05 }
06
07 ?>
The foreach loop also offers a secondary syntax useful for peeling keys and their corresponding val-
ues from associative arrays. For instance you might recall the $states associative array from earlier
in this chapter:
$states = array('CA' => 'California', 'OH' => 'Ohio', 'NY' => 'New York');
The foreach statement can iterate through this array, retrieving each key and its value, using the fol-
lowing syntax:
Download at Boykma.Com
38 CHAPTER 2 • INTRODUCING PHP
01 <?php
02 foreach($states AS $key => $value) {
03 echo "{$value} ({$key})<br />";
04 }
05 ?>
Executing this example produces the output shown in Figure 2-5.
Figure 2-5. Using the foreach Loop
Step #2. Publishing Spreadsheet Data to the Web
Suppose your idea for building a website showcasing your video game collection sprung from the
frustrations encountered when attempting to keep friends informed about your games and which are
currently being borrowed. So far you've been managing the game collection in a simple spreadsheet,
with each row containing information about a specic game. For each game you've cataloged the title,
platform, price, whether a friend is borrowing it, and a few words regarding your general opinion
about the game. A sample of what the spreadsheet looks like is found in Figure 2-6.
Download at Boykma.Com
39CHAPTER 2 • INTRODUCING PHP
Figure 2-6. The game spreadsheet
As you've distributed the spreadsheet to friends over a period of months, various copies have become
outdated and it's causing quite a bit of confusion. Mitch wants to borrow NBA 2K7 but his version
of the spreadsheet indicates Sean has it, although Sean actually returned it weeks ago. Scott wants to
buy Gears of War from you but you already sold it. And nobody seems to know you've been playing
Madden 2009 day and night for weeks now. Multiple versions of the spreadsheet are causing a giant
headache, and so you've decided to create a website which all of your friends can simply refer to for
updates. All you need to do is gure out how to make the spreadsheet available online.
Converting the Spreadsheet
To make your spreadsheet data available online, you'll need to rst convert it to CSV, or Comma-Sep-
arated Values format. CSV isn't formally a standard format, although it's supported by many applica-
tions and languages as a generally agreed upon way to share data, PHP included. As Microsoft Excel
remains far-and-away the most popular spreadsheet creation and analysis application, I'll show you
how to convert an Excel spreadsheet to CSV format.
Saving an Excel spreadsheet in CSV format is very simple; just open up the spreadsheet in Excel and
then navigate to File -> Save As. The Save As dialog will appear as shown in Figure 2-7. Navigate
to a desired save destination, assign the le an easily-recognizable name, and from the Save As Type
drop-down menu choose CSV (comma delimited). Finally, press the Save button to create the CSV
le.
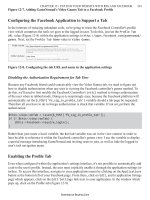
Figure 2-7. Saving the spreadsheet as a CSV le
If you open up this le in a text editor, you'll see that each spreadsheet eld is separated by a comma.
To prevent any confusion which might arise due to commas found in any of the elds, Excel delimit-
Download at Boykma.Com
40 CHAPTER 2 • INTRODUCING PHP
ed those elds with quotation marks. For example, a few lines found in the games.csv le are shown
here:
Title,Platform,Price,Borrowed?,Comments
Halo 3,Xbox 360,$59.99,No,Love the online multiplayer
Spy Hunter,Nintendo Gameboy,$12.99,No,
FIFA 2006,Nintendo Gameboy,$12.00,No,
Saint's Row,Xbox 360,$59.99,No,Need to nish it
Nascar 2008,Xbox 360,$49.99,Scott (10/1/2008),Hard to drive cars
Call of Duty 4,Xbox 360,$59.99,No,My favorite game!
NBA 2K7,Xbox 360,$59.99,Sean (9/15/2008),
Super Mario Bros 3,Nintendo Gameboy,$19.99,No,
Gears of war,Xbox 360,$59.99,No,Would like to sell or trade
Later in this section I'll show you how to disregard these quotation marks when parsing the CSV le.
TIP. Chances are you're going to eventually include a comma in the text found in one of the col-
umns, which will present a problem when you later write a script to parse the CSV le. The most
effective solution is to change the comma delimiter Excel uses to something you'll never use in
the spreadsheet, for instance a vertical bar |. While Excel doesn't offer any way to change this, you
can still change the delimiter by navigating to Start -> Control Panel -> Regional and Language
Options. From here the process varies depending upon your version of Windows. If you're using
Windows XP, click the Regional Options tab, then Customize, and change the separator found in
the List separator box. If you're using Windows Vista, click the Regional Options tab, and then click
Customize this format, and change the separator found in the List separator box. For the purposes of
this exercise I'll forego using commas in any of the elds so we can just use the default setting.
Reading the CSV File
Next we'll write a short PHP script capable of reading the CSV le's contents, and formatting and
displaying the data to the browser. To begin, place the newly saved CSV le within your application's
home directory so the script can easily access it.
NOTE. If you don't want visitors to be able to download your CSV le, you can instead place the
le within PHP's include path, specied within PHP's php.ini conguration le by the include_
path directive.
Next we'll create the script which will be used to parse the CSV le. Believe it or not, much of the
task has already been implemented within a standard PHP function known as
le(). The le()
function will parse a le, dumping its contents into an array. In doing so, it treats each line as a new
array element, with each line ending when it encounters the hidden newline (\n) character. For the
rst iteration of our script (game_parse.php), we'll dump games.csv into an array, and then iterate
over each line of the array, displaying each element to the browser:
Download at Boykma.Com
41CHAPTER 2 • INTRODUCING PHP
<?php
// Dump the games.csv le into an array
$games = le('games.csv');
// Parse the array
foreach($games as $game) {
echo "{$game}<br />";
}
?>
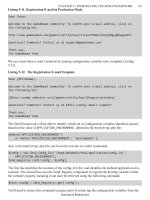
Executing game_parse.php produces the output shown in Figure 2-8:
Figure 2-8. Parsing the games.csv le
Now we're getting somewhere! However we're looking to put together a rather professional presenta-
tion, not to mention one that provides a greater level of control over each array element. To accom-
plish this goal, let's revise the
game_parse.php script to organize the data in an HTML table.
Displaying Data in a Table
The grid has long been one of the most popular approaches to presenting data in an easily readable
fashion. For instance, calendars, ight schedules, and spreadsheets are just a few examples of the
grids found all around you. Given the prevalence of this format, it might not come as a surprise that
the grid was one of the rst features available to the HTML markup language.
Download at Boykma.Com
42 CHAPTER 2 • INTRODUCING PHP
To create a well-organized table, you only need to use a few HTML tags. For instance, the following
HTML snippet produces the table found in Figure 2-9.
<style type="text/css">
#games {
border: 1px solid black;
}
#games th {
text-align: left;
}
</style>
<table id="games">
<tr>
<th>Title</th>
<th>Platform</th>
<th>Price</th>
<th>Borrowed?</th>
<th>Comments</th>
</tr>
<tr>
<td>Halo 3</td>
<td>Xbox 360</td>
<td>$59.99</td>
<td>No</td>
<td>Love the online multiplayer</td>
</tr>
<tr>
<td>Spy Hunter</td>
<td>Nintendo Gameboy</td>
<td>$12.99</td>
<td>No</td>
<td></td>
</tr>
</table>
Figure 2-9. A sample HTML table
In the case of the games spreadsheet, we want the table to expand and shrink based on the number of
rows in the spreadsheet, therefore the table must be built dynamically. In the next section I'm going to
show you how to use a great third-party solution for doing so. First however I'd like to introduce you
to a community-driven code sharing service known as PEAR, which we'll use to obtain the third-party
Download at Boykma.Com
43CHAPTER 2 • INTRODUCING PHP
code for generating dynamic HTML tables.
Introducing PEAR
The open source community has a long history of creating convenient solutions for sharing code. This
code typically offers well-designed solutions to common problems faced by a majority of program-
mers within that community. For instance, no matter what sort of PHP-driven web application you'd
like to build, chances are you're going to have to deal with things such as table layouts, form process-
ing, and validation of user input. You may also need to perform seemingly more esoteric tasks such
as converting numbers to Roman numerals, validating the syntax of IP addresses, or creating user
passwords. Wouldn't it be great if you could simply take advantage of readily available solutions for
these sorts of problems rather than go through the trouble of creating your own?
Indeed, the PHP community has long had a community-driven solution in place for sharing code
capable of accomplishing all of the aforementioned tasks and more. Known as PEAR, or the PHP
Extension and Application Repository, there are at the time of this writing 460 such solutions freely
available for your use! You can browse a list of available packages at
/>Unfortunately, many PHP books tend to shy away from showing readers how to nd and use this code
until much later into the introduction. Not so here! Because this book is all about showing you how
to use PHP in the most efcient and straightforward manner possible, I'd like to buck this trend and
instead introduce you to PHP's particular solution as early as practical in the book, which is now.
Using PEAR
If you followed the installation instructions found in Chapter 1, then PEAR is already installed mean-
ing you can begin using it immediately. You can verify it's installed by opening up a shell (command
prompt in Windows) and executing the following command:
%>pear
This will produce a listing of available commands and other usage information. Feel free to experi-
ment with this command to get a feel for what PEAR can do. For instance, execute the following
command to learn what PEAR packages are already installed on your machine (several are installed
by default):
%>pear list
I'm not going to introduce each of the available PEAR commands, as the listing produced earlier
should be fairly self explanatory. Just keep in mind you'll use this command to install, update, and
remove packages. In fact you'll put this command into practice by installing the HTML_Table pack-
age in the next section.
PEAR packages are all accessed through the object-oriented programming (OOP) paradigm. Most
PHP books tend to give OOP the white glove treatment, because of the notion that OOP is really hard
for newcomers to programming to understand. I dispute this convention, and in fact think you'll nd
it quite easy to understand! OOP is centered around the idea of a class, which you can think of as a
Download at Boykma.Com
44 CHAPTER 2 • INTRODUCING PHP
cookie-cutter or a blueprint for a particular entity we might nd in the real world, such as an automo-
bile, person, or HTML table. This class denes the characteristics (known as attributes) and behaviors
(known as methods) of the entity. For example, an HTML table class might have an attribute which
identies the table's CSS ID, and a method that adds a header to the table.
But remember the class is a blueprint; to use it you need to create an instance of that blueprint, known
as an object. This makes it possible for you to use multiple instances of the class on the same web-
page for instance, which would be necessary if you wanted to add multiple tables to a page in the case
of an HTML table class.
There's much more to OOP than what I've introduced in the previous two paragraphs, however for
the moment it's irrelevant. Just remember the four key terms: class, object, attribute, and method, and
what follows in the remainder of this chapter will be quite clear.
VIDEO. Introducing Object-Oriented Programming
The object-oriented programming paradigm views applications much in the same way humans view
the world: in terms of objects and their interactions. In mimicking our natural world-view, devel-
opers can better conceptualize, design, and maintain applications. This video introduces object-
oriented programming, and guides you through PHP's object-oriented features. Watch the video at
/>Introducing HTML_Table
HTML_Table is a PEAR solution for easily creating dynamic HTML tables. You can use it to manage
all characteristics of the table, such as setting cell contents, retrieving the total number of rows cre-
ated, and assigning CSS identiers to the table, headers, and cells. HTML_Table comes with more than
35 methods, however six are of particular importance because you'll use them in almost every table
you generate using this package:
•
HTML_Table(): This method creates a new table, and must be called before you can use any
other HTML_Table methods.
•
setHeaderContents(): This method assigns data to the <th> elements which are used to
title each table column.
•
setRowAttributes(): This method assigns attributes to the <td> elements found in a table
row.
•
setCellContents(): This method assigns data to a table cell (<td>).
•
altRowAttributes(): This method assigns attributes to alternate rows in the table, typically
for reason of enhancing readability.
•
toHtml(): This method outputs the table structure in HTML format.
You can learn more about
HTML_Table, and can review a breakdown of all available methods at
/>Download at Boykma.Com
45CHAPTER 2 • INTRODUCING PHP
Installing HTML_Table
To install HTML_Table, re up PEAR in the same fashion as you did earlier, and execute the following
command:
%>pear install -o HTML_Table
Some installation-related output will scroll by, followed by a message conrming successful installa-
tion. That's it! You're ready to begin using
HTML_Table.
Using HTML_Table
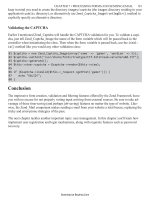
As mentioned, we're going to use HTML_Table to format the game collection in a much more visu-
ally appealing fashion than what was achieved with the earlier approach. The script we'll cover in this
chapter will produce the table shown in Figure 2-10.
Figure 2-10. Formatting the game collection using a table
The next script (
games_table.php) presents the code. Following the listing is a breakdown of the
script.
01 <?php
02
03 // Make HTML_Table available to the script
04 require 'HTML/Table.php';
05
06 // Dump games.csv into an array
07 $games = le('games.csv');
08
09 // Set Table CSS class
10 $attrs = array('class' => 'game');
11
12 // Create a new instance of the HTML_Table class
13 $table = new HTML_Table($attrs);
14
15 // Output the header
Download at Boykma.Com
46 CHAPTER 2 • INTRODUCING PHP
16 $header = explode(',', $games[0]);
17 for($header_count = 0; $header_count < count($header); $header_count++) {
18 $table->setHeaderContents(0, $header_count, $header[$header_count]);
19 }
20
21 // Set Header CSS class
22 $table->setRowAttributes(0, array('class' => 'header'));
23
24 // Parse the array
25 for($row_count = 1; $row_count < count($games); $row_count++) {
26
27 // Convert each line into an array
28 $game = explode(',', $games[$row_count]);
29
30 // Set Row CSS class
31 $table->setRowAttributes($row_count, array('class' => 'row'));
32
33 // Output the next row
34 for($col_count = 0; $col_count < count($game); $col_count++) {
35 $table->setCellContents($row_count, $col_count, $game[$col_count]);
36 }
37
38 }
39
40 // Set attributes for alternating rows
41 $altRow = array('class' => 'altrow');
42 $table->altRowAttributes(1, null, $altRow);
43
44 // Output the HTML table to the browser
45 echo $table->toHtml();
46
47 ?>
Let's review some of this script's key lines:
• Line 04 makes the
HTML_Table package available to the script by "including it" into the
document. We'll talk more about the details of the require() command in the next section,
including how the require() command was able to locate the package without having to
dene the complete path.
• Line 07 dumps the
games.csv le to an array named $games.
• Line 10 creates an array of attributes that will be associated with the
<table> tag. Typically
you'll use this to assign a CSS class tag so CSS style can control attributes such as the table's
width and color.
• Line 13 creates a new instance of the
HTML_Table class, and simultaneously assigns the
aforementioned CSS class tag to it.
Download at Boykma.Com
47CHAPTER 2 • INTRODUCING PHP
• Line 16 uses the PHP function explode() to parse just the rst line of the array. This results
in retrieving the spreadsheet header names which we'll use for the table column headers.
• Lines 17-19 iterate through the
$header array, placing each header title into the table header
using the
setHeaderContents() method. Note the rst parameter of this method is set to 0
because the table row offset for the very rst line is zero.
• Line 22 sets the CSS class for the header.
• Line 25 initiates the iteration of the remaining lines in the $games array. In this
for loop we'll
repeatedly peel off the next row in the array (line 25), parse it into an array called $game (line
28), set the CSS class for each row (line 31), and then output each element into a
<td></td>
tag.
• Lines 41-42 set another CSS ID for alternating rows in the table, beginning with row 1.
• Line 45 outputs the table to the browser.
Step #3. Managing Your Site Design Using Templates
Chances are you have ambitious plans when it comes to the game directory, meaning the website
could soon reach 10, 20, and perhaps even hundreds of pages. But how can you easily manage the
design of each page, presuming each will be based around an identical design theme? For instance,
even changing the copyright year found at the bottom of each page could become quite a chore if the
website consisted of 500 pages.
To remedy this problem, you can create page headers and footers, and then include them within your
scripts. By isolating these templates to a single le, changing header or footer content is as simple
as opening and editing a single document. First up let's review the game directory's header (
header.
php
):
<!DOCTYPE html PUBLIC "-//W3C//DTD XHTML 1.0 Strict//EN"
" /><html xmlns=" /> <head>
<meta http-equiv="Content-Type" content="text/html; charset=utf-8" />
<title>My Game Collection</title>
<link rel="stylesheet" type="text/css" href="/chapter02/css/styles.css" />
</head>
<body>
<div id="logo">
<img src="/chapter02/images/logo.png" />
</div>
<br />
<div id="container">
Next you'll nd the game directory footer (footer.php):
Download at Boykma.Com
48 CHAPTER 2 • INTRODUCING PHP
</div>
<div id="footer">
If you want to borrow a game, contact me!
</div>
</body>
</html>
By inserting the header.php and footer.php scripts into their appropriate locations with the script
displaying the table, we'll be able to achieve a result similar to that shown in Figure 2-11.
Figure 2-11. The game directory page assembled (game_nal.php)
To integrate the header and footer into your script, you'll use the
require() statement. This statement
will retrieve the contents of the specied le, and integrate it into the calling page. If any PHP logic
is found in the le, that logic will be evaluated. The following script (game_nal.php) demonstrates
how Figure 2-11 was created.
<?php
// Insert page header
require('templates/header.php')
// The contents of games_table.php would be inserted here,
// but for reasons of space are clipped from the book.
Download at Boykma.Com
49CHAPTER 2 • INTRODUCING PHP
// Insert page footer
require('templates/footer.php');
?>
The require() function doesn't require a full path name provided you modify the includes_path
directive found in your php.ini le. For instance, for purposes of this example I set my includes_
path directive like so:
includes_path = ".;c:\apache\htdocs\easyphpwebsites\code\chapter02"
On Linux, this path might look like this:
includes_path = "./usr/local/apache/htdocs/easyphpwebsites\code\chapter02"
From here, the require() statement will looks for a templates directory as specied in the provided
path in the script, and from there retrieve the header.php and footer.php les. If you don't have the
php.ini le at your disposal, then you're certainly free to specify the complete path.
As you'll learn in later chapters, far more powerful ways exist for managing large websites, in fact no
such "pages" will exist; rather each will be dynamically created according to user request. However,
if you're interested in building a simple website consisting of just a few pages, using the technique
described in this section will be ideal.
Conclusion
Congratulations! In this brief chapter you've progressed from being a PHP neophyte to having suc-
cessfully built your rst dynamic Web application! In the next chapter you'll give your friends an easy
way to contact you through a Web form.
Download at Boykma.Com
Download at Boykma.Com
CHAPTER 3
Interacting With Your Users
By now the spreadsheet is online, and friends are really digging this new and convenient way to keep
track of your game collection. Encouraged by their interest, you've started thinking about ways to
expand the website. For starters, you think it would be cool if they could use the website to ask your
opinion about certain games, or even request to borrow a few games for the coming weekend.
While the easiest solution might involve simply publishing an e-mail address to the site, you've heard
doing so is a surere way to get deluged by unwanted e-mail from spammers. The most effective
alternative is a Web form, which an inquiring visitor can ll out, providing information such as his
name, e-mail address, and a brief message. In this chapter we'll cover form fundamentals, teaching
you not only how to retrieve data submitted through a form, but also how to validate the data to en-
sure it meets your expectations. You'll also learn how to send this form data directly to your inbox by
sending an e-mail directly from a PHP script.
Chapter Steps
The goals of this chapter are accomplished in ve steps:
• Step #1. Creating a Contact Form: Creating an HTML form is easy enough, but what hap-
pens to the data once it's submitted? In the rst step of this chapter I'll show you how to pass
form information to a PHP script for further processing by creating a contact form which visi-
tors can use to get in touch with you.
• Step #2. Validating User Input: Because most web sites are open to visitors from around the
world, malicious individuals included, it is crucial to thoroughly examine and validate all user
input. In this step I'll show you how to validate input by creating your own data validation
class.
• Step #3: Repopulating Form Data: In cases when users have been informed of submission
errors (such as an invalid e-mail address), you want to let them know about the error while
not inconveniencing them by forcing them to complete the form anew. In this step I'll show
you how to repopulate forms with user data to save them the hassle.
• Step #4. Sending Form Data via E-mail: By now you know how to efciently capture and
process form data, but what's next? For relatively low trafc contact forms, the easiest way to
view the data is by sending it via e-mail to some designated address. In this step I'll show you
how to transmit forms data to your inbox using PHP's
mail() function, as well as through a
more popular solution known as the Mail PEAR package.
• Step #5: More on Securing User Input: While Step #2 showed you how to validate form
data to ensure it conforms to certain constraints, validation is really only part of the bigger
picture when it comes to securing data arriving from an untrusted source (in the case of vali-
dation, the user). In this concluding step I'll discuss some crucial steps you should, no must,
take when processing data arriving from untrusted sources.
Download at Boykma.Com
52 CHAPTER 3 • INTERACTING WITH YOUR USERS
Step #1. Creating a Contact Form
As the website increases in popularity, your stature as a gaming acionado continues to grow. Not
surprisingly, visitors have started emailing you asking your opinion about new and soon-to-be-
released games, as well as lobbying you to add their favorite game to your vaunted list. However,
publishing your e-mail address on the website has resulted in it being netted by spammers' automated
programs, and your inbox is being deluged with Viagra offers and notications of lottery winnings.
The most effective alternative solution is a web-based contact form. By now you've probably used
these sorts of forms dozens of times to contact companies and owners of various websites. In this
section I'll show you how to build such a form and process data sent through it using a PHP script.
We'll create the form shown in Figure 3-1, subsequently using a PHP script to just display the submit-
ted contents back to the Web page. In Step #3 you'll learn how to send these contents to your e-mail
inbox.
Figure 3-1. Invite your visitors to use a contact form
The Contact Form HTML
We'll begin by creating the contact form HTML. I'll presume you're at least somewhat familiar with
HTML syntax at this point, and so won't break down the code, although following Listing 3-1 I'll
discuss a few key form characteristics you should keep in mind when creating PHP-driven forms.
Listing 3-1. The contact form HTML (listing3-1.php)
<form id="form" method="post" action="listing3-1.php">
<p>
Your name: <br />
<input name="name" id="name" type="text" size="35" value="" />
</p>
Download at Boykma.Com
53CHAPTER 3 • INTERACTING WITH YOUR USERS
<p>
Your e-mail: <br />
<input name="email" id="email" type="text" size="35" value="" />
</p>
<p>
Your phone number: <br />
(<input name="phone1" id="phone1" type="text" size="3" value="" />)
<input name="phone2" id="phone2" type="text" size="3" value="" />-
<input name="phone3" id="phone3" type="text" size="4" value="" />
</p>
<p>
Preferred contact method:<br />
<select name="contact_method">
<option value="email">E-mail</option>
<option value="telephone">Telephone</option>
</select>
</p>
<p>
What is your favorite video game:<br />
<textarea name="message" cols="35" rows="5"></textarea>
</p>
<p>
Subscribe to the gaming newsletter?
<input name="newsletter" id="newsletter" type="checkbox" value="yes" />Yes
</p>
<p>
<input name="submit" id="submit" type="submit" value="Send!" />
</p>
</form>
Even if you're new to PHP, I'd imagine you're pretty familiar with HTML forms, however the rst line
might still be a mystery if you're new to forms processing. To recap, the line is:
<form id="form" method="post" action="listing3-1.php">
This line is particularly important because it denes two key characteristics of this form. First, it
species that the form data should be submitted using what's known as the POST method. I'll spare
you a deep technical explanation regarding form methods, however it's important you understand that
the POST method should always be used for forms-related requests which add or change the world's
"state", so to speak. For instance, submitting this form will introduce new data into the world, mean-
ing the proper method to use is POST. On the contrary, forms intended to retrieve information, for
instance from a search engine, should use the GET method. Forms submitted using the GET method
Download at Boykma.Com
54 CHAPTER 3 • INTERACTING WITH YOUR USERS
will result in the data being passed by way of the URL. For instance, if you head on over to Amazon.
com and search for a book, you'll see the search keywords passed along on the URL.
The distinction is important because forms are often used to perform important tasks such as pro-
cessing a credit card. Browser developers presume such forms will adhere to the specications and
be submitted using the POST method, thereby warning the user if he attempts to reload the page,
potentially causing the critical action to be performed anew (in this case, charging the credit card a
second time). If GET was mistakenly used for this purpose, the browser would logically not warn the
user, allowing the page to be reloaded and the credit card potentially charged again (I say potentially
because the developer should logically have built safeguards into the application to account for such
accidents). Given the important distinction between these two methods, keep the following rules-of-
thumb in mind when building web forms:
• Use GET when the form results in an action being taken that no matter how many times it's
submitted anew, will not result in a state-changing event. For instance, searching a database
repeatedly will not affect the database's contents, making a search form a prime candidate for
the GET method.
• Use POST when the form submission results in a state-changing event, such as a comment
being posted to a blog, a credit card being charged, or a new user being registered.
This opening line also denes another important form characteristic: the URL to which the form data
will be sent. Of course, there's nothing to prevent you from submitting the data right back to the very
same form, a strategy that is particularly convenient when working with a fairly simple form such as
this. I'll show you how to do this next.
VIDEO. Creating Your First Web Form
Web forms are used in every conceivable type of website, acting as the channel for contacting the
sales team, posting a comment, or listing an item on a site such as craigslist. This video shows you
how to use PHP to retrieve data submitted through a form, and demonstrates why it's so important
to properly validate user-supplied data.
Sending Form Data to a PHP Script
If you call the contact form from the browser, ll it out, and press the submit button, nothing of con-
sequence happens. This is because although we've specied the form destination to be listing3-1.
php, the PHP code used to process the data hasn't yet been created. In this section you'll create this
script, and learn how to parse the data submitted by the user via the contact form.
Any PHP script dened as the form's submission destination can access the form data using an as-
sociative array called
$_POST. The array values can be accessed by referencing the appropriate key,
with the key being dened by the form's input tag names. For instance, to access the submitting user's
e-mail address you would reference $_POST like this:
$_POST['email'];
Accessing form elds such as checkboxes and drop-down lists operate in identical fashion. For in-
Download at Boykma.Com
55CHAPTER 3 • INTERACTING WITH YOUR USERS
stance, to access the user's preferred contact method you would reference $_POST like this:
$_POST['contact_method']
This would logically contain one of two values:
email or telephone.
Because
$_POST is an array, you can easily output all of the elements using print_r() (The
print_r() function was rst introduced in Chapter 2). In fact, in Listing 3-2 we'll create the skeleton
for what will ultimately become the
index.php script by using print_r() to simply dump the sub-
mitted form data to the browser.
Listing 3-2. Outputting submitted form data to the browser
01 <?php
02
03 if ($_POST)
04 print_r($_POST);
05
06 ?>
Obviously there isn't a practical application to the code found in Listing 3-2, however it does prove
the important point that this data is indeed accessible by the PHP script. Completing and submitting
the form will produce output similar to this (formatted for readability):
Array (
[name] => Jason Gilmore
[email] =>
[phone1] => 614
[phone2] => 555
[phone3] => 1212
[contact_method] => email
[message] => We've got to get together and play Call of Duty!
[newsletter] => yes
[submit] => Send!
)
Take special notice of the text attached to the key
message, because you'll see a single quote included
in the value. For versions prior to PHP 5.2, PHP will automatically escape single quotes (along with
double quotes, backslashes, and NULL characters), meaning a backslash is placed before each quote.
This was done in an effort to prevent users from submitting potentially dangerous input. In Step #2 I'll
talk more about why these sorts of special characters are dangerous, explain PHP's reasoning for es-
caping them, and show you what you should do as an alternative if running PHP version 5.2 or newer
(which I highly recommend).
Of course, outputting the array in this manner is impractical, useful only for quickly viewing form
contents. Let's revise the code (Listing 3-3) to selectively output each form item.
Download at Boykma.Com