Tương tác giữa PHP và jQuery - part 20 pps
Bạn đang xem bản rút gọn của tài liệu. Xem và tải ngay bản đầy đủ của tài liệu tại đây (701.71 KB, 10 trang )
CHAPTER 5 ■ ADD CONTROLS TO CREATE, EDIT, AND DELETE EVENTS
191
Generating a Delete Button
To start, add a Delete button to the full view edit controls by modifying _adminEntryOptions() in the
Calendar class with the code shown in bold:
/**
* Generates edit and delete options for a given event ID
*
* @param int $id the event ID to generate options for
* @return string the markup for the edit/delete options
*/
private function _adminEntryOptions($id)
{
return <<<ADMIN_OPTIONS
<div class="admin-options">
<form action="admin.php" method="post">
<p>
<input type="submit" name="edit_event"
value="Edit This Event" />
<input type="hidden" name="event_id"
value="$id" />
</p>
</form>
<form action="confirmdelete.php" method="post">
<p>
<input type="submit" name="delete_event"
value="Delete This Event" />
<input type="hidden" name="event_id"
value="$id" />
</p>
</form>
</div><! end .admin-options >
ADMIN_OPTIONS;
}
This adds a button that sends the user to a yet-to-be-created confirmation page called
confirmdelete.php, which you’ll build later in this section. After saving the preceding changes, you will
see both edit and delete options when viewing a full event description (see Figure 5-7).
CHAPTER 5 ■ ADD CONTROLS TO CREATE, EDIT, AND DELETE EVENTS
192
Figure 5-7. The Delete button as it appears on the full event view
Creating a Method to Require Confirmation
When a user clicks the Delete button, he is sent to a confirmation page that contains a form to make sure
he really wants to delete the event. That form will be generated by a new public method in the Calendar
class called confirmDelete().
This method confirms that an event should be deleted by performing the following actions:
1. Checks if the confirmation form was submitted and a valid token was passed.
If so, go to Step 2. If not, go to Step 3.
2. Checks whether the button clicked was the Confirmation button.
• If so, it deletes the event.
• If not, it sends the user back out to the main calendar view.
3. It loads the event data and displays the confirmation form.
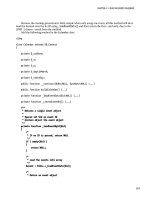
You accomplish the preceding steps by adding the new method, shown in bold, to the Calendar
class:
<?php
class Calendar extends DB_Connect
{
private $_useDate;
private $_m;
private $_y;
private $_daysInMonth;
private $_startDay;
CHAPTER 5 ■ ADD CONTROLS TO CREATE, EDIT, AND DELETE EVENTS
193
public function __construct($dbo=NULL, $useDate=NULL) { }
public function buildCalendar() { }
public function displayEvent($id) { }
public function displayForm() { }
public function processForm() { }
/**
* Confirms that an event should be deleted and does so
*
* Upon clicking the button to delete an event, this
* generates a confirmation box. If the user confirms,
* this deletes the event from the database and sends the
* user back out to the main calendar view. If the user
* decides not to delete the event, they're sent back to
* the main calendar view without deleting anything.
*
* @param int $id the event ID
* @return mixed the form if confirming, void or error if deleting
*/
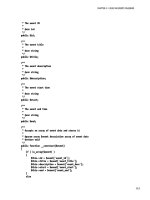
public function confirmDelete($id)
{
/*
* Make sure an ID was passed
*/
if ( empty($id) ) { return NULL; }
/*
* Make sure the ID is an integer
*/
$id = preg_replace('/[^0-9]/', '', $id);
/*
* If the confirmation form was submitted and the form
* has a valid token, check the form submission
*/
if ( isset($_POST['confirm_delete'])
&& $_POST['token']==$_SESSION['token'] )
{
/*
* If the deletion is confirmed, remove the event
* from the database
*/
if ( $_POST['confirm_delete']=="Yes, Delete It" )
{
$sql = "DELETE FROM `events`
WHERE `event_id`=:id
CHAPTER 5 ■ ADD CONTROLS TO CREATE, EDIT, AND DELETE EVENTS
194
LIMIT 1";
try
{
$stmt = $this->db->prepare($sql);
$stmt->bindParam(
":id",
$id,
PDO::PARAM_INT
);
$stmt->execute();
$stmt->closeCursor();
header("Location: ./");
return;
}
catch ( Exception $e )
{
return $e->getMessage();
}
}
/*
* If not confirmed, sends the user to the main view
*/
else
{
header("Location: ./");
return;
}
}
/*
* If the confirmation form hasn't been submitted, display it
*/
$event = $this->_loadEventById($id);
/*
* If no object is returned, return to the main view
*/
if ( !is_object($event) ) { header("Location: ./"); }
return <<<CONFIRM_DELETE
<form action="confirmdelete.php" method="post">
<h2>
Are you sure you want to delete "$event->title"?
</h2>
<p>There is <strong>no undo</strong> if you continue.</p>
<p>
<input type="submit" name="confirm_delete"
value="Yes, Delete It" />
<input type="submit" name="confirm_delete"
CHAPTER 5 ■ ADD CONTROLS TO CREATE, EDIT, AND DELETE EVENTS
195
value="Nope! Just Kidding!" />
<input type="hidden" name="event_id"
value="$event->id" />
<input type="hidden" name="token"
value="$_SESSION[token]" />
</p>
</form>
CONFIRM_DELETE;
}
private function _loadEventData($id=NULL) { }
private function _createEventObj() { }
private function _loadEventById($id) { }
private function _adminGeneralOptions() { }
private function _adminEntryOptions($id) { }
}
?>
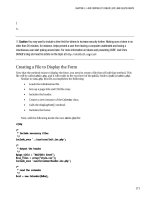
Creating a File to Display the Confirmation Form
In order to call the confirmDelete() method, the file confirmdelete.php needs to be created. This file will
reside in the root level of the public folder (/public/confirmdelete.php), and it will be very similar to
index.php. This file accomplishes the following tasks:
• Ensures an event ID was passed and stored in the $id variable; sends the user to
the main view otherwise.
• Loads the initialization file.
• Creates a new instance of the Calendar object.
• Loads the return value of confirmDelete() into a variable, $markup.
• Defines the $page_title and $css_files variables and includes the header.
• Outputs the data stored in $markup.
• Outputs the footer.
CHAPTER 5 ■ ADD CONTROLS TO CREATE, EDIT, AND DELETE EVENTS
196
■ Note The reason you load the output of confirmDelete() into a variable before including the header is
because the method sometimes uses header() to send the user elsewhere in the app; if the header file was
included before calling
confirmDelete(), the script would fail in certain cases because no data can be output to
the browser before
header() is called or a fatal error occurs. For more information on the header() function, visit
Now add the following code inside confirmdelete.php:
<?php
/*
* Make sure the event ID was passed
*/
if ( isset($_POST['event_id']) )
{
/*
* Collect the event ID from the URL string
*/
$id = (int) $_POST['event_id'];
}
else
{
/*
* Send the user to the main page if no ID is supplied
*/
header("Location: ./");
exit;
}
/*
* Include necessary files
*/
include_once ' /sys/core/init.inc.php';
/*
* Load the calendar
*/
$cal = new Calendar($dbo);
$markup = $cal->confirmDelete($id);
/*
* Output the header
*/
$page_title = "View Event";
$css_files = array("style.css", "admin.css");
CHAPTER 5 ■ ADD CONTROLS TO CREATE, EDIT, AND DELETE EVENTS
197
include_once 'assets/common/header.inc.php';
?>
<div id="content">
<?php echo $markup; ?>
</div><! end #content >
<?php
/*
* Output the footer
*/
include_once 'assets/common/footer.inc.php';
?>
Save this file, then test the system by deleting the “Dinner Party” entry. After showing you the full
event description, the calendar takes you to the confirmation form (see Figure 5-8).
Figure 5-8. The confirmation form a user sees after clicking the Delete button
After clicking the Yes, Delete It button, the event is removed from the calendar (see Figure 5-9).
CHAPTER 5 ■ ADD CONTROLS TO CREATE, EDIT, AND DELETE EVENTS
198
Figure 5-9. After the user confirms the deletion, the event is removed from the calendar
Summary
At this point, you have a fully functional events calendar. You’ve learned how to create a form to create,
edit, save, and delete events, including how to confirm event deletion. However, the administrative
controls are currently available to anyone who visits the site.
In the next chapter, you’ll build a class to grant authorized users access to your site’s administrative
controls.
C H A P T E R 6
■ ■ ■
199
Password Protecting
Sensitive Actions and Areas
Now that your app can add, edit, and remove events, you need to protect those actions by requiring
users to log in before they can make any changes. You’ll need to create a new table in the database and a
new class in the app to make this happen; you’ll also need to make a few modifications to existing files.
Building the Admin Table in the Database
To store information about users authorized to modify events, you’ll need to create a new database
table. This table will be called users, and it will store four pieces of information about each user: an ID,
name, password hash, and email address.
To create this table, navigate to http://localhost/phpmyadmin and select the SQL tab to execute the
following command:
CREATE TABLE IF NOT EXISTS `php-jquery_example`.`users` (
`user_id` INT(11) NOT NULL AUTO_INCREMENT,
`user_name` VARCHAR(80) DEFAULT NULL,
`user_pass` VARCHAR(47) DEFAULT NULL,
`user_email` VARCHAR(80) DEFAULT NULL,
PRIMARY KEY (`user_id`),
UNIQUE (`user_name`)
) ENGINE=MyISAM CHARACTER SET utf8 COLLATE utf8_unicode_ci;
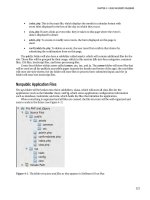
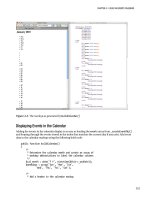
After this code executes, select the php-jquery_example database from the left-hand column and
click the users table to view the new table (see Figure 6-1).
CHAPTER 6 ■ PASSWORD PROTECTION SENSITIVE ACTIONS AND AREAS
200
Figure 6-1. The users table as it appears in phpMyAdmin
Building a File to Display a Login Form
In order to log in, users will need access to a login form. This will be displayed on a page called
login.php, which is stored in the public folder (/public/login.php). This file will be similar to admin.php,
except it will simply output the form since none of its information is variable.
The form will accept a username and a password, and it will pass the session token and an action of
user_login, as well. Insert the following code into login.php to create this form:
<?php
/*
* Include necessary files
*/
include_once ' /sys/core/init.inc.php';
/*
* Output the header
*/
$page_title = "Please Log In";
$css_files = array("style.css", "admin.css");
include_once 'assets/common/header.inc.php';
?>