Open Source Security Tools : Practical Guide to Security Applications part 29 ppsx
Bạn đang xem bản rút gọn của tài liệu. Xem và tải ngay bản đầy đủ của tài liệu tại đây (272.46 KB, 10 trang )
Using Databases and Web Servers to Manage Your Security Data 259
So, you now know how to build a complete Snort intrusion detection network, with
multiple sensors logging into a database tool that can be used to analyze the data and do
reporting. This will help you better use the intrusion detection data, make the most of your
security efforts, and have some tangible reports and graphs to show management. Now, we
will look at some tools that can help with your vulnerability scan data.
Flamey the Tech Tip:
Use Names Carefully!
Be careful when talking to your boss about using Snort and ACID at
work. Make sure he or she understands that these are valuable man-
agement programs, not illegal controlled substances!
One problem when using the vulnerability scanner Nessus to scan medium- to large-
size networks is that the reports can be quite intimidating. The Nessus reporting formats
themselves are fine and the HTML is fairly easy to navigate, but when you have a couple
of hundred pages of data to sort through, it can be hard to see the important data amongst
all the noise. It would be nice to have something to organize the scan data any way you
like. To really be able to analyze it, you need to get your data into a database versus the
standard flat file format. You also want to be able to access the data easily, such as from a
Web-based interface. With this capability, you could quickly get to the most important
data and analyze scan results over time to see if your network was getting more secure or
less secure.
Fortunately, several products integrate Nessus with a database. A few of the Nessus-
to-database programs are NesQuik, Java Nessus Report Manager, and Nessus PHP Inter-
face (NPI). I selected NPI for this book for a number of reasons. First, it is a truly open
source product with no commercial ties. Also, it uses MySQL and PHP, which you have
already used for other tools such as ACID. Using these applications, NPI offers the ability
to port your Nessus data into a database and then view it with a Web browser
NPI (Nessus PHP Interface)
NPI
Author/primary contact: Kristofer T. Karas
Web site: />nessus-php/
Platforms: Most UNIX
License: GPL
Version reviewed: .01a
Howlett_CH08.fm Page 259 Thursday, June 24, 2004 9:54 PM
260 Chapter 8 • Analysis and Management Tools
NPI, similar to ACID in its design, uses a MySQL database to store the results and a
PHP-enabled Web server to view and query the results. Figure 8.8 illustrates the logical
components of NPI. One difference between the Snort and Nessus architectures is that
with Nessus there are two different parts generating the data: a client initiating the scans
and a server running them. In some cases they might be on the same machine, but this fig-
ure shows two different physical servers. There is also database server to which the scan
data is logged, and a Web server that provides the interface to the data. Again, the database
and Web server could be on the same machine or two different boxes.
Figure 8.8 demonstates the flow of data and the logical parts in the NPI system. The
Nessus client logs into the Nessus server to initiate a scan of a target. The data is stored on
the client machine in the native Nessus .nbe format. Once you have the raw file, NPI runs
a conversion script on the .nbe file and imports the data into a MySQL database. When the
scan data is in the database, you can view and query the database using a Web-based PHP
interface from any Web browser. This sounds like a much better way to analyze scan data,
so let’s get busy and set up NPI.
Figure 8.8 NPI Logical Design
Nessus server
Scans the target network
and returns results to
Nessus client
Nessus client
Initiates scans,
generates raw .nbe files
PHP Web server
MySQL
Database
Web browser can view reports
based on date, vulnerability,
port, and so on.
Target network
Howlett_CH08.fm Page 260 Thursday, June 24, 2004 9:54 PM
Using Databases and Web Servers to Manage Your Security Data 261
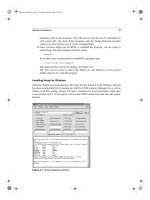
Installing NPI
Before beginning to install NPI, you need to have your MySQL server and Apache Web
server with PHP working. If you haven’t already gotten these up and running, refer back to
the appropriate sections earlier in this chapter. Once you have your SQL and Web servers
ready, take these steps to install NPI.
1.
Get the file from the book’s CD-ROM, and unzip and untar the program. Place the
contents in its own directory. The directory name doesn’t matter as long as all the
files are in the one directory. For example, /usr/local/nessus-php will work fine,
assuming you have the permissions to write there.
2.
Change into that directory and edit the file nsr-php using a text editor. This file
contains variables (those lines that start with
$
) that allow the program to contact
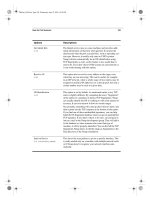
your MySQL server. Table 8.5 lists the variables you need to edit and recommen-
dations for their values.
Table 8.5 NPI Variables for the MySQL Server
Variables Descriptions
$db_host Set this to the host on which the MySQL server will be running. If the
MySQL server is running on the same machine as the Web server, then this is
localhost
. Otherwise enter the IP address or hostname of the MySQL
machine.
$db_user This is the username used to log into the MySQL database. This can be the
same as the user name set up in the MySQL installation.
$db_pass The password corresponding to the above user.
$db_database This is the name of the database that is created to hold the NPI data. The
default database name created by NPI is nessus, but you can change this to
whatever you would like.
$db_suuser This is the administrative user on the MySQL database. This is required by
the nsr-php script. The default is root, which should work for most installa-
tions. Note that this is not the same as the root user on your operating system.
$db_supass The MySQL root password corresponding to the $db_suuser account
described above.
$your_domain A list of domains that you want to be stripped out from the output. This will
clean your reports up if you just want machine names to appear in the output
rather than the full Internet host name. This is an optional variable.
Howlett_CH08.fm Page 261 Thursday, June 24, 2004 9:54 PM
262 Chapter 8 • Analysis and Management Tools
3.
Open the file nsr in a text editor and make the same entries in it as you did in Step
2 (see Table 8.5). Make sure that the path to the Nessus plug-ins directory is cor-
rect. In most installations they should be in the default location, which is /usr/local/
lib/nessus/plugins. Check to make sure yours are there and if they are not, make
the appropriate modification in the nsr file.
4.
Edit the file nessusphp.inc, also changing the variables as in the above two steps.
5.
Create your Nessus database. Do this by running the nsr-php script:
php nsr-php –b
This creates the MySQL database called nessus for your scan data. You can log
into it and check to make sure the proper tables were created.
6.
Verify that the database was properly created.
a.
Log into MySQL using the commands in the MySQL sidebar earlier in this
chapter.
b.
Type
show
databases
; (don’t forget the semi-colon) at the MySQL command
prompt. A list displays showing all the databases, and your newly created
Nessus database should be one of them.
c.
Switch to that specific database using
use
NESSUS
; and then type the
show
tables
; command. You should get the results shown in Figure 8.9. This shows
each of the three tables in the nessus database.
7.
Copy the files in the /www subdirectory of your NPI install directory to your Web
server’s root directory. Create a new directory in your Web server’s document root
where your NPI files will reside. This is the location from which you will access
your Nessus database. Issue the following commands from your nessus-php direc-
tory to do this and set the correct permissions for the files.
mkdir /usr/local/apache2/htdocs/nessus-php
mv ./www /usr/local/apache2/htdocs/nessus-php
chown –R www.www /usr/local/apache2/htdocs/nessus-php
chmod 755 /usr/local/apache2/htdocs/nessus-php/*
mysql> show tables;
+ +
| Tables_in_nessus |
+ +
| report |
| scans |
| scripts |
+ +
3 rows in set (0.00 sec)
Figure 8.9 Output of the show tables; Command
Howlett_CH08.fm Page 262 Thursday, June 24, 2004 9:54 PM
Using Databases and Web Servers to Manage Your Security Data 263
Be sure to change the path to your Web document root if it is different from the
example. You can change the name of the directory that the nessus-php files are in
if you like. This example puts the NPI access page in /nessus-php off your Web
document root. It also uses the same system user (www) for both the user and
group that will access the MySQL database. For better security, set up a special
user with only read access to the data. In that case you would change the
www.www
to the appropriate read-only user and group. You need to do this for the appropriate
MySQL account as well.
You have now installed the NPI program.
Importing Nessus Scans into NPI
Now you are ready to import some Nessus scans into your database.
1.
Run the nsr script on each native Nessus scan file to be imported. (Obviously, you
must have some completed scan files available, saved in the native .nbe format.)
NPI will also accept and convert the older Nessus format .nsr. Enter the following
to run nsr from the command line:
./nsr
/scans/scan.nbe
Replace
/scans/scan.nbe
with your scan file name and path. This takes the raw
Nessus file and imports it into your database. It also checks your Nessus plug-ins
and creates entries in the database for any new plug-ins that may have been added.
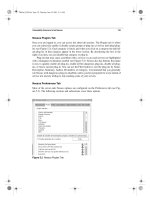
2.
You are now ready to view your Nessus scans in your database. Open a browser
and enter the IP of your NPI Web server with the path to your Nessus-php index
file, for example, http://localhost/nessus-php/. The results should appear in the NPI
interface, fully searchable and sortable (see Figure 8.10).
Using NPI
You can now browse your scan data like any other database, sort it, and run queries to find
specific vulnerabilities, hosts, or other criteria. There are quite a few way to analyze your
Nessus data using NPI. You can sort by the:
•
Host (IP address) with the most vulnerabilities
•
Most common vulnerability
•
Most common category of exploits
•
Most exploitable service (port number)
•
Scan date or date range
•
CVE or CAN number
By creating queries with NPI, you can focus on areas that represent the greatest dan-
ger to your network and maximize the effects of your remediation activity. You can also
Howlett_CH08.fm Page 263 Thursday, June 24, 2004 9:54 PM
264 Chapter 8 • Analysis and Management Tools
quickly rule out certain alerts and/or machines. With NPI, you can manipulate your scan
data any way you choose. One downside to the NPI tool is manually loading each scan file
into the database. A script could easily be written to automate this process, but some asso-
ciates and I decided to take it one step further.
The Birth of an Open Source Project
My consulting firm uses Nessus and Snort extensively. We use the ACID management
tool to manage our network intrusion detection systems. We needed a similar tool to man-
age our Nessus scans. Even though NPI offered some very nice capabilities, it still didn’t
quite meet the needs of our organization. We wanted to be able to initiate scans from the
Web interface, rather than just view the past results. We also found the need to do the
manual importing of each scan arduous and time consuming. We have dozens of scans
that need to be run at any given time, and because they typically belong to different orga-
nizations, they need to be tracked separately. What we really wanted was a tool that would
manage our different scan’s configurations, schedule them, run them automatically, and
import the results into the appropriate database.
We were not able to find an open source tool that matched all these needs, so we were
faced with the alternative of finding a commercial product to meet our needs or develop-
ing one in-house. However, even the commercial vulnerability scanners didn’t quite offer
what we needed in terms of scheduling and keeping track of different client’s scans. Obvi-
Figure 8.10 NPI Main Screen
Howlett_CH08.fm Page 264 Thursday, June 24, 2004 10:10 PM
The Birth of an Open Source Project 265
ously writing a new vulnerability scanner from scratch would have been both cost and
time prohibitive. So we explored the idea of developing our own add-on module to Nessus
as an open source project. We went through a decision process to determine if it made
sense. If you are thinking of writing your own open source program, you should do the
same, taking the following factors into consideration.
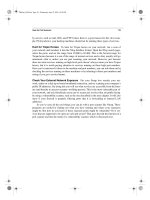
Is There Something Already Out There?
First, search the Web to see if there is anything that already does what you need to do.
Look at places like Sourceforge.net and Freshmeat.net, and use Google and other search
engines. There is a good chance that something already exists to solve your problem. If
you find something that is not quite exactly what you need, you could use it as a starter or
a helper in building your program, as we did with NPI. Even if nothing exists, you might
find some FAQs or sites with helpful information for your project. Also, during your
explorations, you might find some people with the same problems willing to contribute to
your project. Before you know it, you could have several programmers willing to help you.
Is There a Broader Need for Your Program?
If the problem you are solving is a specific niche problem for your company, it may not be
worth going through the trouble to open source it. Drop a few messages on relevant mes-
sage boards to see if there is any interest. If nobody else wants it, you may just want to
keep it as an in-house development project. However, even in the smallest industries there
are usually similar needs for applications, and the Internet has made the world a smaller
place. Think of all the times you went searching for something obscure and found it,
because someone on the Web thought it was worth releasing. So if there’s any interest,
make it open source!
Do You Have Permission to Release Code as Open Source?
If you are doing this as part of your duties for an employer, make sure they will allow you
to release the source code. If it’s part of a larger proprietary program, then it’s doubtful
that they will want it open sourced. However, if it’s a stand-alone program and they see the
benefits of peer review and additional contributors as well as free advertising, there is a
good chance that your employer won’t mind. Just check before you start posting code, if
you value your job.
We went through this process and decided that for all the reasons above, it was worth
developing our own add-on to Nessus as an open source project. We called this program
Nessus Command Center (NCC) and this is the debut of that program in print.
Howlett_CH08.fm Page 265 Thursday, June 24, 2004 9:54 PM
266 Chapter 8 • Analysis and Management Tools
The genesis of NCC was our need to create a management tool to automate our scans
and better analyze the results. The NPI tool described earlier does a pretty decent job of
importing Nessus data into a database, but it doesn’t address the scheduling issue and the
interface left something to be desired. Rather than reinventing the wheel, we used parts of
NPI for our Web interface and added on a management and scheduling module. Our goals
in the project were as follows.
•
A management platform for Nessus scanning. We needed a tool for keeping track of
scans for different companies with different configurations and even different
groups of companies. As a consulting firm, we deal with many different firms. We
even have resellers ordering scans for companies using our infrastructure. We
wanted a way to manage all these different entities and keep them separate, yet giv-
ing us a control panel to globally manage all of them easily.
•
A scheduling database and interface for Nessus. The first goal was to develop a way
to catalog our scan information, schedule the scans, and automatically run them. We
wanted the ability to keep track of different entities, because the scans would
belong to many different companies. There would be an administrator level for us to
create and schedule the scans, and the possible capability in the future for clients to
go in and modify certain parts of their scan configuration, such as time, hosts to
scan, and so on. The database would need to have a Web-based interface, since we
would have customers and agents outside our firewall accessing the system to con-
figure their scans.
•
A database interface for Nessus results. This goal was already partially achieved in
the NPI program, but we wanted to improve the interface, which was rudimentary
and didn’t allow, for example, multiple users and levels of access. We planned to
Nessus Command Center (NCC)
Nessus Command Center (NCC)
Authors/primary contacts:Tony Howlett, Brian Credeur, Matt Sisk, Lorell
Hathcock
Web site: www.netsecuritysvcs.com/ncc
Platforms: Linux, most UNIX
License: GPL
Version reviewed: .01b
Mailing list:
NCC Mailing list
General discussions and questions regarding NCC. Send an e-mail with the
word “subscribe” in either the body or subject of the e-mail to ncc@netsecuri-
tysvcs.com.
Howlett_CH08.fm Page 266 Thursday, June 24, 2004 9:54 PM
The Birth of an Open Source Project 267
use NPI as our template for this part of the program. And given that NPI is GPL and
our program would be GPL this wouldn’t be a problem.
•
A Web interface for setting all Nessus options. This was really an optional feature
rather than a must-have for us. In studying the problem, we found that most of the
scans we ran used only about five different configurations. However, it would be
nice to be able to configure all the possible Nessus scan options right from the Web,
without having the Nessus client loaded. This would allow us to input a scan
directly from a customer’s office or anywhere offsite. We looked around and found
another open source project called Inprotect that was offering a Web interface for
Nessus. The code was released under the GPL, so we could use this code as a guide-
line for our efforts in this area. Due to the more complicated nature of this task, we
decided that this feature would not be in the beta release.
Platforms for NCC
From the very start, we decided we would write our program for the series of platforms
known as
LAMP
(Linux, Apache, MySQL, and Perl).
•
Linux: For obvious reasons, Linux offers the most portability and the lowest cost
for entry. However, there is no reason why this system wouldn’t run on other flavors
of UNIX with some minor modifications. Also, it could be ported to a Windows-
based programming platform, such as Perl for Windows.
•
Apache: Again, we chose this because Apache is open source and is one of the most
popular Web servers. It was also the most logical choice since we would be using it
for our other tools. In addition, this system would also run on any PHP-compliant
Web server including IIS.
•
MySQL: There are several good open source databases including Postgresql and
others. We chose MySQL because we were the most familiar with it and the licens-
ing issues were the easiest to deal with. Like Apache, we were already using
MySQL for our ACID databases.
•
Perl: Again, there are lots of scripting languages, but we picked Perl because it is
one of the most portable languages, doesn’t requires any compiling, and is easily
modifiable by third parties.
Based on this LAMP architecture, we set out to build a tool that would suit our pur-
poses. We first wrote a project plan that detailed the work we would have to do. We then
divided the tasks based on our different skill sets. We listed the programmatic elements
that would be needed for our program, including Perl scripts, PHP scripts, MySQL scripts,
and shell scripts, as well as text files for the documentation. Table 8.6 shows the project
list with all of the pieces needed and what each one does.
Howlett_CH08.fm Page 267 Thursday, June 24, 2004 9:54 PM
268 Chapter 8 • Analysis and Management Tools
Table 8.6 NCC Project Elements
Types Items Descriptions
Perl script ncc.pl Runs with cron and populates the queue table
with scans ready to be run.
Perl script ncc-client.pl Removes scheduled scans from the queue,
issues the command to run them, and then does
the conversion to drop .nbe files into the
MySQL database when they are done.
Perl script ncc-daily.pl Sends out daily summary e-mails and does clean
up on the queue table.
PHP script Main.php and other
supporting php
files, and so on
Interface to enter items into the schedule table;
consists of multiple files.
PHP script Reports.php Interface to view MySQL database, modified
versions of NPI; consists of multiple files.
MySQL database NCC Database Sample database for the scans; internal to
MySQL database program.
MySQL script ncc.mysql Creates initial database.
Misc script install.pl Script to create the cron item, call MySQL
script, copy executables to bin, and php file to
Web.
Text file ncc.ini Environment variables for the Perl and PHP
scripts; database names, file locations, e-mail to
send notifies to, and so on.
Text file INSTALL,
README, and so
on
Multiple files with installation instructions,
operation instructions, and other pertinent
data.
Howlett_CH08.fm Page 268 Thursday, June 24, 2004 9:54 PM