Open Source Security Tools : Practical Guide to Security Applications part 10 pdf
Bạn đang xem bản rút gọn của tài liệu. Xem và tải ngay bản đầy đủ của tài liệu tại đây (458.24 KB, 10 trang )
Security Business Processes 69
using FTP and other nonessential programs. The all-zero IP address is shorthand
for saying “any address.”
iptables –A FORWARD –m multiport –p tcp –i eth0 –d
0.0.0.0 dports www,smtp syn –j ACCEPT
9.
You need to allow certain incoming UDP packets. UDP is used for DNS, and if
you block that your users won’t be able to resolve addresses. Because they don’t
have a state like TCP packets, you can’t rely on checking the SYN or ACK flags.
You want to allow UDP only on port 53, so you specify domain (a built-in variable
for port 52) as the only allowable port. You do that with these statements.
iptables –A FORWARD –m multiport –p udp –i eth0 –d
192.168.0.0/24 dports domain –j ACCEPT
iptables –A FORWARD –m multiport –p udp –i eth0 –s
192.168.0.0/24 sports domain –j ACCEPT
iptables –A FORWARD –m multiport –p udp –i eth1 –d
0.0.0.0 dports domain –j ACCEPT
iptables –A FORWARD –m multiport –p udp –i eth1 –s
0.0.0.0 sports domain –j ACCEPT
10.
The first two statements allow the incoming UDP datagrams, and the second two
allow the outbound connections. You also want to do this for ICMP packets. These
are the network information packets discussed in Chapter 2. You want to allow all
types of internal ICMP outwards, but only certain types such as echo-reply
inwards. This can be accomplished with the following statements.
iptables –A FORWARD –m multiport –p icmp –I eth0 –d
192.168.0.0/24 dports 0,3,11 –j ACCEPT
iptables –A FORWARD –m multiport –p icmp –I eth1 –d
0.0.0.0
dports 8,3,11 –j ACCEPT
11.
Finally, you want to set up logging so you can look at the logs to see what is being
dropped. You will want to view the logs from time to time even if there isn’t a
problem, just to get an idea of the kinds of traffic being dropped. If you see
dropped packets from the same network or address repeatedly, you might be being
attacked. There is one statement to log each kind of traffic.
iptables –A FORWARD –m tcp –p tcp –j LOG
iptables –A FORWARD –m udp –p udp –j LOG
iptables –A FORWARD –m udp –p icmp –j LOG
Howlett_CH03.fm Page 69 Wednesday, June 23, 2004 2:59 PM
70 Chapter 3 • Firewalls
That’s it! This will provide you with firewall protection from the most common
attacks from the Internet.
IP Masquerading with Iptables
When the Internet was originally designed, several large blocks of addresses were set
aside for use on private networks. These addresses will not be routed by the Internet and
can be used without worrying that they will conflict with other networks. The private
address ranges are:
10.0.0.0 – 10.255.255.255
192.168.0.0 – 192.68.255.255
172.16.0.0 – 172.31.255.255
By using these addresses on your internal LAN and having one external, routable IP
on your firewall, you effectively shield your internal machines from outside access. You
can provide this additional layer of protection easily with Iptables using
IP masquerad-
ing
. The internal IP header is stripped off at the firewall and replaced with a header show-
ing the firewall as the source IP. The data packet is then sent out to its destination with a
source IP address of the public interface of the firewall. When it comes back, the firewall
remembers which internal IP it goes to and re-addresses it for internal delivery. This pro-
cess is also known as
Network Address Translation
(NAT). You can do this in Iptables
with the following statements.
iptables –t nat –P POSTROUTING DROP
iptables –t nat –A POSTROUTING –o eth0 –j MASQUERADE
The MASQUERADE flag can be abbreviated to MASQ. One of the improvements of
Iptables over previous systems like Ipchains and Ipfwadm is the way that it handles sec-
ondary tasks like NAT.
So now you know how to build a basic firewall. This is just a simple configuration;
the possible variations are endless. You can forward certain ports to internal servers so
they don’t have to have a public IP address. You can put another network card in your fire-
wall box and make it a DMZ interface for servers with public addresses. There are entire
books on advanced firewall configuration and many mailing lists. One of the better lists is
firewall-wizards. To subscribe to this list, send an e-mail with “subscribe” in the body to:
The firewall-wizards list hosts discussions about all levels of firewall configuration
and is vendor agnostic, that is, all firewall brands are discussed, from open source to
commercial.
If you want to build a quick firewall without entering all those Iptables statements and
remembering the syntax, there is tool that builds the firewall statements using a graphical
interface—so it’s all done for you in the background.
Howlett_CH03.fm Page 70 Wednesday, June 23, 2004 2:59 PM
Security Business Processes 71
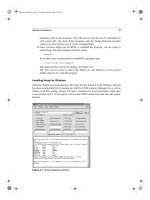
This neat little contraption, called Turtle Firewall, was created by Andrea Frigido.
Turtle is basically a set of Perl scripts that do all the dirty work for you to set up an
Iptables firewall. This program makes it much easier to see your rules and to make sure
you are getting the statements in the right order. It runs as a service, so you don’t have to
worry about initializing your firewall with a shell script. It uses the Linux Webmin service,
which is a little Web server that allows you to make configuration changes to your server
via a Web browser. While this might introduce some insecurity into your system by run-
ning a Web server on the firewall, it may be worth it for the ease of configuration it brings.
Many commercial vendors now use a Web browser interface for configuration. A big ben-
efit of this application is that you can reach the configuration screen from any Windows or
UNIX machine.
For support, Andrea offers a commercial support option. For a mere 100 euros (don’t
ask me to convert that to dollars exactly, but when this book was printed it was about
$100.00), you can get 30 days of e-mail support so you can get help setting it up. It also
might be worth subscribing if you have a problem with an existing installation that you
can’t solve on your own.
Installing Turtle Firewall
Installing and setting up Turtle Firewall is very easy because it uses the Webmin adminis-
tration module, which is available on most Linux platforms.
1. If you did not install the Webmin administration module during your OS installa-
tion, you will need to in order to use Turtle Firewall. Locate and run the RPM,
which should be on most Linux distributions disks. Click on the RPM file and it
will install automatically.
2. Once that is done, you should be able to log into your firewall’s configuration
screen by putting its IP address in your browser window and pressing Enter.
Turtle Firewall: An Iptables-Based Firewall with a
Graphical User Interface
Turtle Firewall
Author/primary contact: Andrea Frigido
Web site: www.turtlefirewall.com/
Platforms: Most Linux-compatibles that support Iptables
License: GPL 2.0
Contact information:
System requirements: Linux operating system with kernel 2.4 or newer
Perl with expat library
Webmin server
Howlett_CH03.fm Page 71 Wednesday, June 23, 2004 11:38 PM
72 Chapter 3 • Firewalls
3.
Now you are ready to install Turtle Firewall. Download the packed distribution
from www.turtlefirewall.com or get it from the CD-ROM that comes with this
book and unzip it.
4.
Change to the turtlefirewall directory and type:
./setup
This runs an installation script that puts the Perl modules and other things that are
needed in the right places.
5.
Log into the Webmin server using a Web browser pointed at the IP address or host
name the server is using. The Webmin interface will display.
6.
Click the Module Index tab, and the Turtle Firewall Main screen displays (see Fig-
ure 3.3).
7.
Click on the Firewall Items icon to begin configuring your firewall.
Figure 3.3 Turtle Firewall Main Screen
Howlett_CH03.fm Page 72 Wednesday, June 23, 2004 2:59 PM
Security Business Processes 73
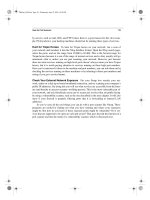
First you will need to define some basic things about your firewall (see Figure 3.4).
Turtle Firewall uses the concept of zones to define trusted and untrusted networks.
A
trusted zone
connects to a network with employees or people who should
generally be trusted on it, such as your internal network. An
untrusted zone
is a
network that could have anything on it, from employees to customers, vendors, or
even people with malevolent intentions. Turtle calls them “good” and “bad,” but it
is basically the same thing as trusted and untrusted.
Figure 3.4 Turtle Firewall Configuration
Howlett_CH03.fm Page 73 Wednesday, June 23, 2004 2:59 PM
74 Chapter 3 • Firewalls
Turtle also has an entry for a DMZ or “Demilitarized Zone” segment. A DMZ
segment is used to put servers that need unfettered access to the untrusted zone.
Put the interfaces for your good, bad, and DMZ (if any) interfaces here.
8.
Next you need to define your internal network IP addresses in the Net box. Put the
IP address range with subnet mask for your internal LAN to be protected by the
firewall in the box provided (see Figure 3.4).
9.
Next, define any internal or DMZ hosts that will need special consideration, such
as your mail server or Web server. Do this in the Hosts box (see Figure 3.4).
10.
Finally, you can define any special hosts that you want to treat differently, such as
administrators, in the Group area. Now your firewall is up and running in basic
mode.
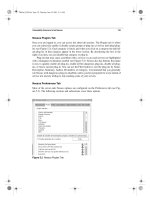
There are probably some additional restrictions or permissions you will want to add,
for example, the ability for someone from the outside to use SSH to get in. You can do this
by writing a rule on the Firewall Rules tab. Click on that tab, and it will graphically walk
you through writing a new firewall rule. You will notice the format is similar to Iptables
(see Figure 3.5).
Figure 3.5 Turtle Firewall Rules
Howlett_CH03.fm Page 74 Wednesday, June 23, 2004 2:59 PM
Security Business Processes 75
If you want to implement the Iptables Masquerade function using private IP addresses
for your internal LAN, click on the NAT and Masquerading icon on the main screen. Here
you can define what zone will be masqueraded (see Figure 3.6). Generally, it will be your
“good” or trusted interface. You can also set up hosts to be “NAT’ed” here. Putting a host
to be your virtual IP makes it act as the front for your real host, and the firewall will for-
ward all packets through the virtual host to the real host. This provides an extra level of
protection for your internal servers.
The two programs discussed previously, Iptables and Turtle Firewall, offer an inex-
pensive way to set up a simple firewall. But if you need a DHCP server, you have to set
that up separately. And if you want to be able to SSH into the machine, that is another pro-
gram to install. SmoothWall is an open source firewall that offers a robust firewall package
with all those features and more built in. It is designed by a company that offers both a free
GPL version and a commercial version with some additional features and enhanced sup-
port. This is another example of how a product can take advantage of the power of open
source and also reap commercial gains for a company. The free version is called Smooth-
Wall Express and is currently on version 2.0; the commercial version is called Smooth-
Wall Corporate Server version 3.0.
SmoothWall Express: A Complete Multi-Function Firewal l
SmoothWall Express
Authors/primary contacts:Lawrence Manning, Richard Morrell, Jon Fautley,
and Tom Ellis (original authors)
SmoothWall Limited (current contact)
Web site: www.smoothwall.org
Platform: Linux
License: GPL
Version reviewed: 2.0
Web forums:
/>IRC chat channels:
Use IRC server irc.smoothwall.org 6667.
Join the channel #help for SmoothWall questions and general chat.
Mailing lists:
For general/installation support, subscribe at:
/>Howlett_CH03.fm Page 75 Wednesday, June 23, 2004 2:59 PM
76 Chapter 3 • Firewalls
SmoothWall Express contains several options beyond Iptables that most companies
would want in a fully functional firewall. Granted, you can cob most of these together with
other programs and Iptables, but SmoothWall offers it all in one program in an easy to
install package. Some of these features are:
•
VPN support: SmoothWall integrates an IPsec VPN with firewall capabilities. This
allows people on the outside to securely access the local area network via an
encrypted tunnel. This can be a fixed remote office or a roaming salesperson
(nonstatic IP VPN is only supported in the corporate edition).
•
DHCP client and server: The client allows the firewall to get a dynamic IP address
for its WAN interface. This is common practice on DSL and cable modem ISP
service. It also allows the firewall to act as a DHCP server for the internal LAN,
handing out IP addresses according to a preset policy. Again, you can add these
Figure 3.6 Turtle Firewall NAT and Masquerading
Howlett_CH03.fm Page 76 Wednesday, June 23, 2004 2:59 PM
SmoothWall Hardware Requirements 77
things to an Iptables firewall, but then you have two separate programs to install and
manage.
•
SSH and Web access to firewall: Secure access via command line and a Web
browser. The Turtle Firewall gives this capability for Iptables but doesn’t allow SSH
access. SmoothWall has both built in with no additional software to install.
•
Web proxy server: The ability to set up a Web proxy so that all Web sites are
accessed through a firewall. This provides some level of Web security, since any
exploits would have to run on the firewall and not the local machine. It can also
allow for further protection through a content filtering option available from
SmoothWall Limited.
•
Web caching server: This feature stores the most popular Web pages for local
access so that access times are improved and bandwidth usage is lowered.
•
Intrusion detection: SmoothWall offers some basic network intrusion detection
capabilities.
•
Graphs and reports: SmoothWall allows you to run some simple reports on firewall
activity and generate graphs based on this data.
•
Support for additional connection types: SmoothWall supports many types of
interfaces including dial-up, cable, ADSL, ISDN, and Ethernet. Some of these
interfaces require additional software and configuration when supported under
Ipchains.
One major difference between SmoothWall and the programs mentioned earlier is that
SmoothWall needs to run on a dedicated machine. When you install SmoothWall, it wipes
everything off the hard disk and installs its own operating system. This is basically a
stripped down and hardened version of Linux, but you don’t have to know anything about
it to run your SmoothWall firewall. This means you won’t be able to run any other tools on
that machine or use it for anything else (at least not without a lot of hassle and the poten-
tial of breaking the SmoothWall software), so it may not be the right fit for everyone. But
if you are looking for a cheap and quick way to set up a turnkey firewall with a lot of fea-
tures, SmoothWall may be right for you.
SmoothWall Hardware Requirements
As mentioned earlier, SmoothWall needs a dedicated machine to run on. The good news is
that the requirements for this machine are quite low since it will be running only the fire-
wall software. The minimum specifications required for SmoothWall are a Pentium-class
Intel-compatible PC running at 200Mhz or higher with at least 32MB of RAM and
512MB of disk space. A more optimal configuration would be a 500Mhz processor with
64MB of RAM and 2GB of disk space. These specifications should be easy to meet on all
but the oldest machines. You will also need a CD-ROM drive and at least one network card
(typically two, if the WAN interface is Ethernet).
Howlett_CH03.fm Page 77 Wednesday, June 23, 2004 2:59 PM
78 Chapter 3 • Firewalls
SmoothWall Express Versus SmoothWall Corporate
If you have a little money to spend and are considering other commercial alternatives, you
might look at the SmoothWall Corporate edition. This firewall has all the benefits of the
Express version with the following important differences:
•
Enhanced IDS support
•
Connection fail-over capabilities
•
VPN roaming support (dynamic IPs)
•
Additional graphs and reports
•
Enhanced graphical user interface
•
Certificate authentication support for VPN
You can see a complete list of the differences at
/>Express_Comparison_20040113.pdf.
Pricing for the commercial version is quite reasonable (check the Web site for the
latest prices). The cost is significantly less than what you’d pay to buy a server to run it on.
SmoothWall also makes other software products for network monitoring and content fil-
tering. Check out their full product line at www.smoothwall.net.
Installing SmoothWall
Caution:
Remember, installing SmoothWall will erase any data on the hard disk and put
its own operating system on it. Do not run this installation on a computer on which you
have data or programs you need.
1.
You must first create a bootable CD-ROM disk. To do this, use CD-writing soft-
ware, such as Nero or Easy CD Creator, and create a disk from the .iso image file
from the SmoothWall directory on the CD-ROM that accompanies this book. The
disk it creates will be bootable.
2.
Set your PC to boot from the CD-ROM first. Otherwise, it will search the hard
drive and load the operating system it finds there. You usually do this in the BIOS
settings of a PC accessed at boot-up before the OS loads. Many PCs use the F2
function key to enter this mode.
3.
Boot the machine from the CD-ROM. A title screen displays some basic licensing
and disclaimer information. Click on OK.
You have the choice of loading from the CD-ROM or HTTP. Remember, do
not enter this mode unless you are ready for all the data on that hard disk to be
erased and replaced with the SmoothWall software.
Choose CD-ROM, and the installation will begin.
Howlett_CH03.fm Page 78 Wednesday, June 23, 2004 2:59 PM