Learning Web Design Third Edition- P9 ppt
Bạn đang xem bản rút gọn của tài liệu. Xem và tải ngay bản đầy đủ của tài liệu tại đây (406.54 KB, 10 trang )
Part II: HTML Markup for Structure
66
Step 5: Change the Look with a Style Sheet
Step 5: Change the Look
with a Style Sheet
Depending on the content and purpose of your web site, you may decide
that the browser’s default rendering of your document is perfectly adequate.
However, I think I’d like to pretty up the Black Goose Bistro home page a bit
to make a good first impression on potential patrons. “Prettying up” is just
my way of saying that I’d like to change its presentation, which is the job of
Cascading Style Sheets (CSS).
In Exercise 4-5, we’ll change the appearance of the text elements and the
page background using some simple style sheet rules. Don’t worry about
understanding them all right now—we’ll get into CSS in more detail in Part
III. But I want to at least give you a taste of what it means to add a “layer” of
presentation onto the structure we’ve created with our XHTML markup.
Open index.html if it isn’t open already.
We’re going to use the
style
element to apply an
embedded style sheet to the page. (This is just one of the
ways to add a style sheet; the others are covered in Chapter
11, Style Sheet Orientation.)
The
style
element is placed inside the
head
of the
document. It uses the required
type
attribute to tell the
browser the type of information in the element (
text/css
is currently the only option). Start by adding the
style
element to the document as shown here:
1.
2.
<head>
<title>Black Goose Bistro</title>
<style type="text/css">
</style>
</head>
Now, type the following style rules within the
style
element
just as you see them here. Don’t worry if you don’t know
exactly what is going on you’ll learn all about style rules in
Part III.
<style type="text/css">
body {
background-color: #C2A7F2;
font-family: sans-serif;
}
h1 {
color: #2A1959;
border-bottom: 2px solid #2A1959;
}
h2 {
color: #474B94;
font-size: 1.2em;
}
h2, p {
margin-left: 120px;
}
</style>
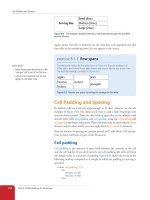
Now it’s time to save the file and take a look at it in the
browser. It should look like the page in Figure 4-14. If it
doesn’t, go over the style sheet code to make sure you didn’t
miss a semi-colon or a curly bracket.
3.
4.
exercise 4-5
|
Adding a style sheet
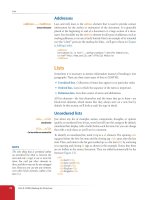
Figure 4-14. The Black Goose Bistro page after CSS style rules
have been applied.
When Good Pages Go Bad
Chapter 4, Creating A Simple Page (HTML Overview)
67
We’re finished with the Black Goose Bistro page. Not only have you written
your first XHTML document, complete with a style sheet, but you’ve learned
about elements, attributes, empty elements, block-level and inline elements,
the basic structure of an (X)HTML document, and the correct use of markup
along the way.
When Good Pages Go Bad
The previous demonstration went very smoothly, but it’s easy for small things
to go wrong when typing out (X)HTML markup by hand. Unfortunately,
one missed character can break a whole page. I’m going to break my page on
purpose so we can see what happens.
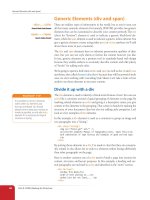
What if I had forgotten to type the slash (/) in the closing emphasis tag
(</em>)? With just one character out of place (Figure 4-15), the remainder of
the document displays in emphasized (italic) text. That’s because without
that slash, there’s nothing telling the browser to turn “off” the emphasized
formatting, so it just keeps going.
g.<em>
<h2>Catering</h2>
<p>You have fun <em>we'll handle the cooking.<em> Black Goose
Catering can handle events from snacks for bridge club to elegant
corporate fundraisers.</p>
Without the slash, the browser
does not know to turn the
emphasized text “off,” and the
remainder of the page is
rendered as emphasized text
(italics).
Figure 4-15. When a slash is omitted, the browser doesn’t know when the element ends,
as is the case in this example.
N o t e
Omitting the slash in the closing tag (in
effect, omitting the closing tag itself) for
certain block elements, such as headings
or paragraphs, may not be so dramatic.
Browsers interpret the start of a new
block element to mean that the previous
block element is finished.
Part II: HTML Markup for Structure
68
When Good Pages Go Bad
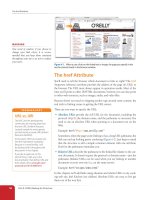
I’ve fixed the slash, but this time, let’s see what would have happened if I
had accidentally omitted a bracket from the end of the first <h2> tag (Figure
4-16).
See how the headline is missing? That’s because without the closing tag
bracket, the browser assumes that all the following text—all the way up to
the next closing bracket (>) it finds—is part of that <h2> tag. Browsers don’t
display any text within a tag, so my heading disappeared. The browser just
ignored the foreign-looking element name and moved on to the next ele-
ment.
Making mistakes in your first (X)HTML documents and fixing them is a
great way to learn. If you write your first pages perfectly, I’d recommend fid-
dling with the code as I have here to see how the browser reacts to various
changes. This can be extremely useful in troubleshooting pages later. I’ve
listed some common problems in the sidebar, Having Problems? Note that
these problems are not specific to beginners. Little stuff like this goes wrong
all the time, even for the pros.
Missing
headline
<h2The Restaurant</h2>
<p>The Black Goose Bistro offers casual lunch and dinner fare
in a hip atmosphere. The menu changes regularly to highlight
the freshest ingredients.</p>
<h2The
Without the bracket, all the following characters are
interpreted as part of a long, unrecognizable element name,
and “The Restaurant” disappears from the page.
Figure 4-16. A missing end bracket makes all the following content part of the tag, and
therefore it doesn’t display.
Having Problems?
The following are some typical
problems that crop up when
creating web pages and viewing
them in a browser:
I’ve changed my document, but
when I reload the page in my
browser, it looks exactly the same.
It could be you didn’t save your
document before reloading,
or you may have saved it in a
different directory.
Half my page disappeared.
This could happen if you are
missing a closing bracket (>) or a
quotation mark within a tag. This
is a common error when writing
(X)HTML by hand.
I put in a graphic using the
img
element, but all that shows up is a
broken graphic icon.
The broken graphic could mean
a couple of things. First, it might
mean that the browser is not
finding the graphic. Make sure
that the URL to the image file
is correct. (We’ll discuss URLs
further in Chapter 6, Adding
Links.) Make sure that the image
file is actually in the directory
you’ve specified. If the file is
there, make sure it is in one of
the formats that web browsers
can display (GIF, JPEG, or PNG)
and that it is named with the
proper suffix (.gif, .jpeg or .jpg, or
.png, respectively).
Test Yourself
Chapter 4, Creating A Simple Page (HTML Overview)
69
Test Yourself
Now is a good time to make sure you’re understanding the basics of markup.
Use what you’ve learned in this chapter to answer the following questions.
Answers are in Appendix A.
What is the difference between a tag and an element?
Write out the minimal structure of an (X)HTML document.
Mark whether each of these file names is an acceptable name for a web
document by circling “Yes” or “No.” If it is not acceptable, provide the
reason why.
a. Sunflower.html Yes No
b. index.doc Yes No
c. cooking home page.html Yes No
d. Song_Lyrics.html Yes No
e. games/rubix.html Yes No
f. %whatever.html Yes No
All of the following markup examples are incorrect. Describe what is
wrong with each one, then write it correctly.
a. <img "birthday.jpg">
b. <i>Congratulations!<i>
c. <a href="file.html">linked text</a href="file.html">
d. <p>This is a new paragraph<\p>
1.
2.
3.
4.
Part II: HTML Markup for Structure
70
(X)HTML Review: Document Structure Elements
How would you mark up this comment in an (X)HTML document so
that it doesn’t display in the browser window?
product list begins here
(X)HTML Review:
Document Structure Elements
This chapter introduced the elements that establish the structure of the
document. The remaining elements introduced in the exercises will be treated
in more depth in the following chapters.
Element Description
html
The root element that identifies the document as (X)HTML
head
Identifies the head of the document
title
Gives the page a title
body
Identifies the body of the document that holds the content
5.
71
IN THIS CHAPTER
Choosing the best element
for your content
Using block elements
to identify the major
components of the
document.
Adding line breaks
Comparing inline elements
Creating custom elements
with the versatile generic
elements, div and span
Adding special characters
to your document
In the previous chapter, you learned the hows and whys of (X)HTML markup.
This chapter introduces the elements you have to choose from for marking up
text content. There probably aren’t as many of them as you might think, and
really just a handful that you’ll use with regularity.
Before we get to the element roll-call, this is a good opportunity for a reminder
about the importance of meaningful (semantic) and well-structured markup.
In the early years of web design, it was common to choose elements based on
how they looked in the browser. Don’t like the size of the h1? Hey, use an h4
instead. Don’t like bullets on your list? Make something list-like using line
break elements. But no more! Those days are over thanks to reliable browser
support for style sheets that do a much better job at handling visual presenta-
tion than (X)HTML ever could.
You should always choose elements that describe your content as accurately
as possible. If you don’t like how it looks, change it with a style sheet. A
semantically marked up document ensures your content is available and
accessible in the widest range of browsing environments, from desktop com-
puters to cell phones to screen readers. It also allows non-human readers,
such as search engine indexing programs, to correctly parse your content and
make decisions about the relative importance of elements on the page.
Your content should also read in a logical order in the source. Doing so
improves its readability in all browsing environments. Information that
should be read first should be at the beginning of the (X)HTML source docu-
ment. You can always use style sheets to position elements where you want
them on the final web page.
With these guidelines in mind, it is time to meet the (X)HTML text elements,
starting with the block-level elements.
Choose elements that
describe your content as
accurately as possible.
Choose elements that
describe your content as
accurately as possible.
MARKING UP
TEXT
CHAPTER
5
Part II: HTML Markup for Structure
72
Building Blocks
Building Blocks
When creating a web page, I always start with my raw content in a text file
and make sure that it has been proofread and is ready to go. I put in the docu-
ment structure elements (html, head, title, and body). I also identify which
version of (X)HTML I’m using in a DOCTYPE declaration, but we’ll get to
that in Chapter 10, Understanding the Standards. Then I am ready to divide
the content into its major block-level elements.
Block-level elements make up the main components of content structure. As
mentioned in Chapter 4, Creating a Simple Page, block-level elements always
start on a new line and usually have some space added above and below,
stacking up like blocks in the normal flow of the document.
There are surprisingly few text block-level elements. Table 5-1 lists (nearly)
all of them (see note).
Table 5-1. Block-level elements for text content
Type Element(s)
Headings h1, h2, h3, h4, h5, h6
Paragraphs
p
Block (long) quotes
blockquote
Preformatted text
pre
Various list elements ol, ul, li, dl, dt, dd
Horizontal rules (lines)
hr
We’ve already used some of these in the exercises in the previous chapter. In
this section we’ll take a closer look at block-level elements and the rules for
how they are used.
Paragraphs
Paragraphs are the most rudimentary elements of a text document. You indicate
a paragraph with the p element. Simply insert an opening <p> tag at the begin-
ning of the paragraph and a closing </p> tag after it, as shown in this example.
<p>Serif typefaces have small slabs at the ends of letter strokes. In
general, serif fonts can make large amounts of text easier to read.</p>
<p>Sans-serif fonts do not have serif slabs; their strokes are square
on the end. Helvetica and Arial are examples of sans-serif fonts. In
general, sans-serif fonts appear sleeker and more modern.</p>
Paragraphs may contain text, images and other inline elements, but they may
not contain other block elements, including other p elements, so be sure never
to put the elements listed in Table 5-1 between paragraph tags.
<p> </p>
A paragraph element
<p> </p>
A paragraph element
N o t e
Tables and forms are also block-level
elements, but they are treated in their
own respective chapters. The generic div
block-level element is introduced later in
this chapter.
N o t e
You must assign an element to all the text
in a document. In other words, all text
must be enclosed in some sort of block
element. Text that is not contained within
tags is called “naked” or “anonymous” text,
and it will cause a document to be invalid.
For more information about checking
documents for validity, see Chapter 10.
Building Blocks
Chapter 5, Marking Up Text
73
In HTML, it is acceptable to omit the closing </p> tag, but in XHTML, the
closing tag must be there. For reasons of forward-compatibility, it is recom-
mended that you always close paragraph (and all) elements.
Headings
In the last chapter, we used the h1 and h2 elements to indicate headings for
our Black Goose Bistro page. There are actually six levels of headings in
(X)HTML, from h1 to h6. Because headings are used to provide logical hier-
archy or outline to a document, it is proper to start with the Level 1 heading
(h1) and work down in numerical order. Doing so not only improves accessi-
bility, but helps search engines (information in higher heading levels is given
more weight). Using heading levels consistently throughout a site—using h1
for all article titles, for example—is also recommended.
This example shows the markup for four heading levels. Additional heading
levels would be marked up in a similar manner.
<h1>Type Design</h1>
<h2>Serif</h2>
<p>Serif typefaces have small slabs at the ends of letter strokes. In
general, serif fonts can make large amounts of text easier to read.</p>
<h3>Baskerville</h3>
<h4>Description</h4>
<p>Description of the Baskerville typeface.</p>
<h4>History</h4>
<p>The history of the Baskerville typeface.</p>
<h3>Georgia</h3>
<p>Description and history of the Georgia typeface.</p>
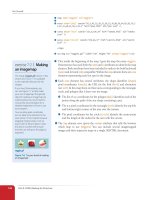
You can use a style sheet to specify the
appearance of the heading levels. By default,
they will be displayed in bold text, starting
in very large type for h1s with each con-
secutive level in smaller text, as shown in
Figure 5-1.
<h1> </h1>
<h2> </h2>
<h3> </h3>
<h4> </h4>
<h5> </h5>
<h6> </h6>
Heading elements
<h1> </h1>
<h2> </h2>
<h3> </h3>
<h4> </h4>
<h5> </h5>
<h6> </h6>
Heading elements
h1
h2
h3
h4
h4
h3
Figure 5-1. The default rendering of four
heading levels. Their appearance can be
changed easily with a style sheet.
Part II: HTML Markup for Structure
74
Building Blocks
Long quotations
If you have a long quotation, a testimonial, or a section of copy from another
source, particularly one that spans four lines or morae, you should mark it up
as a blockquote element. It is recommended that content within blockquotes
be contained in other elements, such as paragraphs, headings, or lists, as
shown in this example.
<p>Renowned type designer, Matthew Carter, has this to say about his
profession:</p>
<blockquote>
<p>Our alphabet hasn't changed in eons; there isn't much latitude in
what a designer can do with the individual letters.</p>
<p>Much like a piece of classical music, the score is written
down – it’s not something that is tampered with – and yet, each
conductor interprets that score differently. There is tension in the
interpretation.</p>
</blockquote>
Figure 5-2 shows the default rendering of the blockquote example. This can
be altered with CSS.
Preformatted text
Early on, you learned that browsers ignore white space such as line returns
and character spaces in the source document. But in some types of infor-
mation, such as code examples or poetry, the white space is important for
conveying meaning. For these purposes, there is the preformatted text (pre)
element. It is a unique element in that it is displayed exactly as it is typed—
including all the carriage returns and multiple character spaces. By default,
preformatted text is also displayed in a constant-width font (one in which all
the characters are the same width, also called monospace), such as Courier.
The pre element in this example displays as shown in Figure 5-3. The second
part of the figure shows the same content marked up as a paragraph (p) ele-
ment for comparison.
<blockquote> </blockquote>
A lengthy, block-level quotation
<blockquote> </blockquote>
A lengthy, block-level quotation
Figure 5-2. The default rendering of a blockquote element.Figure 5-2. The default rendering of a blockquote element.
<pre> </pre>
Preformatted text
<pre> </pre>
Preformatted text
N o t e
There is also the inline element, q, for
short quotations in the flow of text. We’ll
talk about it later in this chapter.
N o t e
The white-space:pre CSS property can
also be used to preserve spaces and
returns in the source. Unlike the pre
element, text formatted with the white-
space property is not displayed in a
constant-width font.
Building Blocks
Chapter 5, Marking Up Text
75
<pre>
This is an example of
text with a lot of
curious
white space.
</pre>
<p>
This is an example of
text with a lot of
curious
white space.
</p>
Figure 5-3. Preformatted text is unique in that the browser displays the white space
exactly as it is typed into the source document. Compare it to the paragraph element in
which line returns and character spaces are ignored.
Figure 5-3. Preformatted text is unique in that the browser displays the white space
exactly as it is typed into the source document. Compare it to the paragraph element in
which line returns and character spaces are ignored.
<hr />
(XHTML)
<hr>
(HTML)
A horizontal rule
Horizontal Rules
If you want to add a divider between sections, you can insert a horizontal rule (
hr
)
element between blocks of text. When browsers see an
hr
element, they insert a
shaded horizontal line in its place by default. Because horizontal rules are block-level
elements, they always start on a new line and have some space above and below.
The
hr
element is an empty element—you just drop it into place where you want
the rule to occur, as shown in this XHTML example and Figure 5-4. Note that in
HTML, the
hr
element is written simply as
<hr>
.
<h3>Times</h3>
<p>Description and history of the Times typeface.</p>
<hr />
<h3>Georgia</h3>
<p>Description and history of the Georgia typeface.</p>
Some authors use the
hr
element as a logical divider between sections, but hide
it in the layout with a style rule. For visual layouts, it is common to create a rule by
specifying a colored border before or after an element with CSS.
Figure 5-4. The default rendering of a horizontal rule.Figure 5-4. The default rendering of a horizontal rule.