The Adobe Photoshop Layers Book- P3 pdf
Bạn đang xem bản rút gọn của tài liệu. Xem và tải ngay bản đầy đủ của tài liệu tại đây (2.98 MB, 30 trang )
The Adobe Photoshop Layers Book
34
The following list is categorized into External Applications,
Commands, Functions, Freehand Tools and Filters. Each is
explained more fully by section. You can use other tools or
additional applications as you explore Photoshop, consult tutorials,
or develop your own work ow, but this list will be comprehensive
in re ecting what you absolutely need.
External Applications
External applications are the additional software items that you add
to your system to enhance processing. There are a plethora of add-
ons you can install for Photoshop, some free and some for a cost,
that claim to add on to what Photoshop already does. These may
come in the form of plug-ins, actions, scripts, custom shapes and
brushes, etc. Some of these additions may be valuable additions
to look, it means you have a good imagination and eventually Photoshop
will work out well for you. However, the tools never do the thinking for you,
and never know what you see in your mind’s eye.
Really, you almost never want the computer to do it for you. The reality
of using Photoshop is that automated tools for correction will usually
make approximations. You are never hard wired to Photoshop, and the
program itself isn’t much of an artist – regardless of what you pay for it
or what version you own. You may think you can depend on it to make
images better, but really all it does is enable you to make images better. It
never sees the images it works on, it just performs calculations that were
developed by the designers, and sometimes what those tools will do to a
particular image may be di cult to predict – even once you have a lot of
experience. Most of the unpredictable tools are exactly the ones we steer
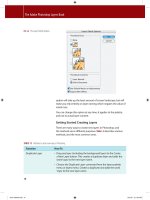
away from in the tool list supplied here. To dispel the rumors: there are no
tools that think for you. No matter how elegantly they work, tools will
not not ‘read your mind’ or ‘do it for you’ and certainly none will do
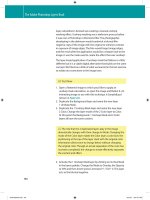
both – whatever the task. That is as it should be (
Figure 2.2).
FIG 2.2 The only tools that attempt
to automate corrections are those
that you probably shouldn’t use.
Ch02-K52076.indd 34Ch02-K52076.indd 34 6/20/07 9:41:43 PM6/20/07 9:41:43 PM
Layer Management: Concepts of a Layer-Based Workflow
35
(like those included with this book). Some will be good for users
who are already very familiar with the tools in Photoshop, know
what they want to accomplish with the program, and are looking
for a speci c enhancement. Generally, the wealth of available
add-ons and plug-ins may seem tempting, but many plug-in
and add-ons just duplicate or repackage functionality already in
Photoshop, sucking in users on claims that they are the ‘Do It for
Me’ tool.
There are really very few external software applications that you
need to work with Photoshop. Those that you do need are mostly
a given. You will need a computer that has operating system
software capable of running Photoshop. You will also sometimes
need drivers that are provided by the vendor of the additional
equipment you purchase (for your printer, camera, backup
systems/drives) or other manufacturer software to run hardware
and devices. A few things you will need that are less obvious are
software utilities to calibrate your monitor, and build an ICC pro le.
Some things you may want, like additional editing software,
image management, etc. are not necessary, and they shouldn’t be
allowed to cloud the picture.
The best overall plan in managing peripheral applications is similar
to the limiting your tool list: keep it simple to keep complexity and
potential variables to a minimum. More software means more to
learn, so put all the non-essential software aside. If you have trouble
with your computer system, the rst place to start troubleshooting
is by eliminating extra software and peripherals – or simply not
adding them as variables in the rst place.
Adobe Gamma (PC) Display Adobe Gamma can be found on PC systems in the Control
Calibrator Assistant (Mac) or Panel; Display Calibrator Assistant can be found on Mac
another monitor calibration systems in the Displays System Preferences by clicking the
system Color and then Calibrate buttons. Both of these utilities do
easy monitor calibration and ICC pro le generation in one
process.
Alternatives to these free options already included with your
existing software are calibration systems, like ColorVision
Spyder, or other hardware calibration device for your monitor
(see These devices are more
reliable than software-only solutions.
Ch02-K52076.indd 35Ch02-K52076.indd 35 6/20/07 9:41:45 PM6/20/07 9:41:45 PM
The Adobe Photoshop Layers Book
36
Commands
Commands are simple functions – essentially single step – used to
achieve a result. I say ‘essentially’ because you may have to address
a dialog to get the result accomplished. For example, if you open
an image, you will need to use the Open command. In the Open
dialog, you will have to browse to nd the image you want to open.
Most commands will be found on the program menus, and can be
invoked by shortcuts.
Monitor calibration and creating pro les can help you stabilize
your work ow and get better color matching between your
monitor and output. If you have problems with output color, the
solution will likely start with good monitor calibration.
Device Software Scanner, digital camera, printer, card reader, backup/DVD/CD/
RAID drivers and software that enables you to access additional
hardware that you will be connecting to your system to access
or store images. See user manuals and installation instruction
materials for each device you add to the system for more
information.
Photoshop Help HelpϾPhotoshop Help, or press F1. This can be a reliable
resource for basic information on using Photoshop features
and functions and is a great place to begin exploration of any
Photoshop tool, and the price is right (free). Depending on your
choices during the installation of Photoshop, this feature may
require additional installation.
New FileϾNew, or press CommandϩN / CrtlϩN [Mac/PC]. Opens a New image. In
the New dialog, set the color, size and resolution to use for a new blank image.
Creates a new image. You might use New to create a canvas where you would
add other images to make a composite or collage.
Open FileϾOpen, or press CommandϩO / CrtlϩO. Opens an existing image. You will use
this command often to open images you have downloaded from your camera.
Save As FileϾSave As, or press CommandϩShiftϩS / CtrlϩShiftϩS. Opens the Save As
dialog. Save your image with a new name, le type or location. It is suggested
you use Save As most or even all of the time to avoid le con icts and potential
for over-writing original les.
Save For FileϾSave For Web, or press CommandϩShiftϩOptionϩS / CtrlϩShiftϩAltϩS.
Web Save images for the Web using JPEG or GIF le types, limited color and
Ch02-K52076.indd 36Ch02-K52076.indd 36 6/20/07 9:41:45 PM6/20/07 9:41:45 PM
Layer Management: Concepts of a Layer-Based Workflow
37
transparency. Using Save for Web results in a smaller le than just saving as JPEG
even with the same compression ratio. There are additional preview bene ts as
well.
Undo EditϾUndo, or press CommandϩZ / CtrlϩZ. Reverses the previous action you
took in editing an image. This is useful for all sorts of things, but mostly stepping
back in the process when you don’t like what a change achieved. To step back
multiple steps, look to the History palette (WindowϾHistory).
Copy EditϾCopy, or press CommandϩC / CtrlϩC. With a selection active in your
image, you can copy the selected image area to the clipboard. Think of this like
you might use copy/paste to move a URL to a browser, or edit text in an email.
Copy can be used to duplicate custom selected image areas, or move image
content to a new image.
Paste EditϾPaste, or press CommandϩV / CtrlϩV. Paste the content of the clipboard
that was stored using the Copy command into the current image. Copy and
Paste are almost always used together to duplicate selected image areas to the
same image or other images.
New Layer LayerϾNewϾLayer, or CommandϩShiftϩN / CtrlϩShiftϩN. New layers can
also be created with the Create a New Layer button at the bottom of the Layers
palette and the New Layer command on the Layers palette menu. This will
create a new layer with no content.
Duplicate LayerϾDuplicate Layer, or duplicate a layer in the Layers palette by dragging
Layer an existing layer to the Create a New Layer button at the bottom of the Layers
palette. The Duplicate Layer command is also available on the Layers palette
menu. This will create a new layer that is exactly like the one being duplicated
but with the word ‘Copy’ appended to the layer name.
Create LayerϾNew Adjustment Layer Ͼ and choose a selection from the New
Adjustment Adjustment Layer submenu. You can also create these with the Create New
Layer Fill or Adjustment Layer button at the bottom of the Layers palette. These help
you keep adjustments distinct from layer content.
Merge LayersϾMerge Layers (CommandϩE / CtrlϩE), LayersϾMerge Visible (Shiftϩ
Layers CommandϩE / ShiftϩCtrlϩE). Merge layers in one of several ways to cut down
on the number of layers in your image and be sure the le isn’t unnecessarily
large. Merging content should only be done where you don’t expect to have to
reverse the changes later; you can use Undo immediately following a merge,
but you can’t undo the changes in a later editing session (after saving and re-
opening the image).
Flatten LayersϾFlatten Image (no shortcut). Very much like Merge, but this function
speci cally combines all layers and image content and attens the image into a
Background layer only.
Ch02-K52076.indd 37Ch02-K52076.indd 37 6/20/07 9:41:45 PM6/20/07 9:41:45 PM
The Adobe Photoshop Layers Book
38
Image Size ImageϾResizeϾImage Size, or press CommandϩOptionϩI / CtrlϩAltϩI. Allows
the user to change the size and resolution of an open image. Usually this
will be a step that you will take in preparing an image for output to a printer.
Upsampling an image (making it bigger) by more than 10% or 20% is not
recommended as you cannot re-create detail that you did not originally capture.
Downsampling is less problematic. Use Bicubic resampling in most cases to get
the best resizing result, and Constrain Proportions so the image does not distort
horizontally or vertically.
Transform EditϾTransform, or press CommandϩT / CtrlϩT allows you to reshape an object
you have isolated with selection or by Copy/Paste so that it is in its own layer.
This can come in handy when you have to patch an image area that is missing or
damaged, or when you want to remove objects/people from a scene.
Inverse SelectϾInverse, or press ShiftϩCommandϩI / ShiftϩCtrlϩI. This will take a
selection you have made and invert it; instead of the area inside the selection
being selected, the selected area will change so that everything outside the
original selection is selected. This is great for using a atly colored background
to make a selection of an object or in other instances where it is easier to make a
selection outside an object than of the object itself.
Fill EditϾFill, or press ShiftϩF5. Will ll a whole layer in your image with a single
color (foreground, background, black, gray or white). This is useful for color and
tone adjustments, converting to grayscale, etc., but also for creating masks from
selections.
Layer Opacity slider on Layers palette (No shortcut). Adjust transparency/visibility
Opacity of individual layers in an image to blend and combine layer content and e ects.
A variety of uses in blending layer content, and color and tone adjustments. Use
up and down arrow keys for ne adjustments.
Layer The mode drop list on the Layers palette. In keeping with the common theme that
Mode everything isn’t a necessary tool, of the 23 layer modes, only about 6 have
every-day uses. These modes apply image content selectively. Normal mode
is the default, multiply is used for darkening or creating shadows, screen is
used for lightening, overlay has several enhancement properties for working
with contrast, color applies layer color only, and luminosity applies tone sans
color.
Functions
Functions are more complex than simple commands that have
a de nitive, one-step goal. Using functions you will have to
determine how to apply settings achieve results, usually using
multiple controls and function features to determine the nal
Ch02-K52076.indd 38Ch02-K52076.indd 38 6/20/07 9:41:45 PM6/20/07 9:41:45 PM
Layer Management: Concepts of a Layer-Based Workflow
39
outcome. Adjustment of more than one control is usually
necessary, and nothing can be achieved using the defaults.
Levels LayerϾNew Adjustment LayerϾLevels. CommandϩL / CtrlϩL opens a Levels
dialog, but creates no adjustment layer. View image histograms as part of
the Levels dialog box display. Use simple sliders to adjust tonal dynamic
range and balance image color. Helps image contrast and color.
Color Balance LayerϾNew Adjustment LayerϾColor Balance. CommandϩB / CtrlϩB
opens a Color Balance dialog, but creates no adjustment layer. Adjust color
by balancing the in uence of color opposites for highlights, midtones and
shadows. Helps remove color casts and stubborn atness in some images.
Hue/ LayerϾNew Adjustment LayerϾHue Saturation. CommandϩU / CtrlϩU
Saturation opens a Hue/Saturation dialog, but does not create a Hue/Saturation
Layer adjustment layer. Adjust color by using slider controls to alter hue, increase/
decrease saturation, and a ect general lightness and darkness. Most
e ective when used to enhance color saturation.
Layer Mask LayerϾLayer MaskϾReveal All (no shortcut). Customize visible image areas
without permanently erasing content. Very useful for blending in pasted
image areas, molding/ tting parts of a collage or composite. Often used
in conjunction with Selection (Polygon Lasso, Magic Wand), Fill and/or the
Paint Brush tool.
Blending LayerϾLayer StyleϾBlending Option, or double-click a content layer.
Options Either action will open the Layer Style screen. From this screen you can
control many options, like General Blending (Mode and Opacity), Advanced
Blending (Fill Opacity, Channel Targeting), Blend If (conditional blending
based on layer content) and Layer Styles (e ects/styles assigned to the
layer). This is a very powerful command center for controlling layers
and how they interact. Can be used for a wide variety of content blending
and e ects.
Freehand Tools
The Toolbar has many freehand tools on it that you will use
infrequently or not at all. By freehand, I mean that the
application is controlled by your input device and the position
of the cursor.
For all of these tools, be aware that options on the Options bar
will a ect the way the tools are applied. For basics about options
for each of these tools, look them up by searching Help for ‘[tool
name] options’.
Ch02-K52076.indd 39Ch02-K52076.indd 39 6/20/07 9:41:45 PM6/20/07 9:41:45 PM
The Adobe Photoshop Layers Book
40
Crop Tool Press C on the keyboard. Used to change image size by permanently removing
(cropping out) image edges. Use this to correct framing for your image, atten
horizons, remove objects at the edge of the image that shouldn’t be in the
frame, and to adjust perspective (make images 4 ϫ 6 for example).
Polygonal Press L on the keyboard, and ShiftϩL to scroll the lasso tools. Create Selections
Lasso Tool of regular and irregularly shaped image objects by clicking at intervals around
an object edge. Use short segments to select curved edges. Easier to control
than the standard Lasso tool.
Magic Press W on the keyboard. Create selections of areas of same/similar color
Wand Tool quickly by clicking in the area. Great for making selections of large, similar
colored areas (sky) or selecting objects with a single color background (select
the background and Invert the selection).
Move Tool Press V on the keyboard. Use to reposition objects on layers within your
images, such as you might have when pasting replacement areas, or when
working with collages or composite parts.
Clone Press S on the keyboard. Make brush-style corrections by sampling image areas
Stamp Tool to clone to another part of the image. Great for straight duplication of one
image area to another. Excellent for all manner of spot correction such as dust
or other simple debris.
Healing Press J on the keyboard. Make brush-style corrections by sampling image
Brush Tool areas to clone to another part of the image. Healing is similar to Clone Stamp,
but this tool makes ‘smart’ corrections to your images by comparing the
sampled area to the target and attempting to blend the correction with the
surroundings. Perfect for making isolated corrections, like removing a stray
eyelash from a cheek.
Paint Press B on the keyboard, and ShiftϩB to scroll the brush tools. Used for
Brush Tool freehand painting. Good for colorizing, adding manual shadows and
highlights, as well as adding dodge and burn e ects. An excellent tool for use
with layer masks to create custom masking e ects.
Eyedropper Press I on the keyboard. Sample to check color and tone values in speci c
Tool image areas, or to set the foreground/background colors that can be used with
Fill or Paint Brush. Also used in conjunction with the Info palette to display
sampled color information.
Foreground/ No shortcuts to open the Color Picker. Press D for default colors and X to
Background exchange foreground and background. These color swatches store colors
Swatches selected from the Color Picker or sampled from the screen using the
Eyedropper Tool. To change the Foreground Color, use the Eyedropper tool and
click anywhere on your image. To change the Background Color, press Option /
Alt and click on your image.
Ch02-K52076.indd 40Ch02-K52076.indd 40 6/20/07 9:41:46 PM6/20/07 9:41:46 PM
Layer Management: Concepts of a Layer-Based Workflow
41
Filters
Filters are an area of the program menus that get explored
extensively by newer users, who often ock there to try out special
e ects and put some pizzazz into their images. The foray into
lters is usually one that is hit or miss, and while you can spend
innumerable hours applying di erent lters and settings, in reality,
you get less pizzazz from lters than you get from shooting better
images.
Filters listed here are few, because it is often di cult to predict
exactly how some lters will behave and what bene t you will
get from the result of applying it. These lters are the practical
ones that you will use for image correction, x damage and create
simple e ects. They are not ‘wow’ lters that will create instantly
interesting e ects. Before you do anything to make fantastic
e ects you want to have complete control of your image. These
lters provide you with a means of control.
Add Noise FilterϾNoiseϾAdd Noise. Adds digital noise to an image. Useful for roughening
lter up tones that are unnaturally smooth, such as areas painted with a Fill or Paint
Brush Tool. Sometimes used in conjunction with Gaussian Blur.
Gaussian FilterϾBlurϾGaussian Blur. Blends adjacent pixels to create a blurring e ect.
Blur lter Useful for smoothing out tones that are unnaturally rough, over-sharpened, or
for creating focus e ects (e.g., soft focus, depth-of- eld).
Unsharp FilterϾSharpenϾUnsharp Mask. Allows users to adjust both local and ne
Masking contrast in the image to a ect the appearance of sharpness, improve edge
de nition and enhance contrast in color and tone.
Looking over these lists of tools and depending on how you count,
there are just about 30 tools to keep in mind for editing your
images. That may sound like a lot, but it is a fraction of the total
number of tools yet it is a complete tool belt that will help you get
through any image-editing situation. Be sure to become familiar
with these if you are not already.
The Logic of Layers
Now that we have outlined a basic work ow and a basic toolbox,
it is time to start wrapping the process of working with images
around layers. As mentioned in Chapter 1, layers are a vehicle for
instituting non-destructive change in images. In other words,
Exploring New Tools
One of the reasons users
nd Photoshop daunting
is that they try to learn too
much – or even all of it – at
once. A better approach for
most people will be to learn
a tool at a time. If there
are tools in the list here
with which you are not
familiar, note them, and give
yourself the opportunity to
explore them one a day, for
half an hour. Read about
Ch02-K52076.indd 41Ch02-K52076.indd 41 6/20/07 9:41:46 PM6/20/07 9:41:46 PM
The Adobe Photoshop Layers Book
42
you can keep the original image information intact while making
virtual changes over it. Working with layers as a primary tool allows
you to reverse any change. Used correctly, layers are a far more
powerful tool than Undo or Histories. With Layers it is possible not
just to undo or reverse sequential changes, but you can adjust
the editing sequence and intensity of applied changes as you go
by re-ordering layers, adjusting opacity and toggling visibility.
The power of layers is greater if you approach them with a solid
understanding of when to use them, and how to organize them
with naming, grouping, merging, duplication, clipping and linking.
When to Create a New Layer
Some layers will force themselves on you. For example, when you
use the paste command, Photoshop will create a new layer. This is
usually as it should be. Ideally you will want to create a new layer
for every change that you intend to make in an image. That is, if
you are going to make a general color adjustment, make a new
layer; if you are going to sharpen, make a new layer; if you are
going to make a spot change to any image area, make a new layer;
if you are making dust corrections to a scan, make a new layer (not
one for each speck, but one for all of them).
The goal of layer creation is to keep each logical step in the process
separated so you can return to the image in the future, see what
you did, and perhaps reverse or re-create these changes and the
process in another image. That is, layers can be used to archive
your work ow in steps that you took to achieve the result, they
can help you save time and e ort if you want to make a change in
the developed image without having to redo all the corrections,
and they can provide a means of learning from your own e orts by
reviewing your process – now or years from now.
Naming Layers
A very important means of keeping layers under control is being
consistent with layer naming. When new layers are created, they
are created with a generic name (e.g., Layerϩnumber, or they may
be named for the type of adjustment layer). Several practices can
help you make better use of layer names: naming the layer by
purpose, entering parameters used and numbering the order of
creation.
Naming the layer by purpose is simply typing in a name
that has to do with what you used the layer to accomplish.
the tools in Photoshop’s
Help (in Photoshop, press
Commandϩ/ or Ctrlϩ/), then
open an image and explore
the tool by applying it. Don’t
look so much for expert
results as the opportunity to
learn how the tool behaves.
That experience will go a long
way toward incorporating it
into your work ow. Fifteen
or twenty minutes a day for
a month would cover this
entire list, but chances are
you are familiar with many
of them already if you are
reading this book.
Ch02-K52076.indd 42Ch02-K52076.indd 42 6/20/07 9:41:46 PM6/20/07 9:41:46 PM
Layer Management: Concepts of a Layer-Based Workflow
43
For example, a layer used for dust removal would be named ‘Dust
Removal’; a layer used to isolate an object would be named for the
object. When using functions like Gaussian Blur on a layer to soften
an area, you may want to note the settings used in the layer name.
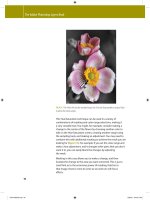
Finally, you might also consider numbering the layers. Though you
will often work from the bottom of the stack upward in order,
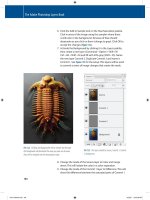
that will not always be the case. See
Figure 2.3 for a simple example
of layer naming according to suggested practice.
FIG 2.3 Following the number order of the layers, you can track what was done to this image to achieve the result by looking at the layer
names. All of these techniques are things we will touch on in later chapters.
Before
After
Ch02-K52076.indd 43Ch02-K52076.indd 43 6/20/07 9:41:46 PM6/20/07 9:41:46 PM
The Adobe Photoshop Layers Book
44
This type of simple naming scheme has potential to be very
helpful in that it can help you know what a layer is for without
having to examine the content (e.g., shutting o other layers,
increasing the size of the thumbnails, zooming in). Naming layers
as you go to hint at what they are will help keep them organized
and let them act as an outline or running history for your editing
procedures. In that way, investing some time up front helps save
lots of time later on in reproducing or duplicating results without
extensive trial and error.
While including some information in the layer name makes
sense, including too much information can make the layer
names bulky and di cult to read.
There are several ways to edit layer names. You can often change
them when creating the layer, but you can also edit the names
after the layers are created. It is time to take a look at working
with layer names. The following exercise has no other goal than
to explore the various opportunities for naming, there will
ultimately be no change in the visual appearance of the image
on screen.
Try It Now
1. Open an image, and atten it if it is not attened already
(choose Flatten from the Layer menu).
2. Choose Duplicate Layer from the Layers menu. This will
open the Duplicate Layer dialog with the As eld pre-named
Background Copy (see Figure 2.4).
3. Change the As eld by typing over the current default name.
Change the name to 1 Duplicate Background, and click OK. This
will close the dialog, and create a duplicate of the Background
layer with the new name in the layers palette.
FIG 2.4 Duplicating a layer with the
Duplicate Layer command creates
an exact replica of the layer being
duplicated but adds the word ‘copy’ to
the name.
Ch02-K52076.indd 44Ch02-K52076.indd 44 6/20/07 9:41:48 PM6/20/07 9:41:48 PM
Layer Management: Concepts of a Layer-Based Workflow
45
4. Hold down the Option / Alt key and then in the Layers palette,
click-and-drag the 1 Duplicate Background layer to the Create
a New Layer button at the bottom of the palette. This will open
the Duplicate Layer dialog and allow you to rename the new
layer. Name this layer 2 Duplicate of the Duplicate, and click OK.
Clicking OK will close the dialog and create a new layer at the
top of the stack identical to the other two, but in name.
Had you not held down the Option / Alt key when
dragging in the previous step, the result would have been to
create the layer without opening the Duplicate Layer dialog.
5. Open the Layers palette menu ( nd the menu button at
the upper right of the palette) and choose Layer Properties. The
Layer Properties dialog will appear. Change the name of
the layer to 2 Duplicate Background II. Click OK to accept the
changes and close the dialog. Note the name will change for
the current layer in the Layers palette.
6. Double-click the Background layer in the layers palette. This will
open the New Layer dialog with the Name Layer 0. Click OK to
accept the changes. You could have changed the name there,
but you will change your mind shortly.
7. Double-click directly on the name Layer 0 in the Layers palette.
The name of the layer will highlight in the palette (see Figure 2.5).
You can type in a name change at this point. Call it Original
Background, and then press Enter or Return on your keyboard
to accept the changes.
There are alternatives for getting to the Layer Properties.
Option / Alt and double-clicking on a layer will open the
Layer Properties. You can also open a menu for the layer: on
Mac, hold down the Control key and click on a layer (not a
Background); on a PC, right-click on a layer. Note that if you
click on the layer or thumbnail, you will get di erent menus.
Any of these methods of naming your layers may come in handy at
various points in the process of editing. You will develop favorites
with experience. But the bigger point is to use layer naming
opportunities to note what step(s) a layer contains at a glance.
Leave this image open, we’ll use it in a moment for another quick
exercise with layer grouping.
Ch02-K52076.indd 45Ch02-K52076.indd 45 6/20/07 9:41:49 PM6/20/07 9:41:49 PM
The Adobe Photoshop Layers Book
46
Grouping Layers
When you begin to work with layers extensively, things will start to
get unwieldy. It may sound funny to those who currently don’t use
layers a lot, but you can easily end up with hundreds of layers in an
image. For some of the advertising photography work I have done,
which requires intense correction of models (changing face, body
shape and contour, along with color correction, pore reduction,
lens correction and the like), it often requires several submissions
of an image, with revisions. I make a habit of saving every step in
the hours of intense correction, so it is unnecessary to start over
again when the revisions come back. Trying to repeat everything
from scratch is not a very pleasant thought. The working version
of images could end up with hundreds of layers and often several
images in various editing stages that would be used for di erent
parts of a composite. More recently I was designing a web
interface for a web application, and the demo image had over
2000 layers. They almost become addictive.
One thing that happens when you get a lot of layers in an image
is that they get confusing just to look at. Equally problematic is
scrolling to the layers you need as you can’t see them all on the
screen at one time once you get over 25 or so – depending on the
size and resolution of your screen and the Layer palette settings for
FIG 2.5 Directly changing layer names
on the palette is possible as well by
simply double-clicking directly on the
name.
Ch02-K52076.indd 46Ch02-K52076.indd 46 6/20/07 9:41:49 PM6/20/07 9:41:49 PM
Layer Management: Concepts of a Layer-Based Workflow
47
the thumbnail size. To keep a bulking layer stack more manageable,
you can store layers in layer groups. Groups work like folders in a le
structure, they allow you to expand and collapse view of the content
so you can choose to see what layers are in a group, or hide them
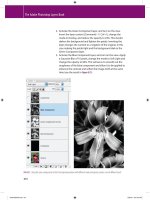
(see
Figure 2.6).
FIG 2.6 The toggle to the left of the folder allows you to expand view of the layers in the group. These two screen shots represent exactly
the same image.
Ch02-K52076.indd 47Ch02-K52076.indd 47 6/20/07 9:41:50 PM6/20/07 9:41:50 PM
The Adobe Photoshop Layers Book
48
Layer Groups were known as layer Sets in Photoshop 7.
They are essentially identical features.
You can both create a layer group from existing layers, or create a
group and add the layers as you go. At any time you can show/hide
the content of the groups, duplicate and move them like any other
layer (even between images), and they can be nested up to 5 deep.
A little practice with them will get you familiar with how they work.
Again, the goal of this exercise is just to experience groups, not to
change the image in any way. Do this exercise continuing from the
point where we left o in the previous exercise (
Figure 2.7):
Try It Now
1. Highlight the two upper layers (2 Duplicate Background II and
1 Duplicate Background). To highlight one layer at a time on PC
hold down the Ctrl key and click the layers in the layers palette;
on Mac hold down the Command key and click the layers in the
layers palette. You can also highlight multiple consecutive layers
FIG 2.7 The layers palette from the previous exercise should look like this.
Ch02-K52076.indd 48Ch02-K52076.indd 48 6/20/07 9:41:51 PM6/20/07 9:41:51 PM
Layer Management: Concepts of a Layer-Based Workflow
49
at once by clicking the upper layer to highlight it, and then
Shift-clicking the lower (or vice-versa).
Highlighting layers one-at-a-time is useful for selecting
layers that are not consecutive.
2. Choose New Group From Layers from the layers palette menu.
This will open the New Group from Layers dialog that will allow
you to rename the group. Accept the default group name
(Group 1) by clicking OK.
3. Click-and-drag the Group 1 group to the Create a New Group
button at the bottom of the layers palette. When you release,
this will immediately create a new group containing the old
group. If you toggle the view for the old group (Group 1), you
will see the originally grouped layers inside Group 1, inside
Group 2 (see Figure 2.8).
FIG 2.8 Photoshop creates a group from the contents dragged to the Create a New Group
button.
4. Now drag Group 1 to the Create a New Layer button. This will
duplicate Group 1 as Group 1 Copy, and it will remain inside
Group 2 (see Figure 2.9).
Ch02-K52076.indd 49Ch02-K52076.indd 49 6/20/07 9:41:52 PM6/20/07 9:41:52 PM
The Adobe Photoshop Layers Book
50
5. Click-and-drag Group 1 Copy over Group 1. As you drag the
cursor, note when Group 1 highlights (see Figure 2.10) and
release the mouse button. This will move Group 1 Copy inside
Group 1.
Layers in any group remain fully editable. The advantage is that
the groups can be collapsed so there is less to search through, and
groups can be organized so you can quickly nd what you need. If
you nd all this naming by ‘Group’ a little confusing, please see the
previous exercise, and exercise your right to rename the groups as
you please. Perhaps this illustrates the bene t of naming layers as
you go as well.
Again, leave this image open and available for use with the next
exercise.
FIG 2.9 Using Create a New Layer
with layer groups simply duplicates
the grouping just as it would duplicate
a layer.
Ch02-K52076.indd 50Ch02-K52076.indd 50 6/20/07 9:41:53 PM6/20/07 9:41:53 PM
Layer Management: Concepts of a Layer-Based Workflow
51
Be aware that the order of how you create and stack layers
sometimes matters to the result. Moving layers around in the
stack willy-nilly just to accomplish a neat grouping may have
an e ect on the image result. Always view the image on screen
while moving layers to be sure the layer movement doesn’t
a ect the image result!
Merging Layers
There are reasons to create layers, and there are reasons to delete
and combine them. Combining layers in Photoshop is referred
to as merging. Merging combines the content of two or more
layers into a single layer. This saves on le size and simpli es the
organization of the layers.
FIG 2.10 Groups can be moved like layers as well and inserted into other groups.
Smart Objects
New to Photoshop CS2, Smart
Objects are similar to Groups
in function but the content
is handled in quite a di erent
way. You can merge layers
into a Smart Object similar
to the way you create a layer
group (see the Convert to
Smart Object command on
the layers palette menu), and
the resulting Smart Object
acts like a merged layer. The
kicker is, the contents in the
layer are not actually merged:
it is stored in a separate PSB
Ch02-K52076.indd 51Ch02-K52076.indd 51 6/20/07 9:41:54 PM6/20/07 9:41:54 PM
The Adobe Photoshop Layers Book
52
Layers can be merged from various groupings: linked layers,
grouped layers, visible layers, active (highlighted) groupings and
simple pairs can all be merged. Usually you will want to merge
layers that do the same thing but somehow end up separate, or
you will want to merge layers which you otherwise really don’t
have a good reason to keep separate. Lets use the image from the
last example starting from where we left o .
Try It Now
1. With the Group 1 Copy layer active, choose Merge Group from
the Layers menu. This is the same as pressing CommandϩE /
CtrlϩE. The content of the group will be merged into a single
layer named Group 1 Copy.
By active I mean to click on the layer so that it is highlighted
in the layers palette. An active layer is the ‘live’ layer in your
image, or the layer you are currently working on. Often problems
that occur in applying changes happen because the wrong layer
is active. Your rst place to check when a change doesn’t behave
as you expect should be to look at which layer you have active
and be sure it is the layer you really want to work on.
2. Click on the 1 Duplicate Background layer in the layers palette
to make it the active layer, then choose Merge Down from
the Layers menu. You will notice that the menu item you are
choosing is in exactly the same place as Merge Group was
in step 1. The merge commands are named with context
sensitivity, and the names will change according to the actions
that are available. Note that the resulting layer from the merge
is Group 1 Copy, as per the lower layer in the merge.
3. Undo the changes from the last step by pressing
CommandϩZ / CtrlϩZ (you can also step back in the History
or choose Undo from the Edit menu). This will restore the
1 Duplicate Background layer.
4. With the 1 Duplicate Background layer active, hold down the
Shift key and click the Group 1 Copy layer. Both the 1 Duplicate
Background and the Group 1 Copy layer should appear
highlighted (see Figure 2.11).
5. Again, choose Merge Layers from the layers menu as in step 2.
Note that the resulting layer is named 1 Duplicate Background,
as per the upper layer in the merge. If you compare steps 2
image. You can still access the
content and make changes.
To edit the content, you
double-click the Smart Object
layer and the content of the
object will open as another
image. You can then save the
object as a PSB (Photoshop
Object) and use the objects in
other images.
Smart Objects can be really
handy if there is some type
of layer grouping that you
use in di erent images.
For example, say in your
exploration of layers you
hit on a combination of
adjustment layers that seems
to you to correct every image
you took in a photo session.
You could create a smart
object from the layers, save
it, and then incorporate it
into all of the other images
from the session. Other more
probable uses are developing
templates for snapshots.
For example, say you were
elected to shoot your son
or daughter’s team pictures.
You might make a frame like
a baseball, softball, or soccer
sports card, and then import
it to the individual team
player shots like a template.
To create a Smart Object,
highlight the layers you want
to group (on Windows hold
down the Ctrl key and click
the layers in the layers palette;
on Mac hold down the
Command key and click the
layers in the layers palette),
then choose Group Into New
Smart Object from the layers
palette menu.
Ch02-K52076.indd 52Ch02-K52076.indd 52 6/20/07 9:41:56 PM6/20/07 9:41:56 PM
Layer Management: Concepts of a Layer-Based Workflow
53
and 5, the dominant name changes depending on how you
merge layers.
6. Choose Flatten Image from the Layers menu. This is the ultimate
merge. The entire contents of the image will be merged as a
Background layer (whether or not one existed in the image
previously).
While it is all well and good to merge these layers and
groups to see how they react, it is important to remember that
you are performing permanent adjustments that will prevent
you from further editing of individual layers that are merged.
7. Choose the Type tool, set a color and font (size and style) and
click on the image to make a new type layer. Make the font
large and bold – a little over-sized as it will come in handy later
(the next exercise). Type in your copyright (e.g., Copyright ©
2007 Richard Lynch). For an ‘appropriate color’ use a light color
on a dark image or a dark color on a light image.
8. Press CommandϩE / CtrlϩE.
9. Choose the Move tool (press V) and move the copyright into
position.
FIG 2.11 Highlighted layers (in blue)
are both currently active.
Ch02-K52076.indd 53Ch02-K52076.indd 53 6/20/07 9:41:56 PM6/20/07 9:41:56 PM
The Adobe Photoshop Layers Book
54
Wait…can’t do that? How about just deleting the copyright. But
you can’t do that either. Perhaps that drives home the idea. You
had super uous layers in the image before – just duplicates of
what was there. You could create more and merge and it didn’t
make a di erence, and actually it was better that you ended up
removing them. However, when you have your copyright, you’ll
want to be able to move it around and maybe shut o the view
for it or remove it for some purposes. If you merge it with another
layer, the content becomes permanently a xed. You want to keep
all distinct changes separate so you have the opportunity to move
or delete them when necessary.
Just so you know you aren’t too far up a creek without a paddle:
10. Press CommandϩZ / CtrlϩZ
11. Move the copyright where it belongs using the move tool
(press the V key)
Undo (step 10) to get back to two layers (background and type
layers) so you can edit the image the way you want without having
to start all over.
Navigating Layers
There are ways to move layers in the layers palette and navigate in the layers palette using just keystrokes.
Some of the more common ones you might use are the following:
Purpose Mac Shortcut Windows Shortcut
Move an active layer up in the layer stack Commandϩ] Ctrlϩ]
Move an active layer down in the layer stack Commandϩ[ Ctrlϩ[
Move an active layer to the top of the layer stack CommandϩShiftϩ] CtrlϩShiftϩ]
(or layer group)
Move an active layer to the bottom of the layer CommandϩShiftϩ[ CtrlϩShiftϩ[
stack(or layer group)
Select the next layer up in the layer stack Optionϩ] Altϩ]
Select the next layer down in the layer stack Optionϩ[ Altϩ[
Select the next layer up in the layer stack (keeping OptionϩShiftϩ] AltϩShiftϩ]
the current layer(s) selected)
Select the next layer down in the layer stack OptionϩShiftϩ[ AltϩShiftϩ[
(keeping the current layer(s) selected)
Select the top layer in the layer stack Optionϩ. Altϩ.
Select the bottom layer in the layer stack Optionϩ, Altϩ,
Ch02-K52076.indd 54Ch02-K52076.indd 54 6/20/07 9:41:57 PM6/20/07 9:41:57 PM
Layer Management: Concepts of a Layer-Based Workflow
55
Clipping Layers
Probably one of my favorite layer types (and not everyone will
share this preference) is the clipping layer. It is really just an easy
way to target changes so they a ect the content of one particular
layer. That is, say you have an object that you have separated into
a layer above the Background. You would like to make a change
to the object, but not the Background. While there are several
potential solutions, clipping layers o er the opportunity to target
an adjustment only to that layer.
The implications are slightly more broad reaching than simply
being an alternative to masking. You can use clipping layers as
masks, and again, as organizational tools for your corrections. The
best way to see them work is through example, so let’s see what
they do in a simple exercise. Continue with the same image you
were using in the previous exercise.
Try It Now
1. Duplicate the Background layer in the previous exercise, and
name it 2 Inverted Background.
2. Press CommandϩShiftϩ] / CtrlϩShiftϩ] to move the 2 Inverted
Background layer to the top of the stack (Commandϩ] / Ctrlϩ]
would work just as well in this case, but I chose the other
command as it is speci cally designated to move the layer to
the top of the stack).
3. Press CommandϩOptionϩG / AltϩCtrlϩG to create a clipping
group from the Copyright type layer and the 2 Inverted
Background layer.
Earlier versions of Photoshop (and Elements) use the
simpler CommandϩG / CtrlϩG for creating a clipping group,
but that shortcut is assigned to Groups as of Photoshop CS3.
4. Press CommandϩI / CtrlϩI to invert the content of the layer.
The copyright should appear as reversed/negative against the
background. Your layers should look like Figure 2.12.
5. Choose the Move tool and be sure the preference for Auto-
select is unchecked. The pull down menu next to auto select
should be set to Layer. Click on the Copyright layer to make
it active and move the text around while watching the
appearance of the image. The type layer acts like a canvas for
the inverted layer content.
Ch02-K52076.indd 55Ch02-K52076.indd 55 6/20/07 9:41:57 PM6/20/07 9:41:57 PM
The Adobe Photoshop Layers Book
56
You can go much further with this by stacking multiple corrections
in the clipping group. Each will act on the content of the bottom
layer in the group in order of the stack. Hold on to that image one
more time to continue into the next exercise…
Linked Layers
One nal potential organizational tool is layer linking. It is really
somewhat subservient to other types of layer organization (like
groups). Linking allows you to make layers behave as a unit,
whether consecutive or not (unlike Groups). This can be handy for
moving layers both up and down in the layer stack and in unison
on the layer plain.
Try It Now
1. With the Copyright type layer still active, hold the Shift key and
click the 2 Inverted Background layer in the layers palette. This
will highlight both layers.
2. Click the Link Layers button (looks like a chain) at the bottom
left of the layers palette. A linking icon will appear to the right
of both layers indicating that they are linked.
3. Click on the Copyright type layer so that it is the only one active.
4. Choose the Move tool and move the type layer around while
watching the appearance of the image. You should notice that,
unlike the previous result, the type will not change color as it
FIG 2.12 After step 4, there should be
three layers as pictured here.
Ch02-K52076.indd 56Ch02-K52076.indd 56 6/20/07 9:41:57 PM6/20/07 9:41:57 PM
Layer Management: Concepts of a Layer-Based Workflow
57
moves. That is because the layer it is linked to is moving with it.
All layers in a linked grouping will move at the same time.
5. Choose Select Linked Layers from the Layers palette menu. This
will select all layers linked to the currently active layer (in this
case, just the one above, but as many as you would otherwise
want to link). This o ers an option for quickly selecting a stack
of linked layers – handy if you need to adjust their position in
the layer stack.
6. Close the image without saving. Closing the image without
saving will stop you from saving over your original.
Summary
While we have done nothing glamorous here as far as exercises
for image editing, we have begun to explore some of the more
serious basic functionality of layer creation and organization.
With what you have learned here you should begin to see some
possibilities for organizing your layers in three types of groups
(Groups, Clipping Groups and Linking), and should begin to see
the exibility of adjusting content in the layer stack. Coupled with
layer naming, you have all the tools you need to keep your layers
in order and sensible as a record of your corrections. We will look at
examples throughout the book that reinforce these basic exercises
in real-world editing situations and applications, starting with the
very next chapter.
Ch02-K52076.indd 57Ch02-K52076.indd 57 6/20/07 9:41:58 PM6/20/07 9:41:58 PM
This page intentionally left blank