game art for teens
Bạn đang xem bản rút gọn của tài liệu. Xem và tải ngay bản đầy đủ của tài liệu tại đây (34.65 MB, 306 trang )
© 2004 by Premier Press, a division of Course Technology. All rights reserved. No part of this book may be repro-
duced or transmitted in any form or by any means, electronic or mechanical, including photocopying, recording,
or by any information storage or retrieval system without written permission from Course PTR, except for the
inclusion of brief quotations in a review.
The Premier Press logo and related trade dress are trademarks of Premier Press and may not be used without writ-
ten permission.
Alias and Alias SketchBook Pro are trademarks or registered trademarks of Alias Systems, a division of Silicon
Graphics Limited, in the United States and/or other countries worldwide. Maya is a registered trademark of Sili
-
con Graphics, Inc., in the United States and/or other countries worldwide, exclusively used by Alias Systems, a divi-
sion of Silicon Graphics Limited. Corel, CorelDRAW, CorelPHOTO-PAINT, and Corel Painter are trademarks or
registered trademarks of Corel Corporation or Corel Corporation Limited. All other trademarks are the property
of their respective owners.
Important: Course PTR cannot provide software support. Please contact the appropriate software manufacturer’s
technical support line or Web site for assistance.
Course PTR and the author have attempted throughout this book to distinguish proprietary trademarks from
descriptive terms by following the capitalization style used by the manufacturer.
Information contained in this book has been obtained by Course PTR from sources believed to be reliable. How-
ever, because of the possibility of human or mechanical error by our sources, Course PTR, or others, the Publisher
does not guarantee the accuracy, adequacy, or completeness of any information and is not responsible for any
errors or omissions or the results obtained from use of such information. Readers should be particularly aware of
the fact that the Internet is an ever-changing entity. Some facts may have changed since this book went to press.
Educational facilities, companies, and organizations interested in multiple copies or licensing of this book should
contact the publisher for quantity discount information. Training manuals, CD-ROMs, and portions of this book
are also available individually or can be tailored for specific needs.
ISBN: 1-59200-307-9
Library of Congress Catalog Card Number: 2003115724
Printed in the United States of America
04 05 06 07 08 BA 10 9 8 7 6 5 4 3 2 1
Course PTR, a division of Course Technology
25 Thomson Place
Boston, MA 02210
SVP, Course Professional,
Trade, Reference Group:
Andy Shafran
Publisher:
Stacy L. Hiquet
Senior Marketing Manager:
Sarah O’Donnell
Marketing Manager:
Heather Hurley
Manager of Editorial
Services:
Heather Talbot
Acquisitions Editor:
Mitzi Foster Koontz
Associate Marketing
Manager:
Kristin Eisenzopf
Project Editor/Copy Editor:
Cathleen D. Snyder
Technical Reviewer:
Daniel Whittington
Teen Reviewer:
Jacob Nobbe
Retail Market Coordinator:
Sarah Dubois
Interior Layout Tech:
William Hartman
Cover Designer:
Mike Tanamachi
CD-ROM Producer:
Brandon Penticuff
Indexer:
Kelly Talbot
Proofreader:
Kim V. Benbow
This book is dedicated to all the young artists.
Keep the dream alive.
Without art, much of beauty would be lost.
You are needed.
Acknowledgments
T
his book is the culmination of
the work of many individuals.
Some, such as Mitzi Koontz,
Cathleen Snyder, Dan Whittington,
and Jacob Nobbe, have worked on the
book directly. Others, such as Carl
Lundgren, Dave Wolverton, and Don
Seegmiller, have helped by teaching
me their craft. My biggest thanks go to
my wife and family, who have put up
with my countless hours away from
them to write this book, and to my
parents, who have always believed in
me. To all who had a role in helping
me to write this book, I express my
deepest appreciation and gratitude.
About the Author
I
n 1987, Les Pardew started his
He currently serves as President of
Alpine Studios, which he founded
career by creating the animation
with Ross Wolfley in the fall of 2000.
for Magic Johnson Fast Break
Alpine Studios is a game development
Basketball on the Commodore 64. He
company focusing on family-friendly
soon found that he loved working on
games. Alpine Studios’ products
games and has been in the industry
include Kublox, Combat Medic,
ever since. His work encompasses
Motocross Mania 2, and Ford Truck
more than 100 video game titles,
Mania.
including some major titles such as
Super Star Wars, NCAA Basketball,
Starcraft: Brood War, James Bond 007,
Robin Hood: Prince of Thieves, and
CyberTiger.
Contents at a Glance
Chapter 1
Chapter 2
Chapter 3
Chapter 4
Chapter 5
Chapter 6
Chapter 7
Introduction xi
Getting Started in Game Art 1
2D Artwork in Games 23
2D Animation 55
Introduction to 3D 67
Building Game Interiors 95
Lighting and Reflections 123
Building Environments in NURBS 145
vii Contents at a Glance
Chapter 8
Building Game Objects 169
Chapter 9
Building Characters Part 1: The Head 191
Chapter 10
Building Characters Part 2: The Body 213
Chapter 11
3D Animation 241
Chapter 12
Specialized Geometry and Special Effects 263
Index 281
Contents
Introduction . . . . . . . . . . . . . . . . . . . . . . . . . . . .xi
Chapter 1
Getting Started in Game Art . . . . . . . . . . . . . . . .1
How Art Is Displayed . . . . . . . . . . . . . . . . . . . . . . . . . . . .1
Working with Pixels . . . . . . . . . . . . . . . . . . . . . . . . . . . . .2
Using Painting Programs . . . . . . . . . . . . . . . . . . . . . . . . .3
Using Brushes . . . . . . . . . . . . . . . . . . . . . . . . . . . . . . . . .4
Photo Paint Programs . . . . . . . . . . . . . . . . . . . . . . . . . . .6
Finishing the Character Sketch . . . . . . . . . . . . . . . .6
Creating a Door Texture . . . . . . . . . . . . . . . . . . . . .7
Working with Vector-Drawing Programs . . . . . . . . . . .10
Working with 3D Modeling Programs . . . . . . . . . . . . . .13
Summary . . . . . . . . . . . . . . . . . . . . . . . . . . . . . . . . . . . .21
Chapter 2
2D Artwork in Games . . . . . . . . . . . . . . . . . . . .23
Learning about Textures . . . . . . . . . . . . . . . . . . . . . . . .23
Color in Textures . . . . . . . . . . . . . . . . . . . . . . . . . .24
Roughness in Textures . . . . . . . . . . . . . . . . . . . . . .26
Translucency in Textures . . . . . . . . . . . . . . . . . . . .27
Reflectivity in Textures . . . . . . . . . . . . . . . . . . . . .27
Surface Luminance in Textures . . . . . . . . . . . . . . .27
Creating Textures . . . . . . . . . . . . . . . . . . . . . . . . . . . . . .28
Painting Textures . . . . . . . . . . . . . . . . . . . . . . . . .28
Using Photographs for Textures . . . . . . . . . . . . . .32
Tiling Textures . . . . . . . . . . . . . . . . . . . . . . . . . . . .37
Creating Game Interfaces . . . . . . . . . . . . . . . . . . . . . . .41
Creating Concept Art for Games . . . . . . . . . . . . . . . . . .47
Summary . . . . . . . . . . . . . . . . . . . . . . . . . . . . . . . . . . . .53
ix
Chapter 3
2D Animation . . . . . . . . . . . . . . . . . . . . . . . . . . .55
How Does Animation Work? . . . . . . . . . . . . . . . . . . . . .55
Creating a Simple 2D Animation . . . . . . . . . . . . . . . . . .56
Creating Character Animation . . . . . . . . . . . . . . . . . . . .61
Summary . . . . . . . . . . . . . . . . . . . . . . . . . . . . . . . . . . . .66
Chapter 4
Introduction to 3D . . . . . . . . . . . . . . . . . . . . . . .67
The 3D Art Program . . . . . . . . . . . . . . . . . . . . . . . . . . .67
Building 3D Worlds . . . . . . . . . . . . . . . . . . . . . . . . . . . .67
Building a 3D Castle . . . . . . . . . . . . . . . . . . . . . . . . . . .68
Building the Walls . . . . . . . . . . . . . . . . . . . . . . . . .78
Texturing the Castle . . . . . . . . . . . . . . . . . . . . . . .88
Finishing the Castle . . . . . . . . . . . . . . . . . . . . . . . .92
Summary . . . . . . . . . . . . . . . . . . . . . . . . . . . . . . . . . . . .94
Chapter 5
Building Game Interiors . . . . . . . . . . . . . . . . . . .95
Building the Interior . . . . . . . . . . . . . . . . . . . . . . . . . . .95
Building the Columns . . . . . . . . . . . . . . . . . . . . . . . . .104
Summary . . . . . . . . . . . . . . . . . . . . . . . . . . . . . . . . . . .122
Contents
Chapter 6
Lighting and Reflections . . . . . . . . . . . . . . . . .123
Real-Time Lighting . . . . . . . . . . . . . . . . . . . . . . . . . . . .123
Point Light . . . . . . . . . . . . . . . . . . . . . . . . . . . . . .124
Directional Light . . . . . . . . . . . . . . . . . . . . . . . . .124
Ambient Light . . . . . . . . . . . . . . . . . . . . . . . . . . .124
Colored Light . . . . . . . . . . . . . . . . . . . . . . . . . . .125
Preset Lighting . . . . . . . . . . . . . . . . . . . . . . . . . . . . . . .125
Real-Time Reflections . . . . . . . . . . . . . . . . . . . . . . . . . .139
Specularity . . . . . . . . . . . . . . . . . . . . . . . . . . . . . .139
Environment Maps . . . . . . . . . . . . . . . . . . . . . . .140
Rendered Reflections . . . . . . . . . . . . . . . . . . . . .141
Summary . . . . . . . . . . . . . . . . . . . . . . . . . . . . . . . . . . .143
Chapter 7
Building Environments in NURBS . . . . . . . . . .145
What Are NURBS? . . . . . . . . . . . . . . . . . . . . . . . . . . . .145
Creating a Racecourse . . . . . . . . . . . . . . . . . . . . . . . . .145
Adding Scenery Elements to the Racecourse . . . . . . . .158
Level of Detail . . . . . . . . . . . . . . . . . . . . . . . . . . . . . . .163
Prelighting the Racecourse . . . . . . . . . . . . . . . . . . . . .165
Building Skyboxes . . . . . . . . . . . . . . . . . . . . . . . . . . . .165
Summary . . . . . . . . . . . . . . . . . . . . . . . . . . . . . . . . . . .168
x Contents
Chapter 8
Building Game Objects . . . . . . . . . . . . . . . . . .169
Types of Objects . . . . . . . . . . . . . . . . . . . . . . . . . . . . . .169
Naming Conventions . . . . . . . . . . . . . . . . . . . . . . . . . .170
Building a Game Object . . . . . . . . . . . . . . . . . . . . . . . .170
Moving Parts . . . . . . . . . . . . . . . . . . . . . . . . . . . . . . . .185
Summary . . . . . . . . . . . . . . . . . . . . . . . . . . . . . . . . . . .190
Chapter 9
Building Characters Part 1: The Head . . . . . . .191
The Human Head . . . . . . . . . . . . . . . . . . . . . . . . . . . . .191
Building the Head . . . . . . . . . . . . . . . . . . . . . . . . . . . .192
Facial Animation Elements . . . . . . . . . . . . . . . . . . . . .206
Finishing the Head . . . . . . . . . . . . . . . . . . . . . . . . . . . .210
Summary . . . . . . . . . . . . . . . . . . . . . . . . . . . . . . . . . . .211
Chapter 10
Building Characters Part 2: The Body . . . . . . .213
Building Hands and Feet . . . . . . . . . . . . . . . . . . . . . . .225
Adding the Head . . . . . . . . . . . . . . . . . . . . . . . . . . . . .230
UV Mapping a Character . . . . . . . . . . . . . . . . . . . . . . .233
Summary . . . . . . . . . . . . . . . . . . . . . . . . . . . . . . . . . . .240
Chapter 11
3D Animation . . . . . . . . . . . . . . . . . . . . . . . . . .241
How 3D Animation Works in Games . . . . . . . . . . . . . .241
Character Animation . . . . . . . . . . . . . . . . . . . . . . . . . .246
Summary . . . . . . . . . . . . . . . . . . . . . . . . . . . . . . . . . . .262
Chapter 12
Specialized Geometry and Special Effects . . . .263
Creating Specialized Geometry . . . . . . . . . . . . . . . . . .263
Collision Maps . . . . . . . . . . . . . . . . . . . . . . . . . . .263
Triggers and Other Invisible Objects . . . . . . . . . .270
Creating Special Effects . . . . . . . . . . . . . . . . . . . . . . . .271
Particle Effects . . . . . . . . . . . . . . . . . . . . . . . . . . .271
Creating Particles . . . . . . . . . . . . . . . . . . . . . . . .278
Animated Billboards . . . . . . . . . . . . . . . . . . . . . .278
Summary . . . . . . . . . . . . . . . . . . . . . . . . . . . . . . . . . . .279
Index . . . . . . . . . . . . . . . . . . . . . . . . . . . . . . . .281
Introduction
I
remember growing up in a small
town in southern Idaho. Our
high school didn’t have an art
teacher. The only place that I could
gain any instruction in art was from
books. I loved reading about artists
and I loved the step-by-step instruc
-
tion books. Now, after years of success
in commercial art, I felt it was time to
help the young students who are
looking for guidance with their dream
of becoming game artists.
This book is designed to give real-
world instruction with solid examples
of game art creation. The chapters are
full of step-by-step projects that show
you in detail how game art is created.
The examples are taken from projects
that could be right out of any game.
To best understand and learn from
this book, you should complete each
project as shown in the step-by-step
instructions. From there, you should
practice the concepts on your own to
broaden your knowledge of the tools
and master the techniques.
The CD contains tools and links to all
the resources you will need to com
-
plete the projects. The tools are trial
versions or learning versions of pro
-
fessional software.
I hope you enjoy reading this book
and doing the projects. I wish you
success and fulfillment as an artist in
this dynamic and exciting field. If you
need help or just want to talk, you can
e-mail me at
This page intentionally left blank
chapter 1
Getting Started
in Game Art
C
reating art for games is fun
and exciting. This book is
your gateway to the fascinat
-
ing world of game art development.
In the following chapters, you will
learn how art is made and used in
games. You will also have a chance to
create art yourself by following the
many projects in each chapter. As you
read each chapter and try out each
project, you will gain a good under
-
standing of game art development.
In this book I only want to deal with
game art. Completing each project
will require some level of artistic tal
-
ent. Because you are interested in
reading this book, I will assume that
you have some skill in art. I will not go
into the basics of drawing and paint
-
ing. There are many great books
about those subjects, but in this book
I only want to deal with the exciting
field of creating art for games.
The book contains step-by-step
instructions on a number of topics. I
have worked hard to be as detailed as
possible so you can follow along with
me; however, no book can provide
every single step to every process in
something as complex as game art
development. The best way to use this
book is to become familiar with the
tools by reading the instructions that
come with the art software. Once you
are comfortable with the basic features
of the art software, following the step-
by-step instructions will be easier.
How Art Is Displayed
The best way to begin any discussion
on game art is to clarify how art is dis
-
played in a game. Most people play
games on a computer, handheld
device, or console game system. The
pictures we see in games on these sys
-
tems are made up of small, colored
square dots of light called pixels.More
precisely, a pixel could be defined as
1
2 Chapter 1
■
Getting Started in Game Art
the smallest controllable segment of a
display. Back when computer games
first came out, the resolution of
video-game pixels were very low and
appeared as big blocks of color. As
technology has advanced, the size of
pixels has shrunk to the point that in
some game systems it is difficult to see
a single pixel.
Figure 1.1 shows a character typical of
those used in early PC games. The
character is 32 pixels high. Notice that
the pixels are very easy to see.
Figure 1.2 shows a scene from a
PlayStation 2 game. Notice that the
pixels are so small that they are very
difficult to distinguish as small blocks
of light. As new game platforms con
-
tinue to become more powerful,
screen resolutions will increase and
individual pixels will be harder to
detect.
Pixels are small dots of colored light
that make up pictures on a computer
screen. This is very important. In tra
-
ditional art, artists work mostly with
the reflected light of a painted surface.
For games, artists work with pure
light as it is displayed on a screen
instead of painting on a canvas. This
fundamental difference takes a little
getting use to, particularly in the area
of color.
A game artist uses colored light to cre-
ate images. Most other forms of art
use reflected light. For example, when
a person looks at an oil painting, he
sees colors that are reflected from
light in the room. On the other hand,
when a person looks at the same
painting displayed on a color monitor
or TV he is looking at direct light, not
reflected light (see Figure 1.3).
Reflected light is not as bright and
vibrant as direct light; however, we
live in a world of reflected light. When
you are creating game art, it is impor
-
tant to remember that the art will
look unrealistic or cartoon-like if you
don’t take care to reduce the intensity
of the color to match how things look
in real life.
Working with Pixels
Artists use a variety of computer pro-
grams to work with pixels on the
screen. These programs fit into two
Figure 1.1 This game
character for an old PC
game is 32 pixels high.
Figure 1.2 This scene is from a
Figure 1.3 Reflected light and direct light
The pixels are blocky
PlayStation 2 game system.
and easy to see.
3 Using Painting Programs
basic categories—two-dimensional
(or 2D) programs and three-dimen-
sional (or 3D) programs. 2D pro
-
grams are the easiest to understand
because computer screens and video
game screens are basically flat. A 2D
art program directly manipulates pix
-
els on screen. Many of these programs
are very sophisticated, and some even
simulate natural media such as air
-
brush, oil paint, or even watercolor.
3D programs create virtual 3D objects
used in the creation of 3D characters
and worlds in games.
Included on the CD for this book are
links to trial versions of several 2D
programs and one 3D program:
■
Corel Painter
■
CorelDRAW suite
■
Alias SketchBook Pro
■
Alias Maya Personal Learning
Edition
Hint
Take some time to explore and become
familiar with the art programs avail
-
able through the accompanying CD-
ROM. Each program is a professional
tool. The better you understand these
programs, the more you will gain from
the projects in this book.
In later chapters I will get into sever-
al specific exercises that deal directly
with these programs. They are all
programs that I use regularly in my
own work, and each one is a true pro
-
fessional program. In this chapter, I
will give you a brief overview of these
programs.
Using Painting
Programs
Game artists use painting programs
to create 2D art for games. 2D art is
often created by the artist from
scratch instead of through manipula
-
tion of other art or photographs. Both
Corel Painter and Alias SketchBook
Pro are great programs for creating
art. They both have very powerful fea
-
tures that allow you to use tools that
simulate natural drawing and paint
-
ing tools.
To use a painting program properly,
you need to have a digitizing tablet—a
flat tablet with a special pressure-
sensitive stylus used to input direction
to the computer, similar to a mouse
(see Figure 1.4). The advantage of the
digitizing tablet is that you can use the
stylus like a pen, pencil, or paintbrush.
The stylus is built like a pen and can
Figure 1.4 A typical digitizing tablet
be held like a pen over the tablet.
When you move the pen over the
tablet, the cursor on the computer
screen moves. Like clicking with a
mouse button, you can select or exe
-
cute commands on the screen by
touching the tip of the stylus to the
tablet. Unlike the mouse, however, the
stylus has a pressure-sensitive tip,
which paint programs use to simulate
the pressure the artist uses in drawing.
If you are serious about doing art for
games, I highly recommend getting a
digitizing tablet because it helps make
the drawing and painting process on
the computer more natural. Don’t
worry if you don’t have one, though.
You can still complete the projects in
the book because all of the art pro
-
grams used in the projects work fine
with a mouse.
4 Chapter 1
■
Getting Started in Game Art
Hint
The purpose of this initial chapter is not
to train you in all aspects of the tools
that will be used in this book; rather, I
want to give you a quick example of
how the programs will be used. Greater
detail on each art program will be pro
-
vided later in the book.
example, an artist might start a pic-
ture by sketching in a rough outline
with a pencil brush.
The following example uses Corel
Painter. Painter is a great program
with a very powerful set of drawing
and painting tools.
When the drawing is complete, the
next step is to clean up all the excess
lines. Painter has an Eraser tool,
which works much the same as a
brush except instead of adding lines
or color, it removes the lines and
returns the image to its original color.
Figure 1.5 shows a sketch of a young
boy for a sports game. Notice the
sketchy outlines. In this example, the
boy is first drawn lightly with mini
-
mal pressure put on the stylus. Once
the general shape is defined by these
loose outlines, the darker lines are
added to the drawing.
Some artists prefer to
draw their initial
sketches on paper
and then scan them
into the computer;
other artists work
directly on the com
-
puter. I like to sketch
by working directly
on the computer
because it saves me
several steps in pro
-
duction.
Figure 1.6 shows a finished line draw-
ing of the character. Now you need to
add color to complete the drawing.
Save the line sketch to a file for later
use.
Painter also has a Magic Wand selec-
tion tool, which will select all
Using Brushes
Painting programs simulate natural
drawing and painting with a set of
tools called brushes. Imagine a fully
equipped artist studio with all the lat
-
est tools and media. In the studio you
might see things like watercolor
brushes, oil paint brushes, pastel
chalks, airbrushes, and any number of
other artist tools. Now imagine all
those tools and media in a painting
program. That is exactly what a paint
-
ing program is meant to simulate.
In a painting program, the brush
defines not only the type of instru
-
ment the painting program is trying
to simulate, but also the media.
Painting programs allow for a wide
range of flexibility in the brushes. For
Figure 1.5 Character sketch of a young boy
5 Using Brushes
Figure 1.6 The cleaned drawing
instances of a color in
a picture. You can use
the tool to mask out
an area of the draw
-
ing, making only that
area available to
paint. This makes
coloring the charac
-
ter very easy.
In Figure 1.7, the
character’s arm has
been selected and
painted using the
Airbrush tool.
By selecting each area, you can add
color to the character. Notice, howev
-
er, that the coloring process has
obscured most of the original lines of
the drawing (see Figure 1.8).
Usually at this stage it makes sense to
switch to a different program. Save
the colored image to a file for use
later.
Hint
Often when I am working on a project,
I will have a paint program, a photo
paint program, and a 3D program all
running on my computer at the same
time. I often switch between programs.
Figure 1.7 The selected area is painted using the Airbrush tool. Figure 1.8 The color has obscured the lines of the drawing.
6 Chapter 1
■
Getting Started in Game Art
Photo Paint Programs
A photo paint program is designed
for photo manipulation and retouch
-
ing. Some artists use them for creat-
ing art, but I find painting programs
work better for the former purposes.
The CD for this book includes a link
to the CorelDRAW suite; one of the
programs in the suite is Corel Photo
Paint. This is an excellent program
for working with photographs or
drawings.
Finishing the Character
Sketch
Because Photo Paint has some very
powerful tools for color adjustments,
it is an excellent choice to finish the
character sketch you started in the
painting program. Load the two
images of the character into the pro
-
gram.
Figure 1.9 shows the two images I cre-
ated earlier. The one on the left is the
original line drawing; the one on the
right is the colored drawing. By
putting the two together or by layer-
ing one on top of the other, you can
create a finished colored character
sketch. The first step will be to copy
and paste the colored sketch over the
line drawing.
Next you use the Transparency tool to
make the desired color appear trans
-
parent so the line drawing shows
through it (see Figure 1.10). As you
might have guessed, the Transparency
tool is used to make an image trans
-
parent.
Figure 1.9 Load the two images of the character into Photo Figure 1.10 The line drawing shows through the transparent
Paint. color.
7 Photo Paint Programs
Now adjust color and brightness to
bring the sketch to a finished state
(see Figure 1.11).
Creating a Door Texture
This section will provide an example
of how you might use a photo paint
program to create a door texture for a
game. First you load the digital pho
-
tograph into the program. Figure 1.12
shows a nice picture of a door I took a
few years ago.
The first step to converting the photo
of the door into a usable texture is to
isolate the door from
the rest of the picture.
Drag a mask around
the door to select it
(see Figure 1.13). A
mask is a selected area
of a picture. You can
-
not manipulate areas
outside the selected
area; you can manip
-
ulate areas inside the
mask.
Figure 1.12 A picture of a door loaded into Photo Paint
Figure 1.11 The finished character sketch Figure 1.13 Select the door from the picture.
8 Chapter 1
■
Getting Started in Game Art
Notice that the door is not square
of the door is dark
with the camera. A photo is seldom
and uneven. There
perfectly flat with the viewer. Textures
are also some hints of
need to be flat, so you should copy the
stone on the bottom
selection and then paste it over the
and some black areas
original picture (see Figure 1.14). You
near the lower-left
can then distort and rotate the pasted
side of the door.
image to fit a flat rectangular shape.
You need to fix the
Once the door is fit into a flat rectan-
lighting of the door.
gle, you can copy and paste it into a
The first step is to
new image without the rock wall that
adjust the brightness
surrounds the door in the original
and contrast of the
picture (see Figure 1.15). At that point
door, as shown in
you could use the door for a texture,
Figure 1.16.
but it really needs more work to be a
good texture. Notice that the lighting
Figure 1.15 Paste the door into a new image without the
doorframe.
Figure 1.14 Distort the door to fit a flat rectangle. Figure 1.16 Adjust brightness and contrast to lighten the door.
9
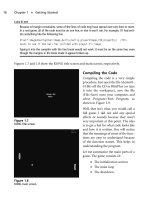
The door looks better now that it is
brighter, but the lighting is still
uneven. The top of the door is lighter
than the bottom. In fact, the bottom
of the door is obscured in shadows.
You can even out the lighting of the
door by making a new image that is
lighter and merging the two images.
You make the new image by copying
the door and pasting it over the old
image. Now there are two images of
the door—one directly over the other.
You then brighten the top image so
the shadowy lower door is as light as
the rest of the door in the original pic
-
ture (see Figure 1.17). Notice that
when the lower door is brightened,
the lighter parts of the door toward
the top become too bright, and you
lose much of the door’s detail.
The next step is to give the new,
brighter top image a linear trans
-
parency. In a linear transparency,an
image is completely transparent on
one side and completely opaque on
the other. The transparency is graded
evenly from the transparent side to
the opaque side. In this example, the
top of the new picture is washed out
because I brightened it to make the
bottom of the door less dark. I want
the bottom of the door but not the
Photo Paint Programs
top. I also don’t want to simply copy
the bottom of the door into the old
image because it will cause a notice
-
able line between the old and new art.
Using the Linear Transparency tool in
Photo Paint, you can make the top of
the new door transparent and the
bottom opaque. The transition from
the opaque to the transparent is grad
-
ual, so when you place the new image
over the old image it appears to be
one image. The lighting of the bottom
of the door is now even with the top
(see Figure 1.18).
Figure 1.17 Brighten the new image to match the rest of the door. Figure 1.18 You can merge the two images to even the lighting.
10 Chapter 1
■
Getting Started in Game Art
Now that the door is more uniform in
its lighting, you simply need to touch
up the problem areas on the bottom
of the door. Photo Paint has a very
effective tool for touching up a photo
-
graph, called a Clone tool. The Clone
tool basically takes a selected part of a
picture and allows you to transfer that
part of the picture by painting it into
another part of the picture. You do
this by selecting the Clone tool and
clicking on the area from which you
want to transfer, and then selecting
the area to which you want to transfer.
The Clone tool takes part of an image
and transfers it to another part of the
image. In Figure 1.19, I selected a part
of the lower door and painted it over
the stone that was in the lower corner.
You can use the Clone tool in the
same way to clean up the black areas
on the lower-left area of the door.
Figure 1.20 shows the Clone tool
working on the left side of the door.
The end result of using the Clone tool
is a cleaner door on which the detail is
visible (see Figure 1.21).
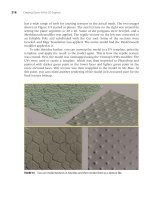
Now the door texture is finished and
usable in a game (see Figure 1.22).
Working with Vector-
Drawing Programs
Vector-drawing programs are art tools
in which you create images using vec
-
tor graphics. Unlike painting on pix-
els, every line or shape in a vector pro-
gram is defined by a line or curve
between two points. Vector-drawing
programs are primarily used in print
production, but occasionally they
come in handy for creating art for
games. The CD for this book includes
a link to the CorelDRAW suite.
CorelDRAW 11 is one of the pro
-
grams in the CorelDRAW Suite. It is
Figure 1.19 Use the Clone tool to clean up the lower-right Figure 1.20 Use the Clone tool to clean up the lower-left
area of the door. portion of the door.
11 Working with Vector-Drawing Programs
Figure 1.21 A close-up of the door area after the Clone tool Figure 1.22 The finished door texture
is used
arguably the most powerful vector-
drawing program on the market.
Vector-drawing programs are great
for anything that deals with typogra
-
phy, such as signs or interface art for
menus. This section shows you a sim
-
ple example of how you could use a
vector-drawing program to create a
graphic for a game.
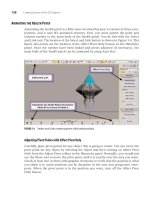
Figure 1.23 shows a rendered image
of a banner imported into Corel-
DRAW. This banner will be part of an
interface screen with type running
across it.
You input the type
into the banner using
the Type tool (see
Figure 1.24). For this
banner, I selected
Garamond Bold Con
-
densed.
Now you need to size
the title to fit the ban
-
ner (see Figure 1.25).
Because you are using
a vector-drawing pro
-
gram, each character
in the title is an
Figure 1.23 The rendered banner